
|
Register or Log In To remove these advertisements. |
|
|
|
|||||||
 |
|
|
Thread Tools | Display Modes |
 01-14-2014, 10:54 PM
|
#1 |
|
Senior Member
 Join Date: Jun 2000
Location: alb, nm
Posts: 413
|
Newb question on welding patch panel
I'm attempting my first patch panel repair and need some advice. I'll be patching a 6 in. by 6 in. rotted area on the rear fender of a '72 Blazer. The area is between the door jamb and the rear wheel arch.
I've looked at some youtube clips and read some info for an idea of what's involved. I've got a flux-core stick and have read that it's not the best choice as can burn through the sheet metal and leaves a lot of splatter, but it's what I have to work with. I intend to practice before I attempt the real thing. After the area is prepared, I think I want to flange the original sheet metal so that the patch will be flush and not set on top like I've seen on some of the youtube clips. Since the hole is small and the back side isn't real accessible, I might use a $40 Harbor Freight air flange tool which has a small moveable head. Thoughts? Eastwood sells a patch kit which includes corrosion resistant patches that look to be a similar gauge to the original sheet metal. Thoughts? Should I paint the backside of the patch with something prior to welding it in? Suggestions are appreciated. Thanks! |

|

|
|
01-15-2014, 09:32 AM
|
#2 |
|
Registered User
Join Date: Jan 2013
Location: Leonardtown, MD
Posts: 1,651
|
Re: Newb question on welding patch panel
Unfortunately YouTube has as many or more hacks showing incorrect methods as those showing the correct repairs. For newbs, many times it's not easy to determine which you should follow.
I twitch every time someone mentions using a flanging tool. Sure, it can be a crutch for someone who is just learning to weld, but you are adding a pocket that is a trap for rust issues, regardless of how well you may seal something. The next issue is that the single panel thickness on one side of the weld expands faster in sunlight than two panel thicknesses on the other side. So regardless of the filler and paint covering it, the repeated differing expansion and contractions will leave a ghost line in your paint finish. Just like a wart on the end of a nose, everyone will see it and know exactly how the repair was done. IMO is detracts from the value of the truck as it is not the correct way to repair. Save your money from the HF and Eastwood purchases. Check any local machine shops or metal suppliers for drop cuts of 18 or 19 ga cold rolled steel, and make your own patch, then butt weld it in place, the correct method. Here is a good fender patch tutorial that may help you to make your own, and assist in proper fitment: http://www.67-72chevytrucks.com/vboa...d.php?t=571177 Ignore the fact that it's on a car, the lessons apply universally. A lot of your success will come from panel fitment to get rid of gaps. Just as I showed in the link above for fitting the fender patch, make the patch, cut the hole smaller than needed, get the patch fitted, scribe and cut accurately with good quality offset snips (look elsewhere than HF, please) and trim the opening to size. Here's an excellent video tutorial on proper tin snip methods.... https://www.youtube.com/watch?v=qAOQ...eature=related Also, my suggestion for anyone practice welding with some sheet metal scraps on the bench is to tack the two sides together, then get it off the bench. I span the piece across the open jaws of my vise to simulate a body panel in free air, as it is on the car. If you're going to practice, match the real situation as much as possible.
__________________
Robert |
|
|
|
|
01-15-2014, 10:33 AM
|
#3 |
|
Registered User
Join Date: Oct 2008
Location: Marianna Arkansas
Posts: 7,280
|
Re: Newb question on welding patch panel
The only thing I use my flange tool for is the other side has the punch for the spot welds and I can make quite a few in short amount of time, then I take a step drill bit and open them up a couple more sizes so that the spot weld is large enough to do any good. Now As far as the welder ask one of your buddies if they may have a wire fed welder. you are gonna do more harm than good with the stick I'm afraid. You can get one of those little wire welders for cheap but it needs to have the gas sheilding to keep the spatter down and the welds contamination free. I would try to cut the patch panel just a fraction smaller than the hole you are trying to fix. Place tacks in opposite corners so the metal doesn't try to pull away from you then just keep placing small tacks all around the panel don't make a solid bead all around the panel as it will cause much warping. Even with this small of a patch, take plenty of time stop part way though and drink a soft drink let it cool down then finish up. Once you have it all welded up then you can grind it down then put fiber stand on it. Don't have you first coat of filler be just body filler as it will absorb moisture were fiber strand is a chopped short fiber glass in filler form that is what makes it water proof. That is why I like it against anything I have welded just for the extra protection. Jim
|
|
|
|
|
01-15-2014, 03:08 PM
|
#4 |
|
Senior Member
Join Date: Jun 2000
Location: alb, nm
Posts: 413
|
Re: Newb question on welding patch panel
Oops, I meant to write that I have a flux core wire feed welder (115v).
Without flanging, how do you keep the patch in place if it just fits inside of the hole to be patched? |
|
|
|
|
01-15-2014, 03:22 PM
|
#5 |
|
Registered User
Join Date: Jan 2013
Location: Leonardtown, MD
Posts: 1,651
|
Re: Newb question on welding patch panel
You can tack on a piece of welding rod to use as a handle (temporarily, of course) as shown:
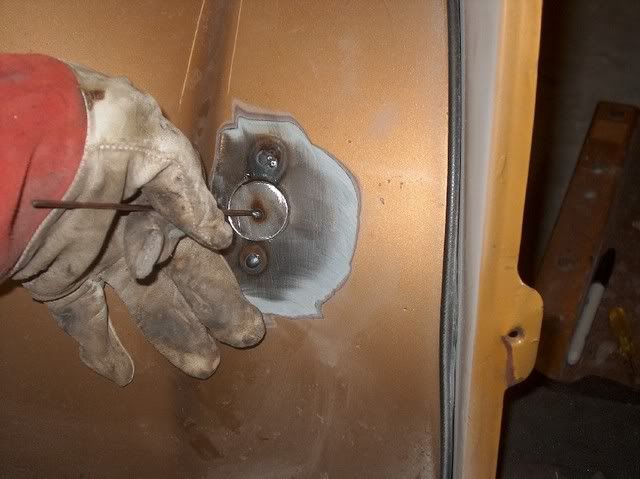 Or use masking tape to cover and hold about 3/4 of it, and tack it where it is not covered. Then move tape and continue. Getting the patch as accurate and tight to the hole size will help, using practice pieces to insure the welder is set up properly helps as well.
__________________
Robert |
|
|
|
|
01-15-2014, 06:52 PM
|
#6 |
|
Registered User
Join Date: Aug 2011
Location: Montrose, CO
Posts: 972
|
Re: Newb question on welding patch panel
MP&C, that was an excellent reference thread, I saved it. And an excellent video on use of aviation snips. I didn't realize how much I didn't know on proper use of them. Thanks.
|
|
|
|
|
01-15-2014, 08:54 PM
|
#7 |
|
Registered User
Join Date: Jan 2013
Location: Leonardtown, MD
Posts: 1,651
|
Re: Newb question on welding patch panel
I've been using tin snips for over 30 years, watched the video a couple years ago and learned a few things as well...
__________________
Robert |
|
|
|
|
01-16-2014, 02:07 PM
|
#8 |
|
Registered User
Join Date: Jun 2002
Location: Tucson AZ by way of WI & CA
Posts: 517
|
Re: Newb question on welding patch panel
I have found that using one of those large red magnets works really good for holding patch panels. Nice and strong to prevent movement, and helps to keep the edges at a consistent gap. Also frees up the other hand to attempt to put out that spark that just rolled down your shirt. The one thing to remember is the size of gap you want between the patch and the original metal. Too much and you will burn thru, too little and you will get no penetration, or if the patch expands it will give you a lip. Use the magnet to position, mark the orientation, grind the edge to achieve the desired gap. This can be done on the bench as well. Take your practice material, hold with the magnet, set your gap using a feeler gauge, tack, check for penetration. This will allow 2 things, the first is you can set your welded to achieve the penetration you need, the second is all you need to do is repeat on you actual part. Make sure you take your time, and move around the panel, to prevent warping. And do not get crazy when grinding the welds down, this creates a lot of heat that can warp things. Also if you can ditch the flux core and switch the welder to gas, it will yield better results. And do not forget some weld thru primer.
|
|
|
|
|
01-16-2014, 02:19 PM
|
#9 | ||
|
Registered User
Join Date: Jan 2013
Location: Leonardtown, MD
Posts: 1,651
|
Re: Newb question on welding patch panel
one word of caution in using a magnet, especially strong ones, they can distort and adversely affect the weld pattern. You may have better results if the magnet is a good distance from the spot you are welding.
Quote:
Quote:
This may help clarify a good grinding process with no heat buildup.... This is a video I did on grinding plug welds, which is the same process used on dot welds except the sanding would wait until the end for a final cleanup after ALL welding is complete... which would help to eliminate wearing down your panel thickness alongside the weld from doing multiple cleanups  http://s5.photobucket.com/user/rmcca...welds.mp4.html
__________________
Robert |
||
|
|
|
|
01-17-2014, 01:53 PM
|
#10 |
|
Registered User
Join Date: Jun 2002
Location: Tucson AZ by way of WI & CA
Posts: 517
|
Re: Newb question on welding patch panel
MP&C, you are correct about the size of magnet. What i mean by large is the ones that have 2 plates on either side are about 1/2 - 3/4" thick, and have a 45 degree angle, and are about 3" long. I use them to hold the panel while adjusting. Once the first few tacks are down, then they are not needed. Beats trying to hold the patch with one hand, the welding gun in the other hand, and trying to flip the mask down, if you do not have a self darkening one, such as what some newbs may not own. As for the weld through primer, since you can't get to the back after it is done, this may offer some protection. When doing any type of welding you want the surface area to be clean around the weld, even if its only an 1/8".
|
|
|
|
|
01-17-2014, 02:03 PM
|
#11 |
|
Registered User
Join Date: Jan 2013
Location: Leonardtown, MD
Posts: 1,651
|
Re: Newb question on welding patch panel
Gotcha!
__________________
Robert |
|
|
|
|
01-17-2014, 02:45 PM
|
#12 |
|
Registered User
Join Date: Aug 2013
Location: sumterville, florida
Posts: 914
|
Re: Newb question on welding patch panel
a good job can be done with the flux welder although it is not my first choice either. you'll have a lot more cleanup to do
|
|
|
|
|
01-28-2014, 10:56 AM
|
#13 |
|
Registered User
Join Date: Nov 2009
Location: OK
Posts: 274
|
Re: Newb question on welding patch panel
MP&C thanks for the video links!
__________________
Robert 1965 Chevy C10 http://67-72chevytrucks.com/vboard/s...d.php?t=374373 1997 Chevy K2500 6.5 diesel |
|
|
|
|
01-28-2014, 06:02 PM
|
#14 |
|
Registered User
Join Date: Jan 2013
Location: Leonardtown, MD
Posts: 1,651
|
Re: Newb question on welding patch panel
Sure thing, glad to help!
__________________
Robert |
|
|
|
|
02-07-2014, 05:02 PM
|
#15 |
|
Registered User
Join Date: Nov 2000
Location: chimayo, nm, usa
Posts: 898
|
Re: Newb question on welding patch panel
I hate to rain on your flux core machine parade but I'll share my experience where I tried practicing on an old ass craftsman mig 110 with flux core I got from a friend for $50 and I could not get a good consistent tack that wouldn't go through on sheet metal and damn did it make a mess. I about gave up on the project lol. In my case I think it was the machine because it only has two rocker switches for adjustment which completely sucks. It says it's a mig machine but it must be 20 years old as I've never seen a welder without the adjustment knobs.
After all that I'm going to just go with a brand new mig welder with the tank. I have a feeling I will experience success going this route. I'll probably spend $700 by the time a get a tank and a hood but that's still a fraction of buying new ill fitting made in china fenders. |
|
|
|
|
| Bookmarks |
|
|


 Linear Mode

