
|
Register or Log In To remove these advertisements. |
|
|
|
|||||||
 |
|
|
Thread Tools | Display Modes |
|
|
 06-28-2009, 04:07 PM
|
#1 |
|
69 Fleetside
 Join Date: Mar 2009
Location: Lake Stevens, WA
Posts: 333
|
Interior is finally done!
I have finally finished my interior after a 4 months of evenings and weekends. Before it was saddle brown/ivory/and original green. Now it is a charcoal gray with a heavy silver flake in it, with the accent panels being silver/aluminum.
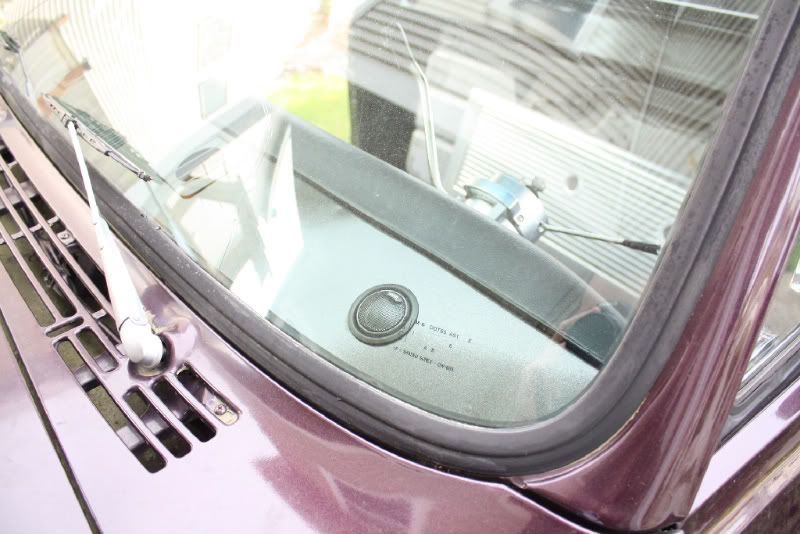
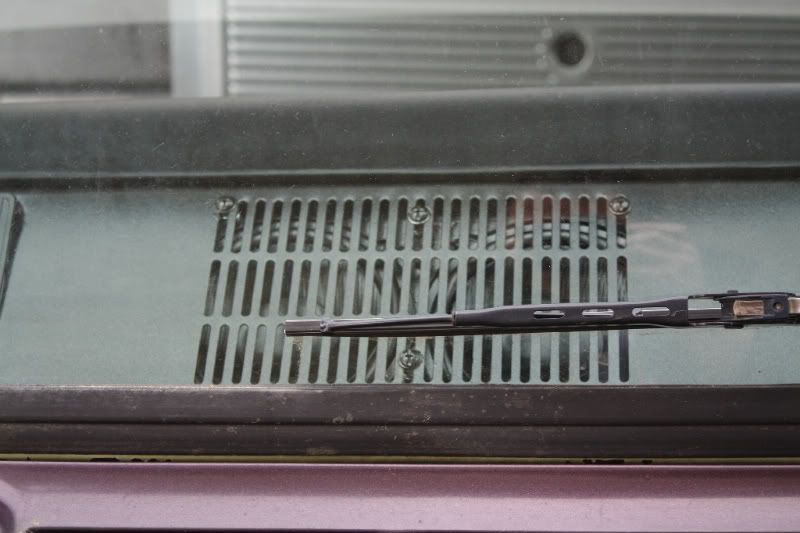
Purchase Day: Not bad for $2200 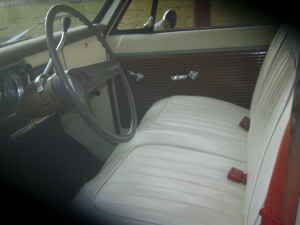 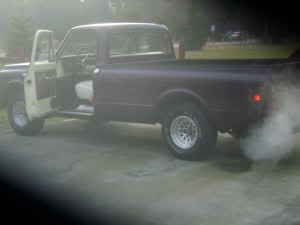 Now gutting it, lots of wire wheel, naval jelly, rust inhibitor seal, primer, and paint to go... 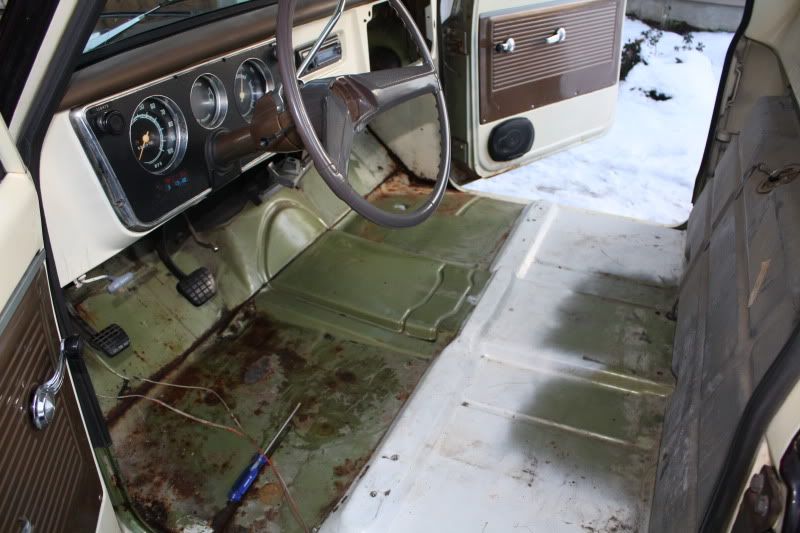 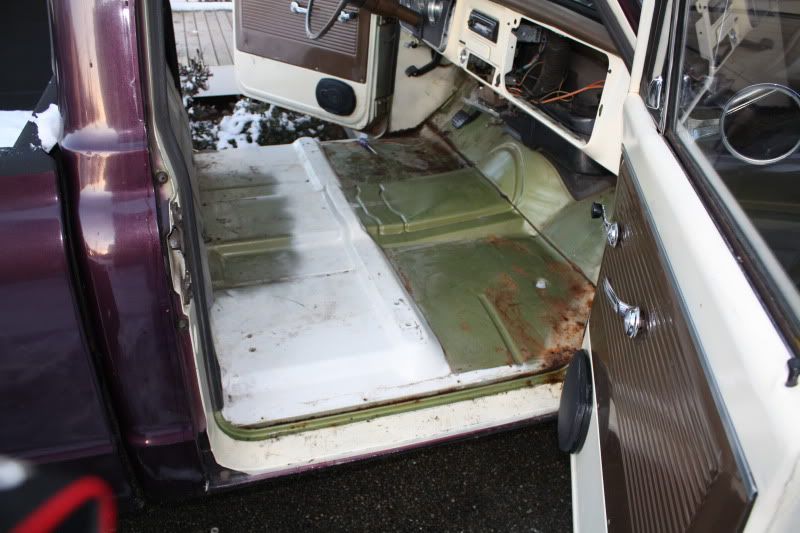 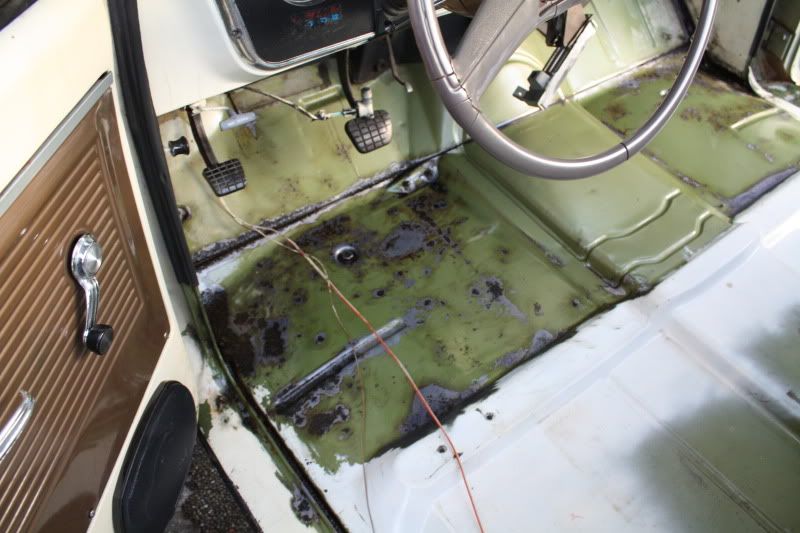 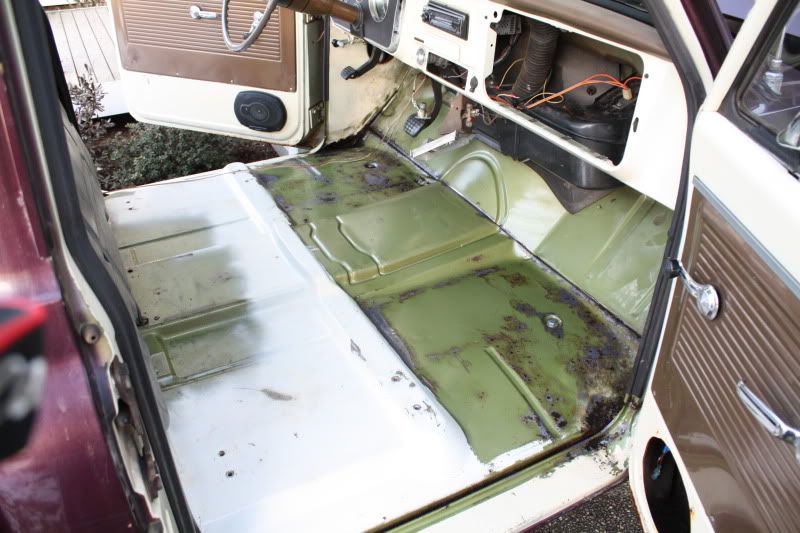   Padding in, carpet in, vents and tube in, wiring for stereo, cig lighter, glove box light 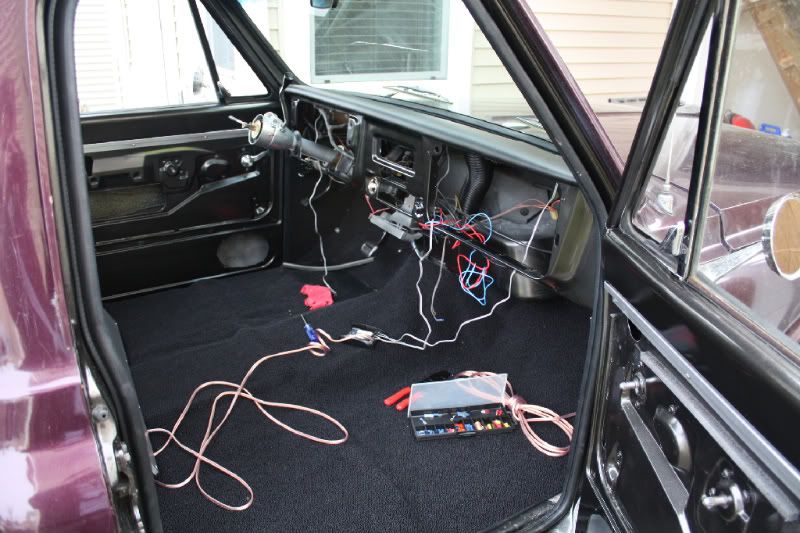 Rebuilt and painted gauges, painted the inside cluster and added a new face, rewired dash for full gauges, new emblems, heater controls, trim rings, etc. Everything worked right off the bat 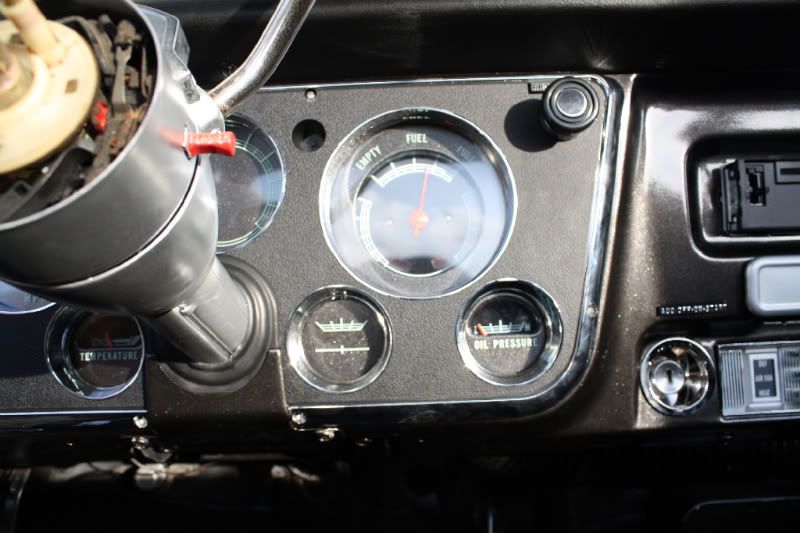
|

|

|
|
06-28-2009, 04:08 PM
|
#2 |
|
69 Fleetside
Join Date: Mar 2009
Location: Lake Stevens, WA
Posts: 333
|
Re: Interior is finally done!
Polk db's in the dash - made a custom bracket for the (2) 5-1/4"'s to fit below stock dash grill(barely cleared top of stereo)
  Polk mm690's in the doors 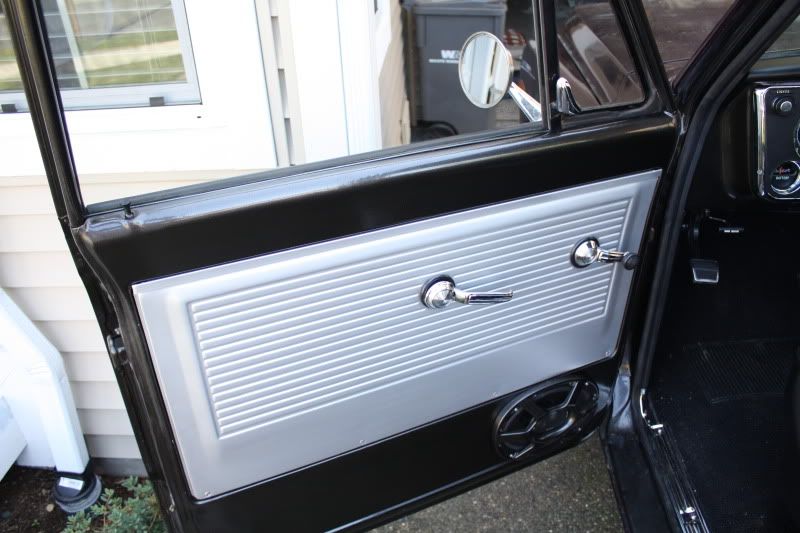 Amp wired in, sub boxes built, carpetted and installed, new seat cover, new seat belts, new visors, new dash pad, new pedal covers, etc... 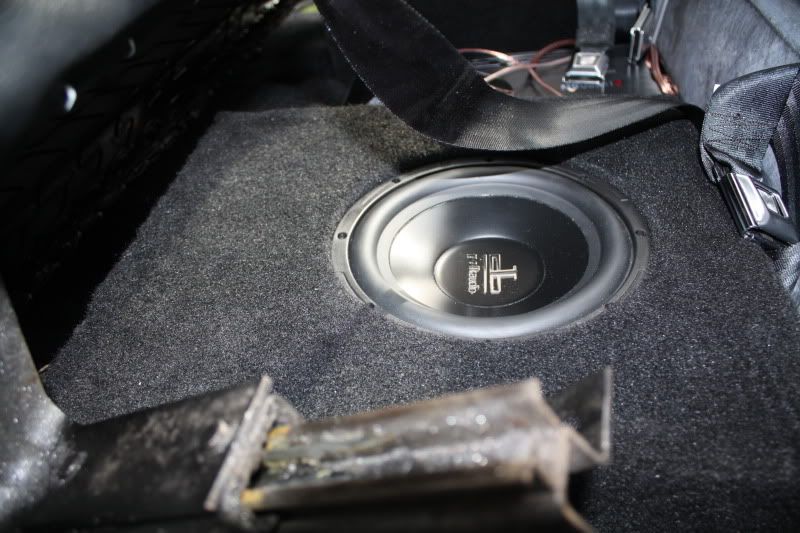  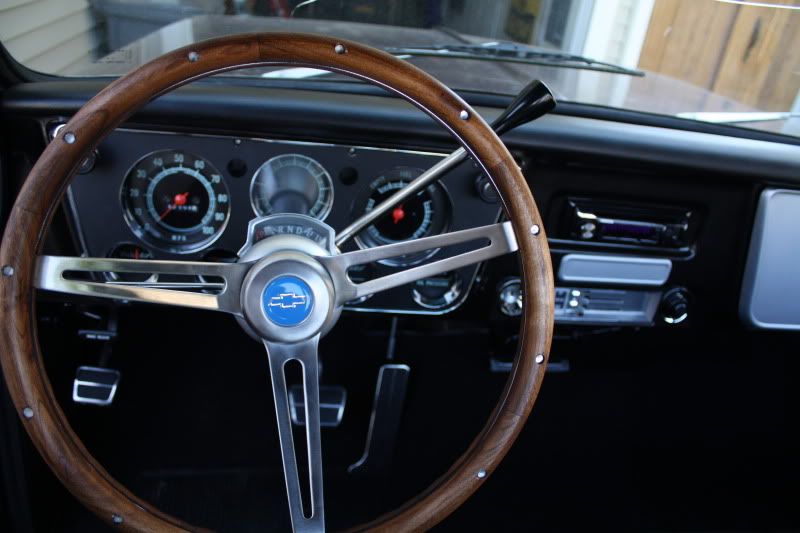 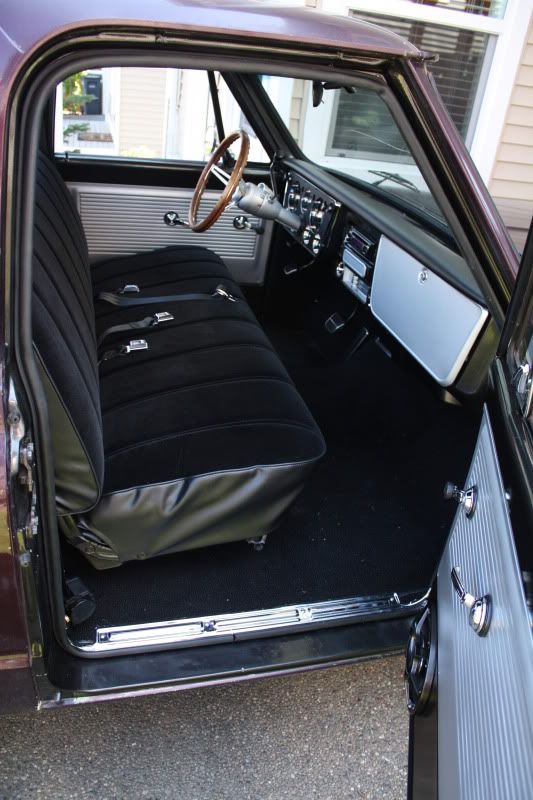 Now on to the rest of it's issues....!  
|
|
|
|
|
06-28-2009, 04:12 PM
|
#3 |
|
'71 chevy s.bed/s.side
Join Date: Mar 2005
Location: Chesapeake, VA
Posts: 1,571
|
Re: Interior is finally done!
WOW!!! That looks good!!
__________________
STILL PLAYS WITH CARS...AND TRUCKS!! Parents! Be good to your kids...they get to choose your nursing home! 250 I-6 with a 3 speed Saginaw and Borg Warner Overdrive...She's got overdrive! |
|
|
|
|
06-28-2009, 04:13 PM
|
#4 |
|
Senior Member
Join Date: Jun 2009
Location: Belews Creek , NC
Posts: 4,220
|
Re: Interior is finally done!
fine job on the interior looks great

|
|
|
|
|
06-28-2009, 05:07 PM
|
#5 |
|
Senior Member
Join Date: Jan 2008
Location: St.Petersburg,Fl
Posts: 1,270
|
Re: Interior is finally done!
Very Nice !

|
|
|
|
|
06-28-2009, 06:01 PM
|
#6 |
|
Registered User
Join Date: Nov 2006
Location: Central Valley, CA
Posts: 198
|
Re: Interior is finally done!
Looks great! What did you use to paint the dash and doors? Did you strip it down to bare metal or paint over the color they were? I'm needing to do this myself and change from one color to another on my interior.
Last edited by JWPOORE; 06-28-2009 at 06:02 PM. |
|
|
|
|
06-28-2009, 06:15 PM
|
#7 |
|
69 Fleetside
Join Date: Mar 2009
Location: Lake Stevens, WA
Posts: 333
|
Re: Interior is finally done!
After all rust treatment I sanded the good areas with 400 and/or scruffed with scotchbrite pad. Then primed with Rustoleum gray primer(1-2 layers) and Rustoleum paint(2 layers) and cleared it (3 layer) - It's a rattle can masterpiece! The door skins were a pain with all those ridges.
Last edited by Beatcoaster; 06-28-2009 at 06:17 PM. |
|
|
|
|
06-28-2009, 06:21 PM
|
#8 |
|
PROJECT 7DEUCE
Join Date: Dec 2002
Location: GRANTS PASS OR
Posts: 21,606
|
Re: Interior is finally done!
Man the interior looks great...
__________________
GO BIG GREEN GO DUCKSMEMBER #6377 72 k-5 daily driver 6'' lift 35'' 350-350-205 slowly getting rust free. Project "7DEUCE" check out my build http://67-72chevytrucks.com/vboard/s...d.php?t=267665 Tim Powell..R.I.P EastSideLowlife..... R.I.P.. |
|
|
|
|
06-28-2009, 06:39 PM
|
#9 |
|
I am a Referee of life.
Join Date: Jun 2000
Location: Greensboro N.C.
Posts: 13,992
|
Re: Interior is finally done!
I did mine the same way a few years ag.I was just trying to get it cleaner looking so I didn't put in new carpet or seat covers.On some areas where it was tight quarters I used double ought steel wool to clean/prep the surface.It still looks as good as it did the day I finished it.
__________________
The 47-present Chevrolet and GMC Truck Message Board Network,it's owners,moderators,members,and associates of any type should not be held responsible for my opinion. You can't fix stupid,not even with duct tape. "My appearance is due to the fact that "GOD" does punish you for having too much fun!" Barrett-Jackson has perfected alchemy,they make rust into gold! "You can lead a horse to water but you can't saddle a duck" "Cleverly disguised as a 'Responsible Adult' "Sometimes your Knight in shining armor is just a retard in tinfoil" |
|
|
|
|
06-28-2009, 07:19 PM
|
#10 |
|
Old member
Join Date: Jan 2002
Location: Liberty, & Garden City S.C. , U.S.
Posts: 19,945
|
Re: Interior is finally done!
Looking good man. It's great feeling knowing you did it yourself.
__________________
1971 LWB Custom, 6.0LS & 4L80E, Speedhut.com GPS speedometer & gauges with A/C. 20" Boss 338's Grey wheels 4 wheel disc brakes. My Driver Seeing the USA in a 71 Upstate SC GM Truck Club 2013,14 and 2016 Hot Rod Pour Tour http://upstategmtrucks.com/ Get out and drive the truck this summer and have some fun! It sucks not being able to hear! LWB trucks rule, if you don't think so measure your SWB! After talking to tech support at Air Lift I have found out that the kit I need is 60811. Per the measurements I gave them. Ride height of truck inside spring and inside diameter of springs. |
|
|
|
|
06-28-2009, 07:31 PM
|
#11 |
|
Registered User
Join Date: May 2009
Location: Laporte, IN
Posts: 167
|
Re: Interior is finally done!
NICE Job! I really like the colors and the speaker install gives me some ideas.
How long did it take you to do the job? Thanks MrBlue |
|
|
|
|
06-29-2009, 10:54 AM
|
#12 | |||
|
69 Fleetside
Join Date: Mar 2009
Location: Lake Stevens, WA
Posts: 333
|
Re: Interior is finally done!
Quote:
Quote:
Quote:
Last edited by Beatcoaster; 06-29-2009 at 10:56 AM. |
|||
|
|
|
|
06-29-2009, 12:06 PM
|
#13 |
|
Registered User
Join Date: Mar 2009
Location: phx,az
Posts: 21
|
Re: Interior is finally done!
Looks great and next week I am starting on my interior so this is a great thred for me. I had a few questions, what kind of dinamat did you use? how much and where did you get it? did you amp your speakers? and where did you mount the sub boxes? I looks great and I am impressed!
__________________
John 71 Chevy C10 02 Chevy Dmax  06 Yahama Rhino: 
|
|
|
|
|
06-29-2009, 03:48 PM
|
#14 |
|
69 Fleetside
Join Date: Mar 2009
Location: Lake Stevens, WA
Posts: 333
|
Re: Interior is finally done!
cr250f = fun bike!!
I used 2 kinds of dynamat. I had some Xtreme Dynamat left over from a previous install I did on my Subaru STi and I also bought some eDead from Elemental Designs off of ebay. I got their thinner product so I could double layer it as needed and used about 20sq ft in each door(both sides of door, very solid sound now) and then just did a single layer on the floor cause I have a layer of jute and then carpet so that should keep road noise down plenty. Dynamat is quite pricey and the eDead is cheap in comparison for a very comparable product. I think it was right around $60 for 50 sq ft of it... I got an MB Quart DSC480 off of ebay for $120 and amped the 6x9's full range and the 8"subs at 120hz. The DB's are run off the head unit and are crossed over at 100hz allowing them to really crank before distortion kicks in. The sub boxes are directly underneath the stock bench seat. The boxes are a extremely tight fit but I am getting the .35 cu ft of space the subs needed. I can barely feel the seat supports hit the boxes as they bow when I sit down. Top mounting and recessing the subs down into the box helps deal with cone movement and steel spring above them. Also placing the woofer near the back of the box keeps it out of the middle area where your butt presses the most. The front portion of the bench seat and rear rail of the seat back keep the boxes locked in place and you need no mounting points for them, they cannot be moved unless the seat bolts are undone. Which bring up a sucky point, that the inner rear bolts could not be used as the box is directly in the way...But it is beyond secure with using 3 per side, and the seatbelts will deal with newtons law if, god forbid, an accident ever did occur. It's funny and annoying, that the cab seems so airtight now that I cannot shut the last door without doing a butt bump on it or having the window down. But if there is anywhere for air to escape(window open) I can shut the doors no problem?! |
|
|
|
|
06-28-2009, 07:42 PM
|
#15 |
|
My Carbon Footprint
Join Date: Oct 2008
Location: Orygun
Posts: 5,527
|
Re: Interior is finally done!
Okay...I'm confused. What is up with that trans tunnel piece? I have never seem one that looks like that. I thought they were all just short or tall hump. Did you make that and if so then why? Thanks!
|
|
|
|
|
06-28-2009, 09:58 PM
|
#16 |
|
Junior Member
Join Date: Jun 2007
Location: China Grove, NC
Posts: 122
|
Re: Interior is finally done!
That looks awesome, man. Love the steering wheel.
__________________
"A man's got to know his limitations." - Dirty Harry _______________________________________________ 1967 C20 Custom Camper, 327, Powerglide, PS, PB, No-Spin Locker |
|
|
|
|
06-28-2009, 11:54 PM
|
#17 | |
|
Account Suspended
Join Date: May 2009
Location: las vegas nv
Posts: 1,493
|
Re: Interior is finally done!
Quote:
interior looks GREAT though |
|
|
|
|
|
06-28-2009, 10:08 PM
|
#18 |
|
Registered User
Join Date: Nov 2006
Location: Springfield/Kansas City
Posts: 1,842
|
Re: Interior is finally done!
nice work!
|
|
|
|
|
06-28-2009, 11:56 PM
|
#19 |
|
My Carbon Footprint
Join Date: Oct 2008
Location: Orygun
Posts: 5,527
|
Re: Interior is finally done!
Yeah.....looks great I just want to know if he rolled those beads or what's going on and why.
I'm waiting............ ;oD |
|
|
|
|
06-29-2009, 12:01 AM
|
#20 |
|
Its a Truck Thing......
Join Date: Dec 2004
Location: Sierra Vista, Arizona
Posts: 3,179
|
Re: Interior is finally done!
Looks good,,,,,
Smitty
__________________
71 C10 283/3SPD Full Resto 71 GMC 1500 Sierra Grande http://67-72chevytrucks.com/vboard/s...d.php?t=518599 70 C10 Suburban Former military GSA truck. 72 Chevy Blazer 4X4, Sloppy Jo, Mountain Climber. Wife says no more trucks. http://67-72chevytrucks.com/vboard/s...d.php?t=707378 72 GMC 1 Ton Motor Home, wife said no more trucks until she saw this one. Gen 3 6.0/4L80E 4.10 http://67-72chevytrucks.com/vboard/s...d.php?t=761110 68 GMC Suburban was 3/4 ton, now 1/2.Wife shook her head 71 C30 Wrecker 71 C20 Scott-Bilt As weird as it gets..BB Cheyenne AC Truck 68 GMC Long Stepside. They keep following me home 69 C30 Former Motor Home, Flat Bed time 70 G20 Red-E-Kamp Conversion "I'm your Boogy Van" |
|
|
|
|
06-29-2009, 01:04 AM
|
#21 |
|
Registered User
Join Date: Aug 2008
Location: el mirage,arizona
Posts: 284
|
Re: Interior is finally done!
looks good congrats
__________________
2 many ,want to finish 1 
|
|
|
|
|
06-29-2009, 04:30 AM
|
#22 |
|
Tot Roddin'
Join Date: Apr 2005
Location: Mid-MO
Posts: 24,461
|
Re: Interior is finally done!
Nice work!
__________________
-Nate  1969 CST SWB - Project Blank Slate (4.5/6" ECE Static Drop, 6-lug disc brake upgrade (manual), Billet Specialties Vintec 20x8.5 255/40 (F) 20x10 295/40 (R), 250 I-6) 1960 AMF Skylark - Tot Roddin' (Lowered with custom frame; soon to include custom push bar and interior) 2008 Silverado CrewCab 1LT (5.3L, 3:73, 4x4, LT1, Z-71, Towing Package) |
|
|
|
|
06-29-2009, 05:24 AM
|
#23 |
|
Registered User
Join Date: Sep 2008
Location: CASA GRANDE AZ
Posts: 4,276
|
Re: Interior is finally done!
Really nice job
__________________
70 SWB STEPSIDE 70 BLAZER 09 challenger |
|
|
|
|
06-29-2009, 08:02 AM
|
#24 |
|
Registered User
Join Date: Jun 2008
Location: South Florida
Posts: 11,375
|
Re: Interior is finally done!
Feels Great when you accomplish a task!!!
Very nice...
__________________
Get your facts first, and then you can distort them as much as you please!!!!!. Sylvester's build thread >>>http://67-72chevytrucks.com/vboard/s...ht=big+rebuild |
|
|
|
|
06-29-2009, 08:47 AM
|
#25 |
|
Registered User
Join Date: May 2009
Location: Burlington, NC
Posts: 49
|
Re: Interior is finally done!

|
|
|
|
|
| Bookmarks |
| Thread Tools | |
| Display Modes | |
|
|


 Hybrid Mode
