
 |
|
|
|
|
#1 |
|
Registered User
 Join Date: Jan 2012
Location: greenville pa 16125
Posts: 283
|
a/c firewall
has anybody taken a non a/c cab and converted it to a/c?
|
|
|

|
|
|
#2 |
|
Registered User
Join Date: May 2007
Location: New Hampshire
Posts: 349
|
Re: a/c firewall
This is mainly about the firewall modification procedure (specifically how to accurately locate the new opening). It was written with the assumption that the person doing the conversion had a good grasp of the refrigeration/electrical aspects of the job and didn't require much guidance in those areas. I'm sure you can figure it out.
BTW - There is one thing I failed to mention below: this job is exponentially easier if you take the time to remove your RH fender (at least pull the wheelhouse/inner fender)! First, get the evap/blower housing and the main (cabin side) air handling section and then start. The reason these are required is because they are needed to mark the locations of the through bolts used for an A/C system. When you have made the new bolt holes, you hang just the evap housing on the engine side. There are 6 places where it is secured. Three are captured type through bolts that are clipped on to the inner half of the air handler and penetrate from the inside (use regular bolts for the locating process) and three are big self tappers. Two of the self tappers are common to both heat-only and A/C systems the other is used only with A/C. Like this: 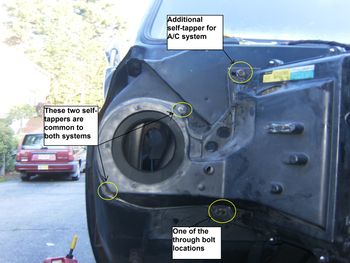 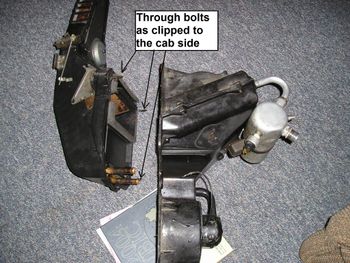 The first step is to mount evap to the FW using just the self tappers. As noted above two of the holes will already exist, drill the 3rd one and install a screw. These three screws will position the box correctly and allow you to accurately determine the proper positions of the 3 through bolt holes. I just leave the box bolted to the wall for drilling. Center punch the FW in the center of each hole in the evap box and drill for 5/16" bolts. The actual diameter of the through bolts is 1/4" but a 5/16" hole will allow for some minor adjustment without sloppiness. Install a couple of temporary bolts in the thru bolt holes - they don't need nuts. The reason for this is explained further down. With the evaporator housing now secured in it's correct and final position, you can begin to modify the firewall to the A/C design. Go into the cab and get under the dash. Note the positions of the temporary bolts in the thru-bolt holes. The lower outboard one doesn't matter. Using the two inboard through bolts as a reference, mark a rectangle that is smaller than the dimension of the inlet to the cabin side of the air handler. Size it so that it is well away from the perimeter of the flange but still large enough for you to pass your hand through. Something like this: 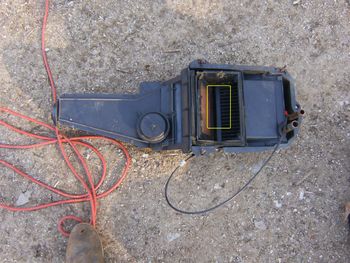 Go back out and remove the evaporator housing from the firewall. Now you will do basically the same thing with the inside air handler as you did with the evap housing (i.e. temporarily secure it in the proper position). There are 4 places to hold it in place while you complete the next step. Use the 3 through bolts (with nuts as they would normally be for final installation) and way over on the outboard side there is a hole in the casing that accepts a big self tapper. This screw is common to both heat-only and A/C air handlers so the hole in the FW will already exist. 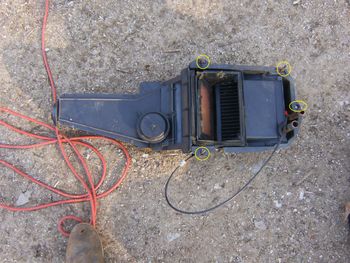 When the air handler is securely in place, it is time to mark the firewall for the final dimension and location of the opening. Get out of the cab, and from the engine side of the FW, reach in with a grease pencil (or Sharpie, metal marker, etc.) and make a nice clean mark on the cab side of the FW. Trace around the inside of the lip that extends out from the air handler flange. After you get one side marked, you will have to move the blend door damper over to it's other limit to mark the opposite edges. That's basically it. Remove the air handler and - while working from inside - remove the excess steel that remains (between your rough opening and the final tracing). If you want the lip around the blend door opening to extend through the firewall, you will have grind an extra 1/8" or so out from your trace mark. That's because when you marked it, you traced around the inside of it. The images directly below show the lip I'm talking about - the factory opening has a nice lip all the way around and the air-handler fits into it. It just looks pretty, it doesn't do anything: 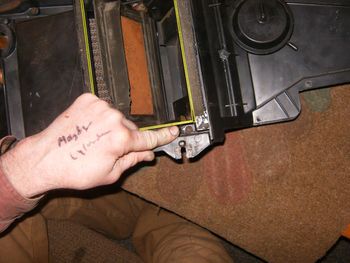 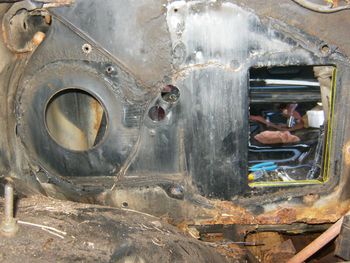 You should end up with an opening in the firewall that pretty much exactly replicates a factory opening. The only difference is that yours won't have that 1/4" turned back lip that the factory opening does - and the corners will be sharp instead of rounded. After the opening is done to your satisfaction, I strongly suggest that you temporarily remount the air handler to the cabin side of the firewall. Then, when you have it in place, manually move the blend door. Note whether there is any binding and confirm that is can be fully stroked from limit to limit. The first A/C modification I did, I neglected to check this. Only after everything was finally assembled did I notice that the damper would stick in certain spots and suddenly pop free. Although this resulted in less than smooth operation - it is such a pain to disassemble everything that I never fixed it. It stayed that way. I wrote this from memory and rather quickly, so it could have many mistakes and/or omissions. If you need more info, come back. After the firewall is modified the rest is tit: Disconnect the wiring and vacuum harness connections on either side of the donor trucks FW. Pull them - and the grommet - through the FW. Strip all the duct work/airhandling components from under the dash. Grab the control head and that's it for the interior. On the other side there is very little to salvage. You will want the condenser, the compressor - if it can still pump and the interconnecting hoses/tubing. The evaporator assembly, heater core, accumulator, blower motor and fan are all mounted together and will have already been installed as part of the FW mod. Oh yeah, one very important thing that people often overlook is the compressor bracketing. It can be a pain to disassemble - but you will really kick yourself in the ass later on if you don't take it. That bracketing group is getting hard to find. Last edited by chengny; 11-14-2015 at 02:48 AM. |
|
|

|
|
|
#3 |
|
Registered User
Join Date: Jan 2009
Location: Louisville,Ky
Posts: 5,811
|
Re: a/c firewall
Vintage air is the easiest way to do it,And it will all be brand new vs all the work and using 30 year old parts that might be bad when you get it.
|
|
|

|
 |
| Bookmarks |
| Thread Tools | |
| Display Modes | |
|
|