
|
|
|
 03-28-2012, 12:27 AM
|
#1 |
|
Registered User
Join Date: Jul 2009
Location: West Jordan Utah
Posts: 95
|
bwilli2's 51 5 window
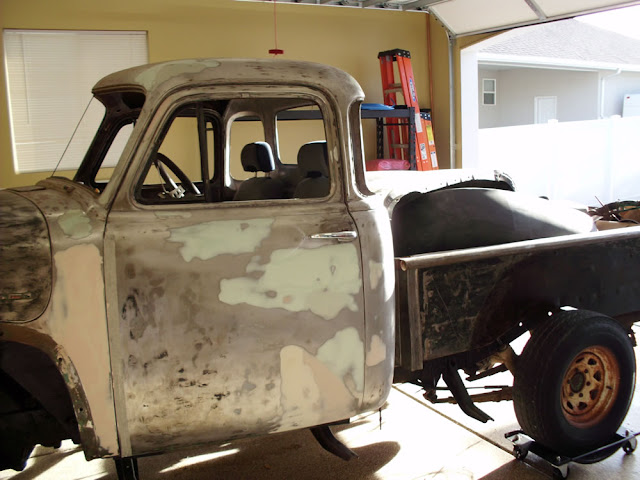
Finally going to get started on my 51. It came into the family around 71. The previous owner did some... interesting things to it.
The bondo and other body work was done by my cousin. He didn't want to weld so there are some good patches and it looks decent but I'll be re-doing all of that. Some interesting previous owner stuff: 283 V8 installed. It runs strong, but I'll be replacing it with a LS1 from a 2000 Camaro. 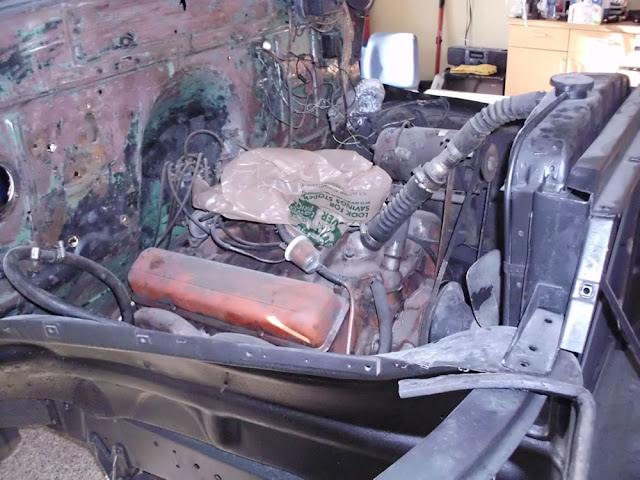 To get the 283 to fit they re-located the steering box on the outside of the frame rail, and pretty much butchered the firewall to re-angle the column and hacked up the inner fender well pretty bad. I've seen this before, but this seems a bit more crude than usual. 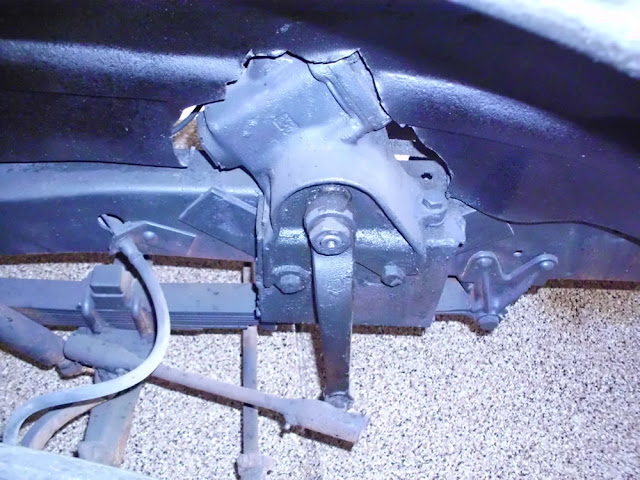 They cut a hole in the center of the dash for a tach... which I'll have to patch. Speaker holes in the doors... which I'll have to patch... and holes in the running boards... which I think I'll end up just replacing. They ran stacks up the back of the cab, through both boards. Looked neat, but kind of weird too. Dash:  Doors:  Running Boards: 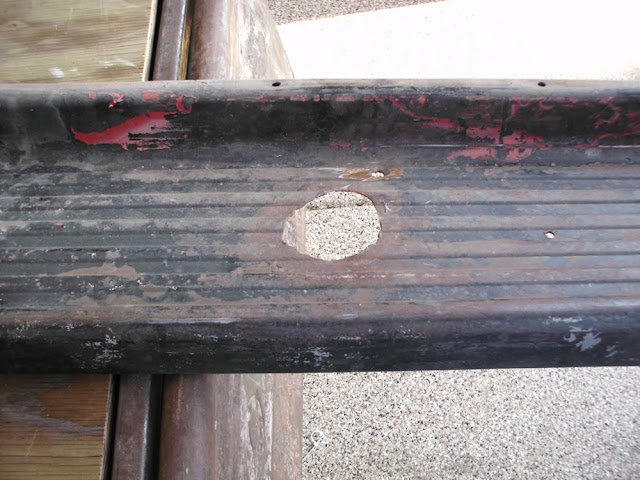 They also angled the driveline a little to the driver side due to the... scary mounting of the engine. You can see how it's not centered in the hoop for the emergency brake cross over:  And looks like some air shocks:  Also cut the stake pockets and flattened the bed rails. (broken welds under there):  I also noticed that at the back stake pocket, there are some holes that are 1/2 covered by the pockets... both sides. Weird.  and 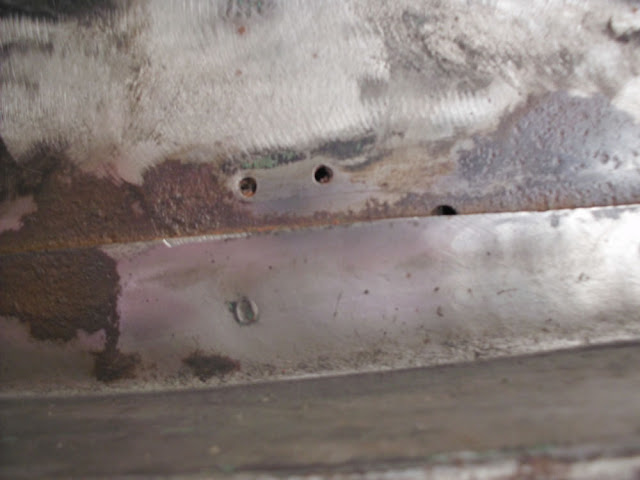 And while it was sitting at the back of my folks summer property, the neighbor kids decided to break EVERY BIT of glass on the thing. Windows, gauges, even the dome light. Sigh. 
Last edited by bwilli2; 03-28-2012 at 12:50 AM. Reason: Fix image links mark II |

|

|
|
03-28-2012, 01:03 AM
|
#2 |
|
Registered User
Join Date: Jul 2009
Location: West Jordan Utah
Posts: 95
|
Re: bwilli2's 51 5 window
The front floor pans are in need of work. The previous owner also cut the seat mounts out.
My plans so far: LS1 and 4L60E Transmission from 2000 Camaro IFS and IRS from 88 Corvette using Flatout's kit. Replace the bed sides and tail gate (sprung really bad, and kind of hacked) Likely the whole bed. I actually wonder what's up with the bed. The paint in the spot welds on the stake pockets match the rest of the truck, but it just seems a little odd. The semi-covered circles, weird welds on the tailgate... I almost wonder if they cut down a long bed. I want to find a place that can update the gauge and speedo to use electronic/digital movements but retain the stock look. I've seen various 'do it yourself' articles using junk yard parts, and may have to go that route. I'm not a huge fan of the aftermarket looks. Although, the Dakota Digital VHX stuff is kind of interesting, as well as New Vintage's stuff. Possibly power windows, A/C and heat for sure. This will be a long process for sure. But it'll be fun! |
|
|
|
|
03-28-2012, 01:07 AM
|
#3 |
|
Registered User
Join Date: Jul 2009
Location: West Jordan Utah
Posts: 95
|
Re: bwilli2's 51 5 window
A couple of other shots:
|
|
|
|
|
03-28-2012, 08:44 AM
|
#4 |
|
Registered User
Join Date: Mar 2012
Location: fortvalley ga
Posts: 345
|
Re: bwilli2's 51 5 window
the loss of the glass sucks but it looks like you have a somewhat solid truck to start with im building a 54 with ls1 and 4l60e ill be watching this will be a good thread
|
|
|
|
|
03-28-2012, 10:14 AM
|
#5 | |
|
Registered User
Join Date: Jul 2009
Location: West Jordan Utah
Posts: 95
|
Re: bwilli2's 51 5 window
Quote:
The real work is undoing/repairing the stuff from the previous owner. Patching the various holes and such. |
|
|
|
|
|
05-12-2012, 12:50 AM
|
#6 |
|
Registered User
Join Date: Jul 2009
Location: West Jordan Utah
Posts: 95
|
Re: bwilli2's 51 5 window
Slow progress. Life. Been working on the tear down so I can get the cab off and onto a cab dolly.
Bedless 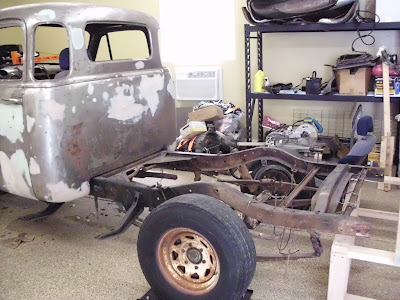 Front panels removed 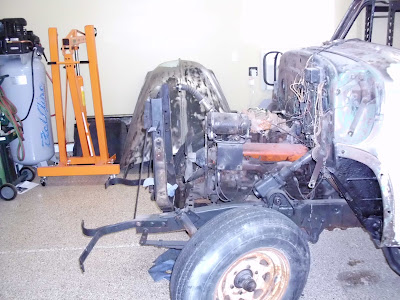 No floor where that floor should be 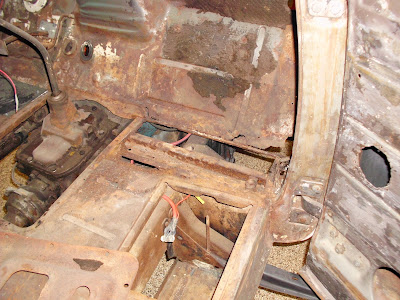
Last edited by bwilli2; 05-12-2012 at 01:00 AM. |
|
|
|
|
05-17-2012, 10:12 AM
|
#7 |
|
Registered User
Join Date: Jul 2009
Location: West Jordan Utah
Posts: 95
|
Re: bwilli2's 51 5 window
Got the cab off and bundled up. I was looking at the frame sitting in the shop and thinking how ecstatic I'll be when I get it BACK to that point with the new drive train... heh.
A few pics: I feel bad I didn't get any shots of it on the cab lift, but I was too busy trying to get it, you know, actually off the truck and onto the dolly.   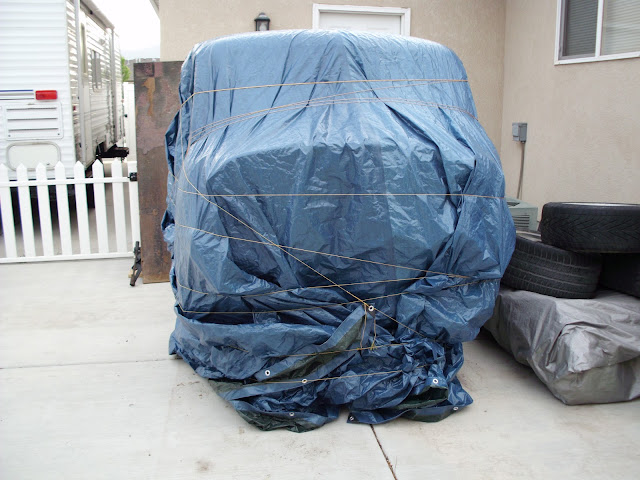
|
|
|
|
|
05-17-2012, 10:30 AM
|
#8 |
|
Registered User
Join Date: Jul 2009
Location: West Jordan Utah
Posts: 95
|
Re: bwilli2's 51 5 window
Some other interesting stuff uncovered.
When I pulled the radiator support out I learned that for whatever reason, the front cross-member has been... "modified" with HUGE holes where the bolts went. Basically they squished a rubber mount in there and filled it with washers as spacers. There is a crack on the passenger side one, so I guess it's possible it was fatigue, but the driver side looks like it was cut. I have no idea why they would have done that.  I also got a good look at the back of the transmission. There are no bolts back there. The transmission looks to be just resting on some rubber mounts/spacers on the transmission cross-member. So, it appears that the engine and transmission are only secured by two bolts at the front through some rough cut diagonal plate. It's been like that for 50 years, so it worked. Just surprises me a bit.  I guess the clutch linkage was also a mount point. :-P Next to pull the engine (Hey! It's only 2 bolts) then start cleaning the frame. 
|
|
|
|
|
06-21-2012, 06:07 PM
|
#9 |
|
Certified Car Nut
Join Date: Jan 2005
Location: Inglewood, California
Posts: 3,118
|
Re: bwilli2's 51 5 window
Looking good man. Keep the pics coming.
|
|
|
|
|
06-21-2012, 07:59 PM
|
#10 | |
|
Registered User
Join Date: Jul 2009
Location: West Jordan Utah
Posts: 95
|
Re: bwilli2's 51 5 window
Quote:
__________________
51 Chevy 3100 5 Window Build Thread: http://www.67-72chevytrucks.com/vboa...d.php?t=516689 |
|
|
|
|
|
06-27-2012, 01:34 AM
|
#11 |
|
Registered User
Join Date: Jun 2012
Location: St. Robert, MO
Posts: 160
|
Re: bwilli2's 51 5 window
Enjoying your un-build! Looking forward to seeing more of your progress

__________________
Boys aren't the only ones that like to get their hands dirty! \m/(@o@)\m/ 1950 Army Chevy 3100 build: The Chester Chronicles Proud Army Wife! 
|
|
|
|
|
06-27-2012, 03:06 PM
|
#12 | |
|
Registered User
Join Date: Jul 2009
Location: West Jordan Utah
Posts: 95
|
Re: bwilli2's 51 5 window
Quote:
__________________
51 Chevy 3100 5 Window Build Thread: http://www.67-72chevytrucks.com/vboa...d.php?t=516689 |
|
|
|
|
|
06-27-2012, 03:52 PM
|
#13 | |
|
Registered User
Join Date: Jun 2012
Location: St. Robert, MO
Posts: 160
|
Re: bwilli2's 51 5 window
Quote:
Maybe find a bit more buried treasure ;P Haha!
__________________
Boys aren't the only ones that like to get their hands dirty! \m/(@o@)\m/ 1950 Army Chevy 3100 build: The Chester Chronicles Proud Army Wife!
|
|
|
|
|
|
07-02-2012, 11:17 PM
|
#14 |
|
Registered User
Join Date: Jul 2009
Location: West Jordan Utah
Posts: 95
|
Re: bwilli2's 51 5 window
Got the last of the 'forever gone' rivets off. Did some primary blasting to see what works. Borrowed a HF sand blaster, and I bought a soda blaster a while ago. Finally broke that puppy out.
The media/sand blaster had media (looked like sand) in it, so just ran it out. Did a fantastic job. Cleaned the rust off down to metal super fast. VERY slick. (Made sure to wear my hood and respirator as I'm not sure if that's low-silica sand or what in there.) Tried the soda blaster. Does a great job cleaning and stripping paint. Handles surface rust, but not the tougher stuff. Tried it for grins on some pretty rough vette wheels that I picked up for rollers when I got my suspension parts. Looks like that'd clean them up nicely. I'll be refilling with aluminium oxide and trying that, then glass bead to see what is the best balance.
__________________
51 Chevy 3100 5 Window Build Thread: http://www.67-72chevytrucks.com/vboa...d.php?t=516689 |
|
|
|
|
08-01-2012, 11:07 AM
|
#15 |
|
Registered User
Join Date: Jul 2009
Location: West Jordan Utah
Posts: 95
|
Re: bwilli2's 51 5 window
July has been a rough month for getting out to the shop. Too much other stuff going on.
I did try my hand at crack repair. That's the first scary thing I've done. Everything up to this point was either reversible or on something I didn't plan on keeping. Taking a grinder to the frame to widen a crack for weld is a bit unnerving. I know that it's always repairable, heck absolute worst case I cut out a section and replace it, but still... Here are some pictures I took along the way. Drilling the end of the crack to stop the spread (sorry for the blur, cell-phone cam at the time)  In the progress of widening the crack for weld fill. For the others I'm going to switch to a smaller diameter and thinner wheel to give me more control.  First and 2nd pass (I didn't take one post grind.)   Came out pretty good. I did have a little burn through on the hole on some of the back fill not-pictured (because it's embarrassing :-). I'll need to fill that in a bit more then re-drill it.
__________________
51 Chevy 3100 5 Window Build Thread: http://www.67-72chevytrucks.com/vboa...d.php?t=516689 |
|
|
|
|
06-27-2012, 03:05 PM
|
#16 |
|
Registered User
Join Date: Jul 2009
Location: West Jordan Utah
Posts: 95
|
Re: bwilli2's 51 5 window
Not huge progress. Sold the front, rear and trans, so I spent my normal 'shop time' moving the parts out where they could be picked up. Have to move this, so I can move that, then move this other thing... burns up the time fast.
Going to try and get the rest of the riveted stuff that needs to come off done tonight so I can get to the blasting. After blasting is crack repair. After crack repair I need to finish straightening the rear frame rails. (This may get bumped down the stack...) After THAT I can start installing the flat-out kit!
__________________
51 Chevy 3100 5 Window Build Thread: http://www.67-72chevytrucks.com/vboa...d.php?t=516689 |
|
|
|
|
11-25-2012, 01:43 AM
|
#17 |
|
Registered User
Join Date: Mar 2011
Location: spokane, wa
Posts: 45
|
Re: bwilli2's 51 5 window
Looking good! What are you going to do for rear suspension?
|
|
|
|
|
12-01-2012, 07:14 PM
|
#18 | |
|
Registered User
Join Date: Jul 2009
Location: West Jordan Utah
Posts: 95
|
Re: bwilli2's 51 5 window
Quote:
There's something appealing in keeping it all Chevy.
__________________
51 Chevy 3100 5 Window Build Thread: http://www.67-72chevytrucks.com/vboa...d.php?t=516689 |
|
|
|
|
|
12-17-2012, 11:26 PM
|
#19 |
|
Registered User
Join Date: Jul 2009
Location: West Jordan Utah
Posts: 95
|
Re: bwilli2's 51 5 window
My new job is burning my time super fast.
A little progress. Added the drivers side boxing plate on the rear:  Cut down the front cross member so I can box the front:  And trimmed the front rails so they can be boxed evenly.
__________________
51 Chevy 3100 5 Window Build Thread: http://www.67-72chevytrucks.com/vboa...d.php?t=516689 |
|
|
|
|
12-17-2012, 11:31 PM
|
#20 |
|
Registered User
Join Date: Jul 2009
Location: West Jordan Utah
Posts: 95
|
Re: bwilli2's 51 5 window
The front boxing plates from the kit are not an exact fit. I'm actually not going to use them and just get some oversized stock and cut it down to fit.
 Not a big deal. Also, oddly those cracks on the frame by the rear cab mounts... are intrestingly symmetrical. Same number of forks in the same places. 
__________________
51 Chevy 3100 5 Window Build Thread: http://www.67-72chevytrucks.com/vboa...d.php?t=516689 |
|
|
|
|
12-21-2012, 01:25 AM
|
#21 |
|
Registered User
Join Date: Jul 2009
Location: West Jordan Utah
Posts: 95
|
Re: bwilli2's 51 5 window
Got the driver side front boxing plate built and on. I need more plate for the passenger side. Coming along!
__________________
51 Chevy 3100 5 Window Build Thread: http://www.67-72chevytrucks.com/vboa...d.php?t=516689 |
|
|
|
|
12-27-2012, 12:14 AM
|
#22 |
|
Registered User
Join Date: Jul 2009
Location: West Jordan Utah
Posts: 95
|
Re: bwilli2's 51 5 window
Got the passenger side done. Here's a shot of the drivers side:
 Took some shots of the template process, but my camera crapped out. Traced on plate with the one from the kit for comparison:  After the rough cut.  Cut one on top of the kit:  The rail prepped:  I'll have to take my other camera out to get more shots. Got it back on the jack stands so I can get it ride level. Moving forward!
__________________
51 Chevy 3100 5 Window Build Thread: http://www.67-72chevytrucks.com/vboa...d.php?t=516689 |
|
|
|
|
02-10-2013, 01:50 PM
|
#23 |
|
Registered User
Join Date: Jul 2009
Location: West Jordan Utah
Posts: 95
|
Re: bwilli2's 51 5 window
Got the rear cross-members tacked in. Next to bolt on all of the various brackets and such.
__________________
51 Chevy 3100 5 Window Build Thread: http://www.67-72chevytrucks.com/vboa...d.php?t=516689 |
|
|
|
|
02-10-2013, 03:33 PM
|
#24 |
|
Registered User
Join Date: Jan 2012
Location: Motown
Posts: 7,677
|
Re: bwilli2's 51 5 window
making progress
 boxing the frame will keep the frame from cracking more. nice work so far
__________________
cool, an ogre smiley Ogre's 58 Truk buildhow to put your truck year and build thread into your signature shop air compressor timer |
|
|
|
|
02-10-2013, 09:29 PM
|
#25 |
|
Registered User
Join Date: Jan 2007
Location: York, Pa.
Posts: 1,386
|
Re: bwilli2's 51 5 window
bwilli2, good to see another C4 suspensioned AD on here. Hope to see some pictures. I am doing one too. I am building the rear set up. But the front is Flat Out. Your blasted frame looks great.
Shannon
__________________
48 Panel Truck 1948 Chevy / S10 1954 Chevy / S10 1951 Chevy / C4 47 Step van Lowered 1996 Dually |
|
|
|
 |
| Bookmarks |
|
|


 Hybrid Mode
