
 |
Register or Log In To remove these advertisements. |
|
|
|
|||||||
 |
|
|
Thread Tools | Display Modes |
|
|
|
|
#1 |
|
Questionable
Join Date: Mar 2005
Location: Atlanta
Posts: 13,373
|
Attempt at new intake/exhaust for inline 250
Okay, so ... both of my exhaust manifolds were pretty rough - one was leaking horribly and rattling, the other one had a hairline crack. I took my spare intake/exhaust, split it, had the intake sandblasted, repainted it with Eastwood exhaust paint, bought new Dynomax headers for $160 from Mothertruckers, coated them with Eastwood header paint, then went to reinstall everything.
The damned headers interfere with the intake, so I can't get it in. The headers bump into: Drivers side motor mount Clutch linkage The bottom sides of the intake for cylinders 1-2 and 5-6 I thought this would be straightforward, but I'm going to need to butcher the bottom side of the headers to make them fit. Here are some pics if anyone is interested in what I got going...I will say this: The Eastwood exhaust and header paints are GREAT. Very easy to prep up and work with. Goes on smooth and one can would have been enough to coat my headers 4x. Headers, before paint:  After paint (1 coat): 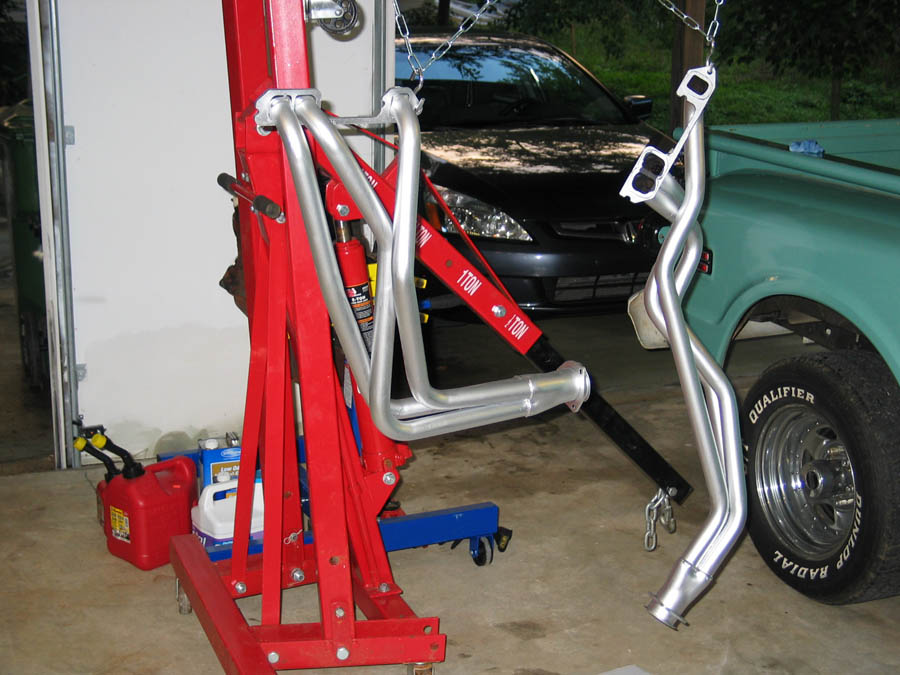 Intake after separation, sandblasting and paint: 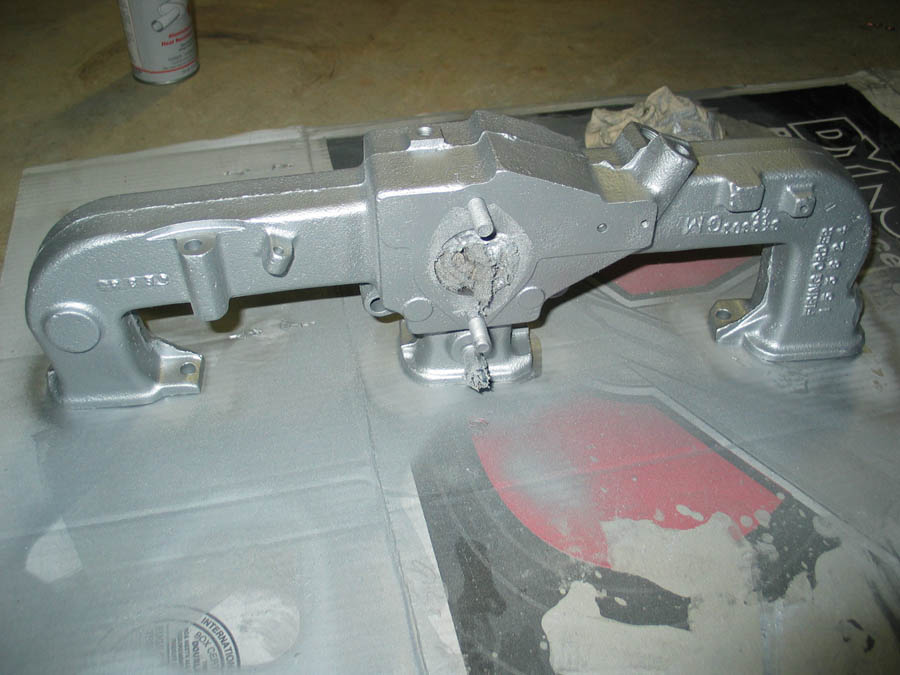 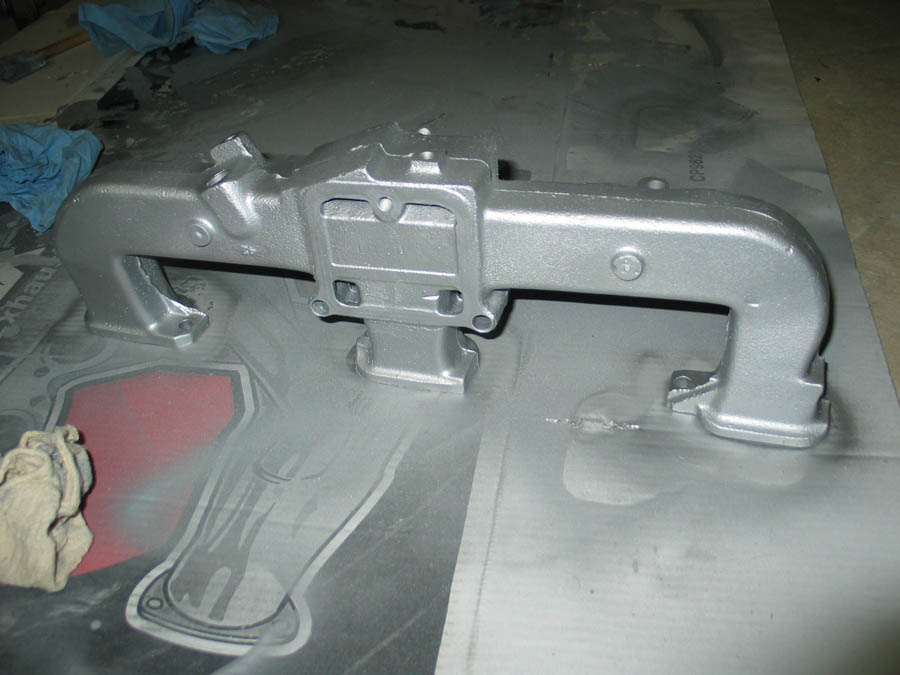 This is the front header mocked up (notice the engine mount and clutch linkage - it bangs right there a little bit):  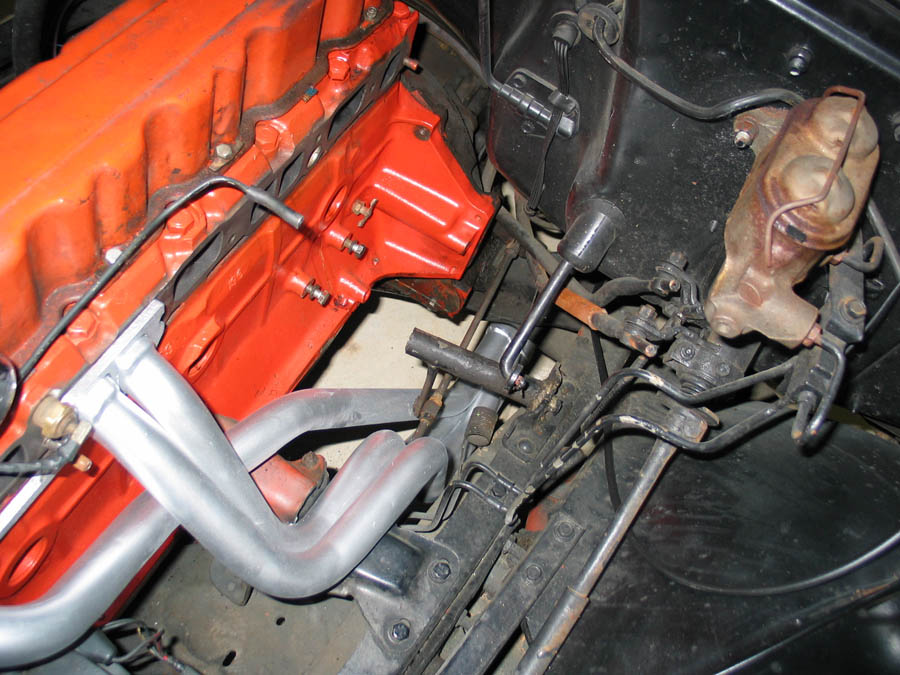 Here are the places where it's not meeting up. I'm going to need to massage both places, but I don't know what I'm going to do about the clutch linkage, because it's not going anywhere. I thought these headers were supposed to "fit" without these problems, but I was sorely mistaken  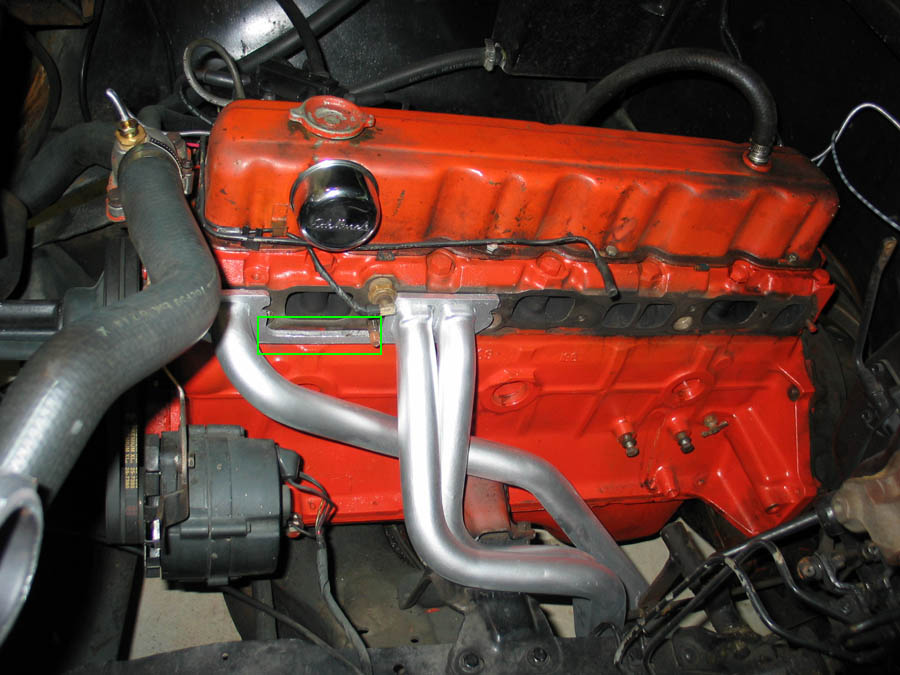 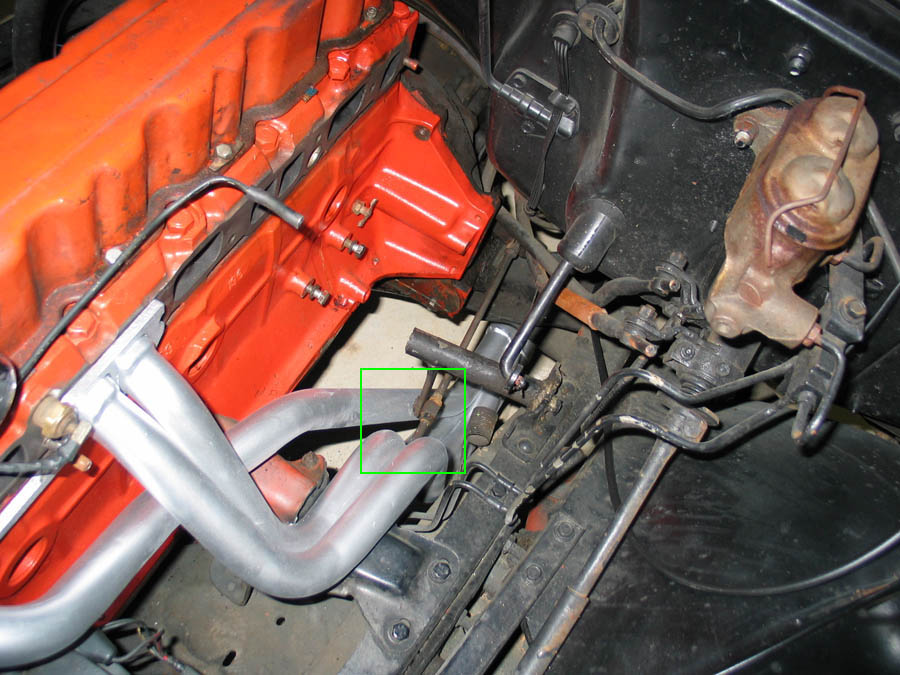
__________________
If I've got anything up for grabs, it'll be here: 7-hole gauge cluster for a 67-72 p/u FREE (link) I can't check the forum daily. If I don't reply to you within 24 hours, drop me a PM! I'm (hopefully) still alive and will reply faster to a PM. |
|
|

|
|
|
#2 |
|
Registered User
Join Date: Jun 2002
Location: san antonio
Posts: 52
|
man =/ I did clifford headers on my 292 and from what I understood they had no problem putting them on. took about 6 hours I belive with the full exhaust done to. those do look like they are abit odd fitting.
__________________
'72 custom 20 Current mods race built chevy 400 engine. over carbed =/ Powder coated bumpers Progressive Wheels Future mods single windows. alum. fuel cell under bed, sidemarker fuel cap mod. All white and yellow interior. leather bucket seats. |
|
|

|
|
|
#3 |
|
Where's my beer?
Join Date: Oct 2004
Location: Glen Allen, VA
Posts: 1,772
|
I wish I could help you with what my headers are on mine, but I don't know the brand, they were on the truck when I got them. I THINK they are Clifford headers, my intake is a Clifford. My setup is like yours though, with a 3 spd stick and they fit fine. I had some header leaking issues and wound up going with a Clifford header gasket, all problems solved. I've also heard nothing but good things about Mothertruckers, so I'd be willing to bet they will surely make things right by you.
__________________
70 C10, shortstep, .30 over 250,Hurst shifted 3 spd parts hauler. Holley 390, Clifford Intake, Header, ported cylinder head, unknown bigger cam. 79 Corvette L82, 4 spd, black, red interior, headers, flowmasters, and unkown bigger cam. '03 Grand Cherokee Laredo, 4.0 4x4 daily driver. 165K miles, and runs great '08 Tahoe LTZ 4x4 155K |
|
|

|
|
|
#4 |
|
Questionable
Join Date: Mar 2005
Location: Atlanta
Posts: 13,373
|
Aww, seriously, this isnt' Mothertruckers fault! I'm totally happy with the product, just ... in my case, I'm having a helluva time trying to make everything fit. :\
__________________
If I've got anything up for grabs, it'll be here: 7-hole gauge cluster for a 67-72 p/u FREE (link) I can't check the forum daily. If I don't reply to you within 24 hours, drop me a PM! I'm (hopefully) still alive and will reply faster to a PM. |
|
|

|
|
|
#5 |
|
Senior Member
 Join Date: Feb 2002
Location: Tucson, AZ USA
Posts: 7,522
|
Shifty, I got around a clutch -push -rod -hitting -the -headers problem ['71 Jimmy K/5] on a 350 w/Heddmans by "joggling" the lower ear on the Z-Bar so the front end of the clutch push rod missed the header tube. You could also shorten the push rod -- just make sure your clutch action is good and you don't need anymore room on it before you do.
The Clifford headers I have on my 292 were fitted on back in '78. I don't recall any major hassles. Just some ball pein dimples to clear the angles of the 4V Offy intake (very similar to stock configuration). Also Clifford sells the same p/n headers for both the 250 and 292. With the 292 heavy duty tall deck (+1.75") the downtubes clear the motor mount and Z-Bar pivots easy. Maybe the geometry is not as good with a 250? Your Pacesetters look a lot like the Cliffords. After a 25-year run on my last 292, I recycled mine by getting the headers hot-tanked and bead blasted, then painted them w/ 1500* VHT Nu-Cast Iron and they're doing great on my fresh 292 build. Hang in there man, these L6s take time because there are fewer experts still alive who remember the old tricks. Results will be worth it.
__________________
Every 25 years I like to rebuild that 292, whether it needs it or not. Last edited by '68OrangeSunshine; 06-21-2005 at 06:27 AM. |
|
|

|
|
|
#6 | |
|
Bloo
Join Date: Feb 2001
Location: Barren County Kentucky
Posts: 6,283
|
something you may consider that i did on the 71 k20 with headers, cut the bar off the bottem of the z-bar and move it over about 3 inches to the left.. never had a problem out of mine
__________________
ASE Master Certified-GM Trained-Mechanic 1968 Chevy C30 157" WB Wrecker 1969 Chevy CST/10 SWB 1971 Chevy Custom/10 (first truck) 350, NV3500 5 speed 1971 Chevy K20 Custom Camper 4x4 350 TBI, SM465/NP205 1974 Chevy Custom Deluxe/10 1979 Chevy Custom Deluxe K10 farm truck beater 1989 Chevy K2500 Quote:

|
|
|
|

|
|
|
#7 |
|
Questionable
Join Date: Mar 2005
Location: Atlanta
Posts: 13,373
|
Thanks, guys. I am going to shorten the rod by about an inch. I really need to do something about the bar itself though.
Here's one for you: My Z-bar (what I guess is the Z-bar) and the Y-shaped mount that holds it to the motor are both shot. The cloth rings and round rubber seals on both of them are totally shot. I really need to tear it down, clean it up and rebuild it. Where do you find replacements for these rings and what are they called? Does it come in a kit or something?
__________________
If I've got anything up for grabs, it'll be here: 7-hole gauge cluster for a 67-72 p/u FREE (link) I can't check the forum daily. If I don't reply to you within 24 hours, drop me a PM! I'm (hopefully) still alive and will reply faster to a PM. |
|
|

|
|
|
#8 |
|
Registered User
Join Date: Apr 2003
Location: Easley, South Carolina
Posts: 491
|
I put an O-ring in mine to replace the rag type seal. I think it was 11/16" I.D. X 3/32 diameter O-ring. It's been a while since I did this but from what I remember it worked well, don't forget to use the zert fitting to grease the sucker.
__________________
Richard Dobson |
|
|

|
|
|
#9 | |
|
Senior Member
 Join Date: Feb 2002
Location: Tucson, AZ USA
Posts: 7,522
|
Quote:
The L6 engine ball stud and bracket assembly could be refurbished, I think. If the bracket is still good, but the L6 ballstud is worn, you could drive out the crimped-in old ballstud, and drill and tap for the threaded [ but still-available] V8 engine ball stud, maybe tack welding it to the bracket or backing up the threaded part with another nut. If the "Y" bracket itself is shot, it could be duplicated out of 1/4" strap steel and the V8 ballstud (engine) p/n 32-6124, affixed in the above manner. I believe the GM dealers still stock this part OEM. I compared a surplus SBC engine ballstud unit off my Jimmy to the L6 set-up and it was the same length and diameter, except for a threaded extension that screws into a V8 block. So if you can't find an L6 engine ballstud and ["Y"] bracket assembly in a junk yard, it could be fabricated by someone who has a lot of time and some talent.
__________________
Every 25 years I like to rebuild that 292, whether it needs it or not. |
|
|
|

|
|
|
#10 | |
|
Seņor Member
Join Date: May 2002
Location: Edge of the world
Posts: 5,367
|
Quote:
__________________
|
|
|
|

|
|
|
#11 |
|
I'm watching you!
Join Date: Feb 2005
Location: Levittown, PA
Posts: 1,822
|
Mine has this thing in the pic attached to the clutch z-bar thing and to the engine. Sorry I don't have a better pic but I think you can see it.
Mike
__________________
2012 Chevrolet Silverado 1500 Z71 4WD 1993 Chevrolet C-1500 W/T - Blue - 4.3L V-6, 4 speed auto - Dad's (RIP) 1992 Chevrolet S10 - LS swap project 1968 Chevrolet C-10 longbed fleetside - sold 
|
|
|

|
|
|
#12 |
|
"Trucks with Class"
 Join Date: Jul 2000
Location: OLYMPIA, WA, USA
Posts: 8,158
|
I use those headers with an Offy intake...had to grind on the bottom of the intake and dent one header pipe...and that was with an AT.
Next time I would go with short cast headers, less hassle, better fit, less leaking. |
|
|

|
|
|
#13 | |
|
Seņor Member
Join Date: May 2002
Location: Edge of the world
Posts: 5,367
|
Quote:
__________________
|
|
|
|

|
|
|
#14 |
|
Questionable
Join Date: Mar 2005
Location: Atlanta
Posts: 13,373
|
I also have a rubber ring around the ball on the end of the Y-shaped fork that connects to the engine block. Basically, the ball that slips into the Z-bar is notched all the way around the circumference and there was a cracked up, rotten rubber seal of some sort seated in it. I can post pics if needed.
__________________
If I've got anything up for grabs, it'll be here: 7-hole gauge cluster for a 67-72 p/u FREE (link) I can't check the forum daily. If I don't reply to you within 24 hours, drop me a PM! I'm (hopefully) still alive and will reply faster to a PM. |
|
|

|
|
|
#15 |
|
Questionable
Join Date: Mar 2005
Location: Atlanta
Posts: 13,373
|
Gotta make a decision tonight: grind the headers, grind the bottom of the intake ... or grind them both
 I'm on a mission to get the truck running tonight. Hopefully I can reinstall the Z-bar with the Y-bar and headers already installed....guess we'll hafta see :\
__________________
If I've got anything up for grabs, it'll be here: 7-hole gauge cluster for a 67-72 p/u FREE (link) I can't check the forum daily. If I don't reply to you within 24 hours, drop me a PM! I'm (hopefully) still alive and will reply faster to a PM. Last edited by shifty; 06-22-2005 at 05:04 PM. |
|
|

|
|
|
#16 |
|
Questionable
Join Date: Mar 2005
Location: Atlanta
Posts: 13,373
|
PS: 68OrangeSunshine: Thanks for the part numbers!
__________________
If I've got anything up for grabs, it'll be here: 7-hole gauge cluster for a 67-72 p/u FREE (link) I can't check the forum daily. If I don't reply to you within 24 hours, drop me a PM! I'm (hopefully) still alive and will reply faster to a PM. |
|
|

|
|
|
#17 |
|
Senior Member
 Join Date: Feb 2002
Location: Tucson, AZ USA
Posts: 7,522
|
Shifty, I would'nt grind the headers -- not much metal there -- can't you ding them with a big ball pein hammer?
__________________
Every 25 years I like to rebuild that 292, whether it needs it or not. |
|
|

|
|
|
#18 |
|
Questionable
Join Date: Mar 2005
Location: Atlanta
Posts: 13,373
|
Well, I don't have much of a lip to grind off the intake, so I'm guessing I need to take off about 1/8" from this part here to make the intake/exhaust ports marry up right:

__________________
If I've got anything up for grabs, it'll be here: 7-hole gauge cluster for a 67-72 p/u FREE (link) I can't check the forum daily. If I don't reply to you within 24 hours, drop me a PM! I'm (hopefully) still alive and will reply faster to a PM. |
|
|

|
|
|
#19 |
|
Questionable
Join Date: Mar 2005
Location: Atlanta
Posts: 13,373
|
XXL: There was never anything mounted in that hole. The only thing mounted to the block was in the two holes above that (see the bolts there - it's where the Y-bracket mounts up)
What is supposed to go in that single hole?
__________________
If I've got anything up for grabs, it'll be here: 7-hole gauge cluster for a 67-72 p/u FREE (link) I can't check the forum daily. If I don't reply to you within 24 hours, drop me a PM! I'm (hopefully) still alive and will reply faster to a PM. |
|
|

|
|
|
#20 | |
|
Senior Member
 Join Date: Feb 2002
Location: Tucson, AZ USA
Posts: 7,522
|
Quote:
__________________
Every 25 years I like to rebuild that 292, whether it needs it or not. Last edited by '68OrangeSunshine; 06-23-2005 at 06:00 AM. |
|
|
|

|
|
|
#21 | |
|
Seņor Member
Join Date: May 2002
Location: Edge of the world
Posts: 5,367
|
Quote:
__________________
|
|
|
|

|
|
|
#22 |
|
Questionable
Join Date: Mar 2005
Location: Atlanta
Posts: 13,373
|
hey, 68OrangeSunshine,
You list the following parts: Felt washer 30-0695 Spring (lock) 30-3103 (x2) Seat 30-2392 (x4) Questions... 1) Are these the LMC part numbers? 2) What are the seat and spring for? 3) Don't you need two cloth washers? I think the Y-bar takes a cloth washer just below the ballstud end. Pretty sure the Z-bar takes one on the side closest to the frame.
__________________
If I've got anything up for grabs, it'll be here: 7-hole gauge cluster for a 67-72 p/u FREE (link) I can't check the forum daily. If I don't reply to you within 24 hours, drop me a PM! I'm (hopefully) still alive and will reply faster to a PM. |
|
|

|
|
|
#23 | |
|
Senior Member
 Join Date: Feb 2002
Location: Tucson, AZ USA
Posts: 7,522
|
Quote:
1] Yes. Sorry I don't have the GM p/n. Sometimes if you have the right number, the parts guy at the dealer can pull up some gems. 2] The 'seats' are bevelled nylon rings. The interior of the Z-Bar is chamfered to seat one then the ball of the ballstud, then another nylon ring to trap the round ballstud, then it is locked in place by the 'spring'. 3] Yes. You're right, You need one at each end. I didn't order a second one because it isn't illustrated in the LMC catalog. When I installed the clutch linkages, I used a red felt battery terminal anti-corrosion washer to hold the grease in the Z-Bar at the engine bracket side. OBTW, don't forget the 'spacer' p/n 30-2906. It's a special lockwasher for the specific application, it holds the threaded end of the frame ballstud in the clutch bracket on the frame. Bending down the ears onto the sides of the nut -- once it's in place -- keeps the nut from walking. 'Clip-linkages' 30-1602 are real handy to have. Get extras and keep 2 in the glove box. Also after 34-odd years of operating, my 'linkage-swivel' 32-6010 was almost sawn thru. This is one part you should try to get from a dealer, if they still have 'em. The GM one is superior to an import repop. Have fun.
__________________
Every 25 years I like to rebuild that 292, whether it needs it or not. |
|
|
|

|
|
|
#24 |
|
Msgt USAF Ret
  Join Date: Jan 2005
Location: Kalamazoo, Michigan
Posts: 8,719
|
interesting I-6 pics
Hey Shifty I thought you might be interested in these pics and this guys project.
http://www.chevyasylum.com/64c10/64c10_11.html
__________________
VetteVet metallic green 67 stepside 74 corvette convertible 1965 Harley sportster 1995 Harley wide glide Growing old is hell, but it beats the alternative. |
|
|

|
|
|
#25 |
|
Questionable
Join Date: Mar 2005
Location: Atlanta
Posts: 13,373
|
Thanks, V²! Was cool to actually see someone doing the same thin. Glad to know this is not a rare occurence.
__________________
If I've got anything up for grabs, it'll be here: 7-hole gauge cluster for a 67-72 p/u FREE (link) I can't check the forum daily. If I don't reply to you within 24 hours, drop me a PM! I'm (hopefully) still alive and will reply faster to a PM. |
|
|

|
 |
| Bookmarks |
|
|