
|
Register or Log In To remove these advertisements. |
|
|
|
|||||||
 |
|
|
Thread Tools | Display Modes |
|
|
 09-13-2009, 07:03 PM
|
#1 |
|
Registered User
Join Date: Jun 2009
Location: Eugene, OR
Posts: 200
|
Let the rebuild begin...
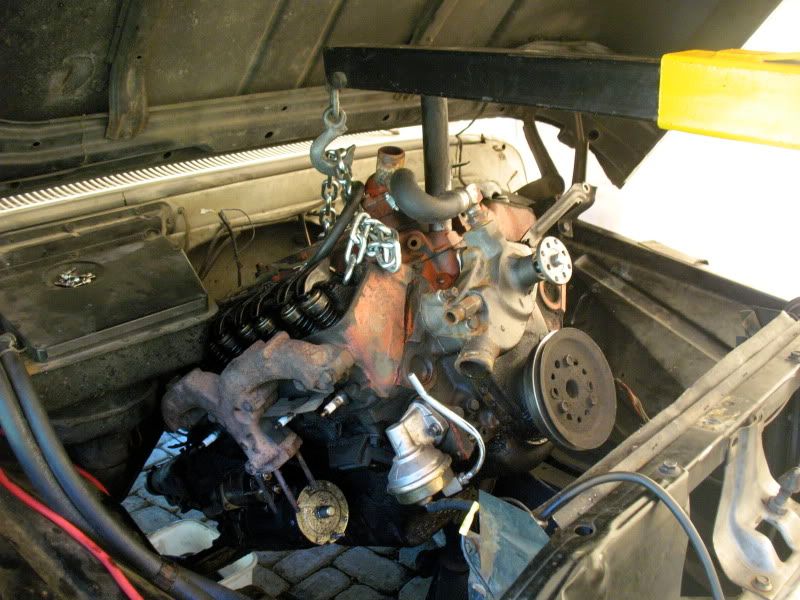
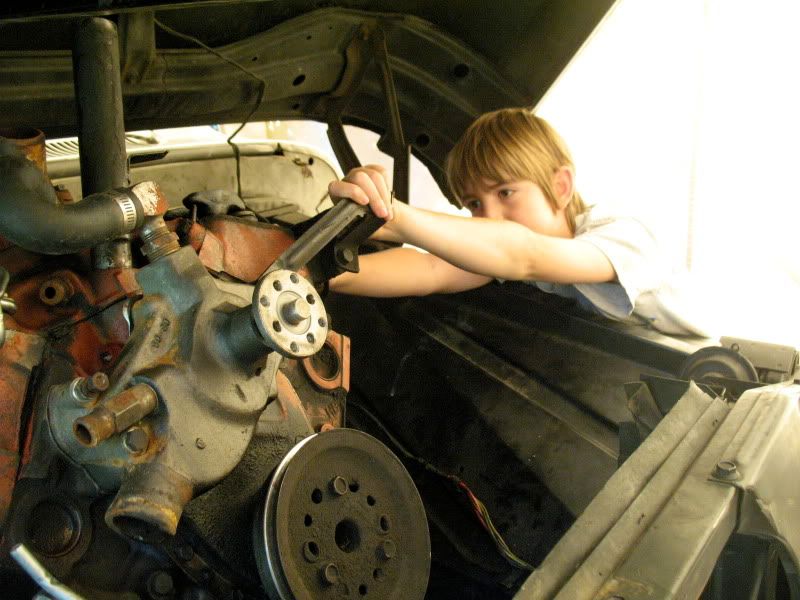
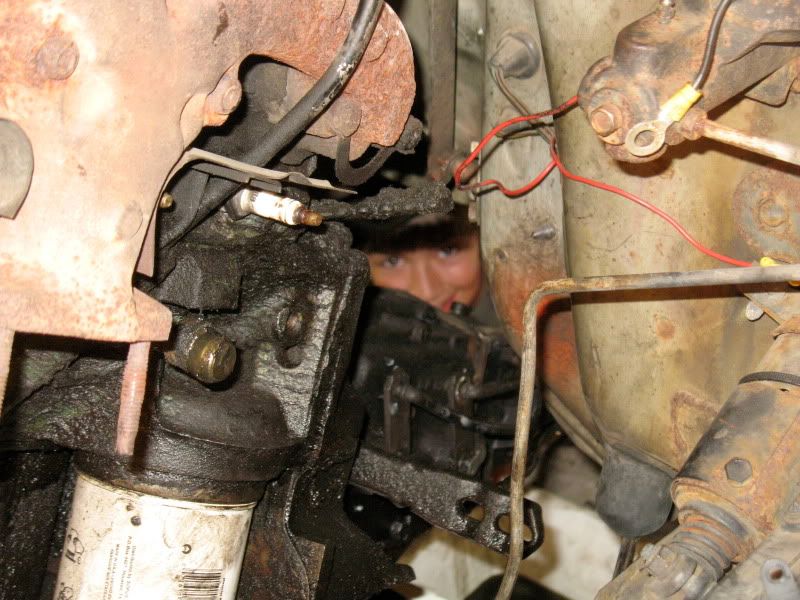
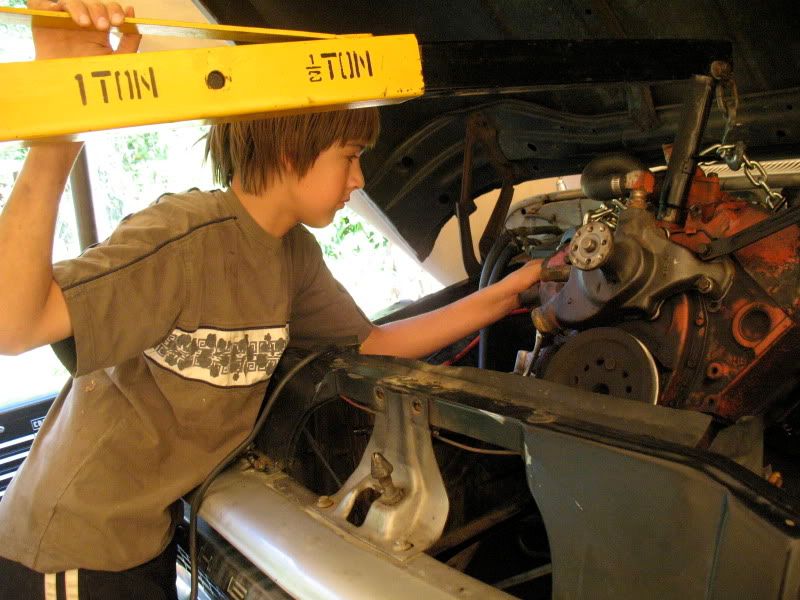
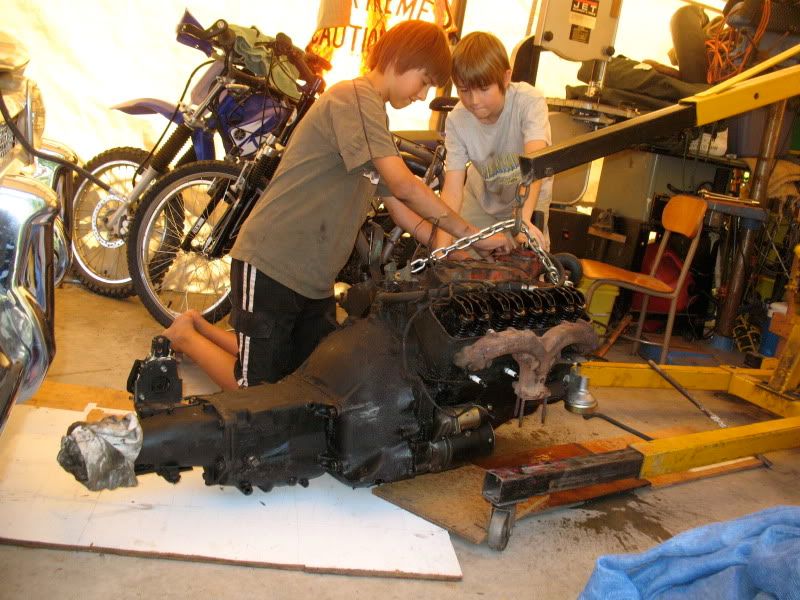
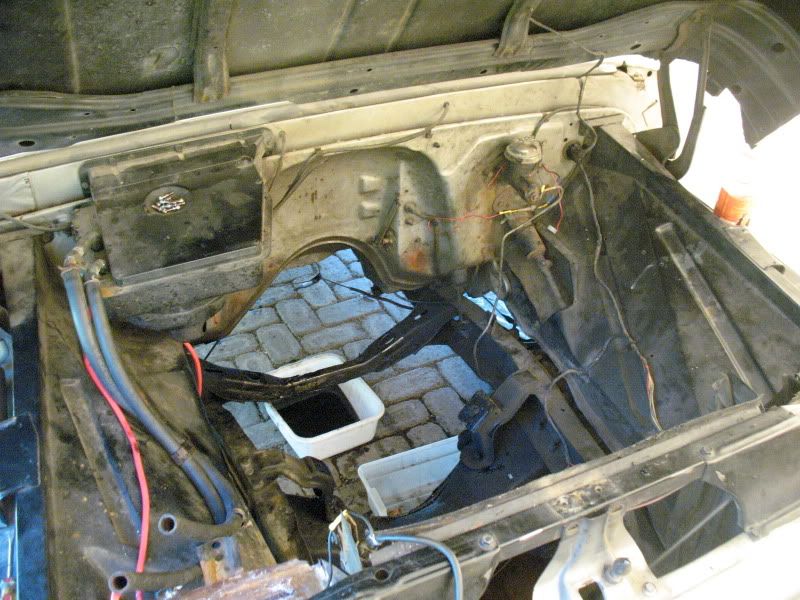
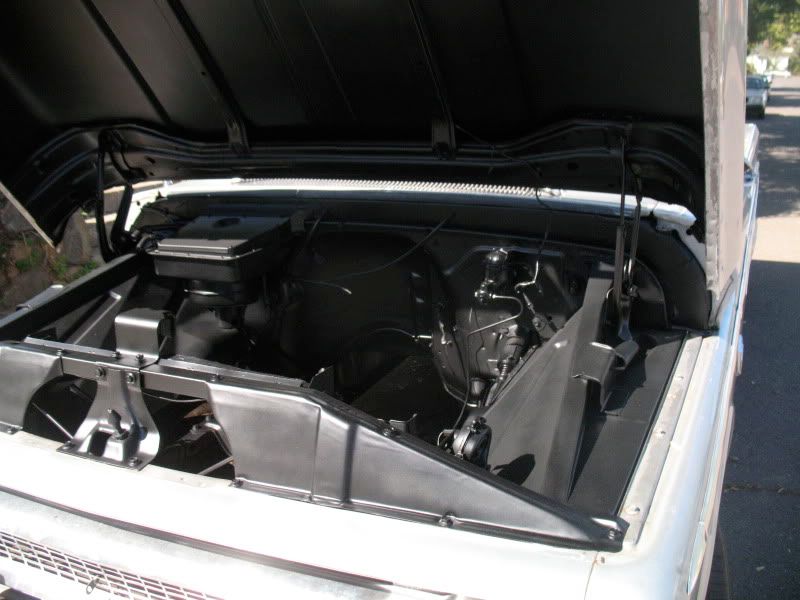
I've been wanting to rebuild the 327 and saginaw in my '66 since I bought it 3 months ago. Well, since I broke a piston skirt a few weeks back, while racing a GTX mopar, no time better than now. Yesterday, my boys and I spent 5 hours pulling the engine and tranny. There must be a 1/2" of sludge on the bottom, back and sides of the motor. I'll be adding a .262 comp cam, HEI distributor, edelbrock intake manifold (blasted aluminum powder coated), Speedway Truram exhaust manofolds (ceramic coated) and aluminum oilpan & timing cover. I already have aluminum corvette script valve covers. I've decided to go with a satin/semi gloss black engine rather than chevy orange to contrast with the aluminum parts. I'll also be painting the engine bay black, after I blast off the 1/2" of 43 year old sludge on the cross member. Here's a few pics of yesterdays engine pull...
Last edited by Sicboy; 09-13-2009 at 08:25 PM. |

|

|
|
09-13-2009, 07:28 PM
|
#2 |
|
Registerd User
Join Date: Sep 2008
Location: Oklahoma
Posts: 2,118
|
Re: Let the rebuild begin...
Good luck vato.
|
|
|
|
|
09-13-2009, 08:10 PM
|
#3 |
|
Senior Enthusiast
Join Date: Feb 2007
Location: Spokane Valley, WA
Posts: 8,356
|
Re: Let the rebuild begin...
Nothing like spending quality time with your sons. My oldest still reminds me (20+ years later) how much fun(?) he had when he was 14, degreasing and sand blasting the front suspension on my 46 Ford sedan! We spent a lot of time in the garage together, and he grew to be so trustworthy I had him button up the bottom of my engines without double checking his work. We remain close today partly because of all the car projects in his youth.
|
|
|
|
|
09-13-2009, 09:56 PM
|
#4 |
|
Registered User
Join Date: Feb 2008
Location: Sidney,b.c.
Posts: 4,425
|
Re: Let the rebuild begin...
the do go in and out easier if you remove the trans and the hood first
ron |
|
|
|
|
09-13-2009, 10:35 PM
|
#5 | |
|
Registered User
Join Date: May 2009
Location: Loganville, Ga.
Posts: 1,408
|
Re: Let the rebuild begin...
That's what I was thinking.........Anyway good luck with your build, should be a blast having your sons helping you !!!!!!!
Quote:
|
|
|
|
|
|
09-13-2009, 11:25 PM
|
#6 | |
|
Registered User
Join Date: Jun 2009
Location: Eugene, OR
Posts: 200
|
Re: Let the rebuild begin...
Quote:
|
|
|
|
|
|
09-13-2009, 11:52 PM
|
#7 |
|
Registered User
Join Date: Feb 2008
Location: Sidney,b.c.
Posts: 4,425
|
Re: Let the rebuild begin...
whatever
ron |
|
|
|
|
09-14-2009, 12:44 AM
|
#8 |
|
60-66 Nut
  Join Date: Mar 2007
Location: Coeur d'Alene, Idaho
Posts: 23,252
|
Re: Let the rebuild begin...
The engine compartment doesn't look that bad, but now is a good time to clean it up and paint it up nice. Are you staying with the 3 speed?
__________________
Power Steering Box Adapter Plates For Sale HERE Power Brake Booster Adapter Brackets For Sale '63-'66 HERE and '67-'72 HERE and '60-'62 HERE and "60-'62 with clutch HERE Rear Disc Brake Brackets For Sale. Impala SS calipers HERE Camaro Calipers HERE D52 Calipers HERE 6 Lug HERE Hydroboost Mounting Plates HERE |
|
|
|
|
09-14-2009, 01:12 PM
|
#9 |
|
283 Drama Queen
Join Date: Dec 2004
Location: Surf City, CA
Posts: 2,435
|
Re: Let the rebuild begin...
 Wow. If those shots aren't inspirational, what is? Wow. If those shots aren't inspirational, what is?
__________________
For about 12 years of my adult life I had a severe speech impediment. My ex-wife never let me get a word in edgewise. |
|
|
|
|
09-14-2009, 01:23 PM
|
#10 | |
|
Registered User
Join Date: Jun 2009
Location: Eugene, OR
Posts: 200
|
Re: Let the rebuild begin...
Quote:
|
|
|
|
|
|
09-18-2009, 10:50 PM
|
#11 |
|
Registered User
Join Date: Sep 2009
Location: Edmonton, Alberta Canada
Posts: 85
|
Re: Let the rebuild begin...
Sharp looking engine bay...
__________________
66 GMC 1500 Series LWB |
|
|
|
|
09-18-2009, 11:06 PM
|
#12 |
|
Rollin' Old Skool
Join Date: Jun 2007
Location: Hattiesburg, MS
Posts: 5,371
|
Re: Let the rebuild begin...
looking good...what kinda paint did you use?
|
|
|
|
|
09-18-2009, 11:19 PM
|
#13 | |
|
Registered User
Join Date: Jun 2009
Location: Eugene, OR
Posts: 200
|
Re: Let the rebuild begin...
Quote:
__________________
Project Build (1): http://67-72chevytrucks.com/vboard/s...d.php?t=362482 Project build (2): http://67-72chevytrucks.com/vboard/s...d.php?t=370985 Life should not be a journey to the grave with the intention of arriving safely in a pretty and well preserved body, but rather to skid in broadside in a cloud of smoke, thoroughly used up, totally worn out, and loudly proclaiming...Wow, What a Ride! - Hunter S. Thompson |
|
|
|
|
|
09-19-2009, 12:41 AM
|
#14 |
|
Registered User
Join Date: Dec 2007
Location: N Texas
Posts: 580
|
Re: Let the rebuild begin...
Now thats the way to raise young men!
The time you guys are spending together on this truck is priceless. BTW, the 327 is awesome...keep it going as long as you can.
__________________
292 + TKO500 |
|
|
|
|
09-19-2009, 12:09 PM
|
#15 |
|
Registered User
Join Date: Jun 2009
Location: Eugene, OR
Posts: 200
|
Re: Let the rebuild begin...
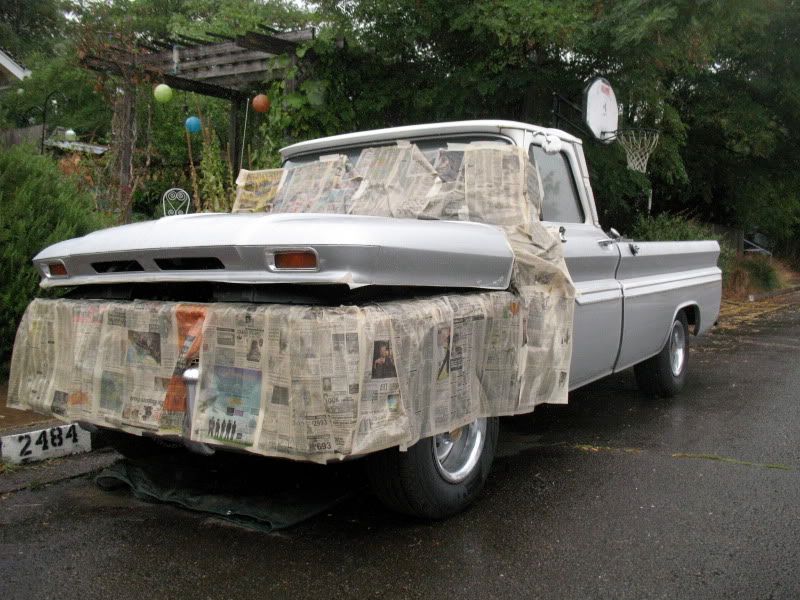
It was bright and sunny yesterday. Got a coat of primer on and two coats of satin black. Today, my plan was to spray the third and final coat...but mother nature has other plans. It's fuggin rainin...and the newspaper is soaked. F@CK!!!
__________________
Project Build (1): http://67-72chevytrucks.com/vboard/s...d.php?t=362482 Project build (2): http://67-72chevytrucks.com/vboard/s...d.php?t=370985 Life should not be a journey to the grave with the intention of arriving safely in a pretty and well preserved body, but rather to skid in broadside in a cloud of smoke, thoroughly used up, totally worn out, and loudly proclaiming...Wow, What a Ride! - Hunter S. Thompson Last edited by Sicboy; 09-19-2009 at 12:10 PM. |
|
|
|
|
09-19-2009, 02:14 PM
|
#16 |
|
Registered User
Join Date: Jun 2009
Location: Eugene, OR
Posts: 200
|
Re: Let the rebuild begin...
You know you're a redneck if...
__________________
Project Build (1): http://67-72chevytrucks.com/vboard/s...d.php?t=362482 Project build (2): http://67-72chevytrucks.com/vboard/s...d.php?t=370985 Life should not be a journey to the grave with the intention of arriving safely in a pretty and well preserved body, but rather to skid in broadside in a cloud of smoke, thoroughly used up, totally worn out, and loudly proclaiming...Wow, What a Ride! - Hunter S. Thompson Last edited by Sicboy; 09-20-2009 at 06:17 PM. |
|
|
|
|
09-19-2009, 02:43 PM
|
#17 |
|
Registered User
Join Date: Sep 2006
Location: Las Vegas, NV
Posts: 169
|
Re: Let the rebuild begin...
Mother nature was just gettin rid of the dust for you on your final coat!
Last edited by Eagar1; 09-19-2009 at 02:44 PM. Reason: spelling |
|
|
|
|
09-20-2009, 06:16 PM
|
#18 |
|
Registered User
Join Date: Jun 2009
Location: Eugene, OR
Posts: 200
|
Re: Let the rebuild begin...
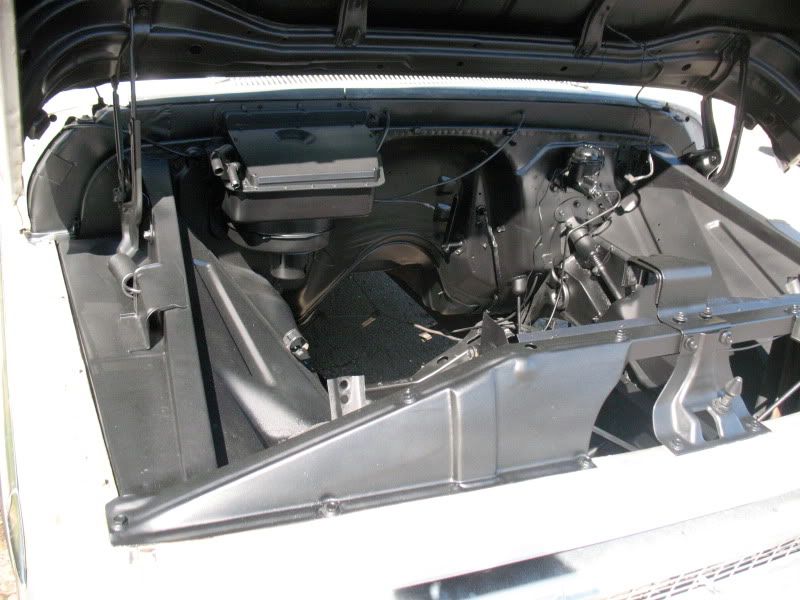
Finished painting the engine bay. Looks brand new again.
__________________
Project Build (1): http://67-72chevytrucks.com/vboard/s...d.php?t=362482 Project build (2): http://67-72chevytrucks.com/vboard/s...d.php?t=370985 Life should not be a journey to the grave with the intention of arriving safely in a pretty and well preserved body, but rather to skid in broadside in a cloud of smoke, thoroughly used up, totally worn out, and loudly proclaiming...Wow, What a Ride! - Hunter S. Thompson |
|
|
|
|
09-06-2011, 10:27 PM
|
#19 | |
|
But Found Her 25yrs Later!
Join Date: Oct 2010
Location: Oregon City, Oregon
Posts: 10,530
|
Re: Let the rebuild begin...
Quote:

__________________
I lost my 65 - Found it 25 years later: http://67-72chevytrucks.com/vboard/s...d.php?t=426650 66 C20 Service Truck: http://67-72chevytrucks.com/vboard/s...d.php?t=428035 |
|
|
|
|
|
09-07-2011, 12:20 AM
|
#20 |
|
Registered User
Join Date: Dec 2010
Location: Venice, Ca.
Posts: 314
|
Re: Let the rebuild begin...
Cool build, my brother in-law lives in Vida, Oregon across from the river. cool area
|
|
|
|
|
09-13-2011, 04:19 AM
|
#21 |
|
Registered User
Join Date: Oct 2010
Location: crestline ca
Posts: 15
|
Re: Let the rebuild begin...
that air cleaner is sick lol how did u make it?
|
|
|
|
|
11-16-2013, 06:54 PM
|
#22 |
|
Registered User
Join Date: Apr 2010
Location: Everett, WA
Posts: 504
|
Re: Let the rebuild begin...
Okay so I know i'm bridging up a fairly old thread but your intake I gotta ask what'd you do about the oil fill hole in the front? Drill it?
|
|
|
|
|
11-17-2013, 02:15 AM
|
#23 | |
|
60-66 Nut
Join Date: Mar 2007
Location: Coeur d'Alene, Idaho
Posts: 23,252
|
Re: Let the rebuild begin...
You could either take a regular intake to a machine shop and have it machined to accomodate the fill tube (the tube is a press fit, so it needs to be exact) or purchase this one already done.
http://www.summitracing.com/parts/edl-2703/overview/ Quote:
__________________
Power Steering Box Adapter Plates For Sale HERE Power Brake Booster Adapter Brackets For Sale '63-'66 HERE and '67-'72 HERE and '60-'62 HERE and "60-'62 with clutch HERE Rear Disc Brake Brackets For Sale. Impala SS calipers HERE Camaro Calipers HERE D52 Calipers HERE 6 Lug HERE Hydroboost Mounting Plates HERE |
|
|
|
|
|
11-16-2013, 07:42 PM
|
#24 |
|
Registered User
Join Date: Jul 2013
Location: grande prairie alberta
Posts: 324
|
Re: Let the rebuild begin...
Man the engine bay is looking great. Can't believe ya pulled the motor over that nice interlock. Lol love the shot on the street with the wet newspaper. Those boys are smart also get your hands dirty. Then they for sure have to drive it.
|
|
|
|
|
11-17-2013, 11:20 AM
|
#25 |
|
Registered User
Join Date: Sep 2008
Location: Newport, North Carolina
Posts: 643
|
Re: Let the rebuild begin...
I have the same heads that you're running...the double humps with no accessory holes for the alternator bracket. I'm interested in what type of alternator bracket you use. It's been holding me up for a while now...trying to move past this hang up.
|
|
|
|
|
| Bookmarks |
|
|


 Hybrid Mode
