 |
|
|
|
|
#1 |
|
Registered User
Join Date: Jan 2010
Location: Forsyth, Ga
Posts: 1,012
|
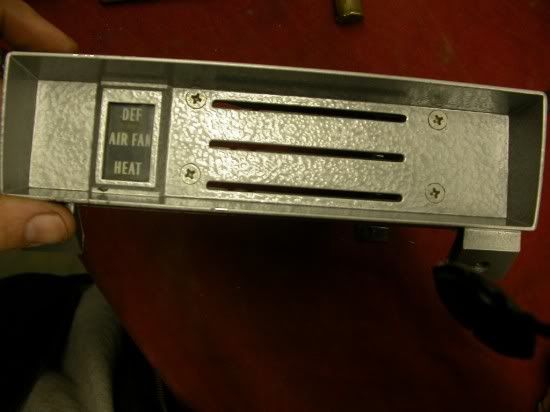
Heater controls..
I was taking out my heater assembly today and noticed that when disconnecting the cables that the levers were floppy.
Once I got everything disconnected I removed the controls and noticed that it appears there are broken rivets that hold the levers to the front panel. Is there a way to fix these? I dont plan on putting the heater back in but would like the factory appearance of the dash. |
|
|

|
|
|
#2 |
|
Registered User
 Join Date: May 2012
Location: Anton, Texas
Posts: 2,364
|
Re: Heater controls..
you can replace the whole unit. i drilled mine and put small nuts and bolts to hold it all together...
|
|
|

|
|
|
#3 |
|
Registered User
Join Date: Jan 2010
Location: Forsyth, Ga
Posts: 1,012
|
Re: Heater controls..
wouldnt you have to drill through the face to do that?
|
|
|

|
|
|
#4 |
|
Registered User
 Join Date: May 2012
Location: Anton, Texas
Posts: 2,364
|
Re: Heater controls..
yes you would have to drill the face plate. that is the only draw back, but i did not think it hurt to do mine that way, i did mine when i first got it, and it was still a $300.00 truck. and did not know i could ever find a good one. and i needed the heater control fixed...
|
|
|

|
|
|
#5 |
|
Registered User
Join Date: Jan 2012
Location: Iredell, Texas
Posts: 582
|
Re: Heater controls..
I have one that I drilled and put in bolts. I think it would be possible to drill and tap the holes, then cut the bolts so that they are flush when screwed in from the back. LMC sells a stick on face that would cover the holes on the front side. I wish I had done that on mine.
-Richard Posted via Mobile Device
__________________
I may have too many Chevys... Is that possible?  68 c50 pickup build: http://67-72chevytrucks.com/vboard/s...d.php?t=704713 |
|
|

|
|
|
#6 |
|
I am a Referee of life.
Join Date: Jun 2000
Location: Greensboro N.C.
Posts: 13,992
|
Re: Heater controls..
The vendors carry a kit to rebuild the levers.It's not a bad job to do and should make it look factory .
__________________
The 47-present Chevrolet and GMC Truck Message Board Network,it's owners,moderators,members,and associates of any type should not be held responsible for my opinion. You can't fix stupid,not even with duct tape. "My appearance is due to the fact that "GOD" does punish you for having too much fun!" Barrett-Jackson has perfected alchemy,they make rust into gold! "You can lead a horse to water but you can't saddle a duck" "Cleverly disguised as a 'Responsible Adult' "Sometimes your Knight in shining armor is just a retard in tinfoil" |
|
|

|
|
|
#7 |
|
Watch out for your cornhole !
 Join Date: Jun 2003
Location: Azle, Texas
Posts: 14,162
|
Re: Heater controls..
Drill and countersink the screw holes. Then after getting it all cinched up, apply the new faceplate over the whole deal.
 Problem solved, and the end result is a controller that won't ever fail again. http://www.classicparts.com/1969-72-.../#.UYBdk8u9KSM Posted via Mobile Device Posted via Mobile Device |
|
|

|
|
|
#8 | |
|
Registered User
 Join Date: May 2012
Location: Anton, Texas
Posts: 2,364
|
Re: Heater controls..
Quote:
|
|
|
|

|
|
|
#9 |
|
Watch out for your cornhole !
 Join Date: Jun 2003
Location: Azle, Texas
Posts: 14,162
|
Re: Heater controls..
Repairing the original with the screws and rebuild kit gets you a much better part than buying a Chinese repro controller will.
Posted via Mobile Device |
|
|

|
|
|
#10 |
|
Registered User
 Join Date: May 2012
Location: Anton, Texas
Posts: 2,364
|
Re: Heater controls..
|
|
|

|
|
|
#11 |
|
1969 Custom 30 wrecker
Join Date: Sep 2001
Location: Pottsville, Pa
Posts: 2,611
|
Re: Heater controls..
Sometimes you can repair them by just placing on a work bench and hammering (peening) over the back of the rivets if enough is left. Also, a small drop of JB weld over the rivets when done will keep it all intact.
I've done a few this way and it seems to hold up. I like the countersink screw idea above too! 
__________________
Bob 63 Impala 283/PG/3.36 (under restoration) 66 Impala 327/PG/3.36 66 Chevelle SS 409/M22/3.55 69 Chevelle 307/PG/3.08 (future restoration) 69 C10 short stepside 454/TH350/3.73 69 Custom 30 tow truck 350/4 spd/4.10 (resto done, CRUISIN TIME!) 71 Cheyenne 20 fleetside 350/4 spd/4.10 71 Chevelle 6/PG/3.08 72 Chevelle 454/M21/4.10 |
|
|

|
 |
| Bookmarks |
|
|