
 |
|
|
|
|
#1 |
|
Registered User
Join Date: Jan 2013
Location: Milford, MI
Posts: 159
|
Control arm help
|
|
|

|
|
|
#2 |
|
Registered User
 Join Date: Jul 2013
Location: Yorba Linda California
Posts: 58
|
Re: Control arm help
I used 2 pipe wrenches 1 on the shaft and 1 on the nut as i look again i am talking about lower control arm my upper was a little different
|
|
|

|
|
|
#3 |
|
Account Suspended
 Join Date: Oct 2012
Location: here
Posts: 2,408
|
Re: Control arm help
I loosened the big bushing/nuts while still installed to the frame with either of socket, adjustable wrench or pipe wrench...then unbolted the stuff from the frame...its easier as you have the truck to leverage against.
|
|
|

|
|
|
#4 |
|
Registered User
Join Date: Jan 2013
Location: Milford, MI
Posts: 159
|
Re: Control arm help
Thanks guys, pipe wrenches worked like a charm!
Posted via Mobile Device |
|
|

|
|
|
#6 |
|
Account Suspended
 Join Date: Oct 2012
Location: here
Posts: 2,408
|
Re: Control arm help
Well, like I always said, I work in a "Bring what ya got" shop. Looks like ya do to. Good job there!
|
|
|

|
|
|
#7 |
|
Registered User
Join Date: Jan 2013
Location: Milford, MI
Posts: 159
|
Re: Control arm help
|
|
|

|
|
|
#8 |
|
Account Suspended
 Join Date: Oct 2012
Location: here
Posts: 2,408
|
Re: Control arm help
In your pic above, the assembly strongly appears incorrect, perhaps dangerously so.
You have no inner seal on the right side thus exposing the threads. It actually appears to be incorrectly installed between the bushing nut and the control arm ear.... If its centered but missing a seal on the right or right seal is incorrectly installed, I'd take it back apart and put the seal in correctly. Good luck. |
|
|

|
|
|
#9 |
|
Account Suspended
 Join Date: Oct 2012
Location: here
Posts: 2,408
|
Re: Control arm help
Here is a pic installed, both left and right seals go inside the A arms, bushings install from the outside...
 From the underside 
|
|
|

|
|
|
#10 |
|
Account Suspended
 Join Date: Oct 2012
Location: here
Posts: 2,408
|
Re: Control arm help
Be sure to center the control arm shafts when you are screwing the bushings into place....start by hand, find center, turn bushings in a bit each side till they come up flush in the ears and the cross shaft is well centered...bolt em on and check for movement....movement may be stiff, but it will be smooth and without bind....lube em good before you get weight on...first couple trys at lubing may be quite difficult with new close tolerance parts.
|
|
|

|
|
|
#11 |
|
Moderator
 Join Date: Dec 2012
Location: ON, Canada
Posts: 2,176
|
Re: Control arm help
Also, your ball joint bolts are in upside down. They should install from the bottom, nuts on top, like in Sharps40's pic.
|
|
|

|
|
|
#12 |
|
Registered User
Join Date: Jan 2013
Location: Milford, MI
Posts: 159
|
Re: Control arm help
|
|
|

|
|
|
#13 |
|
Account Suspended
 Join Date: Oct 2012
Location: here
Posts: 2,408
|
Re: Control arm help
I've never seen seals like that on 64 to 66 C10 suspensions. Never seen one that left thread exposed to dirt/water intrusion.
I don't recognize it at all/now beyond my ability to comment. Perhaps it is a later model or earlier model suspension component than 64-66? |
|
|

|
|
|
#14 |
|
Account Suspended
 Join Date: Oct 2012
Location: here
Posts: 2,408
|
Re: Control arm help
I want to know what year truck and suspension we are working on here cause the replacement ball joint also looks radically different that the one it replaced. It sure don't look like NO 64 to 66 upper ball Joint I've ever seen.
OP, can you tell us what year/model is your truck? Also, what make and part numbers are you using...I'm beginning to wonder what parts you are using there.... From your very first picture, the old shaft seals and old upper ball joint appear to be 64 to 66 oem size and shapes. Your replacement seals and replacement upper ball joint look like nothing I've ever seen for a 64 to 66. |
|
|

|
|
|
#15 |
|
Registered User
Join Date: Jan 2013
Location: Columbia, SC
Posts: 1,927
|
Re: Control arm help
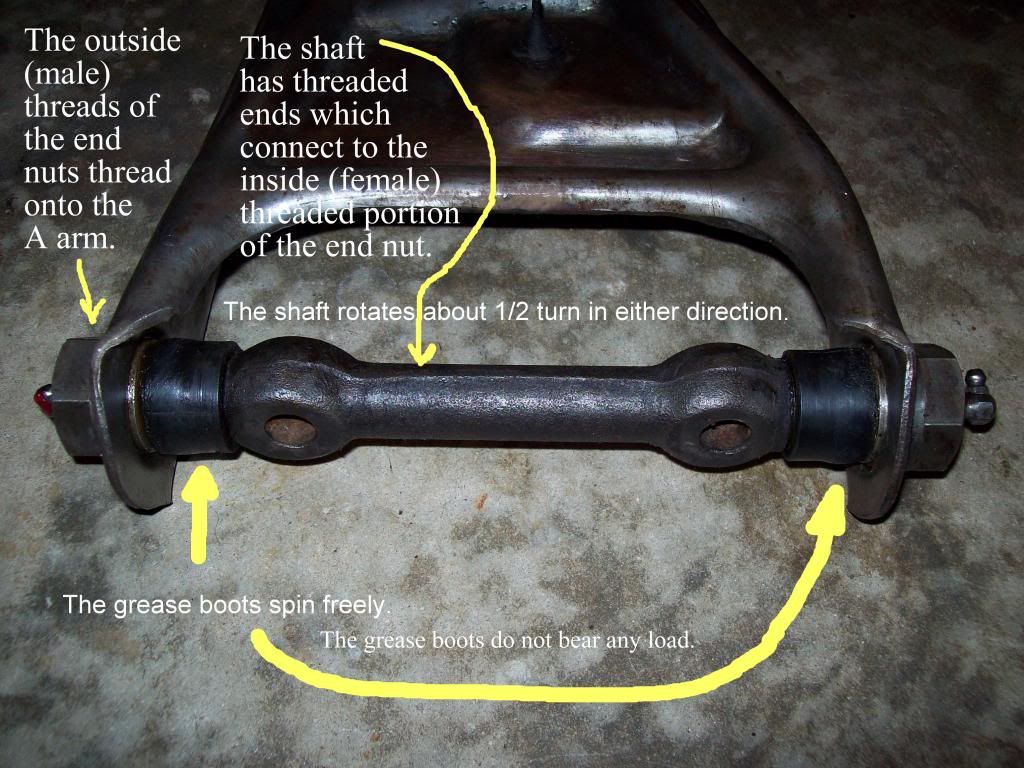
I'll jump in here. If you don't have 64-66 stock control arms, then these pics may not be helpful. These pics are of my 65 C10 control arms. Threads should NOT be exposed. I don't believe there is such a thing as "Too many pics". It's not in my vocabulary.
   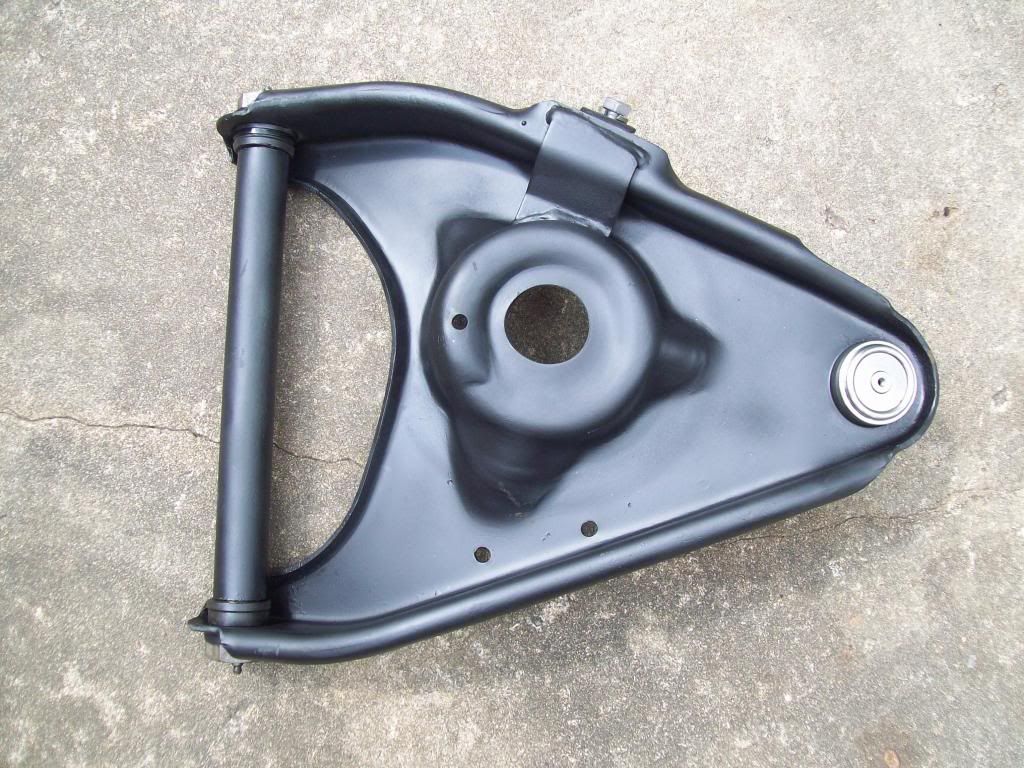 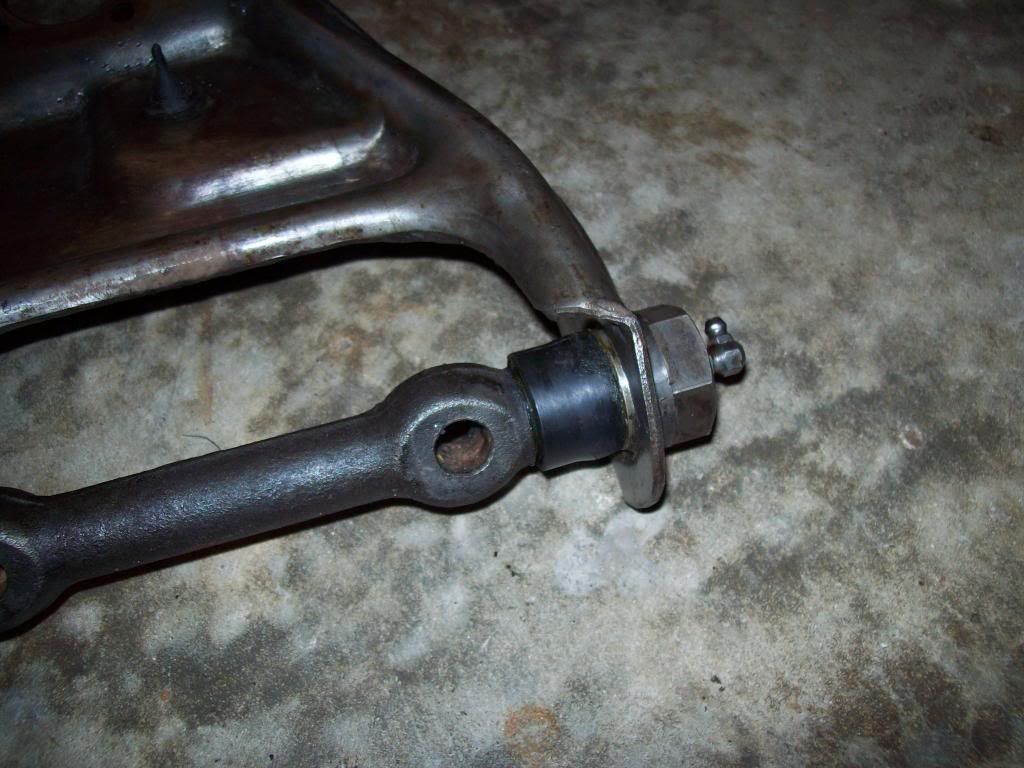  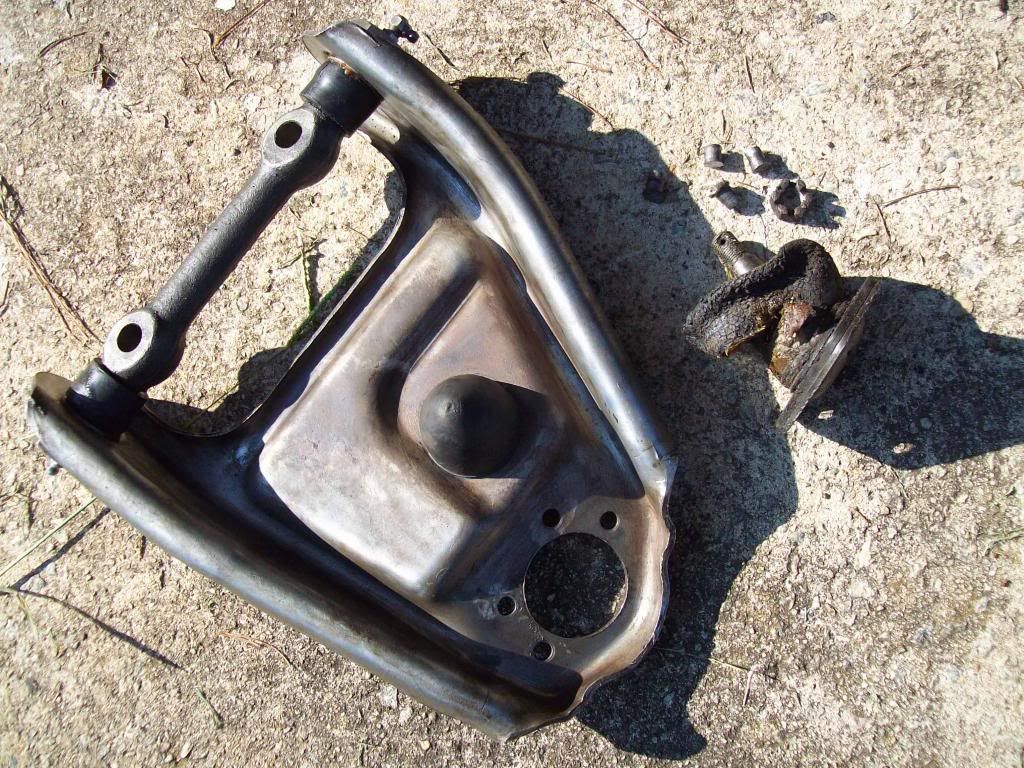   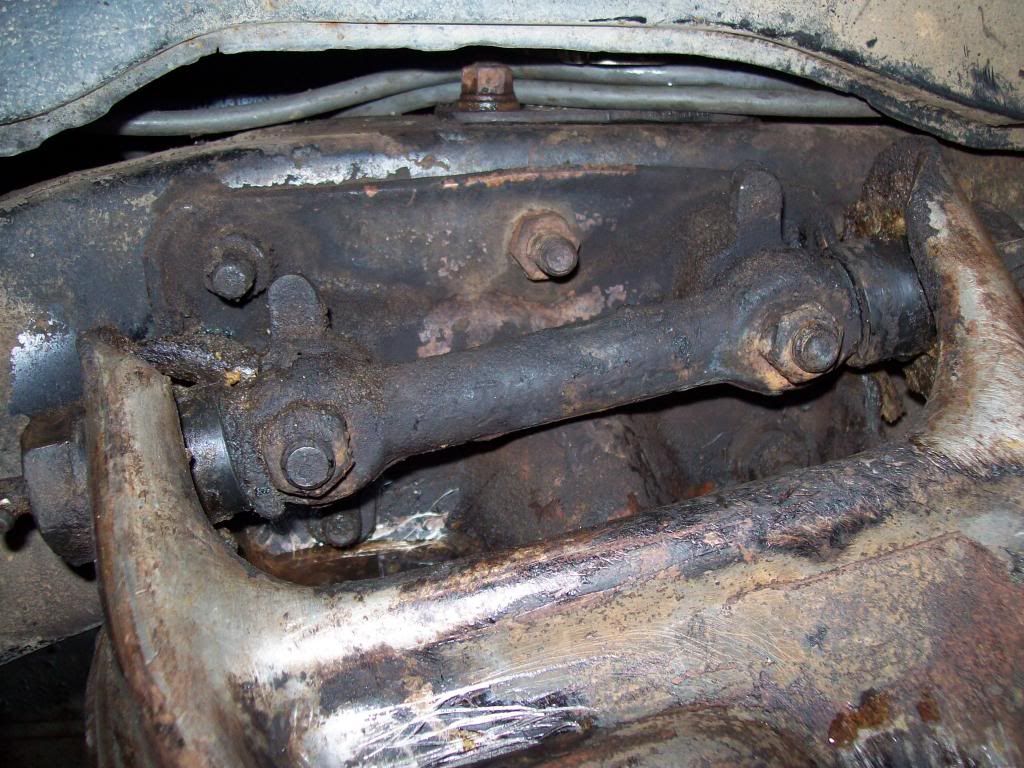 
__________________
My 65 C10 build: www.lugnutz65chevystepside.weebly.com Want to know more about T5 transmissions? My website has a T5 Info Page and a Step by Step T5 rebuild. |
|
|

|
|
|
#16 |
|
Account Suspended
 Join Date: Oct 2012
Location: here
Posts: 2,408
|
Re: Control arm help
Yes, that's the proper set up - upper and lower - for 64/65/66.
|
|
|

|
|
|
#17 |
|
Account Suspended
 Join Date: Oct 2012
Location: here
Posts: 2,408
|
Re: Control arm help
Got it,...that ball joint in post 7 appears to be
1960-62 Chevrolet GMC 1, 1-1/2 ton Truck Upper Ball Joint NOS Moog K6014 3769360 Heres what it looks like on eflay http://www.ebay.com/itm/1960-62-Chev...#ht_957wt_1255 http://www.ebay.com/itm/1960-1961-19...2#ht_39wt_1018 Don't know if the 1 ton GMC/Chevy joints have the same taper/etc for use on the 1/2 ton trucks. I looked up the similar Rare Parts Brand on Orellies and it shows it only compatible with Chevy C30 trucks, so I assume there may be some differences. |
|
|

|
|
|
#18 |
|
Registered User
Join Date: Jan 2013
Location: Milford, MI
Posts: 159
|
Re: Control arm help
Thanks for the research. I bought it from rock auto, it shows it as comparable. I will measure the taper and compare.
Posted via Mobile Device |
|
|

|
|
|
#19 |
|
Account Suspended
 Join Date: Oct 2012
Location: here
Posts: 2,408
|
Re: Control arm help
Matt good luck.
Post up the year make and model of your truck and the suspension you're working on. Most of the folks here can give you exact fit part numbers you can use to get the right parts instead of a comparable that may/may not work or at the least cause you concern/issues down the road. Good luck |
|
|

|
|
|
#20 |
|
Registered User
Join Date: Jan 2013
Location: Milford, MI
Posts: 159
|
Re: Control arm help
|
|
|

|
|
|
#21 |
|
Account Suspended
 Join Date: Oct 2012
Location: here
Posts: 2,408
|
Re: Control arm help
Okay. I see that lists as a universal part from 55 to about 83. Explains some of the different look from direct fit part numbers others have used/differences from the oem parts you pulled off.
|
|
|

|
|
|
#22 |
|
Registered User
Join Date: Jan 2013
Location: Milford, MI
Posts: 159
|
Re: Control arm help
Where is the best place to get the u bolts that hold the lower control arm. My local parts store wanted $20 for two?
Posted via Mobile Device |
|
|

|
|
|
#23 |
|
Account Suspended
 Join Date: Oct 2012
Location: here
Posts: 2,408
|
Re: Control arm help
Oreilly Auto Parts. $9 a pair for the 9/16" upgrade size, dorman part number 13503.
If you want to run the factory 7/16 size just take an old one to napa and order 4 of the same size. But, the 7/16 size are prone to breakage and that's why GM upgraded to 9/16. You simply drill out the holes for the larger ubolt, prolly dimple a spot or two on the cross member to make room for the much larger nuts and install the much beefier ubolts and nuts. I'd post pics but imgur is down right now and all my pics are just big fat x's. |
|
|

|
|
|
#24 |
|
Account Suspended
 Join Date: Oct 2012
Location: here
Posts: 2,408
|
Re: Control arm help
Short version....starts at post 354 of the Official John Lee Jr Thread for the complete story.....
Next to removing the single pot master and splitting front brakes from rear then adding a dual pot master, I think one of the best and likely cheapest ($30 or under) safety upgrades you can make on these old trucks is to replace the 7/16" lower control arm u-bolts with the more modern and less prone to breakage 9/16" u-bolts. If everything goes well, its about a 3 hour or less job and you won't loose the lower half of the suspension when one of them old and just a whisker larger than muffler clamp u-bolts lets go. Typically, on these old trucks the stock 7/16" bolts break when turning, especially backing up. Over the years GM upgraded to 1/2" u-bolts, which also break. Then finally to 9/16". Haven't heard of these breaking. They are a close fit, very close but follow along and we'll get em in and just enough room for a socket on the big prevailing torque nuts at the front inners with a bit of dimpling of the cross member. If your rebuilding the front end, pefect time to do this mod when the lowers are off. If you just want piece of mind and safety, jack stands and jacks and don't get under the control arm any longer than you have to, always do one at a time so you at least have some extra margin of safety. i.e. I only removed one shackle at a time...installed the new one, torqued it and then removed the second shackle....!!! On Ol John Lee, the 64 C10 I used the LMC u-bolts. At $15 each and w/o prevailing torque nuts, they were highly expensive but worked just fine. If there is an advange to the LMC u-bolts, its that they have taller nuts allowing standard sockets to be used. I almost had to go to a deep well socket to get these Dormans in place. By the way, these are available from Oreillys and Auto Zone for $8.99 a pair. Considering there was no shipping, about 1/3 the cost of four bolts from LMC. And, I like the prevailing torque nuts better, no lock washers required.  The old and the new side by side. A huge difference in brute strength. I'll be more comfortable with my lowers riding in these new beefy u-bolts. Got a lotta miles to cover starting in Sept, its hunting season all over again!  These dorman u-bolts are a bit finer finished than the LMCs. The LMCs are not coated with a gold rust proofing. In addition, the LMCs were too "open", I had to install nuts and smack em with a large SmasherWacker to close em up to go into the holes. These Dormans are just fine, drill the holes to 9/16 and tap them right on into place. Here I'm drawing up the prevailing torque nuts evenly, alternating back and forth until its time to put on the torque wrench and finish them up at about 80 foot pounds. (My spec, the 7/16 factory nuts backed off easy with 8" long 3/8 drive wrench!  Just to be sure, I compared the old and the new for thread depth....there is sufficient extra thread on the Dorman replacments that I will not need spacers or washers under the prevailing torque nuts...just run em on and torque em down. 
|
|
|

|
|
|
#25 |
|
Registered User
Join Date: Jan 2013
Location: Milford, MI
Posts: 159
|
Re: Control arm help
Thanks for the tip, I am definitely ordering the up 9/16th parts.
Next time I am in NC the beers are on me Sharps. Posted via Mobile Device |
|
|

|
 |
| Bookmarks |
|
|