
|
|
|
 12-29-2013, 07:32 PM
|
#1 |
|
Registered User
Join Date: Nov 2013
Location: ATLANTA
Posts: 223
|
Fuel Sender testing
Hello, i am trying to test my fuel sender before I do anything drastic. If the sender is working as expected and there is just a wiring issue I should be able to (using a ohm meter) attach a lead to the sending wire (tan wire), and one to a ground and read the resistance to get an idea of the fuel level correct (Based on this thread)?
Here's what I have done so far. First thing was to read several threads on here. I'm following their advice and would like confirmation of my next steps.
Here's where things fall apart. After cleaning up the ground and re-verifying it to the black side of the battery. I checked the resistance to ground of the tan wire near the fuel take it read around 200. I had my wife bounce the rear end of the truck and the reading went haywire and settled back around 200. I then checked the tan wire inside the engine compartment, and it read 56. I still haven't read it once inside the cab or at the gauge. I dread taking the cluster out again. The gauge went from the 3:00 position to about the 2:30 position and is currently holding steady there. . . . here is an image:  Any direction here would be great. |

|

|
|
12-29-2013, 09:21 PM
|
#2 |
|
Registered User
Join Date: Sep 2010
Location: Lake Tahoe, Nevada
Posts: 755
|
Re: Fuel Sender testing
200 ohms at the sending unit is obviously a problem. If you were to guess, how much fuel is in the tank?
Basically, you have three components to the whole circuit. There is the gauge, the sending unit itself, and all the wiring in between. You have done a preliminary test on the gauge by grounding the sending unit and recieved the expected results (empty reading the gauge). Personally, what I would do is run to Radio Shack and pick up a few resistors, about 10 cents each, in various configurations between 0 and 90 ohms (the expected resistance of the sending unit). I would then remove all electrical connections from the sending unit and replace it with resistors. This will tell you if your gauge is indeed working correctly, and also your wiring. If you hook up a 30 ohm resistor and expect to see 1/3 full, but instead you see 3/4 full, you have a problem. What worries me is that you're getting radically different readings whether you test at the sending unit or the engine bay. You should be getting identical, but any problem would make the engine-bay reading HIGHER, not lower. Something is goofy with either your wiring, or your test methods.
__________________
I know a little about cars, but if you have a question about electricity or sport quads, I'm your man!!! |
|
|
|
|
12-29-2013, 09:28 PM
|
#3 |
|
Registered User
Join Date: Nov 2013
Location: ATLANTA
Posts: 223
|
Re: Fuel Sender testing
Good call. What do you mean by "I would then remove all electrical connections from the sending unit and replace it with resistors. "
I'm going to test this start to finish again in the morning. I'll document it and report back. I've been concerned that my sending unit isn't grounded properly. What is the proper sending unit for a stock tank on a 1975 chevy k5 Blazer? Last edited by mpierce9; 12-29-2013 at 09:38 PM. |
|
|
|
|
12-29-2013, 09:50 PM
|
#4 | ||
|
Registered User
Join Date: Nov 2009
Location: Sherman, ME
Posts: 2,404
|
Re: Fuel Sender testing
Ditto what wilkin250r said.
Quote:
Quote:
Also note that you need to have the tan wire disconnected from the sending unit when you take the resistance measurement. Otherwise you'll be measuring the combined resistance of the sending unit and coil inside the gauge. |
||
|
|
|
|
12-29-2013, 09:57 PM
|
#5 |
|
Registered User
Join Date: Nov 2013
Location: ATLANTA
Posts: 223
|
Re: Fuel Sender testing
Ok, I can do that. I'll pick up those resistors in the morning. Regarding the sender, I was wondering about the model and all that. Are these pretty general purpose if you get the correct OHM value? I tried searching on summit racing and jegs with lots of different results.
I can't reach the top of the gas tank and would like to cover some serious due diligence before I start dropping fuel tanks. |
|
|
|
|
12-29-2013, 10:10 PM
|
#6 | |
|
Registered User
Join Date: Nov 2009
Location: Sherman, ME
Posts: 2,404
|
Re: Fuel Sender testing
Quote:
|
|
|
|
|
|
12-31-2013, 03:53 PM
|
#7 |
|
Registered User
Join Date: Nov 2013
Location: ATLANTA
Posts: 223
|
Re: Fuel Sender testing
ok, so i'll admit this, it took me a little while to realize what you wanted me to do with the resistors. But I think I got it. I still have an issue though, and I think this narrowed it down.
First off. . . I'm not removing the wire directly from the fuel sender, I can't reach it. However just under the frame the fuel send wire has a disconnect as seen below. That is where i'm doing my tests. This disconnect is about 48 inches of wire away from the actual connection to the sending unit. Sending wire connected. 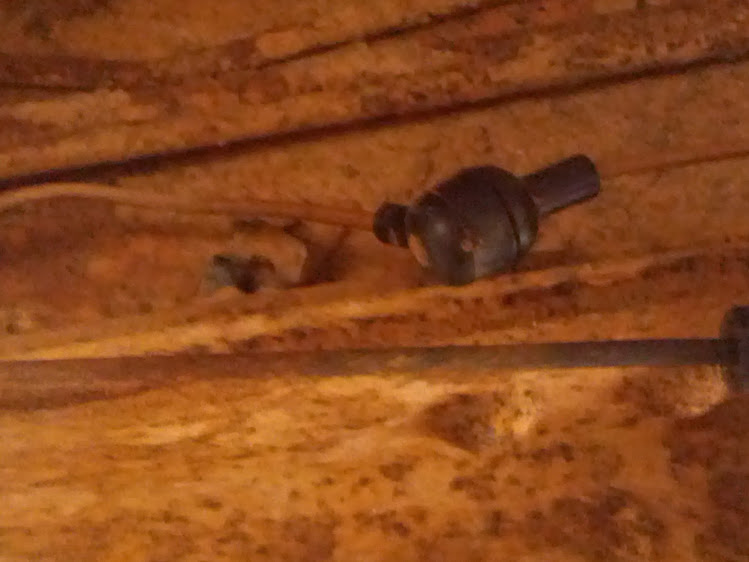 Sending wire disconnected  In order to complete the test above I purchsed two sets of resistors. 68 OHM and 10 OHM.  I then plugged a wire directly into the female portion of the sending wire above, this is the portion of the wire that continues on to the fuel gauge. In order to increase the resistance I would simply add another resistor to the connection in a daisy chain. I then made several iterations which are shown below. Gauge wire connected directly to ground.  Gauge wire connected to 10 OHM resistor which is then connected to ground.  Gauge wire connected to 20 OHM resistor which is then connected to ground.  Gauge wire connected to 30 OHM resistor which is then connected to ground.  Gauge wire connected to 40 OHM resistor which is then connected to ground.  Gauge wire connected to 50 OHM resistor which is then connected to ground.  Gauge wire connected to 118 OHM resistor which is then connected to ground.  Gauge wire connected to 68 OHM resistor which is then connected to ground. In order to manipulate the resistance with the resistors I have I daisy chained the resistors together to add them up and here is a picture of that... The seat belt latch cover and big lots fix-a-tire box are just insulators to keep the wires away from the metal of the truck.  So phase two of investigation. . . I was able to reach my hand in and disconnect the fuel sending wire from the main fuel tank sending unit. (I'm writing this as i go). I ran a ground wire directly from the battery and checked the resistance between that and the nipple where the sending wire connects and got a solid reading of 108. I know we have nearly a full tank. Picture of the nipple the tan wire attaches to on the fuel tank sending unit. It's the much more shiny pin standing straight up in the center of the image.  I believe the sending unit is not of the same OHM range as the gauge. . . |
|
|
|
|
12-31-2013, 06:20 PM
|
#8 |
|
Registered User
Join Date: Sep 2010
Location: Lake Tahoe, Nevada
Posts: 755
|
Re: Fuel Sender testing
You hooked up the resistors correctly, your test setup looks good, as do your results. Your gauge looks to be reading all the resistances correctly. This tells me that your gauge is working, and the wiring up to that point is also in good working order.
Your reading of 108 at the sending unit is troublesome. If you read a open circuit, that would be easy to diagnose as a bad sending unit. The problem is, 108 isn't so far from the expected 90 ohm to call it a "bad" sending unit. It's kind of a gray area, in the realm of "weird" or "odd", but not in the realm "bad". The sending unit itself can be tricky. It's just a wiper that runs along a coil of thin wire, and it's entirely possible that thin wire is broken in a funny spot. It might be broken between full and 3/4 tank. It would be very difficult to spot. And sending units vary significantly, there is no way you could have a mis-match and get "kinda close". Older GM stuff is 0-30 ohm, you obviously don't have one of those. Older Ford stuff goes the other way, (higher at empty) 75-10. The closest thing that would match your readings would be newer Ford units, at 16-158, but there's no way it would FIT, so you can't possibly have the "wrong" sending unit in there. That can't be the problem. The resistor test verified that your gauge is working correctly. I would do several more tests on the sending unit at various fuel levels.
__________________
I know a little about cars, but if you have a question about electricity or sport quads, I'm your man!!! |
|
|
|
|
12-31-2013, 06:38 PM
|
#9 |
|
Registered User
Join Date: Nov 2013
Location: ATLANTA
Posts: 223
|
Re: Fuel Sender testing
Thank you. I did notice that as the fuel level drops the gauge reading drops as well. It just starts at such a high spot I have to interpret the true reading. My dad mentioned that I might let the tank get low and put in some fuel cleaning solution to remove water and possible other contaminants hoping to make the slight adjustment that's need to get an accurate reading. I'll try that as the fuel level drops, the danger is that I do know what the reading is at full, i just don't know it at empty. I'm sure that'll be an interesting evening.
Thank you for the feedback on this. The resistor test was great advice. I will let the fuel level drop, shake it around, add some of that stuff that removes water and cleans gasoline up and report back. Wish me luck. |
|
|
|
|
12-31-2013, 07:56 PM
|
#10 |
|
Registered User
Join Date: Jul 2011
Location: WV
Posts: 946
|
Re: Fuel Sender testing
One last thing to check is the tank ground. If the ground is sketchy, you may get odd readings like this too.
__________________
72 GMC C2500 402/Th400 first truck (still have) 77 GMC C3500 CC dually Sold  70 C50 dump truck "Rusty" 87 K10 Suburban Sold 93 K2500 xcab 6.5TD 96 GMC K2500 Suburban 6.5 TD |
|
|
|
|
12-31-2013, 08:13 PM
|
#11 |
|
Registered User
Join Date: Nov 2013
Location: ATLANTA
Posts: 223
|
Re: Fuel Sender testing
I've grounded the tank directly to the black side of the battery for these tests. . . I will say too that I did pull off the ground wire and grind down the metal to the frame where it connected as well as the bolt and wire adapter. I feel very grounded about my ground. Everything is shiny and tests great when i check it against the black side of the battery.
|
|
|
|
|
12-31-2013, 09:15 PM
|
#12 |
|
Registered User
Join Date: Sep 2010
Location: Lake Tahoe, Nevada
Posts: 755
|
Re: Fuel Sender testing
I feel your pain on the empty tank. My sending unit was completely bad on both tanks, so I got NO feedback. I ran out of gas twice before I dropped my main tank and replaced the sending unit. Some time I'll do it to the other side, too.
And if the sending unit is suspect, you're going to want to run as much gas as possible out of it anyways before you attempt to drop the tank, may as well take some readings along the way.
__________________
I know a little about cars, but if you have a question about electricity or sport quads, I'm your man!!! |
|
|
|
|
12-31-2013, 09:24 PM
|
#13 |
|
Registered User
Join Date: Aug 2009
Location: S.C.
Posts: 1,593
|
Re: Fuel Sender testing
Did I miss something here? (if I did, I'm sorry.)
If the gauge works, but reads wrong, bend the float arm until it's correct. Maybe it's just the Yankee/redneck thing coming out. 
__________________
'86 C-30 dually, 454/tbh400 '73 K-20 350/350/205 (sold  ) )I'm kinda like duct tape- no real purpose, but handy to have around. |
|
|
|
|
01-01-2014, 04:53 PM
|
#14 | |
|
Registered User
Join Date: Sep 2010
Location: Lake Tahoe, Nevada
Posts: 755
|
Re: Fuel Sender testing
Quote:
__________________
I know a little about cars, but if you have a question about electricity or sport quads, I'm your man!!! |
|
|
|
|
|
01-02-2014, 06:19 AM
|
#15 |
|
Registered User
Join Date: Aug 2009
Location: S.C.
Posts: 1,593
|
Re: Fuel Sender testing
Me too.
I read and saw all the testing, and thought why? Last time I ran into a non-functional sender, I had to r+r the tank anyway. I was able to clean up the old sender, get it functional, replace the sock, and re-install it. The old sender actually fit the new tank better and I didn't want to make the 15 mi treck back to the auto parts store just to have them tell me, they'd have to order it.
__________________
'86 C-30 dually, 454/tbh400 '73 K-20 350/350/205 (sold )I'm kinda like duct tape- no real purpose, but handy to have around. |
|
|
|
|
01-02-2014, 10:59 AM
|
#16 |
|
78K & 79C Jimmys
Join Date: Nov 2009
Location: Ottawa Ont CANADA
Posts: 7,901
|
Re: Fuel Sender testing
not sure if this applies for your year but
I replaced my 79 sender/tank,not sure if this one will work for you do you have any other items wired into the dash. My 78 gauge bounced till i changed the cluster from idiot to Tach/gauges the new cluster needed a "extra" ground installed just for the gas gauge from what i've read and seen (the wired dash goes down to one black ground behind the cluster) and may cause power feed issues. and make sure it's all plugged in solid
__________________
John 1978 GMCJimmy4X4-350/203 1979 GMCJimmy4X2-305/350 |
|
|
|
|
01-02-2014, 10:51 AM
|
#17 |
|
Registered User
Join Date: Nov 2011
Location: So. Calif
Posts: 305
|
Re: Fuel Sender testing
My tank reads the same and does not move much at all unless i fill it up and it then moves closer to the 3 oclock position
__________________
1974 C10 swb 350 1977 3/4 ton Silverado 454 1999 2 door 2wd Tahoe |
|
|
|
|
01-02-2014, 05:30 PM
|
#18 |
|
Registered User
Join Date: Nov 2013
Location: ATLANTA
Posts: 223
|
Re: Fuel Sender testing
Excellent images of your sending unit. Thanks for sending these.
|
|
|
|
|
01-02-2014, 08:16 PM
|
#19 |
|
Registered User
Join Date: Sep 2010
Location: Lake Tahoe, Nevada
Posts: 755
|
Re: Fuel Sender testing
You see in that last photo, right were the float arm pivots. That little "fan" looking piece is a coil of very small, bare wire. As the float moves up and down, it makes an electrical contact along that coil of wire, the further along the wire, the higher the resistance.
Small wire has more resistance than large wire. In order to get up to 90 ohms, the wire has to be very thin, and the electrical contact is constantly moving up and down against it as the float level changes. Eventually, it will wear that small wire down and cause it to break. That wire isn't much thicker than hair. For that reason, I usually reccomend changing the sender if there is any question. The original sender has 20+ years of abrasion against that little wire, it won't last forever. And for all the hassle it takes to drop the tank, for me the peace of mind is well worth the cost of a new sending unit, knowing that little tiny wire, the thickness of a human hair, is new and fresh.
__________________
I know a little about cars, but if you have a question about electricity or sport quads, I'm your man!!! |
|
|
|
|
01-02-2014, 08:23 PM
|
#20 |
|
Registered User
Join Date: Nov 2013
Location: ATLANTA
Posts: 223
|
Re: Fuel Sender testing
I agree and believe i'm moving in that direction. I'm not going to jump the gun but in the next couple of months i'll most likely drop the tank and replace the sender with the one above. The Spectra company appears to make a sender for my truck as well. . . Don't be surprised if you see a thread on here about dropping the tank. Unless I can find one in search. Thank you all for all the help. i will continue to monitor the levels as a reduce the fuel in my tank.
|
|
|
|
|
01-02-2014, 08:55 PM
|
#21 |
|
Moderator
 Join Date: Oct 2008
Location: Wentworth, NH
Posts: 5,050
|
Re: Fuel Sender testing
Two people can slide the bed back onto 4x4 lumber or completely off onto sawhorses. It'll save you a headache. The sender is usually right at the divide point between the bed and cab.
4 bolts and one electrical plug will pull the bed. If the bolts are rusted up just slice through them with a torch, grinder, or saw and replace.
__________________
1959 M35A2 LDT465-1D SOLD 1967 Dodge W200 B383, NP420/NP201 SOLD 1969 Dodge Polara 500 B383, A833 SOLD 1972 Ford F250 FE390, NP435/NP205 SOLD 1976 Chevy K20, 6.5L, NV4500/NP208 SOLD 1986 M1008 CUCV SOLD 2000 GMC C2500, TD6.5L, NV4500 2005 Chevy Silverado LS 2500HD 6.0L 4L80E/NP263 2009 Impala SS LS4 V8 RTFM... GM Parts Books, GM Schematics, GM service manuals, and GM training materials...
And please let us know if and how your repairs were successful. |
|
|
|
|
01-02-2014, 09:07 PM
|
#22 |
|
Registered User
Join Date: Nov 2013
Location: ATLANTA
Posts: 223
|
Re: Fuel Sender testing
This is a 75 Blazer. . . The tank is in the very rear center of the truck. I wish it would have been that easy. But thanks for the insight.
|
|
|
|
|
01-03-2014, 01:39 PM
|
#23 |
|
Moderator
Join Date: Oct 2008
Location: Wentworth, NH
Posts: 5,050
|
Re: Fuel Sender testing
The saddle tank brackets are kind of a pain to pull.
The blazer tank is strapped in more like a fullsize car so once you've run her low on fuel it shouldn't be too bad to R&R. Replace the fuel lines before you re-install it. You'll only want to do it once.
__________________
1959 M35A2 LDT465-1D SOLD 1967 Dodge W200 B383, NP420/NP201 SOLD 1969 Dodge Polara 500 B383, A833 SOLD 1972 Ford F250 FE390, NP435/NP205 SOLD 1976 Chevy K20, 6.5L, NV4500/NP208 SOLD 1986 M1008 CUCV SOLD 2000 GMC C2500, TD6.5L, NV4500 2005 Chevy Silverado LS 2500HD 6.0L 4L80E/NP263 2009 Impala SS LS4 V8 RTFM... GM Parts Books, GM Schematics, GM service manuals, and GM training materials...
And please let us know if and how your repairs were successful. |
|
|
|
|
01-03-2014, 02:35 PM
|
#24 | |
|
Registered User
Join Date: Sep 2009
Location: Beaverton, OR from WA State
Posts: 1,515
|
Re: Fuel Sender testing
Quote:
__________________
Devin 1983 GMC High Sierra 2500, 4x4, RC/LB, 400 S.B., SM-465, NP-208, Corporate 10 bolt & 9.5" 14 bolt 1996 GMC Sierra SLE 3500 DRW, 4x4, EC/LB, Vortec 454, NV-4500, BW-4401, AAM 925 & AAM 1050 1997 GMC Sierra SLT 1500 4x4, Z71/F44, EC/SB, Vortec 350 My Introduction with my '83s History New Daily, the '96 |
|
|
|
|
|
01-05-2014, 05:31 PM
|
#25 |
|
Moderator
Join Date: Oct 2008
Location: Wentworth, NH
Posts: 5,050
|
Re: Fuel Sender testing
I'm a very big guy. The fuel lines are painful, at best, to get back on with my big hands. If you can fit your hand up there more power to ya. I usually have to lift the bed up on blocks to get enough room to reach in there with more than my fingertips. I just take it off so I don't end up pinched between the bed and frame. It's 4 bolts and about 1/2 hour to pull the bed with 2 guys and faster back on.
__________________
1959 M35A2 LDT465-1D SOLD 1967 Dodge W200 B383, NP420/NP201 SOLD 1969 Dodge Polara 500 B383, A833 SOLD 1972 Ford F250 FE390, NP435/NP205 SOLD 1976 Chevy K20, 6.5L, NV4500/NP208 SOLD 1986 M1008 CUCV SOLD 2000 GMC C2500, TD6.5L, NV4500 2005 Chevy Silverado LS 2500HD 6.0L 4L80E/NP263 2009 Impala SS LS4 V8 RTFM... GM Parts Books, GM Schematics, GM service manuals, and GM training materials...
And please let us know if and how your repairs were successful. |
|
|
|
 |
| Bookmarks |
|
|


 Hybrid Mode
