
 |
Register or Log In To remove these advertisements. |
|
|
|
|||||||
 |
|
|
Thread Tools | Display Modes |
|
|
|
|
#1 |
|
Registered User
Join Date: Apr 2015
Location: Finland
Posts: 133
|
C30 dually project goes patina
Some time ago, I found this C30 on a local craigs list type site. The truck was sold with the price including transport home from Texas, where it was at the time.
To begin with, I planned to use the frame to build a dually hot rod, and chuck the cab, or maybe transplant it on a cheap Scottsdale frame or something. To my surprise, I started liking the look of the little truck, and decided to try and get it running as is. Here's a pic from the ad. 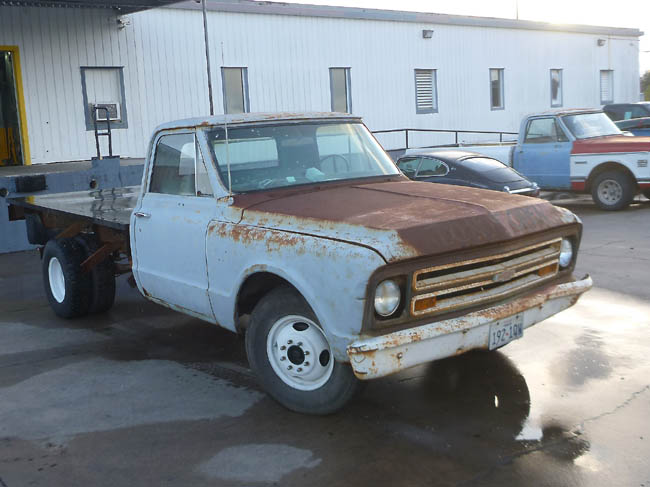 And another from when it came home. 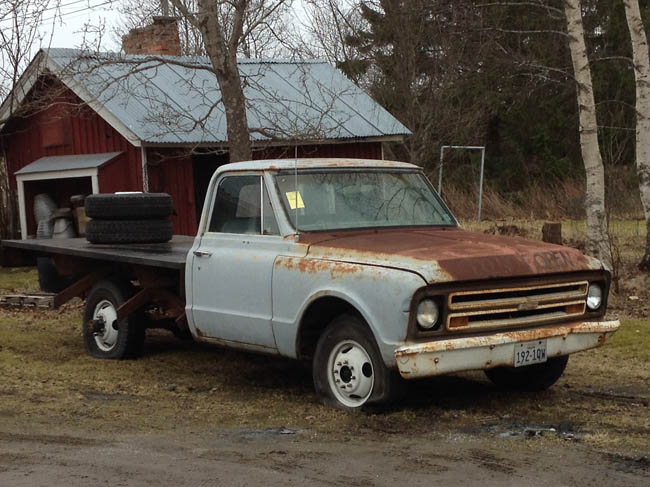 It looked pretty sad, especially with two rear wheels removed to make it fit on the tow truck. Only three tires held any air. |
|
|

|
|
|
#2 |
|
Registered User
Join Date: Apr 2015
Location: Finland
Posts: 133
|
Re: C30 dually project goes patina
I noticed there was some writing on the doors, so I started sanding with fine sand paper.
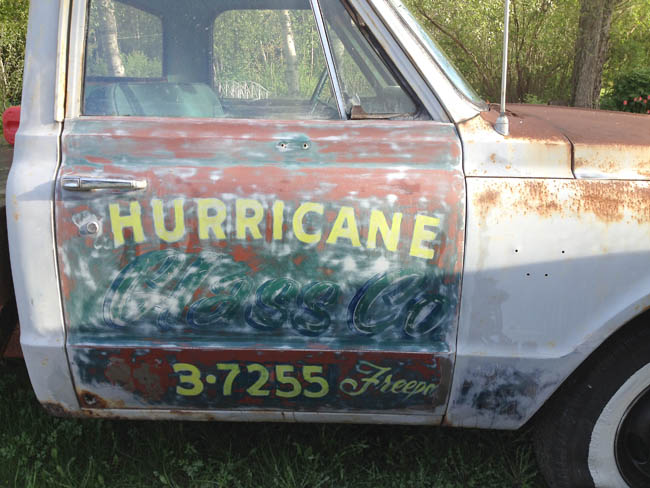 This looked like fun, and this was when the idea to make this a patina project was born. I sanded all the cab, and working on the other door, I noticed that I had been sanding the right hand side door too enthusiastically. I read somewhere that there are no real rules for a patina look, so I decided to try and repair my mistake.  A couple days after, when the OneShot paint was dry the new text was sanded to blend in with the rest of the cab.  At this time the wheels had been sand blasted and painted gloss black, and new tires mounted. New chrome wheel nuts were added, and I decided I wanted to do a well maintained but patinaed-look style. |
|
|

|
|
|
#3 |
|
Registered User
 Join Date: Mar 2013
Location: Syracuse, Utah
Posts: 499
|
Re: C30 dually project goes patina
I like it. You've done great work, wheels, and the patina paint look very cool.
__________________
Justin '67 C20 CST Custom Camper '04.5 LLY Duramax CCSB...sold |
|
|

|
|
|
#4 |
|
Senior Member
 Join Date: Aug 2011
Location: Reno, Nv.
Posts: 1,440
|
Re: C30 dually project goes patina
That's cool. Have fun with it and enjoy.
__________________
1927 Willy's Knight 24,000 original miles, 1958 Impala 283/Powerglide, 1971 Monte Carlo 350/350, 1972 GMC K2500 350/350, 1976 Chev. K10 350/350, 2006 GMC Sierra 2500HD LBZ Duramax/Allison, 2006 Chev. Silverado K3500 LBZ Duramax/Allison |
|
|

|
|
|
#5 |
|
Registered User
Join Date: Apr 2015
Location: Finland
Posts: 133
|
Re: C30 dually project goes patina
This is just the beginning of the project. it may look ok, but it's not driveable by a long shot.
I took it into the garage, after getting rid of the huge flat bed. It wouldn't start, as there was almost no compression in the engine, so I had to drag it in using the starter motor, so I guess it's a hybrid now... 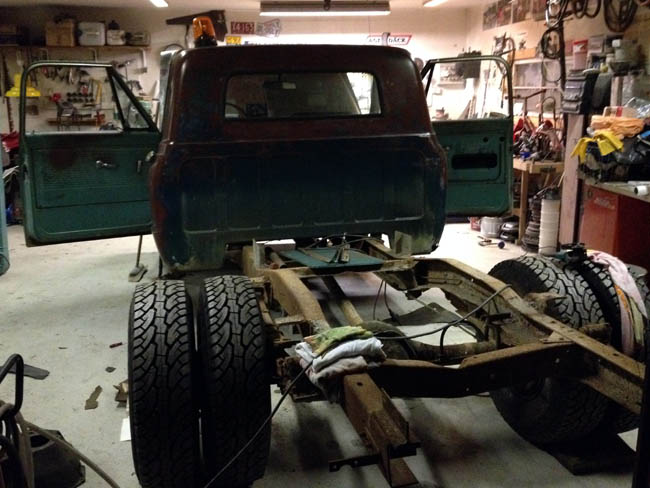 The inside rockers and the outer edge of the floors were rusted, so some welding is due. |
|
|

|
|
|
#6 |
|
Registered User
Join Date: Apr 2015
Location: Finland
Posts: 133
|
Re: C30 dually project goes patina
Thank you Orange67. The cab was sprayed a satin clear, and the guy at the paintshop, who sold the clear was shocked when he saw what I was working on and exclamated:
"Oh damn, it's ugly!!!" I guess the beauty is in the eye of the beholder  Thank you allchevy58. I certainly will have fun with it, when it's ready! Okay, turning to the rust deletion work then. The worst rot was cut out, and pieces of fresh sheet metal was cut, bent and knocked into submission. 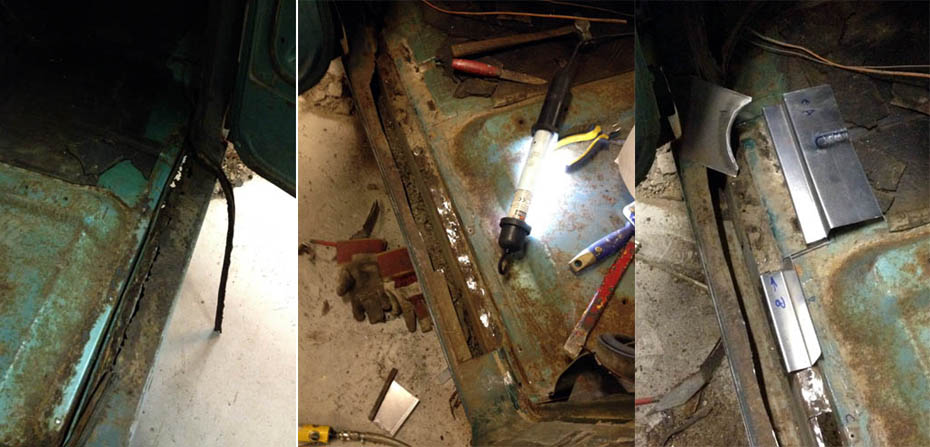 The inside of the rocker was repaired along with the edge of the floor 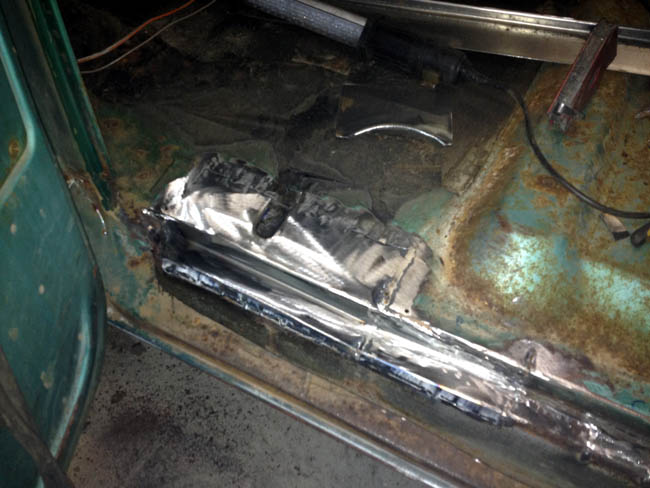 ...and the top of the rocker was welded in... 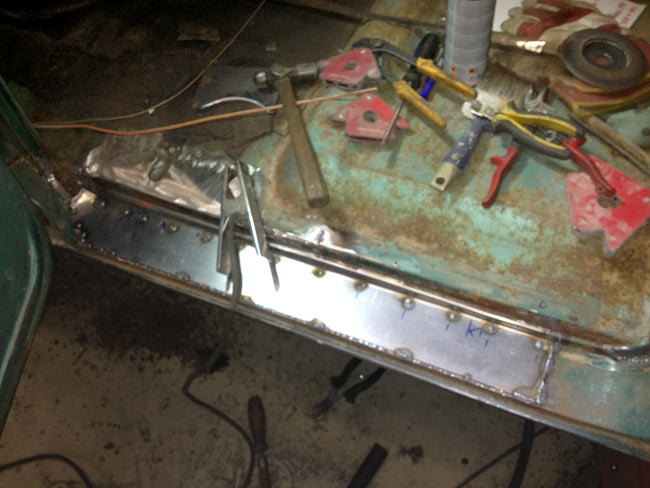 ...and ground 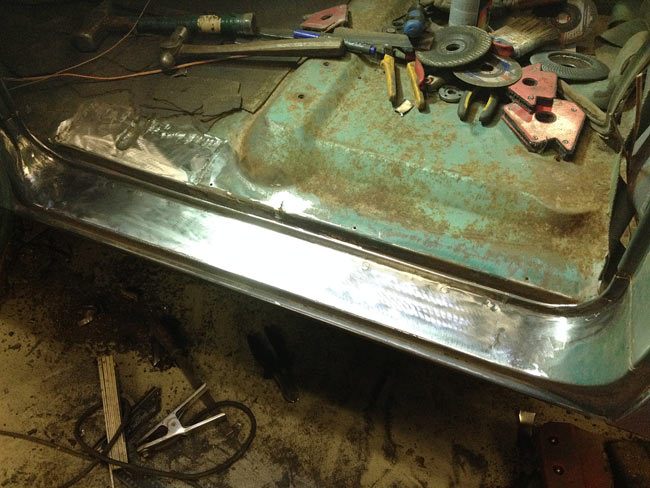 Same on the other side. The floors and rockers had about the same amount of rust on either side. I found some standard rubber at the rubber shop, so new door seals will be cheap and cheerful, and look exactly like the originals. |
|
|

|
|
|
#7 |
|
Registered User
Join Date: Apr 2014
Location: Azle,Texas
Posts: 2,248
|
Re: C30 dually project goes patina
Nice and clean job sir! I cant even tell where you added the new metal by just looking at the final picture.

|
|
|

|
|
|
#8 |
|
Registered User
Join Date: Oct 2009
Location: canton ga
Posts: 12,724
|
Re: C30 dually project goes patina
Im in to see more .
|
|
|

|
|
|
#9 |
|
Registered User
 Join Date: Feb 2016
Location: Camarillo, CA
Posts: 256
|
Re: C30 dually project goes patina
Yay!!! Another C30 saved. And it's almost as ugly as 'Anela...

|
|
|

|
|
|
#10 |
|
Registered User
Join Date: Jul 2014
Location: South East Ohio
Posts: 644
|
Re: C30 dually project goes patina
Glad you saved the truck. Lookin' good.
|
|
|

|
|
|
#11 |
|
Registered User
Join Date: Apr 2015
Location: Finland
Posts: 133
|
Re: C30 dually project goes patina
Thank you cornerstone. I'm no expert, and it's nice when the result is nice to look at.
fLashed: be my guest. Hope I can provide some inspiration. AKC: It should at least be illegal to crush old cars. Richard2112: Doing my best  Not all will like it, but it's fun! Not all will like it, but it's fun!So, here goes: The other side was done in the same manner, and is now ready, except from some suitable red and green shades to sand to look like it all belongs. 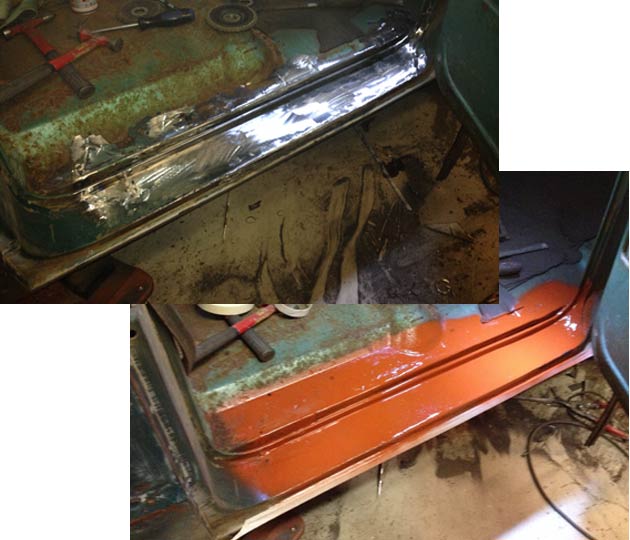 Then time for the frame. It's totally covered in ugly surface rust, but all solid. It must've stood in a wet or acid place for some time. 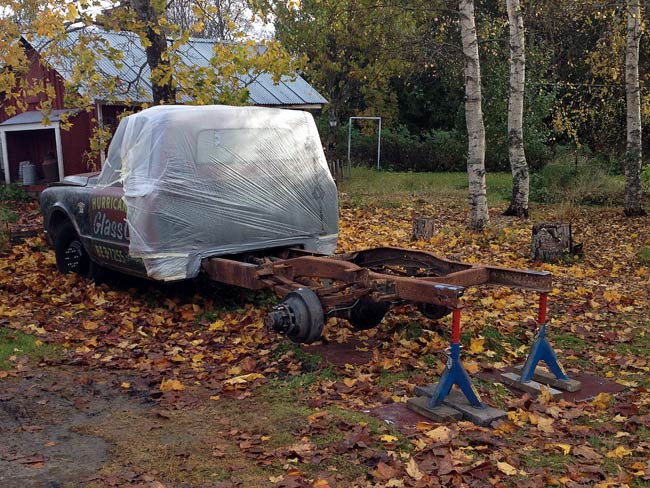 A mobile sandblaster came and did his magic. Amazingly enough, he used less than 200lbs of sand. I'd guess that's about what would fit in a wheelbarrow. Next summer it will be all gone. Very convinient. 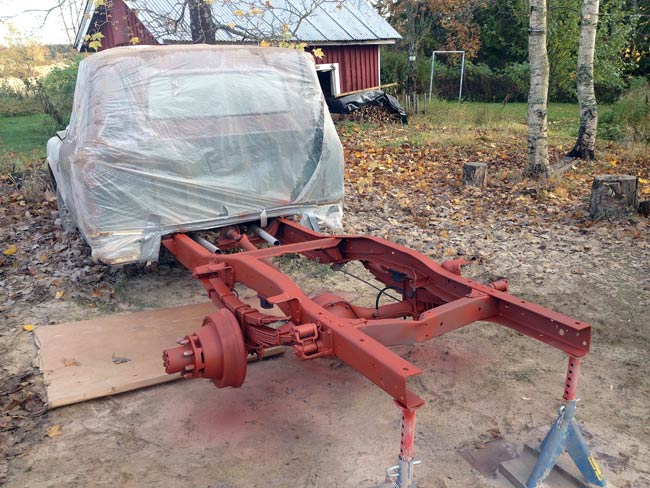 The frame was sprayed with some primer, wheels added, and it was back into the shop again. 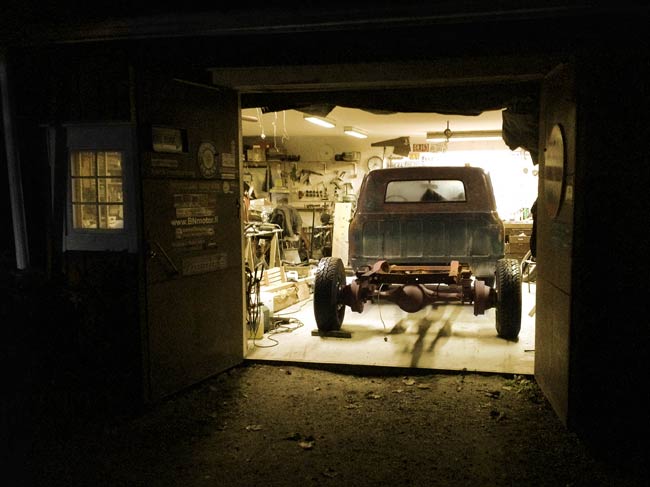
|
|
|

|
|
|
#12 |
|
Senior Member
 Join Date: Dec 2009
Location: TN.
Posts: 8,444
|
Re: C30 dually project goes patina
Nice work.
I have a C30 also. Mine has only a drivers side sunvisor and no center rear view mirror. I noticed you have a rear view mirror. Keep up the good work.👍 |
|
|

|
|
|
#13 |
|
Registered User
Join Date: Apr 2015
Location: Finland
Posts: 133
|
Re: C30 dually project goes patina
Thank you, Getter-Done.
Honestly, I don't know if I have any sunvisors in my truck, I never gave it any thought. The reason for this, of course, is that I never really drove it. The engine started and ran, so I drove it a hundred yards down to the road and back with no working brakes at all. The last time I started the original engine, I happened to have one of the valve covers off, and noticed that one rocker didn't move at all. Holding it with my fingers while the engine ran, I could feel some remnants of a cam lobe. So next up will be changing to another engine. No use trying to do a simple and easy engine overhaul on an engine that has a whole cam lobe ground down in the lubricating oil. All bearing surfaces must be in a real bad condition. |
|
|

|
|
|
#14 |
|
Registered User
Join Date: Apr 2015
Location: Finland
Posts: 133
|
Re: C30 dually project goes patina
As the truck was back inside the shop, and the engine wasn't going to run decently without an overhaul anyway, it was yanked.
It looked read sad under a layer of sandblasting dust. 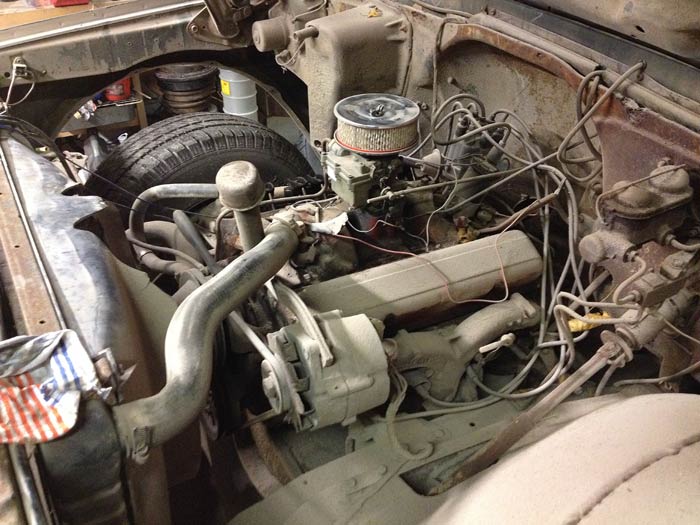 I removed the intake to take a look at the camshaft, and discovered that you don't see it in a chevy engine. Last time I was wrenching on an engine it was a Chrysler LA smallblock, and as far as I remember you are able to see the camshaft with the intake removed on those. 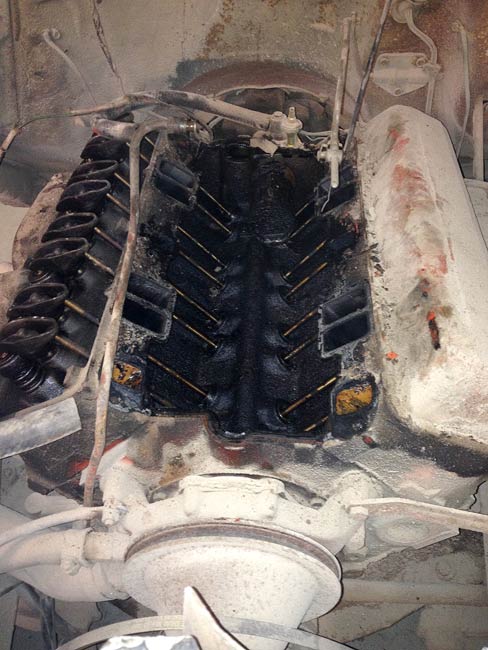 The amount of carbon and dirt in this engine is awful, so I was very happy to have a spare engine sitting in a corner in the shop. In this pic the work with the "new" engine is under way. It's going to look just like the old 283, so the water pump, intake, valve covers, exhaust manifolds, fan and single groove crank pulley, along with the flywheel will be used. 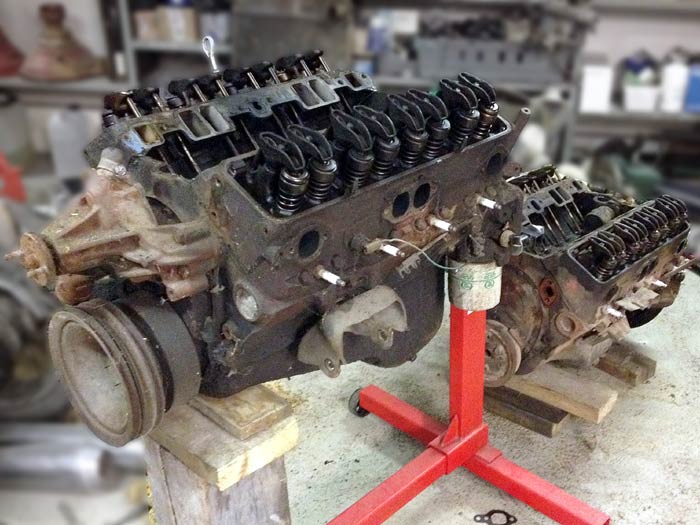 The new engine in the foreground, and the old one on the floor behind it. The most visible difference is that the new engine has threaded holes in the end of the cylinder heads. |
|
|

|
|
|
#15 |
|
Registered User
Join Date: Apr 2015
Location: Finland
Posts: 133
|
Re: C30 dually project goes patina
That new engine, according to the numbers on it, is a 1984 305 out of a Caprice. It hadn't been in use for some time, and the freeze plugs looked bad, especially the screw in replacement ones. Good idea to change them, some were in bad shape, and someone had just left the old ones in the waterjacket, so there were a lot of plugs coming out of that block!
The waterjacket was flushed with the garden hose, and a LOT of rust and old engine parts came out   The flywheel and clutch assembly were mounted to the crank, as was a pilot bearing. 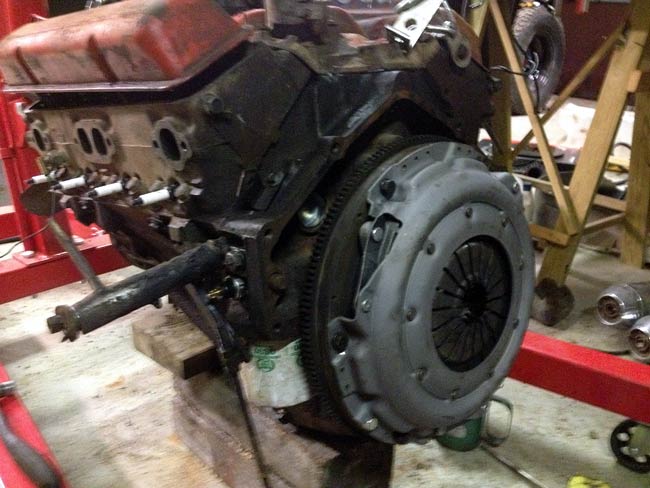 The 305 was just cleaned out and flushed. No special cleaning or such on the outside. As the starter was still attached to the block, a compression test was made, and its results was very good, all cylinders had between 160 and 180 psi, which is remarkably even for an old engine that hasn't been run in years. Also all pushrods were rotating as the engine was cranked, which is a good sign, telling us that the camshaft and lifters are in good condition. |
|
|

|
|
|
#16 |
|
Registered User
Join Date: Jan 2010
Location: Katy Texas
Posts: 501
|
Re: C30 dually project goes patina
this thing is awesome, following along
__________________
 c10clubtexas c10clubtexas
|
|
|

|
|
|
#17 |
|
Registered User
Join Date: Apr 2015
Location: Finland
Posts: 133
|
Re: C30 dually project goes patina
Thank you aboesec10, it's nice to get some encouragement
 Continuing with some unwanted patina here. The bore in the master brake cylinder was so rusted, that it needed to be replaced. A style decision had to be made at this point, in that almost all functioning mechanics has to be new or redone. So, ok, the master cylinder and other new stuff may as well look new then. 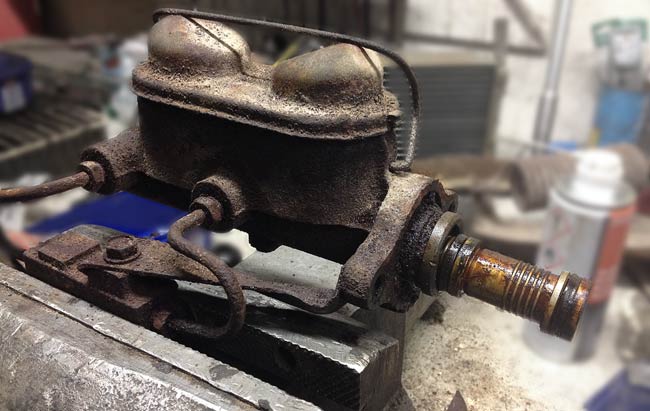 Being over here in northern Europe, it's not just to walk into the nearest Napa or O'Reilleys to buy a new 1967 C30 mastercylinder (we have neither: No Napa, no O'Reilleys, nor any C30 mastercylinders), so I had to make do with a 1967 Biscayne one, that happened to have the same bore and stroke, and also was for a drum/drum setup. After purchasing a tube bender, pretty bends could be done easily. 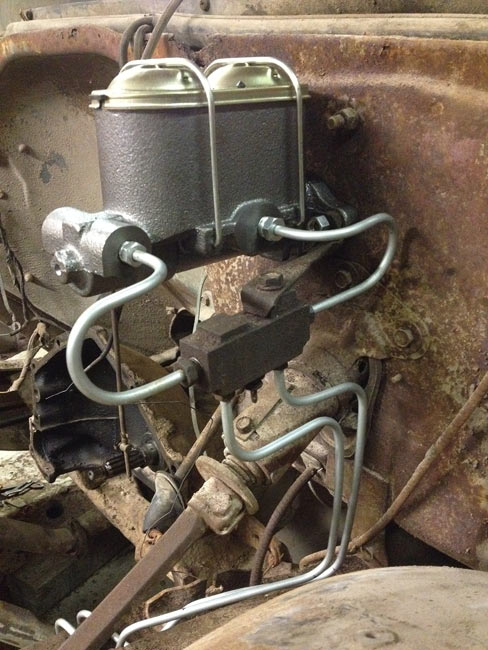 A new repop inner fender arrived from the US, so when that was bolted into its new home, the engine bay's pretty much ready for the engine. Last edited by flatbed67; 04-04-2018 at 01:38 PM. |
|
|

|
|
|
#18 |
|
Registered User
Join Date: Apr 2015
Location: Finland
Posts: 133
|
Re: C30 dually project goes patina
Time to get the engine in.
I had a good friend helping me with the engine and hoist. If the blue oval disturbes you, he's sold his Ford, and is wrenching on a chevy now  It took a bit more fiddling than usually with an automatic, to get the engine to fit the manual transmission, as one has to get the splines and pilot bearing in line, but it was soon in. 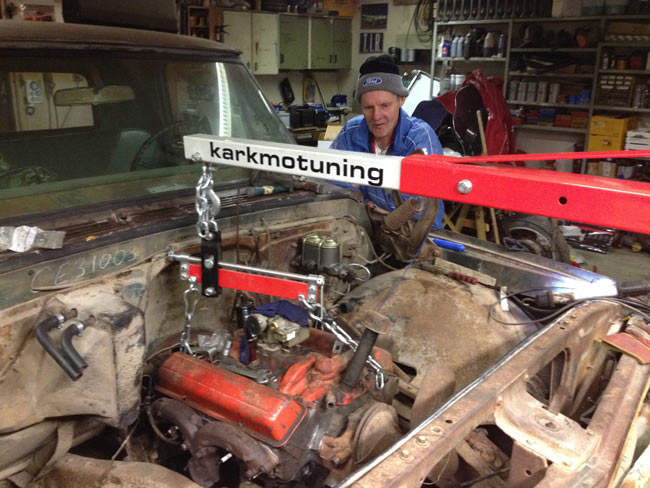 With a new carburetor mounted to the intake, and an old air cleaner on the top, the engine doesn't much look like it comes out of a 1984 Caprice anymore. 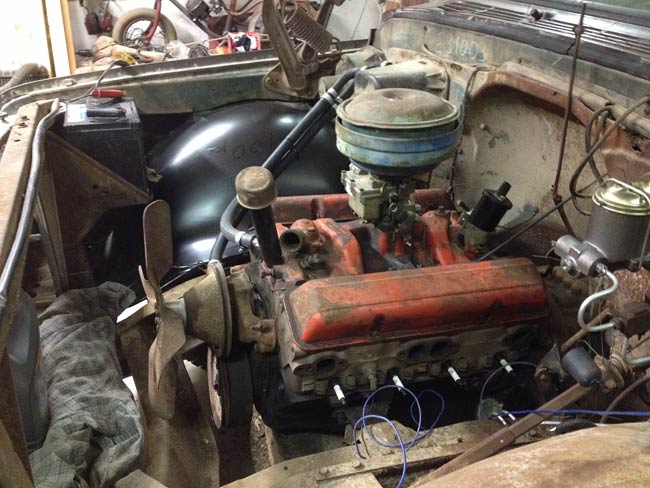
Last edited by flatbed67; 04-07-2018 at 03:49 AM. |
|
|

|
|
|
#19 |
|
Registered User
Join Date: Apr 2015
Location: Finland
Posts: 133
|
Re: C30 dually project goes patina
Among all the small stuff to get done was the alternator mount. It had been mounted to the driver's side exhaust manifold, but the manifold had cracked at the alt mount, so something had to be done about it.
Like this: 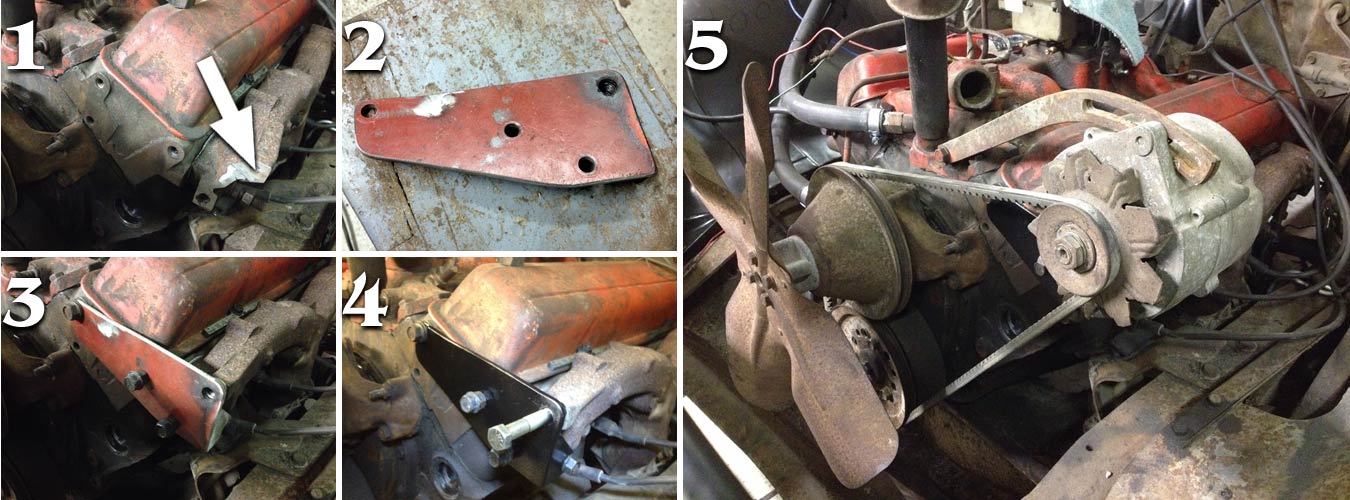 1. The alternator had been bolted to the drivers' side exhaust manifold. Here about 5/8" is cut off the manifold to make room for a new mount with a nut welded in (arrow). 2. Putting the tapped holes in the newer heads to use, the new alt mount was made out of about 3/16" thick sheet metal. 3. Trial mounted to the head and exhaust manifold (one usable threaded hole remained in the manifold). 4. New mount painted and bolted to the head and exhaust with four bolts. The long bolt is where the alternator goes. 5. The alternator mounted to its new mount. The front strap still missing in this pic. This new homebrewed part really should have some patina treatment to fit in, but it's flat black for now. |
|
|

|
|
|
#20 |
|
Registered User
Join Date: Apr 2015
Location: Finland
Posts: 133
|
Re: C30 dually project goes patina
The blue air cleaner a couple posts earlier is reworked for modern paper air filters. The welding and grinding caused it to look unsettlingly rebuilt, but a few squirts of black, beige, two browns and another black got the patina started. Dousing it with sand and dirt and scuffing it with a rag while the paint still wasn't completely dry, made it look suitably old and grimy. The rust on the very top of the cleaner is real original rust. ( I thought I'd never be proud to say that *grins*)
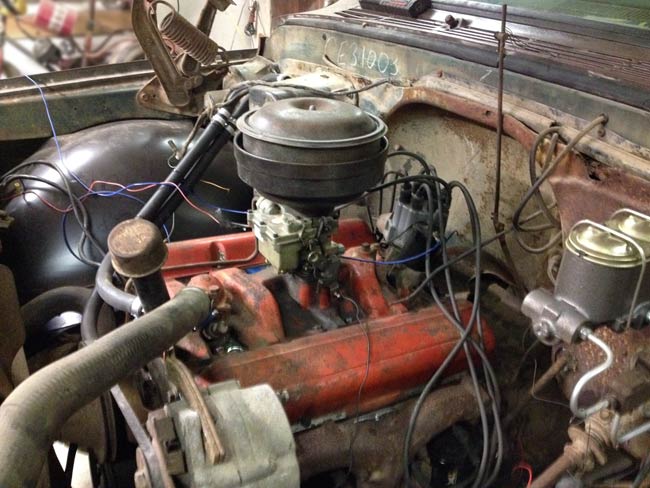 The color is better too, it doesn't look too much out of place now. A piece of 3" exhaust pipe happened to fit the Rochester 2G nicely, and was used as a base for the air filter rebuild. Two small paper filters off a Tri-Power setup was used. |
|
|

|
|
|
#21 |
|
Senior Member
 Join Date: Dec 2009
Location: TN.
Posts: 8,444
|
Re: C30 dually project goes patina
Great progress.
Using the original points distributor really makes it 👍 |
|
|

|
|
|
#22 |
|
Registered User
 Join Date: Mar 2013
Location: Syracuse, Utah
Posts: 499
|
Re: C30 dually project goes patina
Sir, you have awesome skills. I'm impressed, and very cool truck!
__________________
Justin '67 C20 CST Custom Camper '04.5 LLY Duramax CCSB...sold |
|
|

|
|
|
#23 |
|
Registered User
Join Date: Apr 2015
Location: Finland
Posts: 133
|
Re: C30 dually project goes patina
Thank you, Orange67, that's very kind of you.
Getter-Done: Yes, using the old distributor makes it look period. I huge HEI would look out of place behind that little carb. Now that the engine is in, it's time to turn to the attention to the wheel brakes. All tubes and hoses had been done, and I took a deep breath and dived into the task of making the breaks work. When I removed the first drum, an awesome surprise waited. The breaks are all brand new! Some previous owner had been working on the truck, buying and mounting all new brake parts! 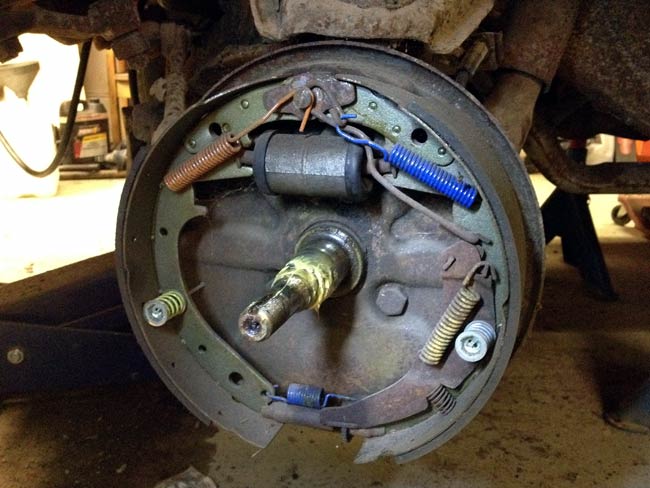 This is not the way drum brakes look inside on a fifty year old truck. All brand new, the brake shoes had never touched the surface of the brand new drums. Gotta hit gold sometimes, huh? Taking my geographical situation into account, I easily saved two weeks and a nice bunch of greenbacks. I beleive that the PO had given up at some point. Maybe when he had poured brake fluid into the master reservoir, and it had just leaked in on the floor of the cab. Who knows... So I just connected the new hoses, and bled the brakes. Of course a T-junction leaked, so I had to get a new one, but other than that the brakes were pretty straight forward from here. I bench bled the master cylinder. I once tried to do without bemch bleeding a new maser cylinder, but it was definitely a no go. 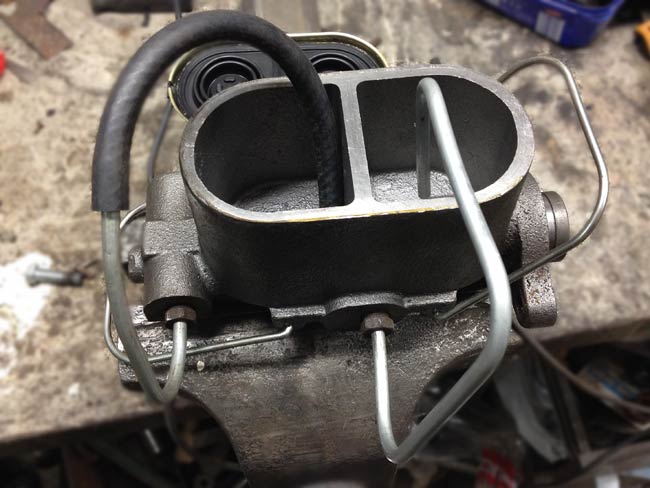 I had used up all my 1/4" brake tube, so I used a piece of rubber hose to extend my last piece of tube.  The new version of the offending T-joint. I had never realized these could wear out. Apparently they do, because it was no way it was going to hold any break fluid. I made three new tubes, and failed miserably to get any of them tight, and had to give in and buy a new T. It's not like it was expensive, but it was yet another trip to the almost-local speed shop. |
|
|

|
|
|
#24 |
|
Registered User
Join Date: Apr 2015
Location: Finland
Posts: 133
|
Re: C30 dually project goes patina
New mirrors were mounted to the doors. These cheapo mirrors were ordered from Amazon to a cost of $19 each. Now the right hand side door latch works as it should too (it didn't open at all before), it only needed a little tweak and some lubrication.
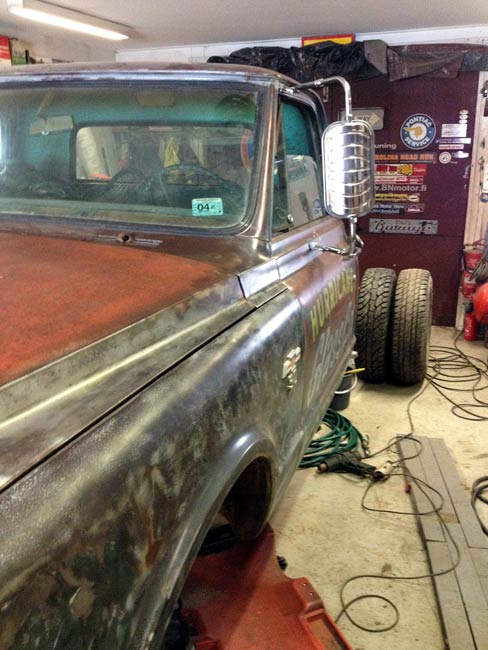 And no, the rear axle isn't that wide. The outer wheel is a front wheel just standing there, and what looks like the inner wheel is actually the outer dual. |
|
|

|
|
|
#25 |
|
Registered User
Join Date: Apr 2015
Location: Finland
Posts: 133
|
Re: C30 dually project goes patina
The frame was in good condition. It looked real bad, but it was just a thin layer of surface rust, so it cleaned up real nice when it was sand blasted.
The rear crossmember had been pulled hard out of shape, so it was next on the agenda. Someone had probably tried to pull out a tree stump, or maybe the truck had got stuck in some deep mud or a ditch, and yanked out. 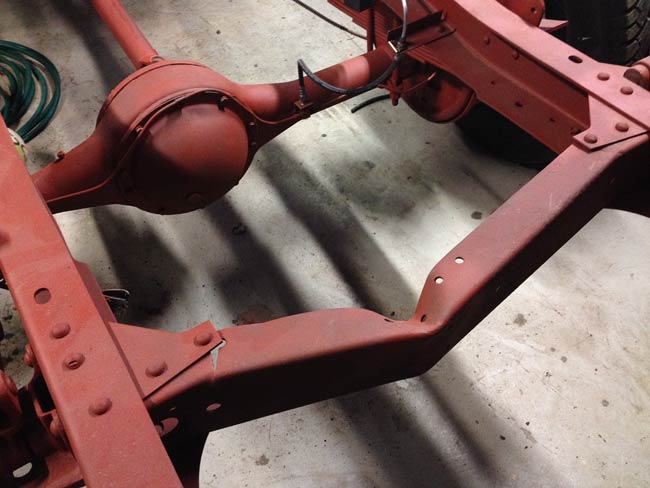 Even when the crossmember was cut every which way, it wouldn't budge with the sledge hammer, so it was pulled with a wire winch, and then hammered. Slowly it was back to something resembling the original shape, and welded back together. 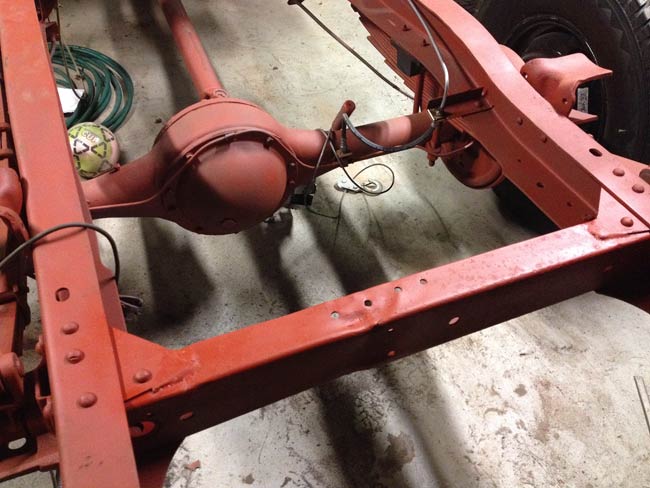 The result is not perfect, but nobody will see it under the bed later anyway |
|
|

|
 |
| Bookmarks |
|
|