
 |
Register or Log In To remove these advertisements. |
|
|
|
|||||||
 |
|
|
Thread Tools | Display Modes |
|
|
#26 |
|
Senior Member
Join Date: Aug 2002
Location: Valley Center KS
Posts: 3,524
|
Re: Ackattack's Pro touring restoration thread
Sandblasting is complete!!!!
The cross member is cut out. So I guess it's time to start putting it back together. I was blasting the lower A-arms and noticed they were damaged, so I went out to my parts pile and tore off another set. I'm not sure if they're the right year, or maybe they're for 73+. I guess I'll post some pictures and/or compare them to my 72 GMC's. In laws were in town for a week and today's my 6th anniversary...so not much work has been getting done. I'll get more pics later. |
|
|

|
|
|
#27 | |
|
Registered User
Join Date: Apr 2001
Location: DALLAS,TX
Posts: 22,075
|
Re: Ackattack's Pro touring restoration thread
Quote:
64~72's have rubber-lined steel bushings & 'thread' into the a-arms.
__________________
67SWB-B.B.RetroRod 64SWB-Recycle 89CCDually-Driver/Tow Truck 99CCSWB Driver All Fleetsides @rattlecankustoms in IG Building a small, high rpm engine with the perfect bore, stroke and rod ratio is very impressive. It's like a highly skilled Morrocan sword fighter with a Damascus Steel Scimitar..... Cubic inches is like Indiana Jones with a cheap pistol. |
|
|
|

|
|
|
#28 |
|
Senior Member
Join Date: Aug 2002
Location: Valley Center KS
Posts: 3,524
|
Re: Ackattack's Pro touring restoration thread
Well after doing some looking, it looks like the upper arms are from a 73+
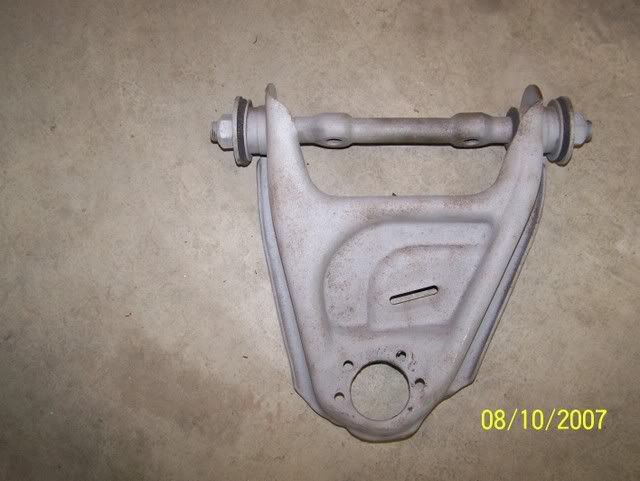 And now I'm using a lower arm from up to a 72. So is this combo of parts going to cause me a problem when I go to get a drop spindle? I also started painting some stuff with por15. Basically I was just seeing how hard/time consuming its going to be. I'll get some serious work done on Sunday. |
|
|

|
|
|
#29 |
|
Registered User
Join Date: Apr 2001
Location: DALLAS,TX
Posts: 22,075
|
Re: Ackattack's Pro touring restoration thread
Just use the correct ball-joints for the spindle & you'll be fine.
__________________
67SWB-B.B.RetroRod 64SWB-Recycle 89CCDually-Driver/Tow Truck 99CCSWB Driver All Fleetsides @rattlecankustoms in IG Building a small, high rpm engine with the perfect bore, stroke and rod ratio is very impressive. It's like a highly skilled Morrocan sword fighter with a Damascus Steel Scimitar..... Cubic inches is like Indiana Jones with a cheap pistol. |
|
|

|
|
|
#30 |
|
Senior Member
Join Date: Aug 2002
Location: Valley Center KS
Posts: 3,524
|
Re: Ackattack's Pro touring restoration thread
got the frame painted with POR 15 today. 2 coats of the por 15, and 1 coat of chasis black. Also did the axle housing.
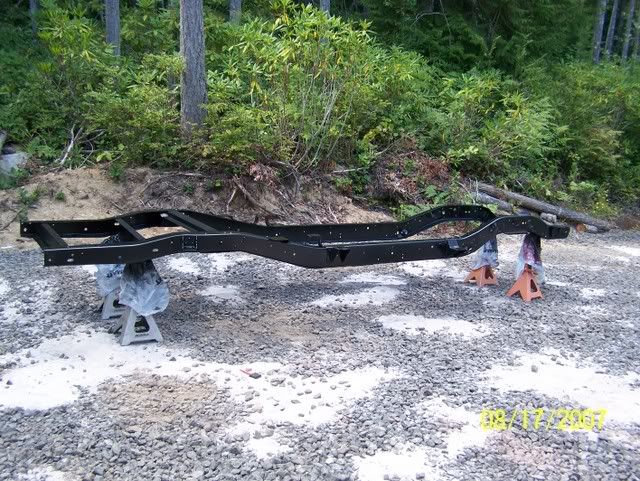 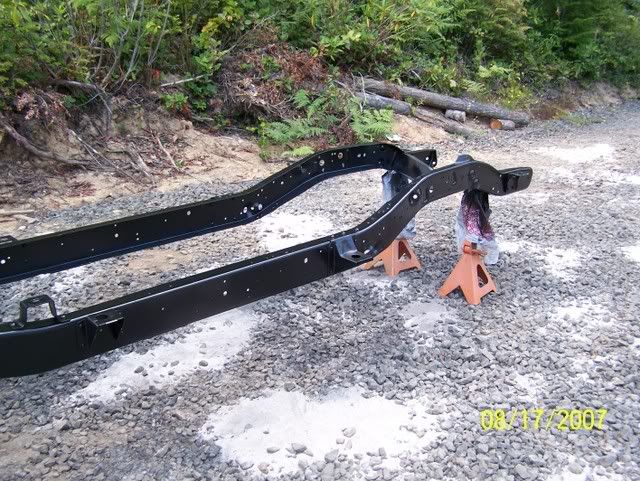 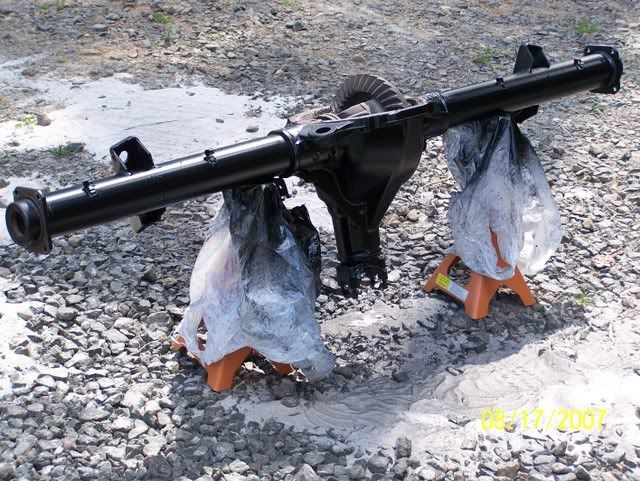 I also welded one side of the control arms. I was very impressed that my welder could keep up with welding continously for as long as it took me. I'll do the other side too. 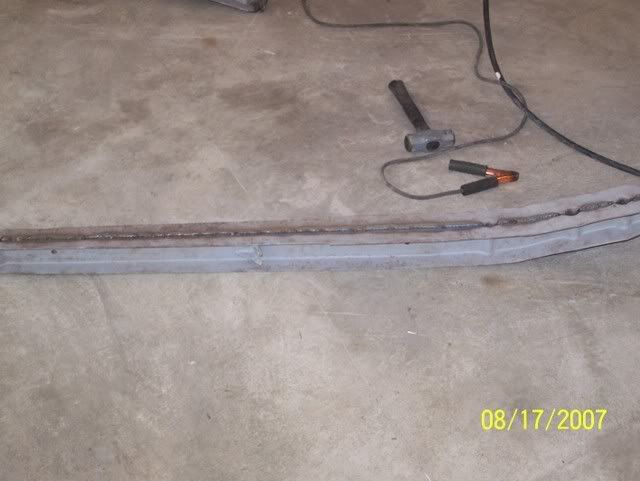 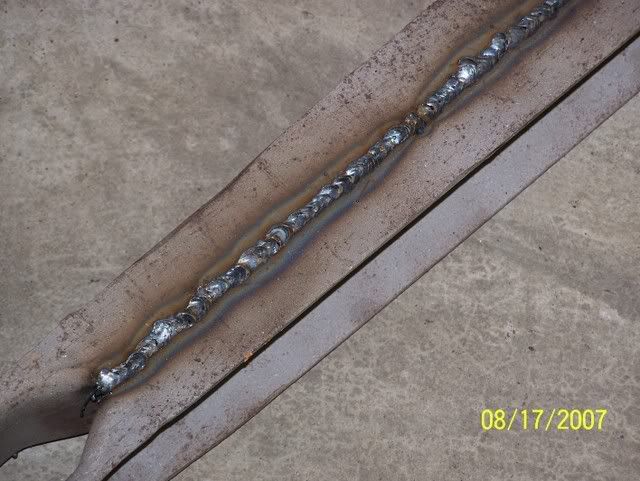 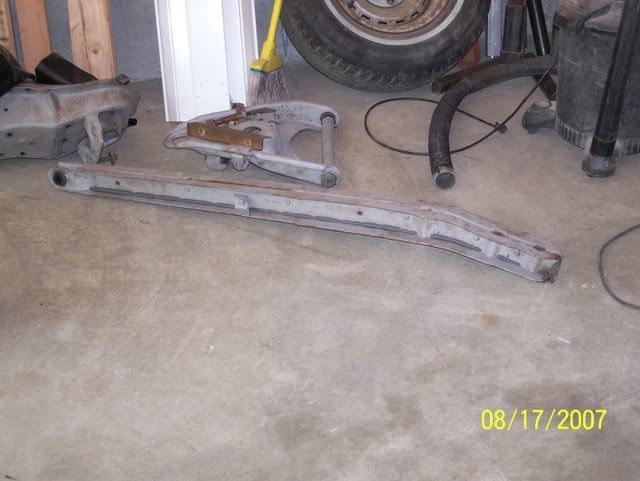
|
|
|

|
|
|
#31 |
|
Senior Member
Join Date: Aug 2005
Location: tulsa OK
Posts: 3,070
|
Re: Ackattack's Pro touring restoration thread
looking good, did you ever tell us what fuel injected engine your going with?
sorry if i missed it.. keep up the work... once everything is painted and ready to be re-assembled thats when it starts to pay off... |
|
|

|
|
|
#32 |
|
Senior Member
Join Date: Aug 2002
Location: Valley Center KS
Posts: 3,524
|
Re: Ackattack's Pro touring restoration thread
GenIII of some sorts. Probably an LS1. I actually bought a 98 Trans Am for the engine and tranny, but I got such a good deal on the car, I'm now instead going to sell it and hopefully make enough on it to buy an engine/tranny outright.....of course I also have a line on a totalled camaro that I may get....we'll see.
|
|
|

|
|
|
#33 |
|
Registered User
 Join Date: Aug 2005
Location: Hillsboro Oregon
Posts: 6,449
|
Re: Ackattack's Pro touring restoration thread
Looking good. Wish I could take my 69 down to that level. Some day it'll get a frame off. Go for an LS2

|
|
|

|
|
|
#34 |
|
Senior Member
Join Date: Jun 2003
Location: Westminster, CO
Posts: 3,071
|
Re: Ackattack's Pro touring restoration thread
Looks goood!!!! I'm a bit behind ya on my 68'. But will be sandblasting soon! I'll be watching your build!!! Keep up the good work.
__________________
Alex 1971 Lil' Red 350 SBC 700R4 |
|
|

|
|
|
#35 |
|
Registered User
Join Date: Aug 2007
Location: Hays, Kansas
Posts: 7
|
Re: Ackattack's Pro touring restoration thread
I want one!!
Looks like Ack had a good mentor!! Last edited by RoadDog; 08-23-2007 at 07:09 PM. |
|
|

|
|
|
#36 |
|
Senior Member
Join Date: Aug 2002
Location: Valley Center KS
Posts: 3,524
|
Re: Ackattack's Pro touring restoration thread
Progress has been slow, I did manage to get the rest of the control arms welded together and started painting the engine crossmember.
I also started practicing shaving the drip rails on the "extra" cab I have.http://67-72chevytrucks.com/vboard/s...d.php?t=256827 Hopefully I'll get to some welding on it this week. |
|
|

|
|
|
#37 |
|
Registered User
Join Date: Aug 2007
Location: Weatherford, Texas
Posts: 47
|
Re: Ackattack's Pro touring restoration thread
Looks like a nice project ! Just to let you know, you can re-use that sand over and over if you screen out the big chunks before pouring it back into the pressure pot . We use Aluminum oxide here at work on aircraft and oilfield parts, but it works the same. Just chunk it after it gets so fine it doesn't cut anymore. All the sand does is break down into finer and finer grit as you go. Good luck on the project !
 Rick |
|
|

|
|
|
#38 |
|
Senior Member
Join Date: Aug 2002
Location: Valley Center KS
Posts: 3,524
|
Re: Ackattack's Pro touring restoration thread
I know I could reuse the sand, but it took to long to screen it, so I just bought more....my time is worth more than the cost of a bag of sand.
I did make a deal on a 5.3L engine yesterday, basically the long block. Then I found a harness and computer. Still going to need an intake, throttle body, and maf. I also started researching wire harness modifications. The harnesses (2 of them) are for throttle by wire throttle bodyies, but I think I'm going to switch to a regular cable actuated, so I'll have to do some wiring and programing mods. Oh, and then I was reading about boring the 5.3L out to 5.7L. I'll probably do that once I get the truck on the road. I'll get it all running and trouble shoot with it in its stock configuration, then pull the engine back out for modifications 
__________________
Project Bruiser: 68 Pro-Touring C-10 5.3L / 4L60E Project Ironhide: 97 GMC Crew Cab 4x4 Cummins SOLD: '69 GMC 1/2T SWB TBI'd: Project No Buck Assembly Manual Index Sign up Thread!!! Factory Service Manual Index Last edited by Ackattack; 09-11-2007 at 03:03 PM. |
|
|

|
|
|
#39 |
|
State of Confusion!
  Join Date: Jul 2002
Location: Gulfport, MS USA
Posts: 47,266
|
Re: Ackattack's Pro touring restoration thread
This will be an interesting one to watch. I love your truck as a LWB, can't wait to see it shrunk down.
__________________
Bill 1970 Chevy Custom/10 LWB Fleetside 2010 Toyota Tacoma PreRunner SR5 Double Cab - DD Member of Louisiana Classic Truck Club (LCTC) Bill's Gallery Life isn't tied with a bow, but it's still a gift. Live simply. Love generously. Care deeply. Speak kindly. Leave the rest to God! |
|
|

|
|
|
#40 | |
|
Senior Member
Join Date: Aug 2002
Location: Valley Center KS
Posts: 3,524
|
Re: Ackattack's Pro touring restoration thread
Quote:
Plans have changed, the LWB is for sale so you better just buy it....just going with a straight SWB.
__________________
Project Bruiser: 68 Pro-Touring C-10 5.3L / 4L60E Project Ironhide: 97 GMC Crew Cab 4x4 Cummins SOLD: '69 GMC 1/2T SWB TBI'd: Project No Buck Assembly Manual Index Sign up Thread!!! Factory Service Manual Index Last edited by Ackattack; 09-11-2007 at 04:20 PM. |
|
|
|

|
|
|
#41 |
|
Senior Member
Join Date: Aug 2002
Location: Valley Center KS
Posts: 3,524
|
Re: Ackattack's Pro touring restoration thread
As some of you may be aware, I'm putting a 5.3L into the 68 chevy pickup
Well, mad a deal for the 5.3L long block, but it does not include the intake, tb, fuel rails, ecm or computer. So I found a guy on the "performance truck" part of LS1tech that has the wiring harness and ECM I need. In fact he is sending me two wiring harnesses. One from a truck with a 4L80E and one from a 4L60E. I wasn't aware at the time that I made the deal with mark, but the trucks are drive by wire like the corvettes are. I thought and pondered and read about my options. I finally decided to go with drive by wire. For a few reasons. One the wiring harness is already set up for it, and then I can easily do cruise control. It just so happens that the same guy with the harnesses aslo had an intake/thottle body/ and fuel rail off the same truck so he's sending that too. The other parts needed to run "drive by wire" are a gas pedal assembly with the little reostat, a TAC box (controls the throttle I guess) and the wires that go between the two. So this morning I scored those two things a salvage yard. The only other part I still need for the engine to run is a MAF. I believe the trucks use a 5 wire one though. Have to do some checking. I then went to another salvage yard (since it's my day off and I don't get the chance to go real often) Anyways for the 68, I need a hood, grill, all the bracketry for the hood release, and hood hinges. I found a truck that had all this stuff on it and it is in great condition. There's a small dent in the hood, and a small dent in the grill, but otherwise they're almost perfect. No rust or anything. I figure for the $135 buck I spent on this stuff, it would have cost me about $1000 for new parts (not to mention shipping) The only other parts I was on the look out for was an original AM radio, but they wanted $50 for that...not worth it, and a set up LT1 camaro rear brake calipers. Oh well, maybe next time. |
|
|

|
|
|
#42 |
|
Senior Member
Join Date: Aug 2002
Location: Valley Center KS
Posts: 3,524
|
Re: Ackattack's Pro touring restoration thread
Picked up the engine yesterday. It has corvette accessories on it, which look like they'll fit no problem. Although I don't have the A/C compressor bracket/pulley set up yet....working on that though.
It also has a corvette oil pan on it. Think I'll have to find a truck oil pan. 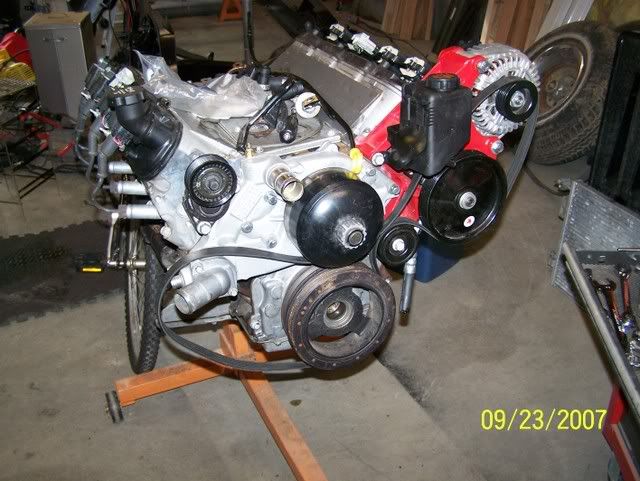 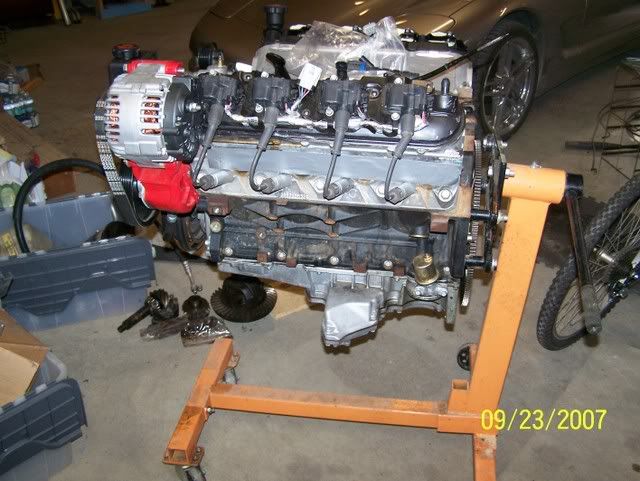 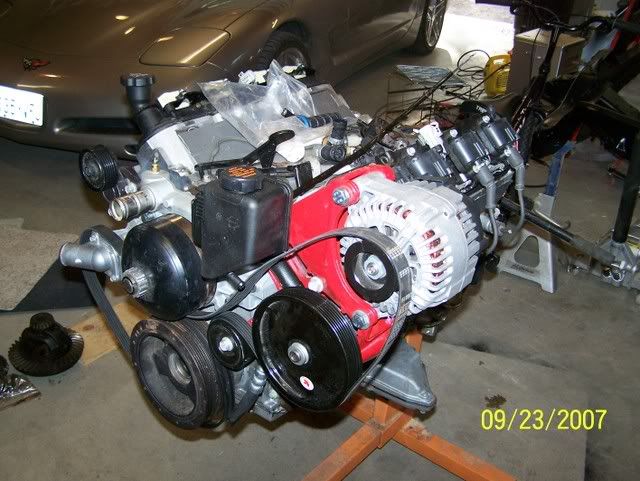 and here's the grill I got 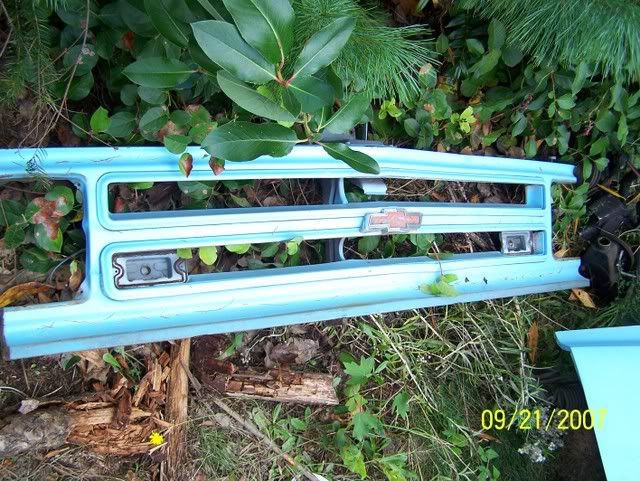
|
|
|

|
|
|
#43 |
|
Senior Member
Join Date: Aug 2002
Location: Valley Center KS
Posts: 3,524
|
Re: Ackattack's Pro touring restoration thread
ASSEMBLY HAS BEGAN!!!!!
Though its not much, I did get the front engine cross member bolted in today. My first piece of re-assembly. 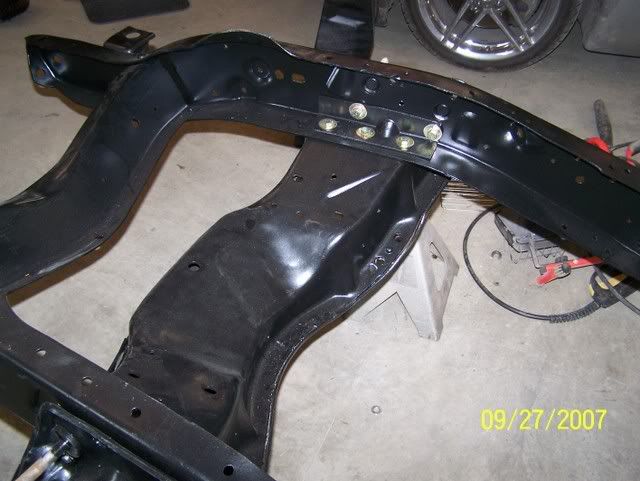 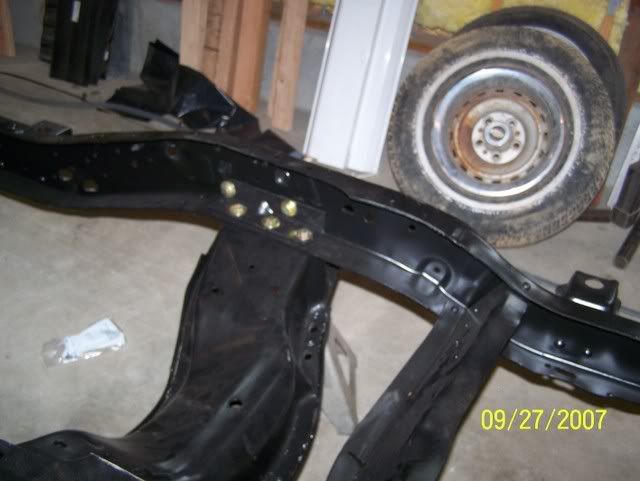 I also got the A/C bracket that I needed (though I have to get a pulley for it) so I decided to see if it was going to clear the frame rails. 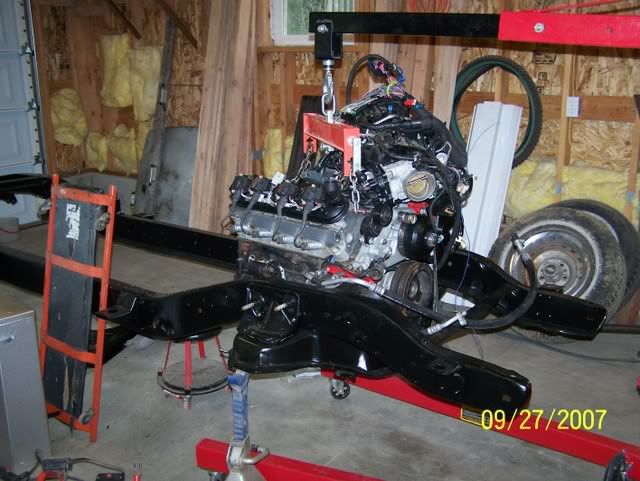 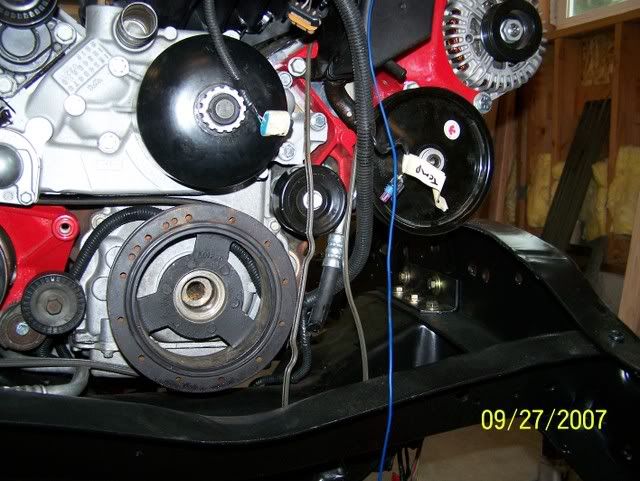 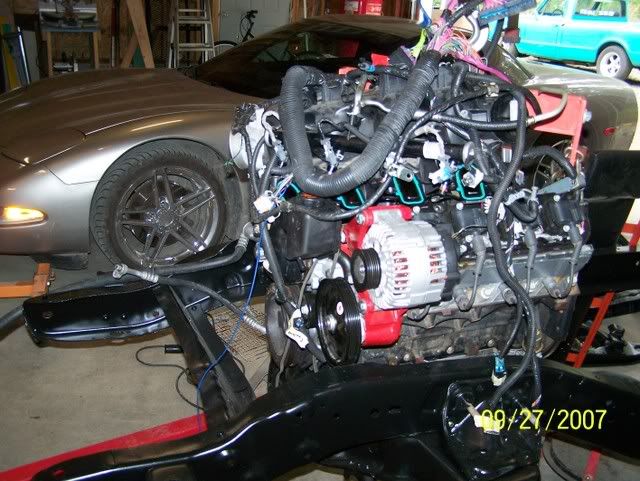 looks like I'll have to notch out the drivers side frame rail to clear the power steering pulley. It looks like the A/C compressor will fit down into the frame rail. But, I don't have my engine stands or engine mounts yet, so it's kinda hard to tell for sure if I'll be able to slide it in there while its hanging on the cherry picker. |
|
|

|
|
|
#44 |
|
Registered User
Join Date: Aug 2006
Location: Florida
Posts: 1,684
|
Re: Ackattack's Pro touring restoration thread
s&p does have a "high side" a/c relocating bracket kit. Comes with a belt also, I think. As with all from s&p it's pricey.
__________________
1986 C10 SWB 6.0/6l90e Miami...Flee it like a native |
|
|

|
|
|
#45 | |
|
Senior Member
Join Date: Aug 2002
Location: Valley Center KS
Posts: 3,524
|
Re: Ackattack's Pro touring restoration thread
Quote:
Today I made another salvage yard run. I got the LT1 camaro brake calipers I need as well as another wiring harness for the motor. This one is the correct harness for the transmission (4L60E) I'll be using...rather than modifiying the one I have. I also got the underhood fuse block along with some other fuse block fittings (plug into the back of the fuse block). I'm hoping this will simpliyfiy some of the wiring. I also got the ALDL connector from inside the truck. When I got home I fired up my parts truck, pulled it over to in front of the garage and proceeded to tear apart the front end. I took off the grill, fenders, inner fenders, hood, and cowl. The inner fenders I'll be using as they're in pretty good shape. The rest is for sale. The radiator core support is also solid, so I'll be using that too...but I didn't pull it yet since it's still in "driveable" condition. Here's a pic of the passenger side inner fender...not too much damage. 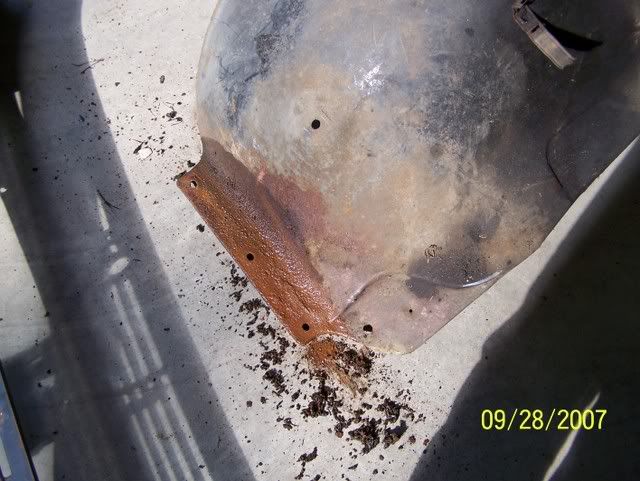
|
|
|
|

|
|
|
#46 |
|
Senior Member
Join Date: Aug 2002
Location: Valley Center KS
Posts: 3,524
|
Re: Ackattack's Pro touring restoration thread
I got the Trans Am sold!!! All in all, I made about $1500 off of it, plus I drove it for 3 months!
Since I have some money to play with now, I ordered some parts: ECE extreme drop member poly trailing arm bushings poly body mounts poly tranny mount poly front control arm bushings (for the 73 a arms) ECE supertrack bar ECE 2 1/2" drop spindles ball joints eaton posi and install kit 1350 series pinion yoke braided stainless steel brake lines tubular style engine stands and mounts lower control arm u-bolts there might be a few more things I'm forgetting. I also need to order lower control arm grease seals headers rear rotors (caprice) front wheel bearings and rotors airbag stuff .....and the list goes on and on That should keep me busy for awhile, and also allow me to get the rear end in so I can measure for the C-notch. Also, I can get the engine in to clearance the frame for the power steering pulley. |
|
|

|
|
|
#47 |
|
Licensed to Thrill!
Join Date: Apr 2006
Location: Northwest, GA
Posts: 1,673
|
Re: Ackattack's Pro touring restoration thread
If I ever "redo" my truck, it'll be a Pro-Tourer.
I'll enjoy watching this build. DLB |
|
|

|
|
|
#48 |
|
PITbut
Join Date: Sep 2007
Location: monroe washington
Posts: 3,054
|
Re: Ackattack's Pro touring restoration thread
Hey Ack. What size compressor are you using on that sandblaster you have there?
Also, any more pics or detailed instructions on how your hanging on to that cab as your pulling it off with the cherry picker??? |
|
|

|
|
|
#49 |
|
Senior Member
Join Date: Aug 2002
Location: Valley Center KS
Posts: 3,524
|
Re: Ackattack's Pro touring restoration thread
60 gallon 220V air compressor from home depot that I got several years ago....still working....but for an oil lubed one it's pretty loud. I kinda got my eye on one at sears (2 stage 60 gal) but I don't know if its worth upgrading.
The way I picked up the cab was a bad way. I used 2 chains. Each went from the front cab mount hole to the rear seat bolt hole, then I think I used a load leveler to connect the too and then to the cherry picker. The next one I pull (if I use the cherry picker) I'll make a frame on the roof and lift using that. oh, got the a arm seals and headers ordered, and KP components is working out the details for my airbags. |
|
|

|
|
|
#50 |
|
Senior Member
Join Date: Aug 2002
Location: Valley Center KS
Posts: 3,524
|
Re: Ackattack's Pro touring restoration thread
Well I've been too busy to update the my build thread. Between trying to work out, finishing my bonus room into a home theater and the project truck I'v been busy
 I got the ECE drop member installed, the poly bushings put in the rear control arms and the rear end mounted into the frame. I also began to assemble the rearend, though I had to get a 1 5/16 in socket to install the 1350 series u-joint, so that is on pause for now. I also need a in-lb dial torque wrench. I did get new outer wheel bearings and seals installed. The bearing races installed into the housing. The ring gear swapped onto the posi unit. 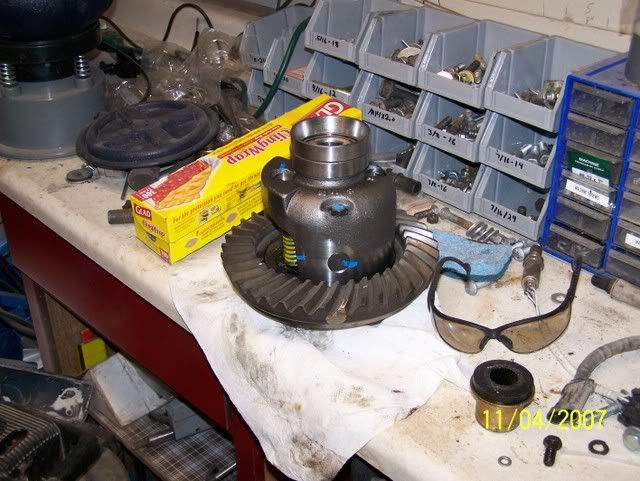 I also got the rear calipers mocked up. Looks like they will work. I'm going to take it all back apart and powder coat the bracket and have the caliper polished. I still need to order rotors. 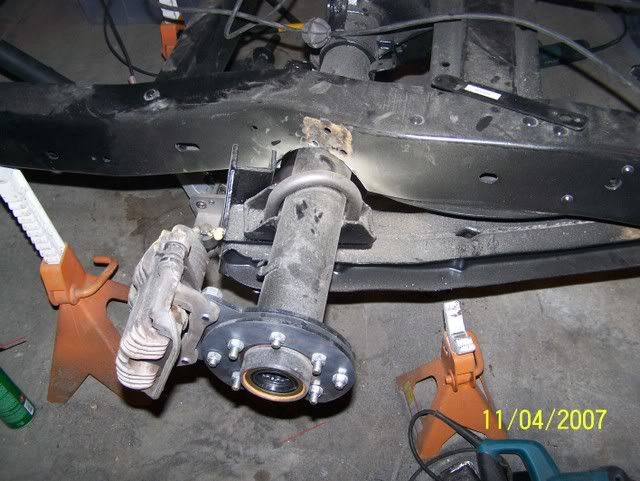 As you can see in the above picture I also started on the rear notch. I got one side welded in tonight. One more side to go, plus some grinding, and then touching up the paint. 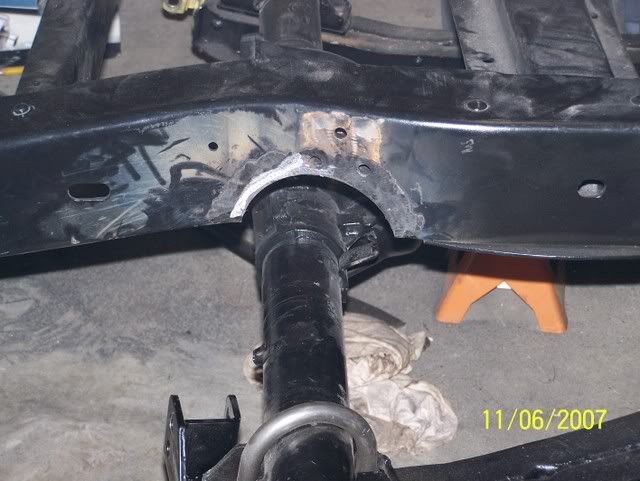 I also notched the frame a little for some additional clearance for the A/C compressor lines. I'm going to wait to get the transmission before I notch the frame for the power steering pulley. I'm picking up the transmission this weekend. 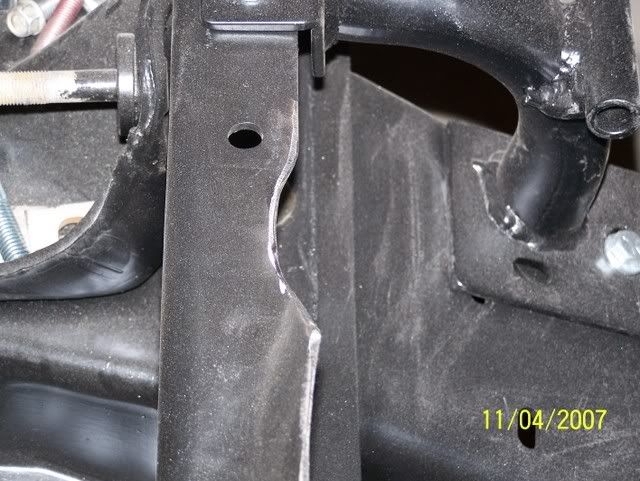 I was going to use 73+ upper control arms, but I fought with the poly bushings, and said F*&^ it and went and grabbed an extra set of the correct control arms and sand blasted them. I'm going to go ahead and powder coat them too. 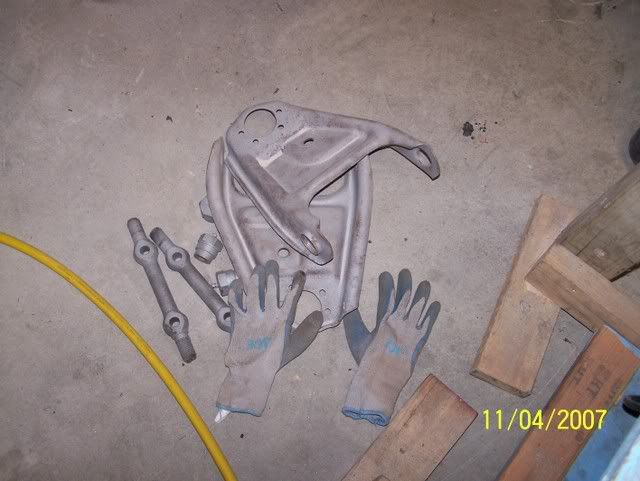 I got the engine stands installed. 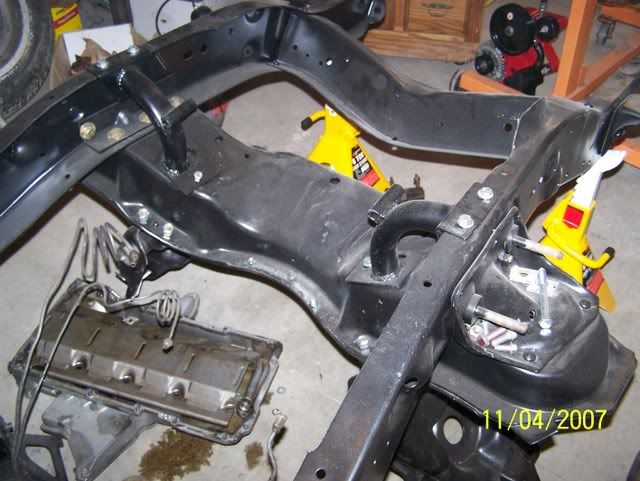 And then test fitted the engine. I made my own engine mount adapter plates too. 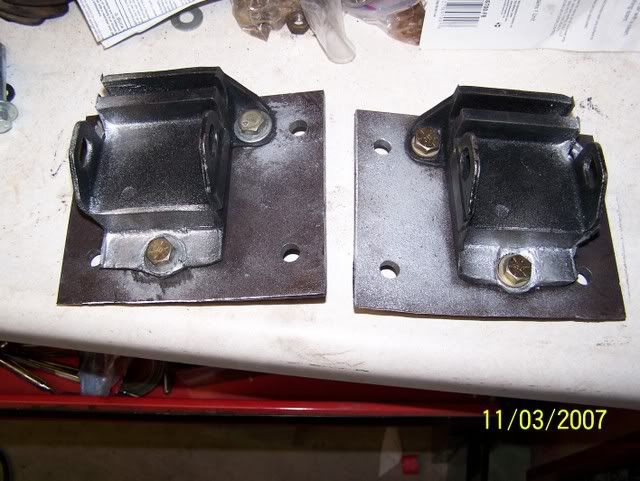 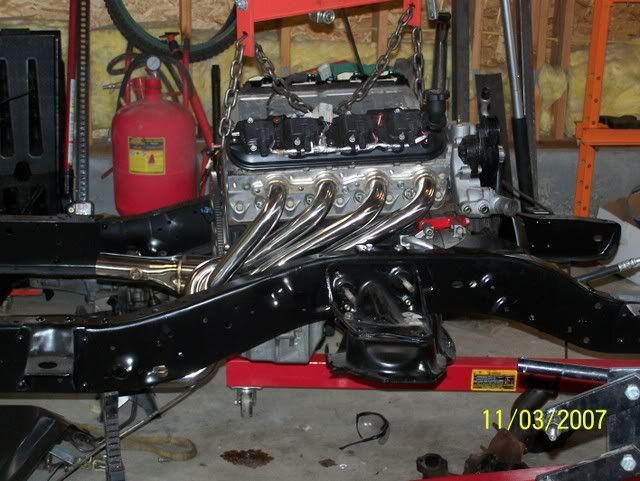 I got the headers off of ebay. They're stainless steel and were only $350. They look good. My only complaint is that the bolting flange is a little off, so I'll have to fix that. These are the same brand of headers I also have on my corvette. Clearance is going to be tight, but they should work. I can't tell 100% until I get the tranny in place. My biggest concern with them is clearance for the frame mounted shift linkage thing from the steering column. The headers do tuck up nicely though! Let's see....also made another trip to the salvage yard. I was in search of a good core support. I thought I was going to use the core support from my parts truck that is in very good shape for being an original, but I have since found out that the 69+ are different than the 67-68. The salvage yard didn't have any better condition ones than what I already have. I did manage to pick up a van tilt column though. 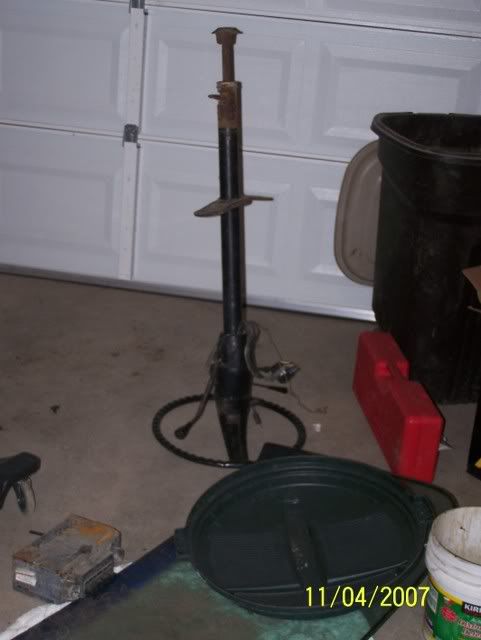 So that's all for now. I have a 4 day weekend coming up, so I'm hoping to bust out some more work. |
|
|

|
 |
| Bookmarks |
| Thread Tools | |
| Display Modes | |
|
|