
 |
Register or Log In To remove these advertisements. |
|
|
|
|||||||
 |
|
|
Thread Tools | Display Modes |
|
|
#26 |
|
Registered User
Join Date: Apr 2009
Location: Faribault, MN
Posts: 385
|
Re: Bartmans AD-S10 Chassis Swap
Jeez, I wouldn't mind that cab. I have a good top that could be chopped on it.
|
|
|

|
|
|
#27 |
|
Registered User
Join Date: Mar 2009
Location: Derby Kansas
Posts: 564
|
Re: Bartmans AD-S10 Chassis Swap
That's what I thought about doing and that is why I set this cab on the chassis for mock up. It has a lot less rust in the front fender attachment area, but both cowl sides have creases from the doors and inner and outer rear cab corners are rotten and there are a several other dents.
I have to replaces the same areas on my other cab and it has fare less dents and dings and a good roof. The only thing really bad about my original cab is it looks like someone hit the voltage regulator with a 10 pound sledge and wrinkled the top corner of the firewall. 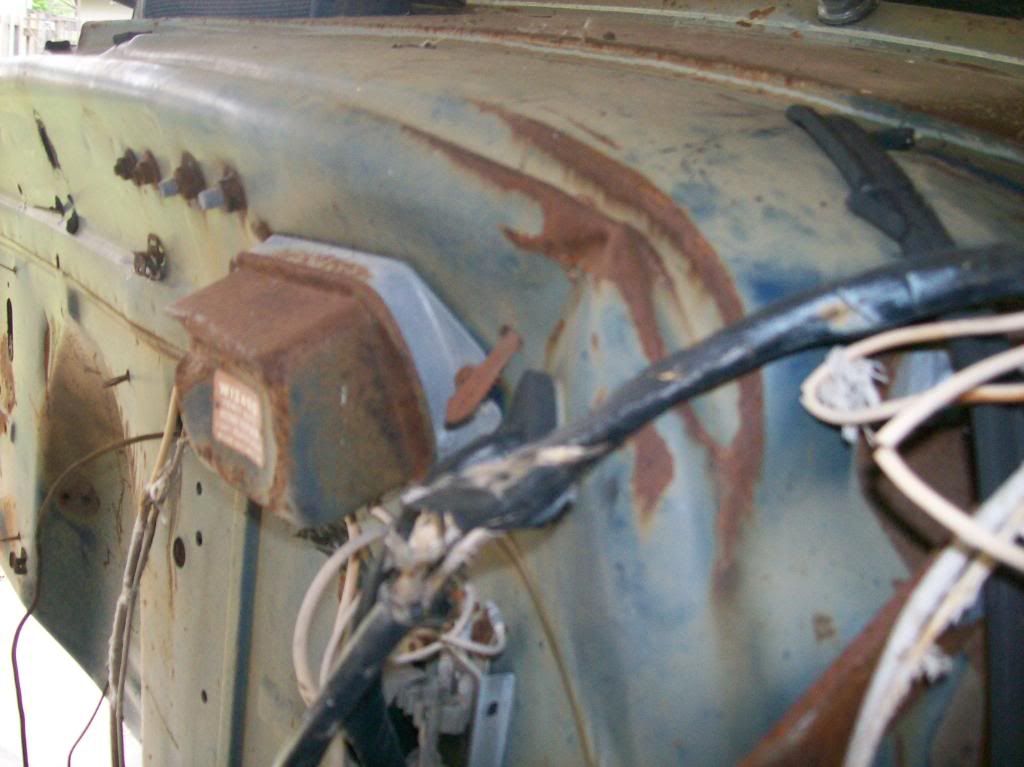 So I plan to cut a section out of the caved in cab and fix that.
__________________
av8tr33337 AKA Bartman  Email av8tr33337@yahoo.com Email av8tr33337@yahoo.comBartman's Ad-S10 Chassis Swap http://67-72chevytrucks.com/vboard/s...d.php?t=415418 My First Youtube Video http://www.youtube.com/watch?v=B6hSt...eature=channel More Pics of the 51 Project http://s668.photobucket.com/albums/v...hassis%20Swap/ 1951 3100 Pickup |
|
|

|
|
|
#28 |
|
Registered User
Join Date: Mar 2009
Location: Derby Kansas
Posts: 564
|
Re: Bartmans AD-S10 Chassis Swap
Funny you should ask. I pushed the truck outside and took those latest pics about 2 hours before the storm hit. I was planning on leaving it outside over night because I planned on cleaning the shop up a little bit the next morning. My wife heard that there was baseball size hail a few miles north so we put it back inside. We only got pea and marble sized hail here at the house but my niece across town got some a little bigger that golf ball size. There was also a Tornado heading right for us but it lifted about 3 miles away and didn't do any damage here. Gotta love Kansas!!!
__________________
av8tr33337 AKA Bartman  Email av8tr33337@yahoo.com Email av8tr33337@yahoo.comBartman's Ad-S10 Chassis Swap http://67-72chevytrucks.com/vboard/s...d.php?t=415418 My First Youtube Video http://www.youtube.com/watch?v=B6hSt...eature=channel More Pics of the 51 Project http://s668.photobucket.com/albums/v...hassis%20Swap/ 1951 3100 Pickup |
|
|

|
|
|
#29 |
|
Senior Member
 Join Date: Aug 2008
Location: Cedar Park, Texas
Posts: 7,500
|
Re: Bartmans AD-S10 Chassis Swap
Nice build!
|
|
|

|
|
|
#30 |
|
Registered User
Join Date: Mar 2009
Location: Derby Kansas
Posts: 564
|
Re: Bartmans AD-S10 Chassis Swap
Been a while since I posted anything. I went from only working part time to getting a full time job and continuing to work part time as well. 56-60 hrs a week. Needless to say, progress has been slow, but I have spent my rare free evenings and the occasional saturday trying to get the rust tamed on the S10 chassis. Also finished a little welding and mock up.
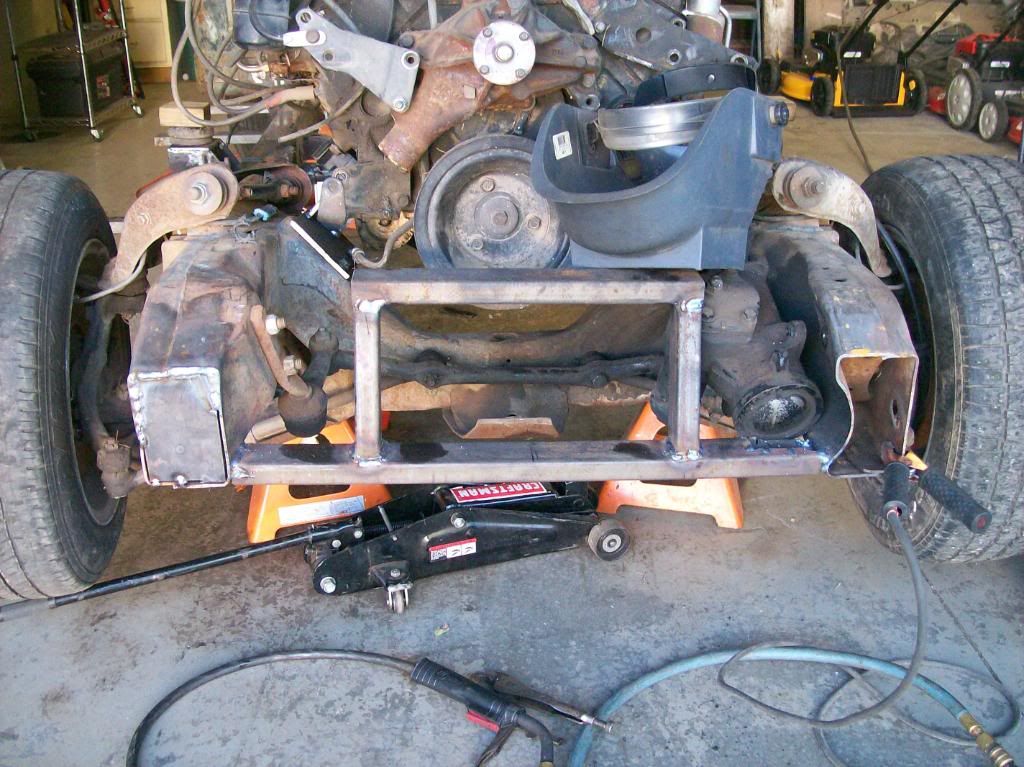 Boxed in the frame horns and fabbed a support for the front sheet metal and radiator. Going with a 19X22 crossflow. Boxed in the frame horns and fabbed a support for the front sheet metal and radiator. Going with a 19X22 crossflow. 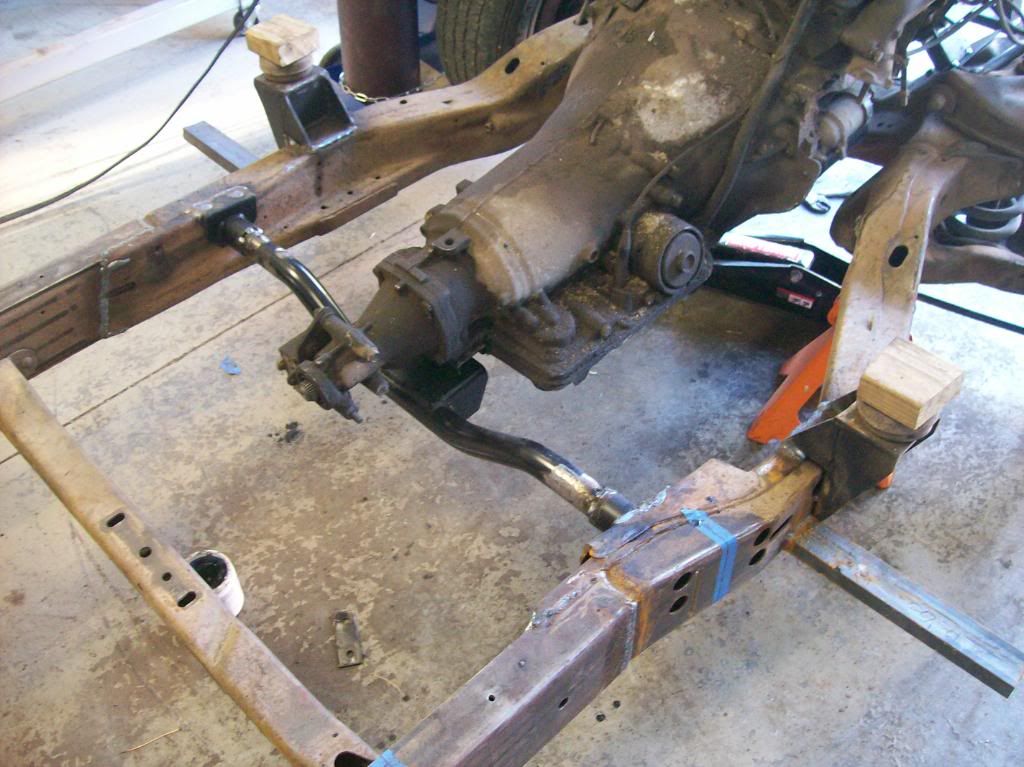 Got the tranny mount in place. Got the tranny mount in place.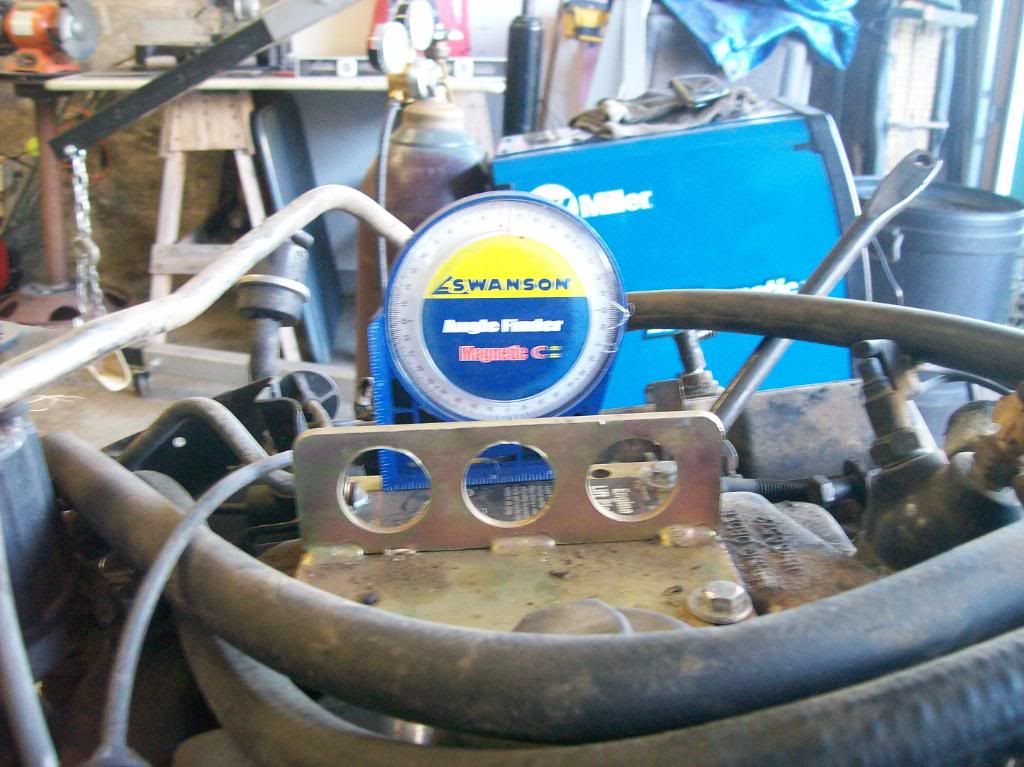 Not a clear pick but I ended up with a 4 degree slope, front to rear on the engine. Not a clear pick but I ended up with a 4 degree slope, front to rear on the engine.
__________________
av8tr33337 AKA Bartman  Email av8tr33337@yahoo.com Email av8tr33337@yahoo.comBartman's Ad-S10 Chassis Swap http://67-72chevytrucks.com/vboard/s...d.php?t=415418 My First Youtube Video http://www.youtube.com/watch?v=B6hSt...eature=channel More Pics of the 51 Project http://s668.photobucket.com/albums/v...hassis%20Swap/ 1951 3100 Pickup Last edited by av8tr33337; 10-31-2010 at 10:07 PM. |
|
|

|
|
|
#31 |
|
Registered User
Join Date: Mar 2009
Location: Derby Kansas
Posts: 564
|
Re: Bartmans AD-S10 Chassis Swap
Rust removal sucks. Media blasting is the way to go but I am just to cheap. I may have saved a few bucks but it was a b$%ch. If your time is worth anything to you I would suggest getting your project media blasted. I estimate I spent 20-30 hours, one 4 1/2 inch harbor fail grinder, 4 knotted wire cups, 3 flapper sanding wheels, 3 large cans of WD-40, one pint of Vapo-rust, and a good deal of my sanity, getting this thing ready for primer. And as hard as I tried I could not get ALL the rust out of the nooks and crannies around the crossmember attach points. But this is not a show truck. It's going to be a daily driver.
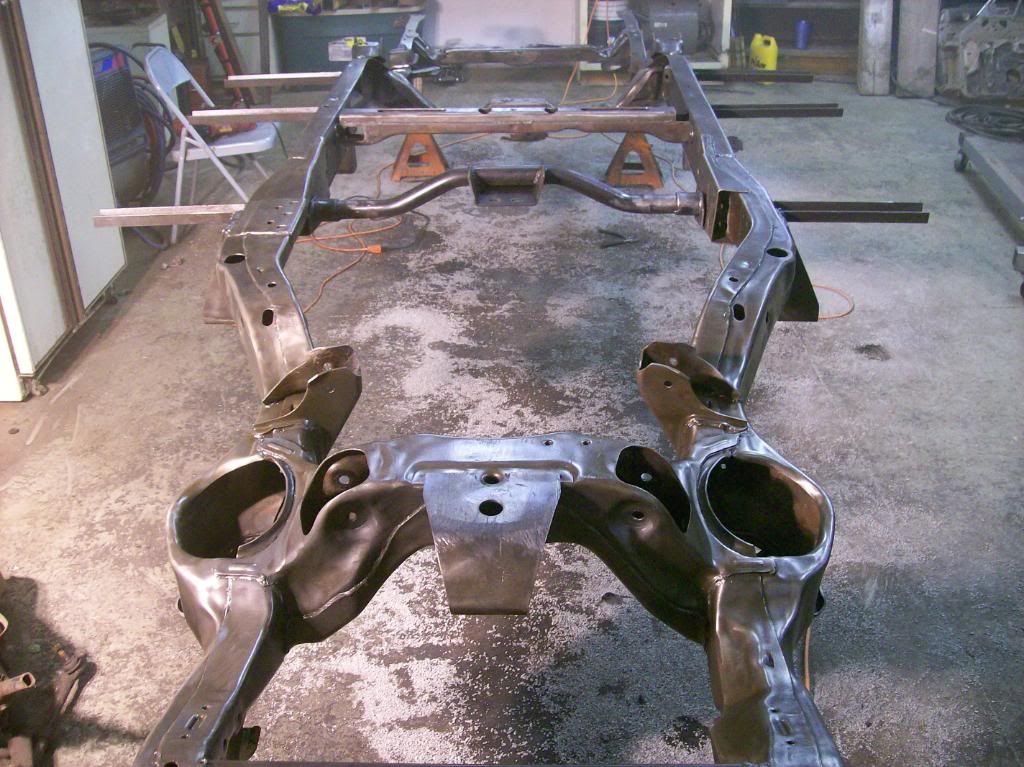 Getting there 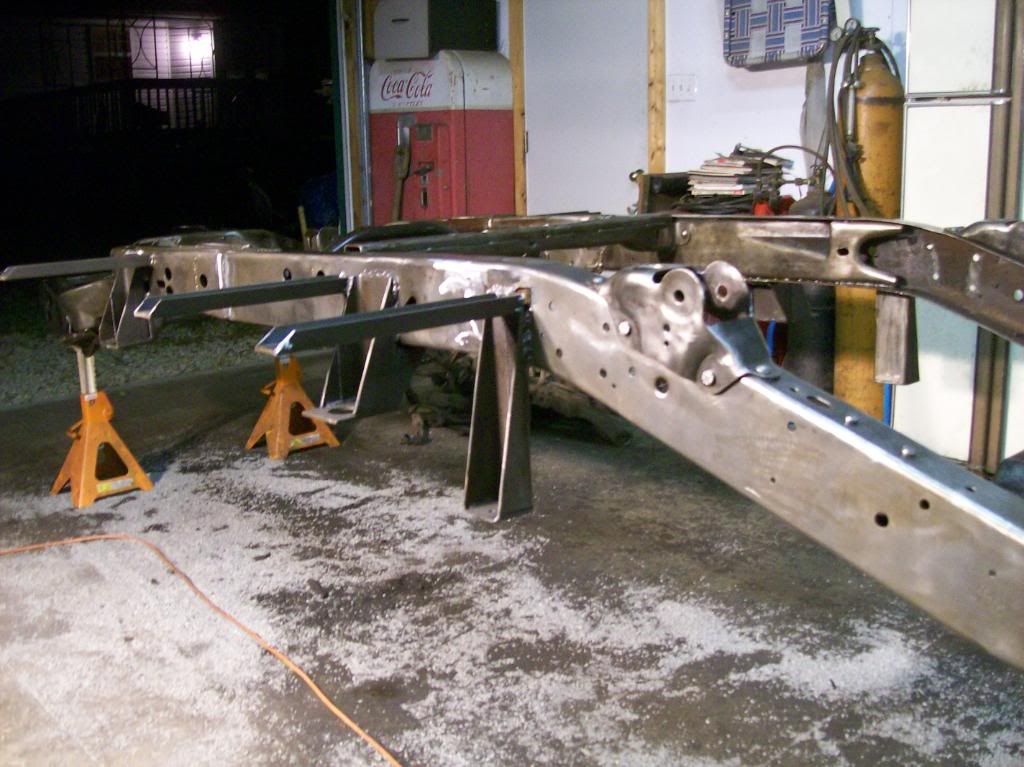 Starting to really shine. I put lacquer thinner in a spray bottle and wiped it all down a couple times after I thought I had all the rust off. Found a few places that needed more work. I hit them with the kniotted wire cups and wiped everything down a couple more times. It is as good as I can get it so time for primer. 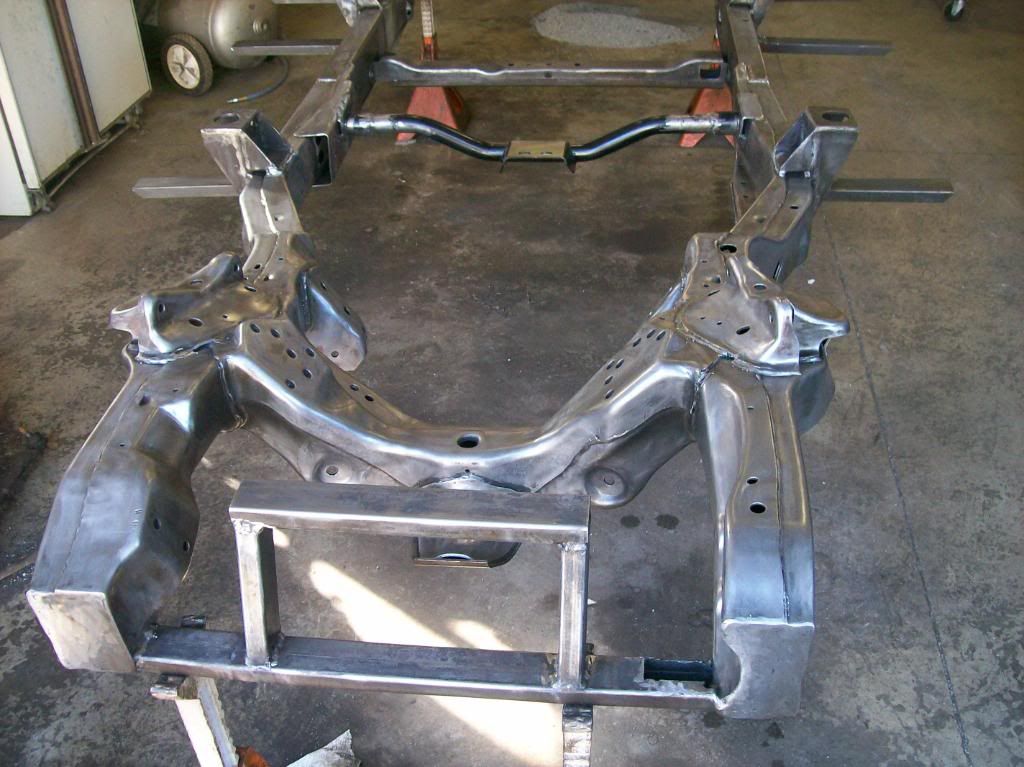 I did't get any pics of it in primer but I used epoxy primer and gave it 2 coats. Then after letting it set for 60 minutes I hit it with 2 coats of chassis black. It was ready to use right out of the can and went on really smooth. 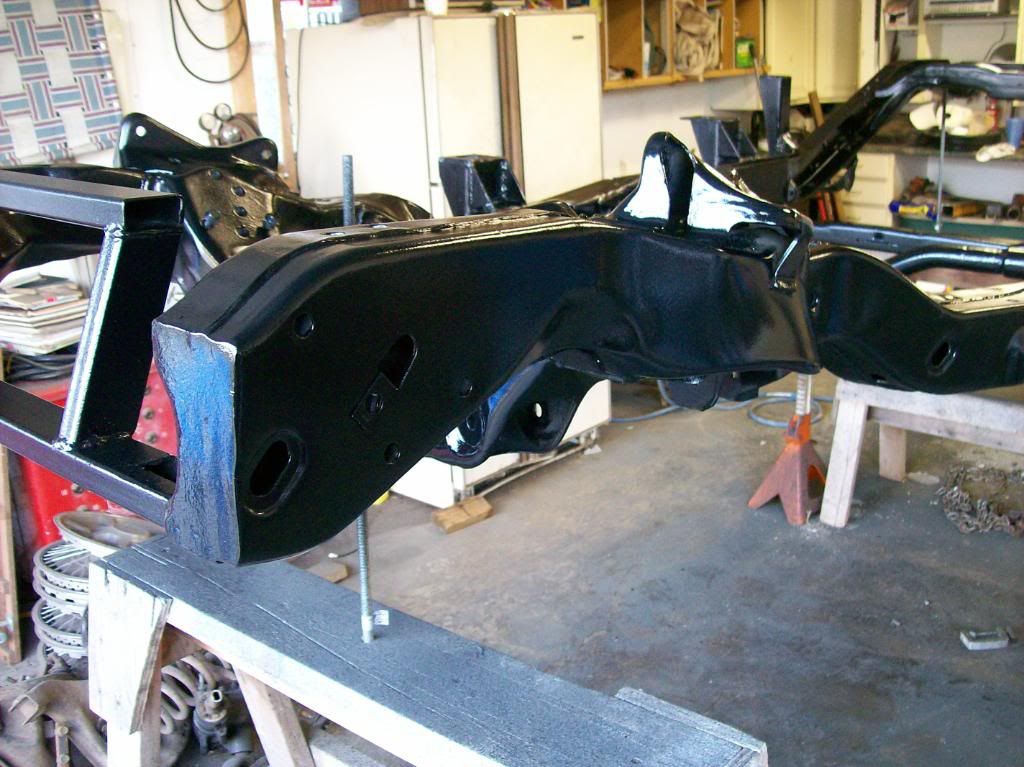 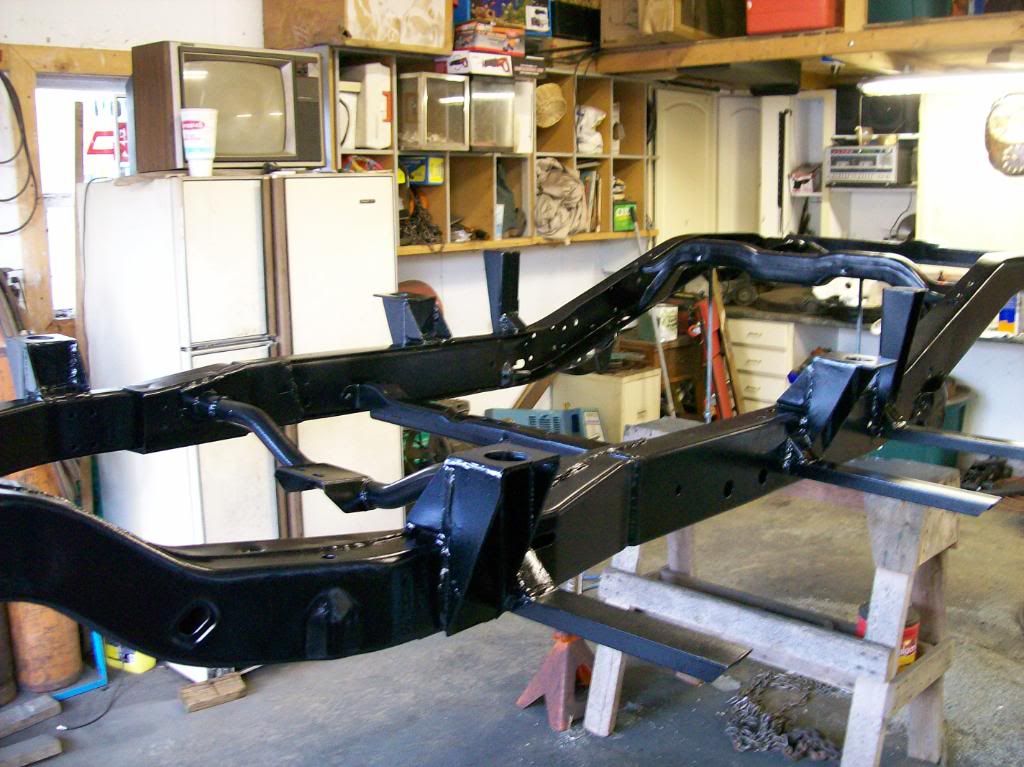 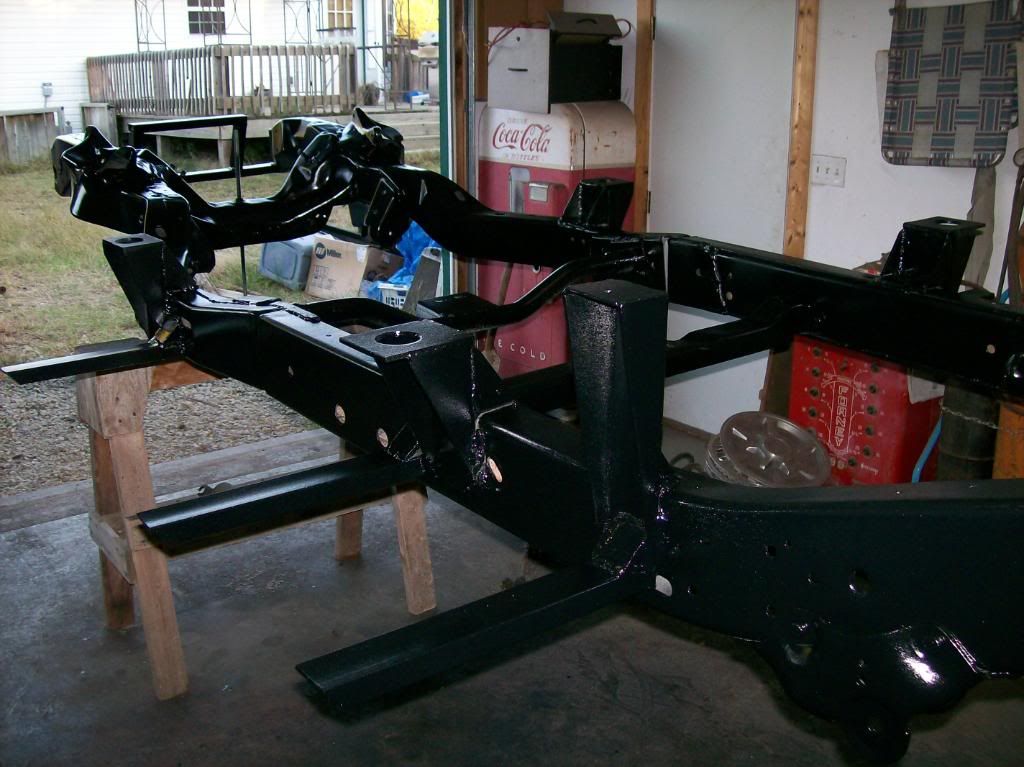 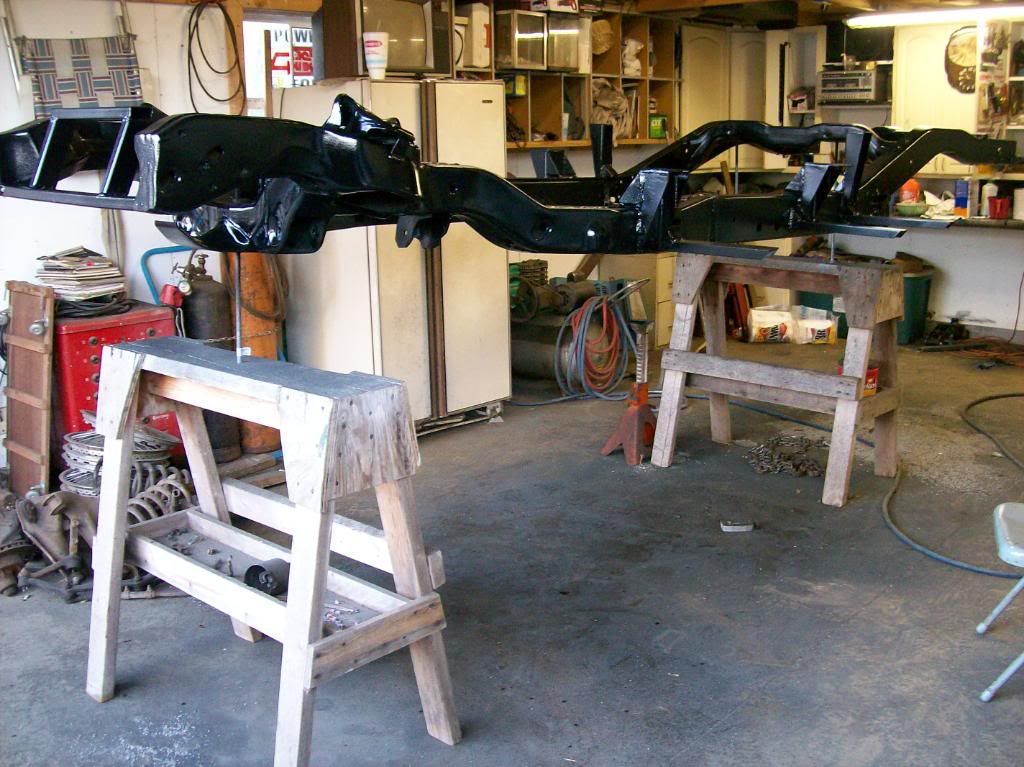 I am pretty happy with the results. I know there are a lot of opinions on how to do a project like this and I value others imput. For a first time builder I think it's going pretty well.
__________________
av8tr33337 AKA Bartman  Email av8tr33337@yahoo.com Email av8tr33337@yahoo.comBartman's Ad-S10 Chassis Swap http://67-72chevytrucks.com/vboard/s...d.php?t=415418 My First Youtube Video http://www.youtube.com/watch?v=B6hSt...eature=channel More Pics of the 51 Project http://s668.photobucket.com/albums/v...hassis%20Swap/ 1951 3100 Pickup Last edited by av8tr33337; 10-31-2010 at 10:09 PM. |
|
|

|
|
|
#32 |
|
Registered User
Join Date: Jun 2006
Location: Idaho
Posts: 8,800
|
Re: Bartmans AD-S10 Chassis Swap
Nice job. In 85 I burned up a 1/4 drill using a wire brush on mine. Did not have a compressor at the time. Half way thru this project I discovered 3M purple disks. They look like oat mill but cut like crazy and do not scratch or mess up the metal. DA with 80 grit works good on the flats too. Something magical about going from bare metal to black frame paint.
__________________
1959 Chevy Short Fleetside w/ 74 4WD drive train (current project) OrrieG Build Thread 1964 Chevelle Malibu w/ 355-350TH (daily driver) Helpful AD and TF Manual Site Old Car Manual Project |
|
|

|
|
|
#33 |
|
Registered User
Join Date: Mar 2009
Location: Vancouver Island, Courtenay B.C. CANADA
Posts: 578
|
Re: Bartmans AD-S10 Chassis Swap
That is one clean looking bare metal frame, what a lot of ugly work. I started out to do mine that way and after an hour or so I said screw it and loaded her up in the truck and off to the blasters it went. I would've never thought you could get it looking that nice, good job.
__________________
1962 Chevy blue SBFS 1957 Chevy yellow SBSS 1956 GMC red SBSS Nov 2017 ToTM https://www.facebook.com/groups/Cana...geChevyTrucks/ |
|
|

|
|
|
#34 | |
|
Registered User
Join Date: Mar 2009
Location: Derby Kansas
Posts: 564
|
Re: Bartmans AD-S10 Chassis Swap
Quote:
I've heard people refer to DA's a lot on here and I have no idea what that is. fill me in. I know about orbital and jitter bug sanders but I am at a loss on this one.
__________________
av8tr33337 AKA Bartman  Email av8tr33337@yahoo.com Email av8tr33337@yahoo.comBartman's Ad-S10 Chassis Swap http://67-72chevytrucks.com/vboard/s...d.php?t=415418 My First Youtube Video http://www.youtube.com/watch?v=B6hSt...eature=channel More Pics of the 51 Project http://s668.photobucket.com/albums/v...hassis%20Swap/ 1951 3100 Pickup |
|
|
|

|
|
|
#35 |
|
Registered User
Join Date: Mar 2009
Location: Derby Kansas
Posts: 564
|
Re: Bartmans AD-S10 Chassis Swap
I thought I would Post a few pics of the frame shortening process just in case anyone needs a visual.
 First I followed the advice of another forum member and put two strips of tape on the outside of each side of the frame 17 inches apart center to center. Then I actually drew lines down the middle of each piece of tape (using a square) that were exactly 17 inches apart. I am removing 5 inches. So starting with 17 inches I should wind up with exactly 12 inches between the lines when finished. I tried grinding the factory welds off first and got no where fast. I then made cuts about an 1/8 of an inch inside of, and along the factory welds.  After separating the front half from the back half, I cut 5 inches off the back half of the chassis  This is what I ended up with.  You will have to notch the chassis in a couple of the inside corners on the back half so the chassis rear half will slide back inside the front half. I have heard some guys say they butted theirs together but I found out I could actually slide them back together this way. after tacking it together you will also need to notch the inside corners of the front half of the chassis and beat it in to where it is closer to the rear half due to the the rear half narrowing slightly thru this area. It sounds confusing but once you get into it for yourself it should make sense. This is just my 2 cents worth on the process. I also found that I don't weld very well on vertical surfaces so I used my cherry picker to flip the chassis on it's side and upside down so I could weld it more easily. Another hint for you is to use a ratcheting tie down strap to pull the two halves together and hold it in place while you tack things back together. I fastened one end to the old carrier bearing cross member and the other end to the skid plate on the front cross member. Make sure to throw a straight edge on the bottom of the chassis to make sure it is all straight before welding. Or if you are doing all this on jack stands that you have all leveled, etc, you should be able to check the bottom of the chassis with a level to ensure everything is straight. Also measure from a couple of of points on both sides of the chassis to make sure one side is not longer that the other.
__________________
av8tr33337 AKA Bartman  Email av8tr33337@yahoo.com Email av8tr33337@yahoo.comBartman's Ad-S10 Chassis Swap http://67-72chevytrucks.com/vboard/s...d.php?t=415418 My First Youtube Video http://www.youtube.com/watch?v=B6hSt...eature=channel More Pics of the 51 Project http://s668.photobucket.com/albums/v...hassis%20Swap/ 1951 3100 Pickup Last edited by av8tr33337; 11-02-2010 at 11:40 PM. |
|
|

|
|
|
#36 |
|
Registered Chevy Owner
Join Date: Aug 2008
Location: Snohomish, wa
Posts: 1,557
|
Re: Bartmans AD-S10 Chassis Swap
I knew you would come to the dark side eventually!
 You have made some awesome progress on your build. What are you going to do with the other frame that you started out with? I was hoping that you were going to finish that one because from what I've read and understand no very very few have finished it. Keep up the great work and keep those pic comin'. And don't forget to fish plate over your frame splice. Best to error on the side of caution.
__________________
Love is fleeting, but Chevy trucks are forever!!!!  1970 Chevy CST C10 long box 350/400  2008 Chevy Silverado short box 4x4 Had; 1951 Chevy short box 307/T5 1988 Chevy shot box 4x4 350/350 1971 Chevy C10 long box 4x4 350/350 1971 Chevy C20 long box 350/350 1971 Chevy C10 long box 350/350 |
|
|

|
|
|
#37 |
|
Registered User
Join Date: Jun 2006
Location: Idaho
Posts: 8,800
|
Re: Bartmans AD-S10 Chassis Swap
while you did not mention it I assume you established and the check diagonal points to make sure it is square. Side to side length can be the same but pulled into a trapazoid.
__________________
1959 Chevy Short Fleetside w/ 74 4WD drive train (current project) OrrieG Build Thread 1964 Chevelle Malibu w/ 355-350TH (daily driver) Helpful AD and TF Manual Site Old Car Manual Project |
|
|

|
|
|
#38 |
|
Senior Member
 Join Date: Aug 2008
Location: Cedar Park, Texas
Posts: 7,500
|
Re: Bartmans AD-S10 Chassis Swap
|
|
|

|
|
|
#39 |
|
Registered User
Join Date: Mar 2009
Location: Derby Kansas
Posts: 564
|
Re: Bartmans AD-S10 Chassis Swap
Thanks for pointing that out Orrie. Yes I referenced points on both sides and made diagonal measurements. I measured everything repeatedly, tweaked it where needed, until I was satisfied that it was all as straight as I could get it.
__________________
av8tr33337 AKA Bartman  Email av8tr33337@yahoo.com Email av8tr33337@yahoo.comBartman's Ad-S10 Chassis Swap http://67-72chevytrucks.com/vboard/s...d.php?t=415418 My First Youtube Video http://www.youtube.com/watch?v=B6hSt...eature=channel More Pics of the 51 Project http://s668.photobucket.com/albums/v...hassis%20Swap/ 1951 3100 Pickup |
|
|

|
|
|
#40 |
|
Registered User
Join Date: Jul 2010
Location: Columbia Mo
Posts: 395
|
Re: Bartmans AD-S10 Chassis Swap
Bartman are you still out there? Anything new?
__________________
http://67-72chevytrucks.com/vboard/s...d.php?t=413926 http://youtu.be/Qe9xJUhWkWc |
|
|

|
|
|
#41 |
|
Registered User
Join Date: Jan 2011
Location: Wichita, KS
Posts: 52
|
Re: Bartmans AD-S10 Chassis Swap
Hey Bartman, you've made a ton of progress since we talked over on that other site! Looks great so far! I need come down and check your project out since you are right down the road. I'm starting another one now, you're welcome to swing by and shoot the breeze and check it out.
__________________
My S-10 swap thread: http://www.killbillet.com/showthread.php?t=16296 |
|
|

|
|
|
#42 |
|
Registered User
Join Date: Sep 2004
Location: Wichita, Ks
Posts: 47
|
Re: Bartmans AD-S10 Chassis Swap
Yeah whats the progress bartman? Where in Derby do you live? I live just past Chet Smith in Park hill. I may have to pick your brain about what youve done. I have a 52 shortbed that I put a 383/th350 combo in it and did the C-10 ifs swap. I also have a 54 longbed both in NM at my moms waiting to be picked up.
|
|
|

|
|
|
#43 |
|
Registered User
Join Date: Dec 2003
Location: Thomasville, NC
Posts: 1,877
|
Re: Bartmans AD-S10 Chassis Swap
looking good,keep the pictures coming & keep on truckin''

__________________
My Truck: 2.5 drop front, 4 & 5/8 in rear, 350cubic in. been bored .60 over, 700r4 (soon), 3 speed (on tree for now).rims & tires size,15x8 ralleys 5 on 5,P275/60R15. Members I have met: Pickupman, 1972 Super Cheyenne, Stepside,Chis Mc Bride. tsnow67,joel.e, 
|
|
|

|
|
|
#44 |
|
Registered User
Join Date: Mar 2009
Location: Helena, Alabama
Posts: 453
|
Re: Bartmans AD-S10 Chassis Swap
any updates.
__________________
1950 GMC http://67-72chevytrucks.com/vboard/s...d.php?t=335667 1965 F*rd Stang http://67-72chevytrucks.com/vboard/s...d.php?t=399891 1931 F*rd Model A http://67-72chevytrucks.com/vboard/s...d.php?t=496016 1954 Chevrolet Pickup http://67-72chevytrucks.com/vboard/s...d.php?t=486183 |
|
|

|
|
|
#45 |
|
Registered User
Join Date: Dec 2009
Location: killeen tx 76542
Posts: 193
|
Re: Bartmans AD-S10 Chassis Swap
we at the shop are in the process of building a 51 for the shop owners father. hope to have it done by Christmas, so we can give it to him. your body mounts are an inspiration.
keep up the good work
__________________
A C Ward Retired US Army 66 El Camino 67 SWB underwent major Surgery- http://67-72chevytrucks.com/vboard/s...d.php?t=776475 |
|
|

|
|
|
#46 |
|
Registered User
Join Date: Mar 2009
Location: Derby Kansas
Posts: 564
|
Re: Bartmans AD-S10 Chassis Swap
WOW!!!!! I have been away from this site for so long I feel like Rip Van Winkle!!!
Sorry it's been so long. Money has been really tight and you know that working 2 jobs to make ends meet sucks a$$. Thanks for all the comments and cudos. I'm getting the itch to work on the old truck again and I do have a few things I can do that won't cost an arm and a leg. I bought all the ball joints and control arm bushings last summer so I can get those changed out. I also came across a way to remove rust from my control arms, etc that might be helpfull to someone. You mix 1 gallon of molasses with 10 gallons of water and submerge your parts in that solution. I went to a farm supply store and picked up some feed grade molasses like you would use for livestock or for a deer lick. I got a 30 gallon trash can and doubled the recipe and it worked pretty well. I will still have to shine everything up with knotted wire brushes, but it will be minimal. I also hung some rusty old headers in the solution and they came out nice too. Again just need a little shining up. I even hung an inexpensive thermostatically controlled stock tank heater in it so it wouldnt freeze over the winter. For you guys in the Derby Ks. area or anyone close by you are all welcome to drop by and check out my work. I really need to do a good cleanup in the shop before I get started so this weekend will probably be dedicated to that. Wish I had more pics to post but I think I have pretty much covered all my progress. Oh, I just thougth of a question for anyone who has an opinion. After I painted the Chassis I started to bolt in my motor mounts that I built and notice that one of the mounts sits about 1/2 to 3/4 of an inch lower (would make the motor sit about 1/2 inch to the right of the center line of the chassis and ever so slightly lower on the left side. I considered scraping them and starting over, but now I'm thinking that I would probably be the only one who would ever notice it and I know that some vehicles deliberatley moved the motor as much as 2 inches to one side or the other from the factory. Should I rebuild the mounts or go with them as they are?
__________________
av8tr33337 AKA Bartman  Email av8tr33337@yahoo.com Email av8tr33337@yahoo.comBartman's Ad-S10 Chassis Swap http://67-72chevytrucks.com/vboard/s...d.php?t=415418 My First Youtube Video http://www.youtube.com/watch?v=B6hSt...eature=channel More Pics of the 51 Project http://s668.photobucket.com/albums/v...hassis%20Swap/ 1951 3100 Pickup |
|
|

|
|
|
#47 |
|
Registered User
Join Date: Jan 2007
Location: York, Pa.
Posts: 1,386
|
Re: Bartmans AD-S10 Chassis Swap
av8tr33337, I know how things can be. I work all the time too. I have 3 kids and my wife stayes home with the youngest. It does not pay for her to work and for us to pay for day care. I will have to try the molasse solution and see how it works out. As for the motor mount I do not think I would redo it. If it sets fairly level side to side and just sets in the frame one way more I would run it. I know to that some cars have thr motor one way more because of steering coming down. Hope that helps.
Shannon
__________________
48 Panel Truck 1948 Chevy / S10 1954 Chevy / S10 1951 Chevy / C4 47 Step van Lowered 1996 Dually |
|
|

|
|
|
#48 |
|
Registered User
Join Date: Jul 2010
Location: Columbia Mo
Posts: 395
|
Re: Bartmans AD-S10 Chassis Swap
Bartman! good to see you are still kicking,I feel your pain brother I am going to have to join the two job folks soon and man I am not looking forward to it, I have done it before but I was a lot younger and a lot less hurt.
My engine set low on the right side I used JTR mounts and had to pull the engine up as far as it would go and let it go a low as possible on the left and it still looks a slight bit of kilter but most people don't notice it. I got to see pictures of the molasses treatment.
__________________
http://67-72chevytrucks.com/vboard/s...d.php?t=413926 http://youtu.be/Qe9xJUhWkWc |
|
|

|
|
|
#49 |
|
Registered User
Join Date: May 2010
Location: Calgary, Alberta
Posts: 2
|
Re: Bartmans AD-S10 Chassis Swap
Great thread. Will you be posting any more photos?
|
|
|

|
|
|
#50 |
|
Registered User
Join Date: Mar 2009
Location: Derby Kansas
Posts: 564
|
Re: Bartmans AD-S10 Chassis Swap
Yes I will. I've been at a stand still due to lack of funds and lack of time, but I plan to start replacing control arm bushing, ball joints etc and get it back into a rolling chassis. I would really like to get it running and driving before next winter but that's pretty ambitious.
__________________
av8tr33337 AKA Bartman  Email av8tr33337@yahoo.com Email av8tr33337@yahoo.comBartman's Ad-S10 Chassis Swap http://67-72chevytrucks.com/vboard/s...d.php?t=415418 My First Youtube Video http://www.youtube.com/watch?v=B6hSt...eature=channel More Pics of the 51 Project http://s668.photobucket.com/albums/v...hassis%20Swap/ 1951 3100 Pickup |
|
|

|
 |
| Bookmarks |
| Thread Tools | |
| Display Modes | |
|
|