
 |
|
|
#26 |
|
Registered User
Join Date: Sep 2012
Location: Lawton Oklahoma
Posts: 308
|
Re: Posting pictures
it came from a 56' Nomad

__________________
People who make excuses didn't want to do it in the first place!  http://s1326.photobucket.com/albums/...cpZZ1QQtppZZ16 |
|
|

|
|
|
#27 |
|
Registered User
Join Date: Apr 2011
Location: Edmond, Ks
Posts: 595
|
Re: Posting pictures
Looks great on the truck! Is the nomad yours too?
__________________
Step by steps: Remove primer to reveal original paint Rebuild a carburetor See My Build - Cecilia!  Some people are like slinkys. Not worth much but funny as heck when pushed down stairs. |
|
|

|
|
|
#28 |
|
Registered User
Join Date: Aug 2011
Location: Patterson California
Posts: 1,133
|
Re: Posting pictures
here is how you do it, follow the instruction i have uploaded in a PDF format!!!!
__________________
MY 65 C20 BUILD http://67-72chevytrucks.com/vboard/s...d.php?t=483346 ......................_____ .........________//__{\_____ ,,,,,,,/__(O)___//___/__(O)_/ Last edited by Budman56; 09-28-2012 at 11:50 AM. |
|
|

|
|
|
#29 |
|
Registered User
Join Date: May 2011
Location: Anderson SC
Posts: 3,906
|
Re: Posting pictures
If you're using an IPod/IPhone, download the free Photobucket app and find the settings menu.
 Chose "Upload" and set the "Image size" to 640x640 max. All the pics you upload will now automaticly set to 640 max width/height. It saves this setting so you only have to do this once, not everytime you upload a pic. You can also create separate albums here under the "Default Album" tab for the photos to be uploaded into. I have a few for my different projects to keep things organized.  To upload a pic, go to the "Upload Media" menu and click "choose existing".  Choose which album, then click on the picture you want to upload.  Once you click on a pic it'll go to the "processing" page. Your pic is now uploaded, and you can access it in the "My Albums" tab, or on your account on Photobucket.com. 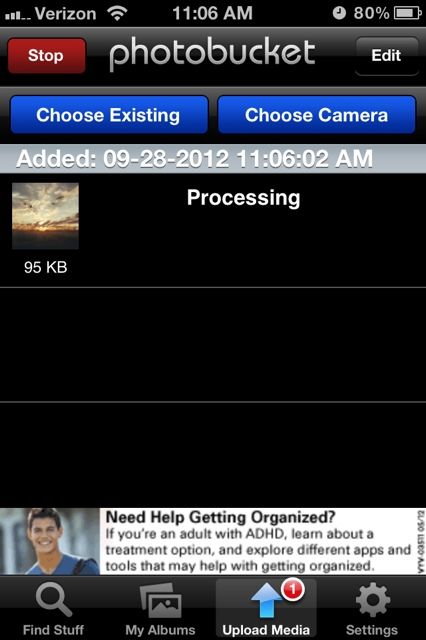 To post a pic from your iPod, go to the "My Albums" page and choose the album that you uploaded the pic to. 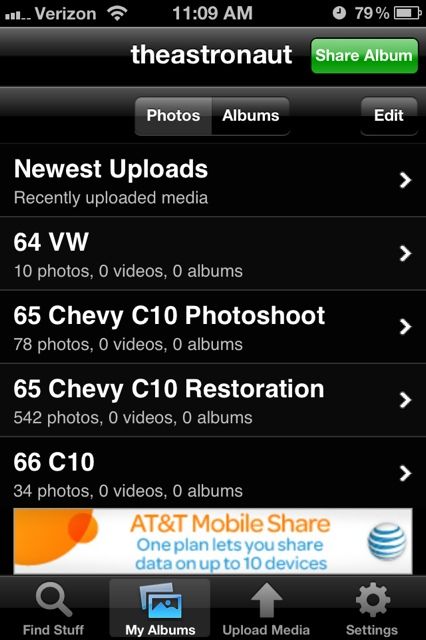 Choose the Album,  Then find the pic you want to upload, click on it to open it, then click the "i" at the bottom to open the link box. Click the bottom "IMG" code to copy the link for the forum.  All you have to do then is open Safari/67-72chevytrucks.com, and paste the IMG code in your forum message wherever you want the pic to show up. It goes quickly and smoothly once you get used to it, and it's way easier/quicker than using a digital camera and having to transfer the pics to your computer, then attatching them to your message using the forum's galllery. And you can take pics and post from your iPod (or any device with photobucket's app) wherever you are. If you want to post from a computer just find your account on photobucket.com. They're already resized and it's the same process- find the pic you want to upload, click the "IMG" code, then paste the code in your post. I like photobucket since there's no watermarks or ad bars in the pic itself, or visible/separate link codes- just the pic. 
__________________
Project Goldilocks '66 C10 Short Fleet BBW Build '65 C10 Highly Detailed Stock Restoration Thread '78 Camaro Targa Roof Build '55 International Metal/Body/Paint Work '66 F100 Full Rotisserie Restoration '40 Packard 120 Convertible Coupe Restoration How To Restore and Detail an Original Gauge Cluster How To Detail Sand Body Panels, Edges, Corners, Etc |
|
|

|
|
|
#30 |
|
Registered User
Join Date: Sep 2012
Location: Lawton Oklahoma
Posts: 308
|
Re: Posting pictures
Hey thanks for the Ipod info!
and No the Nomand is borrowed from the WWW. Just to show the paint. I have been working on this truck for over 3yrs, and it is my first, and may be my last! ha I had help with the engine and the 2 tone paint, I did all the masking, and my friend did the spraying. Then I came back and airburshed, then he cleared over it. All of this was done right where you see it in the pic. My garage..
__________________
People who make excuses didn't want to do it in the first place!  http://s1326.photobucket.com/albums/...cpZZ1QQtppZZ16 |
|
|

|
|
|
#31 |
|
Registered User
Join Date: Apr 2011
Location: Edmond, Ks
Posts: 595
|
Re: Posting pictures
Excellent work! It's that kind of in-my-own-garage work that breathes the best life into them. With me it's 80% sweat, 10% research, 10% billfold, and 10% insanity.

__________________
Step by steps: Remove primer to reveal original paint Rebuild a carburetor See My Build - Cecilia!  Some people are like slinkys. Not worth much but funny as heck when pushed down stairs. |
|
|

|
|
|
#32 |
|
Registered User
Join Date: Aug 2011
Location: Patterson California
Posts: 1,133
|
Re: Posting pictures
sorry the pdf would load up so here it is in photo's
1) DOWNLOAD THIS PROGRAM FROM HERE TO RESIZE YOUR PHOTO’S http://www.rw-designer.com/picture-resize 2) PUT THIS PROGRAM INTO THE SAME FOLDER THAT YOUR PHOTOS ARE IN THAT YOU WANT TO RESIZE. 3) GRAB THE PHOTO OR BATCH OF PHOTOS WITH YOUR MOUSE AND DRAG TO THE PHOTO RESIZER AND DROP IT ON THE ICON. 4) THE ICON WILL OPEN AND RESIZE THE PHOTOS AND DROP THEM BACK INTO THE SAME FOLDER WHEN ALL DONE SIMPLY HIT THE ENTER KEY TO EXIT THE PROGRAM. 5) NOW YOU HAVE THE RESIZED PHOTO IN THE SAME FOLDER WITH THE EXTENTION OF THE SIZE THAT YOU RESIZED. 6) GO TO CHEVY FORUM POST SOMETHING. 7) SCROLL DOWN THE PAGE AND GO TO MANAGE ATTACHMENTS CLICK ON THAT BUTTON. 8) CLICK ON THE BROWSE BUTTON. 9) DIRECT THIS TO WHERE YOU PUT YOUR PHOTOS SELECT THE PHOTO WITH THE SMALLER NUMBER AT THE END OF THE EXTENTION. 10) NOW YOU SEE IT ON THE BROWSE BUTTON 11) CLICK ON THE UPLOAD BUTTON AND NOW YOU SEE IT IN BLUE UNDER CURRENT ATTACHEMENTS IF YOU WANT MORE THAN ONE PHOTOUPLOADED YOU JUST REPEAT THE LAST STEPS ABOVE. 12) NOW CLICK ON CLOSE AFTER YOU HAVE UPLOADED YOUR RESIZED PHOTOS HIGHLIGHTED IN YELLOW WHEN YOU MOUSE OVER IT. 13) NOW YOUR BACK AT YOUR POST, NOW CLICK ON SUBMIT REPLY AND YOUR DONE 14) HERE IS YOUR PHOTO UPLOADED TO THE FORUM HAVE FUN!!!!
__________________
MY 65 C20 BUILD http://67-72chevytrucks.com/vboard/s...d.php?t=483346 ......................_____ .........________//__{\_____ ,,,,,,,/__(O)___//___/__(O)_/ Last edited by Budman56; 09-28-2012 at 04:19 PM. |
|
|

|
|
|
#33 |
|
Registered User
Join Date: Aug 2011
Location: Patterson California
Posts: 1,133
|
Re: Posting pictures
Read the text in the first post and follow the photos.
__________________
MY 65 C20 BUILD http://67-72chevytrucks.com/vboard/s...d.php?t=483346 ......................_____ .........________//__{\_____ ,,,,,,,/__(O)___//___/__(O)_/ Last edited by Budman56; 09-28-2012 at 04:20 PM. |
|
|

|
|
|
#34 |
|
Registered User
Join Date: Aug 2011
Location: Patterson California
Posts: 1,133
|
Re: Posting pictures
Read the text in the first post and follow the photos.
__________________
MY 65 C20 BUILD http://67-72chevytrucks.com/vboard/s...d.php?t=483346 ......................_____ .........________//__{\_____ ,,,,,,,/__(O)___//___/__(O)_/ Last edited by Budman56; 09-28-2012 at 04:20 PM. |
|
|

|
|
|
#35 |
|
Registered User
Join Date: Nov 2011
Location: fayetteville nc
Posts: 10,338
|
Re: Posting pictures
Great looking truck. Hope we get some more pics
__________________
1963 Short bed step side SBW 427 big block and borg warner T-16 HD 3 speed manual http://67-72chevytrucks.com/vboard/s...d.php?t=519869 1963 Short bed fleetside BBW 348 1st gen big block w/Powerglide http://67-72chevytrucks.com/vboard/s...d.php?t=619024 1964 Short bed trailer |
|
|

|
 |
| Bookmarks |
| Thread Tools | |
| Display Modes | |
|
|