
 |
|
|
#401 | |
|
Registered User
Join Date: Apr 2012
Location: Cambridge, Ontario, Canada
Posts: 1,771
|
Re: Markeb01 Build Thread
Quote:
__________________
Craigerrr My build thread, CRGRS 66 Winter Build: http://67-72chevytrucks.com/vboard/s...09#post5638709 |
|
|
|

|
|
|
#402 |
|
Registered User
Join Date: Apr 2012
Location: Cambridge, Ontario, Canada
Posts: 1,771
|
Re: Markeb01 Build Thread
Hey Mark, what intake manifold are you running? I like the oil filler tube on the intake. I also want to run some vintage valve covers, and put a pcv valve inconspicuously on the side of one of the valve covers. Hope you don't mind me posting this on your thread...
__________________
Craigerrr My build thread, CRGRS 66 Winter Build: http://67-72chevytrucks.com/vboard/s...09#post5638709 |
|
|

|
|
|
#403 |
|
Senior Enthusiast
Join Date: Feb 2007
Location: Spokane Valley, WA
Posts: 8,356
|
Re: Markeb01 Build Thread
Not at all, always enjoy the exchange. The intake manifold on my truck is an Edelbrock 7101 Performer RPM:
http://www.summitracing.com/parts/EDL-7101/?rtype=10 It originally belonged to my son and he ground off all the name and model details on its way to a full polish job. Then he lost interest, so it was sandblasted for a generic look. I also got him to bore out the oil fill blank on the front. Edelbrock now also offers the 2703 manifold with the oil fill hole open and the tube/cap included: http://www.speedwaymotors.com/Edelbr...ill,51954.html For the hidden smog valve connection, I created the system shown at the following link. It works perfectly, but my son moved on to other employment so we won't be recreating any duplicates: http://67-72chevytrucks.com/vboard/s...d.php?t=366853
__________________
My Build Thread: http://67-72chevytrucks.com/vboard/s...d.php?t=444502 |
|
|

|
|
|
#404 |
|
Registered User
Join Date: Apr 2012
Location: Cambridge, Ontario, Canada
Posts: 1,771
|
Re: Markeb01 Build Thread
Thank you Mark. Much appreciated!!
__________________
Craigerrr My build thread, CRGRS 66 Winter Build: http://67-72chevytrucks.com/vboard/s...09#post5638709 |
|
|

|
|
|
#405 |
|
Senior Enthusiast
Join Date: Feb 2007
Location: Spokane Valley, WA
Posts: 8,356
|
Re: Markeb01 Build Thread
In order to better play with the look of the 327/flag emblems, I scaled a photo of a real emblem to actual size, printed it out on photo paper and attached it to a chunk of refrigerator magnet so I could move it around.
At first the wife thought it was just too much foo-foo for a truck, but after showing her that GMC did the same thing in almost the same place she agreed it was a nice improvement. After 2 hours of internet research the new parts were ordered this afternoon. Sorry for the lousy picture but I just washed the truck yesterday and Iím trying to keep it clean so I can get some really nice photos once I can find a good location and have cooperative weather. Hereís the GMC emblem as purchased:  And the future direction (after some correction on the positioning). This is also the first photo after having removed the Moon Equipped decals last night: 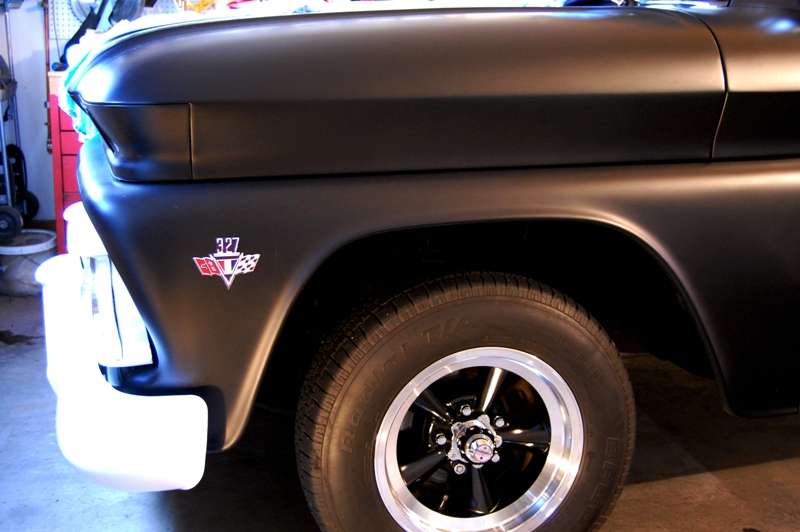
__________________
My Build Thread: http://67-72chevytrucks.com/vboard/s...d.php?t=444502 |
|
|

|
|
|
#406 |
|
Registered User
Join Date: Apr 2012
Location: Cambridge, Ontario, Canada
Posts: 1,771
|
Re: Markeb01 Build Thread
I like that a lot!!! Can you get a reproduction chrome 327 emblem like that? I have seen ford type 289 emblems on mustangs at shows...
__________________
Craigerrr My build thread, CRGRS 66 Winter Build: http://67-72chevytrucks.com/vboard/s...09#post5638709 |
|
|

|
|
|
#407 |
|
"Where were you in '62?"
 Join Date: Jul 2004
Location: Cleveland County, North Cackalacky
Posts: 5,013
|
Thumbs up on the 327 emblem Mark!
Here is a 1968 Pontiac Beaumont 327 Emblem that kinda has the look of the GMC emblem.  Either one would look awesome and kinda go well with your sweet interior. Muscle Truck. 
__________________
PROJECT: "FULL METAL YELLOW JACKET" 1962 Chevy C-10 Stepside Shortbed Nostalgia Pro/Street Pickup Truck PROJECT: "FULL METAL YELLOW JACKET Build Thread What Are You Workin' On? - 1Bad62ChevyPickup PROJECT: "TYRANNORAMBLER REX" 1969 AMC Rambler American Nostalgia Pro/Street Youtube Channel: Father Son Projects Youtube Channel: 2TIMOTHY2FITHTEEN        "North and South Carolina Folks Click Here!" (((( ~ I have Parts For Sale & Miscellaneous Stuff ~ )))) "Well being as there's no other place around the place, I reckon this must be the place, I reckon...Nyuk Nyuk Nyuk" -Curly Howard Ph.D. |
|
|

|
|
|
#408 | ||
|
Senior Enthusiast
Join Date: Feb 2007
Location: Spokane Valley, WA
Posts: 8,356
|
Re: Markeb01 Build Thread
Quote:
Surprisingly, some of the NOS parts looked awful. Lotís of flash and poor castings. These are the ones I picked from CarPartsDiscount. Several other suppliers sell the same version for even more money. Iíve never dealt with CPD before, so that part is a gamble. 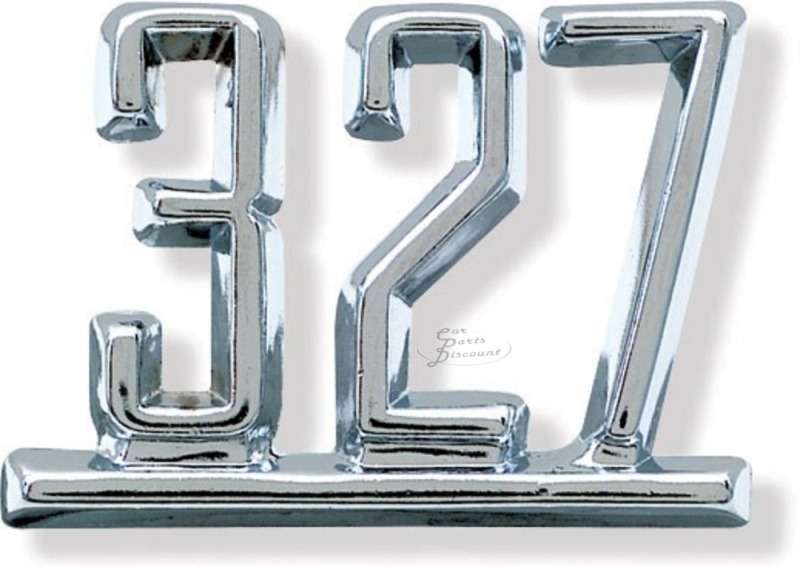  Some of the details of the flag emblem are not completely OEM accurate, but the quality of the casting, chrome, and paint are far superior to many of the cheaper versions. Quote:

__________________
My Build Thread: http://67-72chevytrucks.com/vboard/s...d.php?t=444502 |
||
|
|

|
|
|
#409 |
|
Registered User
Join Date: Jun 2012
Location: Selkirk Ontario Canada
Posts: 1,141
|
Re: Markeb01 Build Thread
is the cross flags from the vette?
__________________
My 63 GMC Panel Slow Build http://67-72chevytrucks.com/vboard/s...=1#post5457281 63 
|
|
|

|
|
|
#410 |
|
Registered User
Join Date: Apr 2012
Location: Searcy, AR
Posts: 4,203
|
Re: Markeb01 Build Thread
I like the 327 emblem idea and placement. Planning on the same set for my 65, found an OEM set on Ebay that are in good shape. I am going to use your print out idea for placement planning.
__________________
DON Proverbs 27:17  US Air Force Retarded errr Retired My '65 Stepper Build:http://67-72chevytrucks.com/vboard/s...d.php?t=533920 My '60 Rusty Patina Build:http://67-72chevytrucks.com/vboard/s...66#post7402266 My '72 http://67-72chevytrucks.com/vboard/s...59#post7204359 SOLD |
|
|

|
|
|
#411 |
|
Senior Enthusiast
Join Date: Feb 2007
Location: Spokane Valley, WA
Posts: 8,356
|
Re: Markeb01 Build Thread
Everything shown is from the 65-67 Chevelle, although they also fit specific Camaros and perhaps a couple of other models.
__________________
My Build Thread: http://67-72chevytrucks.com/vboard/s...d.php?t=444502 |
|
|

|
|
|
#412 |
|
Senior Enthusiast
Join Date: Feb 2007
Location: Spokane Valley, WA
Posts: 8,356
|
Re: Markeb01 Build Thread
It sure makes it easier to visualize having what basically amounts to a refrigerator magnet of the actual emblem. I thought it looked perfect where I stuck it on the first time, but studying the photos I realized it could be better. Once I finally dial it and have the real pieces in hand I'll make a template including the mounting holes so both sides come out the same and in exactly the right place.
__________________
My Build Thread: http://67-72chevytrucks.com/vboard/s...d.php?t=444502 |
|
|

|
|
|
#413 |
|
Senior Enthusiast
Join Date: Feb 2007
Location: Spokane Valley, WA
Posts: 8,356
|
Re: Markeb01 Build Thread
Okay hereís a weird one Iíve never experienced before. The truck has been driven several times since the new windshield gasket and trim were installed and everything seemed tip top.
Yesterday I took a short trip and was greeted with a high pitched shrieking vibration rattle. It was very loud and distracting. It sounded somewhat like a bad throw out bearing or perhaps a bad pilot bushing. As engine speed increased, the shrieking got louder, but I soon realized it was worse on right hand turns. Regardless of engine rpm or clutch position, the noise went away on left turns. So apparently the issue was being caused by body torque. The sudden onset was surprising because everything in the driveline is like new and no changes have been made in a long time. It seemed ridiculous to consider, but the only recent change was the windshield trim addition, so I reached up and grabbed the windshield gasket above the mirror and gave it a strong pull. To my amazement the pitch of the rattle changed and diminished, leaving me to speculate the vibration noise was caused by the ends of the upper windshield trim scraping together on each other. Since the windshield was installed without sealant, I surmised the lack of adhesive was allowing the trim to move around inside the gasket, and since the ends of the upper trim pieces were nearly touching after the glass was installed, vehicle movement apparently caused the gap to close completely causing the noise. I picked up a tube of 3M Windo-Weld urethane windshield adhesive and studied the options. Eventually I decided to apply a quantity under the bottom edge of the trim near the center of the windshield. This doesnít show, and glues the trim to the gasket preventing movement. Next I went inside and applied a nice thick ľĒ bead at the bottom of the pinch weld groove in the gasket across the entire top of the windshield. The gasket was pulled tight to the full height of the body indentation and taped in place overnight to dry. This adhesive also cannot be seen. The result Ė the squeak/rattle is completely gone. I think the primary cause goes back to when I installed the trim in the gasket on the bench. I should have insured there was at least a ľĒ gap between the two upper pieces of trim. Having never done this before I had no way of knowing this could be a problem, but by the time the glass was installed in the truck the two pieces were nearly touching. I wanted to share this information in case it might help the next person avoid this problem.
__________________
My Build Thread: http://67-72chevytrucks.com/vboard/s...d.php?t=444502 |
|
|

|
|
|
#414 |
|
"Where were you in '62?"
 Join Date: Jul 2004
Location: Cleveland County, North Cackalacky
Posts: 5,013
|
Hmmmmmmm....
  http://www.truckerzparadise.com/cata...alvecover.html  http://www.jegs.com/i/Edelbrock/350/41443K/10002/-1
__________________
PROJECT: "FULL METAL YELLOW JACKET" 1962 Chevy C-10 Stepside Shortbed Nostalgia Pro/Street Pickup Truck PROJECT: "FULL METAL YELLOW JACKET Build Thread What Are You Workin' On? - 1Bad62ChevyPickup PROJECT: "TYRANNORAMBLER REX" 1969 AMC Rambler American Nostalgia Pro/Street Youtube Channel: Father Son Projects Youtube Channel: 2TIMOTHY2FITHTEEN        "North and South Carolina Folks Click Here!" (((( ~ I have Parts For Sale & Miscellaneous Stuff ~ )))) "Well being as there's no other place around the place, I reckon this must be the place, I reckon...Nyuk Nyuk Nyuk" -Curly Howard Ph.D. |
|
|

|
|
|
#415 |
|
Senior Enthusiast
Join Date: Feb 2007
Location: Spokane Valley, WA
Posts: 8,356
|
Re: Markeb01 Build Thread
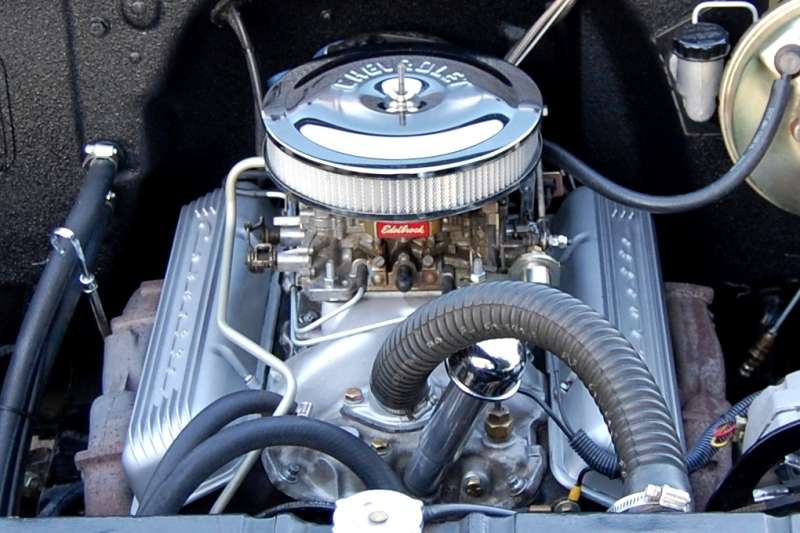
Iím afraid Iím too old school:
 But if my engine was orange and I were ever to switch back to tin covers I could certainly be happy with these: 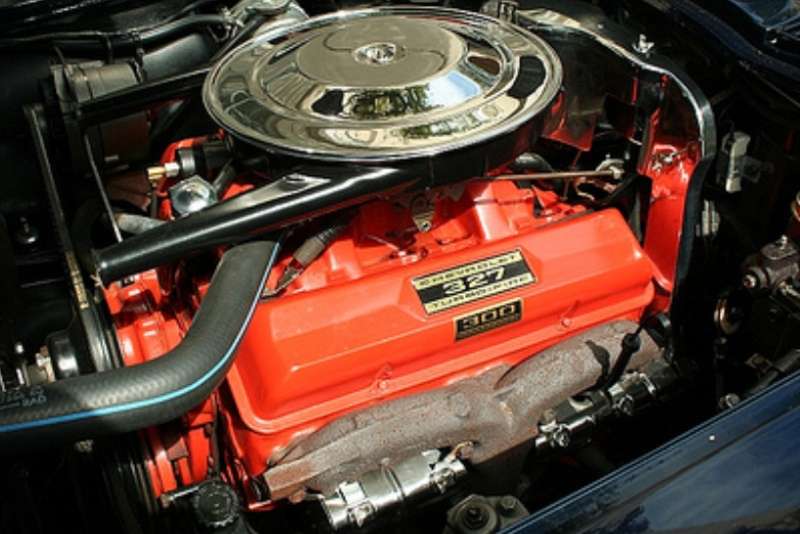
__________________
My Build Thread: http://67-72chevytrucks.com/vboard/s...d.php?t=444502 |
|
|

|
|
|
#416 |
|
Senior Enthusiast
Join Date: Feb 2007
Location: Spokane Valley, WA
Posts: 8,356
|
Re: Markeb01 Build Thread
The new fender emblems arrived today and are nothing short of spectacular. The castings, chrome, and paint are perfect. They are much higher quality than NOS OEM parts. As expected, the dimensions I found on the internet werenít very accurate, so I had to make another correct scale refrigerator magnet to determine positioning on the fenders. Iíll start experimenting and photographing later this afternoon, and should have them mounted some time over the weekend.
I cancelled my first order with Car Parts Discount because their committed ship date was over 10 days out. CPD was very prompt and polite, issuing a refund immediately (on a Sunday night) so Iíll likely try them again on some future purchase. I ended up buying the identical parts from Original Parts Group, Inc. (OPGI). They were very responsive and delivered well packaged parts within 3 days. This is the first time Iíve dealt with OPGI, and I wouldnít hesitate to buy from them again. Hereís a shot of the new emblems. They look much nicer than this is real life: 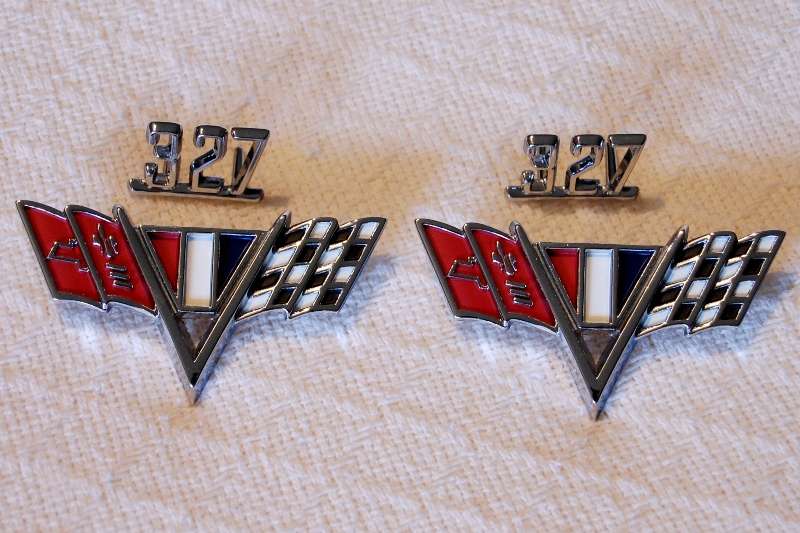 And this shows the emblems and the photo magnet I'll be using to optimize the location on the fenders: 
__________________
My Build Thread: http://67-72chevytrucks.com/vboard/s...d.php?t=444502 |
|
|

|
|
|
#417 |
|
"Where were you in '62?"
 Join Date: Jul 2004
Location: Cleveland County, North Cackalacky
Posts: 5,013
|
They do look nice!
 Thanks for letting us know the supplier. 
__________________
PROJECT: "FULL METAL YELLOW JACKET" 1962 Chevy C-10 Stepside Shortbed Nostalgia Pro/Street Pickup Truck PROJECT: "FULL METAL YELLOW JACKET Build Thread What Are You Workin' On? - 1Bad62ChevyPickup PROJECT: "TYRANNORAMBLER REX" 1969 AMC Rambler American Nostalgia Pro/Street Youtube Channel: Father Son Projects Youtube Channel: 2TIMOTHY2FITHTEEN        "North and South Carolina Folks Click Here!" (((( ~ I have Parts For Sale & Miscellaneous Stuff ~ )))) "Well being as there's no other place around the place, I reckon this must be the place, I reckon...Nyuk Nyuk Nyuk" -Curly Howard Ph.D. |
|
|

|
|
|
#418 |
|
Registered User
Join Date: Apr 2012
Location: Searcy, AR
Posts: 4,203
|
Re: Markeb01 Build Thread
Looking forward to seeing them installed...
__________________
DON Proverbs 27:17  US Air Force Retarded errr Retired My '65 Stepper Build:http://67-72chevytrucks.com/vboard/s...d.php?t=533920 My '60 Rusty Patina Build:http://67-72chevytrucks.com/vboard/s...66#post7402266 My '72 http://67-72chevytrucks.com/vboard/s...59#post7204359 SOLD |
|
|

|
|
|
#419 |
|
Registered User
Join Date: Jun 2012
Location: Selkirk Ontario Canada
Posts: 1,141
|
Re: Markeb01 Build Thread
will they be strong enough that they will not fall off
__________________
My 63 GMC Panel Slow Build http://67-72chevytrucks.com/vboard/s...=1#post5457281 63 
|
|
|

|
|
|
#420 |
|
Senior Enthusiast
Join Date: Feb 2007
Location: Spokane Valley, WA
Posts: 8,356
|
Re: Markeb01 Build Thread
Theyíre pretty strong. There are two mounting posts cast into the back of each emblem, which are held to the fender by flanged speed nuts. The only time Iíve seen them come off a factory fender is after it had scraped into something else, shearing off the pins.
__________________
My Build Thread: http://67-72chevytrucks.com/vboard/s...d.php?t=444502 |
|
|

|
|
|
#421 |
|
Senior Enthusiast
Join Date: Feb 2007
Location: Spokane Valley, WA
Posts: 8,356
|
Re: Markeb01 Build Thread
It’s hard to believe myself but mounting the new fender emblems took a full 8 hour Saturday. In my youth the same task would probably have taken 30 minutes, but these days I strive to put a little more quality into everything I undertake. The photos don’t always exactly match the text, but following are the sequence of events:
Although my truck rides high in the front by contemporary standards, it is still somewhat nose down overall, even on a garage floor with a substantial uphill slope toward the front. To make sure the emblems came out level on the fenders, the first thing I did was level the truck (along the line of the front fender) by jacking up the front end.  The next step was measuring down 3” from the body crease and running a horizontal tape line so I could capture consistent vertical dimensions in the emblem area.  From this line, all measurements off the flag emblem were on center at the top of the V area between the flags. 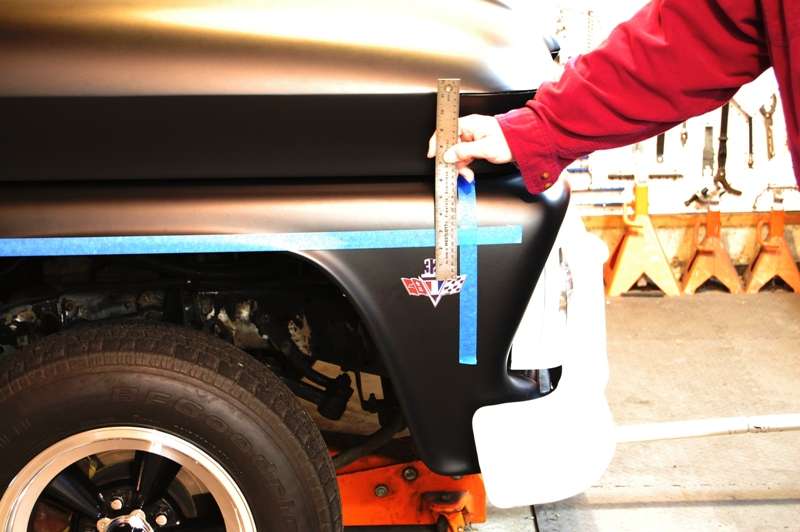 Next was extending another tape line down from the corner hood seam, for front to back emblem measurements. To make sure this remained the same on both sides, I confirmed the distance from the rear of the fender (at the tape line) on both sides of the truck.  I then set about placing the magnetic photo emblem in various places, taking 3 angle photos (3/4 front, side, ĺ rear) of each position while noting dimensions for each spot. Front to back measurements were taken from the center of the V.  There were at least 6 or 7 different positions, high, low, forward, and back. Next the photos were downloaded and studied. Once I arrived at the perfect position, I pulled the tape to get clean photos before drilling.  Removing the tape changed the whole perspective and I didn’t like the looks at all.  So I started over without any tape this time. When I was finally satisfied again with the positioning, it all had to be retaped to get the dimensions needed to replicate the other side.  The most critical aspect (at least to me) is the alignment and spacing between the 327 and the V in the center of the flags. A Google search will show more crooked installations than those leveled and aligned. And those are the glaring details that drive me nuts when not done correctly. So the flags were done first and taped in place. A line was marked ľ” above the true top of the V to insure alignment and spacing. Since the pins on the 327 emblem are not equally spaced on the mounting bar, I flipped the emblem to where it was pointing face down, and placed the mounting bar under the 327 numbers directly on top of the V. This centered it perfectly with the flags. I then outlined the mounting pins on the tape with an ink pen (shown in the photo above). The next step was simply center punching the marks at the intersection of the pins on the line ľ” above the V, drilling, pulling tape, and bolting everything in place. And after all that, here are the actual emblems, which don’t look all that much different than the photo magnet (at least not in pictures)! 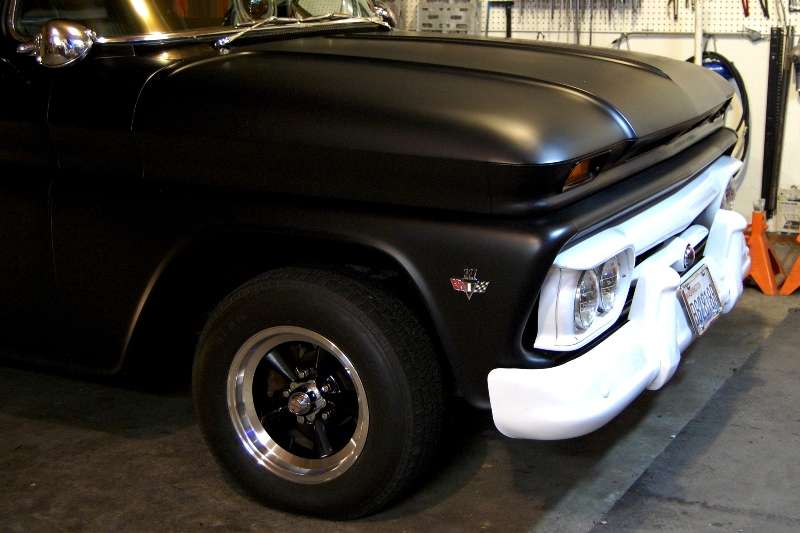  The truck is covered in sheets at the moment to keep it clean until we get a decent weather day to attempt capturing a Post Card quality photo (which may take a few days). I’d really like to capture at least one fantastic photo worth framing, because unless I win the Lottery, the truck is cosmetically done at this point. I’d like one great photo the way it looks right now because it’s unlikely to ever look any better in the future, after wear and tear have taken their toll. Although the snapshots aren’t at all impressive, standing back and looking at the overall truck I’m glad the emblems are in place and the Moon Equipped decals are gone. To me at least they seem to add a more balanced look with the stainless windshield trim and the bed rails.
__________________
My Build Thread: http://67-72chevytrucks.com/vboard/s...d.php?t=444502 Last edited by markeb01; 10-30-2012 at 02:24 AM. |
|
|

|
|
|
#422 |
|
Registered User
 Join Date: Mar 2012
Location: Shallow Lake Ontario,Canada
Posts: 201
|
Re: Markeb01 Build Thread
Nice work, Looks great!!
|
|
|

|
|
|
#423 |
|
Registered User
Join Date: Apr 2012
Location: Searcy, AR
Posts: 4,203
|
Re: Markeb01 Build Thread
Awesome, Love the Attention to Detail... You are an inspiration Sir!
__________________
DON Proverbs 27:17  US Air Force Retarded errr Retired My '65 Stepper Build:http://67-72chevytrucks.com/vboard/s...d.php?t=533920 My '60 Rusty Patina Build:http://67-72chevytrucks.com/vboard/s...66#post7402266 My '72 http://67-72chevytrucks.com/vboard/s...59#post7204359 SOLD |
|
|

|
|
|
#424 |
|
Registered User
Join Date: Jun 2012
Location: Selkirk Ontario Canada
Posts: 1,141
|
Re: Markeb01 Build Thread
looks killer nice job
__________________
My 63 GMC Panel Slow Build http://67-72chevytrucks.com/vboard/s...=1#post5457281 63 
|
|
|

|
|
|
#425 |
|
Rollin' Old Skool
Join Date: Jun 2007
Location: Hattiesburg, MS
Posts: 5,371
|
Re: Markeb01 Build Thread
great job once again! looking forward to your Post Card quality photo

__________________
_____________________________________________ Phillip My Build threads: 1966 Chevy C-10 "Black Betty" shortbed, fleetside, BBW, 327 V8/ Powerglide (under construction) http://67-72chevytrucks.com/vboard/s...ighlight=betty 1997 Chevy Tahoe, 2dr/2wd, mild custom (Daily driver) http://67-72chevytrucks.com/vboard/s...d.php?t=601142 Pics: '66 C-10 https://flic.kr/s/aHsjHWD4h9 '97 Tahoe https://flic.kr/s/aHsjGZ7wKP '93 C-1500 https://flic.kr/s/aHskxdpdnQ '88 S-10 Blazer https://flic.kr/s/aHsjYGx4Md Previous Rides: 1993 Chevy S-10 ext. cab, 4.3L, 4/5 drop (Sold) 1993 Chevy C-1500 short/step Retro-Rod (Sold) 1988 S-10 Blazer 2dr/2wd mild custom (Sold) |
|
|

|
 |
| Bookmarks |
| Thread Tools | |
| Display Modes | |
|
|