 |
Register or Log In To remove these advertisements. |
|
|
|
|||||||
 |
|
|
Thread Tools | Display Modes |
|
|
#1 |
|
Registered User
Join Date: Dec 2015
Location: Okotoks Alberta
Posts: 158
|
I know... Another rust repair question!!
Hey everyone!! Long time reader of the site but I've finally began tearing into my truck in depth so I'm going to have plenty of questions...
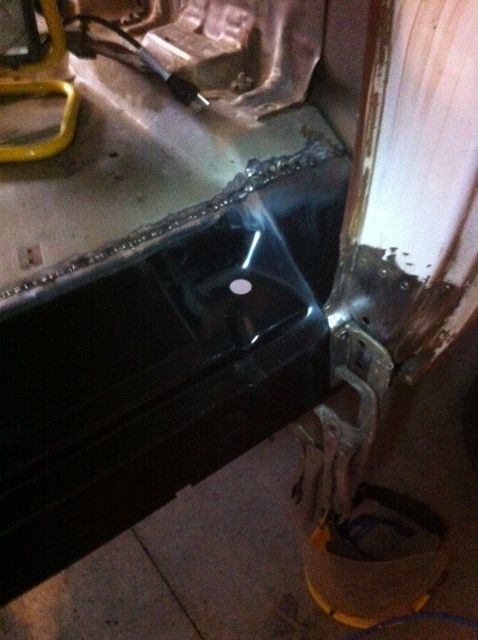
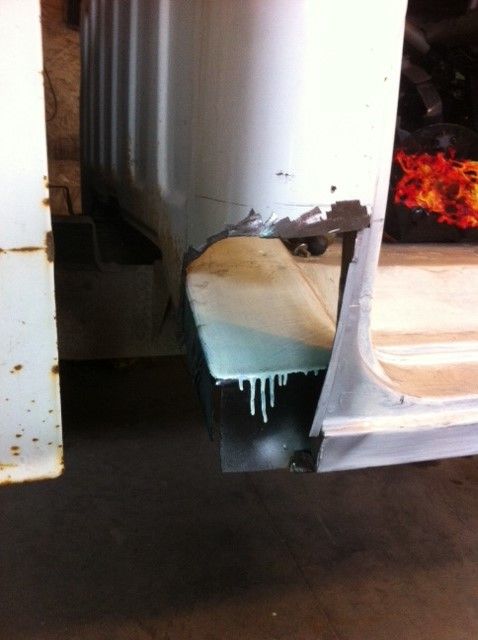
I am new to the metal work game when it comes to rust repair but have some decent skills with a mig so I am going to do everything myself. My question that I am wondering is the process I should take in order to have everything lapping properly and in the correct spots. I pulled the carpets and the idiot that I bought the truck from had siliconed tin over all his problems, so just my luck I have tons of problems. I have two rotten back cab mounts, some holes at the rockers and the floor pans. Its hard to explain so here are the best pictures I could get: [IMG]  [/IMG] [/IMG][IMG]  [/IMG] [/IMG][IMG]  [/IMG] [/IMG][IMG]  [/IMG] [/IMG][IMG]  [/IMG] [/IMG][IMG]  [/IMG] [/IMG]So the first few are the drivers side, then the passenger side. Any advice or game plan help would be more than greatly appreciated!! thanks in advance guys and gals!! and just for the sake of it heres my girl: [IMG]  [/IMG] [/IMG]
|
|
|

|
|
|
#2 |
|
Registered User
Join Date: Sep 2010
Location: Winchester Oregon, formerly Vancouver BC
Posts: 2,949
|
Re: I know... Another rust repair question!!
The front is standard fodder but the rear might be a bit tougher, too bad you didn't post earlier, I had that rear section that was rust free but I ended up scrapping it.
|
|
|

|
|
|
#3 |
|
Registered User
Join Date: Jun 2013
Location: Somewhere
Posts: 3,128
|
Re: I know... Another rust repair question!!
Your troubles are the same as everyone else's. The parts are steel, and they weren't painted inside by the mfgr. Rust free is a myth. Rust starts from the inside of parts like rockers and you have no idea how bad it is from the outside til it comes through the paint.
Might want to look up a lapped repair... Different people have different opinions but to me, a factory lapped joint is fine, but lapping a repair where metal was a single part is not to good and invites more trouble. The bottom rust in the pics is standard rockers/floor/cab corner repair. Look at the roof. |
|
|

|
|
|
#4 |
|
Registered User
Join Date: Dec 2015
Location: Okotoks Alberta
Posts: 158
|
Re: I know... Another rust repair question!!
I understand the issue behind the rust, I guess my question is the correct order of panels to replace? To i take off outer rockers first then the floor or do i have to have the rocker on the put the cab support back in? I am just concerned about pulling it apart in the wrong order or taking too much off and causing more issues?
|
|
|

|
|
|
#5 |
|
Registered User
Join Date: Dec 2015
Location: Okotoks Alberta
Posts: 158
|
Re: I know... Another rust repair question!!
OH NO! well I guess I should have been quicker to the site instead of just creeping in the shadows looking at everyones build threads.
|
|
|

|
|
|
#6 |
|
60-66 Nut
  Join Date: Mar 2007
Location: Coeur d'Alene, Idaho
Posts: 23,252
|
Re: I know... Another rust repair question!!
To answer your question. Remove the outer rocker, and lower A and B pillars if needed. Then the inner rocker and outer floor area. Next the cab corner, mounts and inner floor if needed. Reverse the order in replacement. Be sure to brace the cab to help keep it's shape and leave room to bolt the door back on to check your door opening shape, check fitment and gaps.
__________________
Power Steering Box Adapter Plates For Sale HERE Power Brake Booster Adapter Brackets For Sale '63-'66 HERE and '67-'72 HERE and '60-'62 HERE and "60-'62 with clutch HERE Rear Disc Brake Brackets For Sale. Impala SS calipers HERE Camaro Calipers HERE D52 Calipers HERE 6 Lug HERE Hydroboost Mounting Plates HERE |
|
|

|
|
|
#7 |
|
Registered User
 Join Date: May 2014
Location: Western ND
Posts: 198
|
Re: I know... Another rust repair question!!
measure measure measure. brace the door opening and measure its dimensions front to back and top to bottom. CaptainFab had the advice for the order. i had to cut mine back apart after i had fixed it because the door didnt fit anymore. my own fault for getting in a rush.
__________________
Current Project : 1962 Chevy SWB Fleetside Others, 1958 Edsel Villager Station Wagon 1926 Ford Model T Roadster Hotrod www.suedescarclub.com |
|
|

|
|
|
#8 |
|
meowMEOWmeowMEOW
Join Date: Sep 2009
Location: MKE WI
Posts: 7,128
|
Re: I know... Another rust repair question!!
I have a bunch of pics in my build of doing the floor and corner area there on my '66. We actually went back later and tubbed the firewall area later in the build, and there are some other looks at that floor/corner/crease area.
Depending how far back you need to go, just keep an eye on the cab mount location. If its sagged at all, you want to support the cab so its at the correct height, so when you install the new mount and start to do the floor, everything comes out level. Its pretty straightforward, just something to keep any eye on.
__________________
'66 Short Step / SD Tuned / Big Cam LQ4 / Backhalfed /Built 4l80e / #REBUILDEVERYTHING  |
|
|

|
|
|
#9 |
|
Registered User
Join Date: Nov 2011
Location: Chaparral NM
Posts: 693
|
Re: I know... Another rust repair question!!
I saw this in the great internet and found this to be very informative and I like pictures!.. http://www.hotrod.com/how-to/1512-19...98819#photo-01
__________________
CURRENT & PAST CHEVY TRUCKS 60 C-10 Apache short step side 62 C-10 short step side 66 GMC Long bed fleet side 305 V-6 77 C-20 Custom Deluxe (Blue Goose) |
|
|

|
|
|
#10 | |
|
Registered User
Join Date: Dec 2015
Location: Okotoks Alberta
Posts: 158
|
Re: I know... Another rust repair question!!
Quote:
|
|
|
|

|
|
|
#11 | ||
|
Registered User
Join Date: Dec 2015
Location: Okotoks Alberta
Posts: 158
|
Re: I know... Another rust repair question!!
Quote:
Thats exactly what i needed thanks! Quote:
|
||
|
|

|
|
|
#12 |
|
Registered User
Join Date: Dec 2015
Location: Okotoks Alberta
Posts: 158
|
Re: I know... Another rust repair question!!
oh wow I just realized your build is right in your sig.
|
|
|

|
|
|
#13 |
|
Registered User
Join Date: Jan 2010
Location: Regina, SK
Posts: 809
|
Re: I know... Another rust repair question!!
. I am by no means an expert, but just did similar rust repair on my passenger side and now starting the drivers side. similar rust.
I drilled out the floor/brace spot welds, then removed outer rocker, bottom of pillar, inner kick plate area and then the floor slightly less than my patch will cover. Leaving the rusty front brace as a locater for where the floor should fit. Cut new floor panel to fit then clamp the new floor/inner rocker panel at the rear where the old one was bolted (you'll see the holes) and clamp the front to the rotten floor brace you didn't cut out yet. That lines up the new panel. Once you have it spotted in you can cut out the old floor brace and replace it. I also welded cross bracing in the cab and drilled holes through my door hinges so hopefully the door gaps will be good when back together. Should also mention I sand off the black primer in contact spots and paint with kbs rust proof. Like where braces sit. Hope this helps a bit    the cab corners i'm doing later after i have the bed removed. 
Last edited by dracko; 12-27-2015 at 04:56 PM. |
|
|

|
|
|
#14 |
|
Registered User
Join Date: Mar 2001
Location: RADFORD, VA
Posts: 2,651
|
Re: I know... Another rust repair question!!
Yep that's what mine looked like when I got it the PO just covered it up with some tin and screws, course I knew that when I bought it, looks like you've jumped right in and tackled it..
__________________
1964 BBC 402 4x4     |
|
|

|
|
|
#15 |
|
Registered User
Join Date: Dec 2015
Location: Okotoks Alberta
Posts: 158
|
Re: I know... Another rust repair question!!
Quote:
|
|
|

|
|
|
#16 |
|
Registered User
Join Date: Oct 2009
Location: port robinson ontario canada
Posts: 400
|
Re: I know... Another rust repair question!!
All great advise here. Following Dracko's pictures , when the floor and braces are in place , the A and B pillars repaired , but before the rockers and cab corners are done , you can re-install the door , and adjust the A and B pillar for door gaps , that seems to be why they are bolted at the bottom. After the gaps are as good as you can get them , you could repair the cab corner , installing the rocker last ( pre-fitting along the way). Don't you just love rust?
|
|
|

|
 |
| Bookmarks |
| Thread Tools | |
| Display Modes | |
|
|