 |
Register or Log In To remove these advertisements. |
|
|
|
|||||||
 |
|
|
Thread Tools | Display Modes |
|
|
#1 |
|
Watch out for your cornhole !
 Join Date: Jun 2003
Location: Azle, Texas
Posts: 14,162
|
Swaybar Install FAQ With Pictures
There are lots of members asking about installing a swaybar on the front of their trucks.
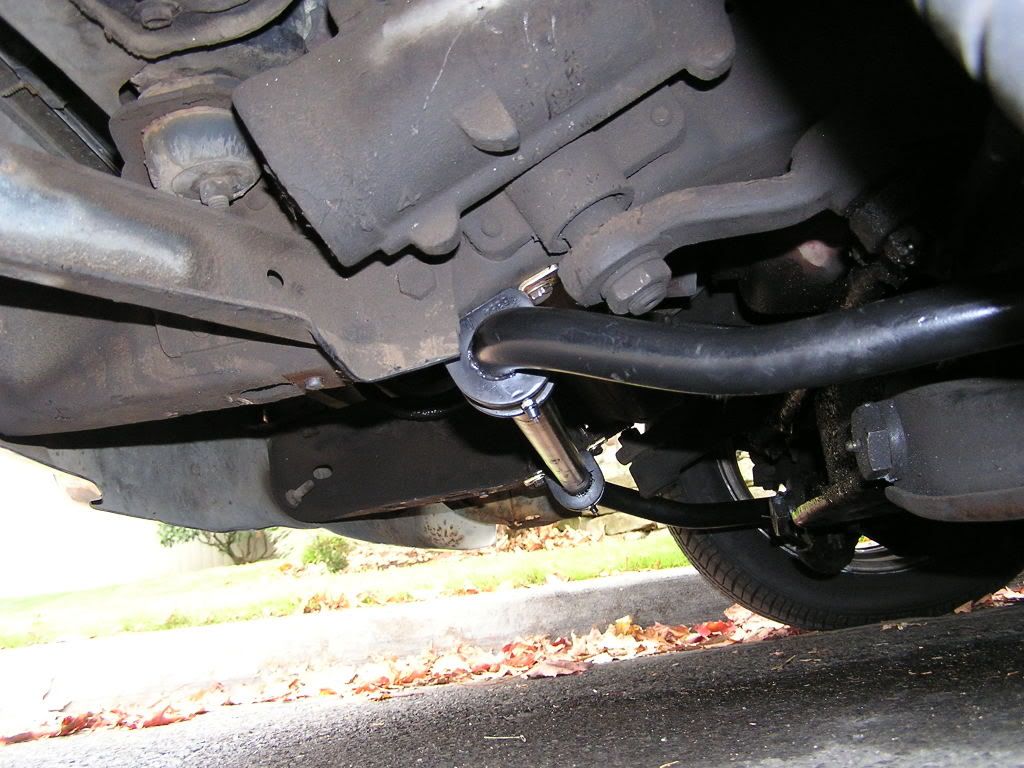
First, all swaybars from 73-87 2wd trucks interchange onto earlier trucks. The larger trucks like 3/4 and 1 tons typically had larger bars on them from the factory. The bar shown in this install was given to me by a friend. We pulled it off an 86 3/4 ton 2wd truck. It is the 1 1/4" bar. Some of our trucks came equiped with factory swaybars. If your's did, you are lucky. You can simply snag a larger unit off a heavy duty truck to improve your handling. For folks like me, who's trucks did not come equipped with a factory unit, the install process is a little more complicated. The install documented below was performed by myself in about 2 hours. One factor to consider is if your truck is lowered or will be in the future. The factory swaybar mounts hang very low under the frame and when the truck is lowered, they typically get bent very quickly against a curb. Early Classic Enterprises makes a set of raised mounts intended for lowered trucks. With these mounts, your bar will be high enough to never have to worry about hitting it. I used the raised mounts on my truck, which is lowered 4.5 inches in the front. First picture is of my Blazer which uses factory GM mounts and is lowered 4.5 inches in the front. As you can see, the bar hangs too low.
__________________
I'm on the Instagram- @Gearhead_Kevin Last edited by Tx Firefighter; 08-24-2004 at 08:21 PM. |
|
|
|
|
#2 |
|
Watch out for your cornhole !
 Join Date: Jun 2003
Location: Azle, Texas
Posts: 14,162
|
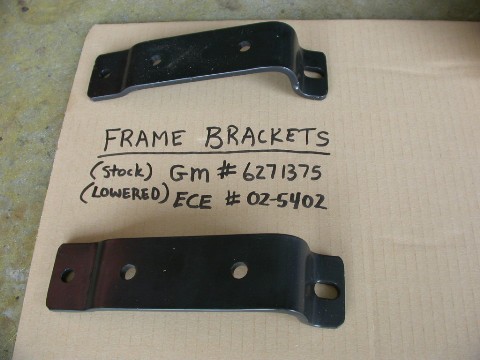
Besides the swaybar itself, you will need some other parts. If you pull a unit off another truck, be sure to get the clamps (4) that bolt the bar to the truck. You can also get the factory sway bar mounts off the donor truck too, but be forewarned, they are riveted on. Usually, it's too much trouble for me to remove the rivets in the junkyard, so I just buy new mounts.
This picture is the ECE mounts. Notice the part number is written there for you. ECE mounts cost 19.00. Also, is the GM part number for the factory mounts. Just take the number to the dealer parts guy and pay 12.00 each (you need two). Last edited by Tx Firefighter; 08-24-2004 at 08:32 PM. |
|
|
|
|
#3 |
|
Watch out for your cornhole !
 Join Date: Jun 2003
Location: Azle, Texas
Posts: 14,162
|
You will also need 4 clamps. Remember when I said they get hit against a curb? Well, two of mine were bent, and they came off a non lowered 3/4 ton!
Don't sweat it. Notice I bought two new ones. Again GM part number is shown. Cost was 2.66 each. Last edited by Tx Firefighter; 08-24-2004 at 08:34 PM. |
|
|
|
|
#4 |
|
Watch out for your cornhole !
 Join Date: Jun 2003
Location: Azle, Texas
Posts: 14,162
|
New bushings are advised too. I used Urethane bushings. If you go to any local parts store that sells Moog brand parts, you can buy them there. The part number shown is for 1 1/4" bushings. Your parts guy will want to know what diameter bar you have, so measure before you go to the store.
Don't even mention Urethane to the parts guy, you will just confuse him. All Moog bushings are Urethane. They come two to a box, so you will need 2 boxes. I paid 11.00 per box, or 22.00 for all of them. You can also order whatever flavor suits you through any aftermarket vendor. Again make sure what size bar you have before ordering. Last edited by Tx Firefighter; 08-24-2004 at 08:37 PM. |
|
|
|
|
#5 |
|
Watch out for your cornhole !
 Join Date: Jun 2003
Location: Azle, Texas
Posts: 14,162
|
Here is the main difficulty of the job. Notice I'm holding the brackets up where they will go, and there is a rivet in one of the holes. The rivet secures the bottom of that little crossmember in place. Take your grinder or torch and remove the rivet head. Using a punch, hammer the rivet out of the hole after de-heading it. Do one side at a time, or the crossmember will try to move. After removing the rivet, bolt the mount in place, before removing the other side rivet.
Bolt both brackets in place using 3/8 grade 8 bolts. Don't worry, the grade 8 bolt is as strong as the rivet you removed. As a note, Early Classic stuff comes with the finest hardware anywhere. All cadnium plated grade 8 bolts with nylon lock nuts. Strictly first rate and well worth the money. Last edited by Tx Firefighter; 08-24-2004 at 08:39 PM. |
|
|
|
|
#6 |
|
Watch out for your cornhole !
 Join Date: Jun 2003
Location: Azle, Texas
Posts: 14,162
|
Here is one of the brackets installed. Notice I put the bolts down through the bracket before installing it. You can't do that after the bracket is in place. They taught me in airplane mechanic school years ago to always put bolts hanging down rather than up, so if the nut ever comes off, the bolt can't fall out. Right or wrong, that's the way I'm mentally programmed.
Also notice, I left all bolts loose until later to allow everything to shift a little if needed. Don't worry, I did tighten them all later on. Again, notice beautiful bracket and hardware from Early Classics. I never mind paying a little more for good stuff. Last edited by Tx Firefighter; 08-24-2004 at 08:40 PM. |
|
|
|
|
#7 |
|
Watch out for your cornhole !
 Join Date: Jun 2003
Location: Azle, Texas
Posts: 14,162
|
Your lower control arms on each side will have these two holes for the swaybar clamp to bolt into. Don't worry if your truck never had a factory bar, the holes will be there anyway. That blue thing is the coil spring to give reference as to where these holes are.
Last edited by Tx Firefighter; 08-24-2004 at 08:42 PM. |
|
|
|
|
#8 |
|
Watch out for your cornhole !
 Join Date: Jun 2003
Location: Azle, Texas
Posts: 14,162
|
Now, bolt it all in. If you use new Urethane bushings like I did, there will be strong language and prying to get it to all line up. The Urethane doesn't give much slack. You might have to let the truck back down onto the ground to get everything lined up. When you finally have the bolts in all 4 clamps started, go back and forth side-to side thightening them up. Recheck all bolts for tightness when you're done.
Last edited by Tx Firefighter; 08-24-2004 at 08:44 PM. |
|
|
|
|
#9 |
|
Watch out for your cornhole !
 Join Date: Jun 2003
Location: Azle, Texas
Posts: 14,162
|
All done! Notice how much higher this bar sits than the one in the first picture. Both trucks are lowered the same amount and have the same size tires. The Early Classics brackets raised the bar up a bunch.
If you buy the frame brackets new, you will spend 19-24 dollars. New bushings are 22.00. New swaybar clamps would be 11.00 if you bought all 4. And a swaybar typically runs about 20-30 bucks in a junkyard. So for a total of 70-85 dollars max, you will improve the handling of your truck more than any other mod you do. Mine was a particulary good deal, but I still have less than 50 in the whole deal. If you don't have to buy the clamps and can get a bar cheaper you could save even more money. There is actuallly no reason you couldn't reuse the old bushings if they aren't oil soaked or deteoriated. I'm not trying to screw the aftermarket vendors here, but with the Urethane bushings, your junkyard bar is just as good as the 125-150 ones sold new by vendors. It's just a 1 1/4 inch bar, not rocket science. Plus, these things are heavy and it costs some bucks to UPS one across country. But, on the other hand, you might not have the time or willingness to lay on your back in a dirty junkyard to gather all the pieces up. 
Last edited by Tx Firefighter; 08-24-2004 at 08:46 PM. |
|
|
|
|
#10 | |
|
Watch out for your cornhole !
 Join Date: Jun 2003
Location: Azle, Texas
Posts: 14,162
|
Quote:
__________________
I'm on the Instagram- @Gearhead_Kevin |
|
|
|
|
|
#11 | |
|
Happy to be here
 Join Date: Mar 2000
Location: Cypress, TX
Posts: 39,021
|
Quote:

__________________
Follow me on Facebook and Instagram @N2trux.com Articles- "Jake" the 84 to 74 crewcab "Elwood" the77_Remix 85 GMC Sierra "Scarlett" "Refining Sierra" |
|
|
|
|
|
#12 | |
|
Registered User
 Join Date: Aug 2005
Location: Hillsboro Oregon
Posts: 6,449
|
Re: Swaybar Install FAQ With Pictures
Quote:
 Why bother with brackets? Here's my front bar. Why bother with brackets? Here's my front bar.
|
|
|
|
|
|
#13 |
|
Registered User
Join Date: Apr 2010
Location: sacramento ca.
Posts: 1,038
|
Swaybar Install FAQ With Pictures UPDATE!
***UPDATE***
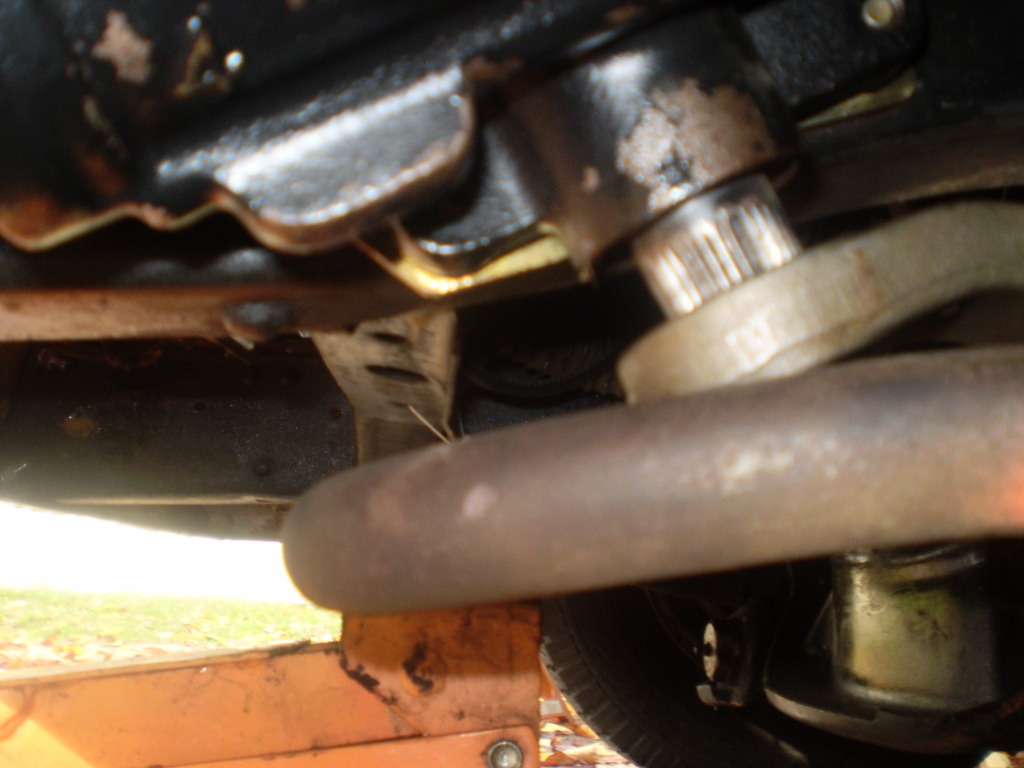
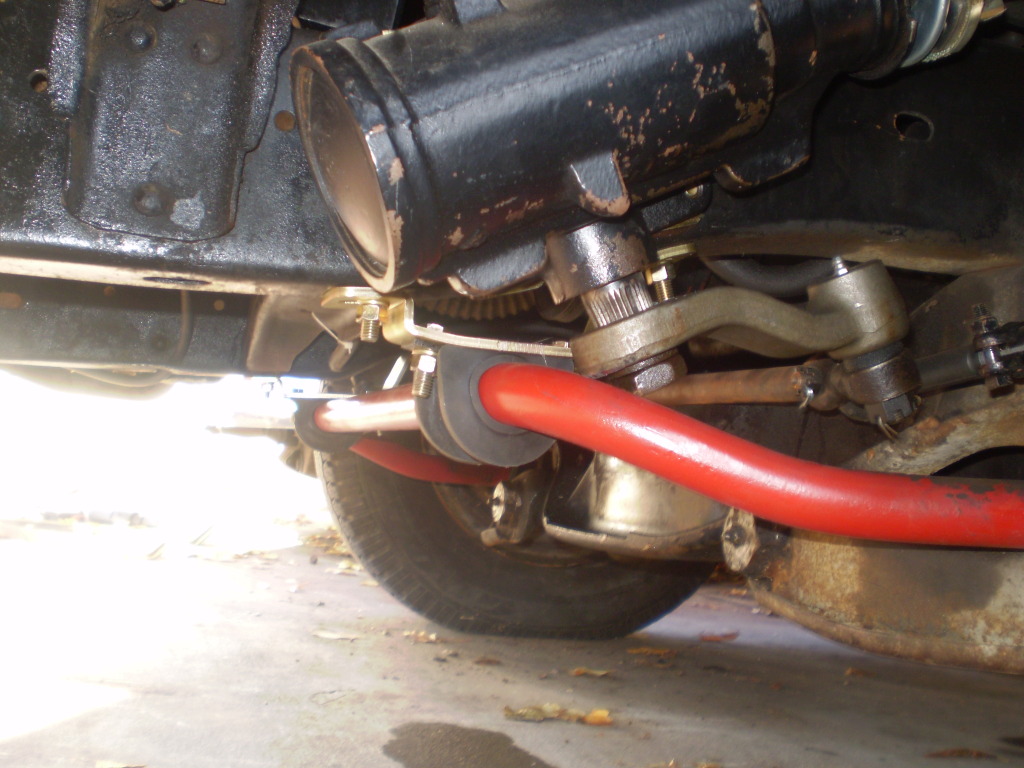
"Tx Firefighter" did a great thread on installing front sway bars on earlier trucks but since it was posted in 2003 and its almost 2012 i figured it might need a update with some stuff i have come across doing my swaybar. I will be using pictures from the original thread First I'll start with the bushings:  In the old post "Tx Firefighter" said that they cost $11.00 for a box(set of 2) so 4 bushings would cost you $22.00. When i went to the parts house (kragen o'riellys) and gave them "Moog# k6476" they cost $20.99 for a box(set of 2) so 4 bushings will cost you $42.00 before tax,but the good thing is that if you just give them the part number "k6476" there will be the MOOG brand bushings then also MASTERPRO brand that cost $7.99 for a box(set of 2) so the four you need will cost you around $16.00,They might not be "urethane" or might be,doesnt say in listing but alot cheaper:  Brackets:  Since i need the lowering brackets for my install i found out www.earlyclassic.com still sells them under part #: ECE #02-5402 for $19.00 a pair for the set for lowered trucks. Also www.carolinaclassictrucks.com sells them under part #: ECE #02-5402 for $19.00 a pair for the set for lowered trucks and gets them from Earlyclassics also. Also www.truckandcarshop.com sells them: Stock height brackets: GM brand part# 65-14603 $26.00 each (2 required) Reproduction brackets part# 65-146032 $24.00 (pair) Lowered bracket set part# 65-146031 $24.00 (pair) Also www.classicperform.com sells them: Stock height brackets part# 6372SSB for $24.00 (pair) Lowered set part# 6372LSB for $24.00 (pair) Three of the above companys were out of stock of the lowering mounts and said it could take up to two weeks to get them made so if your going to need them you might want to call around and get them ordered before you start to tackle your sway bar project. Now here's where I ran into a problem with my sway bar install I noticed some guys were mounting thiers right to the frame without the frame brackets like in this picture notice how high up the bar is and how high the stock steering box sits on frame:  I tried to do this but since i have the power steering the gear box hangs lower on my frame then where the stock steering gear box does.I couldnt mount mine that far up on frame and need the lowered sway bar frame mounts that let the bar mount lower then where the bar ends up when you mount it straight to the frame here you can see about the level mine needs to be with mounts notice rivet location in each picture(in this picture i had my sway bar the wrong way but flipped it over and still same result):  this is how it should look mounted when my mounts arrive:  Hope this helps!
__________________
Timmy D. "What that grinding noise?Don't worry about that it will eventually clearance itself!" 1966 chevy c10 Build Thread:http://67-72chevytrucks.com/vboard/s...d.php?t=485977 1954 ford customline H.A.M.B 54 Build Thread:http://www.jalopyjournal.com/forum/s...d.php?t=622142 Last edited by augie; 02-17-2012 at 04:06 PM. |
|
|
|
|
#14 |
|
Registered User
Join Date: Apr 2010
Location: sacramento ca.
Posts: 1,038
|
Swaybar Install FAQ With Pictures UPDATE
heres how the swaybar mounting brackets worked on helping me with my powersteering box hanging to low to mount the bar straight to the frame it was tight but everything works:
 
__________________
Timmy D. "What that grinding noise?Don't worry about that it will eventually clearance itself!" 1966 chevy c10 Build Thread:http://67-72chevytrucks.com/vboard/s...d.php?t=485977 1954 ford customline H.A.M.B 54 Build Thread:http://www.jalopyjournal.com/forum/s...d.php?t=622142 Last edited by augie; 02-17-2012 at 04:03 PM. |
|
|
 |
| Bookmarks |
|
|