
|
 08-06-2013, 10:59 PM
|
#251 |
|
Registered User
Join Date: Aug 2012
Location: Salem Mo
Posts: 649
|
Re: 1957 Chevy truck re-rebuild
On to another loose end I wanted to take care of. It's the panel in front of the bed. When it's bolted in place you can see into the opening of this panel. By spending a couple hours now and closing the openings now, I'll never have to see these openings again.
   
|

|

|
|
08-07-2013, 12:30 AM
|
#252 |
|
Registered User
Join Date: Aug 2007
Location: Corona, California
Posts: 7,998
|
Re: 1957 Chevy truck re-rebuild
That came out real nice.
Kim |
|
|
|
|
08-07-2013, 07:57 AM
|
#253 |
|
Registered User
Join Date: Dec 2011
Location: Stratford, Ontario
Posts: 97
|
Re: 1957 Chevy truck re-rebuild
Your sheetmetal work is absolutely astonishing. I hope to be half that talented some day.
|
|
|
|
|
08-07-2013, 08:31 AM
|
#254 |
|
A320 Pilot/USAF Retired
Join Date: Mar 2009
Location: Charleston, SC
Posts: 2,622
|
Re: 1957 Chevy truck re-rebuild
Excellent!
__________________
JJ My 1957 build: http://67-72chevytrucks.com/vboard/s...d.php?t=334552 http://www.trifive.com/forums/showthread.php?t=22037 Instagram - Chuckdriver57 |
|
|
|
|
08-12-2013, 09:02 PM
|
#255 |
|
Navy Radioman Veteran
Join Date: Jul 2007
Location: Western Kentucky
Posts: 1,350
|
Re: 1957 Chevy truck re-rebuild
Outstanding work... subscribed.
__________________
1987 Chevrolet R10 Silverado BBC Build thread - SOLD 1986 GMC Sierra Classic - SOLD 1957 Chevy Step Side - At the Body Shop Daily Driver; 2005 Chevrolet Silverado 4x4 Z71 Stepside |
|
|
|
|
08-12-2013, 11:40 PM
|
#256 |
|
Registered User
Join Date: Aug 2012
Location: Salem Mo
Posts: 649
|
Re: 1957 Chevy truck re-rebuild
Thanks for the compliments, I have to admit, I'm really trying to push my abilities as far as I can on this project.
Since the weather is all about high humidity I'm focused on the interior right now. I hope to get the interior designed and fitted before the weather turns to perfect painting humidity and temperature. One item I definitely want in this truck are cup holders. I have space between the shifter and the firewall so I'll use this space. Once again I used some construction paper to get the design and used the torchmate to cut the sheet metal out of 18 gauge sheet metal.  After a little bending and cutting I have it matching the shifter base.  I have some finalization to do with the frame work but it is just about done.  As the pieces are coming together. 
|
|
|
|
|
08-13-2013, 02:09 AM
|
#257 |
|
Registered User
Join Date: Aug 2007
Location: Corona, California
Posts: 7,998
|
Re: 1957 Chevy truck re-rebuild
Looks good.
Kim |
|
|
|
|
08-13-2013, 09:14 AM
|
#258 |
|
Registered User
Join Date: May 2000
Location: Flin Flon, Manitoba, Canada
Posts: 8,855
|
Re: 1957 Chevy truck re-rebuild
oh man that console is sweet!!! Good thinking, using door panels as sides. I was going to build a console for mine too because I'm running the same B&M shifter and I wanted to get it up off the floor.
Nice work!!
__________________
My name's Tim and I'm a truckaholic My 56 Chevy shop truck build http://67-72chevytrucks.com/vboard/s...d.php?t=562795 |
|
|
|
|
08-13-2013, 09:16 AM
|
#259 |
|
Registered User
Join Date: Dec 2011
Location: Southern Oklahoma
Posts: 181
|
Re: 1957 Chevy truck re-rebuild
Looks very nice! And thank you for posting photos.
|
|
|
|
|
08-14-2013, 01:35 PM
|
#260 |
|
Registered User
Join Date: Aug 2012
Location: Salem Mo
Posts: 649
|
Re: 1957 Chevy truck re-rebuild
Thanks again everyone. Dubie, I dealt with the same issue of the floor shifter. I actually waited til I got the shifter then started building the interior around it. That's how important I felt the shifter location was.
 Just a follow up on the progress. Getting the seats back in place and I can't tell you how many times I've jumped in the truck and imagined the ride.   Yes, finally got the center counsel made, fits great and is just the right height for my right elbow to rest on.  Same picture, just from the drivers side. 
|
|
|
|
|
08-14-2013, 07:22 PM
|
#261 |
|
Registered User
Join Date: Aug 2007
Location: Corona, California
Posts: 7,998
|
Re: 1957 Chevy truck re-rebuild
Looking real nice.
Kim |
|
|
|
|
08-18-2013, 01:41 PM
|
#262 |
|
Registered User
Join Date: Aug 2012
Location: Salem Mo
Posts: 649
|
Re: 1957 Chevy truck re-rebuild
Moving forward, I'm trying to think of all the odds and ends that need to be considered before paint.
One item that comes to mind is a mount, or support for the fuse block. Looking through the discussions about wiring I never see much about how and where everybody is mounting the fuse block. So here goes..... I know I don't want holes drilled into the firewall. I know I don't want it easily seen, yet I want to find the fuses when I need to find them. After looking for a good spot I decided on a bracket that will attach to the brake pivot. There isn't a good flat surface to weld to, so the bracket will need to follow the contour of the brake pivot.  I made it as a two piece bracket, I figure once to wiring is routed and I made one long bracket I may never get the brake pivot out again if I need to with all the wires in place.  Now bolt on the extension for the fuse block to mount to.  Now with the fuse block in place. I have plenty of space on the sides and behind the fuse block to route the wires where needed.  Ok, check one more item off the "to do" list.
|
|
|
|
|
08-18-2013, 07:13 PM
|
#263 |
|
Registered User
Join Date: Aug 2007
Location: Corona, California
Posts: 7,998
|
Re: 1957 Chevy truck re-rebuild
Nice job on the fuse block.
Kim |
|
|
|
|
08-19-2013, 01:53 PM
|
#264 |
|
Registered User
Join Date: May 2000
Location: Flin Flon, Manitoba, Canada
Posts: 8,855
|
Re: 1957 Chevy truck re-rebuild
great idea on the fuse panel mount. I'm wishing i would have gone slower on my build so I could have borrowed a few of these great ideas.
__________________
My name's Tim and I'm a truckaholic My 56 Chevy shop truck build http://67-72chevytrucks.com/vboard/s...d.php?t=562795 |
|
|
|
|
08-19-2013, 11:19 PM
|
#265 |
|
Registered User
Join Date: Aug 2012
Location: Salem Mo
Posts: 649
|
Re: 1957 Chevy truck re-rebuild
dubie, I hear ya, I've mentioned to denee 007 that I'm glad she's a little further ahead than I am, I know I'm more prepared than I would have been.
I'm still on the interior, so many choices to make and to chose from. I know I want to keep it clean and performance oriented. The truck is going to be two tone black and silver. With the steering wheel and the shifter having a black and polished aluminum or chrome, I don't want to bring the silver into the interior of the truck. I do however want to bring more of the polished look into the cab. Polished stainless steel is my choice for breaking up some of the black. I ordered 24 feet of 1/4" solid stainless rod. I'll call this the "trail of broken taps and drill bits"  I'm drilling with 5/64" and 7/74" drill bits and #6 taps, this is going to take a tremendous amount of patience. Plus stainless is a little harder than mild steel so it adds to the breakage. I'm drilling with 5/64" and 7/74" drill bits and #6 taps, this is going to take a tremendous amount of patience. Plus stainless is a little harder than mild steel so it adds to the breakage. This is what I have to work with, I have no idea how a simple door panel can take such a beating and have extra holes drilled into it. I was about to order new ones til I came up with the stainless and black vinyl idea.  I'll jump to the close to finished product. Everything is temporarily in place.  Hopefully the new black carpet will arrive this week, and with the doors painted black and black kick panels, this stainless should be minimal yet make a bold statement.  I have a boat load of pictures of how to, I'll get to those next. |
|
|
|
|
08-20-2013, 01:05 AM
|
#266 |
|
Registered User
Join Date: Aug 2007
Location: Corona, California
Posts: 7,998
|
Re: 1957 Chevy truck re-rebuild
Door panels look nice.
Kim |
|
|
|
|
08-20-2013, 07:40 AM
|
#267 |
|
A320 Pilot/USAF Retired
Join Date: Mar 2009
Location: Charleston, SC
Posts: 2,622
|
Re: 1957 Chevy truck re-rebuild
Very cool!
__________________
JJ My 1957 build: http://67-72chevytrucks.com/vboard/s...d.php?t=334552 http://www.trifive.com/forums/showthread.php?t=22037 Instagram - Chuckdriver57 |
|
|
|
|
08-20-2013, 03:11 PM
|
#268 |
|
Registered User
 Join Date: May 2012
Location: Finley, TN.
Posts: 198
|
Re: 1957 Chevy truck re-rebuild
I hope you did not create a tuning fork effect with the fuse panel.
|
|
|
|
|
08-21-2013, 09:58 PM
|
#269 |
|
Registered User
Join Date: Aug 2012
Location: Salem Mo
Posts: 649
|
Re: 1957 Chevy truck re-rebuild
On to the stainless trim work... I wasn't sure of how the stainless would clean up after the discoloration from heating it red hot, fortunately it polished up like it never happened.
I also made a bending platform. With the flat platform it helped keep the trim true to itself after bending.  Slowly I bent the rod to match the door panel.  And here's one of the many of trouble makers. Trying to drill and tap to a #6 was no fun, but once done it all worked well.  Here is the final result when finished.  With these threaded holes I want to have a #6 screw thread into the backside. I need to weld shut the facing to get rid of the unsightly hole.  With just enough weld to cover the hole I used the 4 1/2" grinder to remove some of the excess.  Now for some hand filing.  Now after emory cloth, ending with 400 grit. It still needs a final polish.  This worked for the door panels where the panel mounts against the door itself. It allows me to use a small wedge screws to hold the trim in place. On the floor counsel I wanted to have studs that I could use nuts to hold the trim in place, that'll be the next pictures. |
|
|
|
|
08-22-2013, 11:29 AM
|
#270 |
|
Registered User
Join Date: Jan 2012
Location: Motown
Posts: 7,677
|
Re: 1957 Chevy truck re-rebuild
attention to detail is amazing
same ridge and ss trim in the console looks good stepside 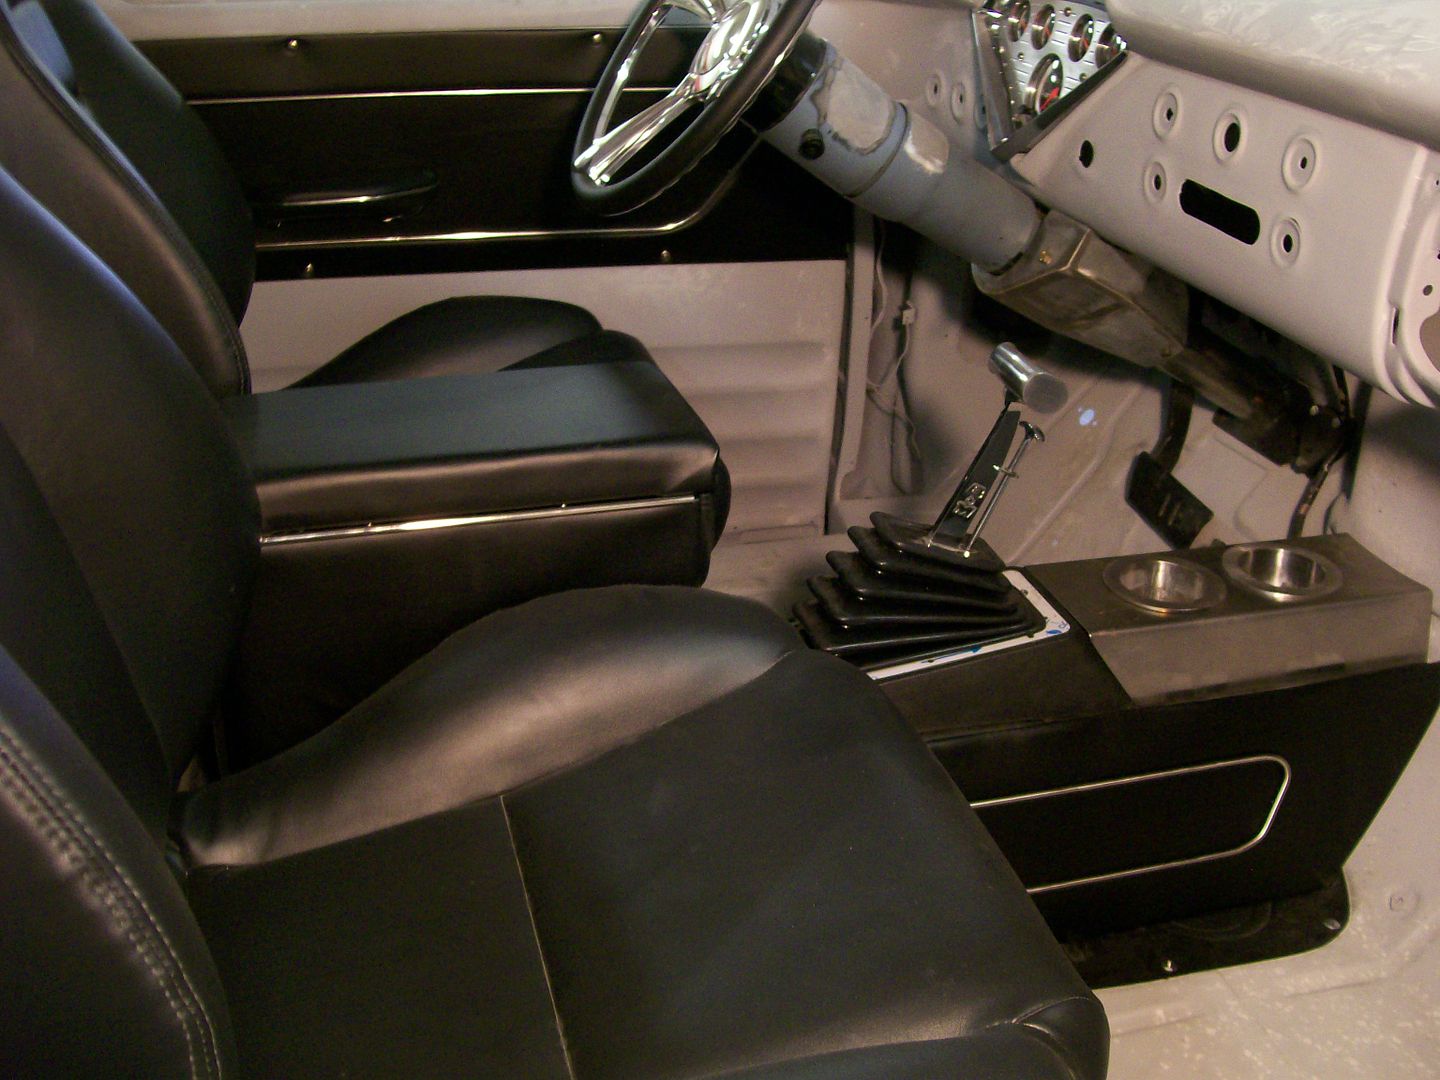
__________________
cool, an ogre smiley  Ogre's 58 Truk build Ogre's 58 Truk buildhow to put your truck year and build thread into your signature shop air compressor timer |
|
|
|
|
08-22-2013, 01:31 PM
|
#271 |
|
Registered User
Join Date: Aug 2007
Location: Corona, California
Posts: 7,998
|
Re: 1957 Chevy truck re-rebuild
Very nice work.
Kim |
|
|
|
|
08-22-2013, 10:12 PM
|
#272 |
|
Registered User
Join Date: Apr 2011
Location: .
Posts: 3,104
|
Re: 1957 Chevy truck re-rebuild
I Like
|
|
|
|
|
08-24-2013, 11:59 PM
|
#273 |
|
Registered User
Join Date: Aug 2012
Location: Salem Mo
Posts: 649
|
Re: 1957 Chevy truck re-rebuild
Now to get the stainless steel to having studs for mounting vs. threaded holes.
Before the studs I had one picture of the backside of the door panel using screws to hold the stainless trim. Since this is all about a mock up and test fit I'm using duct tape to hold the vinyl in place.  Using the same drilling a threading technique I have a threaded hole.  The screws I'm gonna use to create a stud has a tapered head.This works well, I take a pointed rotary brr to create a female taper.  Then to thread the screw in place. At this point I tightened the screw very tight, I want it to seat itself and stay.  Now for some fine grinding and I ready to weld again.  The welding and grinding and filing and polishing is the same procedure as closing the hole so I didn't show that again. Here is the final result.  There is one step I could have saved. I could have just drilled the hole, then inserted the screw and tightened a nut to keep the screw in place then welded the head of the screw in place. By now I figured the technique for threading the holes and it seemed like a more secure way, so I took the long route. |
|
|
|
|
08-25-2013, 11:10 AM
|
#274 |
|
Registered User
Join Date: Aug 2007
Location: Corona, California
Posts: 7,998
|
Re: 1957 Chevy truck re-rebuild
Nice work.
Kim |
|
|
|
|
08-25-2013, 11:58 AM
|
#275 |
|
Registered User
Join Date: Apr 2011
Location: .
Posts: 3,104
|
Re: 1957 Chevy truck re-rebuild
Very Well Done Sir!
|
|
|
|
 |
| Bookmarks |
|
|


 Linear Mode

