
 |
|
|
#1 |
|
Registered User
Join Date: Jan 2012
Location: Eastern Ontario, Canada
Posts: 1,041
|
Rear cab panel 51 AD
Hey All! Everyone having a good May 24? I am with my truck build. I bought a new complete rear cab panel for my 51 AD and am starting to install it. Kinda confused on how I have to install the new one. I just cut out the old one about 1/2" from the belt line all the way around. I had to shut er down for the day. Has anybody replaced the same part and have some install tips on how they did it?
Cheers! Sid
__________________
1952 Canadian Chevy 1300 C4 IFS & D44 IRS 5.3 HO L33 My Build: http://67-72chevytrucks.com/vboard/s...d.php?t=632938 
|
|
|

|
|
|
#2 |
|
Registered User
Join Date: Dec 2000
Location: Boise, Idaho
Posts: 6,003
|
Re: Rear cab panel 51 AD
Is it the complete panel all the way into a folded lip at the top where the original one pinch welds in?
Brian
__________________
1948 Chevy pickup Chopped, Sectioned, 1953 Corvette 235 powered. Once was even 401 Buick mid engined with the carburetor right between the seats! Bought with paper route money in 1973 when I was 15. "Fan of most anything that moves human beings" |
|
|

|
|
|
#3 |
|
Registered User
Join Date: Jan 2012
Location: Eastern Ontario, Canada
Posts: 1,041
|
Re: Rear cab panel 51 AD
Yes it is the complete panel.
__________________
1952 Canadian Chevy 1300 C4 IFS & D44 IRS 5.3 HO L33 My Build: http://67-72chevytrucks.com/vboard/s...d.php?t=632938 
|
|
|

|
|
|
#4 |
|
Registered User
Join Date: Jan 2012
Location: Eastern Ontario, Canada
Posts: 1,041
|
Re: Rear cab panel 51 AD
Right now I have the bottom part of the rear panel removed along the floor pan and rear door pillars. I do have to install new inner cab corners but the rest is pretty solid. It's just removing the old rear panel at the belt line. I have the four bolts removed. From what I have removed at the belt line by the drivers door, it appears that the rear panel is spot welded in at the corners. It looks like the top lip is sandwiched in between two others pieces. Hope none of the inside upper panels have to come off in order to put this in.
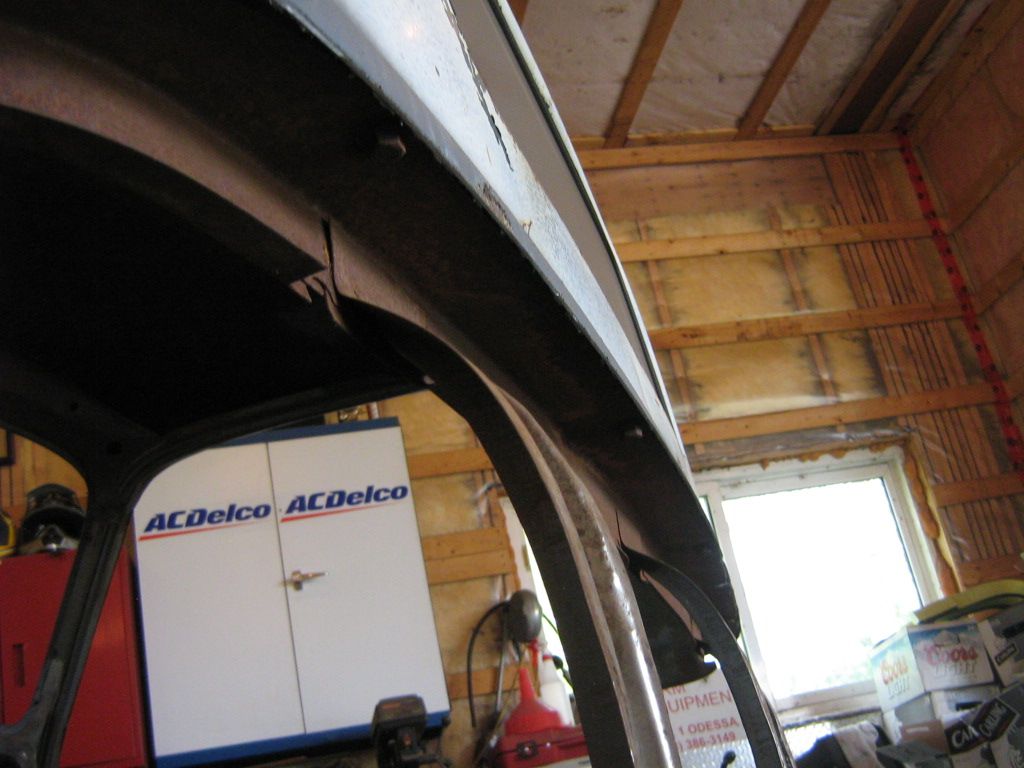 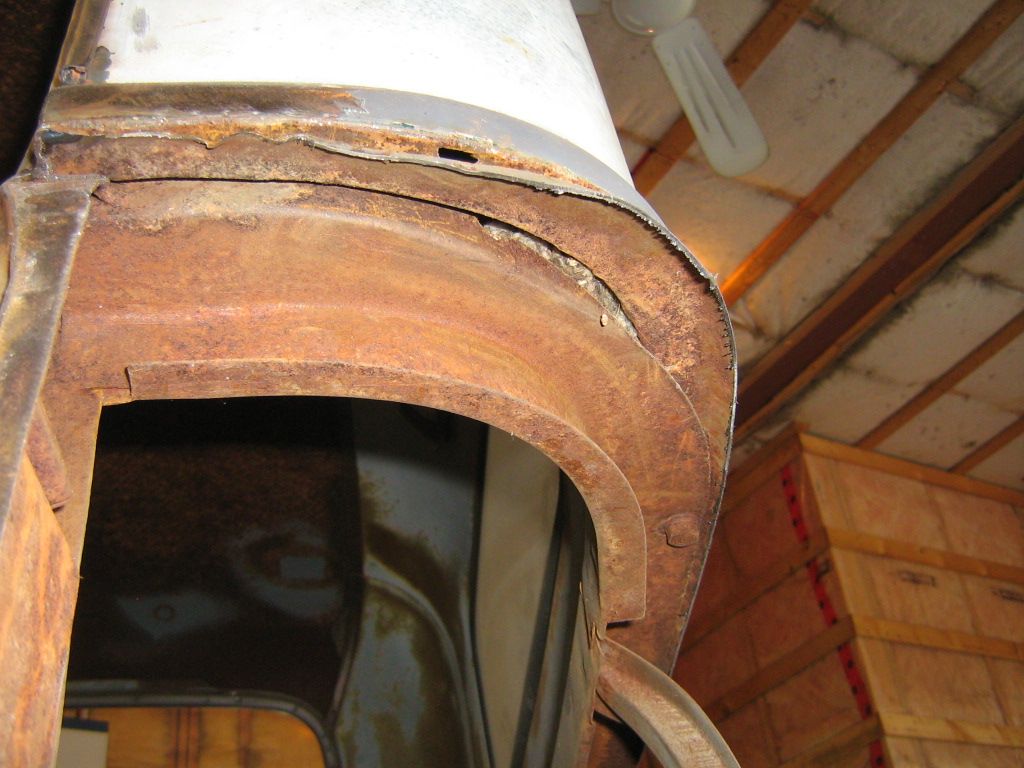 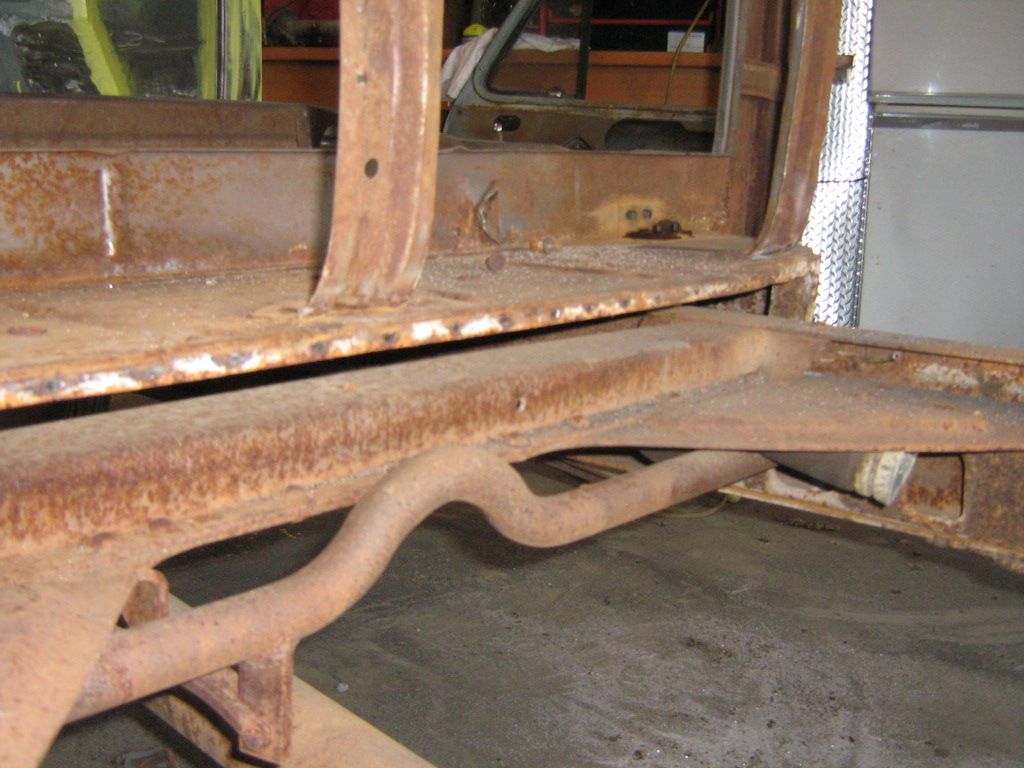
__________________
1952 Canadian Chevy 1300 C4 IFS & D44 IRS 5.3 HO L33 My Build: http://67-72chevytrucks.com/vboard/s...d.php?t=632938 
|
|
|

|
|
|
#5 |
|
Senior Member
 Join Date: Apr 2011
Location: South NJ
Posts: 1,268
|
Re: Rear cab panel 51 AD
Subscribing as i will be doing the same on mine
|
|
|

|
|
|
#6 |
|
Hollister Road Co.
Join Date: Apr 2005
Location: Houston
Posts: 6,131
|
Re: Rear cab panel 51 AD
Its not hard to do just hard to manage the panel by your self.
Cut the 3 vertical bows loose from the floor and pull them forward Remove all the bolts that hold the cab panel to the window panel , 4 I think, and then cut the welds at the door and bust the spots along the door gap and around the bottom spot weld line. Don't remove the support bow that runs on top of the lower cab panel. Once the old panel is completely removed clean up the spot welds. Wrap the panel around the door pillars making sure your cab corners are positioned, pull it up slide it over the support bow and re-bolt the back panel to the window panel. This is going to take some fitting and maneuvering and maybe an extra set of hands. It may not fit perfectly without a little shifting. You can check to see if it in the right spot by closing the door. if the gap looks good and the belt line looks good then stat clamping the lower edges. you may need to jack the floor up on the back center to meet the spot weld line. weld at the door belt line and work your way down the door gap and around to the middle, alternate side so you don't end up with the panel pushed one way or the other. Once the panel is back in place and welded place your felt strip between the bows and the panel and apply some pressure to re position the bow on the floor and re-weld it Last edited by dwcsr; 05-20-2014 at 11:34 AM. |
|
|

|
|
|
#7 |
|
Registered User
Join Date: Jan 2012
Location: Eastern Ontario, Canada
Posts: 1,041
|
Re: Rear cab panel 51 AD
Thanks Dave. Very helpful. I'm not quite following you on a few points. I already have the rear panel removed from both door openings and along the bottom of the panel at the floor. All that's left is a strip along the belt line. I did this so I could see what what is going on up there a lot easier. The 4 bolts are removed also.
Why do I need to cut the 3 vertical bows? Is the top of the lower panel only spot welded at the corners where they wrap around to the door opening and the area along the back under the window only held in place by the 4 bolts? Thanks!
__________________
1952 Canadian Chevy 1300 C4 IFS & D44 IRS 5.3 HO L33 My Build: http://67-72chevytrucks.com/vboard/s...d.php?t=632938 
|
|
|

|
|
|
#8 |
|
Registered User
 Join Date: Jul 2007
Location: Toppenish, WA
Posts: 15,728
|
Re: Rear cab panel 51 AD
Humm, that makes it a good day for me because I learned something that I never knew or thought of before. I thought the back of the cab was spot welded all the way across under the belt line. Thanks Dave for that info.
__________________
Founding member of the too many projects, too little time and money club. My ongoing truck projects: 48 Chev 3100 that will run a 292 Six. 71 GMC 2500 that is getting a Cad 500 transplant. 77 C 30 dualie, 454, 4 speed with a 10 foot flatbed and hoist. It does the heavy work and hauls the projects around. |
|
|

|
|
|
#9 |
|
Hollister Road Co.
Join Date: Apr 2005
Location: Houston
Posts: 6,131
|
Re: Rear cab panel 51 AD
It is a little weird. I can't seem to figure out why its bolted in the middle and welded on the ends. I think its because there is supposed to be a rubber seal there and spotting wouldn't work but I have yet to pull out a seal from the belt line and have only seen it mentioned in old parts books.
|
|
|

|
|
|
#10 | |
|
Hollister Road Co.
Join Date: Apr 2005
Location: Houston
Posts: 6,131
|
Re: Rear cab panel 51 AD
Quote:
Spot welds are from the belt line to the bottom and across and back up to the belt line. There are also spots along the top about every 6" or so along with the 4 bolts. There is also a solid weld at the door edge at the belt line that needs to be trimmed. |
|
|
|

|
|
|
#11 |
|
Registered User
Join Date: Jan 2012
Location: Eastern Ontario, Canada
Posts: 1,041
|
Re: Rear cab panel 51 AD
Been playing around with the truck tonight. So you mean by loosening the bottom of the three bows, pulling them towards the front of the cab, it flexes the upper parts where the bows attach downward to get at the spot welds? It kinds seems that way like you describe now that I look at it. The rear panel is sandwiched between two other parts at the top..
__________________
1952 Canadian Chevy 1300 C4 IFS & D44 IRS 5.3 HO L33 My Build: http://67-72chevytrucks.com/vboard/s...d.php?t=632938 
|
|
|

|
|
|
#12 | |
|
Hollister Road Co.
Join Date: Apr 2005
Location: Houston
Posts: 6,131
|
Re: Rear cab panel 51 AD
Quote:
The cab structure at the belt line has an upper window lip that has the nuts in it, replacement panels don't, You also have a horizontal bow that runs side to side at the belt line, it has bolt holes matching the nuts, new ones don't, and you have the lower panel lip that slides over the horizontal bow that also has bolts holes, new ones don't. The below pictures are for a 47 center mount cab we have in the shop now and they are a different in the rear cab area below the window as you can see. The first picture shows the lower inner window panel section has been removed at the horizontal bow, you can see the bow is L shaped. The inner window panel welds to the down leg of that bow as do your 3 vertical bows (1949 up have the 3 vertical bows 47 an 48 look like the pictures). Second picture shows the lower cab panel lip over the bow. It gets welded to the bow, The upper window panel will sit on the two pieces and gets welded to the bow as well. If you don't have the inner window panel out of opened like ours then you weld the belt line seam full length to attach it all together. |
|
|
|

|
|
|
#13 | |
|
Registered User
 Join Date: Jul 2007
Location: Toppenish, WA
Posts: 15,728
|
Re: Rear cab panel 51 AD
Quote:
The good thing for us might be that instead of cutting the roof through the windows and door posts like a lot of us have done when replacing a damaged roof we can cut the front door posts just below the welds on the donor rig, cut the welds at the rear door posts and unbolt the roof and with a bit of diligent trimming around the old welds on the cab we are using set the replacement roof in place, bolt it down in back, line it up in front and weld it back just like the factory did with a minimum of finish work after we are done.
__________________
Founding member of the too many projects, too little time and money club. My ongoing truck projects: 48 Chev 3100 that will run a 292 Six. 71 GMC 2500 that is getting a Cad 500 transplant. 77 C 30 dualie, 454, 4 speed with a 10 foot flatbed and hoist. It does the heavy work and hauls the projects around. |
|
|
|

|
|
|
#14 |
|
Senior Member
 Join Date: Apr 2011
Location: South NJ
Posts: 1,268
|
Re: Rear cab panel 51 AD
Anyone care to chime in and give an opinion on who sells the best lower back panel? Need to source one.
Thanks all for the detailed and very helpful info on how to replace one! |
|
|

|
|
|
#15 |
|
Registered User
Join Date: Jan 2012
Location: Eastern Ontario, Canada
Posts: 1,041
|
Re: Rear cab panel 51 AD
I bought mine through LMC as they have free shipping on orders overs $1000. It's not hard to get to that amount. LOL! Shipping on large items is killer.
__________________
1952 Canadian Chevy 1300 C4 IFS & D44 IRS 5.3 HO L33 My Build: http://67-72chevytrucks.com/vboard/s...d.php?t=632938 
|
|
|

|
|
|
#16 |
|
Registered User
Join Date: Jan 2012
Location: Eastern Ontario, Canada
Posts: 1,041
|
Re: Rear cab panel 51 AD
Here is how the cab sits right now.
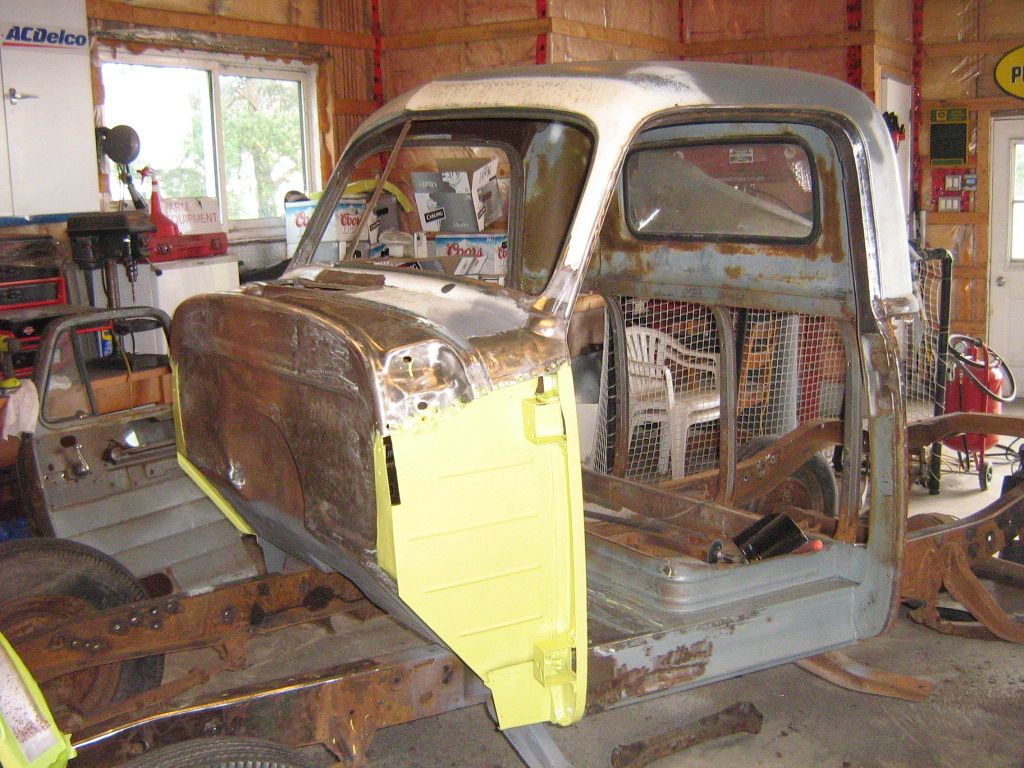 Here's a few of the bows and where they attach at the top. 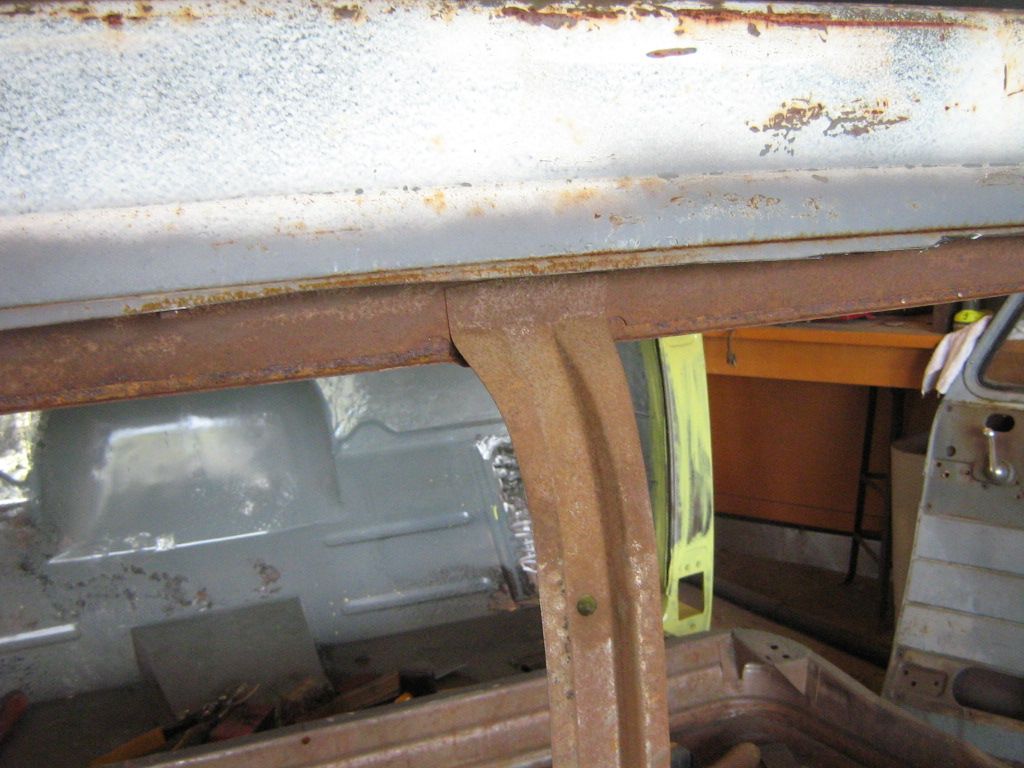 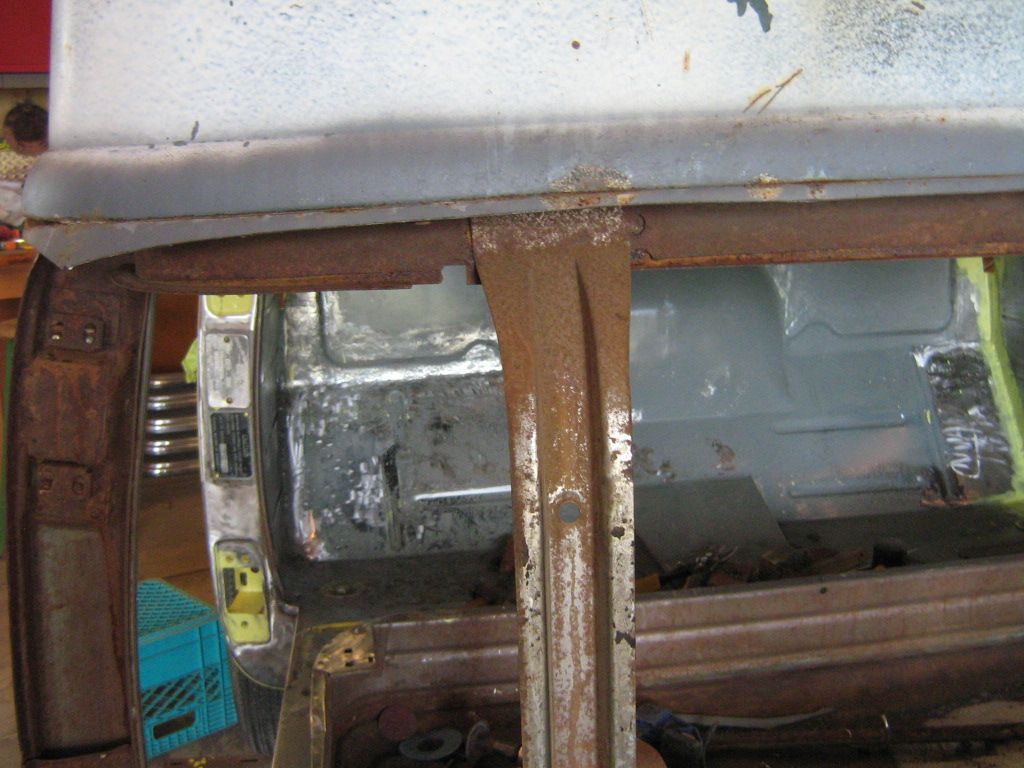 And here is the three layers or where the three parts sandwich together. I pried down a bit to see any spot welds.  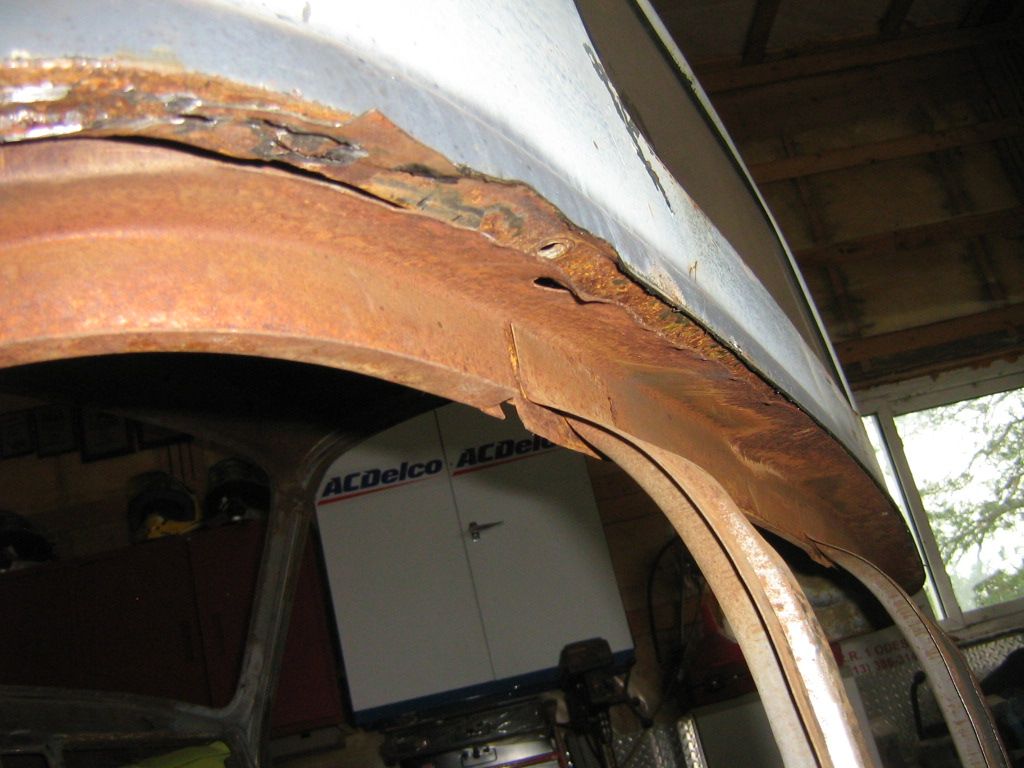 Whats' your opinion on installation. Should I cut an opening inside the cab below the window to reweld or weld up the seam from the outside? I will be working on it more tonight so maybe I will get a better idea on how I should proceed.
__________________
1952 Canadian Chevy 1300 C4 IFS & D44 IRS 5.3 HO L33 My Build: http://67-72chevytrucks.com/vboard/s...d.php?t=632938 
|
|
|

|
|
|
#17 |
|
Hollister Road Co.
Join Date: Apr 2005
Location: Houston
Posts: 6,131
|
Re: Rear cab panel 51 AD
I would weld the seam because its an area that water gets into and your inside panel is good so why chop it up.
|
|
|

|
|
|
#18 |
|
Registered User
Join Date: Mar 2008
Location: Waukee, Iowa
Posts: 1,608
|
Re: Rear cab panel 51 AD
I'd use panel bond adhesive for the same reasons that dwcsr mentioned. I'd do that over welding the seam because it is so difficult to re-create that body line after it's welded (I know because I'm there right now...wishing I hadn't).
__________________
build threads: 86 Suburban 88 Jeep 6.0 swap 49 Chevy truck 54 Chevy wagon 86 Suburban lowered 4/6 54 Chevy wagon 49 Chevy/s10 mix 88 Jeep Wrangler rockcrawler |
|
|

|
|
|
#19 |
|
Hollister Road Co.
Join Date: Apr 2005
Location: Houston
Posts: 6,131
|
Re: Rear cab panel 51 AD
Thats a good idea. The weight of the panel is enough to apply pressure to the bond. it would make the seam clean up easier and seal it off from water.
|
|
|

|
|
|
#20 |
|
Registered User
Join Date: Jan 2012
Location: Eastern Ontario, Canada
Posts: 1,041
|
Re: Rear cab panel 51 AD
I made some good progress today and think I came up with a solution that will work mint! Don't have the time right now but will explain tomorrow with some pictures. All you American folk have a good long weekend?
__________________
1952 Canadian Chevy 1300 C4 IFS & D44 IRS 5.3 HO L33 My Build: http://67-72chevytrucks.com/vboard/s...d.php?t=632938 
|
|
|

|
|
|
#21 |
|
Registered User
Join Date: Jan 2012
Location: Eastern Ontario, Canada
Posts: 1,041
|
Re: Rear cab panel 51 AD
So....I think I came up with an idea that I think will work with what repairs I have to do to the cab. I cut out the bottom portion flange that has the 4 holes in it for bolts. I will have to replace a few sections of the lower lip on the belt line so with this gone, it's much easier to do repairs. Here's a picture if the lower flange removed.
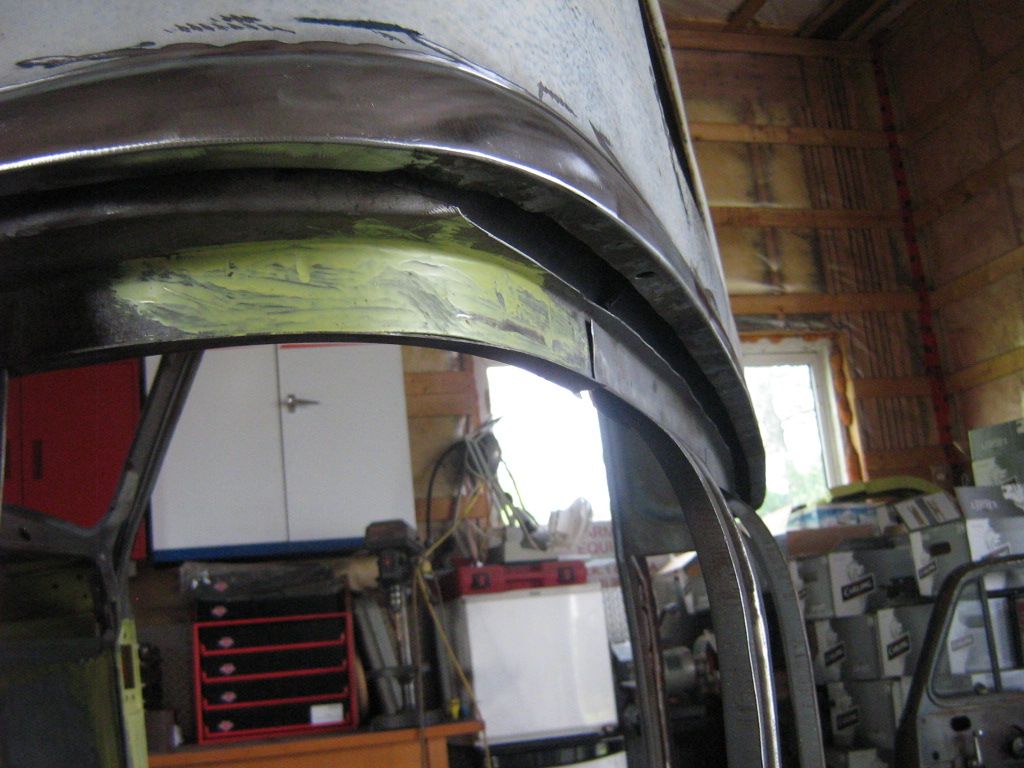 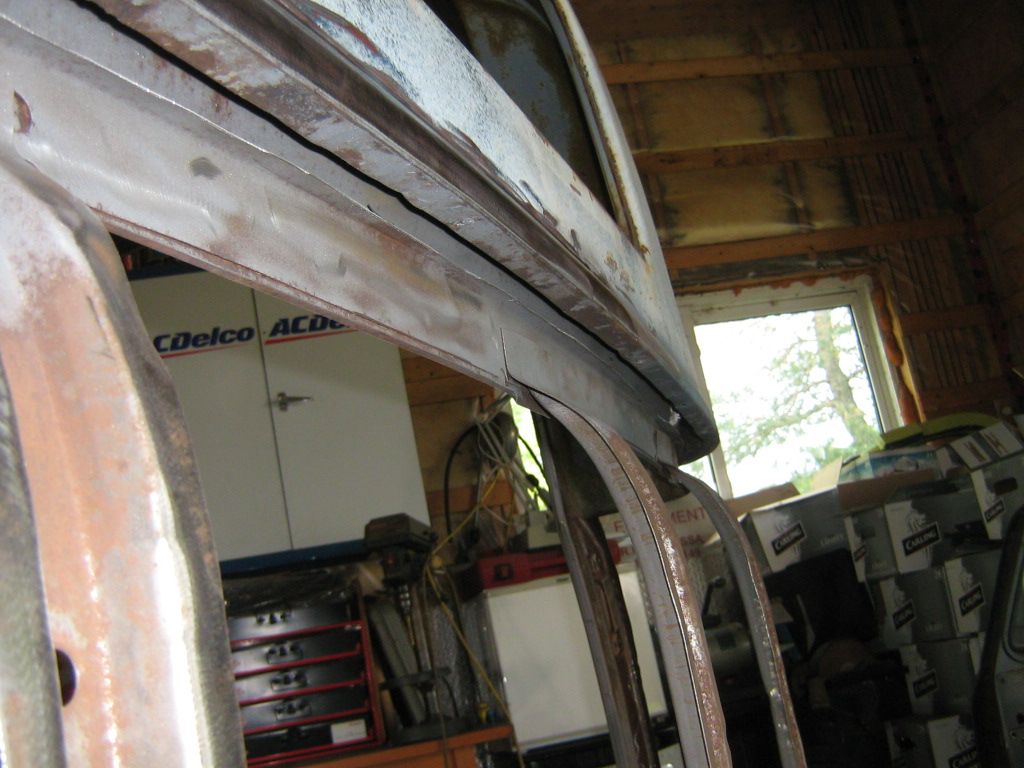 Here's a short repair of the belt line flange. More of this to be done and where the captive nuts will spot welded up inside. 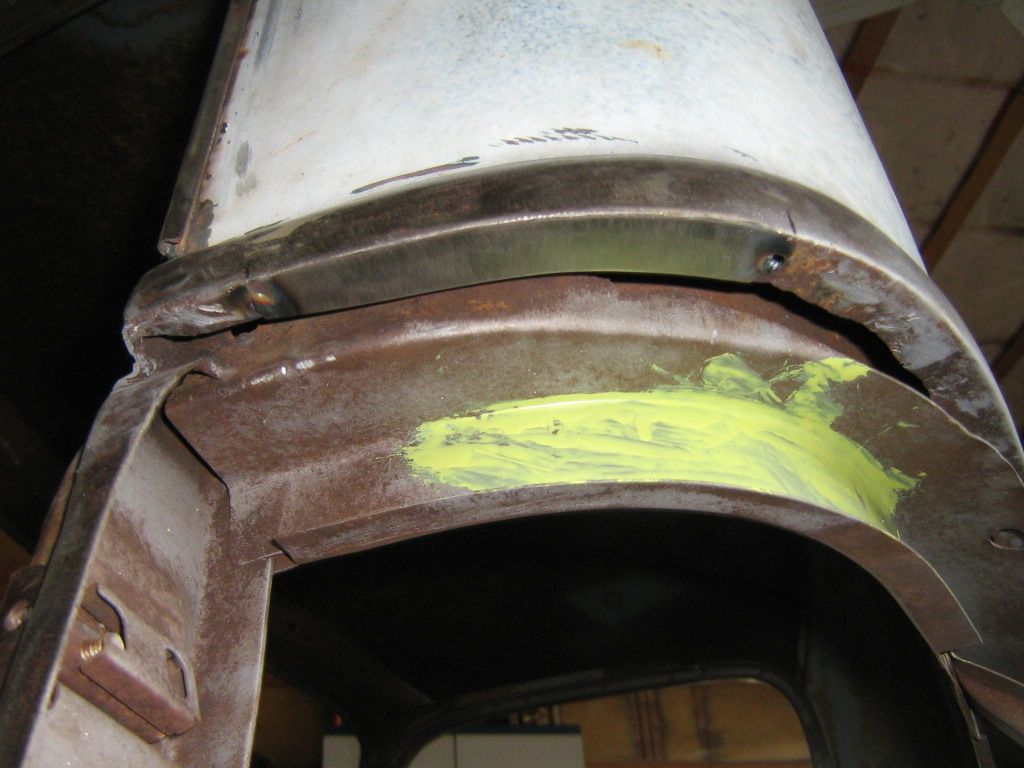 Since there were like a million spot welds along the belt line with the 4 bolts holding all three parts together, I have no way of attaching the new panel other than the 4 bolts and welds at the door opening. Since I have to repair some sections of the belt line flange, I made these captive nuts to spot weld above the belt line flange and will use them to secure the upper and lower panels together along with either seam sealer or panel adhesive. Not sure which yet. What do you all think? I can access these captive nuts from inside the cab but there's no way I can do any welding unless I cut access holes on the inside of the cab. 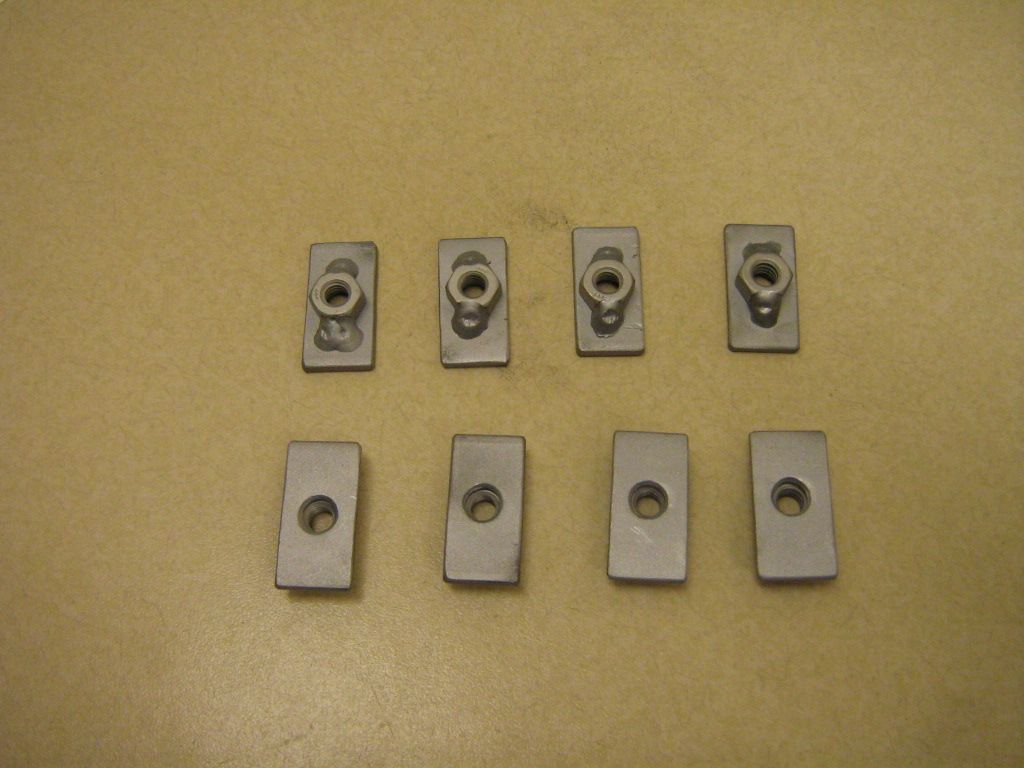 I also got the inner cab corners done. 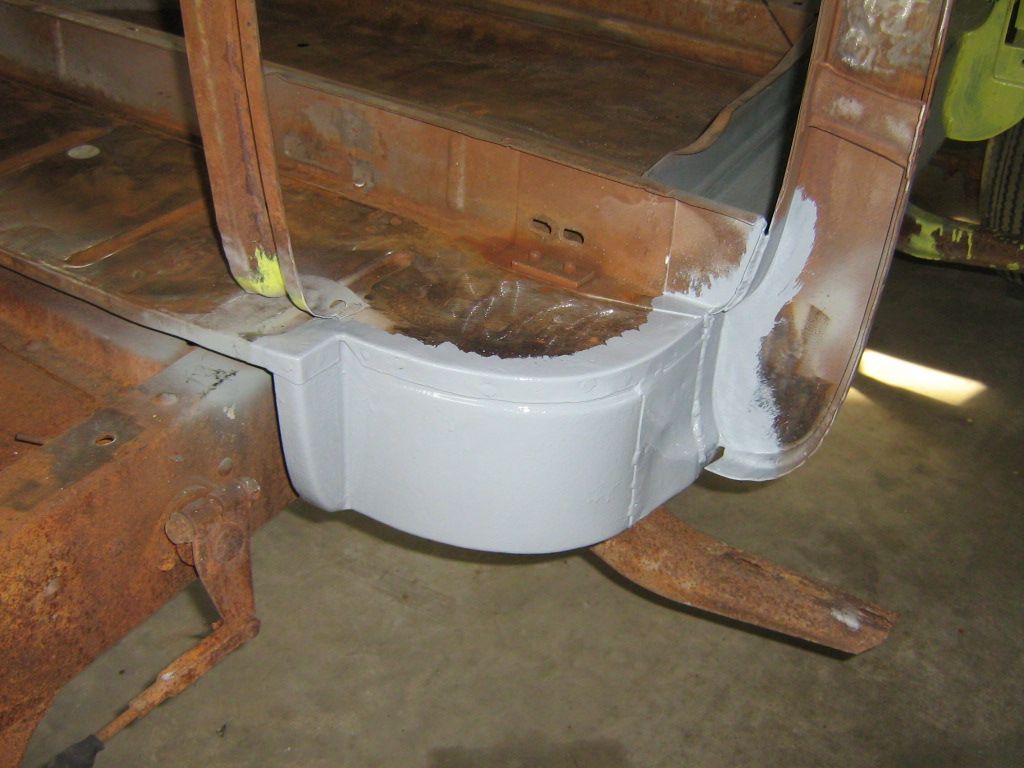
__________________
1952 Canadian Chevy 1300 C4 IFS & D44 IRS 5.3 HO L33 My Build: http://67-72chevytrucks.com/vboard/s...d.php?t=632938 
|
|
|

|
|
|
#22 |
|
Formerly- 1972SuperCheyenne
 Join Date: Oct 2008
Location: Wake Forest NC
Posts: 5,782
|
Re: Rear cab panel 51 AD
Damn nice work my friend. Looks really good. Is that a brush on seam sealer or primer on the inner cab corner?
__________________
--Josh My Build Thread:http://67-72chevytrucks.com/vboard/s...d.php?t=799218 A good crossthread is better than Loctite any day. Life is not about what you have, but who you have to share it with. |
|
|

|
|
|
#23 |
|
Registered User
 Join Date: Jul 2007
Location: Toppenish, WA
Posts: 15,728
|
Re: Rear cab panel 51 AD
This is looking better all the time.
__________________
Founding member of the too many projects, too little time and money club. My ongoing truck projects: 48 Chev 3100 that will run a 292 Six. 71 GMC 2500 that is getting a Cad 500 transplant. 77 C 30 dualie, 454, 4 speed with a 10 foot flatbed and hoist. It does the heavy work and hauls the projects around. |
|
|

|
|
|
#24 |
|
Registered User
Join Date: Dec 2000
Location: Boise, Idaho
Posts: 6,003
|
Re: Rear cab panel 51 AD
There are two other ways to do this. First off, simply make inverted plug welds from inside the cab going up into the space between the inner panel and the rear panel plug welding them just as it was. Now, this isn't easy, but VERY do-able. Punch the holes in the new lower panel where it will meet up there. Install the panel then mark where the holes are looking up from underneath with a flash light. Remove the rear body panel and clean where those welds are going to be REALLY good, spot sand blasting would be the ticket. Then apply a thin coat of weld thru primer.
With the BEAUTIFUL work you are doing, the VERY nice work you are doing, I fully believe you could weld that rear body panel on as it was (well plug welded not spot welded, but you get the idea). Going up just as you did with the sharpie to mark the holes, plug weld the panel in place. If you go to this link, the whole "Basics of Basics" for MIG welding may be worth a read to you, but half way down is the "Inverted MIG welding" addition to the "Basics" that has some good stuff there where you can weld those welds from the underside as I describe. http://www.autobodystore.com/new_page_11.shtml The other option would be to remove the whole inner panel and plug welded it down thru upper rear cab panel into the new lower panel. This panel is held in with a bunch of spot welds and if you remove it as described in the "Basics of Basics" of spot weld removal it's not a lot like "Unbolting" it. http://www.hotrodders.com/forum/basi...ls-222549.html 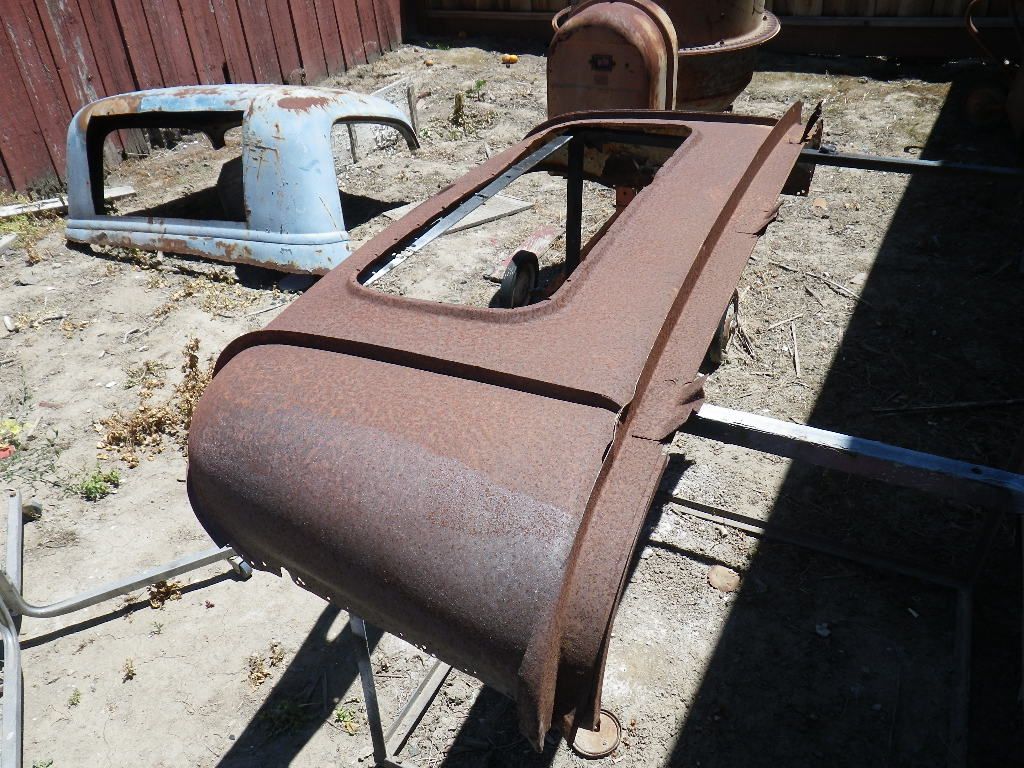 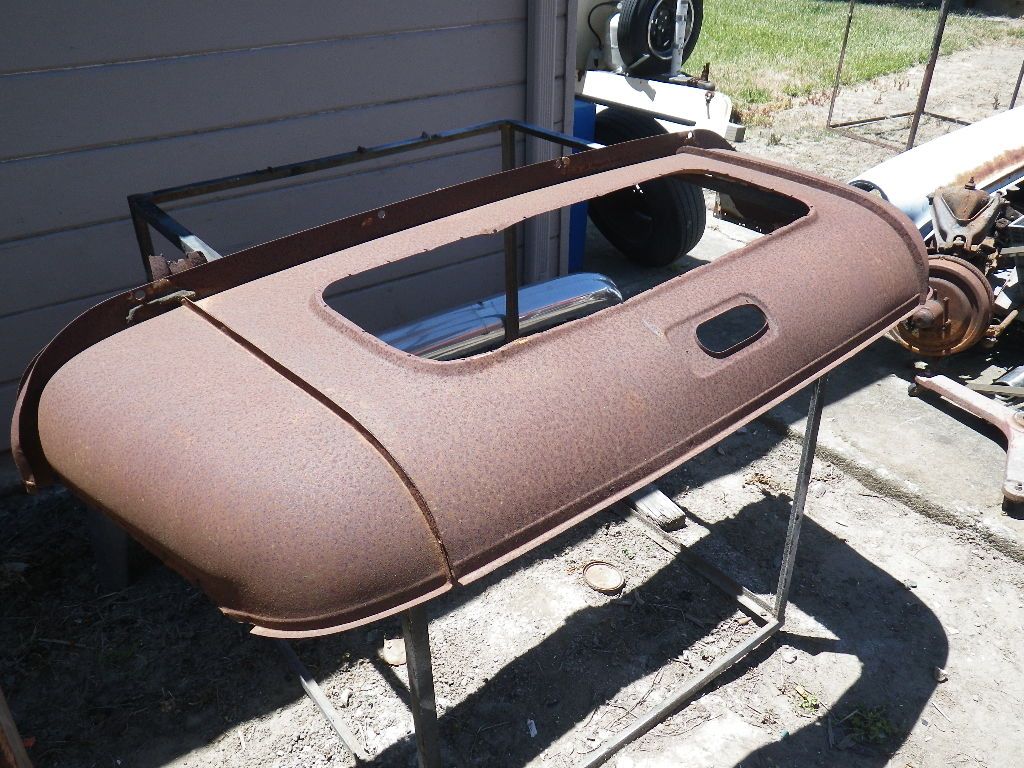 Here is what it looks like with the rear inner panel removed at that joint between the lower panel you are replacing (cut off under the pinch weld) and the upper cab panel, you can see where I cut out the rear window. 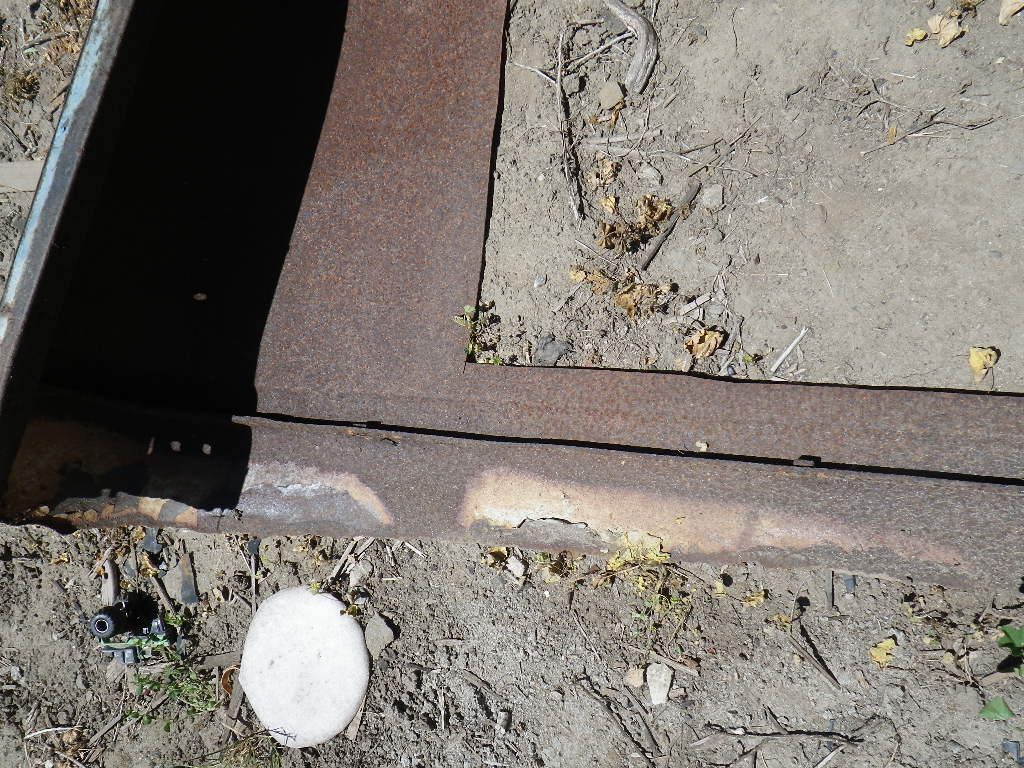 But honestly, you CAN plug weld that panel in from the bottom. Practice a little, read the "Basics", print it out and read it a few times while you relax in the evening and then get out there and practice and you WILL be able to do an inverted plug weld sure as can be.  Brian
__________________
1948 Chevy pickup Chopped, Sectioned, 1953 Corvette 235 powered. Once was even 401 Buick mid engined with the carburetor right between the seats! Bought with paper route money in 1973 when I was 15. "Fan of most anything that moves human beings" |
|
|

|
|
|
#25 |
|
Registered User
Join Date: Jan 2012
Location: Eastern Ontario, Canada
Posts: 1,041
|
Re: Rear cab panel 51 AD
Thanks for the great write up Brian. Thanks. Others will find that very useful. I can't do it that way now as I cut one of the flanges off. The captive nuts will work good. I neglected to mention in my previous post that I plan on installing a few tabs along the width of the cab to replicate the 4 bolt holes that were in the flange I cut out. It will stiffen the inner to outer panels like factory.
__________________
1952 Canadian Chevy 1300 C4 IFS & D44 IRS 5.3 HO L33 My Build: http://67-72chevytrucks.com/vboard/s...d.php?t=632938 
|
|
|

|
 |
| Bookmarks |
|
|