
 |
Register or Log In To remove these advertisements. |
|
|
|
|||||||
 |
|
|
Thread Tools | Display Modes |
|
|
#1 |
|
Registered User
Join Date: Feb 2012
Location: Mission Viejo, CA
Posts: 1,856
|
new cam in truck thats not going anywhere
I put new heads and cam lifters intake on my engine. The truck is still a rolling chassis.
Should I just leave it until I get stuff like the cab gas pedal and key installed (6monthsish) or attempt to rig up fuel/tach/throttle and break in the cam now? |
|
|

|
|
|
#2 |
|
Registered User
 Join Date: Aug 2014
Location: Pittsburgh, PA
Posts: 627
|
Re: new cam in truck thats not going anywhere
I would break-in the cam now while there is still assembly lube on everything (you did use assembly lube right?). Otherwise if you wait you would probably have to remove each lifter and re-apply the assembly lube.
|
|
|

|
|
|
#3 |
|
Registered User
Join Date: Feb 2012
Location: Mission Viejo, CA
Posts: 1,856
|
Re: new cam in truck thats not going anywhere
yea I put assembly lube on the cam and lifters.
any suggestions on how to rig up a throttle? Im supposed to run it for 20 minutes or so at X rpm. Dont think I want to stand there and hold the carb linkage. I suppose I can use my timing light for the tach. one thing Im worried about is that the timing and everything else is going to be off. So its going to be tricky timing it and breaking it in at the same time. Not to mention needing to adjust the valves. |
|
|

|
|
|
#4 | |
|
Registered User
Join Date: Jul 2007
Location: Fall River California
Posts: 2,026
|
Re: new cam in truck thats not going anywhere
Quote:
__________________
http://smg.photobucket.com/albums/v655/aaronhero/ |
|
|
|

|
|
|
#5 |
|
Registered User
Join Date: Aug 2013
Location: Hiram Ohio
Posts: 619
|
Re: new cam in truck thats not going anywhere
Adjust your valves first, static time the dist, start and raise rpm to specified number, use Carb idle screw to hold rpm. easy
__________________
1953 Chevy 3100 1964 Chevy Impala 1966 Chevy El Camino 1970 Chevy C10 Fleet Long 1972 Chevy C10 Step long 1985 Chevy K10 Fleet Short |
|
|

|
|
|
#6 |
|
Registered User
Join Date: May 2014
Location: Manteca, Ca.
Posts: 274
|
Re: new cam in truck thats not going anywhere
Ya'all had my answers while I was typing.
__________________
Terry Soon to be retired and moving to Bristol, TN. |
|
|

|
|
|
#7 |
|
Registered User
Join Date: Apr 2010
Location: So Cal
Posts: 1,470
|
Re: new cam in truck thats not going anywhere
Rolling Chassis?
Without the radiator and transmission lines installed, it would be ill advised. The assembly lube will stay put. When you have the assembly farther alone and you don't have to jury-rig every thing, pull the distributor and prime the oil pump and oil passages while hand turning the crank. Without coolant, you will overheat the engine before the cam and lifters are properly broken in.
__________________
'67 GMC 2500, 292, 4spd, AC |
|
|

|
|
|
#8 |
|
Registered User
 Join Date: Aug 2014
Location: Pittsburgh, PA
Posts: 627
|
Re: new cam in truck thats not going anywhere
The posters above just about summed it up.
|
|
|

|
|
|
#9 | |
|
Registered User
Join Date: Jun 2014
Location: Glendale, Arizna
Posts: 1,642
|
Re: new cam in truck thats not going anywhere
Quote:
Perform the following before you install the spark plugs. Set all the lifters 5/8 of a turn down from contact at the rocker arm, spin the pushrods with your fingers while tightening to feel when it hits. The lifters will be empty so start your 5/8 of a turn upon INITIAL contact. The lifters are spring loaded but if your fingers are strong you will still be able to turn the pushrod after contact. with #1 cylinder Intake Valve at full valve lift .... Adjust #6 Intake Valve with #8 cylinder Intake Valve at full valve lift .... Adjust #5 Intake Valve with #4 cylinder Intake Valve at full valve lift .... Adjust #7 Intake Valve with #3 cylinder Intake Valve at full valve lift .... Adjust #2 Intake Valve with #6 cylinder Intake Valve at full valve lift .... Adjust #1 Intake Valve with #5 cylinder Intake Valve at full valve lift .... Adjust #8 Intake Valve with #7 cylinder Intake Valve at full valve lift .... Adjust #4 Intake Valve with #2 cylinder Intake Valve at full valve lift .... Adjust #3 Intake Valve with #1 cylinder Exhaust Valve at full valve lift .... Adjust #6 Exhaust Valve with #8 cylinder Exhaust Valve at full valve lift .... Adjust #5 Exhaust Valve with #4 cylinder Exhaust Valve at full valve lift .... Adjust #7 Exhaust Valve with #3 cylinder Exhaust Valve at full valve lift .... Adjust #2 Exhaust Valve with #6 cylinder Exhaust Valve at full valve lift .... Adjust #1 Exhaust Valve with #5 cylinder Exhaust Valve at full valve lift .... Adjust #8 Exhaust Valve with #7 cylinder Exhaust Valve at full valve lift .... Adjust #4 Exhaust Valve with #2 cylinder Exhaust Valve at full valve lift .... Adjust #3 Exhaust Valve Before you start adjusting valves install an oil pump priming device and prime it in several different crankshaft positions while adjusting valves to ensure no air pockets and to fill the lifters as best to avoid clatter. While your valve covers are off set your crankshaft balancer to #1 TDC then install your valve covers. Now set your timing. Mark the distributor body for #1 and #2 electrode positions. Drop in the dist and install the hold-down loosely as close to # 1 as possible with the distributor indexed as in the figure below, then put your crankshaft balancer on the pointer where you want it timed, like 10-15 degrees BTDC for instance. Then turn distributor clockwise to where the rotor points between cap electrodes #2 and #1. Install the cap and only the #1 plug wire to the cap and to either a grounded spark plug or a spark tester on the other end. Now plug in the HEI power wire with the key on 12V and with only # 1 plug wire installed, turn the distributor counter-clockwise until you see spark at the plug or spark tester. Tighten down the distributor. If you are running an automatic transmission it's best to leave the torque converter un-bolted and pushed away from the flywheel for this procedure so you are not distracted with filling the trans. You might carefully use a bungy cord or something to hold it away from the flexplate. After all this run the engine again and get it all the way warmed up never exceeding 2500 RPM then let it completely cool down and then you have broken in the valve springs as well. If you don't let the valve springs heat up and cool all the way at least once before revving it up, they will become weakened. |
|
|
|

|
|
|
#10 |
|
Registered User
Join Date: Feb 2012
Location: Mission Viejo, CA
Posts: 1,856
|
Re: new cam in truck thats not going anywhere
thanks for the posts guys.
I have the engine, tranny, rad, rear end , exhaust and drive shaft in place. brakes, wheels tires as well. No cab or bed though. so no gas pedal, brake or any gauges or master cylinder. I like the idea of doing the valves with the engine not running so thanks for that post. |
|
|

|
|
|
#11 | |
|
Registered User
Join Date: Jun 2014
Location: Glendale, Arizna
Posts: 1,642
|
Re: new cam in truck thats not going anywhere
Quote:
|
|
|
|

|
|
|
#12 | |
|
Registered User
Join Date: Feb 2012
Location: Mission Viejo, CA
Posts: 1,856
|
Re: new cam in truck thats not going anywhere
I've never done this before. Ive set timing but not adjusted valves, or swapped cam and heads for that matter.. So I've read your post a couple times now and think I have most of it in theory.
couple questions. just for knowledge why do you set #6 when #1 is at full lift etc? something to do with where the cam is on that cylinder when the other one is at the top? and this isn't really a question but I don't quite get this part. Im going to grab my distributor this evening so I can play with it and see if it clicks. Quote:
|
|
|
|

|
|
|
#13 |
|
Registered User
Join Date: Jan 2009
Location: Calgary, AB
Posts: 1,181
|
Re: new cam in truck thats not going anywhere
Don't do the twisting method if you have never adjusted valves before. You could end up over tightening them and causing issues. The easiest way is to lift them up and down until the pushrod doesn't move up or down. There is a fine line where there is too much or not enough.
After you set your intial timing (recommend 10 BTDC) make the rotor point at #1 cylinder and install the cap and where the rotor points use that as the #1 terminal. You want to ensure you are setting your valve lash on the base of the cam lobes and hence why the #1 and #6 firing positions. You can also know when you are on TDC #1 or #6 by the intake valves. When your in TDC #1 the #3 take valve will be open and when you are at TDC #6 the #2 intake valve will be open. |
|
|

|
|
|
#14 |
|
Registered User
Join Date: Feb 2012
Location: Mission Viejo, CA
Posts: 1,856
|
Re: new cam in truck thats not going anywhere
So I got the heads on and needed to check the pushrod length. Looks like the stock length is correct.
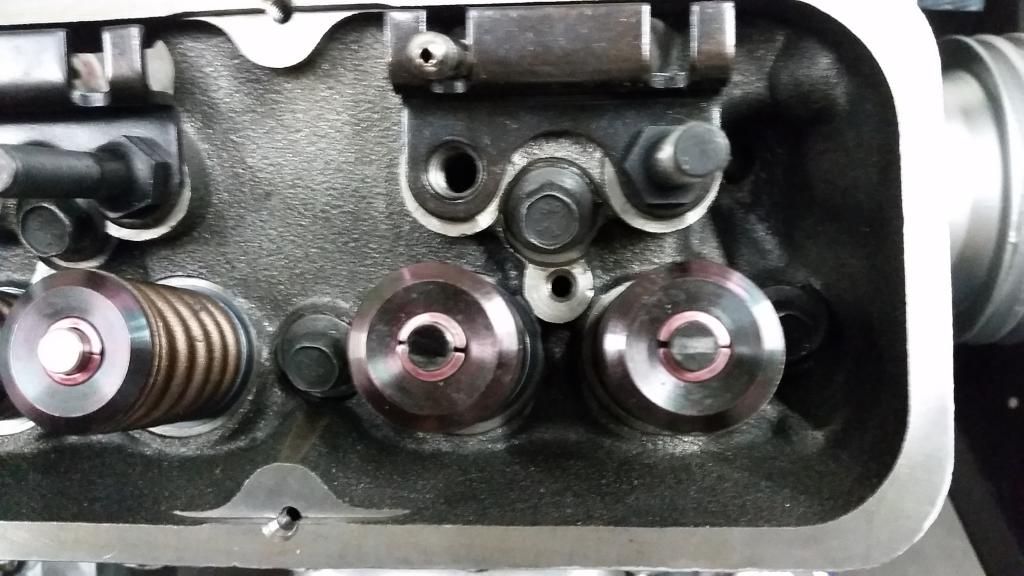 But the stupid nut cross threaded on the next one I was testing. I got it almost all the way back off but the threads are completely gone on the stud and it just backed the stud out... grumble. So I have to get another one of those. 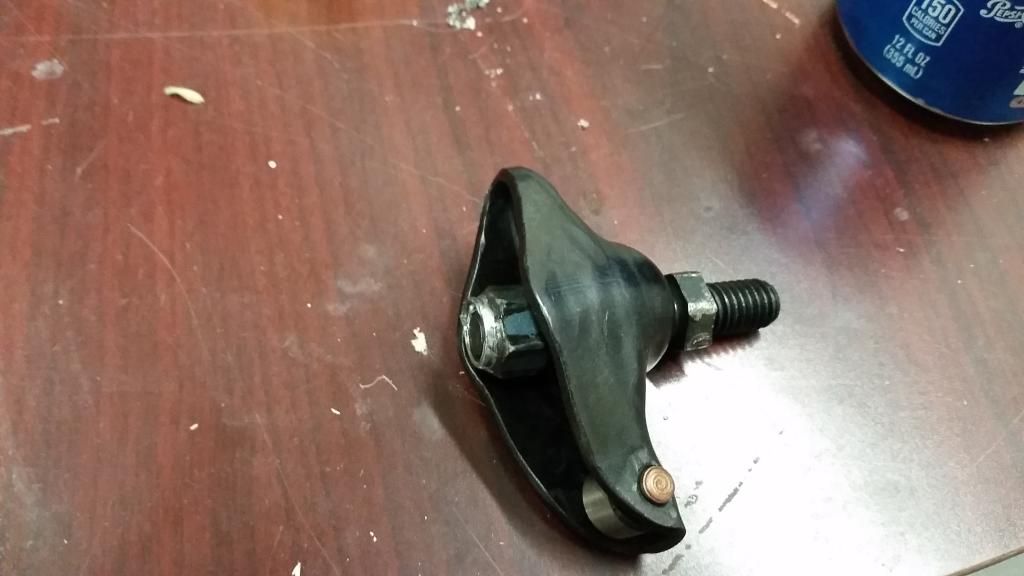 But then I tested some other nuts and threads and I cant get even the whole nut over the threads by hand. Are they the wrong nuts?? I was able to get the first one on and off but it was tight. After screwing up the second I didnt want to test any more. 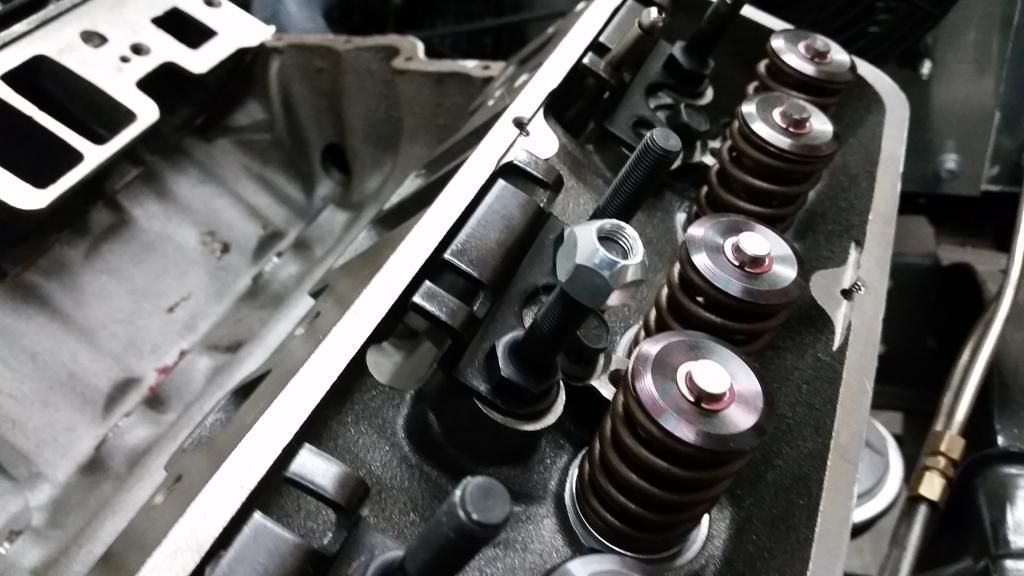 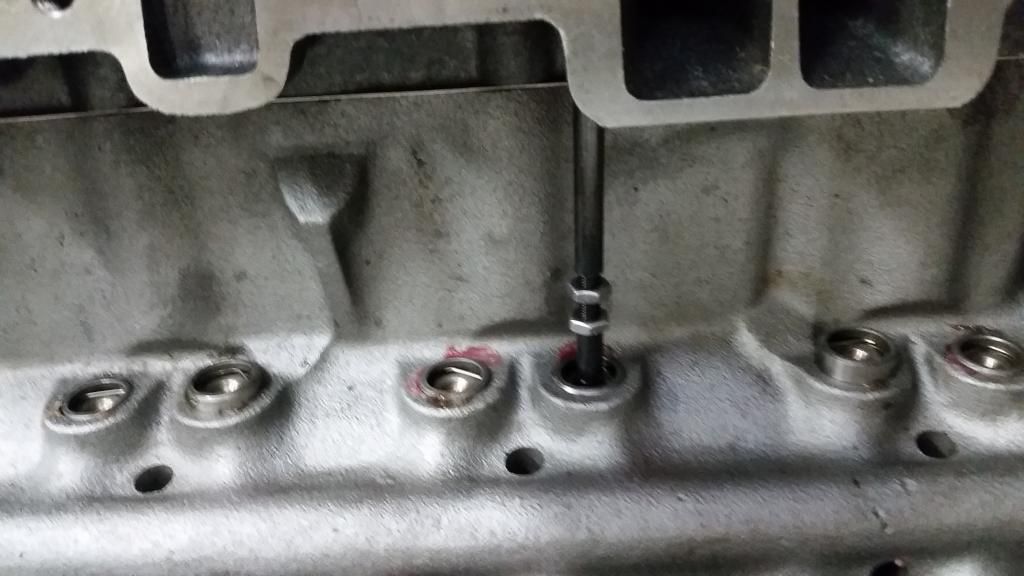 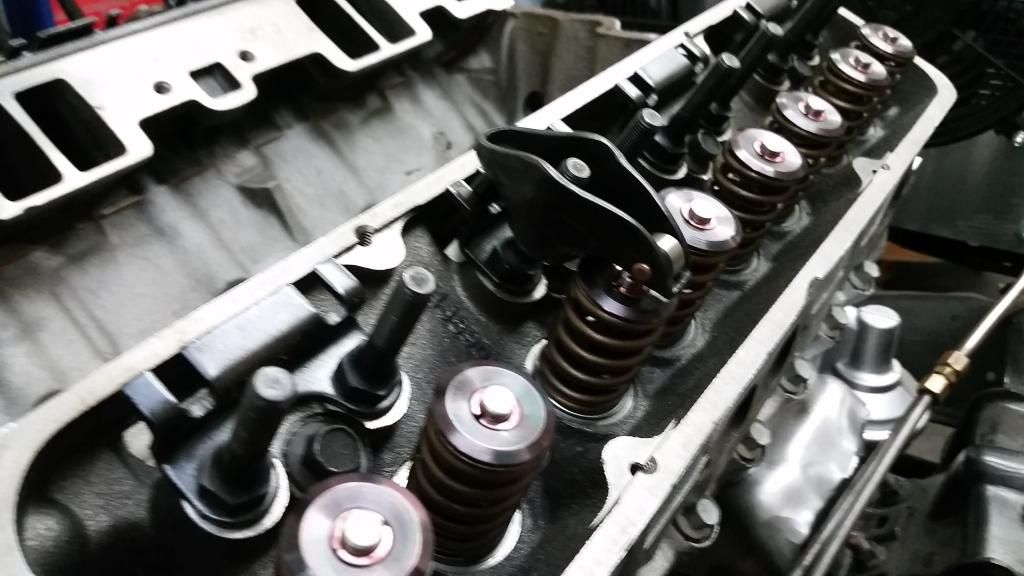
|
|
|

|
|
|
#15 |
|
Registered User
Join Date: Feb 2012
Location: Mission Viejo, CA
Posts: 1,856
|
Re: new cam in truck thats not going anywhere
im going to call jeggs tomorrow.
the heads and rocker arms both say 3/8" studs. But Dont know if thats relevant to the threads.. heads: http://www.jegs.com/i/ProMaxx+Perfor.../2151/10002/-1 rockers: http://www.jegs.com/i/JEGS+Performan...20180/10002/-1 |
|
|

|
|
|
#16 |
|
Registered User
Join Date: May 2014
Location: Manteca, Ca.
Posts: 274
|
Re: new cam in truck thats not going anywhere
The nuts are "lock nuts". They are designed with a bit of a "pinch" on the end to keep them from backing off. They are not designed to be put on with your fingers.
__________________
Terry Soon to be retired and moving to Bristol, TN. |
|
|

|
|
|
#17 |
|
Registered User
Join Date: Feb 2012
Location: Mission Viejo, CA
Posts: 1,856
|
Re: new cam in truck thats not going anywhere
ok thats good to know. I cant believe I actually crossthreaded it though...
|
|
|

|
|
|
#18 |
|
Senior Member
 Join Date: Oct 2014
Location: New Palestine In
Posts: 932
|
Re: new cam in truck thats not going anywhere
You did put antiseize compound or some oil on those lock nuts before trying to installing them didn't you? Those type of nuts can gall the threads if assembled dry
|
|
|

|
 |
| Bookmarks |
|
|