
 |
|
|
#226 |
|
Registered User
Join Date: Apr 2011
Location: .
Posts: 3,104
|
Re: 1940 Packard 120 Convertible Restoration
Looks like someone liked silicon bronze.
Break it down. Bet you could build better doors. |
|
|

|
|
|
#227 |
|
Registered User
Join Date: Apr 2012
Location: Beaver, Pa.
Posts: 197
|
Re: 1940 Packard 120 Convertible Restoration
More great work John, always impressive.
|
|
|

|
|
|
#228 |
|
Proprietor of Dale's Corner
 Join Date: Nov 2012
Location: Vacaville , CA
Posts: 16,246
|
Re: 1940 Packard 120 Convertible Restoration
After watching you use your awesome skills. Those doors don't scare me. I'm confident you'll do something amazing.
__________________
"Some Days Chickens And Some Days Feathers" Dale XNGH ECV Sam Brannan 1004 R.I.P. 67ChevyRedneck R.I.P. Grumpy Old Man R.I.P. FleetsidePaul |
|
|

|
|
|
#229 | |||||||
|
Registered User
Join Date: May 2011
Location: Anderson SC
Posts: 3,901
|
Re: 1940 Packard 120 Convertible Restoration
Quote:
 I've been meaning to build one for a few months but just haven't taken the time to do it. I've been meaning to build one for a few months but just haven't taken the time to do it. Quote:
 Quote:
There are a few places that sells used Packard parts that may have a door. A coupe door would work, I'm pretty sure that they converted coupe doors to use on convertibles. There are caps welded on at the two spots where the window frame was cut off, then they leaded over the caps to blend the caps into the door. That would be much easier to replicate than fabricating well over 1/2 of the current door. Quote:
Quote:
 It is nice for the owner to have a car that's been apart this far, especially when they plan on keeping it in the family for generations. Being able to use modern products like epoxy primer, weld thru primer, and epoxy seam sealers means that the metal is sealed up better than anything ever appied at the factory. Having good products makes spending all this time worth it, you don't have to worry about if it will last. It is nice for the owner to have a car that's been apart this far, especially when they plan on keeping it in the family for generations. Being able to use modern products like epoxy primer, weld thru primer, and epoxy seam sealers means that the metal is sealed up better than anything ever appied at the factory. Having good products makes spending all this time worth it, you don't have to worry about if it will last. Quote:
 Thanks! Quote:

__________________
Project Goldilocks '66 C10 Short Fleet BBW Build '65 C10 Highly Detailed Stock Restoration Thread '78 Camaro Targa Roof Build '55 International Metal/Body/Paint Work '66 F100 Full Rotisserie Restoration '40 Packard 120 Convertible Coupe Restoration How To Restore and Detail an Original Gauge Cluster How To Detail Sand Body Panels, Edges, Corners, Etc |
|||||||
|
|

|
|
|
#230 |
|
Registered User
Join Date: May 2011
Location: Anderson SC
Posts: 3,901
|
Re: 1940 Packard 120 Convertible Restoration
I'm back from the Redneck Roundup in Rock Hill. Made new friends and learned a lot from watching other guys work on their projects and the various presentations throughout the weekend. I appriciate MP&C prodding me to sign up for the allmetalshaping.com forum, I wouldn't have known about the meet had it not been for signing up for the forum.
One of the things I learned more about was the "flexible shape pattern". I've seen pictures of them posted on allmetalshaping but didn't know anything about them. One of the presentations on Friday included a brief discussion on them so I thought that the passenger side fenderwell lip would be a good place to try one out. The concept is to use reinforced shipping tape to make a non-deforming yet flexible pattern that shows how much shape a panel has so you can accurately determine how much shrinking or streching the panel needs. It also helps determine if an area of a panel has bends only- no stretching/shrinking needed to arrive at that particular shape. I used a layer of blue painters tape as the first layer, being careful not to overlap anywhere. Then I used a single layer of reinforced tape on the spots I thought would need to be stretched, and a double layer (at opposing angles) on the area that I though was only bent- the inner flange. Once it's pulled off the panel (the painters tape makes it easy to remove) you use baby powder to kill the adhesive so it can be handled without it sticking to everything. I didn't get a picture of it before I had removed it and used baby powder on it so I taped it back in place for a quick pic.  It doesn't look like much pulled off until you weigh down the spots that will lay completely flat, in this case the inner edge. If it will easily lay down with no wrinkels or bucking you know that that area only needs bending to arrive at its final form.  The ruffles along the outer edge won't lay flat. You can see that there is "more" tape for that section than a straight/flat piece so the new metal needs to be stretched in that area.  I cut a blank out, using the flat section of the tape pattern to mark out the inner flange's curve. I probably would have made this in a straight section and used the brake to make the first bend, then stretched and shrunk each side to curve it. With the shape pattern, I already had the correct curve of the flange so I could go ahead and cut it to shape. Once the piece was cut out, I set up the bead roller with mis-matched dies to make a makeshift tipping die to get the curved bend started. Initial bend and stretching.  I had some leftover 1/8" plate in the scrap pile that had the same radius as the fender opening. I smoothed the edge and bent it to the same shape as the opening so I could use it as a dolly to form the edge over. This supported the edge, and a piece of tubing hammered beside it made the flared edge.    It's roughed in, still needs some fine tuning to match the shape of the opening, and to match the proper gradual increase in flare from top to bottom.  
__________________
Project Goldilocks '66 C10 Short Fleet BBW Build '65 C10 Highly Detailed Stock Restoration Thread '78 Camaro Targa Roof Build '55 International Metal/Body/Paint Work '66 F100 Full Rotisserie Restoration '40 Packard 120 Convertible Coupe Restoration How To Restore and Detail an Original Gauge Cluster How To Detail Sand Body Panels, Edges, Corners, Etc |
|
|

|
|
|
#231 |
|
Registered User
 Join Date: May 2007
Location: Deale Md
Posts: 4,663
|
Re: 1940 Packard 120 Convertible Restoration
won't be long you be holding one at your shop
__________________
James 63 GMC V6 4speed carryall 65 chevy swb bbw V8 auto 68 K20 327/4 speed, buddy buckets 2002 GMC CC Dually Duramax 64 GMC lwb 3/4 V6 4speed SOLD 66 GMC swb bbw buddy buckets SOLD IG duallyjams The only thing that stays the same is constant change! |
|
|

|
|
|
#232 |
|
Registered User
Join Date: Jan 2013
Location: Leonardtown, MD
Posts: 1,648
|
Re: 1940 Packard 120 Convertible Restoration
John, well worth the trip? I need to make it down to Will's myself one of these times......
__________________
Robert |
|
|

|
|
|
#233 |
|
Registered User
Join Date: Apr 2003
Location: Indep, MO
Posts: 5,893
|
Re: 1940 Packard 120 Convertible Restoration
Good stuff, thanks for the lesson!
__________________
Boppa's Old Yeller Truck Build, Old Yeller's New Heart! Project Buzz Bomb Flyin' Low! |
|
|

|
|
|
#234 | |
|
Registered User
Join Date: May 2011
Location: Anderson SC
Posts: 3,901
|
Re: 1940 Packard 120 Convertible Restoration
We're nowhere near well-equippted enough to have a metal meet like that!
Quote:
No problem!
__________________
Project Goldilocks '66 C10 Short Fleet BBW Build '65 C10 Highly Detailed Stock Restoration Thread '78 Camaro Targa Roof Build '55 International Metal/Body/Paint Work '66 F100 Full Rotisserie Restoration '40 Packard 120 Convertible Coupe Restoration How To Restore and Detail an Original Gauge Cluster How To Detail Sand Body Panels, Edges, Corners, Etc |
|
|
|

|
|
|
#235 |
|
Registered User
Join Date: May 2011
Location: Anderson SC
Posts: 3,901
|
Re: 1940 Packard 120 Convertible Restoration
To finish up the quarter panel edge I made a set of templates off the driver side to match up the shape.
 Before and after fine tuning the shape. The templates were spaced every two inches.   Fit to the quarter panel:  Shape matches the original panel:  Started repairing the inner fenderwell so I'll have a clean flange for the quarter to weld to. 
__________________
Project Goldilocks '66 C10 Short Fleet BBW Build '65 C10 Highly Detailed Stock Restoration Thread '78 Camaro Targa Roof Build '55 International Metal/Body/Paint Work '66 F100 Full Rotisserie Restoration '40 Packard 120 Convertible Coupe Restoration How To Restore and Detail an Original Gauge Cluster How To Detail Sand Body Panels, Edges, Corners, Etc |
|
|

|
|
|
#236 |
|
Registered User
Join Date: Oct 2009
Location: canton ga
Posts: 12,724
|
Re: 1940 Packard 120 Convertible Restoration
You make it look so easy and I would make a mess.
|
|
|

|
|
|
#237 |
|
Senior Member
 Join Date: Jul 2012
Location: Oblong, Illinois
Posts: 7,028
|
Re: 1940 Packard 120 Convertible Restoration
Nice work on the complex shape. How did you shape it? Tipping wheel, stretcher, ?
|
|
|

|
|
|
#238 |
|
Registered User
 Join Date: Jul 2015
Location: 2nd left past the stump on a dirt road.
Posts: 2,629
|
Re: 1940 Packard 120 Convertible Restoration
Again nice work, I know that is time consuming a quickly becoming a lost art.
|
|
|

|
|
|
#239 |
|
Registered User
Join Date: Oct 2007
Location: Spanaway
Posts: 8,451
|
Re: 1940 Packard 120 Convertible Restoration
That was a tough one for sure!
__________________
Mike. Swamp Rat build thread : http://67-72chevytrucks.com/vboard/s...d.php?t=595019 72 3/4T 4X4 4" BDS Lift 33" BFG's |
|
|

|
|
|
#240 | ||
|
Registered User
Join Date: May 2011
Location: Anderson SC
Posts: 3,901
|
Re: 1940 Packard 120 Convertible Restoration
Sometime I make messes too, I just don't post them!
 Quote:
It was definitely one of the more involved pieces. I enjoyed the challenge of making it though!
__________________
Project Goldilocks '66 C10 Short Fleet BBW Build '65 C10 Highly Detailed Stock Restoration Thread '78 Camaro Targa Roof Build '55 International Metal/Body/Paint Work '66 F100 Full Rotisserie Restoration '40 Packard 120 Convertible Coupe Restoration How To Restore and Detail an Original Gauge Cluster How To Detail Sand Body Panels, Edges, Corners, Etc |
||
|
|

|
|
|
#241 |
|
Registered User
Join Date: May 2011
Location: Anderson SC
Posts: 3,901
|
Re: 1940 Packard 120 Convertible Restoration
I have started on the rear half of the inner fenderwell. There is a dip in the upper part of the fenderwell lip and I want both the front and rear to be solid before I go about straightening that out.
 I used the "dirty thumb" method of making a template for the shape of the lower edge.   New piece welded in. 
__________________
Project Goldilocks '66 C10 Short Fleet BBW Build '65 C10 Highly Detailed Stock Restoration Thread '78 Camaro Targa Roof Build '55 International Metal/Body/Paint Work '66 F100 Full Rotisserie Restoration '40 Packard 120 Convertible Coupe Restoration How To Restore and Detail an Original Gauge Cluster How To Detail Sand Body Panels, Edges, Corners, Etc |
|
|

|
|
|
#242 |
|
Registered User
Join Date: May 2011
Location: Anderson SC
Posts: 3,901
|
Re: 1940 Packard 120 Convertible Restoration
The rear inner body mount brace was in bad shape along the bottom so I made a new section to repair it. I had added a couple temporary braces to hold the back of the car in place as the brace had become weak and sagged with the weight of the body on it.
  I mentioned flexible shape patterns earlier so I'll show how I made it and how to read it once it's made. Start by adding a layer of painters tape, its not as ridged as other tapes and the weaker adhesive makes it easy to remove.  Then add a layer of reinforced shipping tape. I also added a second layer with the strands turned 90* to the first layer so that the tape can't stretch later when it's removed.  Peel it off and sprinkle the adhesive side with baby powder to reduce the adhesive's grip. You can see that it retains the shape of the part.  Now the pattern can be laid flat on a countertop to see exactly what areas will need stretching or shrinking. One thing to note- areas that only need bending will lay flat as well, such as the side of the pattern with the raised bead pressed in. That side lays flat because that shape is only bent in one direction (the same way you'd fold a piece of paper). Only the areas needing shrinking or stretching (compound curves) will show up in the pattern. There are two spots sticking up right in the middle of the bend. This show how much and where the metal needs to be stretched to attain the correct shape on the new panel. Knowing exactly where and how much to stretch/shrink saves time and guesswork when you start to make the new piece.  
__________________
Project Goldilocks '66 C10 Short Fleet BBW Build '65 C10 Highly Detailed Stock Restoration Thread '78 Camaro Targa Roof Build '55 International Metal/Body/Paint Work '66 F100 Full Rotisserie Restoration '40 Packard 120 Convertible Coupe Restoration How To Restore and Detail an Original Gauge Cluster How To Detail Sand Body Panels, Edges, Corners, Etc |
|
|

|
|
|
#243 |
|
Registered User
Join Date: May 2011
Location: Anderson SC
Posts: 3,901
|
Re: 1940 Packard 120 Convertible Restoration
__________________
Project Goldilocks '66 C10 Short Fleet BBW Build '65 C10 Highly Detailed Stock Restoration Thread '78 Camaro Targa Roof Build '55 International Metal/Body/Paint Work '66 F100 Full Rotisserie Restoration '40 Packard 120 Convertible Coupe Restoration How To Restore and Detail an Original Gauge Cluster How To Detail Sand Body Panels, Edges, Corners, Etc |
|
|

|
|
|
#244 |
|
Registered User
Join Date: Jan 2013
Location: Leonardtown, MD
Posts: 1,648
|
Re: 1940 Packard 120 Convertible Restoration
Nice work John!
__________________
Robert |
|
|

|
|
|
#245 |
|
Registered User
Join Date: Apr 2011
Location: .
Posts: 3,104
|
Re: 1940 Packard 120 Convertible Restoration
Extremely nice work, totally jealous.
What is the time frame on a patch panel part? |
|
|

|
|
|
#246 | |
|
Registered User
Join Date: May 2011
Location: Anderson SC
Posts: 3,901
|
Re: 1940 Packard 120 Convertible Restoration
Thanks!
Quote:
One thing that stuck out from the metal shaping meet was that if you're a proficient welder then you can get by with making smaller and easier to make panels. The tail end of the inner fender with the two short beads didn't take long since it's flat. Most of the time is in laying out the pattern correctly and fitting the finished panel to the car. Took maybe 30 minutes to cut a blank and add the two beads. Trimming it to fit the body, accurately laying out and adding both the square and round holes for the fender mounting clips, drilling for the plug welds, prepping the overlap areas with weld-thru primer, and getting the edge trimmed so there is minimum gap at the weld seam is where most of the time is spent. I welded it in this afternoon and started grinding the welds. Took around 4 hours to go from a blank to welded in place. I'll spend another ~15 minutes smoothing the welds before I move on to welding in the body mount, and zipping up the plug welds. Adding the beads is the quick/easy part. Once I got a feel for how much to pre-stretch the parts started going pretty quickly with less distortion to work out after rolling the bead. Parts like the floor pans that were flat with a bead rolled pattern were quick to make. Fitting them took a lot of time, especially with the body mount depressions and offset for the rocker overlapping, and the shape/folds of the edge up front. I didn't have anything to go by for those areas so I had to mock it all up to make decisions on how to make those details. The heavier gauge body brace patch that had more shape, it took roughly 3-4 hours from cutting it out, blasting it, making a pattern, cutting out a new blank, forming it, welding it together, then smoothing it up. The flexible shape pattern helped speed up the process by showing exactly where and how much to stretch the blank.
__________________
Project Goldilocks '66 C10 Short Fleet BBW Build '65 C10 Highly Detailed Stock Restoration Thread '78 Camaro Targa Roof Build '55 International Metal/Body/Paint Work '66 F100 Full Rotisserie Restoration '40 Packard 120 Convertible Coupe Restoration How To Restore and Detail an Original Gauge Cluster How To Detail Sand Body Panels, Edges, Corners, Etc |
|
|
|

|
|
|
#247 |
|
Registered User
Join Date: Oct 2009
Location: canton ga
Posts: 12,724
|
Re: 1940 Packard 120 Convertible Restoration
You constantly amaze me as I have never seen anyone make panels like you do .The cars and trucks I have seen rebuilt were with readily available repop parts , not one off custom parts like you do and you are so willing to share and teach us ,great job.
|
|
|

|
|
|
#248 |
|
Registered User
Join Date: Apr 2008
Location: Md
Posts: 2,482
|
Re: 1940 Packard 120 Convertible Restoration
Really Beautiful, Metal Artwork, Awesome Skills thanks for sharing.
__________________
http://67-72chevytrucks.com/vboard/s...d.php?t=635605 |
|
|

|
|
|
#249 |
|
Registered User
Join Date: Apr 2011
Location: .
Posts: 3,104
|
Re: 1940 Packard 120 Convertible Restoration
Thank you for the detailed response.
What you get done in one hour takes me 1 day. Theres a lot of discipline in finishing out parts all the way to the end. Let alone the knowledge. Keep it up, You're able to salvage the bug? Any updates on Goldilocks? |
|
|

|
|
|
#250 |
|
Registered User
Join Date: May 2011
Location: Anderson SC
Posts: 3,901
|
Re: 1940 Packard 120 Convertible Restoration
Appreciate the comments guys!
Greg, the VW will be back on the road eventually. I think the longblock is salvageable along with the carbs. The decklid is the only part that got hot enough to warp, and it's only a spot right in the center so I think I can straighten it out. No progress on Goldilocks. I've thought about getting the frame rolling, putting the sheetmetal together, and making an inventory list so I could advertise it. I'd love to keep and finish it and I probably will, it's just not a priority at the moment. I want to build a shop of my own and that could be some cash to throw at it and less space taken up inside once the shop is up. For those that aren't friends with me on Facebook or following on Instagram, my '64 VW had an engine fire this past Sunday afternoon. It was practically my first car- took my drivers test in it at 15 years old, drive it 100 miles round trip to Greenville Tech my last year there, been all over the place to shows in it, and was my daily driver up until a couple years ago. Still had 90% original paint, absolutely no rust, and was matching numbers. I had just finished building and installed a ~130 horsepower 1679cc engine and had only made it about 2-3 miles on the first test drive. The oil drain plug either hit or scraped something hard enough to loosen it and oil dumped straight on the header. It took almost two full sized fire extinguishers to get the fire under control until the fire department arrived. It's fixable but will take a lot of work to make it nice again. 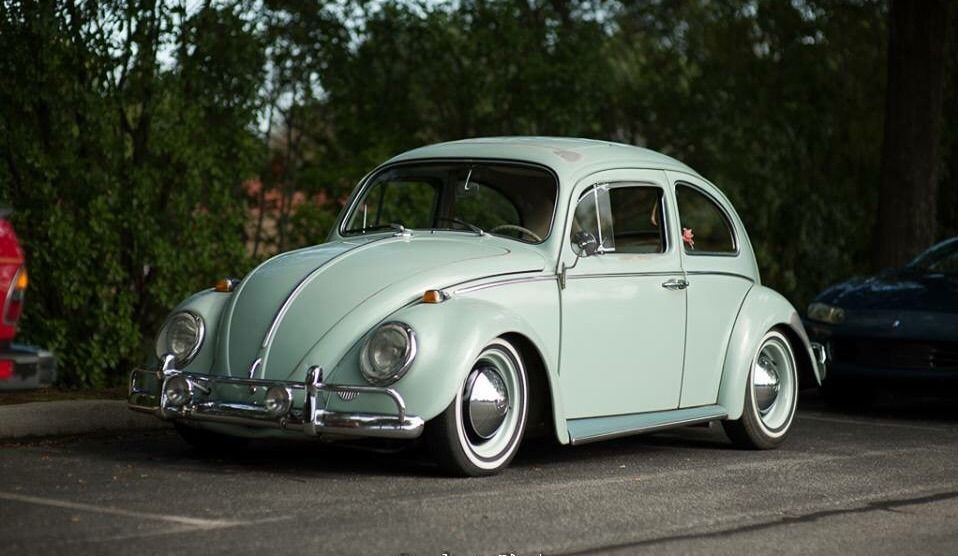 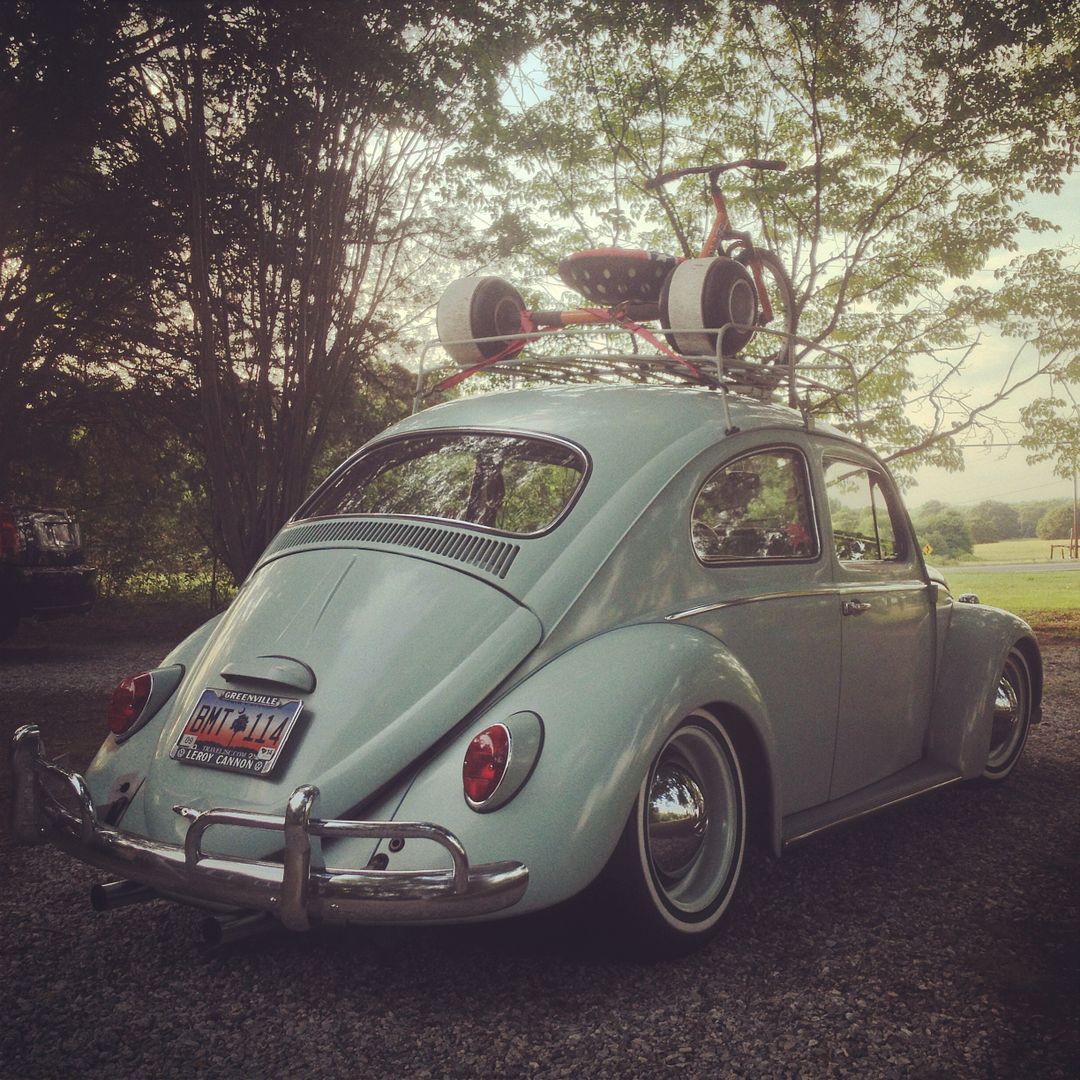 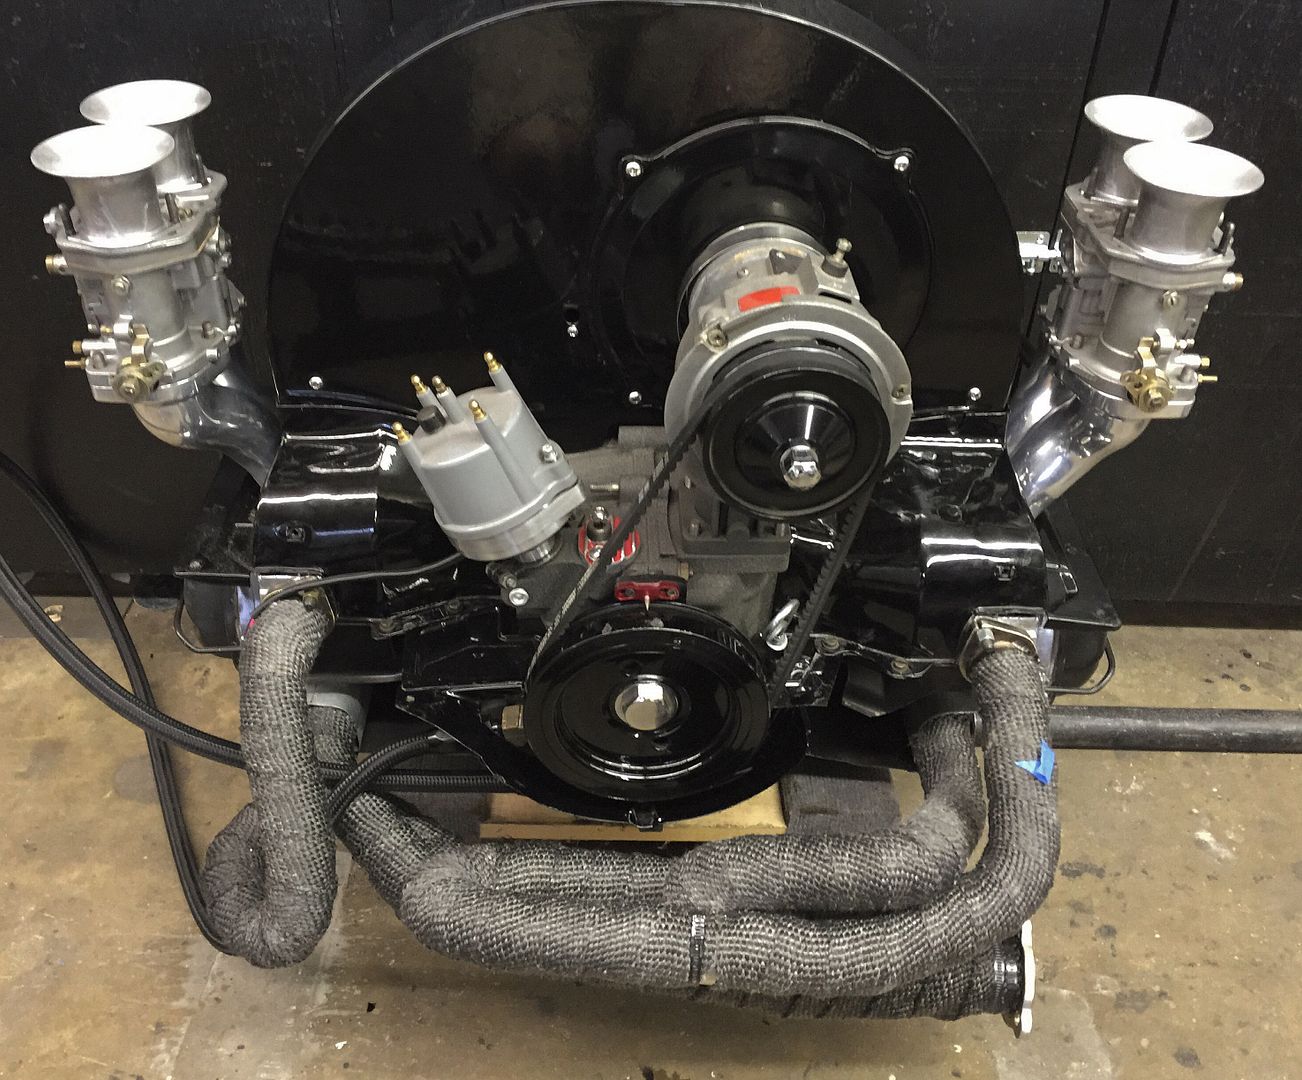 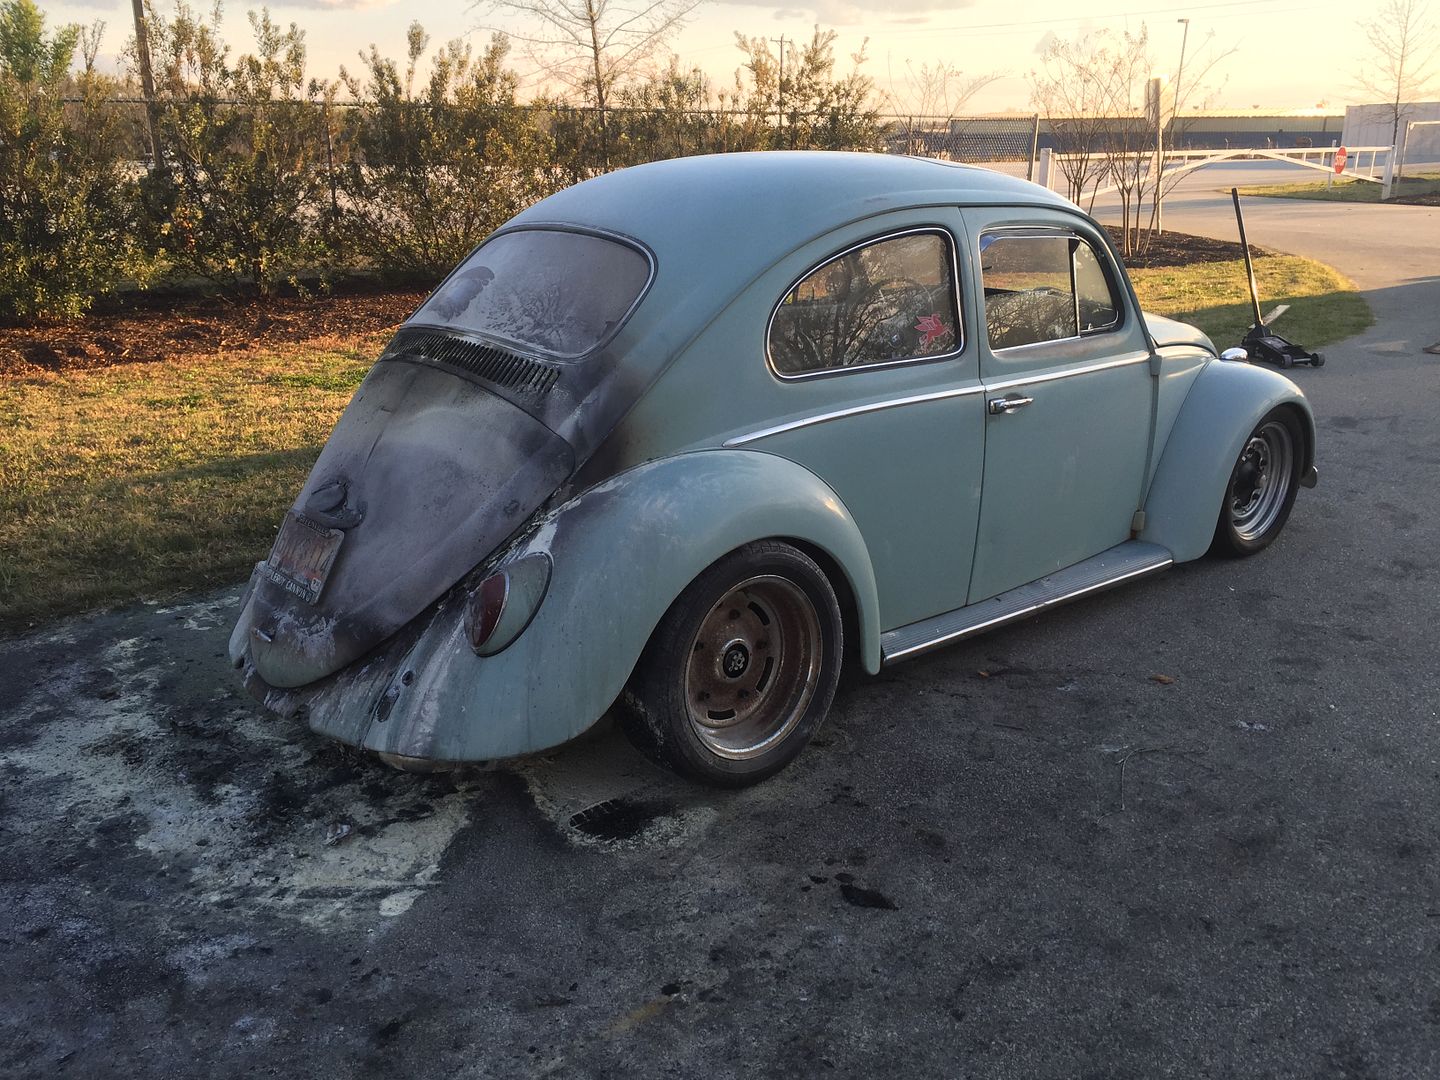 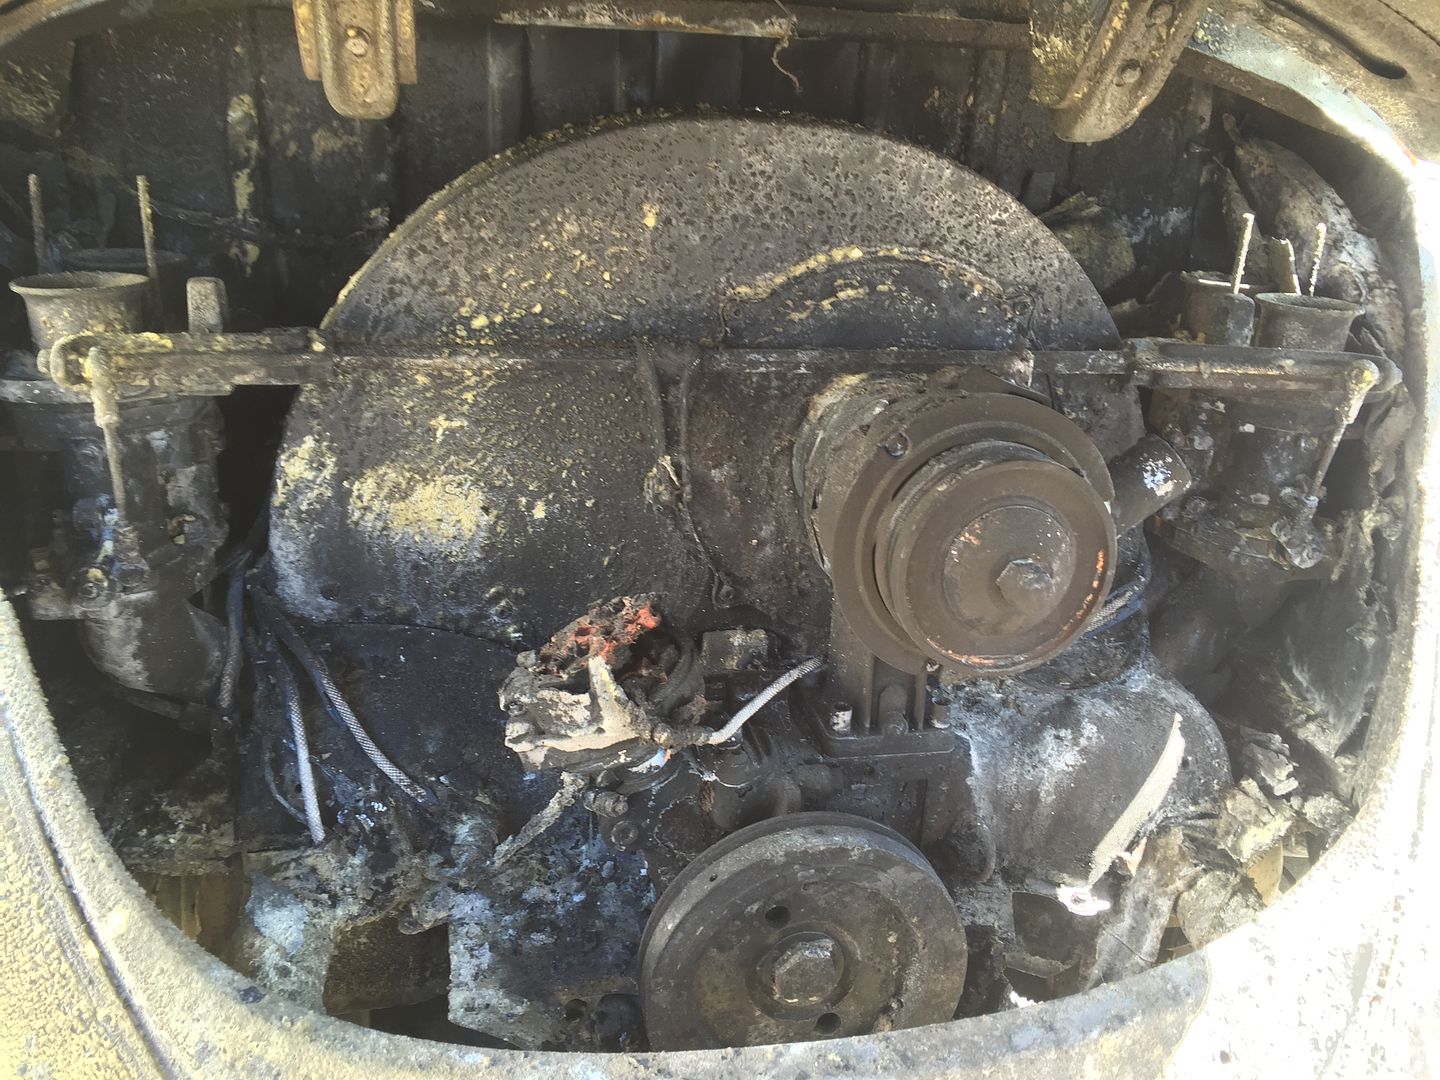 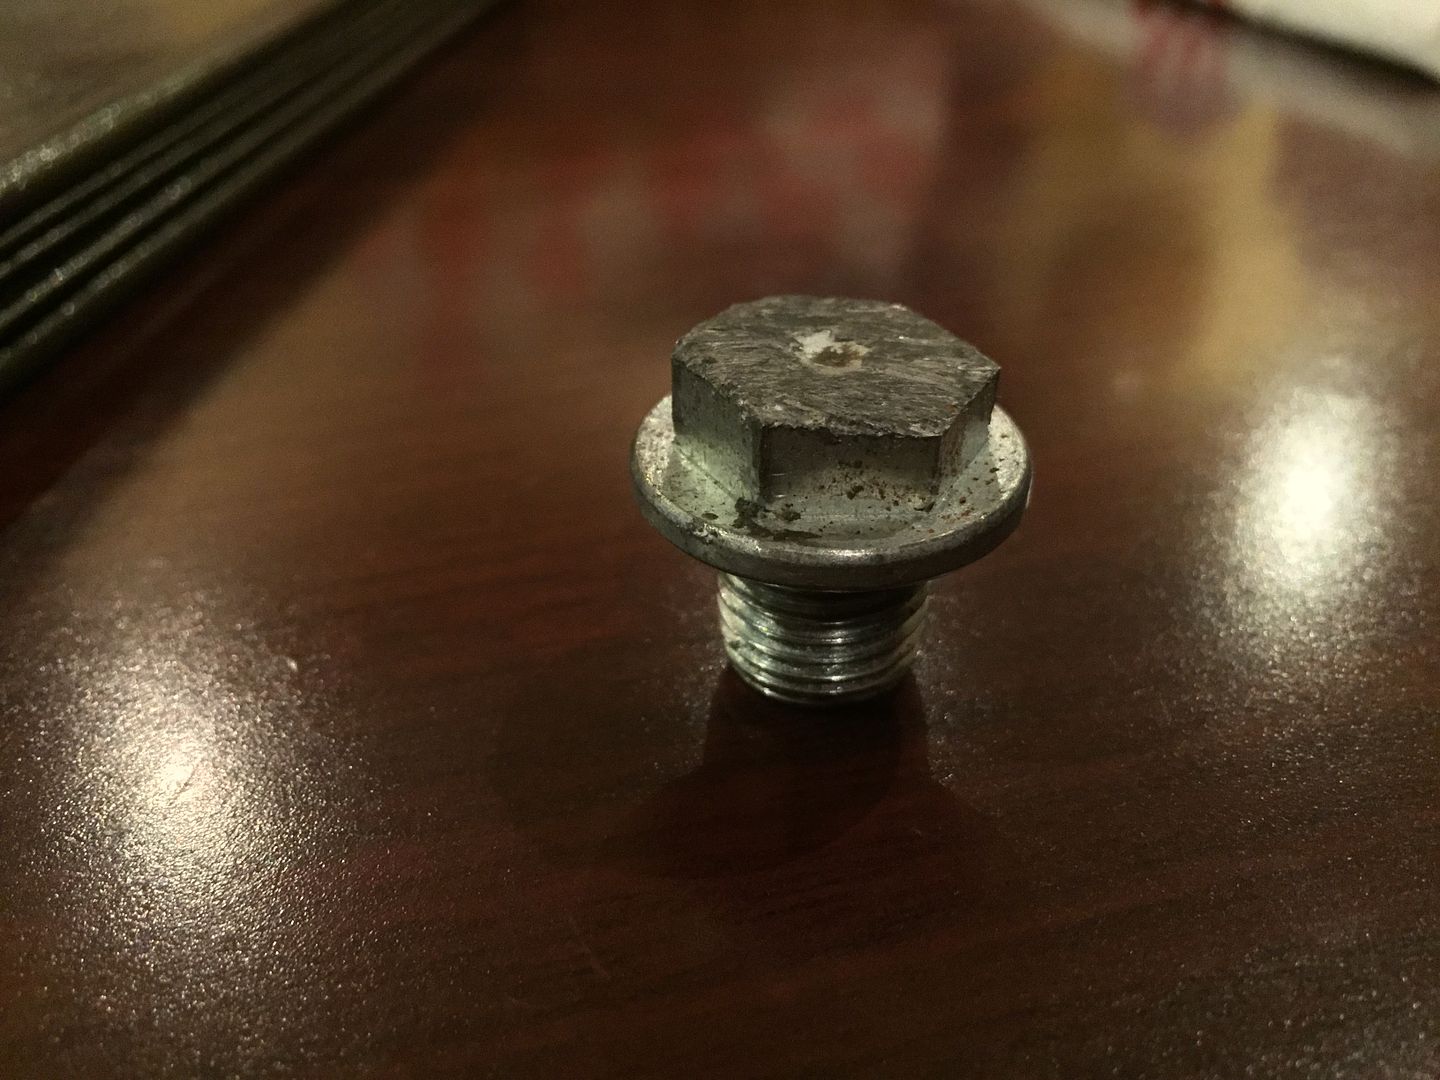
__________________
Project Goldilocks '66 C10 Short Fleet BBW Build '65 C10 Highly Detailed Stock Restoration Thread '78 Camaro Targa Roof Build '55 International Metal/Body/Paint Work '66 F100 Full Rotisserie Restoration '40 Packard 120 Convertible Coupe Restoration How To Restore and Detail an Original Gauge Cluster How To Detail Sand Body Panels, Edges, Corners, Etc |
|
|

|
 |
| Bookmarks |
|
|