
|
 02-27-2026, 01:27 AM
|
#526 |
|
Registered User
Join Date: Dec 2011
Location: Moxee WA
Posts: 1,698
|
Re: Long Time Coming......
Lovin the work you have done on the truck.
2 Questions: did you shorten the stake pockets to match the bottom of the bed where the roll pan mounts? Also, can you list the instagram contact for the tail light mounts. Thanks.
__________________
49 chevy 3100 3 window. 327 / m21 4 spd, 12 bolt w/ 3:55's Bought in 1973 for $235.00. Had it longer than my wife & Kids!! |

|

|
|
02-27-2026, 05:31 AM
|
#527 | |
|
Registered User
Join Date: Jan 2022
Location: Conn.
Posts: 297
|
Re: Long Time Coming......
Quote:
The guys IG account is @Fenderbends. He makes nice stuff! I'm glad you like them. Its a funny thing, I justr happened to stumble upon a post where he had some he made on a truck all painted. It wasn't even a post saying that he produced them to sell, but I inquired asking if he would make another set and he gladly took care of me and made more.
__________________
Glenn 1951 3100, Area51 1955 BelAir, 4EVER17 1987 R10, Ethel Copper Hill Rod & Custom http://67-72chevytrucks.com/vboard/s...d.php?t=829856 |
|

|
|
|
02-27-2026, 11:49 AM
|
#528 |
|
Registered User
Join Date: Dec 2011
Location: Moxee WA
Posts: 1,698
|
Re: Long Time Coming......
Thanks much for the info and all the great ideas. I have no where the experience that you do but I'm lucky that I belong to a great club with a lot of talented guys. If I mess something up they will help me fix it.
__________________
49 chevy 3100 3 window. 327 / m21 4 spd, 12 bolt w/ 3:55's Bought in 1973 for $235.00. Had it longer than my wife & Kids!! |
|
|
|
|
02-27-2026, 05:12 PM
|
#529 | |
|
Registered User
Join Date: Jan 2022
Location: Conn.
Posts: 297
|
Re: Long Time Coming......
Quote:
Locally we have a group ofter referred to as The Wednesday Night Guys. Definitely not a car club, but rather a group of guys that get together every Wednesday of the year unless it falls on Christmas. It has gotten smaller, but at one time upwards of 30 guys would show up. Sadly many have aged out or passed away. They have been doing this since the mid 70's! There is now roughly a dozen of us, and 8 that host. So it rotates through the 8 and then starts over again. We meet at our respective shops/garage or businesses. Its a wonderful thing and I look forward to it every week. At 57, I'm the youngest by nearly a decade. These guys are all the local hot rod heroes that I grew up around with my dad. Just a great group of ball busting car guys. Just don't call it a "car club" as that might piss one of them off. No rules, just show up and have fun.
__________________
Glenn 1951 3100, Area51 1955 BelAir, 4EVER17 1987 R10, Ethel Copper Hill Rod & Custom http://67-72chevytrucks.com/vboard/s...d.php?t=829856 |
|
|
|
|
|
03-03-2026, 05:17 PM
|
#530 |
|
Registered User
Join Date: Jan 2022
Location: Conn.
Posts: 297
|
Re: Long Time Coming......
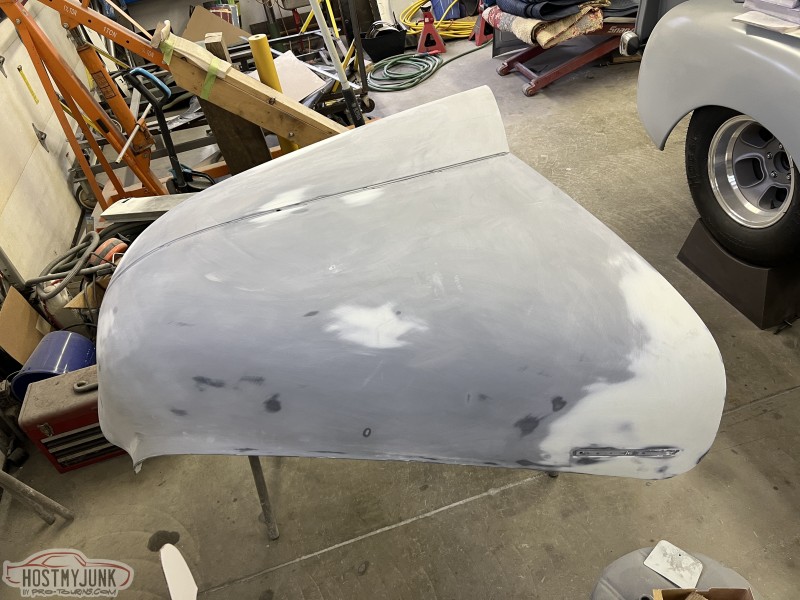
I spent 11 hours last weekend doing bodywork on my hood. I didn't take a lot of pictures, but here it is waiting to go to the booth for poly prime. Just when I thought I was done I flipped it over to mask the underside so I don't get a ton of overspray on the bottom. Thats when I realized that the roughly 1.25" wide flat on the edge of the hood that rolls inward at the fender looked like crap and will toltally be seen with the hood open. So another couple hpurs fixing that and its all now done.
 I ended up with the day off today due to some snow which gave me some unexpected shop time. I should have spent it doing final body work on the inner fender, but in all honesty I just wasn't into it. So instead I did some much needed clean up and then moved to some of the inetrior things that still needed to be addressed. I have this pocket on the passenger cowl side that I decided to make a filler panel to use for mounting something. Not sure what yet, but I know this will end up being useful. I may end up putting the Bim modules in here for the efi and shifter if the wiring reaches. This also might be a good place for bus bars fr the wiring. Again, this is up in the air. First I made a cardboard template... Then I transferred that to some metal I had on hand. In the end I didn't make it with the top and bottom cross pieces like the template. I don't see the need, also I left the top and bottom open to be able to run wires through it for the power windows and whatever made need to go up through the top. 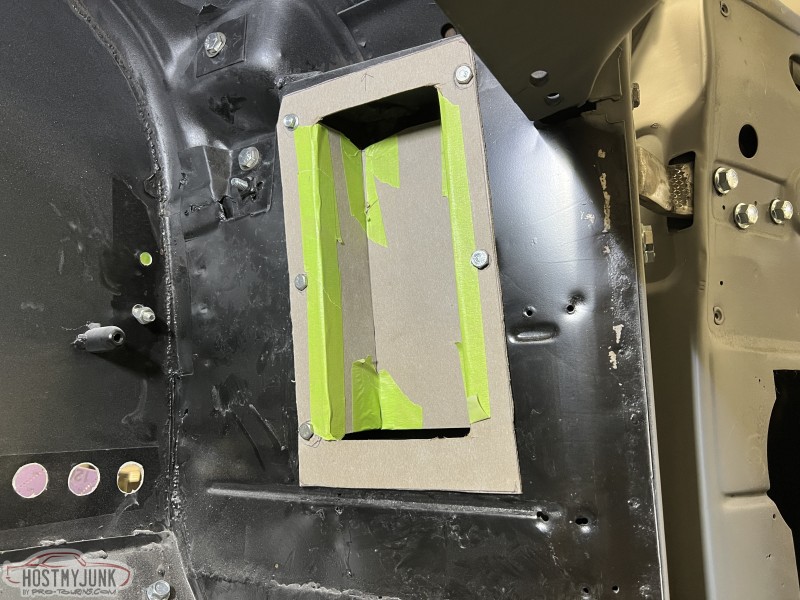 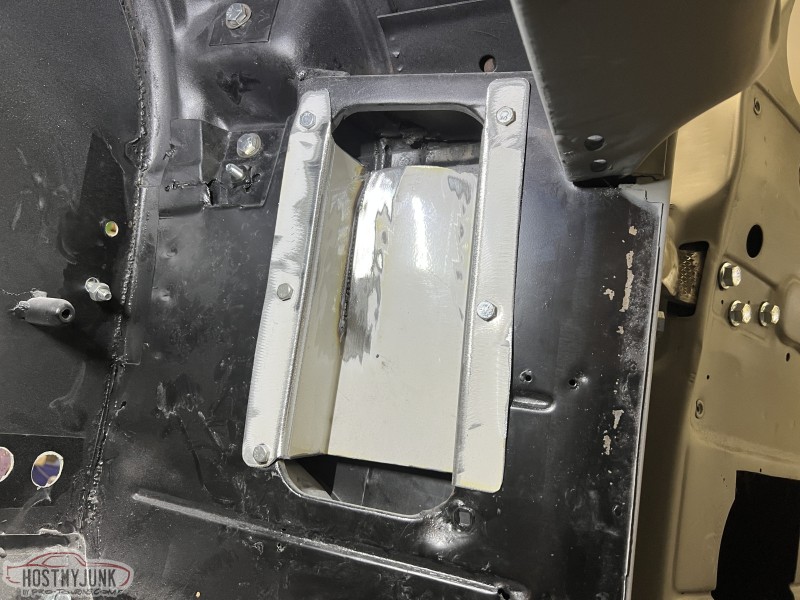 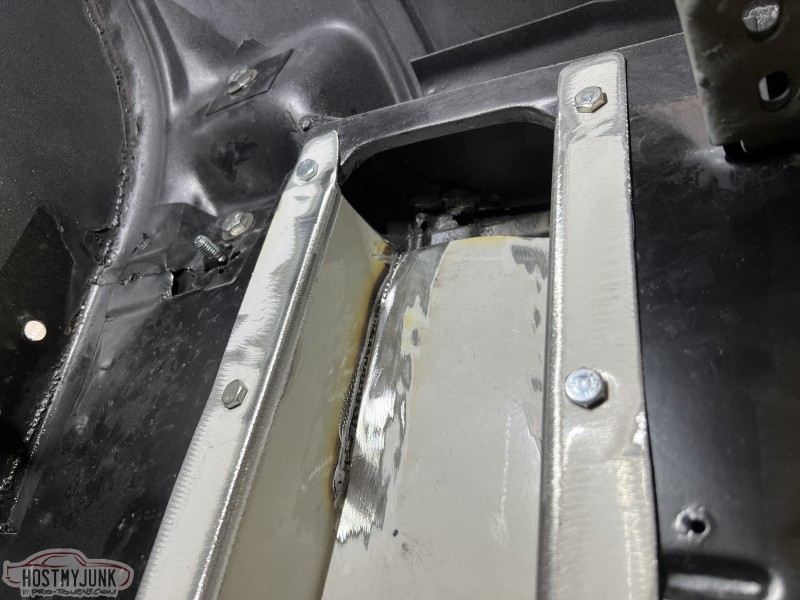 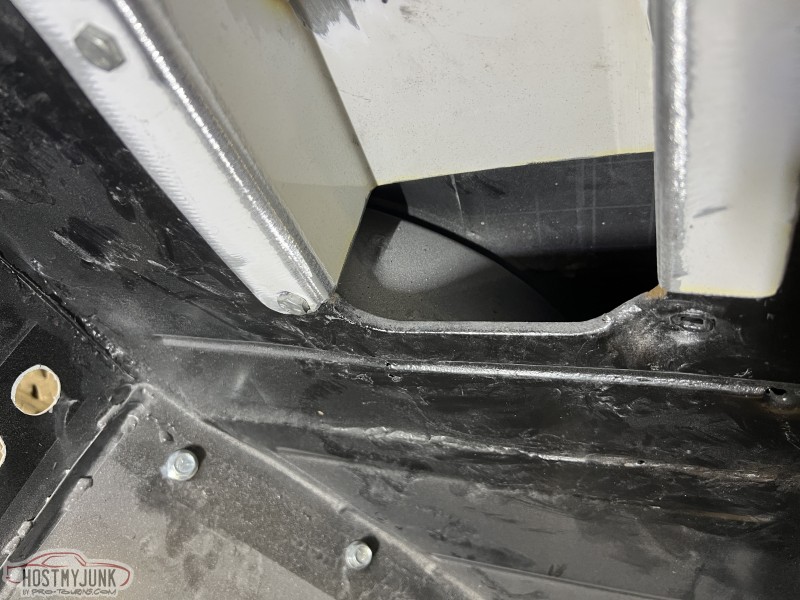 I then fitted the passenger-side kick panel I have. 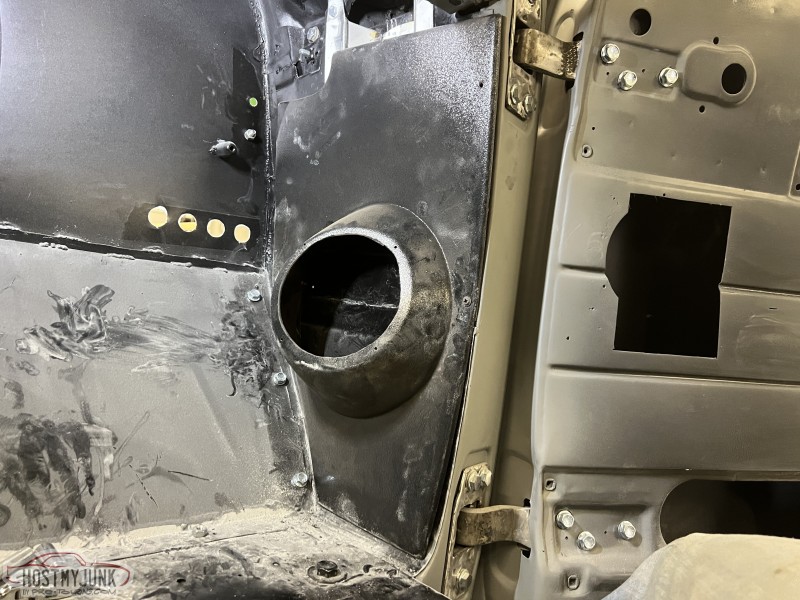 After I was done on that side I went over to the driver side. I now have the Holley Terminator X computer and harness to run my EFI. I had to figure out where to mount that in relation to the Painless wiring harness and the module for the Dakota Digital RTX gauges. This is what I came up with. 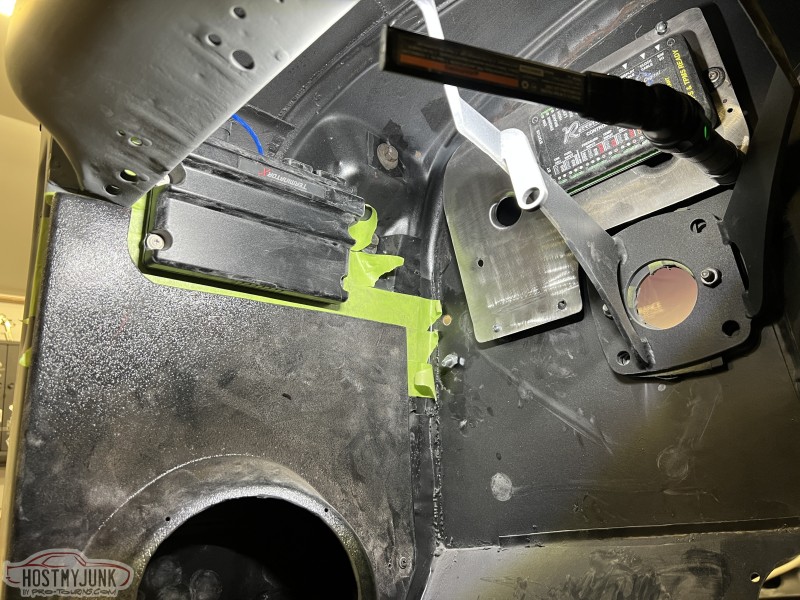 Technically, the ecu is upside down, but I mounted it this way so I can easily see the lights on the bottom edge to verify everything is working properly, or not. 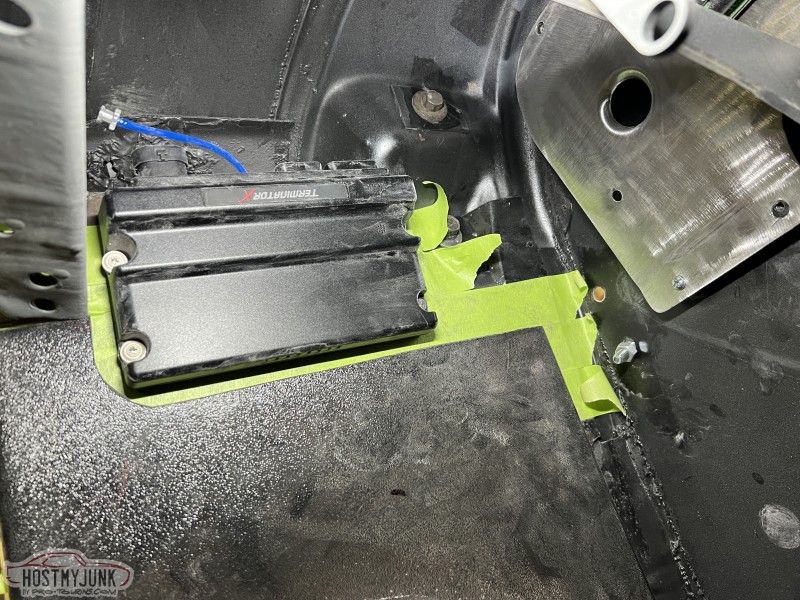   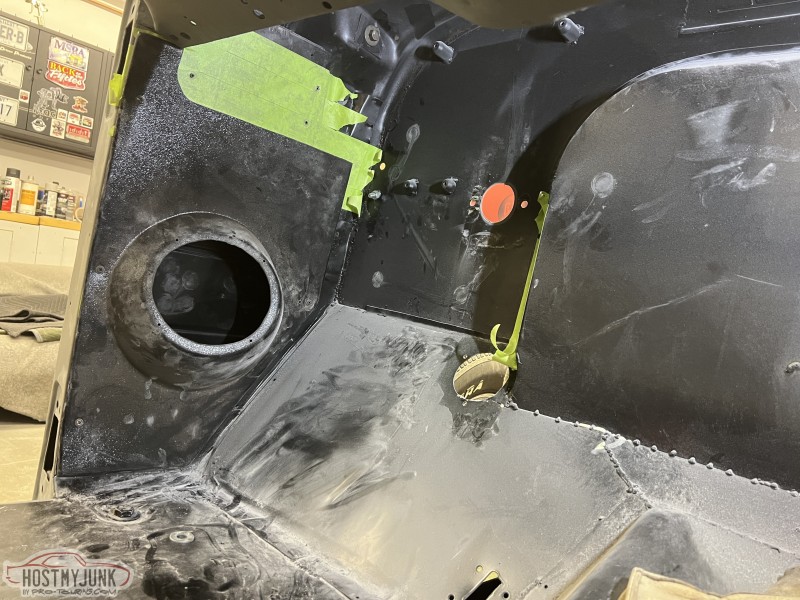 I'm very happy with how thiings are working out here. There is so much to cram into a small area that it can make it hard to fit. I will use some rubber isolators in between the ecu and the metal body for vibration. Not sure how much it will help, but its worth a shot. .
__________________
Glenn 1951 3100, Area51 1955 BelAir, 4EVER17 1987 R10, Ethel Copper Hill Rod & Custom http://67-72chevytrucks.com/vboard/s...d.php?t=829856 |
|
|
|
|
03-03-2026, 05:28 PM
|
#531 |
|
Senior Member
 Join Date: Sep 2017
Location: Bryan, Texas
Posts: 2,522
|
Re: Long Time Coming......
Good planning and great work.
__________________
8man-aka Robert 1948 on a S10 Frame, small block with a carb 1954 Cab, 53 Front and Bed, 50 Doors, S10 Frame, Power TBD Build thread: "]http://67-72chevytrucks.com/vboard/showthread.php?t=746899&highlight=wife%27s+48[/URL] [/URL]http://67-72chevytrucks.com/vboard/showthread.php?t=840204 |
|
|
|
|
03-12-2026, 05:03 PM
|
#532 | |
|
Registered User
Join Date: Jan 2022
Location: Conn.
Posts: 297
|
Re: Long Time Coming......
Quote:
Its been a few weeks now since I got the body work done on the hood as well as the newly made filler panel that goes between the rolled pan and bumper. I would love to have sprayed these a bit ago, but when loading the hood in my truck to bring to school I had to stop dead in my tracks. Seems the hood is too wide for my Toyota Tacoma bed!  I knew I had the hood at school before so I figured this was how I did it. Once my memory kicked in I remembered that I had borrowed a friends 2500 GMC and slid it in his bed. Once I remember that all I had to do was ask to borrow his truck, but here is the tricky part...he was having some heart troubles and was in the hospital. While we talked every day the last thing I was going to to was ask to use his truck. I knew I had the hood at school before so I figured this was how I did it. Once my memory kicked in I remembered that I had borrowed a friends 2500 GMC and slid it in his bed. Once I remember that all I had to do was ask to borrow his truck, but here is the tricky part...he was having some heart troubles and was in the hospital. While we talked every day the last thing I was going to to was ask to use his truck. In any case, he is out and fine now. So he came over and helped me load the hood and we swapped trucks for the day so I could bring the hood to school. Here it is today in three coats of Evercoat Optex poly primer. 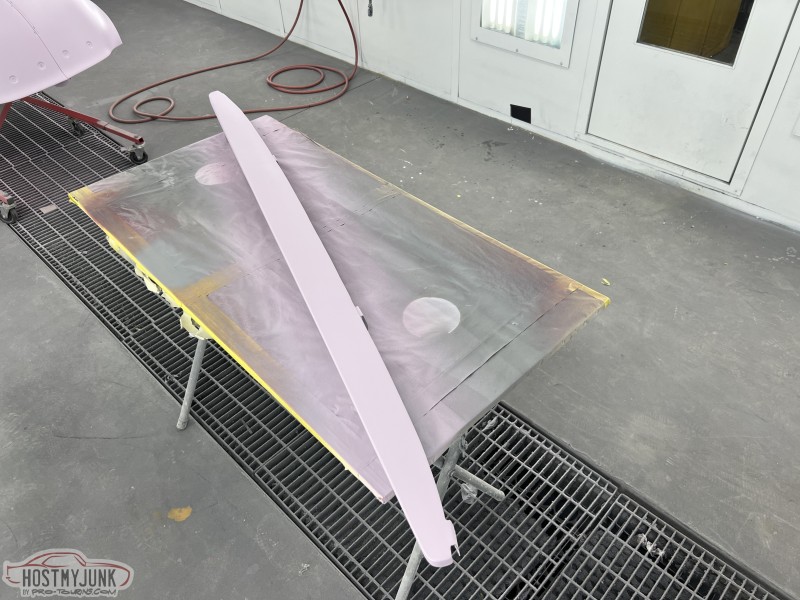 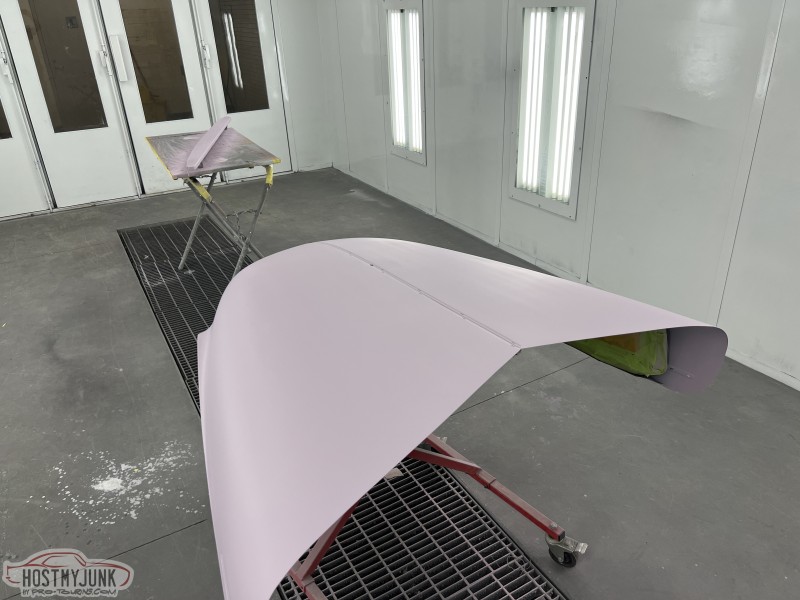 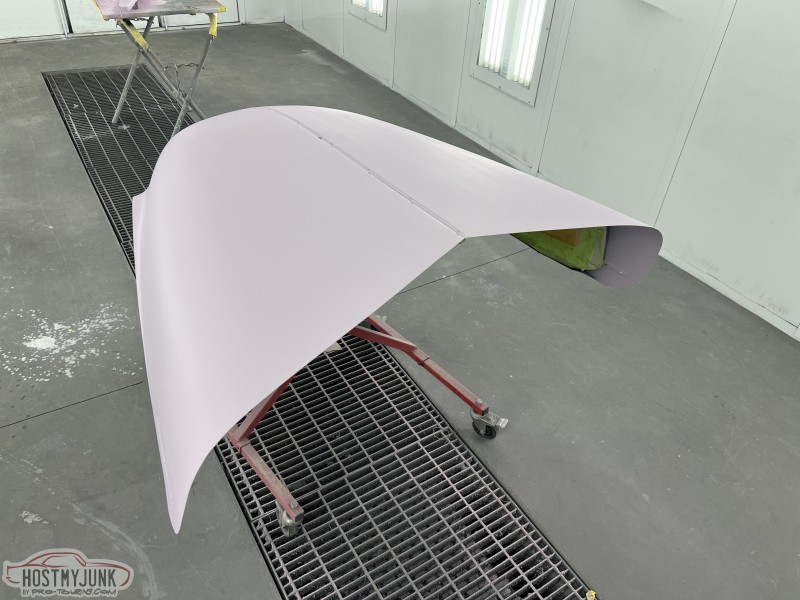 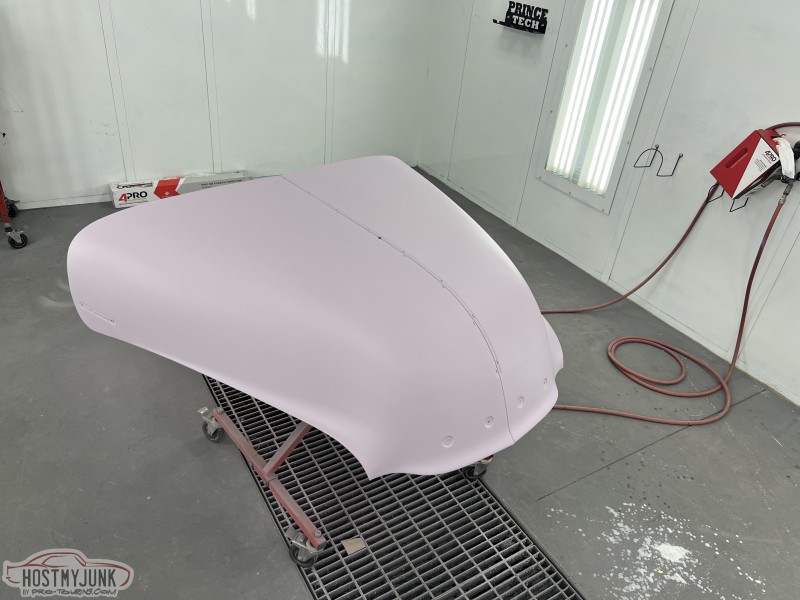 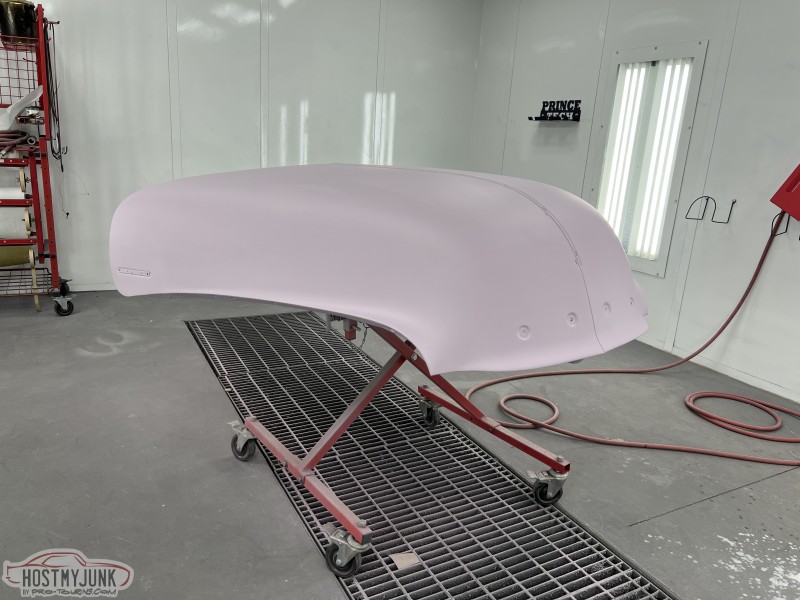 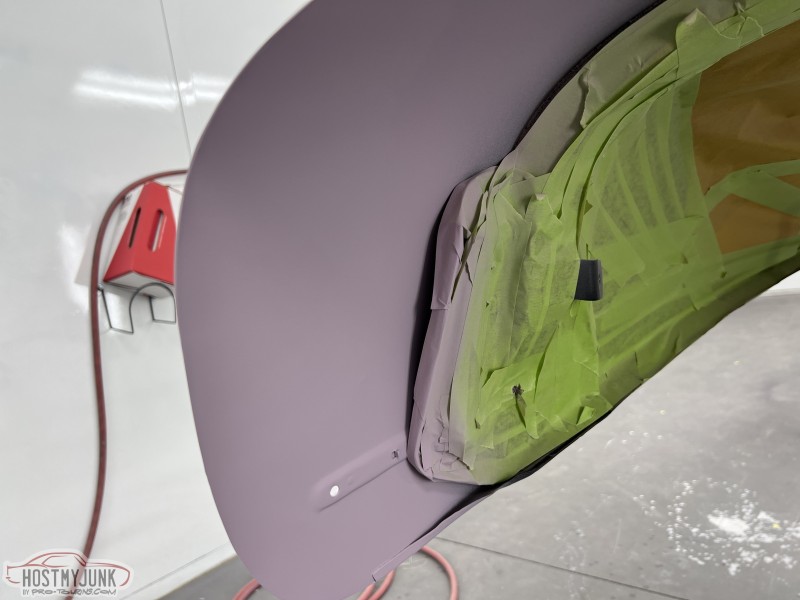 Everything was looking good and I was feeling like progress was being made in a major way.....until I noticed the cracks! I'm shocked I had not seen them before at any time when I stripped the hood to bare metal, or sprayed the epoxy, or block sanded every inch of it as well as the filler work. How could I have missed them? Your guess is as good as mine. But here I am with two identical cracks on each front corner edge of the hood. Is this normal for these hoods, given that it's an original 51 hood? So one step forward and two back. Now I will flip the hood over, grind down the areas, and weld the cracks, body filler, and reprise. All in only a few hours, but it sucks to go backwards no matter what. 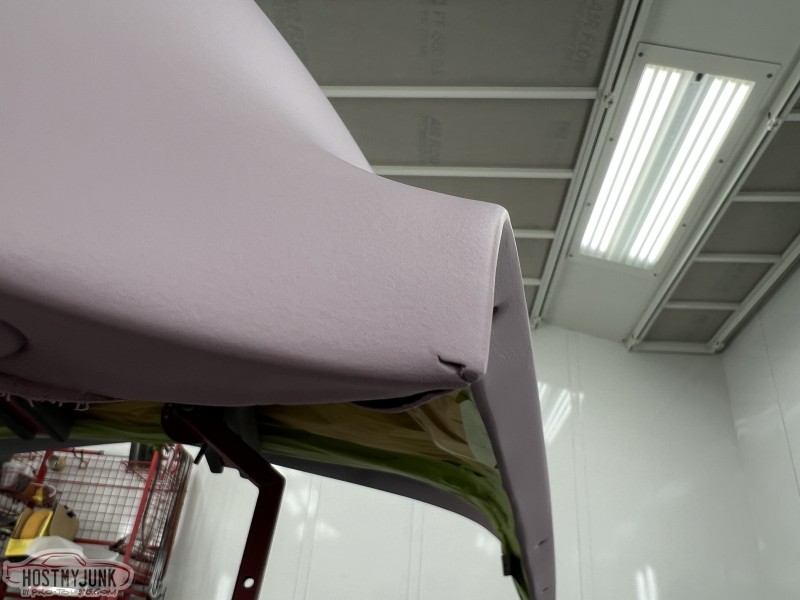 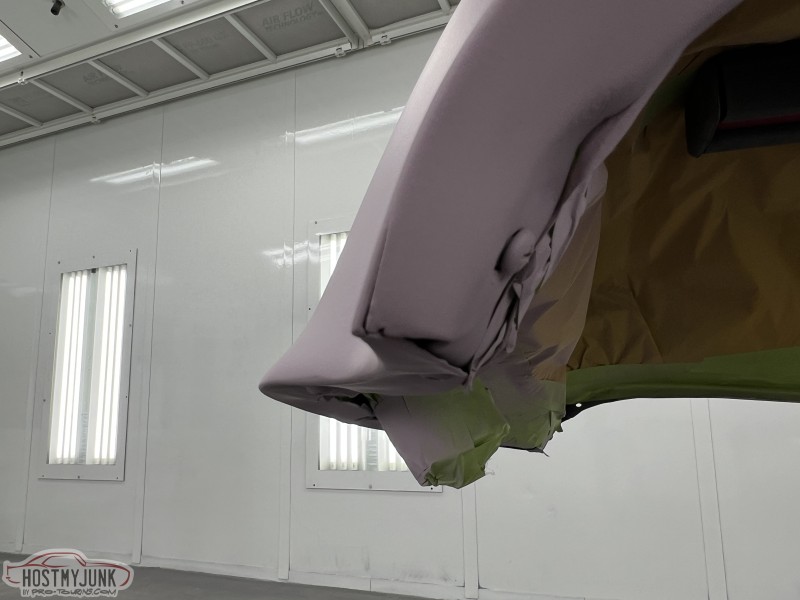 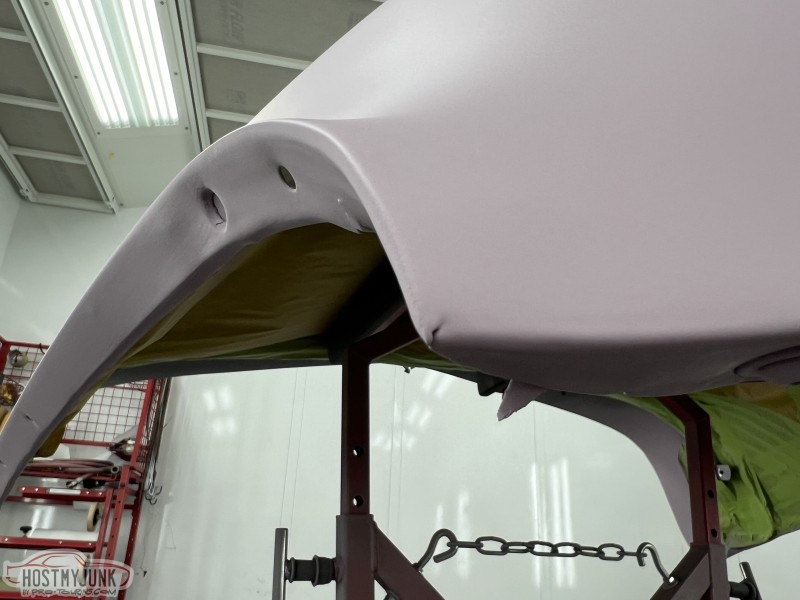 And for the record, I am now at 926.3 hours in this project! .
__________________
Glenn 1951 3100, Area51 1955 BelAir, 4EVER17 1987 R10, Ethel Copper Hill Rod & Custom http://67-72chevytrucks.com/vboard/s...d.php?t=829856 |
|
|
|
|
|
03-13-2026, 02:19 PM
|
#533 |
|
Registered User
Join Date: Nov 2018
Location: Ishpeming, mi
Posts: 660
|
Re: Long Time Coming......
Can definitely relate to the one step forward and two back. In the end it will all be worth it. It’s what makes an excellent build stand out from a good build. I never kept track of my hours. I know it was a lot! You’re making great progress.
__________________
http://67-72chevytrucks.com/vboard/s...d.php?t=780018 Jasons 56 build |
|
|
|
|
03-14-2026, 09:04 AM
|
#534 | |
|
Registered User
Join Date: Jan 2022
Location: Conn.
Posts: 297
|
Re: Long Time Coming......
Quote:
Because I do a fair amount of side work on hot rods for people I needed a good way to track my time that was better than using a pen and pad. I found this app called "Hours Tracker". With this, I can create a job, name it, give it an hourly rate. Then punch in and out to the minute. Give each time stamp a comment on what was done during that time period. I can also export it to an email that creates a bill for a customer.  Here is the job for my truck, I call Area51 with all time stamps so far. Now I obviously am not charging myself, but if I were paying someone to build this truck this is what it would co$t. 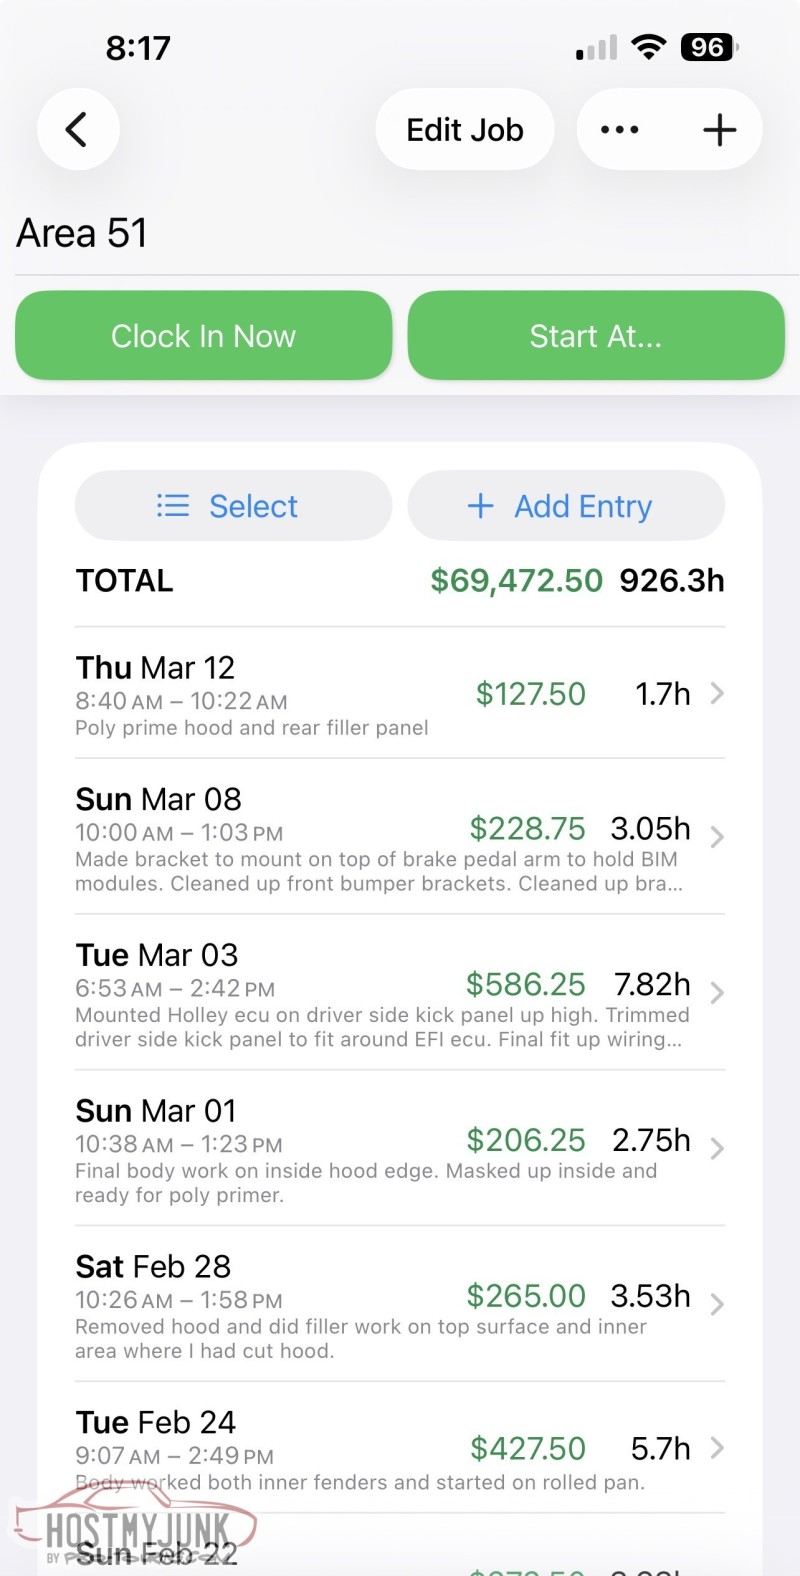 And here is an actual time stamp from last week. This shows punch in and out, hourly rate, and the note for what I did during that time. 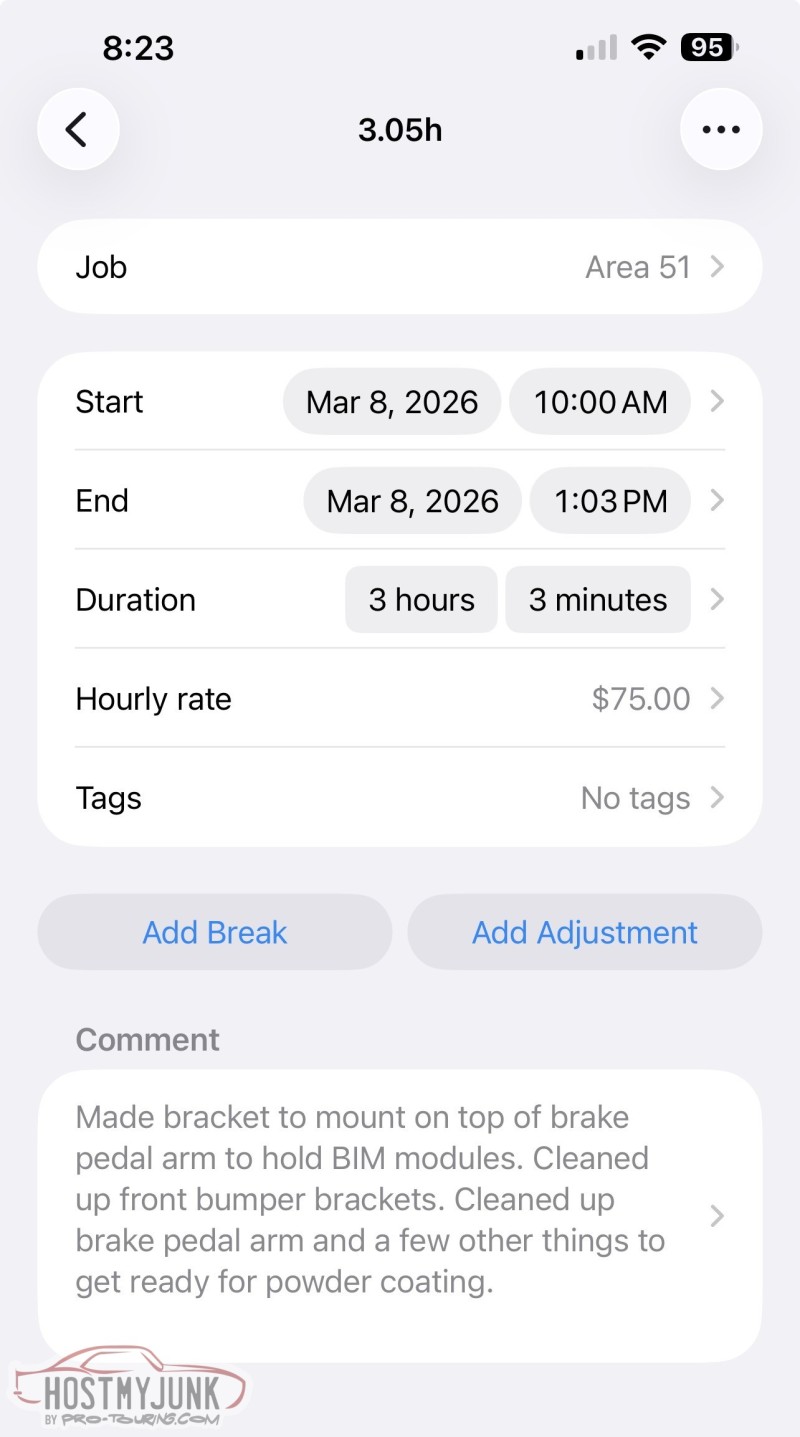
__________________
Glenn 1951 3100, Area51 1955 BelAir, 4EVER17 1987 R10, Ethel Copper Hill Rod & Custom http://67-72chevytrucks.com/vboard/s...d.php?t=829856 |
|
|
|
|
|
03-14-2026, 01:58 PM
|
#535 |
|
Registered User
Join Date: Jan 2022
Location: Conn.
Posts: 297
|
Re: Long Time Coming......
So today is my 57th birthday, and as such, I spent only a couple of hours in the shop working on buttoning up a couple of things I had already started.
To go back to a previous post about finding ways to mount everything under the dash that needs to be put somewhere. I have these two modules from Dakota Digital. Once is for the gear selector interface that wires between the transmission and the gauges that will show what gear it is in, much as a new car does. The other one wires between the Holley Term X and the Dakota Digital module for the gauges I showed previously. 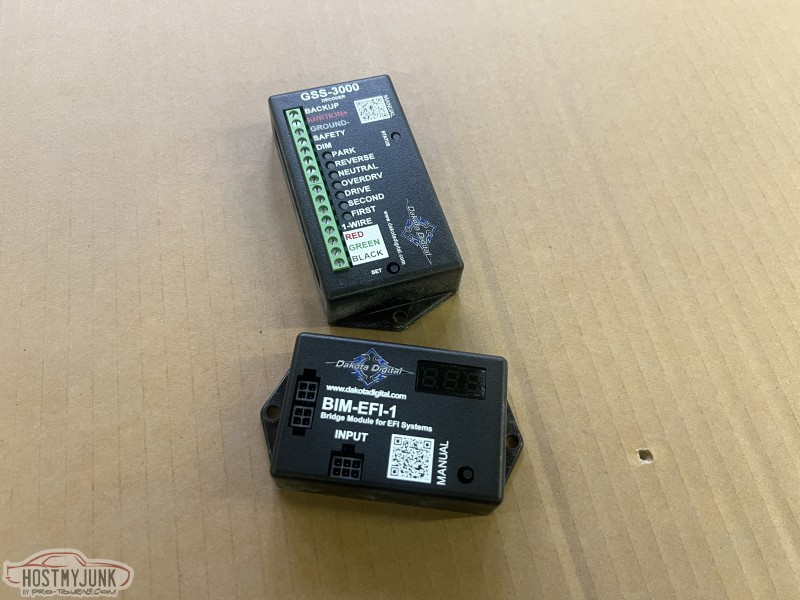 So I started thinking about all the dead space above the steering column support bracket I am using and thought that might be a good place for some things. 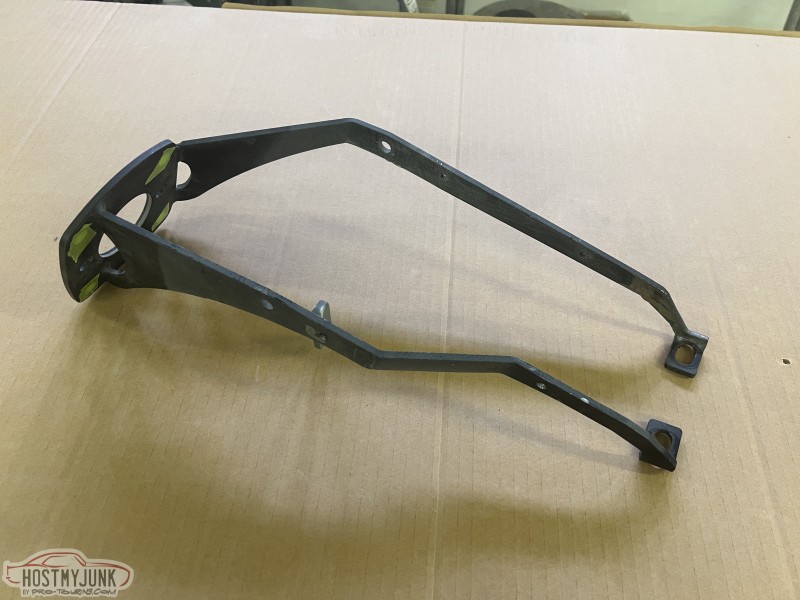 I had used some poster board material and made a quick mock-up of what I wanted, then transferred it to some sheet metal I have and made this. 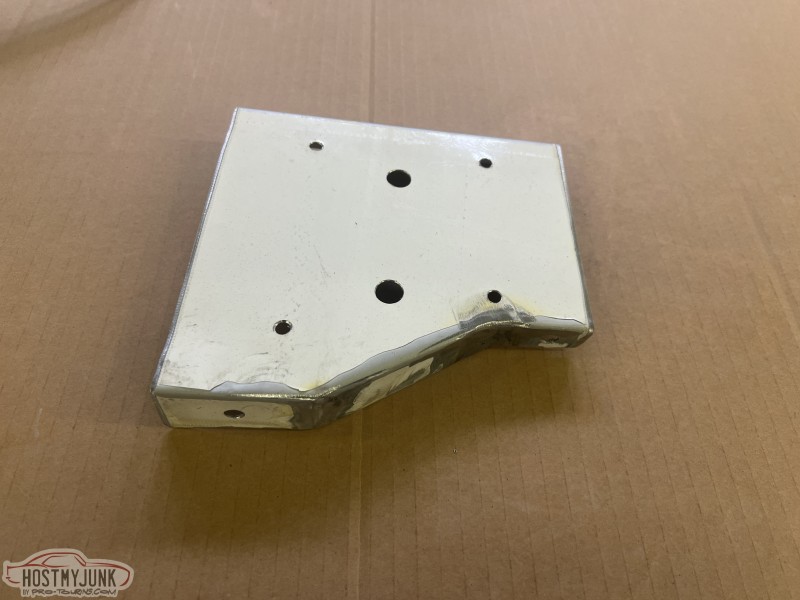 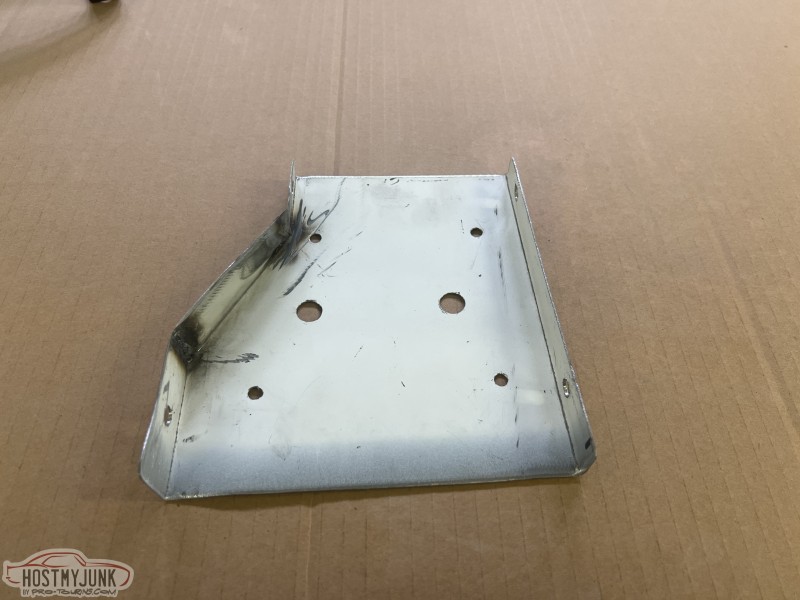 I drilled out the mounting holes for the modules as well as two larger holes that will eventually get grommets installed and use them as a pass through for the wiring. Here are the two modules bolted in place. 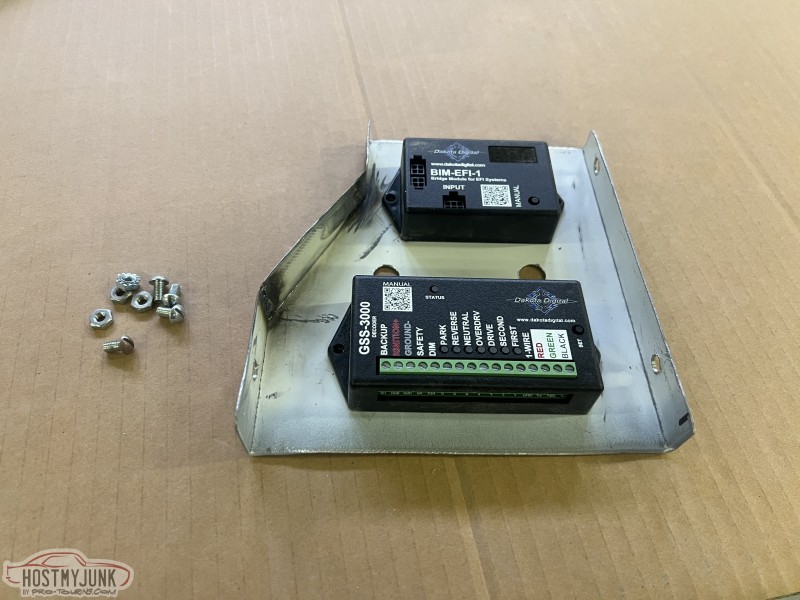 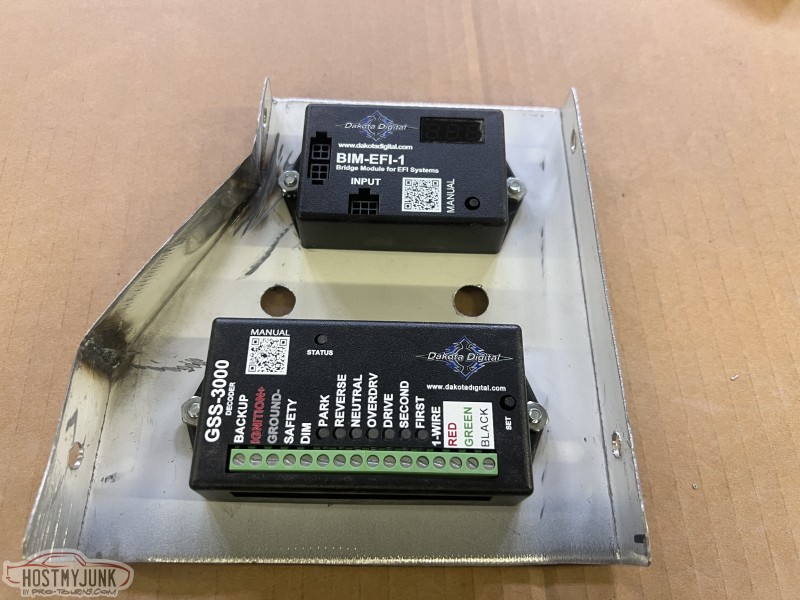 I drilled mounting holes in the column support and tapped them to accept 1/4-20 screws. Here, the bracket is mounted. 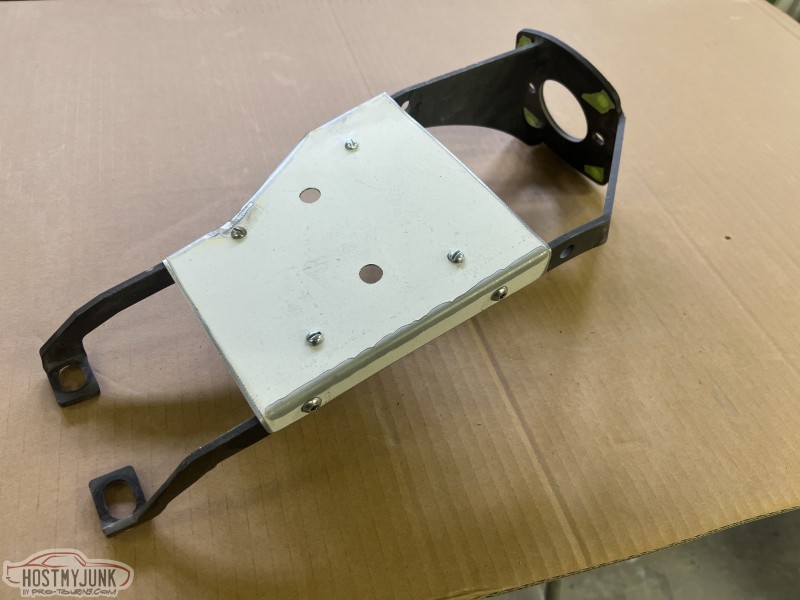 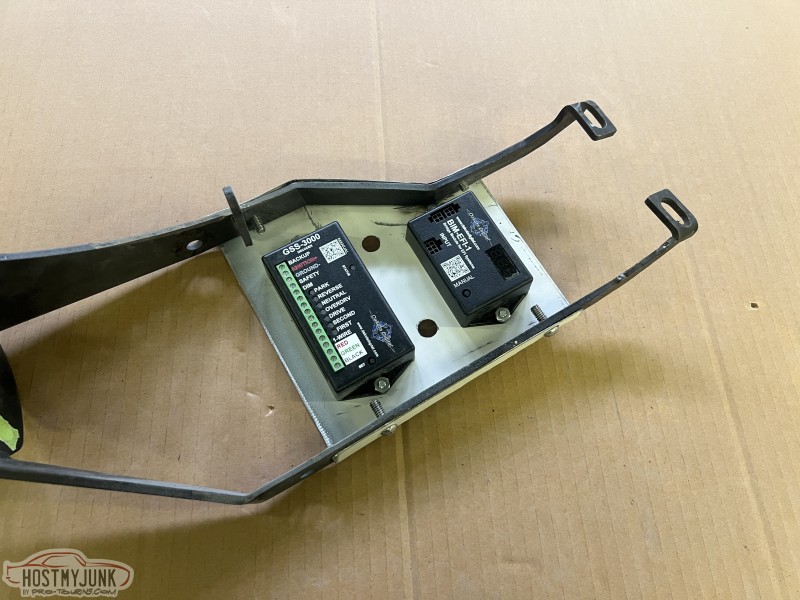 And finally, here is the entire thing bolted in place inside the cab. I admit that at first glance it might seem odd to have them facing down, but my thought is that I need to have easy access to them at any point I need to be able to see them. If they were mounted on the top the only way to see them is if the gauges were removed, or with a mirror. This also leaves the top of the bracket open for mounting something else if I see a need. 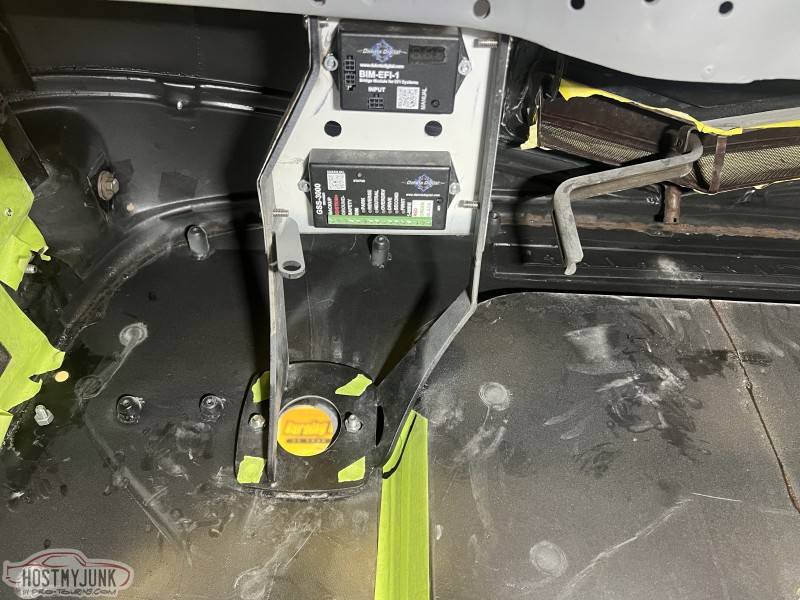 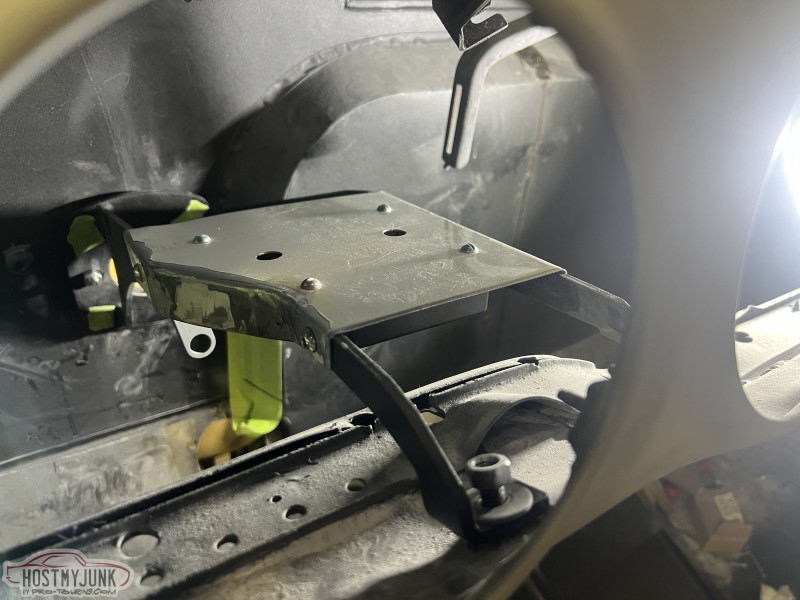 I hope youre all enjoying this build thread. Ive noticed its mostly the same four or five people commenting, which is totally fineIm not posting this to feed my ego. Im really just trying to get a sense of whether the thread is useful or interesting to anyone beyond myself. I also hope Im not getting too far into the weeds with all the detailed photos and explanations. I was fortunate to grow up with a dad who taught me a lot, along with several mentors and friends I deeply respect who also shared their knowledge with me. As Ive said before, my main goal in this thread is to share ideas or techniques that might help others. Even if its just a small tip or a different way of doing something, it's worthwhile. And if people are here simply to enjoy following along with a build like this, Im happy to provide that, too. Have a great day, Glenn
__________________
Glenn 1951 3100, Area51 1955 BelAir, 4EVER17 1987 R10, Ethel Copper Hill Rod & Custom http://67-72chevytrucks.com/vboard/s...d.php?t=829856 |
|
|
|
|
03-14-2026, 04:06 PM
|
#536 |
|
Senior Member
Join Date: Dec 2009
Location: TN.
Posts: 9,870
|
Re: Long Time Coming......
Nice work
 And Happy Birthday.
__________________
________________________________________________________________________________________ ____________________________________________ The early bird gets the worm, But the second mouse gets the cheese 85 Chevy K-20 63 Impala (my high school car) http://67-72chevytrucks.com/vboard/s...Crew Cab Build |
|
|
|
|
03-14-2026, 08:41 PM
|
#537 |
|
Registered User
Join Date: Nov 2013
Location: Portland, OR
Posts: 614
|
Re: Long Time Coming......
As someone working on one of these trucks I can say this is a very useful thread. I’ve referenced the chassis photos a few times and learned a few tricks for lining up front body panels. I’ve had to replace a bunch of rust and will soon be priming and painting so the info on those topics is useful too. Keep up the thread and the great work!
|
|
|
|
|
03-15-2026, 07:06 AM
|
#538 | ||
|
Registered User
Join Date: Jan 2022
Location: Conn.
Posts: 297
|
Re: Long Time Coming......
Quote:
Quote:
For any part of your priming/painting questions, please feel free to reach out. I am very knowledgeable on PPG products specifically, but processes are very important and not brand specific.
__________________
Glenn 1951 3100, Area51 1955 BelAir, 4EVER17 1987 R10, Ethel Copper Hill Rod & Custom http://67-72chevytrucks.com/vboard/s...d.php?t=829856 |
||
|
|
|
|
03-16-2026, 03:35 PM
|
#539 |
|
Registered User
Join Date: Dec 2011
Location: Moxee WA
Posts: 1,698
|
Re: Long Time Coming......
What started out to be a simple refresh on my '49 has now lead to many upgrades. So far I've followed your lead on rounding the bed stakes. The rear fenders are now at a friend's shop having some dents & cracks reworked. Also, we are installing tubs in the bed, but not your usual style. We are taking a pair of rear fenders and cutting them so they fit between the bed sides & the frame rails.
So right now, I'd like to know where you positioned your gas filler in the left fender. Some dimensions would really help. Thanks much.
__________________
49 chevy 3100 3 window. 327 / m21 4 spd, 12 bolt w/ 3:55's Bought in 1973 for $235.00. Had it longer than my wife & Kids!! |
|
|
|
|
03-16-2026, 08:48 PM
|
#540 |
|
Registered User
Join Date: Nov 2013
Location: Show Low, Arizona
Posts: 844
|
Re: Long Time Coming......
Here is the job for my truck, I call Area51 with all time stamps so far. Now I obviously am not charging myself, but if I were paying someone to build this truck this is what it would co$t.
So you have almost 1000 hours in it? Any predictions on what the hours will be at completion? I didn't keep any records, but I sat down a while ago and went through my build thread and estimated what I had in hard costs in my truck (then put the spreadsheet somewhere where my wife can't find it) I did sub out some of the paint work and all the upholstery, so there was some paid labor in there. I concluded that I'd be lucky to get the cash I'd spent back if I sold it and I'd basically donate my labor. I figure I have about 1500-2000 hours in it, but I'm not near as far down the paint/fab learning curve as you are. But I enjoyed every minute of it and it kept me out of the bars at night. Nice work - and I do very much appreciate you documenting the nitty-gritty details |
|
|
|
|
03-17-2026, 04:41 AM
|
#541 | |
|
Registered User
Join Date: Jan 2022
Location: Conn.
Posts: 297
|
Re: Long Time Coming......
Quote:
On my fuel filler, I made a template of the shape of it and moved it around in the area I knew it needed to be until I landed on a spot that fit well. I let that dictate the exact location. Tonight I will go out and take some measurements and pictures of exactly where I put mine if that helps you. Stay tuned....
__________________
Glenn 1951 3100, Area51 1955 BelAir, 4EVER17 1987 R10, Ethel Copper Hill Rod & Custom http://67-72chevytrucks.com/vboard/s...d.php?t=829856 |
|
|
|
|
|
03-17-2026, 04:52 AM
|
#542 | |
|
Registered User
Join Date: Jan 2022
Location: Conn.
Posts: 297
|
Re: Long Time Coming......
Quote:
Thanks for the comments. My time out in the shop fooling around on this is like one giant therapy session. I'm looking forward to finishing this one, but I do enjoy it. I built a blue Ford Maverick that I showed for a few years 2018-2020 and had a little over 2000 hours in that. I won't post up pictures here, but if you Google my name, Glenn Sinon, you will very easily find them. When I sold the Maverick, I was able to recoup the money I spent on parts and then some more. Basically, I built the car for far less than minimum wage. But I look at the fun I had building it, the three magazine features, car shows, TV show (interviewed on MY Classic Car with Dennis Gage), friends made, and so on. I'm ok with where I ended up. I figure this truck will be in the 1500 range. I know I'll have at least 40 hours doing the final block sanding, painting it myself and between masking and spraying and all that is easily 25 hours, wet sanding and buffing will be roughly 60 hours. Wiring the entire truck is another 40+, plumbing fuel and brake lines, Assembling the truck, and so on. Man, just typing that out is exhausting. Basically the only thing I farm out is the upholstery. My guy is ready for me, can't wait to see that come together. My hope and plan is that about a year from now the truck is running and driving and ready for the streets.
__________________
Glenn 1951 3100, Area51 1955 BelAir, 4EVER17 1987 R10, Ethel Copper Hill Rod & Custom http://67-72chevytrucks.com/vboard/s...d.php?t=829856 |
|
|
|
|
|
03-17-2026, 10:55 AM
|
#543 |
|
Registered User
Join Date: Dec 2011
Location: Moxee WA
Posts: 1,698
|
Re: Long Time Coming......
Glen: I can so relate to your feeling on your truck. They are great therapy, but can get frustrating.
I've had mine since 1972. Lots of road trips, towing ski boats, camping with my kids, hauling landscaping material for 3 homes. etc. But when I retired 3 years ago, it was due for some much needed love. The plan is to get it into good enough shape so my wife and I can take some road trips. I also got involved in a large car club here and these guys have been a great help. The best thing is if I run into a problem, some one is allways available to help out.
__________________
49 chevy 3100 3 window. 327 / m21 4 spd, 12 bolt w/ 3:55's Bought in 1973 for $235.00. Had it longer than my wife & Kids!! |
|
|
|
|
03-17-2026, 01:41 PM
|
#544 |
|
Registered User
Join Date: Feb 2021
Location: WestCentral MN,
Posts: 50
|
Re: Long Time Coming......
I hear ya, and happy belated birthday ( oh to be 57 again ). I also farm out the upholstery, and some of the internals of the automatic transmissions and the cam bearings and valve guides of my engines. Everything else I do on my own. I think minimum wage is a good goal.. allthough if I had to count my "thinking time"... I might be less than half of minimum wage...
|
|
|
|
|
03-17-2026, 03:20 PM
|
#545 |
|
Registered User
Join Date: Jul 2019
Location: Calgary, Alberta
Posts: 97
|
Re: Long Time Coming......
$75 per hour for all that detailed custom work and fabrication? Sounds like a bargain to me! With shop rates these days, you could easily double that number. Nice work.
|
|
|
|
|
03-18-2026, 10:06 PM
|
#546 |
|
Registered User
Join Date: Aug 2024
Location: ɹǝpun uʍop
Posts: 74
|
Re: Long Time Coming......
I read all the threads in here but rarely comment - I find them a valuable resource for both ideas and answers to problems - some of which I don't even know I am going to have yet ! I also like to document my own build threads on various forums as it serves as a useful databank to return to years later if needed to recall what I did and when/why plus when you sell the vehicle the new owner can use it as a reference - what master cylinder did he use ? etc.....
__________________
It always seems impossible until it's done |
|
|
|
|
03-19-2026, 10:01 AM
|
#547 |
|
Registered User
Join Date: Nov 2010
Location: calgary alberta
Posts: 9,039
|
Re: Long Time Coming......
nice work, and pretty quick too. I like how you have maximized your limited space. have you thought about using rivnuts in spaces where you may have trouble holding the retaining bolt/screw on the back side? just thinking of your home made panel above your pedals and how, in my case anyway, the fasteners would end up turning up top when doing up the self locking nut on the underside.
nice build, jealous how quickly your stuff comes together. I am always engineering the build as I go cuz nothing is stock. it's a frame swap and interior swap and extended cab and.... |
|
|
|
|
03-21-2026, 08:52 AM
|
#548 | |||||
|
Registered User
Join Date: Jan 2022
Location: Conn.
Posts: 297
|
Re: Long Time Coming......
Quote:
Quote:
Quote:
Quote:
Quote:
On the topic of river-nuts, have you seen the pneumatic riv-nut gun? Makes installing a riv-nut one of the easiest and fastest thing you will ever do.
__________________
Glenn 1951 3100, Area51 1955 BelAir, 4EVER17 1987 R10, Ethel Copper Hill Rod & Custom http://67-72chevytrucks.com/vboard/s...d.php?t=829856 |
|||||
|
|
|
|
03-21-2026, 10:18 AM
|
#549 |
|
Registered User
Join Date: Nov 2010
Location: calgary alberta
Posts: 9,039
|
Re: Long Time Coming......
I have used air operated riv nut guns before, big ones, for use on semi trailers etc. I know there are smaller ones too, like the pop rivet air operated ones and some that spin instead of pull.
check aircraft spruce for rivet tools and other hand dollies etc. astro tools has a version as well. there are also adapters for use with a drill https://www.aircraftspruce.ca/catalo...u3PwoATOvBHA23 https://www.rivetnutusa.com/how-does...ert-tool-work/ https://atlasautoequipment.ca/3-8-ai...etric-and-sae/ |
|
|
|
|
03-22-2026, 07:35 AM
|
#550 | |
|
Registered User
Join Date: Jan 2022
Location: Conn.
Posts: 297
|
Re: Long Time Coming......
Quote:
I found this one a while ago on Amazon, and I really like it. It comes with 3 different-sized quick-release heads for ease of use with different-sized nut-certs. For the $160 price tag I have found this to be a very useful tool and is one of my favorites. The top button spins the nut cert on, and then press the bottom button and it spins out. I can install a nut cert in about 5 seconds with this 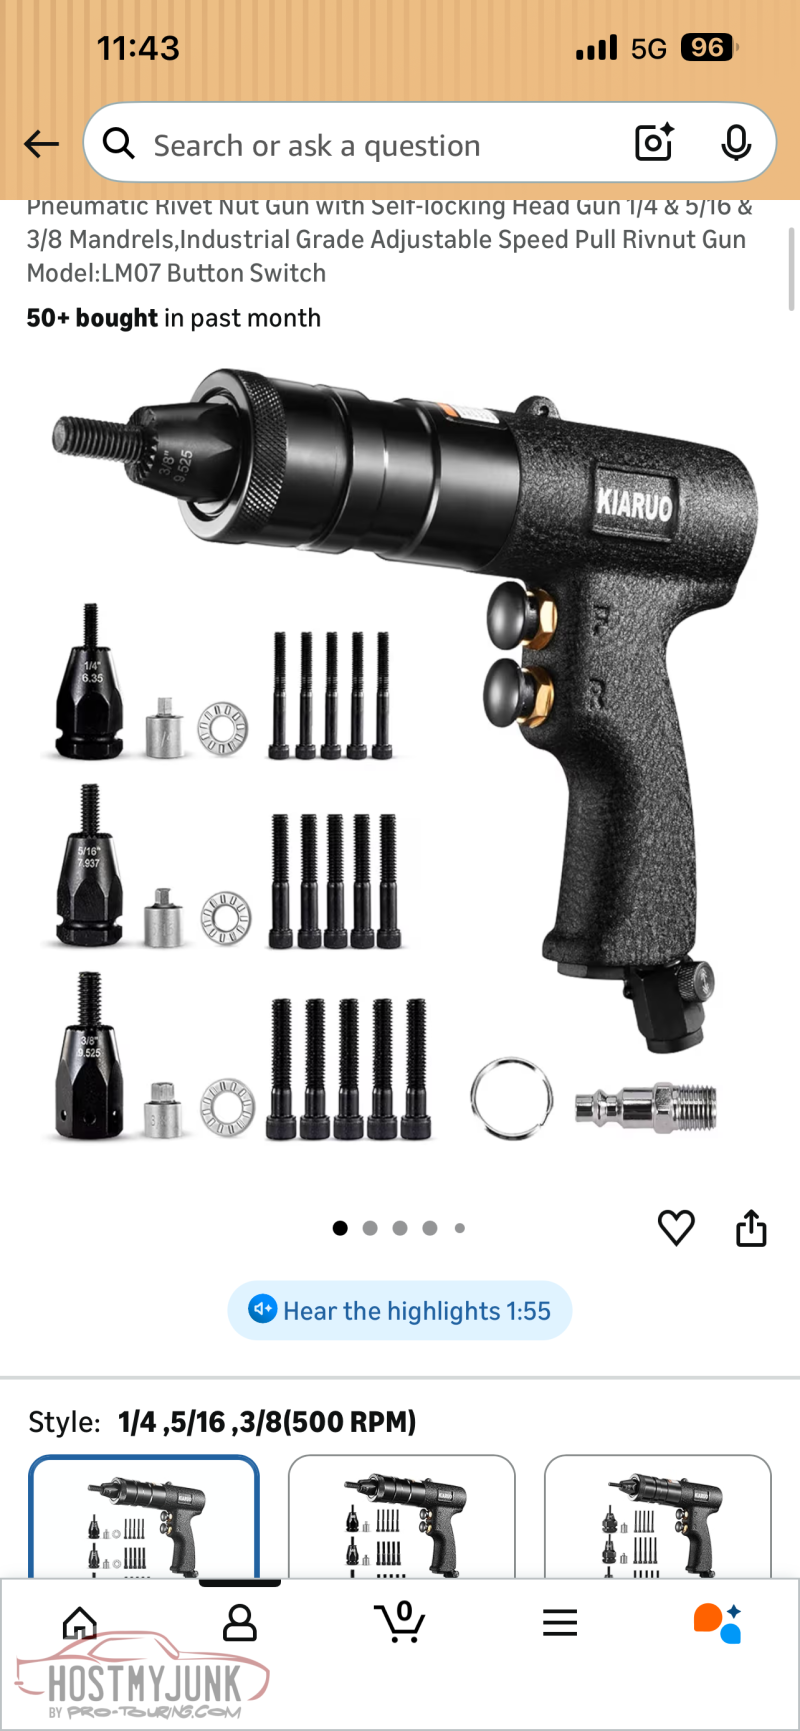
__________________
Glenn 1951 3100, Area51 1955 BelAir, 4EVER17 1987 R10, Ethel Copper Hill Rod & Custom http://67-72chevytrucks.com/vboard/s...d.php?t=829856 |
|
|
|
|
 |
| Bookmarks |
|
|


 Linear Mode

