
|
 01-26-2026, 01:05 AM
|
#526 |
|
Senior Member
 Join Date: Jul 2010
Location: Race City U.S.A.
Posts: 1,172
|
Re: "Midnight Rider" 1970 C10 SWB Fleetside
Started making a harness that will finish the fuel sending unit.
 Added a Weatherpack connector on one end. Installed two ground terminals for a frame ground. Finished it off with DEI split wire shield and shrink tubed the plug end. Once installed, the other end will connect to the Dakota Digital control box.  
__________________
Board Member #87725 My build thread... http://67-72chevytrucks.com/vboard/s...d.php?t=813848 Last edited by omodified; 02-03-2026 at 09:23 PM. |

|

|
|
01-26-2026, 01:11 AM
|
#527 |
|
Senior Member
Join Date: Jul 2010
Location: Race City U.S.A.
Posts: 1,172
|
Re: "Midnight Rider" 1970 C10 SWB Fleetside
Getting some dash parts ready for paint. Need to wet sand these next. Then, spray black and clear.
    
__________________
Board Member #87725 My build thread... http://67-72chevytrucks.com/vboard/s...d.php?t=813848 Last edited by omodified; 02-01-2026 at 06:02 PM. |
|
|
|
|
02-01-2026, 05:40 PM
|
#528 |
|
Senior Member
Join Date: Jul 2010
Location: Race City U.S.A.
Posts: 1,172
|
Re: "Midnight Rider" 1970 C10 SWB Fleetside
Installed the headlight dimmer switch. I used NOS 1997037 and stainless #12 screws with star washers, just like the originals.
   
__________________
Board Member #87725 My build thread... http://67-72chevytrucks.com/vboard/s...d.php?t=813848 |
|
|
|
|
02-01-2026, 06:03 PM
|
#529 |
|
Senior Member
Join Date: Jul 2010
Location: Race City U.S.A.
Posts: 1,172
|
Re: "Midnight Rider" 1970 C10 SWB Fleetside
Installed the ignition switch. For this, I used NOS 1116709 ignition switch, 3918894 spacer and 3918893 bezel.
     
__________________
Board Member #87725 My build thread... http://67-72chevytrucks.com/vboard/s...d.php?t=813848 |
|
|
|
|
02-03-2026, 09:57 PM
|
#530 |
|
Senior Member
Join Date: Jul 2010
Location: Race City U.S.A.
Posts: 1,172
|
Re: "Midnight Rider" 1970 C10 SWB Fleetside
I wanted to fill this hole in the dash, behind the glove box door. The only way to fill that one is to install the light that goes there. For this, I used NOS 987188. I polished the stainless face and routed the wiring neatly. The wiring is just long enough to make it to the fuse block.
 
__________________
Board Member #87725 My build thread... http://67-72chevytrucks.com/vboard/s...d.php?t=813848 |
|
|
|
|
02-03-2026, 10:16 PM
|
#531 |
|
Senior Member
Join Date: Jul 2010
Location: Race City U.S.A.
Posts: 1,172
|
Re: "Midnight Rider" 1970 C10 SWB Fleetside
Another loose wire under the dash that's been staring me in the face is the heater light socket for the heater control. The issue is, I am not running a heater control. The AC control needs two sockets as a light is required on each side. The second socket is included in the factory AC harness, which I don't have or need with the Vintage Air. So, I bought two sockets and spliced the into the heater light wire. For the bulbs, I used Dapper Lighting BA9S LED lights. Here is everything neatly installed. Can't wait to see it lit up.
    
__________________
Board Member #87725 My build thread... http://67-72chevytrucks.com/vboard/s...d.php?t=813848 Last edited by omodified; 02-05-2026 at 02:16 PM. |
|
|
|
|
02-05-2026, 11:32 PM
|
#532 |
|
Senior Member
Join Date: Jul 2010
Location: Race City U.S.A.
Posts: 1,172
|
Re: "Midnight Rider" 1970 C10 SWB Fleetside
Got a few small things done today. Installed the second half of the fuel sending unit harness. Had to drill a hole in the frame for the ground connections. Made sure the hole had a decent amount a bare metal and also used a star washer. The other end of the harness is routed along with the transmission harness and into the cab. Still need to finish that end.
 Last, using the same screw type as the fuse block and transmission dipstick, a ground stud was created on the firewall. There was a nice flat area next to the wiper motor that worked perfectly. This will let me clean up the ground wires that are left inside the cab. Did a continuity check on this ground and the frame ground for the fuel sending unit. Both ground looks really clean!  
__________________
Board Member #87725 My build thread... http://67-72chevytrucks.com/vboard/s...d.php?t=813848 |
|
|
|
|
03-29-2026, 09:31 PM
|
#533 |
|
Senior Member
Join Date: Jul 2010
Location: Race City U.S.A.
Posts: 1,172
|
Re: "Midnight Rider" 1970 C10 SWB Fleetside
Got a few small things wrapped up. First, in order to finish the wiring under the dash, I needed a distribution block for the remaining power wires. I found one on Amazon that was the perfect size. I mounted the distribution block next to the Dakota Digital control box. This made things nice and compact which kept the wiring right where I needed it to go. I also connected the remaining ground wires to the firewall ground post. Aside from the connections to the steering column, the under dash wiring is complete!
  Next up, I added bulbs to the under dash lights. For these, I chose Dapper Lighting 1156-S. I still haven't mounted the housings. I will wait to do that once the AC vents are installed. They will just be hanging around for now.   Next I used NOS 3816659 plastic tie straps to bundle the wiper hoses.   Next, I installed the ignition. For this I used a keyed set that I purchased from board member LockDoc. Before I installed it I gave it a good internal coat of spray lubricant. This got the key operating smoothly. Soon, I will be able to turn the key and make some things happen. For now, it just looks good.  
__________________
Board Member #87725 My build thread... http://67-72chevytrucks.com/vboard/s...d.php?t=813848 |
|
|
|
|
03-29-2026, 09:50 PM
|
#534 |
|
Senior Member
Join Date: Jul 2010
Location: Race City U.S.A.
Posts: 1,172
|
Re: "Midnight Rider" 1970 C10 SWB Fleetside
Still working on the inside of the cab. Today, I installed the sunvisors. For this, I used a pair of NOS 3944430 sunvisor assemblies that I bought from board member 70LonghornCST. I used stainless hardware and I reused my original retaining hooks.
    Last, I bought some blank J plugs for the unused ports on the ECU. This will keep the dust out. 
__________________
Board Member #87725 My build thread... http://67-72chevytrucks.com/vboard/s...d.php?t=813848 |
|
|
|
|
03-29-2026, 10:43 PM
|
#535 |
|
Senior Member
Join Date: Jul 2010
Location: Race City U.S.A.
Posts: 1,172
|
Re: "Midnight Rider" 1970 C10 SWB Fleetside
Today, I installed some more cool parts. For the rear lights, I used NOS taillight housings 5958722, NOS reverse light housings 5959019 and 5959020, NOS taillight lenses 5959111 and NOS bullseye reverse light lenses 5959461 and 5959462. I used Dapper Lighting1156-S and 1157 for the bulbs. Stainless and nickel plated original hardware to finish it off. Like the parking lights, I painted the inside of the housings to get brighter light.
           For the rear side marker lights, I reused the NOS lights 911310 and 911311 that I bought back in 2012. I doubt they had 100 miles on them. so, they are still pristine. For the bulbs, I used Dapper Lighting 194 LEDs. 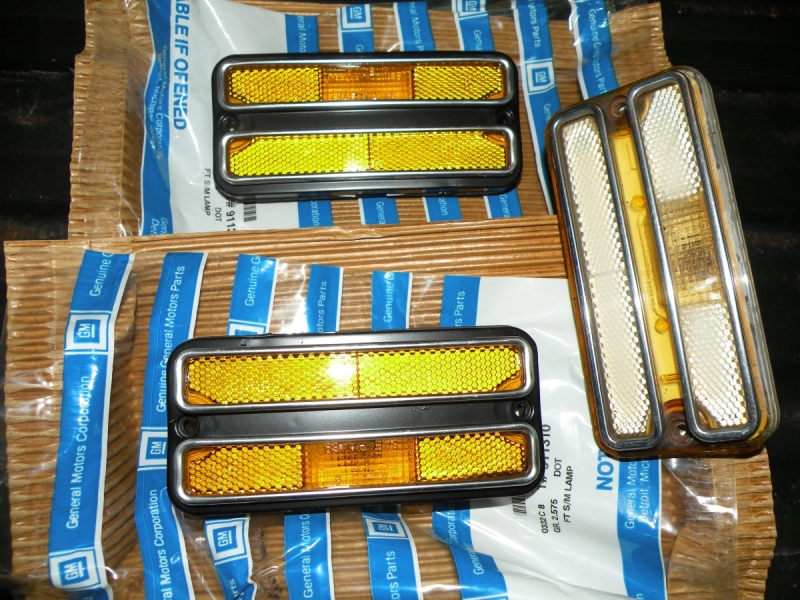 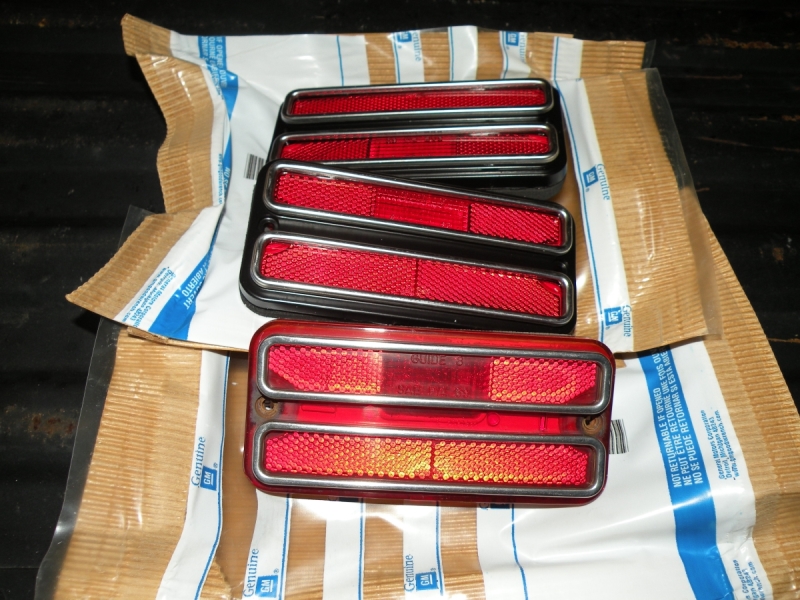  
__________________
Board Member #87725 My build thread... http://67-72chevytrucks.com/vboard/s...d.php?t=813848 Last edited by omodified; 03-30-2026 at 09:42 PM. |
|
|
|
|
03-30-2026, 09:49 AM
|
#536 |
|
Senior Member
Join Date: Jun 2002
Location: Murray, Kentucky
Posts: 4,102
|
Re: "Midnight Rider" 1970 C10 SWB Fleetside
You've done some great work. When I first looked at the pic of the dimmer switch I thought "why does he need 2 dimmer switches?" Just shows how good your paint is!
__________________
Roger '68 Short step - https://67-72chevytrucks.com/vboard/...d.php?t=849675 '69 ('70?) 2wd Blazer - https://67-72chevytrucks.com/vboard/...d.php?t=856475 '70 GMC Jimmy 2wd '73 Firebird - https://67-72chevytrucks.com/vboard/...d.php?t=853203 Ideas - https://67-72chevytrucks.com/vboard/...d.php?t=851743 |
|
|
|
|
03-30-2026, 09:46 PM
|
#537 | |
|
Senior Member
Join Date: Jul 2010
Location: Race City U.S.A.
Posts: 1,172
|
Re: "Midnight Rider" 1970 C10 SWB Fleetside
Quote:
      
__________________
Board Member #87725 My build thread... http://67-72chevytrucks.com/vboard/s...d.php?t=813848 |
|
|
|
|
|
03-30-2026, 10:02 PM
|
#538 |
|
Senior Member
Join Date: Jul 2010
Location: Race City U.S.A.
Posts: 1,172
|
Re: "Midnight Rider" 1970 C10 SWB Fleetside
The ashtray face plate was also painted and buffed out. To make the faceplate look as nice as possible, the ashtray was completely disassembled. I nickel plated the remainder of the assembly. I had to find special stainless tubular rivets to piece it back together. I also need a special rivet tool. The housing was installed back on post 520, but today it becomes complete.
   
__________________
Board Member #87725 My build thread... http://67-72chevytrucks.com/vboard/s...d.php?t=813848 |
|
|
|
|
03-30-2026, 10:31 PM
|
#539 |
|
Senior Member
Join Date: Jul 2010
Location: Race City U.S.A.
Posts: 1,172
|
Re: "Midnight Rider" 1970 C10 SWB Fleetside
More parts are out of the paint booth. Time to assemble and install the left and right A/C vents and finish the A/C system under the dash. For this, I used NOS deflectors 3856472 and some aftermarket rear housings and felts. The assemblies went together nicely. I had to buy 10 extra feet of duct hose as Vintage Air doesnt supply nearly enough to do the whole truck comfortably. The Vintage Air reducers were drilled to the same pattern as the rear housings so they would lock together. This eliminated the cheesy clips that came with the kit. Next, the duct hose was ran to the center and outer A/C vents, as well as the defrost vents. Special attention was paid to the routing so important things were still accessible if needed. Once in place, everything was zip tied together or zip tied to magnetic mounts. The dash is nearly complete now.
      
__________________
Board Member #87725 My build thread... http://67-72chevytrucks.com/vboard/s...d.php?t=813848 |
|
|
|
|
03-31-2026, 09:55 PM
|
#540 |
|
Senior Member
Join Date: Jul 2010
Location: Race City U.S.A.
Posts: 1,172
|
Re: "Midnight Rider" 1970 C10 SWB Fleetside
More parts are out of the paint booth. Time to install the rear splash guards. The LH shield needed some clearance for the fuel vent tube. Once I had the clearance needed, I used some edge guard to protect the hose from chaffing. I used new AMK bolts with the correct head markings to bolt it all together.
       
__________________
Board Member #87725 My build thread... http://67-72chevytrucks.com/vboard/s...d.php?t=813848 Last edited by omodified; Yesterday at 01:39 PM. |
|
|
|
|
03-31-2026, 10:18 PM
|
#541 |
|
Senior Member
Join Date: Jul 2010
Location: Race City U.S.A.
Posts: 1,172
|
Re: "Midnight Rider" 1970 C10 SWB Fleetside
Got a couple small things done today. Since the AC vents are installed now, I was able to mount the under dash lights. Had to drill a hole for the RH side.
  I need to finish up the fuel lines. Before I can do that, I needed to install the fuel pressure regulator. I already nickel plated the mount that came with it. I used one of the bolts that holds the AC evaporator under the dash to hold the mount and also drilled for a second bolt.  
__________________
Board Member #87725 My build thread... http://67-72chevytrucks.com/vboard/s...d.php?t=813848 Last edited by omodified; Yesterday at 01:40 PM. |
|
|
|
|
Yesterday, 11:39 AM
|
#542 |
|
Registered User
Join Date: Dec 2014
Location: Tucson, AZ
Posts: 970
|
Re: "Midnight Rider" 1970 C10 SWB Fleetside
You do very nice work sir!

__________________
1987 V20 farm-hand rescue 1998 C2500 lot-rot rescue |
|
|
|
 |
| Bookmarks |
|
|


 Linear Mode

