
 |
Register or Log In To remove these advertisements. |
|
|
|
|||||||
|
|
Thread Tools | Display Modes |
|
|
#1 |
|
Senior Enthusiast
Join Date: Feb 2007
Location: Spokane Valley, WA
Posts: 8,356
|
Unity Spotlight Repairs
Enthusiasts wanting to rebuild or repair a vintage Unity spotlight may find this post informative or interesting. Everyone else might prefer to leave now or risk being bored to tears. It’s a collection of what I’ve learned and experienced over several decades of putting junk yard dogs back into service.
The Unity spotlight has been the standard of commercial industry at least since the 1940’s. Thousands (if not millions) have been installed on fire equipment, police cars, heavy trucks and private vehicles. Edit - 7/7/2010 - I've recently discovered - as of February 1951 Unity was advertising "over five million Unity lights in use" as shown on the attached back up light box label. 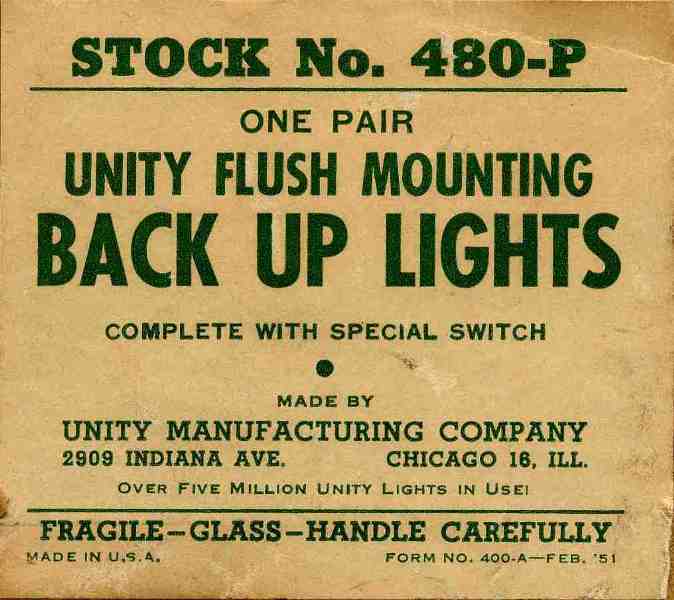 Many spotlights were forced on new car buyers right after World War II. New vehicles were in short supply and high demand through the end of the 1940’s. Long waiting lists meant customers would buy whatever they could get. In this climate, dealers loaded new cars with high margin accessories (including spotlights), somewhat explaining why so many cars from the late 1940’s had spotlights in the first place. The overall Unity spotlight design remained relatively unchanged until the 1970’s, when the screw on lamp ornament or emblem was eliminated, and the one piece handle wedge was replaced with a tubular wedge and screw. There have been a variety of lamp head styles, most recently made of plastic. Many components are backward and forward compatible between eras, although my focus is specifically on the early S6 (six inch) round head model with the screw on emblem and one piece wedge bolt. Having spent most of my life in vehicles equipped with Unity spotlights, I recently decided to add a pair to my 1960 GMC. Common problems with old Unity spotlights (besides surface rust) include damaged parking/travel limiting interface, one or more gears may have broken teeth, defective switch, feed wire cut or damaged, and the plastic grip may be broken or not the desired color. When recently faced with rebuilding several more spotlights, I was disappointed to find virtually no information available on how to disassemble these lamps without risking at least cosmetic damage. Since one of my recent spotlight purchases was only good for parts, I tested all the practices on that one first. The lamps shown in the following photos all have the special short GM handle/grip. Other than length, it is essentially the same as any standard length black or ivory plastic handle/grip. The Unity S6 spotlight consists of 4 major components, labeled in the photo below: 1. Lamp head assembly. 2. Headpost housing assembly. 3. Tube and rod assembly. 4. Handle assembly. Also of note in this photo are the labeled screws and wedge bolt:  Although it doesn’t show up well, the next photo shows the location of the screw to adjust rotation tension on the lamp head: 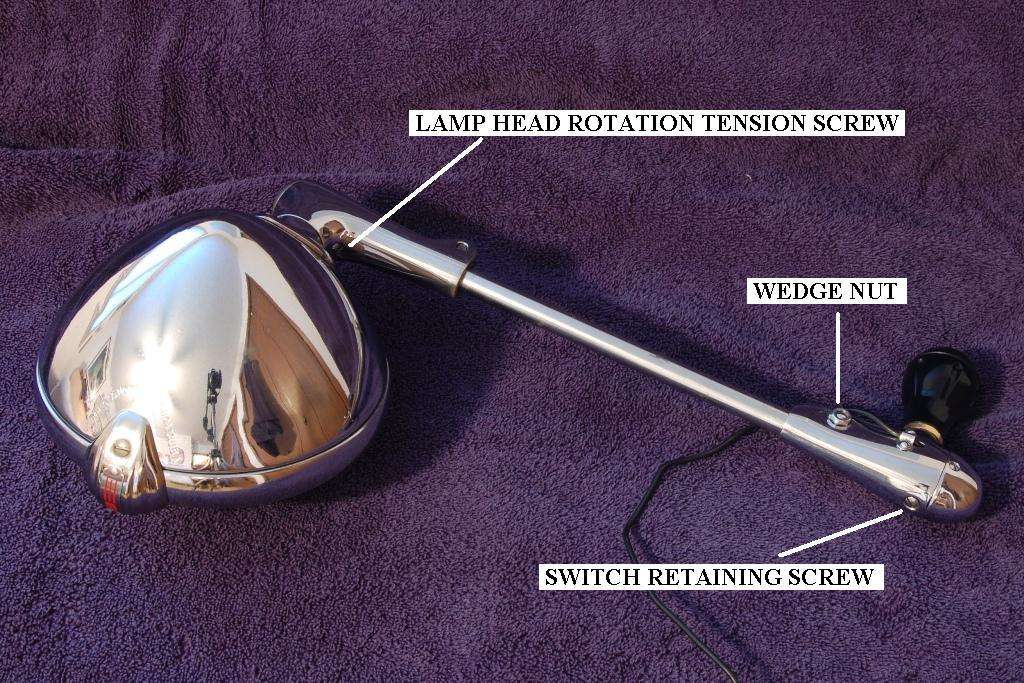 The next picture shows the major components separated. To achieve this level of disassembly, the following steps apply: 1. Loosen the 3/8” nut from the wedge bolt. Align nut with end of wedge bolt threads. 2. Brace the opposite side of the handle with your free hand, and tap the wedge bolt free with a plastic hammer. Remove the nut and wedge bolt. 3. Handle is now free to slide off shaft. 4. Loosen the headpost housing clamping screw. 5. With a twisting motion pull the outer tube free of the headpost housing and remove from the inner tube. 6. Remove the emblem and bezel screws. Gently but firmly pull the bottom of the bezel away from the lamp shell, until the bulb/bezel assembly detaches. 7. Disconnect ground wire from bulb terminal, and power wire from probe in headpost. 8. Remove 9/16” nut and star washer holding shell to headpost. 9. Gently pull the lamp shell from the headpost until detached. 10. Remove the headpost assembly from the headpost housing by driving the solid tapered retaining pin out (this is not a roll pin). On all three of my lamps, the pin was originally installed from the passenger side of the head. This may have been standard practice, or coincidental. Perform close inspection to insure pin is extracted and inserted from the same side it was originally installed, to avoid damage to the casting. 11. The headpost assembly is a friction fit in the headpost housing. The easiest way to remove it is to temporarily reinstall the lamp shell, and using the shell as a lever pull the headpost free. Use caution handling the headpost assembly, there are small o-rings and a small spring surrounding the center pin, and a thin shim washer between the spring and the base of the gear section. 12. To remove the end plug from the headpost housing, remove the retaining screw under the bottom and tap the plug out from the inside through the headpost hole. This will avoid damage to the chrome finish by attempting to pry if off from the outside. 13. The rod and gear assembly will slide forward out of the inner tube, or if exceptionally dry may require a push from the handle end. Normally, no additional disassembly is required. If however the inner tube is damaged, or you want to change the shaft length of the light, the inner tube must be removed from the head housing. 14. Remove the inner tube retaining screw from the bottom of the head housing. 15. In order to prevent damage to the chrome finish of the head housing, drill a ½” hole in a piece of scrap wood. If the chrome finish is like new do the same thing with a piece of leather or vinyl. 16. Open the jaws on a bench vice at least ½”, insert the inner tube through the leather and wood block and rest on top of the vice with the inner tube pointing down. 17. Insert an 11/32” transfer punch into the front of the head housing and tap the inner tube free from the housing. Note – Virtually all parts from the same era Unity spotlights interchange, however many items were hand drilled and tapped without benefit of jigs or positional tooling. Although tubes can easily be interchanged, the threaded screw mounting holes may or may not line up. Note – for cleaning the inside of the inner and outer tubes, a 38 caliber or 9mm bore brush and patches work well. Note – The flat wedge clamping surface on the inner tube dictates the mounted angle of the handle in relation to the lamp head (it is not adjustable). Some tubes have one flat which positions the handle in direct alignment with the head. Other tubes (as shown) have two flats, allowing the handle to be offset 30 degrees for matching left and right installations.  Further disassembly shows the 3 parts of the tube and rod assembly. It is also easy to see in this photo how electricity is transmitted from the power wire through the switch, to the contact on the end of the rod & gear assembly. On the forward end of the rod, a bearing surface rubs against the spring loaded brass contact pin contained in the headpost assembly. Inside the lamp housing, a wire slips over this post and the other end connects to the bulb terminal. 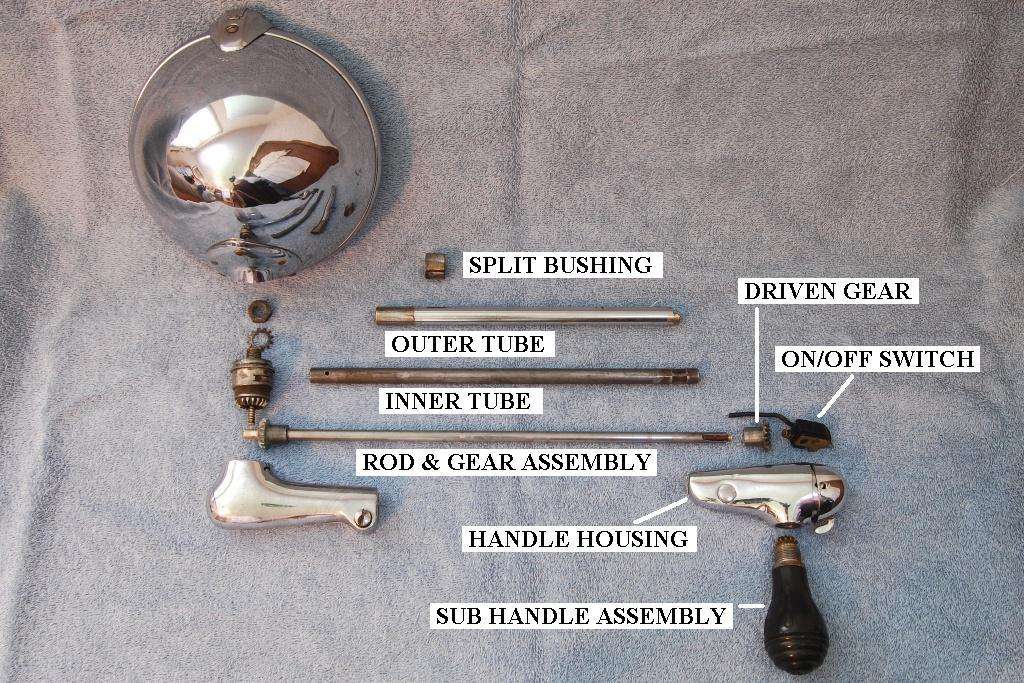 Next is a close up shot of the forward end of the inner tube. The retaining hole is on the bottom, and the slot on top aligns with a corresponding protrusion in the head housing, locking the housing and inner tube into a fixed relationship. 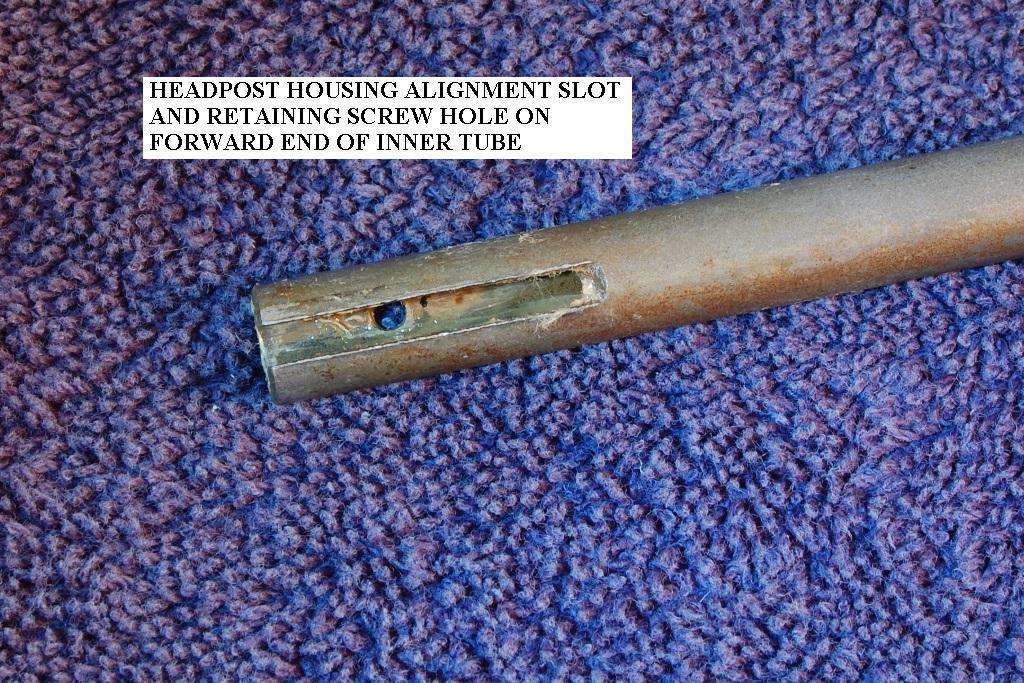 Two issues are visible in the next photo. The rotational travel of the shaft is limited by an interference fit between the cut away end of the outer tube, and a nub or projection inside the handle housing (shown in the next photo). If either is damaged, it will not be possible to limit the fore and aft travel of the lamp. In the parked position, the lamp head will likely rest on the vehicle body. The cut away end of the tube must have square crisp edges. As shown, this damaged tube will chew away at the parking nub in the handle housing until it fails. Also shown are the dual flats on this particular inner tube. The lower flat has been used extensively with a loose wedge bolt to the point of deforming the tube. It can be put back in service however, but adhering a 3/16”x1/2” piece of thin shim stock to the wedge bolt with instant glue. In my application a junk feeler gauge provided the shim stock. 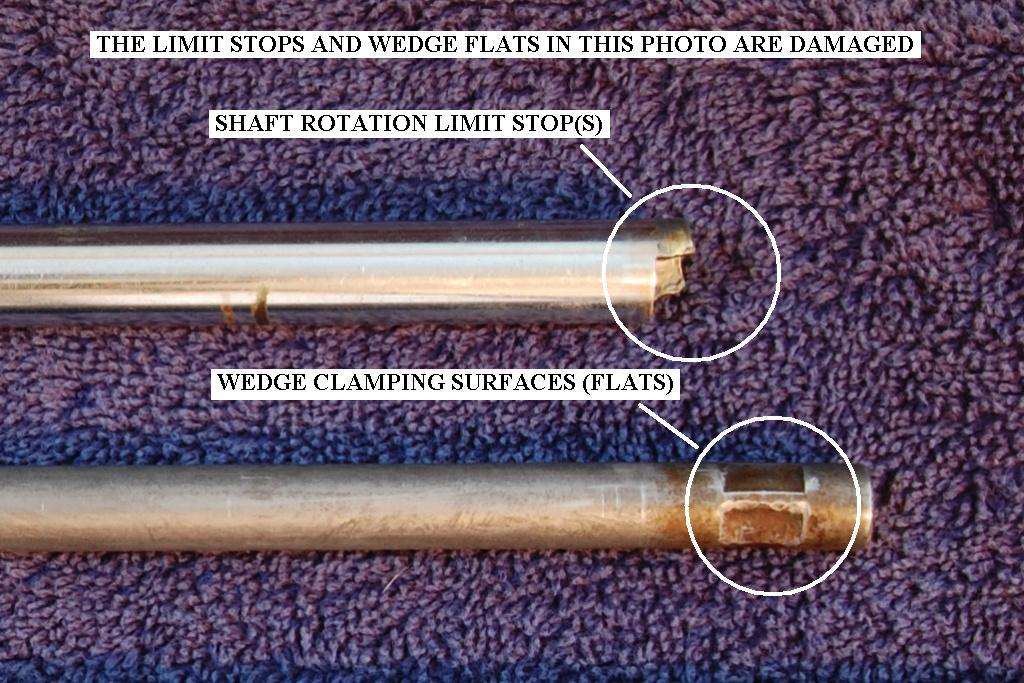 This photo shows the damage caused by a bad outer tube. 60-80% of the parking nub has been chewed off. On another handle in my assortment, the projection is completely gone. Note – there are three main reasons for this damage. A. Rough treatment parking the lamp. B. Allowing the wedge bolt to remain loose. C. Having the lamp mounted on a door instead of a post or other fixed position. When mounted on a door, slamming the door jars the spotlight head, transmitting force through the inner tube to the handle, chipping away at the projection in the handle. Keeping the wedge bolt tight will help, but this type of installation is more prone to travel limit failure than a post mounting.  The last photo shows the layout of the handle components. To disassemble: 1. Remove the screw from the bottom of the grip, and lift the cap free. 2. Hold the grip with a rubber faced glove and remove the 9/16” nut with an impact wrench. Note - the star washer and nut actually serve as a lock nut, holding the clearance setting between the plastic grip and the bushing. To reinstall thread the plastic grip on until snug, then back off until desired clearance is obtained. Prevent the handle and pinion from moving while tightening the nut 3. The plastic upper grip is simply unscrewed from the threaded shaft once the nut is removed. Do not attempt to remove the grip by hammering or prying. If necessary to prevent rotation of the pinion, jam the gears with something hard enough to block the gears yet soft enough to prevent damage. 4. To remove the bushing from the handle housing, attach a small gear clamp to the sleeve portion normally hidden by the grip. Tap the gear clamp lightly with a small hammer and the bushing should unscrew easily. 5. The pinion gear/shaft is a slip fit in the bushing. There is a cylindrical felt washer on the end that goes into the bushing, resting above the top of the grip. 6. Remove the switch cap screws (one on either side of the cap). 7. Remove the wire clamp from the passenger side of the handle. 8. Remove the switch retaining screw, extract the switch and wire from the handle housing. 9. Use caution - the driven gear in the handle is a slip fit in the housing and will fall free once the switch and pinion gear are removed. The gear is keyed to the slot in the end of the rod and gear assembly, and must be lined up when reinstalling the handle to seat correctly. 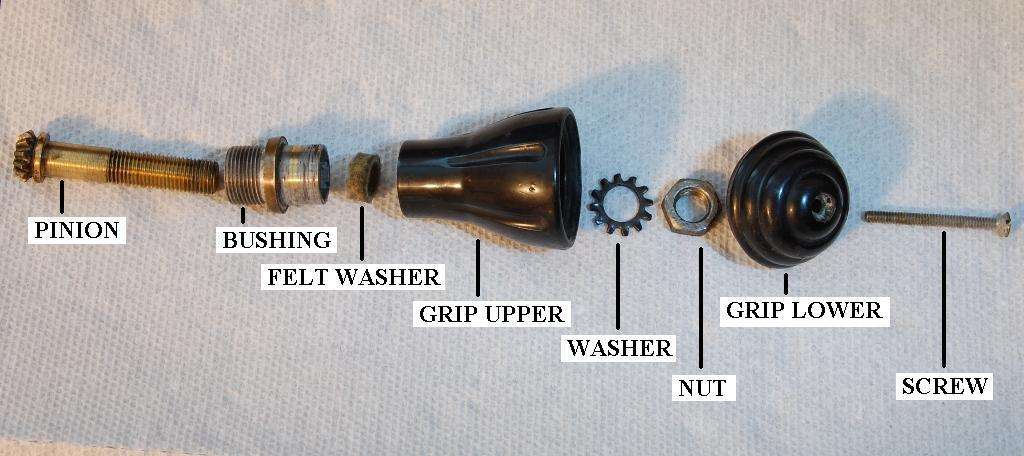 If you’ve gotten this far, putting it all back together isn’t that difficult by simply reversing the order. Other notes or points of interest – o Most damaged parts can be replaced with an order direct to Unityusa. Almost everything is available, except for some obsolete mounting brackets. Used spotlights with cosmetic problems can also be an inexpensive source for spare parts. o Most of the chrome components are made of brass or zinc and are easily damaged when using metal tools. o Some small dents in the shell can actually be worked out with thumb pressure or cautious and tedious picking with a padded tool from the inside. The shell is pressed brass and relatively soft. o Old grease can dry out enough to produce brittle chunks hard enough to break gear teeth in the handle or head housing. Avoid “testing” rotation of the lamp until you can pull it apart and remove the dead lubricant. o I have found white grease to work effectively in lubricating all internal parts, and I use it generously on the gears and inside the tubes. o Early bulb retainers had a full metal ring around the light bulb held in place with elongated C clips. This early retaining ring is one of the few parts made of carbon steel and can disintegrate completely if allowed to rust. Later versions hold the bulb in place with four simple W shaped springs. This method of bulb retention is preferred. o Customized cars almost never used Unity spotlights. Appleton spots have always been the standard for customs. Now if they would only bring back Spotty during intermission at the local drive in. Of course before that does any good someone will have to bring back the local drive in theater! And for those interested in mounting a Unity spotlight on a 60-63 Chevy or GMC truck, here's a link detailing the installation process: http://67-72chevytrucks.com/vboard/s...ight=spotlight Edit - and here are the vehicle code links for California and Washington state, pertaining to owning and using vehicle mounted spotlights: California: http://www.dmv.ca.gov/pubs/vctop/d12/vc24404.htm Washington: http://apps.leg.wa.gov/RCW/default.aspx?cite=46.37.180
__________________
My Build Thread: http://67-72chevytrucks.com/vboard/s...d.php?t=444502 Last edited by markeb01; 05-08-2012 at 01:01 AM. |
|
|

|
| Bookmarks |
|
|