
|
Register or Log In To remove these advertisements. |
|
|
|
|||||||
|
|
Thread Tools | Display Modes |
 03-24-2016, 01:28 PM
|
#1 |
|
Registered User
Join Date: Mar 2015
Location: Morada, CA --- (Near Lodi)
Posts: 1,443
|
Ah the joys of electrical wiring....
Ah electrical wiring.... its a 'calling' thats for sure!
 and not one that many car builders look forward to. With all the PRE-MADE wire harness kits that are available today for the home hobby builder.... almost anybody can be an 'electrician' for a day or 5 or 10! - and not one that many car builders look forward to. With all the PRE-MADE wire harness kits that are available today for the home hobby builder.... almost anybody can be an 'electrician' for a day or 5 or 10! -  Making a real nice clean harness takes a bit of work even when using a kit. If you want to build them out of reels of wires it will cost you dearly. The kits are typically much more economical way to do it. Either way the key to a beautiful, trouble-free and functional harness is using a layout board instead of doing it right on the vehicle. Wire coming off reels wants to roll back up and will always be curved if you dont 'train' it to go straight. Thats where the board and nails and "corridors" come into play. Start with a 4x8 sheet of 1/2" plywood. Prep it for your AREA OF WIRING; - front harness, rear harness, cab harness, engine harness, dash harness.... whatever you will be working on. You can build multiple harness' on 1 board on both sides. 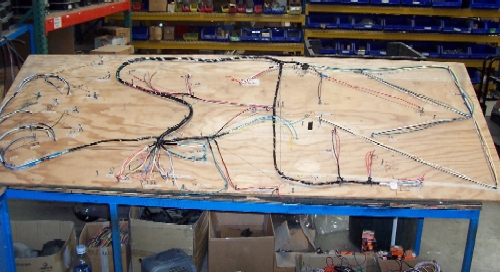 Its pretty basic; take basic measurements of where each wire goes - point A to point B... where everything has to start and end up within the area of the board. Lay it out with pencil on the plywood (like a schematic drawing). Then install #8, #16 nails (taller for more wires in that area) as needed at all the corners where the wire loom will make turns in any direction. Every termination point gets a nail and acts like a separator if using a terminal block(s). Then just string the wires 1 at a time like string art to their final point of termination away from the distribution center. DOnt put any terminals or connectors on until after it is placed on the vehicle. That way the finished "LOOM" will fit thru the firewall holes and grommets easiest.  Other items to use: Panduit Wire chase:  These can be used for the "corridors" where long straight bundling is needed. They are avail in many different widths, sizes. Push pins are great way to loop wire ends.  Once all the board work is completed and you have checked every circuit for continuity (Light test) then you can tape wrap it, wire tye it, plastic or fiber loom wrap it or use whatever you decide to finish it with and its all done. Before you remove it from the board, take a Sharpie and trace the entire loom and all the connector points and mark them, in case it has to come back for a 'rework'. Install into the vehicle (where it belongs), run all the wires out to their final termination points and then MOUNT THE HARNESS into place first. Then do the terminals and connector installations once everything is where it is suppose to be finished at. This makes for the cleanest looking and well planned out harness under a hood or anyplace on a vehicle so there are no wires hanging out and extra lengths sticking out of a connector once its mounted. Wiring and plumbing is where all the true efforts in a build is shown when a 'show judge' is looking at stuff or anybody else for that matter. Make your work count! Enjoy and good luck.....!
__________________
My Build: 57 Chevy Pro-Street |

|

|
| Bookmarks |
|
|


 Threaded Mode