 |
Register or Log In To remove these advertisements. |
|
|
|
|||||||
|
|
Thread Tools | Display Modes |
|
|
#1 |
|
Registered User
Join Date: Aug 2013
Location: Calgary, Alberta
Posts: 683
|
Light Painting Photography Instructions - C10
Hi! I'm going to share a photo technique for your C10 that uses simple tools and can create photos you can't believe you actually took. I'm happy with how well these turned out, myself. If you decide to try this, post your results. If it's not working for you, no problem, I'm happy to suggest some adjustments to make.
Video showing the steps, with trial and error: https://youtu.be/dJHV4IMHXuA Setup  Results  Equipment needed:
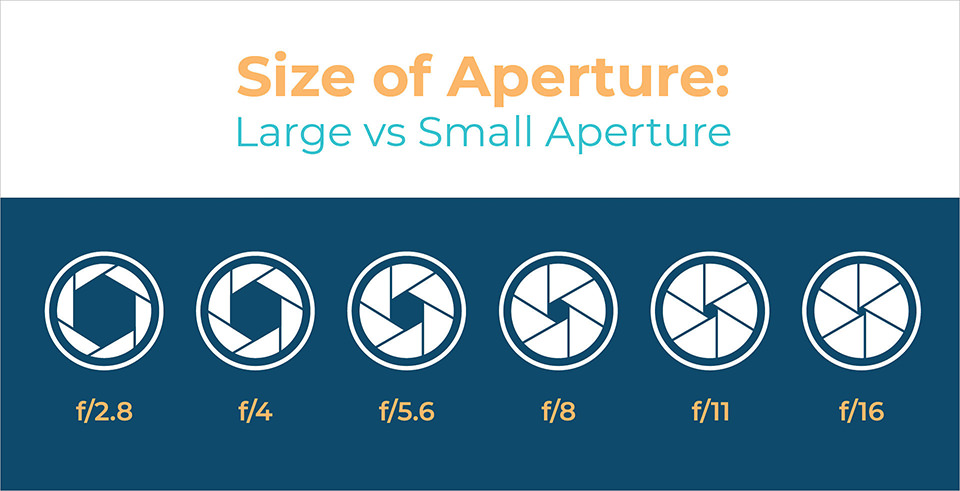
 Concept: Cameras collect light. That's their job. When you take a photo in the daylight, the light from the sun bounces off the subject and into the camera lens. That's how the photo shows up later (digital or film). In the pitch dark, a photo will be black because there is no light for the camera to see and create the picture. So, in the dark you can provide the light via a flashlight! This offers you the control to dictate what the camera sees. Wherever you shine the light during the photo, that lit-area will appear in the photo. Why am I not visible in the photos? Because I never let the light touch me. As far as what the camera sees, I'm dark, so it does't register me as in the photo. Only what the light touches. Camera Setting: Your camera will need a manual mode. Why? Because this type of photography is all about controlling 2 major settings, and trial and error. It took 40+ attempts to get the final photos I liked, below. This means making large or small adjustments to the following settings: Aperture & shutter speed. Aperture: This is a ring within the lens that can open or close to let more or less light in. A photo will be brighter if the aperture is open, and darker if the aperture is closed. The term to describe the aperture setting is F-stop, and it describe in the units of F4, F8, F11, F18, etc. There's a big range of aperture values for each lens. The odd thing to remember is F4 is more open (more light) then F18. Check out the illustration below.  Shutter Speed: Shutter speed means how long the camera is letting light in, during the photo. Typical photography uses fractions of a second to capture a still image (1/500th of a second). When there is a lot of light available (sunshine) a very short (brief) shutter speed (1/500th of sec) is required to allow the light to build up and create the image. When there is less light available (indoors), more time is required for the available light to build up in the camera to create the photo (1/5th of a second). Shutter speed or "exposure time" can be thought about like leaving a piece of tan leather out in the sun. The longer you leave it there, the more bleached it's going to become. This 'brightness' of the leather in the sun is related to a) how long the sun hits the leather, and b) how intense the sun is. The same is true for the brightness of the photo building up. In the case of light painting photography, I typically use a 30 second exposure. That's right 30 entire seconds of light entering the camera. This is why I put it on Manual mode, so I can set the shutter speed to 30 seconds. My aperture is typically F9 or F16, depending on the power of my flashlight. It'll take trial and error to figure out what aperture you'll need for the photo to be bright enough vs too bright. Why do I want 30 seconds of shutter speed? Mainly to give myself time. Time to grab my flashlight, run over to the truck, and have time to 'paint' light on the truck for a 30 second period. This brings the tripod into the picture. Have you tried taking a photo inside, with poor light and no flash? If you're holding the cameara, guess what? You're moving. In auto mode, the camera senses it's dark, so to compensate it a) opens the aperture up, and b) tries to apply a long shutter speed to collect the little light that's available (1/5th of a sec sometimes). During this 1/5th of a second, you are MOVING, even a little. This causes a blurry photo. This is why in auto mode, the flash will typically try to add light to the scene to the goal of getting a brief shutter speed to avoid a blurry photo. The tripod fixes this 'movement' problem that creates blurryness. During the 30 second exposure, the camera is totally still. And since the truck is totally still, there is no blurryness. Other tips:
 Results:       Good luck!
__________________
1972 Cheyenne Super SWB PS, PB, Tach, A/C, Tilt. Drivetrain: Built 402BB, TCI Streetfighter 700R4, 2,500 stall, Eaton posi, 3.73. Suspension/Chassis: ECE 4.5/6.5 drop, CPP nitrogen shocks, CPP front and rear sway bar, CPP cross members. Exhaust: 3" exhaust with x-pipe, Spintech 3000 mufflers, Hooker ceramic coated headers. Best 1/4 mile time: TBD. Last edited by Ekliptix; 12-09-2018 at 02:18 PM. |
|
|

|
| Bookmarks |
|
|