
|
Register or Log In To remove these advertisements. |
|
|
|
|||||||
|
|
Thread Tools | Display Modes |
 01-20-2020, 02:43 AM
|
#1 |
|
Registered User
Join Date: Feb 2018
Location: Boise, Idaho
Posts: 26
|
My King Ranch seat swap
I first saw a King Ranch seat swap on the 67-72 forums and thought it might be a good option for my truck. I was using my stock bench seat--but it was uncomfortable on long trips and placed me too high in the drivers seat, and too close to the steering wheel. After doing some research, I learned that the rear seat from a 2006 F250/F350 series King Ranch truck would work for my application. I also learned that some seat swappers have used King Ranch front bucket seats or the front bench seats from the F150 King Ranch truck. I elected to use the F250/F350 rear seat to keep my cab as roomy as possible for my growing Dad Bod.
My buddy Jerami Sharkey sourced the donor seat from salvage yard inventory where it had been stored for several years. The seat was almost complete, except for one plastic hinge covers on the drivers side. I made the purchase and loaded it up to take it home. After a thorough cleaning and several coats of leather conditioner, the new seat began to look like it might work for my truck.  IMG_0988 by James Page, on Flickr IMG_0988 by James Page, on Flickr IMG_0995 by James Page, on Flickr IMG_0995 by James Page, on Flickr IMG_1023 by James Page, on Flickr IMG_1023 by James Page, on FlickrThe next step was to remove my old seat and lay down some Hushmat. While the seat was out I decided to replace my old rubber floor mats with a carpet kit from Auto Custom Carpets. I selected a beige color carpet to go with my beige seat belts and (hopefully) complement my saddle-colored vinyl door panels, headliner, and dash pad that I planned to reuse from a Brothers Truck interior kit that had previously purchased about two years ago.  IMG_1158 by James Page, on Flickr IMG_1158 by James Page, on FlickrThe first test-fit allowed me to mark the stock King Ranch seat bracket, which I determined could be modified to work in my C/10. After cutting down the bracket legs, drilling new holes, cleaning up my cut edges, and touching up the paint on the bracket edges, I bolted down the seat using some hardware I had laying around the garage. I drove the truck for a couple of weeks to decide if I really wanted to keep the King Ranch seat in my truck. After a couple of weeks of driving I deciding that I wanted to keep the seat. I uninstalled it and installed my new carpet. After the carpet was installed, I again placed the seat in the cab to mark where I needed to cut the carpet for my permanent grade-eight hardware. The first real challenge was doing something to rebrand the King Ranch seat so that it didnt look like a Ford product in my Chevy. I elected to brand some leather with the C/10 Club Idaho logo. I paid for a brass branding iron that was CNCed with the club logo. I practiced my branding skills ruining a BUNCH of leather in the process. It turns out that branding leather is NOT easy. The results are contingent on a number of variables including the thickness of the leather, whether the leather is natural, veg-tanned, or chemical tanned, the heat of the iron, the duration that the iron is applied to the leather, the pressure used against the leather, and whether to use a wet branding process or dry-branding process.  IMG_1115 by James Page, on Flickr IMG_1115 by James Page, on Flickr IMG_1121 by James Page, on Flickr IMG_1121 by James Page, on Flickr IMG_1122 by James Page, on Flickr IMG_1122 by James Page, on Flickr IMG_1157 by James Page, on Flickr IMG_1157 by James Page, on Flickr IMG_1159 by James Page, on Flickr IMG_1159 by James Page, on Flickr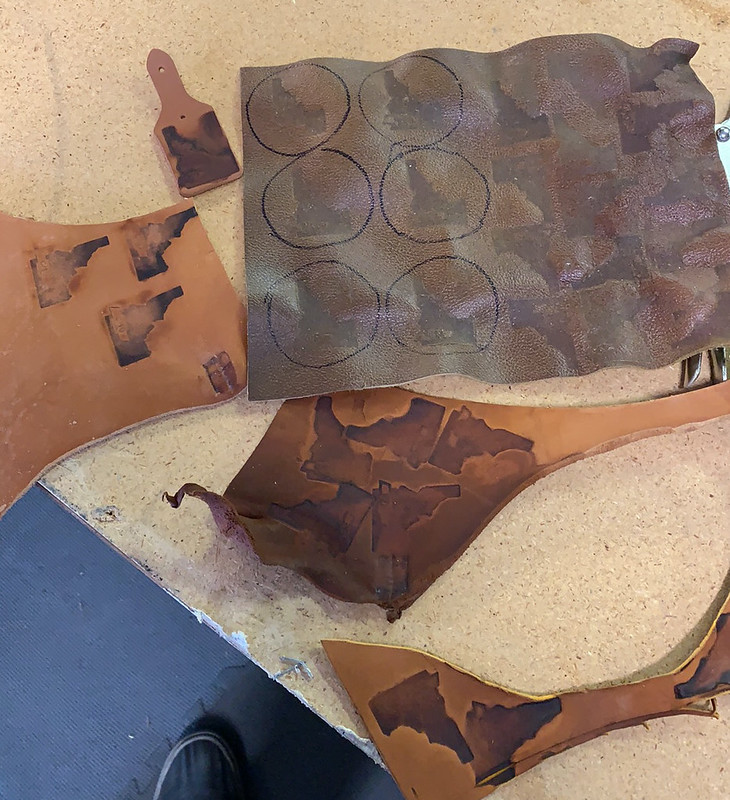 IMG_1160 by James Page, on Flickr IMG_1160 by James Page, on FlickrThe second challenge was finding leather that matched my seat. I failed. Many times. The local Tandy Leather store got a bunch of my money as I experimented with several scraps, hides, and various tanning products. Eventually, I realized I was not going to be satisfied unless the leather was an EXACT match to my existing seats. I decided to use a professional upholstery guy and asked Joe Scarlavai at @CCAutoUpholstery Custom Concepts Auto Upholstery to help me out. Joe did a headrest-delete, which not only made the seat look more period correct, but it also allowed us to repurpose the leather from the old headrests to create panels that would hide the headrest bracket holes while having enough leftover material for my branding-patches. Joe removed the leather covers and sewed on my newly branded patches, as well as his headrest delete panels. I couldnt be happier with his work.  IMG_1163 by James Page, on Flickr IMG_1163 by James Page, on FlickrFinished  IMG_1175 by James Page, on Flickr IMG_1175 by James Page, on Flickr IMG_1176 by James Page, on Flickr IMG_1176 by James Page, on Flickr IMG_1181 by James Page, on Flickr IMG_1181 by James Page, on Flickr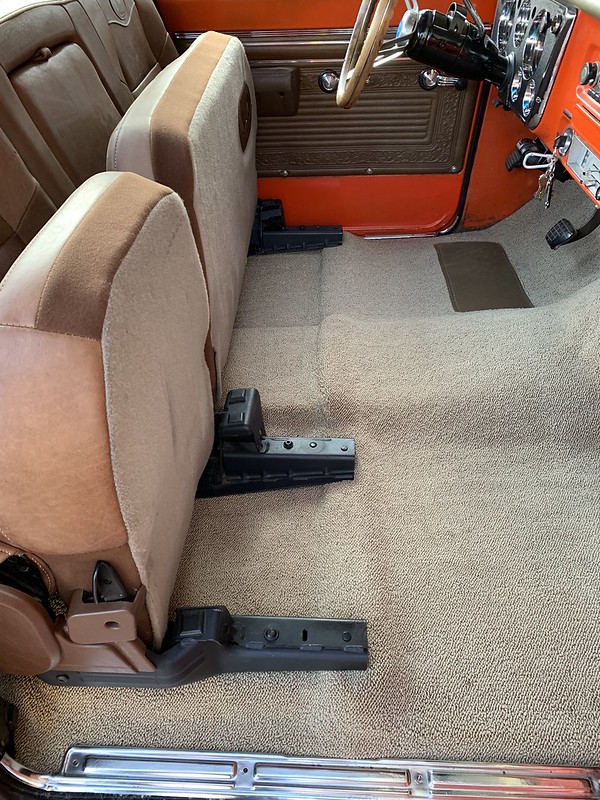 IMG_1187 by James Page, on Flickr IMG_1187 by James Page, on Flickr IMG_1189 by James Page, on Flickr IMG_1189 by James Page, on FlickrBefore and After  beforeafter by James Page, on Flickr beforeafter by James Page, on Flickr
|

|

|
| Bookmarks |
|
|


 Threaded Mode