
 |
Register or Log In To remove these advertisements. |
|
|
|
|||||||
 |
|
|
Thread Tools | Display Modes |
|
|
#1 |
|
Registered User
Join Date: May 2007
Location: Fort Worth, TX
Posts: 172
|
Weekend Progress Part II - 5.3 install - pics
Well - finally finished the motor mounts.. Ended up welding the I6 mounts to the plates I made for the 5.3. Got tired of trying to line everything up and make it a bolt on deal. The only reason I didn't weld it up to start with was because of the rubber in the mount. I was afraid of melting/damaging it - or seperating it from the mount itself. Didn't hurt it at all - I just took my time welding - and cooling it off.
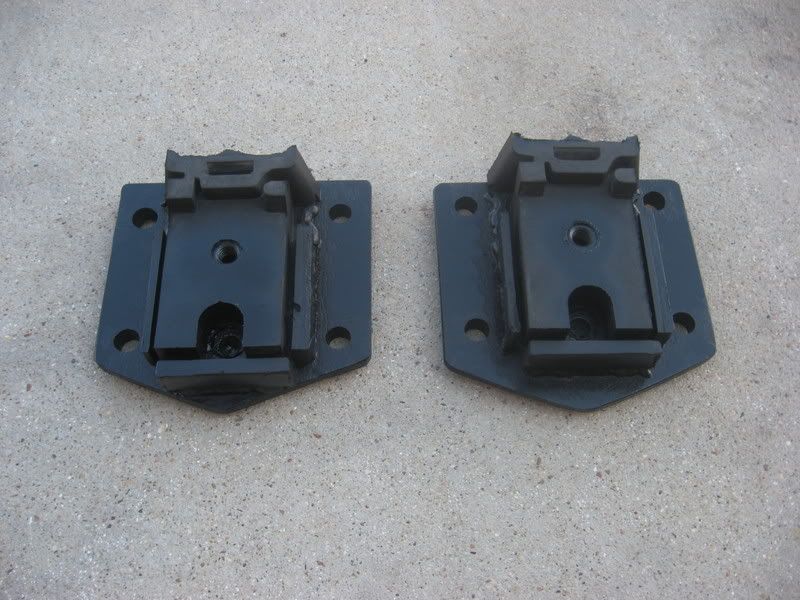 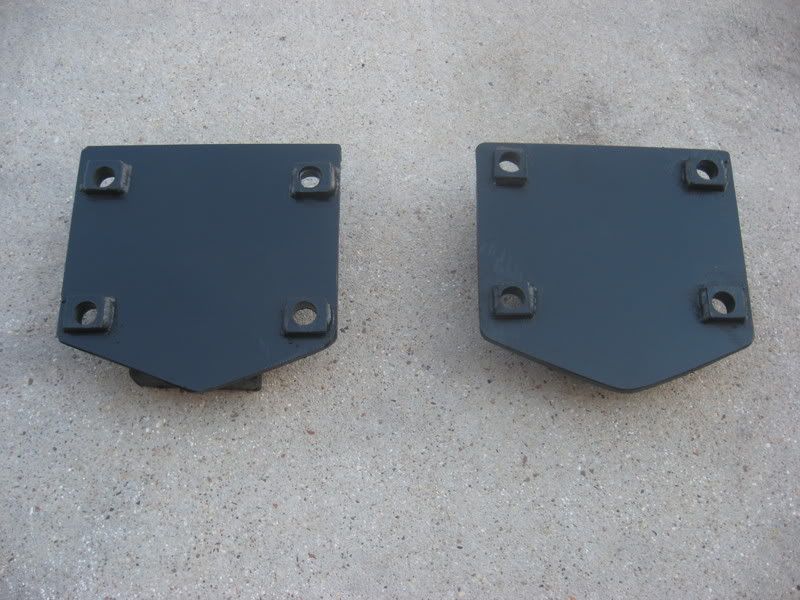 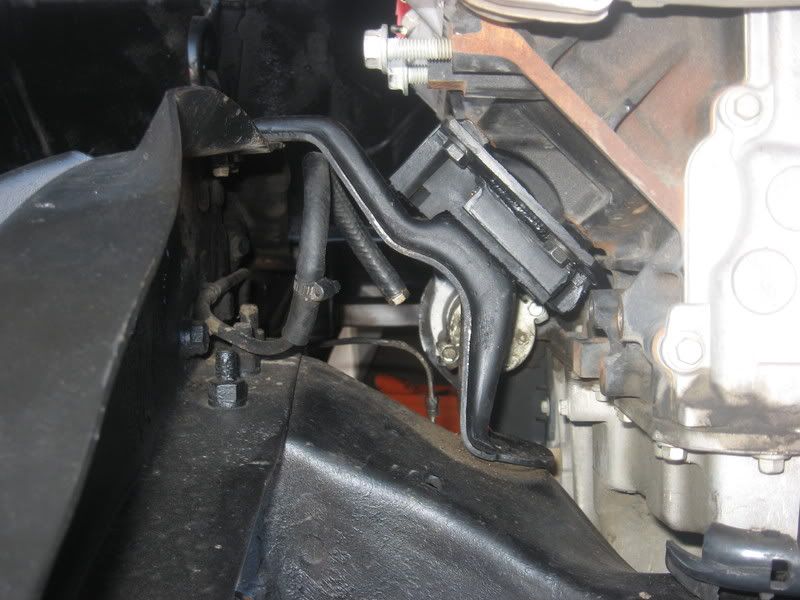 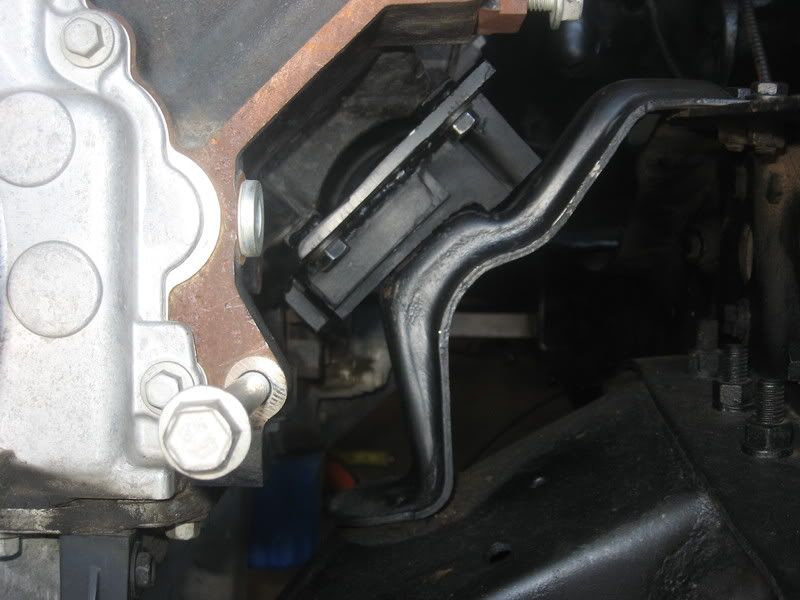 Got all the accessories back on: 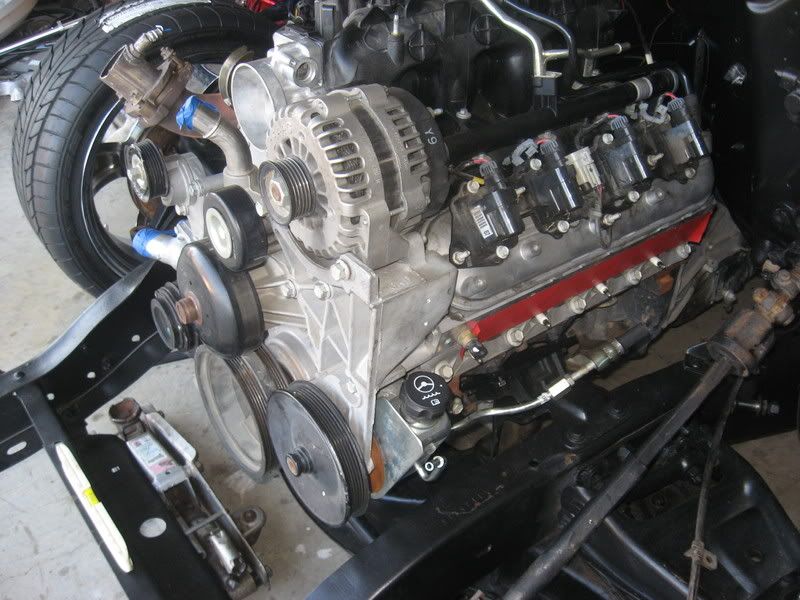 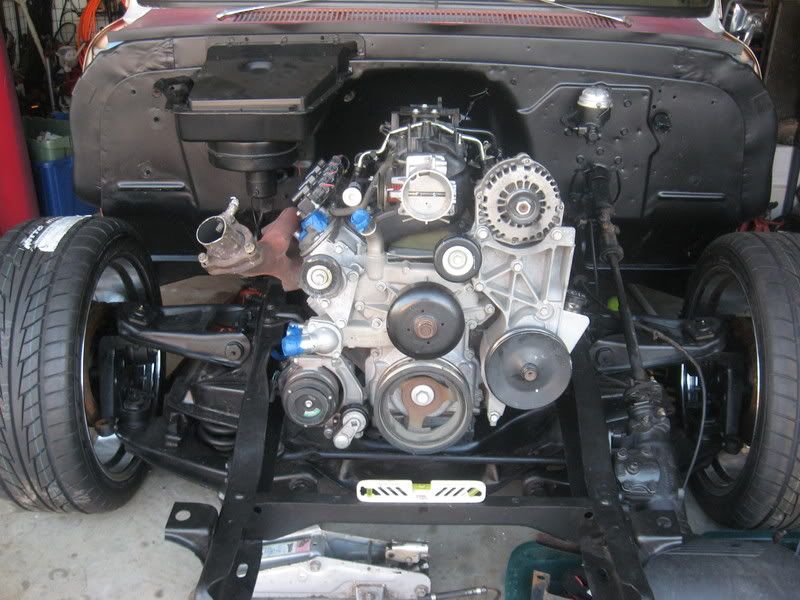 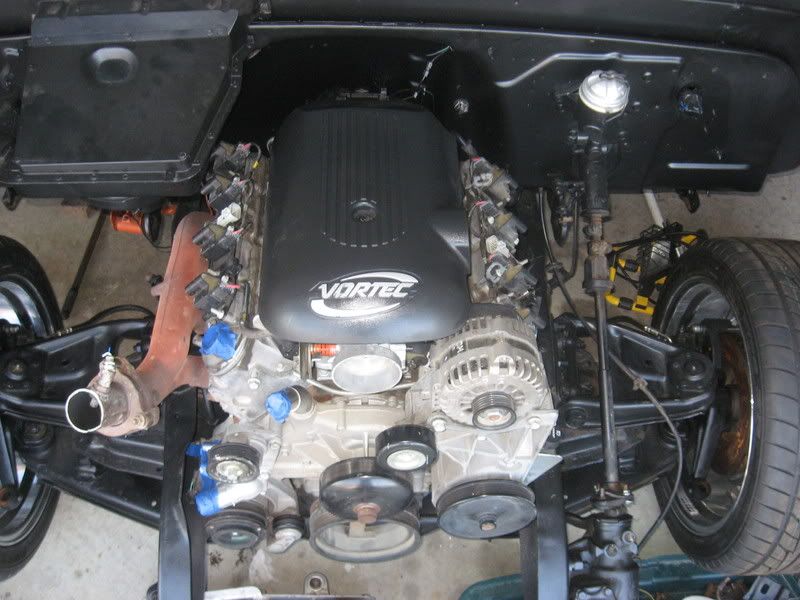 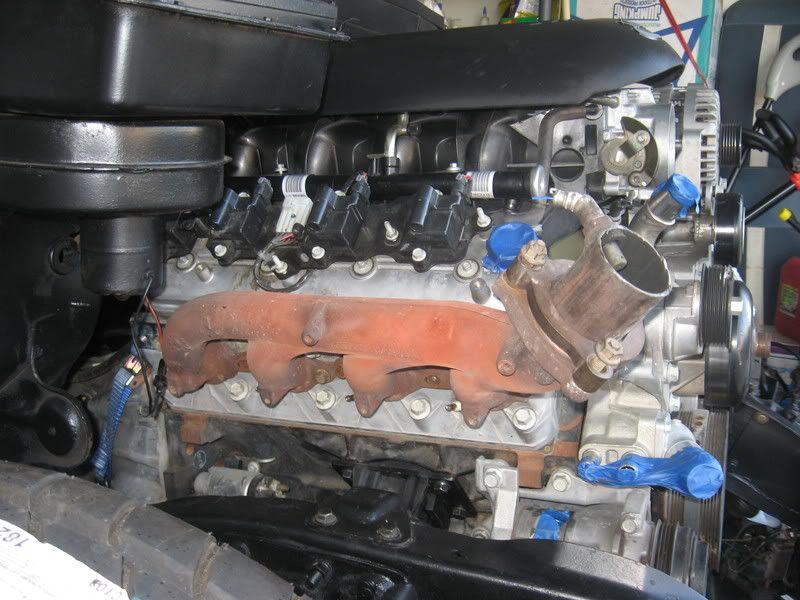 Yes - the exhaust manifold is backwards. Just thinking WAY ahead..  It does not clear the frame rail(normal), which has me worried about headers. I'd like to run Mac mid lengths(F-bod), but I'm not too sure they'll work either. If not, guess I'll be making headers too. It does not clear the frame rail(normal), which has me worried about headers. I'd like to run Mac mid lengths(F-bod), but I'm not too sure they'll work either. If not, guess I'll be making headers too.One last shot: 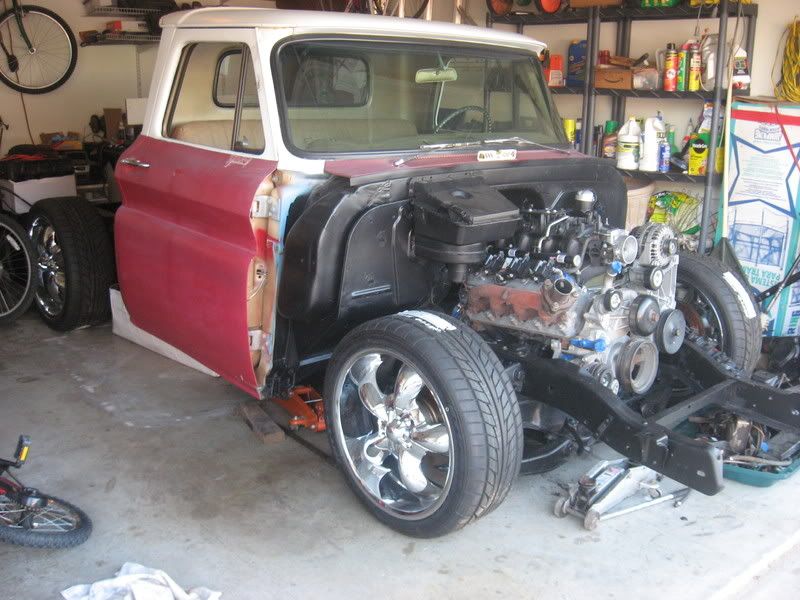
|
|
|

|
|
|
#2 |
|
*---------------*
 Join Date: Mar 2008
Location: Central Missouri
Posts: 1,791
|
Re: Weekend Progress Part II - 5.3 install - pics
I was thinking you were going turbo with the exhaust that way.
 Keep the pics coming.
__________________
2001 GMC SIERRA 1956 Chevy Panel Build Page with a Scott's Hotrods IFS 1953 Chevy trucks Project Dime Time 1968 Camaro 1968 Volksrod "NOBACK" Jared |
|
|

|
|
|
#3 |
|
One day...
 Join Date: Apr 2008
Location: Tuttle, Ok
Posts: 9,243
|
Re: Weekend Progress Part II - 5.3 install - pics
Heck ya that looks good!
|
|
|

|
|
|
#4 |
|
Senior Member
 Join Date: Nov 2007
Location: Greenville, SC
Posts: 873
|
Re: Weekend Progress Part II - 5.3 install - pics
Hey Lane,
Thanks for all the pics and info. The motor mounts look good. I have a 6 litre to go in my 65 and I was planning on using the cast iron exhaust manifolds. It looks like I have a ton of clearance with the frame rail. They might hit the motor mount but not the frame. They look very similar to yours but not exactly (mine are from a SSR). Where exactly are you hitting? Thanks, TR PS. I was going to use header wrap or something on mine. The cast manifolds are pretty hard to beat power wise. In the tests I have seen the headers can usually barely match the cast iron on LS1 / LS2.
__________________
1965 C10 SWB Fleet Two owner LS2 Swap Thread http://67-72chevytrucks.com/vboard/s...d.php?t=413880 |
|
|

|
|
|
#5 |
|
Account Suspended
Join Date: Dec 2007
Location: Queen Creek AZ
Posts: 243
|
Re: Weekend Progress Part II - 5.3 install - pics
sweet man! how is all the wiring going to be??? fairly easy or what?
|
|
|

|
|
|
#6 |
|
Registered User
Join Date: Mar 2008
Location: Waukee, Iowa
Posts: 1,608
|
Re: Weekend Progress Part II - 5.3 install - pics
I believe the stock truck manifolds splay out too far to where the frame would have to be notched to fit them. There was a post on the 67-72 forum where the guy notched his frame around the manifolds to fit the stock truck ones.
__________________
build threads: 86 Suburban 88 Jeep 6.0 swap 49 Chevy truck 54 Chevy wagon 86 Suburban lowered 4/6 54 Chevy wagon 49 Chevy/s10 mix 88 Jeep Wrangler rockcrawler |
|
|

|
|
|
#7 |
|
Registered User
Join Date: Aug 2006
Location: Florida
Posts: 1,684
|
Re: Weekend Progress Part II - 5.3 install - pics
fbody manifold will probably fit, they fit my 86.
__________________
1986 C10 SWB 6.0/6l90e Miami...Flee it like a native |
|
|

|
|
|
#8 | |
|
Registered User
Join Date: May 2007
Location: Fort Worth, TX
Posts: 172
|
Re: Weekend Progress Part II - 5.3 install - pics
Quote:
Header wrap should do the trick for heat. |
|
|
|

|
|
|
#9 | |
|
Registered User
Join Date: May 2007
Location: Fort Worth, TX
Posts: 172
|
Re: Weekend Progress Part II - 5.3 install - pics
Quote:
I'll post some pics on that as well when I get to that bridge. Last edited by Lane; 06-24-2008 at 12:42 AM. |
|
|
|

|
|
|
#10 | |
|
Registered User
Join Date: May 2007
Location: Fort Worth, TX
Posts: 172
|
Re: Weekend Progress Part II - 5.3 install - pics
Quote:
An F-bod mandifold may work. I've heard of guys using long-tubes with this setup no problem. But they had after market mounts - or home-made mounts. |
|
|
|

|
|
|
#11 |
|
Registered User
Join Date: Apr 2008
Location: Boomer Sooner
Posts: 74
|
Re: Weekend Progress Part II - 5.3 install - pics
DAD BURN IT
This is what I was afraid of, I had my heart and soul set on putting a 5.3 in my truck and the way it looks your going to have to do some wild bending or notching your frame or something. Please post anything you figure out on this and if there is anybody out there that has already accomplished this please let us know something.  Thanks BB |
|
|

|
|
|
#12 |
|
Registered User
Join Date: Dec 2007
Location: Kimberley, BC, Canada
Posts: 799
|
Re: Weekend Progress Part II - 5.3 install - pics
Looks great, Lane! Looking at your passenger side motor mount pic, I see your "secret" for increased fuel economy!

__________________
Greg 64 GMC Suburban - 283, NV3500, 14 bolt 77 C10 swb - 292, SM465, 12 bolt |
|
|

|
|
|
#13 |
|
Registered User
Join Date: Dec 2007
Location: Palmer, Alaska
Posts: 13,821
|
Re: Weekend Progress Part II - 5.3 install - pics
Billy, there are a few trucks on here with the new gen small blocks, it can be done.
i believe super73 has one in his drag truck, might pm him and see if he will give you some input.
__________________
 CHEVY ONLY CHEVY ONLY
|
|
|

|
|
|
#14 |
|
Registered User
Join Date: May 2007
Location: Fort Worth, TX
Posts: 172
|
Re: Weekend Progress Part II - 5.3 install - pics
Here's one - a '68, but the frame is the same right?
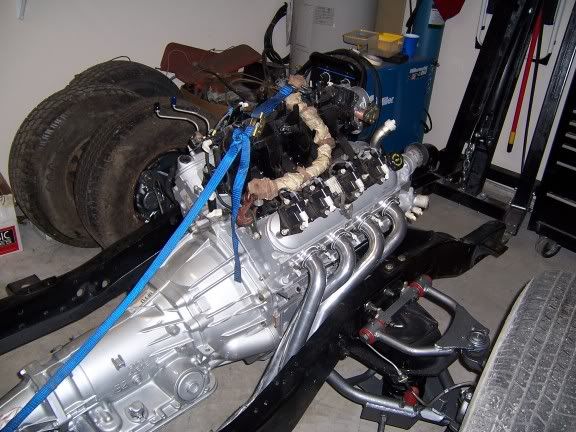 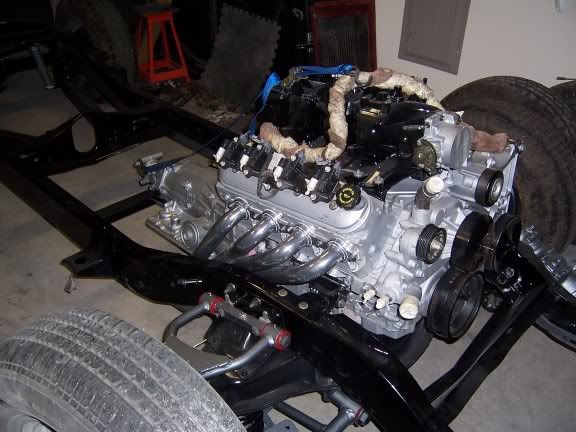 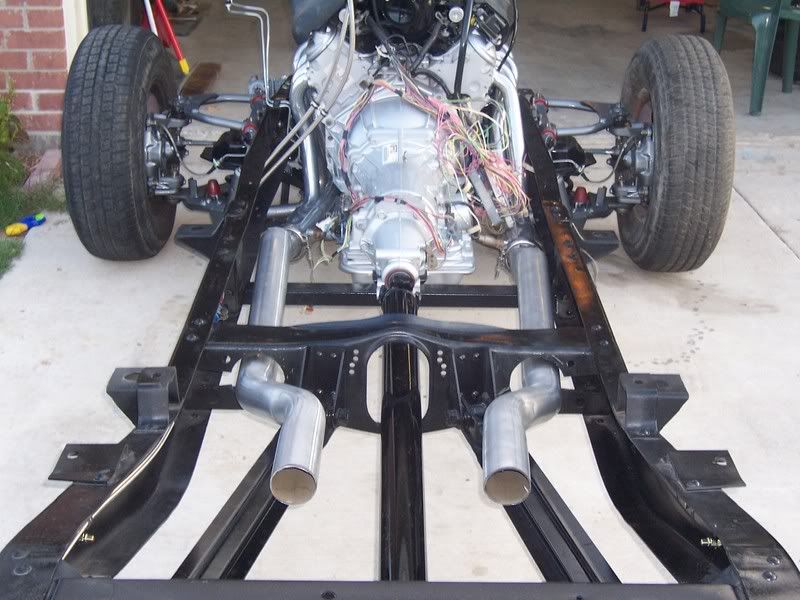 F-bod LT's - it's tight, very tight on the passenger side, but it's in there. His motor may be a little farther back than mine. billy - it my take some tweaking, but overall it looks like these motors were made for our trucks! 
Last edited by Lane; 06-23-2008 at 11:28 PM. |
|
|

|
|
|
#15 |
|
Account Suspended
Join Date: Dec 2007
Location: Queen Creek AZ
Posts: 243
|
Re: Weekend Progress Part II - 5.3 install - pics
can't wait to see it all done man!
|
|
|

|
|
|
#16 | |
|
Registered User
Join Date: Jul 2006
Location: Springtucky, Oregon
Posts: 265
|
Re: Weekend Progress Part II - 5.3 install - pics
Whats the ground clearance like with those headers?
Quote:
|
|
|
|

|
|
|
#17 |
|
Registered User
Join Date: Apr 2008
Location: Boomer Sooner
Posts: 74
|
Re: Weekend Progress Part II - 5.3 install - pics
Thanks for the great pictures, they look great. What size exhaust is that and what do the headers come from. I don't know if a 68 frame is the same width as a 66 (is it). Oh and buy the way what is F-bod LT's.
Thanks again BB |
|
|

|
|
|
#18 |
|
Hey Y'all!!
Join Date: Dec 2007
Location: Bay Minette, Alabama
Posts: 1,755
|
Re: Weekend Progress Part II - 5.3 install - pics
Not positive on the frame widths but I believe that they are very close if not the same. As for the meaning of F-Bod LTs, it is short for F-Body(Camaro/TransAm) Long Tube headers.
|
|
|

|
|
|
#19 |
|
Registered User
Join Date: Apr 2008
Location: Boomer Sooner
Posts: 74
|
Re: Weekend Progress Part II - 5.3 install - pics
Thanks alot.
BB |
|
|

|
|
|
#20 |
|
Registered User
Join Date: May 2007
Location: Fort Worth, TX
Posts: 172
|
Re: Weekend Progress Part II - 5.3 install - pics
Here's a side pic:
This is not my truck btw 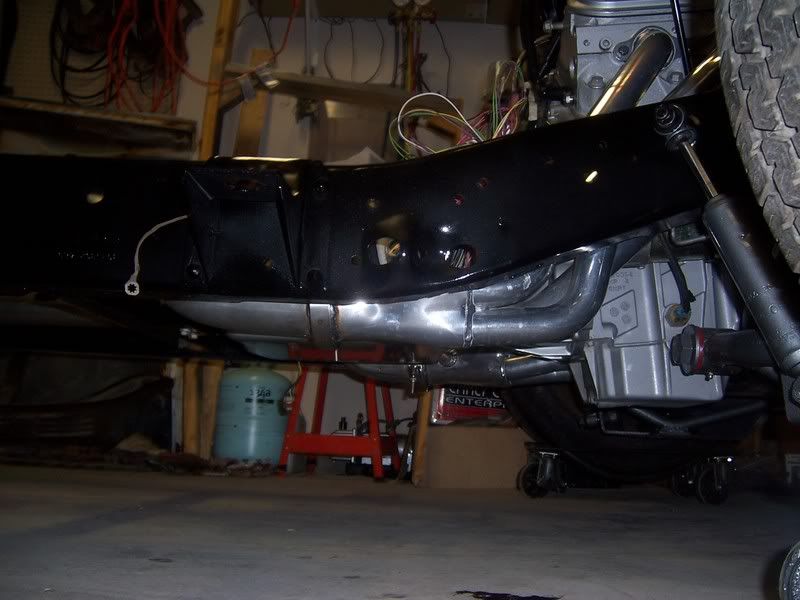
|
|
|

|
|
|
#21 |
|
Registered User
Join Date: May 2007
Location: Fort Worth, TX
Posts: 172
|
Re: Weekend Progress Part II - 5.3 install - pics
You can tell in this pic that he's going to have issues on the passenger side. Looks like the header is resting on the rail.

|
|
|

|
|
|
#22 |
|
Junior Member
Join Date: May 2006
Location: Peninsula, Oh
Posts: 197
|
Re: Weekend Progress Part II - 5.3 install - pics
Those are Pasesetter headers. Last summer they were 399 and are worth every penny. I used those for my 5.3 swap. The end of the collector of the d/s has to be angle cut to clear the frame rail, but not too bad. Ground clearance is excellent. My exhaust guy went under my stock tranny crossmember. they fit good, even with my column shift (4l60e of course)
I bought a set of mac mid length but if memory serves me correct I was going to notch the top of the d/s frame. the bends coming off the exhaust ports was not tight enough. The pacesetters fit way better. It doesn’t look like a flex fuel motor, but looks like you don't have a separate return line off of your fuel rail. The non returnless is way easier to run because only one line is needed to run all the way to the front. I used aluminum line and some high pressure fuel line (will get the brand if you want, its way cheaper and better then the efi fuel line from napa) and used the factory fittings. the russel fuel line adapters are prone to failure and are expensive. Also I like how you used the I6 engine stands. I ended up spending 40$ on the normal adapters, but I already had the v8 stands. I think it ended up moving the motor back further because I had the same coils you have on your engine but had to swap for the round ones because the square ones wouldn’t fit on the p/s. Let me know if you have any questions and I will try to get some pictures too. Graham
__________________
A good friend will come bail you out of jail, but a true friend will be sitting next to you saying, "That was ****ing awesome." |
|
|

|
|
|
#23 | |
|
Registered User
Join Date: May 2007
Location: Fort Worth, TX
Posts: 172
|
Re: Weekend Progress Part II - 5.3 install - pics
Quote:
Made these a few years ago for a '67 Chevy II swap: 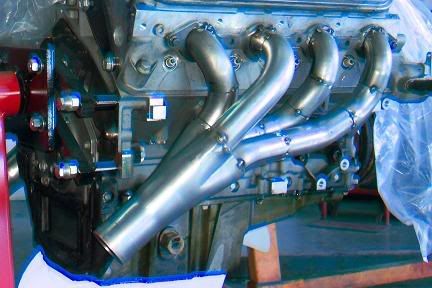 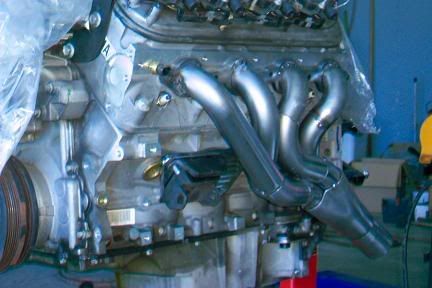 I hadn't even paid attention to the single fuel line - which you're right, that's all it's got! I get kind of focused on one thing, then the next..  The fuel system is a few weeks away, after I get the rear gas tank. I may PM you for the part # for the line you used. The fuel system is a few weeks away, after I get the rear gas tank. I may PM you for the part # for the line you used.
|
|
|
|

|
|
|
#24 |
|
Hey Y'all!!
Join Date: Dec 2007
Location: Bay Minette, Alabama
Posts: 1,755
|
Re: Weekend Progress Part II - 5.3 install - pics
Any updates on your progress?
|
|
|

|
|
|
#25 | |
|
Registered User
Join Date: Feb 2008
Location: Sidney,b.c.
Posts: 4,425
|
Re: Weekend Progress Part II - 5.3 install - pics
Quote:
ron |
|
|
|

|
 |
| Bookmarks |
| Thread Tools | |
| Display Modes | |
|
|