
|
 07-03-2010, 08:41 AM
|
#1 |
|
Registered User
Join Date: Jan 2010
Location: East Central Illinois
Posts: 511
|
New Clutch Time
Well the noise that would occasionally come and go when the clutch engaged finally came and went this past month in the C-30. As expected, the clutch left with it.
 Been putting it off when the weather was hot but now with mild temperatures and not wanting to pay someone to do what I know/think I can...yes, today is clutch day as I sip my coffee for confidence this morning. Yes, I recall the last time I did a clutch job was over 30 years ago on a '66' 3/4 Ford in my garage one week-end, so this is not something I "know" how to do. So if this thread becomes longer than this you'll know why! Yet like a mechanic friend reminded me; I have the tools, I have the shop, I have his transmission jack now and even he told me why should I pay him to do what is basically a nut & bolt job. I think he smiled as I drove off with that jack...he was going fishing this week-end.  So I have read and reread the Haynes manual, (only one I have at this point), searched this site and more on this topic and with a brand new creeper purchased yesterday,(finally had a reason to buy one) and the dusty transmission jack on loan ( there is probably a reason it is dusty that I don't know yet) this is my 'holiday' project. Any input beyond this is welcome. I just don't want to pay the $400 plus in labor to do what I should be capable of doing if I just follow directions! Damn, I knew there was a catch!  Speaking of directions, besides the manual...here is the outline I am following thanks to "sixfour 4x4" in another post on this topic: "a clutch is a pretty big job...you haven't done this before? you'll really want to invest in an attachment for your floorjack to hold your tranny. 2wd or 4? a 4wd transfercase adds a lot of weight. you're going to run into snags. i see lots of swear words in your future. however if you want a step by step, here goes... remove transmission tunnel cover. remove bolts top the sm420 and pry off can shifter and trans top (stuff a towel around the gears as to not get them dirty!) support motor and trans aside from crossmember remove exhaust or anything else that could be in the way disconnect speedo and e-brake disconnect driveshafts (tape up your barrings so the needles don't fall out) disconnect clutch mechanism (whether hydro or mechanical) remove bolts from crossmember to tranny remove crossmember (this aids in aiming the outputshaft back into the pilot barring) support trans with floor jack remove bolts from bellhousing to engine block pull trans down and back remove bolts from clutch pressure plate remove clutch from flywheel remove flywheel ********TAKE FLYWHEEL TO MACHINE SHOP!!!!!!!!!!***********###### also consider flipping your ring gear or replacing it...(theres a trick with an oven lol) remove pilot bearing by any means possible(i have a trick with grease and a plug to hydrolically displace the barring hit me up when you get to this point) bolt everything back down now the fun part...you'll have to manuever the trans shaft back into the clutch and into the pilot barring. you can use the output to turn back and forth to work into the clutch. it's kind of like a space shuttle dock and it has to be just right.... bolt it all back up.... " http://67-72chevytrucks.com/vboard/s...ch#post3955355 Feel free to add to this. If ever there is a need for a sticky thread for this topic it is to have one for those like me venturing to where I have not gone before!  Have a safe holiday! Mark  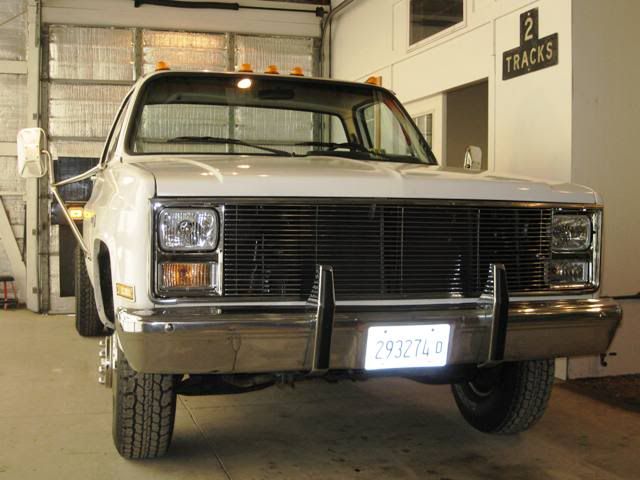
__________________
1985 Chevy C-30 Hydraulic Dump Bed 2001 Saturn SC2 (go to work car) 2010 PT Cruiser (wife's car) "Reality is just a hallucination brought on by lack of alcohol."
|

|

|
|
07-03-2010, 04:06 PM
|
#2 |
|
Registered User
Join Date: Jan 2010
Location: East Central Illinois
Posts: 511
|
Re: New Clutch Time
Well I'm at that part of the project that suggests"remove bolts from crossmember to tranny"...sounds simple until one realizes these bolts are 25 years old!
Up until this part of the "how-to list" the earlier part was easy. Now I see that cross-member is why some might pull the motor as the other option. Oh well, not in a hurry and taking a break after some torch time on 2 nuts/bolts that just wouldn't cooperate...notice the ratchet with a breaker bar, the air tool...and then there is the torch. The torch always wins!  Once past this part the rest should be easy compared to this. Jacks in place, just slowed down on this cross member. 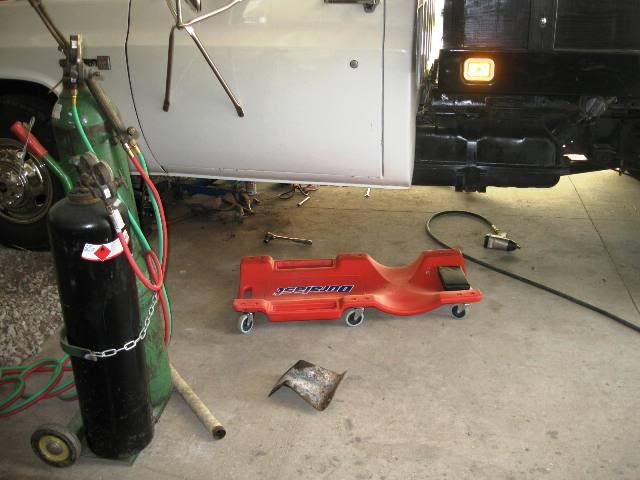 Mark
__________________
1985 Chevy C-30 Hydraulic Dump Bed 2001 Saturn SC2 (go to work car) 2010 PT Cruiser (wife's car) "Reality is just a hallucination brought on by lack of alcohol."
|
|
|
|
|
07-03-2010, 04:10 PM
|
#3 |
|
Senior Member
Join Date: Apr 2000
Location: Delta,Pa
Posts: 14,948
|
Re: New Clutch Time
Your transmission is heavy. very heavy. dont expect to grab ahold of it and throw it around. Let the jack do the work. take your time and move slow. Its not a terribly hard job. Its fairly straight forward. Once you get it torn down and back together. You will kick yourself for considering to pay someone else to do it. Just make sure when you bolt the pressure plate down that you use the clutch alignment tool or you will never get the trans back on
__________________
Owner of North Point Car Care in Dundalk Md. We specialize in custom exhaust on both modern and classic vehicles. We are a full service auto shop from classics to modern vehicles. Feel free to contact me with questions. I will give a 10% discount to any board member. |
|
|
|
|
07-03-2010, 04:29 PM
|
#4 |
|
Registered User
Join Date: Jun 2010
Location: Dahlonega, ga
Posts: 9
|
Re: New Clutch Time
probably too late, but did you consider replacing rear main seal (engine) and front seal (trans)? I always recommend it. Nothing is worse than having a leak a month after having everything out, just to remove EVERYTHING to fix the leak. Had a friend didn't change out rear main, then it started leaking 3 weeks later. Turned out OK though, we pulled the 351M, got 400 crank kit, bored the block, 390 pistons, had heads worked.... Too bad, that Mazda 5 speed never had a chance... Back to subject, sorry, just thought I'd give my $0.02 on the 'other' stuff around there.
Good luck and GOD BLESS
__________________
I know, its a GM site. I have to remember half the roads in this country, I'm lucky to remember 1 user name/password. If my responses seem delayed, I'm home about 150 hours weekly, please be patient with me. 87 R30 CC dually 454/465/dana70-4.11 "Dudley" 91 S10 2800/5spd "Lil Red" 78 Big 10 350HO/TH375/3.73 "Old Red' - Sold for Taxes  77 GMC Sierra Classic 350/350/3.08 "Old Blu" - Father-in-Law's hot rod - 'runs like a 305-it WAS a 305' - solved that problem. 92 Honda Accord - x3 - just like 30mpg for some reason |
|
|
|
|
07-03-2010, 09:51 PM
|
#5 |
|
Registered User
Join Date: Jan 2010
Location: East Central Illinois
Posts: 511
|
Re: New Clutch Time
Appreciate the advice on lining up the pressure plate and the seals...rear & front mains were done a few months ago, but this has me looking all around under there. That new creeper is a must have for this old man!
Anyway, 24 bolts later the cross-member is removed. My luck included the use of a breaker bar on each and every one except the two I torched. Even a PB Blaster soaking didn't help loosen those bolts! The shifter is also off, after searching here for better guidance than the manual, so that is done. http://67-72chevytrucks.com/vboard/s...ission+shifter Yes, I'll admit that was a workout getting those bolts off so no evening work on this project. Safety is first and tomorrow will start fresh and tie down the transmission to the jack and start that removal. Question: Can I just unbolt the bell-housing and pull both this and the transmission as one? Or better to pull the transmission first? Still have to disconnect the hydraulics from the bell-housing but except for that, it is ready to unbolt and come out. Heavy? This sm465 even looks heavy! Hope to finish getting it all apart tomorrow in between church and other 4th of July goings on...then get the parts. Flywheel at least will get turned or maybe replaced. Will know the parts list when its all on the floor. (if this project gets done a week from now I'll be happy...pondering what else I can do underneath with the transmission out of the way.) I do see the need for a torque wrench too. Anyone have the specs for flywheel & pressure plate? As always thanks to this forum for one great library of posts from others either asking the same questions or sharing the experience that I've been using to search from. (that's how the shifter finally came off tonight! The manual was not as specific.)  Anyway here is where it sits for the night. Transmission jack and a floor jack in the back with a block of wood under the oil pan to help carry the weight. Maybe after this thread is done it will help someone down the road like me who really didn't/still doesn't have a clue to what I'm doing except following the directions from the manual and this forum and turning the nuts and bolts to get it done. Mark
__________________
1985 Chevy C-30 Hydraulic Dump Bed 2001 Saturn SC2 (go to work car) 2010 PT Cruiser (wife's car) "Reality is just a hallucination brought on by lack of alcohol."
Last edited by RuralRoute C-30; 07-03-2010 at 09:56 PM. |
|
|
|
|
07-05-2010, 09:25 AM
|
#6 |
|
Registered User
Join Date: Jan 2010
Location: East Central Illinois
Posts: 511
|
Re: New Clutch Time
Had a few hours to work on this yesterday. Finally it's apart. Now the problems and the need for advice with the problems! (never could be simple...) Hope the pics tell someone who has been here before a story I need to know.
Even without experience in this, the obvious to me was after the transmission came out. The missing tab on the clutchfork that holds the throwout bearing is broken. I am "guessing" this would cause the throwout bearing to torque sideways, so to speak, and not apply even pressure on the pressure plate. New clutchfork on the list of parts: 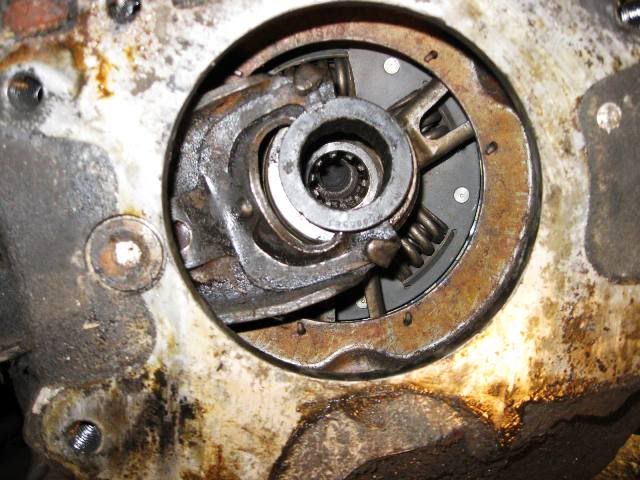 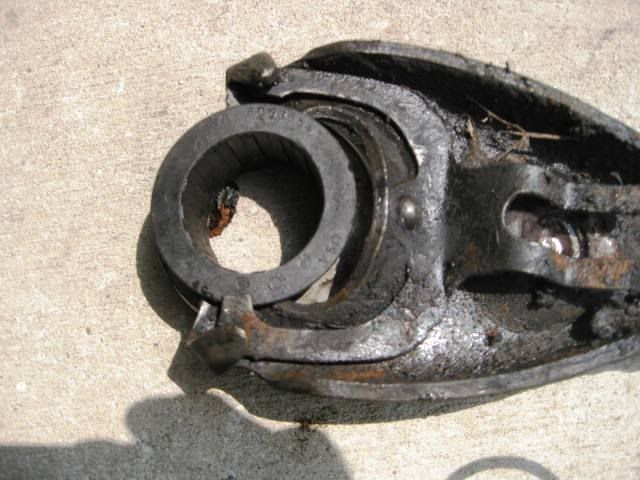 This pic of the pressure plate shows it appears was making contact unevenly: 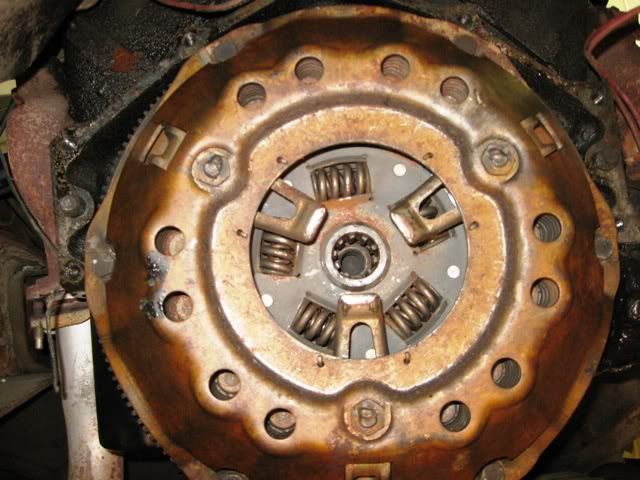 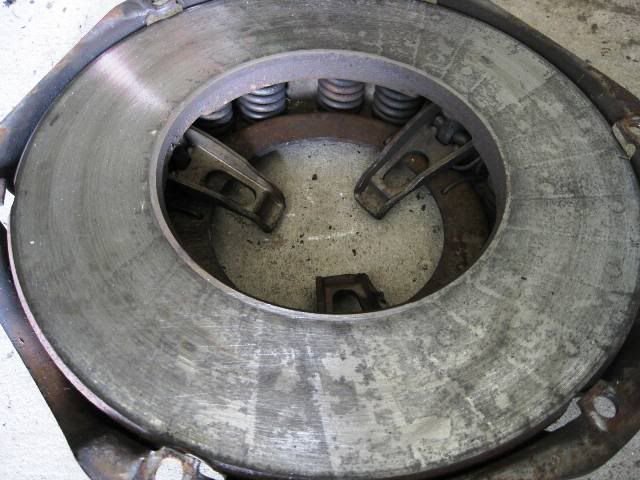 Now there is a groove on what I'd call the "clutch drive shaft" of the transmission from this. Is this something I can smooth out, ignore, or what are the options? 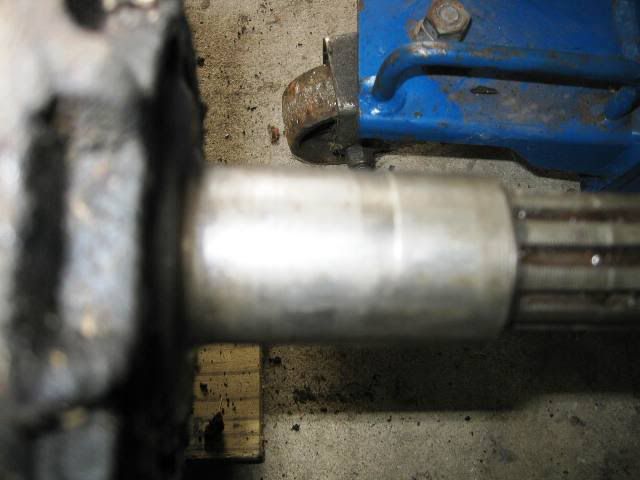 Taking the flywheel to get turned today hopefully (still on holiday): 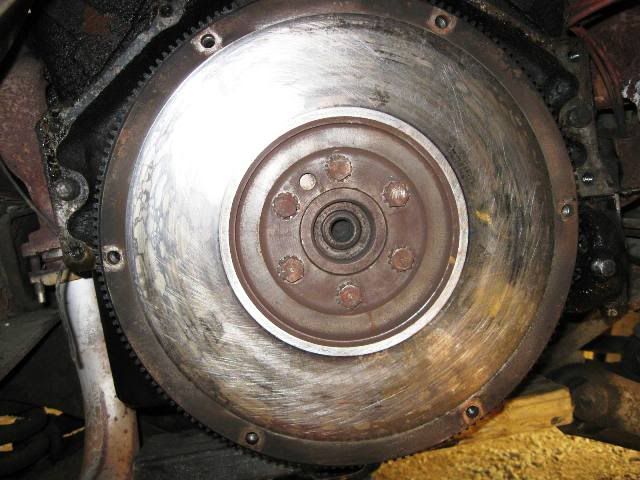 Other than this and that and the other at least it's apart. Definitely need some oven cleaner,elbow grease and power washing for the bell-housing including some clean-up on the transmission.  So with all this apart my main concern is that groove in the transmission shaft. Still need to get the pilot bushing out and replaced as well since I am surgically this deep into this clutch job. The actual clutch plate looks good, but at this point I am replacing the clutch since I am in this deep. (I have no burning desire to duplicate a return trip to taking that transmission and crossmember assembly out again if possible) What a mess though! Glad I replaced the front and rear seals a few months ago, but now I see where all the oil went when it leaked! Also I notice there are two types of clutch pressure plates; a diaphragm vs borg/beck which is what I have. Are these options? Positive vs negative? Or should I just replace what I have with what I got? 12" clutch. http://67-72chevytrucks.com/vboard/s...d.php?t=408662 Just grateful today is a designated holiday...this old body is sore from disassembly! Just glad I bought that creeper! Anyway, today is getting dirty cleaning that bell-housing, removing a pilot bushing,(tips are appreciated!) and parts running. Appreciate any advice at this point. And yes, just to confirm what everyone here has said, that SM465 transmission is dangerously heavy! I'm a fairly strong guy, but that's one object I have learned to respect. Working safe. Mark
__________________
1985 Chevy C-30 Hydraulic Dump Bed 2001 Saturn SC2 (go to work car) 2010 PT Cruiser (wife's car) "Reality is just a hallucination brought on by lack of alcohol."
Last edited by RuralRoute C-30; 07-05-2010 at 09:58 AM. |
|
|
|
|
07-07-2010, 06:57 PM
|
#7 |
|
Registered User
Join Date: Jan 2010
Location: East Central Illinois
Posts: 511
|
Re: New Clutch Time
Just been gathering the parts for this project this week during this 90/100 degree heat wave. Clutch fork to arrive tomorrow. Went ahead and bought the clutch kit over the counter yesterday and picked up the flywheel from a local machine shop on the way home from work today. Definite improvement!
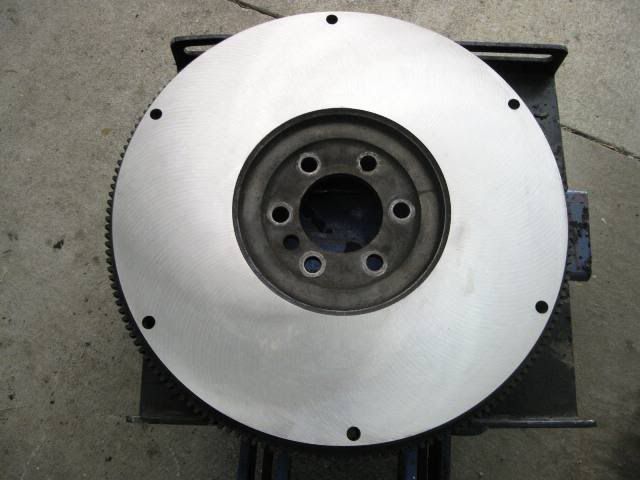 Figure by Friday evening and Saturday the temps will cool down and I'll get this back together. Been working on cleaning the bell housing, transmission and crossmember parts. Figure a quick paint job on these parts before reinstall should make leaks in the future be easier to find. Any tricks to that pilot bearing? Still need to replace it. Was thinking about threading a bolt into it...any suggestions? Just been too darn hot to "play" in the machine shed but gathering the parts. Mark
__________________
1985 Chevy C-30 Hydraulic Dump Bed 2001 Saturn SC2 (go to work car) 2010 PT Cruiser (wife's car) "Reality is just a hallucination brought on by lack of alcohol."
|
|
|
|
|
07-08-2010, 12:11 AM
|
#8 |
|
Registered User
Join Date: Mar 2008
Location: Salt Lake City UT
Posts: 441
|
Re: New Clutch Time
I've had pilot bearings come out with finger pressure, but usually that's not the case. The old-timer who first instructed me in clutch replacement showed how to remove a stubborn pilot bearing. It's already been alluded to in above posts, but here are the details.
-Get a deep socket that will just fit into the ID of the pilot bearing along with a ball peen and a 6" socket extension.,,,WARNING: do not use a shallow socket!! -Fill the opening in the back of the crank (ID of pilot bearing) with grease. Pack it in tightly to prevent air bubbles. -Reverse the deep socket and install the extension. Insert the socket into the grease, hold straight/steady and smack the extension with hammer. Might take a couple of whacks. -As grease does not compress, the pilot bearing is forced out of the crank. A roller pilot bearing should be available for your engine, I believe the one fitting a 6.5 diesel engine will work. This is preferable, but if you're pressed for time just get the bronze bushing type....they're a bit less money. Regarding your input shaft, as the photo shows wear, it's a good idea to replace it ...otherwise the pilot bearing wears prematurely and the trans will fail from the slop considering the input shaft must be properly supported. Here's a link for the input shaft http://www.novak-adapt.com/catalog/sm465_parts.htm Here's a link for the rebuild. http://www.4wheeloffroad.com/brandpa...ild/index.html Prior to the install, closely examine the hydraulic slave cylinder for leaks...might consider replacing it with a new one at this time. Here's a tip for easier replacement of the trans. -Once you have the flywheel, clutch disc and pressure plate properly torqued and aligned (using a clutch alignment tool), install the bell housing. -Get two bolts matching the trans to bell housing one but about 2" longer. Grind/cut the bolt heads off and round off the shaft creating a stud. -Hand install these studs into the upper bolt holes of the bell housing. -Now you'll have two guides to assist you in aligning the trans input shaft through the clutch disc and help take the weight off your hands as the studs help support the trans. Don't forget to remove the studs prior to bolting the trans into place. Good luck on the project. |
|
|
|
|
07-08-2010, 12:30 AM
|
#9 |
|
Registered User
Join Date: May 2010
Location: Lewis County, WA
Posts: 1,523
|
Re: New Clutch Time
My 2 cents?
Stick with the bronze pilot bushing. Less to go wrong than a roller pilot bearing. |
|
|
|
|
07-08-2010, 02:13 AM
|
#10 |
|
Gettin It One Pice At A Time
Join Date: Oct 2004
Location: everett, washington
Posts: 2,688
|
Re: New Clutch Time
What I have been taught to get pilot bearing out is use a tap. Use two kinds, a bottoming one and a starting *one with point*. make sure they are the size of hole in bearing. And take one withe point and thread it down till it bottoms out. Then get the other one and back it out of the hole. pretty easy.
__________________
RIP ELJAY   Work In Progress 1979 GMC C1500 Trailering Special. Work In Progress 1979 GMC C1500 Trailering Special. Getting the truck done, one piece at a time. You can tell a lot about a fellows character by his way of eating jellybeans.Ronald Reagan I dont know the key to success but I know the key to failure is trying to please everybody. Bill Cosby |
|
|
|
|
07-08-2010, 06:31 PM
|
#11 |
|
Registered User
Join Date: Jan 2010
Location: East Central Illinois
Posts: 511
|
Re: New Clutch Time
Thanks Dan for that link to Novak.http://www.novak-adapt.com/catalog/sm465_parts.htm Called and ordered the front bearing retainer with seal today to replace the grooved one. For $22.46 it is worth the wait to fix this right.
Had some local input that suggested the emery cloth would have smoothed it out but, and when I heard that word of hesitation I ordered the part...after this, I really don't want to muscle this transmission again. Part should arrive around Tuesday. This just gives me more time to clean things up as I should before reassembly. Clutch fork arrived today. 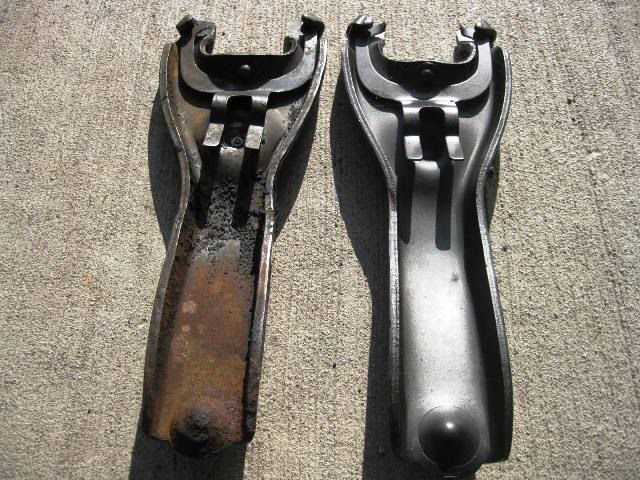 Now once this transmission part arrives I can complete this project. Again, thanks for that link to Novak. Great to talk to and easy to order from. Just turning nuts and bolts and following directions. Mark
__________________
1985 Chevy C-30 Hydraulic Dump Bed 2001 Saturn SC2 (go to work car) 2010 PT Cruiser (wife's car) "Reality is just a hallucination brought on by lack of alcohol."
Last edited by RuralRoute C-30; 07-08-2010 at 06:57 PM. |
|
|
|
|
07-10-2010, 10:05 PM
|
#12 |
|
Registered User
Join Date: Jan 2010
Location: East Central Illinois
Posts: 511
|
Re: New Clutch Time
Progress continues while I wait for that front retainer bearing for the transmission to arrive in the mail.
Started the clean-up of these two items the other night. Here is the final product. Considering the inside of the bellhousing was literally black from a former rear oil seal leak and the transmission with 25 years of grime on it...glad this part of this project is over. Finally clean! 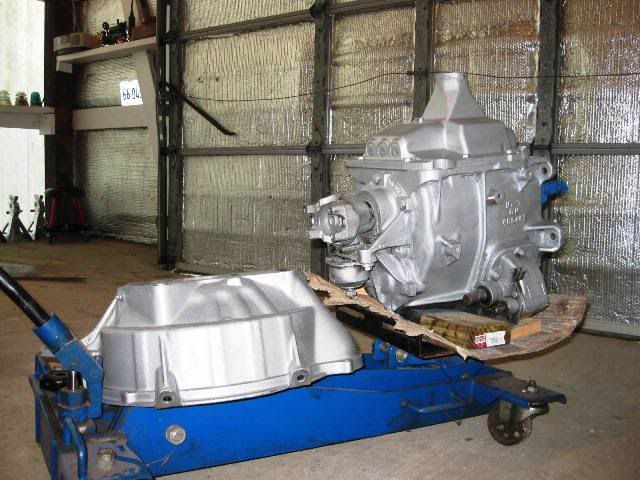 Tomorrow hope to spend time "cleaning" underneath and install the new pilot bearing. Seems like the right thing to do having it all torn apart at this time. And just a reminder, this transmission fell once off the jack today. Like everyone has mentioned, this thing is heavy! Can't say it enough to handle this one with care. It wasn't easy getting it back on that jack. Mark
__________________
1985 Chevy C-30 Hydraulic Dump Bed 2001 Saturn SC2 (go to work car) 2010 PT Cruiser (wife's car) "Reality is just a hallucination brought on by lack of alcohol."
Last edited by RuralRoute C-30; 07-10-2010 at 10:12 PM. |
|
|
|
|
07-20-2010, 11:27 PM
|
#13 |
|
Registered User
Join Date: Jan 2010
Location: East Central Illinois
Posts: 511
|
Re: New Clutch Time
Just an update of this project. Following Saturday's unsuccessful search for flywheel bolts, which now should have them arrive tomorrow, USPS allowing, thought I'd toss a few pics of where this sits tonight.
Also, about that leaky rear seal I had on the transmission: Decided to take it to a local 'old school' transmission shop as I didn't have a socket big enough to get that yoke off. I also let them install the front bearing retainer that arrived from Novak last week. They only charged me $41 and it was worth it to me! A cheap "refresh" to the transmission! Saturday and Sunday was the dirtiest day of scraping,sanding, wire brush cleaning then painting the underside as well as the cross-member pieces. I figure why not do it since I'm waiting on parts and while the space to access this area is open. Didn't cost much, was mostly labor, although it was a heckuva mess to do. Results were worth it though. At least now everything is restored to clean from the rear of the engine to the rear-end. At least any future leaks should be easier to see in the future! Cooler weather lately allows working in the evening out in the shop a pleasure again. So with it all ready to go back together less the dirt and grease and rusty bolts it came apart with, I'm just waiting for those flywheel bolts. (new hardware waits for that cross-member too!) 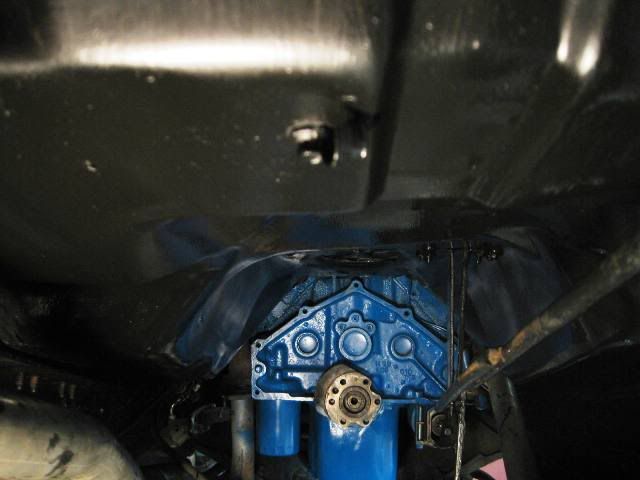 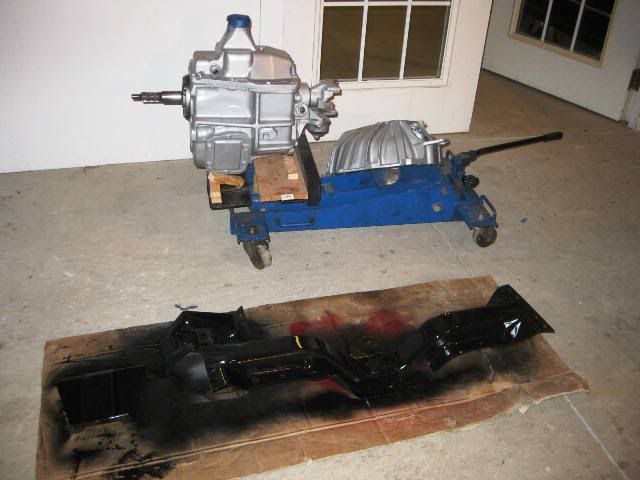 Yet thanks again to this forum as I doubt I'd tackle this project without this place! But like others have said, it has been about just turning nuts and bolts and following the directions. Not to mention a lesson that doesn't hurt in patience as well! If nothing else I finally am learning to paint with a spray can! Maybe I'll graduate to a paint gun after this. Once again learning how fixing one problem on these older trucks can often lead you to fixing more than you started out to fix! It has reminded me more than once to just laugh when it doesn't go "as planned". To be continued until done... Mark
__________________
1985 Chevy C-30 Hydraulic Dump Bed 2001 Saturn SC2 (go to work car) 2010 PT Cruiser (wife's car) "Reality is just a hallucination brought on by lack of alcohol."
|
|
|
|
|
07-21-2010, 08:00 AM
|
#14 |
|
Registered User
Join Date: Dec 2006
Location: SLC, UT
Posts: 706
|
Re: New Clutch Time
Looking good. Can't wait for the final installment(s) of the saga.
|
|
|
|
|
07-21-2010, 08:50 AM
|
#15 |
|
Still plays with trucks
Join Date: Jul 2009
Location: Spokane, WA
Posts: 3,556
|
Re: New Clutch Time
If you haven't gotten the pilot bushing out yet I have another way to try that was pretty easy.
I have used the grease trick before but my pilot bushing was worn out to a point the sockets I had didn't fit tight enough to work. Out of frustration I picked up a large coarse thread bolt that looked about the right size and I was able to thread it right in with minimal effort. Used a slide hammer and yanked it right out.
__________________
miSSed opportunity - ground up creation of an AWD 1994 454 SS that never was http://67-72chevytrucks.com/vboard/s...d.php?t=795577 69 C10 shortbed stepside 400 small block - built like what a super sport truck could have been 69 K20 lwb TBI 350 4L60E NP208 14-bolt Dana-44 w/disc 68 Camaro SS / RS 500hp 439 inch roller cam big block 4L80E 79 Malibu TPI 350 4L60 w/ Z28 steering & sway bars |
|
|
|
|
07-21-2010, 11:15 AM
|
#16 | |
|
Registered User
Join Date: May 2010
Location: Lewis County, WA
Posts: 1,523
|
Re: New Clutch Time
Quote:
|
|
|
|
|
|
07-21-2010, 09:24 PM
|
#17 |
|
Registered User
Join Date: Jan 2010
Location: East Central Illinois
Posts: 511
|
Re: New Clutch Time
Question: When I purchased the new clutch I made sure the pilot bearing slid freely onto the input shaft of the transmission before installing. What I didn't check was to see if it fit over the alignment tool that came with the kit.
Tonight before bolting on the flywheel I recalled this and tried to insert the alignment tool into the now installed pilot bearing. Is it not supposed to slide into the bearing or just line up to the outside of the pilot bearing hole? Could i have 'splayed' that pilot bearing when I installed it? Used a socket and hammer to drive it in and it was a tight fit. It is almost as though the input shaft, or at least that alignment tool, is just under 1/16" larger than the new pilot bearing. Are the tolerances supposed to be a tight fit? Anyway, looking at the old vs new pics it appears the old pilot bearing was a larger diameter. But that could be just the pictures or because the old one was needing replaced. 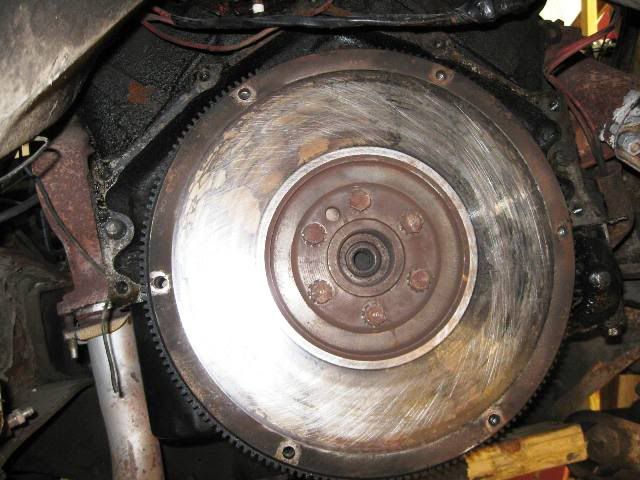 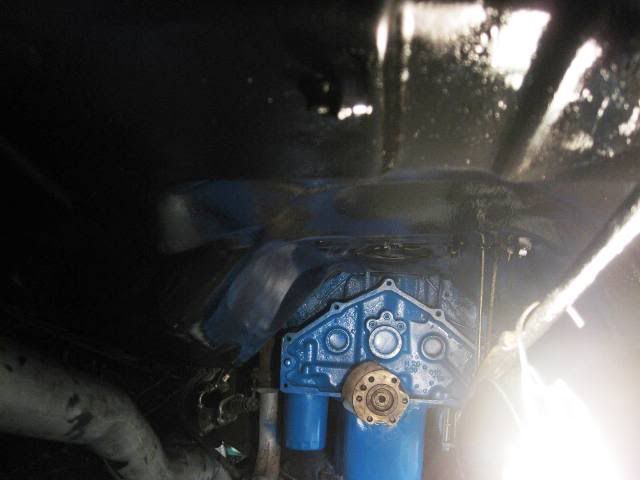 Either way, sure would hate to assemble it all and find out the transmission won't slip into this pilot bearing. Any advice or ideas is appreciated. Mark
__________________
1985 Chevy C-30 Hydraulic Dump Bed 2001 Saturn SC2 (go to work car) 2010 PT Cruiser (wife's car) "Reality is just a hallucination brought on by lack of alcohol."
|
|
|
|
|
07-25-2010, 11:14 PM
|
#18 |
|
Registered User
Join Date: Jan 2010
Location: East Central Illinois
Posts: 511
|
Re: New Clutch Time
Finally got something done this week-end on this clutch project! Granted the pilot bearing problem can be found here:
http://67-72chevytrucks.com/vboard/s...d.php?t=413342 Yet once I got past that screw-up, time allowing, I actually got something done. At this time clutch is in, transmission is installed and I'm ready to bolt the cross-members back in with one sitting in place. After that it is pretty simple with just the driveshaft and in this case, the pto connection for the dump bed. Basic nuts and bolts at this stage of the project. Granted it ain't hit the ground yet so no pat on the back yet. The biggest pain in all of this though was getting that transmission back in. By myself it was a losing battle. So with some help today it finally slipped right in without anyone/me getting hurt. Trust all who warn how heavy an SM465 4-speed transmission really is. After muscling it yesterday for 2 hours and losing it twice off the transmission jack I kicked my pride and ego out of the shop and scheduled some help for today. Seriously, that thing loves gravity! Today, with help, it took less than 20 minutes and it was bolted in. So what have I learned? Did I save any money so far? In labor costs yes, I saved all of that. In time? No, it would be quicker to send it out had I needed the truck right away. Material costs so far? $60 for the flywheel to be turned. About $80 in the transmission repairs which includes purchasing the new front bearing retainer shaft and the rear seal and gaskets along with having a transmission shop do that work. I had no tool to get the rear yoke off to replace the rear seal it needed. (these parts took a week to get but why not fix it with it out of the truck already?) Clutch was around $125 and a second pilot bearing to replace what I screwed up adds another $6. Toss about another $50 in paint and materials for clean-up and renovation of the underside while waiting on parts.(optional) Tool expense? I had everything except a torque wrench so add another $45. Not the best money could buy but works. Transmission jack was borrowed. Nuts and bolts to replace the old rusty ones where I could another $30. Add another $8 for the flywheel bolts.(all optional) So far that totals out @ $404.00. Add in fuel I've used to run around for parts has it probably closer to $450.00 total in this so far. (I say so far because it still is not on the road at this time even though it should do fine) Yet had this been done in a shop for 'just a clutch job', the rear trans seal would still leak and the underside would be what it was, surface rust and dirt, and the labor, I know what I was quoted and my time is free. Anyway, here is where it stands tonight. Cool weather and some evening time this week after the day job and it shouldn't be long have it back on the road!  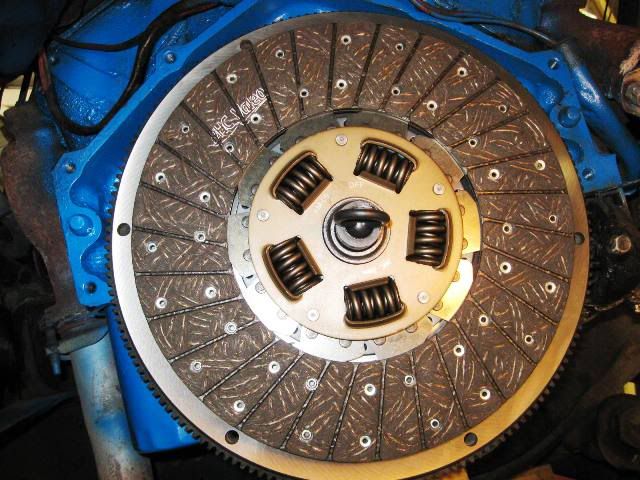 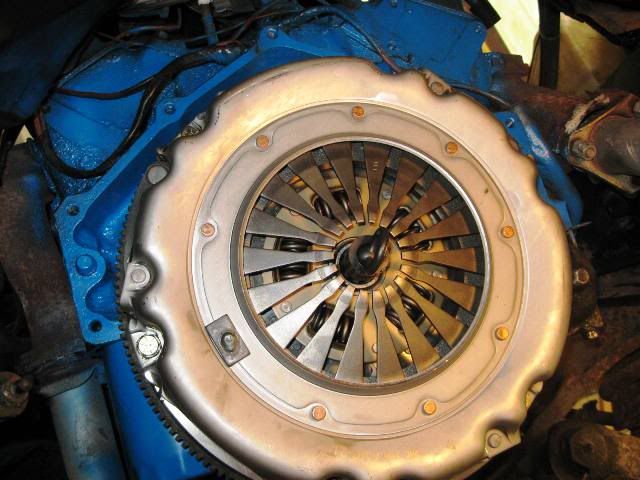 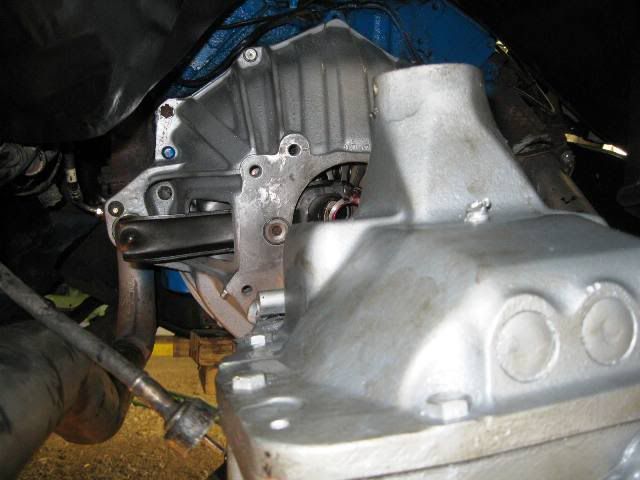 Appreciate being given the advice I have here during this project. My hope with this link is if someone later on, as myself, not as experienced as many here but willing to try to learn as I am, wants to replace their own clutch then this clutch link might add some light to their questions. I know I've had a few! (advice: read book ask questions then the mistake is yours!) Might save some money, maybe not. Yet I know it has been and continues to be a learning curve for myself...but even with the frustration at times it still never hurts to learn! Yes, old dogs can learn new tricks! Mark
__________________
1985 Chevy C-30 Hydraulic Dump Bed 2001 Saturn SC2 (go to work car) 2010 PT Cruiser (wife's car) "Reality is just a hallucination brought on by lack of alcohol."
|
|
|
|
|
08-08-2010, 12:14 AM
|
#19 |
|
Registered User
Join Date: Jan 2010
Location: East Central Illinois
Posts: 511
|
Re: New Clutch Time
Sorry about the lack of a follow-up but heat indexes, life and the day job, along with some admitted unexpected problems with this project has taken time.
With new bolts reinstalling the 3-piece cross-member went a lot quicker than taking it apart. It was worth the money spent on new hardware. Following that 24 bolt reassembly, yes, 24 bolts installs or takes apart that transmission support cross member, the rest went together without a hitch. But...once back together the darn thing wouldn't disengage! Finally with help from a couple of friends it boiled down to the hydraulics. Here I will add that what everyone says about how hard it can be to get air out of the system on these square body hydraulic brake systems is true if doing it the old-fashioned way of pump & bleed. I know, I tried. While I didn't break the hydraulic lines open during this clutch job, knowing it was back together right and should work but didn't is what took my attention to the slave cylinder. Add the fact this truck sat for some time before I bought it last February and the rusty colored fluid was suspicious. In hindsight, and we all know what that is worth, there is a chance I should have started at the hydraulics first before tearing this apart. Yet not one to look back at least this truck has a new clutch now. So another $80 last week for a master cylinder and slave cylinder figuring if I've gone this far just replace what remains of the clutch system on this 85 square body. At least at this point everything is now new. Since bench bleeding was new to me it was a lesson in comical trial and error. I read the book, researched the net, watched various You Tube videos and searched this forum as well. Yet in the end it still was a pain in the...to get the air out! Seriously the idea of dropping that transmission again was about an option each time I thought the air was out and it still wouldn't disengage! Yet finally it became noticable even to a mechanic friend it was all in the hydraulic system though. Yet 2 nights of pump & bleed still had it not wanting to completely disengage. (Actually today I was ready to claim the new slave was faulty and try another one from a different manufacturer.) It has been that frustrating. Yet being the week-end it was back to square one and do the pump and bleed, only this time, wait a half hour, do it again and again and ...wow, it actually works! I had it right on the edge of working and didn't know it. Finally I have a working clutch! Now for all you seasoned mechanics with the big grin of having 'been there done that, could have told ya' look', yes, you were right about everything and the hydraulic system on these trucks can be hard to bleed. Had I listened more in the beginning to some of what I read in the "details" to do this, I would have saved the world from many 4 letter words. Fortunately no one was around to listen on that night. So with this said and having had it back on the road a few times this evening in trial runs that returned to the shop for some final pump & bleed to return it to a smooth shifting...it actually works! My advice: Anyone who never has done this and is thinking about it consider time, tools and your ability to cuss occasionally in solitude. Other than that, as I was told, it basically is a nuts and bolts job IF you know at minimum what I have learned here. Let my mistakes not be yours if that is possible as you will probably find new ones along the way only you can own. I admit I own more than enough after this project. The only thing that really challenged me and I cannot emphasize enough to pay attention to, besides learning what I did not know, was that SM465 transmission R&R. So keep in mind the seriousness of the weight and awkwardness that thing is to remove and replace if you try this alone. Granted it is easier for a younger man as I am older than dirt and limited from an old injury of my left arm that keeps me creative to do more than the medical community said I should/could. Yet best of luck to anyone that follows my lead to their first clutch job. Yes, like someone mentioned early on to me here, it is nice to know, having done it now, that I can do it. I accept that satisfaction. Anyway, thanks again to this forum and all who are here with experienced advice for those of us in these types of projects attempting to learn. It was and is a definite learning experience working on these older trucks! 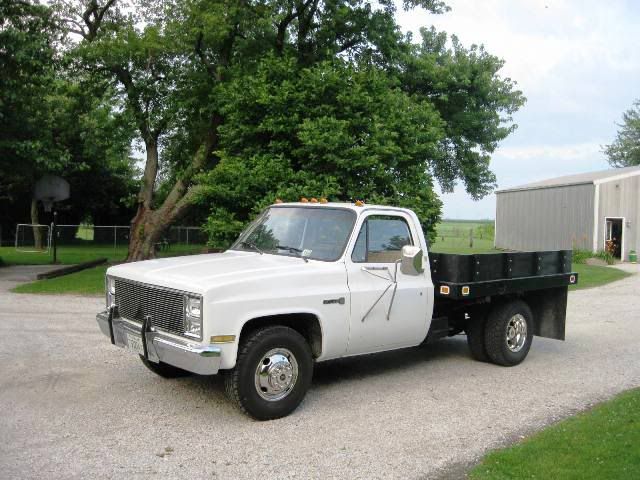 Finally this 85 C-30 is back on the road. Mark
__________________
1985 Chevy C-30 Hydraulic Dump Bed 2001 Saturn SC2 (go to work car) 2010 PT Cruiser (wife's car) "Reality is just a hallucination brought on by lack of alcohol."
|
|
|
|
|
08-08-2010, 12:38 AM
|
#20 |
|
Registered User
Join Date: Oct 2009
Location: Buhl, Idaho
Posts: 1,438
|
Re: New Clutch Time
love that truck and congrats on the new cluth.

__________________
86 c30 crew cab dually 454/400 4/6 drop SOLD 1-8-11 1981 chevy K10 short Bed Scottsdale SOLD 10-26-2020 67 GMC Stepside Straight six/3 on the tree "The Peach" 2020 Silverado Double Cab LT Z71 5.3 8 speed Daily Driver K10 build http://67-72chevytrucks.com/vboard/s...d.php?t=671934 The Peach build http://67-72chevytrucks.com/vboard/s...d.php?t=733903
|
|
|
|
|
08-08-2010, 12:58 AM
|
#21 |
|
At the body shop.
Join Date: Aug 2009
Location: Land of fruits and nuts.
Posts: 5,260
|
Re: New Clutch Time
Puts D-I-Y to whole new level.
Job well done tho
__________________
" That didnt make it any newer " " Dont antique the equipment " |
|
|
|
|
08-08-2010, 09:42 PM
|
#22 |
|
Registered User
Join Date: Jan 2010
Location: Loveland, CO
Posts: 1,921
|
Re: New Clutch Time
This forum will be loads of help for me in the future because my 76 k10 will be needing a clutch soon and i definitly wont be paying anybody to do it for me, but i will keep driving my truck until i have no clutch
__________________
Zach 1970 Chevrolet Custom Camper K20 1971 GMC Super K2500, 12V/NV4500 swap in progress 1971 Chevrolet Custom C10 1972 Chevrolet Custom Deluxe C20, 5.3/4L60E 1972 Oldsmobile Cutlass Supreme, 455/TH400, 3.73 posi 2004 GMC Sierra 2500HD, LB7/Allison, CCSB 2005 GMC Sierra 1500, 5.3/4L60E, CCSB |
|
|
|
 |
| Bookmarks |
| Thread Tools | |
| Display Modes | |
|
|


 Linear Mode

