 |
|
|
#76 |
|
Registered User
Join Date: May 2006
Location: Detroit
Posts: 73
|
Re: 1950 LQ9 conversion
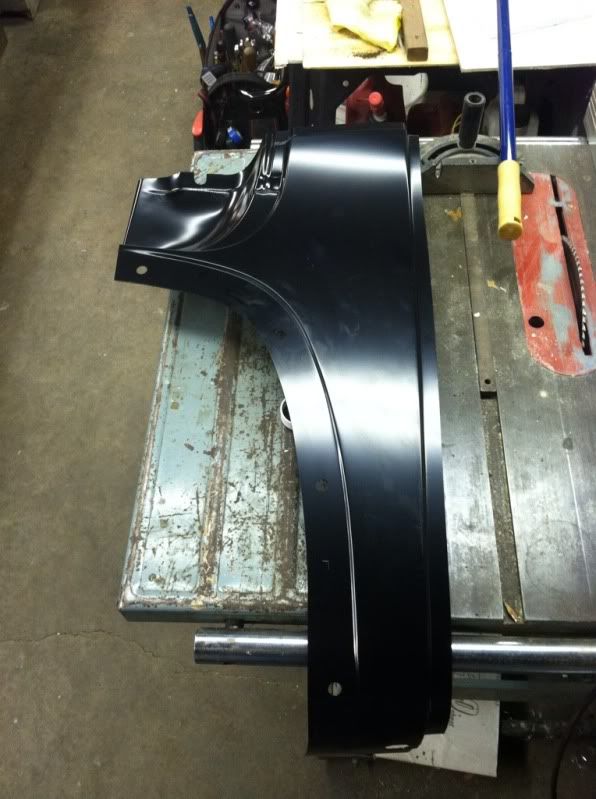
 just got back from HD and got some flap discs, primer, rust converter, more primer, some flat army green paint  I am going to try and get the worst side done, I have it the most cut out. Pull the door... How would you prep the inner area before it is welded closed? How many spot welds are there on the upper part of the cowl? I have them out on the side, but I still need to melt the ole lead out to find the upper edge. How tuff is the old one in there? |
|
|

|
|
|
#77 |
|
Registered User
Join Date: May 2006
Location: Detroit
Posts: 73
|
Re: 1950 LQ9 conversion
 
|
|
|

|
|
|
#78 |
|
Registered User
Join Date: May 2006
Location: Detroit
Posts: 73
|
Re: 1950 LQ9 conversion
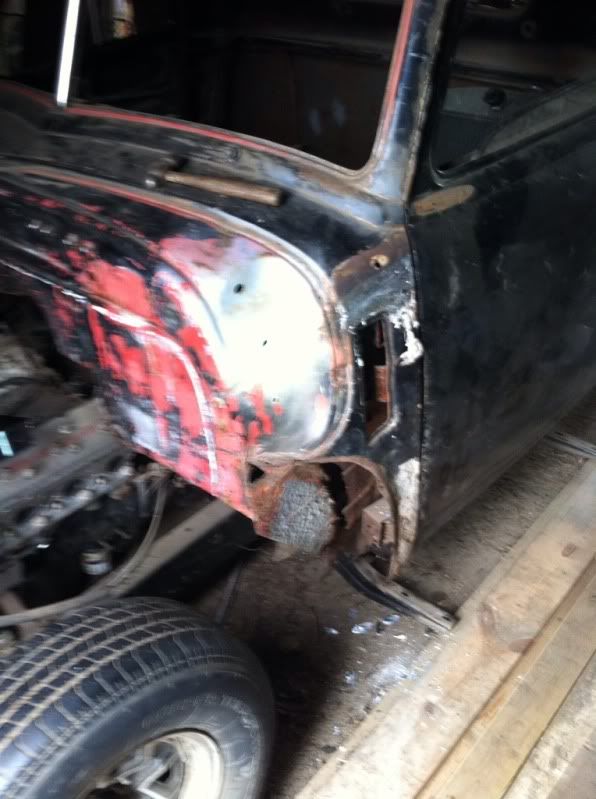
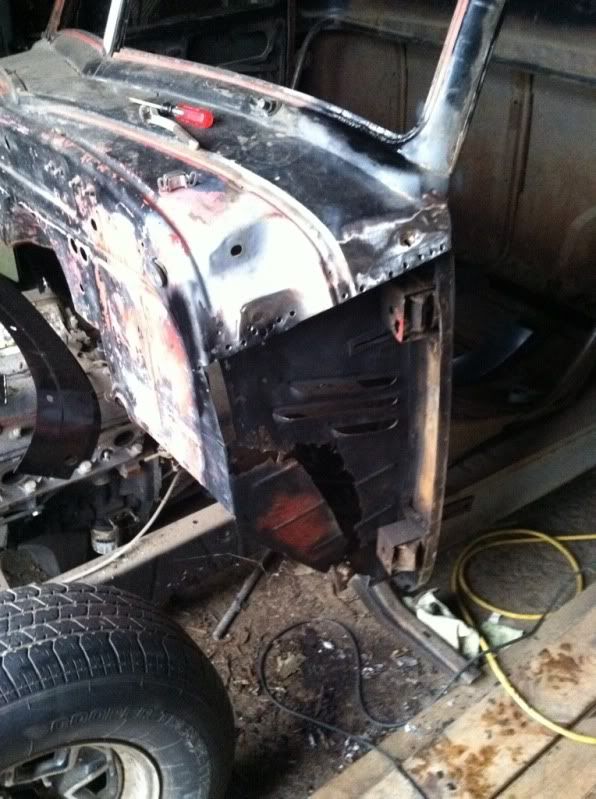
ANyone have any tips for getting a door and jam back in shape?? It looks like this door was over-opened, replaceing the creased/dented cowl is first step, but I took to the door and man there was 3/4 in of bondo over an old pulled dent
 Looking for a new door...so much progress to get stuck, what should I do?? Looking for a new door...so much progress to get stuck, what should I do??
|
|
|

|
|
|
#79 |
|
Registered User
Join Date: May 2006
Location: Detroit
Posts: 73
|
Re: 1950 LQ9 conversion
Hey guys I am still here...I need advise bad. What should I focus on?? I am lost with all the details. Anyone have some direction that will help get this thing going???
I think I need to pull the cab back off and focus on the frame/driveline/brakes/rear end...and not worry about the sheetmetal till I have the driveline ironed out. Anyone else have any tips to get this project back moving in a direction???? thanks |
|
|

|
|
|
#80 |
|
Registered User
Join Date: Feb 2012
Location: Memphis, TN
Posts: 285
|
Re: 1950 LQ9 conversion
First of all, congratulation on your project. You’ve got a great start, and the journey is half the fun. Personally, I would attempt to get the drive train finished to the point that you could crank and hear it run. It really isn't that far. My son and I are on the last lap of an almost 5 year frame off build restomodding a 66 GTO. We have the same engine as you (2006 Escalade) with a T56 behind it. When we had the car down to the frame rails with the engine mocked up, we used a truck computer (with the Theft turned Off) and wiring harness from a 2002 truck (my son wanted drive by cable, so we used an earlier computer), and a fuse block from the same model truck. The engine harness plugs into the truck fuse block, and there are only 4 (maybe 5) wires that have to be plugged in to the bottom of the truck fuse block to crank the engine and have it run. We used the thread set up by "Jeepinpete" on the LS1Tech website. Because we didn't have a fuel tank at the time, we sprayed gas into the intake, then engaged the starter. The engine came right to life. For a gearhead, that is the best sound around, it will really make you want to work again. It is also good for doubting spouses and children that may think you are crazy!!!
|
|
|

|
|
|
#81 |
|
Registered User
Join Date: Jul 2009
Location: West Jordan Utah
Posts: 95
|
Re: 1950 LQ9 conversion
I feel the pain. If you look at everything as a whole, it gets overwhelming. There's nothing wrong with jumping from sheet metal then back to drive line, then to electrical IF you can keep track of what you are doing and keep it all straight. Jumping around can keep boredom from setting in or help get past that frustrating part.
The flip side is you have lots of 'distractions' of stuff that all needs attention. Hard to finish any one thing if you spread yourself too thin. So, AN approach, not THE approach: Once you have an idea as to what your end goal is in general, typically work from the ground up: Frame, Front Suspension, Rear Suspension, brake system, Power train, fuel system, electrical, sheet metal, glass, interior. Lots of folks start with wheels and tires. Truly ground up. With re-ordering as necessary, like your engine choice may dictate fuel system stuff be done in parallel. Or suspension may drive brake systems. I wrapped up my cab and am storing it outside while I'm working on my frame. The goal was to free up space in the shop, but an interesting side effect is I don't find myself thinking about the sheet metal work ahead of me as much while I'm working on the frame. For what it's worth. Good luck! As long as you keep doing SOMETHING I still count that as progress.
__________________
51 Chevy 3100 5 Window Build Thread: http://www.67-72chevytrucks.com/vboa...d.php?t=516689 |
|
|

|
|
|
#82 |
|
Registered User
Join Date: Jun 2006
Location: Idaho
Posts: 8,800
|
Re: 1950 LQ9 conversion
The way my brain works is after I have it down on paper I quit worrying about everything except the current task. Do it for work or I would go crazy. Make a list (I use excell so I can move things around or add sub tasks) then figure your critical path (what needs to be done to keep moving forward). For instance right now I have 3 things, getting the ac hoses figured out and fabbed so I can mount the unit under the dash and get the diffusers, etc. in. Second is the gas filler which is keeping me from finishing the bed and firing the engine. Third is the one piece door glass which is keeping be from modifying the doors, painting the insides and hanging them to work on the gaps. Lots of other things to do, but these are what I am priortizing my funds for.
Once you have the list you can focus on the task and quit worrying about forgetting something or what comes next. I looked at a lot of the builds here to get an idea of the sequence, most guys are pretty good about pointing out where they had to retrace their steps. A cold 12 pack doesn't hurt either, I have spent many hours just sitting in a camp chair with a beer looking at the truck and building it in my mind.
__________________
1959 Chevy Short Fleetside w/ 74 4WD drive train (current project) OrrieG Build Thread 1964 Chevelle Malibu w/ 355-350TH (daily driver) Helpful AD and TF Manual Site Old Car Manual Project |
|
|

|
|
|
#83 |
|
Registered User
Join Date: Jan 2012
Location: Omaha, Ne
Posts: 18
|
Re: 1950 LQ9 conversion
new guy here. mostly just read here but, your last post beckoned me, so to speak - so i speak now.
where your at on your build - im more or less in the same spot. fwiw, I grew tired of cab work also (including cowls, kick panels, floor, cab corners, etc) and went back to my frame also. can be overwhelming. however, i really could only go so far w/ the frame cuz, im using all aftermarket suspension, powertrain and all that jazz too. you need, (or i need) the cab done w/ the outer cowls done to mock up a fender so ill know for certain where the wheel is centered in the fender. then i can mock up whats left of a bedside to make sure where my rear wheel will be centered also. plus getting the cab done will help me visualize ride height and stance for welding in the suspension permanent with respect to crossmember angle and then later rear end pinion angle too. which relates to my ls motor angle and thus tailshaft angle also... everything ties together i think i know precisely what your going through. you can probably get some stuff done on the frame but i thought id just let you know my perspective about the cab. like the other guy said, i use a lot of lists to organize my thoughts or the process and attempt to follow an order of steps or a plan of sort. btw, i had bought another parts truck that had the same problem w/ the cowls from apparently the door opening to far also. weird good luck |
|
|

|
 |
| Bookmarks |
| Thread Tools | |
| Display Modes | |
|
|