
|
Register or Log In To remove these advertisements. |
|
|
|
|||||||
 |
|
|
Thread Tools | Display Modes |
|
|
 12-16-2018, 09:29 PM
|
#1 |
|
Registered User
Join Date: Mar 2018
Location: Etowah, NC
Posts: 30
|
Re: What did you do to your truck today.The 3rd chapter
After the AC box was back in, I decided to take a look at the drip rail to see how difficult it would be to remove. Tried to pry a little of the old, dried, separated seam sealer, and before I knew it, I had most of it out. And, I had told my wife that I was going to wait on that job.
 Most of it came out fairly easily, then I attacked it with a wire wheel. Some surface rust, but no holes and no rust through!!  So, decided to use some rust reformer just to make sure there wasn't something hidden, so masked it all up and shot a coat on it. The goal is to let this cure overnight, then tomorrow evening I am planning to attempt to redo the seam sealer. I have the 3M 8307 for the horizontal section, then 8308 for the vertical sections. Never done seam sealer before, so it should be interesting...
__________________
1970 C10 CST, PS, PB, AC, patina, original, work in progress |

|

|
|
12-26-2018, 02:08 PM
|
#2 | |
|
Registered User
Join Date: Nov 2017
Location: Anthem AZ
Posts: 288
|
Re: What did you do to your truck today.The 3rd chapter
Quote:
|
|
|
|
|
|
01-01-2019, 09:58 PM
|
#3 | |
|
Registered User
Join Date: Mar 2018
Location: Etowah, NC
Posts: 30
|
Re: What did you do to your truck today.The 3rd chapter
Quote:
Anyway, got to it tonight. The whole process worked out much better than I feared. My goal in all of this is for the drip edge to be weather tight, not looks. Before the Christmas road trip, I had sprayed on a coat of 2K Epoxy primer that I got in a rattle can from Advance Auto (who knew?). Primarily because the 3M instructions indicate to apply this on a 2K primer or bare metal. This will be the beige color in the pics below. Along with the 3M 8307 Self Leveling and the 3M 8308 heavy body, I also ordered the 3M gun (3M P/N 8571). I started with the vertical portions of the drip edge and laid down a pretty thick bead of the 3M 8308, starting right at the top of the upper curve. Then I simply used a gloved finger to smooth it out, trying to press it into the seam without squeezing it out. I left the beginning of the bead pretty thick, so it will act as a dam for the self leveling 8307. I also had a spot at the upper right corner where there was about a 1/8" gap between the roof skin and the rest of the metal that I filled with a small bead of 8308. Once both sides were done, I let it cure for about an hour, then took the 3M 8307 and got after it. Starting on one side, I began filling the drip edge, and worked my way around to the other side. The 8307 is definitely thinner than the 8308 and leveled out nicely. I then let that cure for about an hour, then masked off the cab and sprayed a coat of basic white rattle can primer over the newly sealed drip edge. Nothing fancy.
__________________
1970 C10 CST, PS, PB, AC, patina, original, work in progress |
|
|
|
|
|
01-02-2019, 10:28 AM
|
#4 |
|
Registered User
Join Date: Apr 2018
Location: Austin
Posts: 75
|
Re: What did you do to your truck today.The 3rd chapter
No longer in jackstand jail. Having trouble with brakes still though

|
|
|
|
|
01-05-2019, 08:03 PM
|
#5 |
|
Registered User
 Join Date: Oct 2014
Location: New Palestine In
Posts: 933
|
Re: What did you do to your truck today.The 3rd chapter
While I'm waiting for some parts to refresh my door mechanisms I decided to tackle a couple of rust issues in each outer corner and where it is split unde the vent wing. Also I'm getting rid of that God awful 6x9 speaker hole. here's a few pics of my progress.
__________________
Phil "Money is only a tool to create and achieve what you want most in life" PayPal: rodnrudy@comcast.net |
|
|
|
|
01-05-2019, 08:06 PM
|
#6 |
|
Registered User
Join Date: Oct 2014
Location: New Palestine In
Posts: 933
|
Re: What did you do to your truck today.The 3rd chapter
And a few more of the rust repair and speaker hole.
__________________
Phil "Money is only a tool to create and achieve what you want most in life" PayPal: rodnrudy@comcast.net |
|
|
|
|
01-10-2019, 04:43 AM
|
#7 | |
|
Senior Member
Join Date: Feb 2010
Location: rochelle il.
Posts: 384
|
Re: What did you do to your truck today.The 3rd chapter
Quote:
|
|
|
|
|
|
01-06-2019, 02:16 AM
|
#8 |
|
Registered User
Join Date: May 2017
Location: Seatac, wa
Posts: 172
|
Re: What did you do to your truck today.The 3rd chapter
Nice ride. Hope u get those brakes worked out before spring bro
|
|
|
|
|
01-06-2019, 09:46 PM
|
#9 | |
|
Senior Member
Join Date: Mar 2011
Location: Hanover NJ
Posts: 4,842
|
Re: What did you do to your truck today.The 3rd chapter
Quote:
__________________
Grand Theft Auto https://67-72chevytrucks.com/vboard/...d.php?t=855961 Doc & Kim build http://67-72chevytrucks.com/vboard/s...d.php?t=722288 I am from the desert http://67-72chevytrucks.com/vboard/s...d.php?t=650332 basket case build SOLD http://67-72chevytrucks.com/vboard/s...d.php?t=648557 |
|
|
|
|
|
01-07-2019, 10:38 AM
|
#10 |
|
Registered User
Join Date: Jul 2018
Location: Ozark, AL
Posts: 43
|
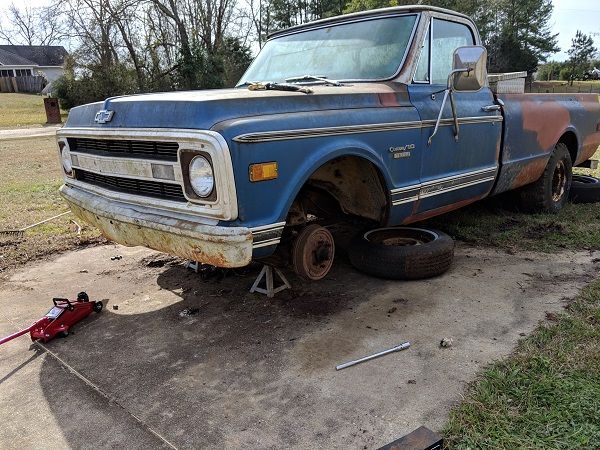
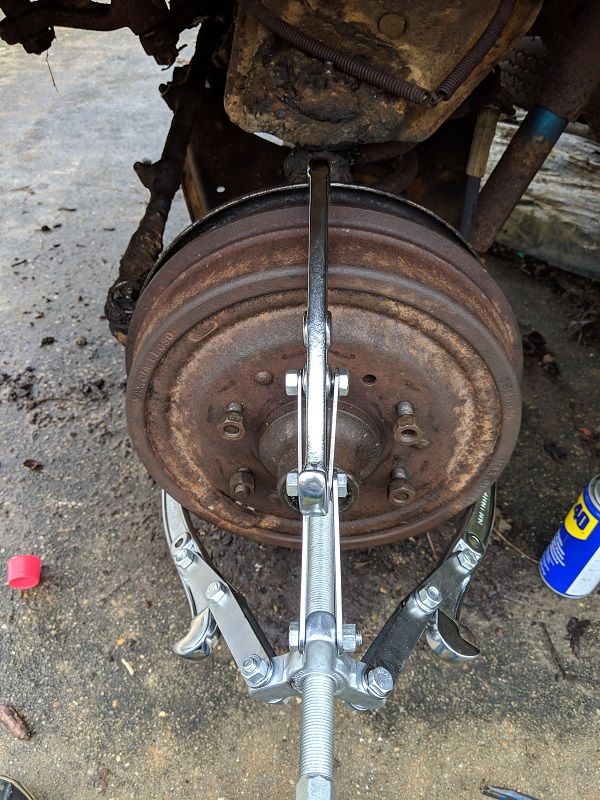
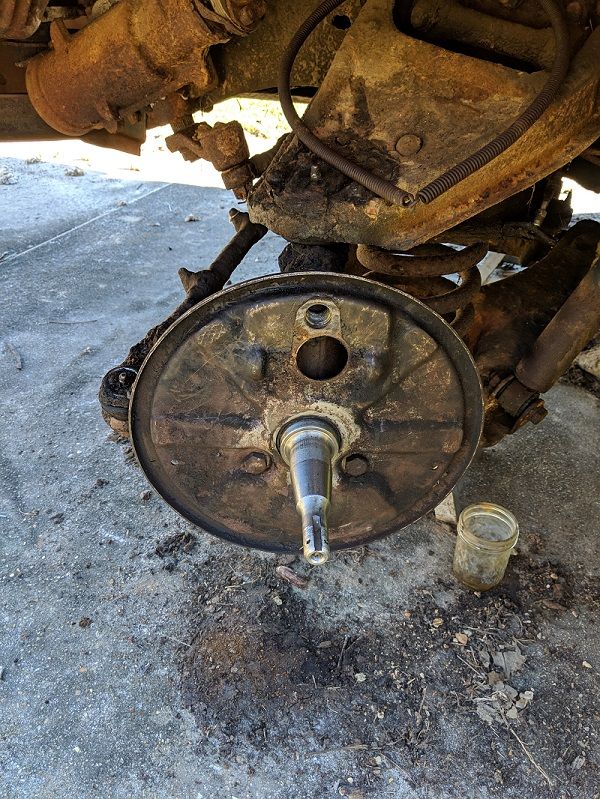
Re: What did you do to your truck today.The 3rd chapter
I finally got started on my project over the holidays, i'm going to try to upload photos shortly. Getting the front drums off, they were completely rusted solid, was a chore. But I have them off, and I've gotten all the parts to put it back together. I'm keeping the drum brakes for now, I hope in the future to go to disc.
|
|
|
|
|
01-07-2019, 12:41 PM
|
#11 |
|
Registered User
Join Date: Jul 2018
Location: Ozark, AL
Posts: 43
|
Re: What did you do to your truck today.The 3rd chapter
Let me see if I got the picture upload thing down?
|
|
|
|
|
01-09-2019, 10:03 PM
|
#12 | |
|
Registered User
Join Date: Jun 2012
Location: Clearwater Beach Florida
Posts: 873
|
Re: What did you do to your truck today.The 3rd chapter
Quote:
|
|
|
|
|
|
| Bookmarks |
| Thread Tools | |
| Display Modes | |
|
|


 Hybrid Mode
