 |
Register or Log In To remove these advertisements. |
|
|
|
|||||||
 |
|
|
Thread Tools | Display Modes |
|
|
#1 |
|
New Member
 Join Date: Mar 2024
Location: Bend, Oregon
Posts: 12
|
Distributor/Spark Plug Setup
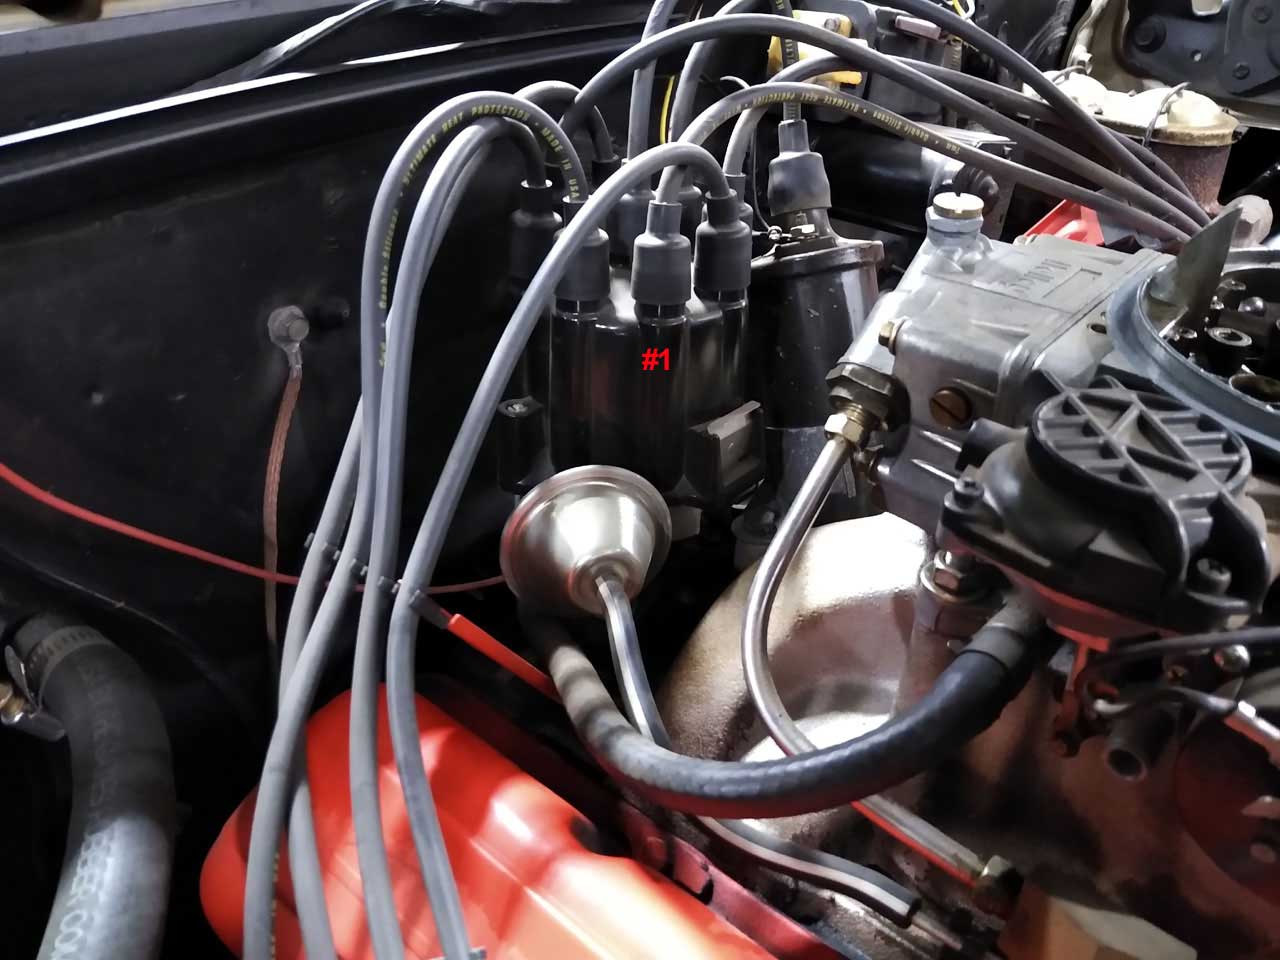
Went to replace the plugs/wires on my '72 with a 350. Curious if this looks correct (picture taken before removing the old wires). Seems like from my I can find online wire 1 is in spot 8? If so what effect does this have on the engine/performance? Obviously going to correct it but just curious.
|
|
|

|
|
|
#2 |
|
Senior Member
  Join Date: Jan 2005
Location: CA
Posts: 6,013
|
Re: Distributor/Spark Plug Setup
It looks like the distributor was just installed with the rotor clocked a little more clockwise than normal. It is irrelevant from a functionality standpoint. It would be a hassle to adjust it at this point if all you're wanting to do is replace your plug wires. You would have to set the crank at TDC, pull the distributor out of the block, rotate the oil pump shaft a little with a long screwdriver and then go through the trial and error process of reinstalling the distributor repeatedly until you get the rotor pointing in the direction you want #1 to be. You'd need to readjust the timing with a timing light afterward. Probably not worth the effort.
|
|
|

|
|
|
#3 |
|
New Member
 Join Date: Mar 2024
Location: Bend, Oregon
Posts: 12
|
Re: Distributor/Spark Plug Setup
Appreciate the response. Basically, just reinstall the new wires to match what they looked like before then?
|
|
|

|
|
|
#4 |
|
Senior Member
  Join Date: Jan 2005
Location: CA
Posts: 6,013
|
Re: Distributor/Spark Plug Setup
Yes, assuming the current wires are installed in the correct 1-8-4-3-6-5-7-2 order.
|
|
|

|
|
|
#5 |
|
Senior Moment
 Join Date: Mar 2002
Location: Pittsburg Ca
Posts: 4,193
|
Re: Distributor/Spark Plug Setup
Best way is One at a time so you don’t get mixed up.
__________________
1970 CST LS 1 6 speed Ford 9 inch Detroit Tru Track, Dakota Didgital, Vintage Air, QA1 Coil Overs Front & Rear Lots of FUN 2013 GMC PU, Oldest Son 71 GMC LWB. QA1 Suspension, Angry SB. Youngest Son 2017 Toyota SUV Daughters car 2018 Traverse , Wife’s Ride Pittsburg Ca 94565 |
|
|

|
|
|
#6 |
|
Senior Member
 Join Date: Jun 2022
Location: San Ramon,CA
Posts: 610
|
Re: Distributor/Spark Plug Setup
There is a conventional way that most folks clock their distributor, but no reason it has to be done that way.
I found this out the first time I swapped plug wires
__________________
1970 C10 Custom longbed 350/350 Code:
            __
     ______|__]\____
....|___(o)_____(o)_]
|
|
|

|
|
|
#7 |
|
All stock and staying that way
 Join Date: Jul 2003
Location: Elkland, PA
Posts: 1,864
|
To prevent cross firing, try not to have the wires touch each other.
__________________
1970 K/5 Blazer CST 4WD, Medium Bronze, 93k ACT. miles, 350, 4 speed, rear positraction, 16.5" x 8.25" HD wheel option, tilt, tach, vacuum, AM/FM, manual throttle...Dad ordered and purchased new 4/70. Currently frame off restoration finally getting close to completion..  1972 Cheyenne Super 20 2WD, DK Blue/White, 90K ACT. miles, 402, TH400, 4.10 open, tilt, tach, vacuum, A/C, AM/FM, manual throttle.. A mostly original paint never rusted Texas survivor...  2017 Sierra 1500 SLT 4WD, Black, 45k miles, 5.3, 6L80E, 3.42 LS, 20" polished wheels, everything but moonroof and 6.2... 2019 Canyon SLT 4WD, White, 62k miles, 3.6, 8L45, 3.23 LS, 18" wheels |
|
|

|
|
|
#8 |
|
Registered User
Join Date: Oct 2005
Location: Northern Arkansas
Posts: 1,146
|
Re: Distributor/Spark Plug Setup
I think that's an old wives tale going back to old fashioned plug wires. I can't see any way for the newer thick silicone jacketed wires to cross fire each other. There's a much higher chance of carbon tracking inside the cap causing a misfire than wires touching or laying on each other.
|
|
|

|
|
|
#9 |
|
Registered User
Join Date: Apr 2010
Location: So Cal
Posts: 1,470
|
Re: Distributor/Spark Plug Setup
Rules of physics may not agree. Current in one wire will generate a magnetic field and cause current to flow in a parallel wire.
__________________
'67 GMC 2500, 292, 4spd, AC |
|
|

|
|
|
#10 |
|
Who Changed This?
 Join Date: Jan 2013
Location: Simi Valley, CA
Posts: 10,727
|
Re: Distributor/Spark Plug Setup
^ While this is true, the wires would have to be parallel for awhile for enough counter EMF to make a crossfire, and the magnetic field tapers off exponentially. Most wires these days have a wire winding around the conductor, ADDED- or has the coil right on the spark plug, /ADDED which minimizes those fields. The wires on my truck are like that. It was an issue back in the day, though, for sure.
__________________
~Steven '70 Chevy 3/4T Longhorn CST 402/400/3.56 Custom Camper Simi Valley, CA Last edited by Steeveedee; 12-28-2024 at 07:44 PM. |
|
|

|
|
|
#11 |
|
Registered User
Join Date: Dec 2023
Location: Rural California
Posts: 32
|
Re: Distributor/Spark Plug Setup
Your distributor is installed correctly with #1 in between the vacuum advance can and the points adjustment window.
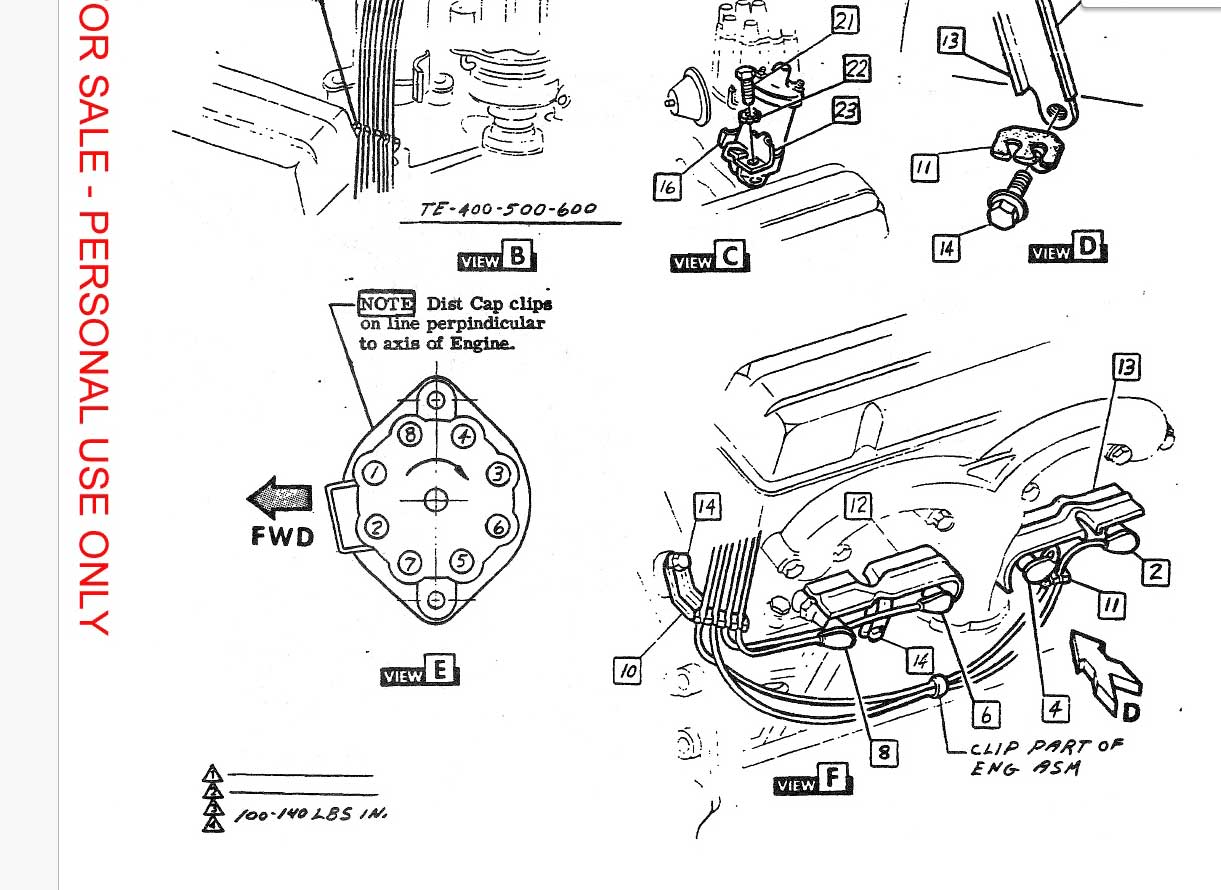
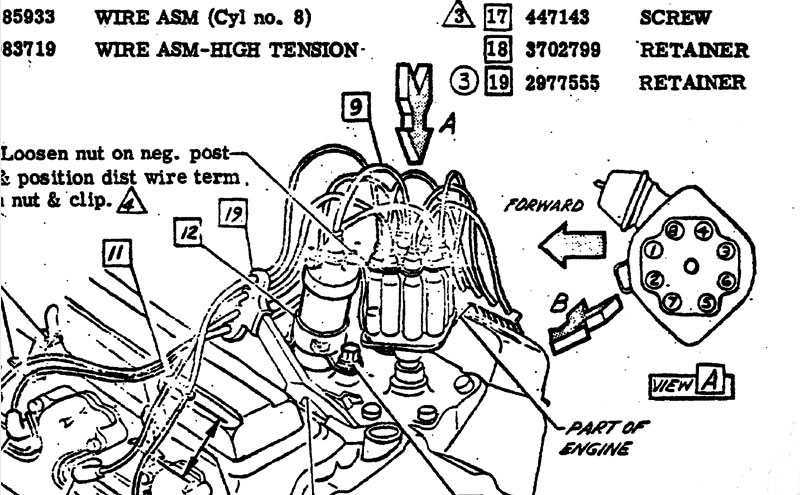
Now some folks will tell you that the #1 terminal should be pointing at the #1 cylinder. While this is correct for the HEI distributor this is not the way GM installed the earlier window points distributors. Check out the assembly manual.   
|
|
|

|
|
|
#12 |
|
Who Changed This?
 Join Date: Jan 2013
Location: Simi Valley, CA
Posts: 10,727
|
Re: Distributor/Spark Plug Setup
I'm liking View E- "Clips on line perpendicular to axis of engine", though they did misspell perpendicular on the drawing. Perpendicular makes sense, for best access to the clips.
__________________
~Steven '70 Chevy 3/4T Longhorn CST 402/400/3.56 Custom Camper Simi Valley, CA |
|
|

|
|
|
#13 |
|
Senior Member
 Join Date: Mar 2015
Location: washington
Posts: 2,301
|
Re: Distributor/Spark Plug Setup
It actually does make a difference if the distributor is correctly clocked and wired.
It has to do with the clocking between the end of the rotor and the tabs on the inside of the cap. It works either way. The gap the spark has to jump from the rotor to the cap can be larger than optimum. The distributor gear has 13 teeth, so each tooth change moves the whole distributor about 28 degrees. Each cap terminal is 45 deg apart. Last edited by Accelo; 12-31-2024 at 05:33 PM. |
|
|

|
|
|
#14 | |
|
Senior Member
 Join Date: Feb 2009
Location: Northern Nevada
Posts: 7,329
|
Re: Distributor/Spark Plug Setup
Regarding SPW contact
Quote:
I didn't know that Stanco, for a points distributor - thanks for sharing; and nice engine bay.
__________________
Tony 71 Custom Deluxe, SWB, 2WD, 402, A/C. I developed an assembly kit for restoring the (a) truck from the ground up. My build thread, and more on the assembly kit https://67-72chevytrucks.com/vboard/...d.php?t=730025 |
|
|
|

|
 |
| Bookmarks |
| Thread Tools | |
| Display Modes | |
|
|