
 |
Register or Log In To remove these advertisements. |
|
|
|
|||||||
 |
|
|
Thread Tools | Display Modes |
|
|
#26 |
|
Registered User
Join Date: Apr 2007
Location: Calgary, Alberta
Posts: 441
|
Re: 59 Apache - Lifelong obsession
Once I had a plan, I started collecting parts so that I was ready once I pulled the truck out of storage.
Parts aquired so far: - '59 Impala Steering wheel - '78 Chevy Van Steering Column - ’65 327 – will need to be rebuilt - '81 Camaro clip - '77 Z28 Rear End – 3.23 Posi ( may swap to 3.73s later ) - '89 700r4 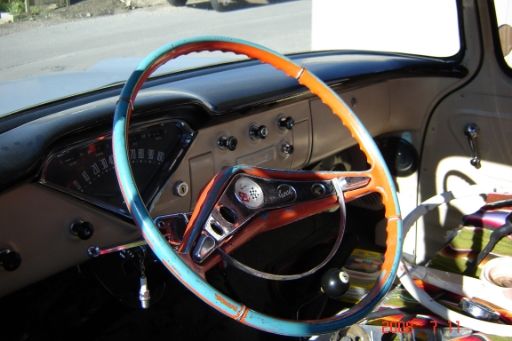 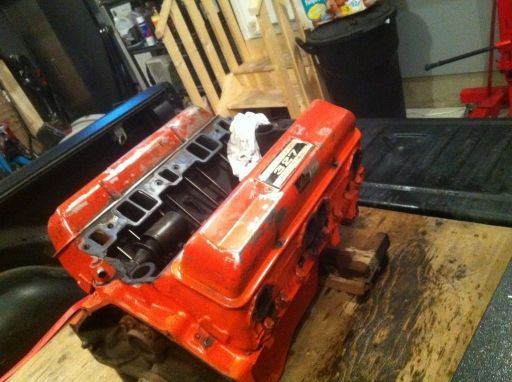 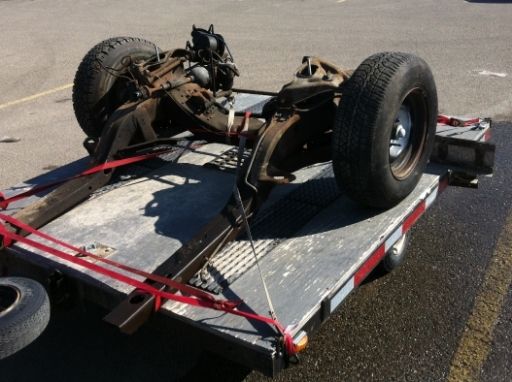
__________________
My Build Thread: 59 Apache - Lifelong obsession http://67-72chevytrucks.com/vboard/showthread.php?t=622133"]59 Apache - Lifelong obsession |
|
|

|
|
|
#27 |
|
Registered User
Join Date: Aug 2007
Location: Corona, California
Posts: 7,998
|
Re: 59 Apache - Lifelong obsession
Love the steering wheel.
Kim |
|
|

|
|
|
#28 |
|
Registered User
Join Date: Apr 2007
Location: Calgary, Alberta
Posts: 441
|
Re: 59 Apache - Lifelong obsession
In October, I finally got the truck back in my garage where it belongs. I had stored it out at my Mom and Dad’s farm for the past few years. I put a fresh battery, fuel and a set of points in it and it fired right up.
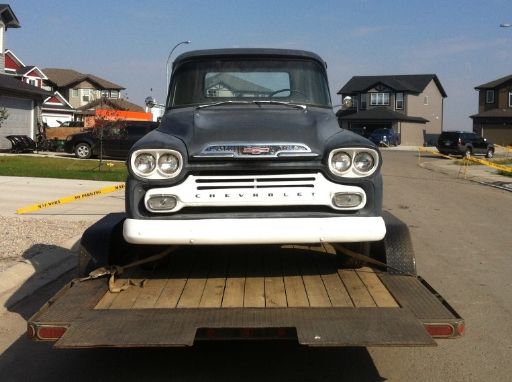 Over the Thanksgiving long weekend my father-in-law and I tore it apart and installed the Camaro clip. I drove the truck into the garage and immediately started tearing it apart. Notice the fuse box on the firewall? This was my version of wiring the first time around. I had cut a fuse block out of a truck at a wrecking yard and spiced all the wires into it years ago. The wiring was a mess of original wiring and a mix of what-ever color the closest roll of wire happened to be on my workbench. All of this mess will be replaced with a proper aftermarket wiring harness this time. 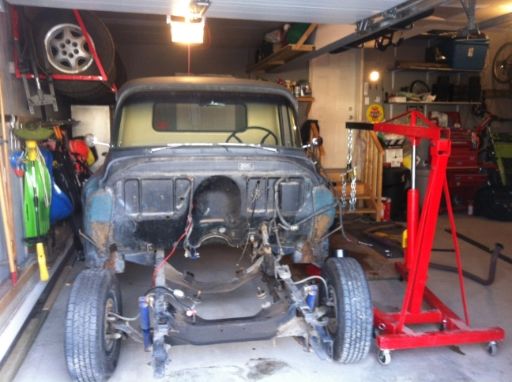 This was a running and driving truck just 2 days before. 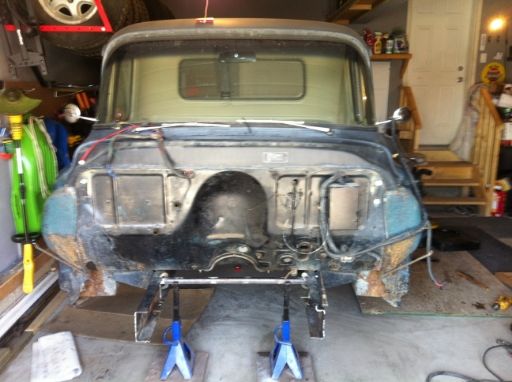 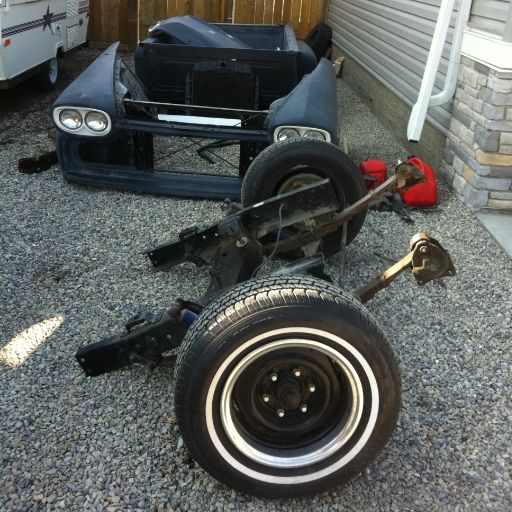 Getting ready to test fit the clip. 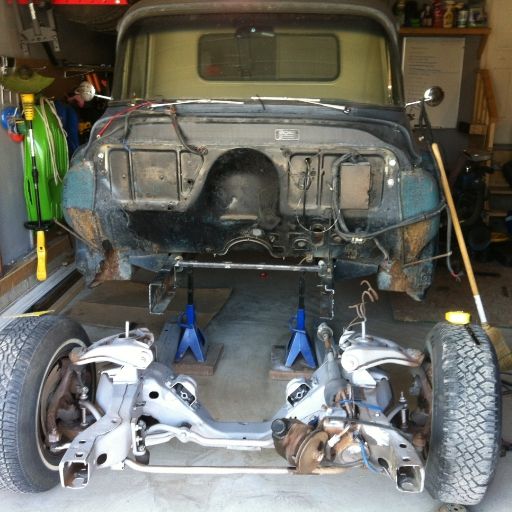 Test fitting a fender to see how the new stance will look. 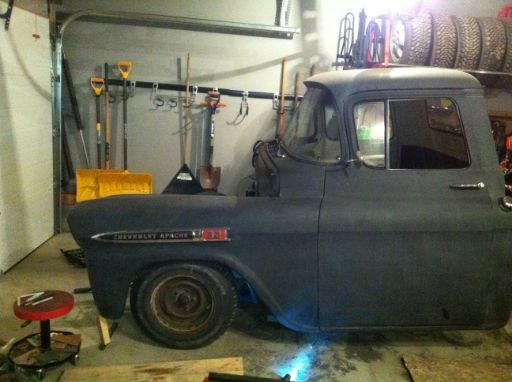 Here’s a comparison pic from a few years back. Notice two things: - The difference in stance with the stock suspension vs the camaro clip. - What happens when you leave primer out in the sun over a number of years. It has completely chalked out. 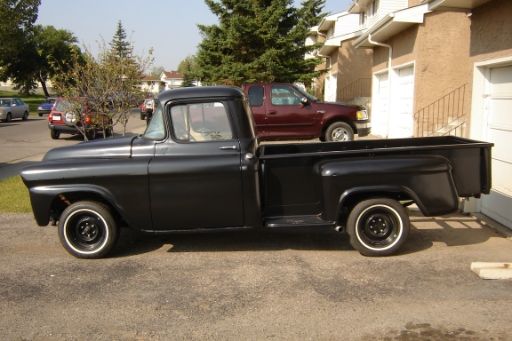
__________________
My Build Thread: 59 Apache - Lifelong obsession http://67-72chevytrucks.com/vboard/showthread.php?t=622133"]59 Apache - Lifelong obsession |
|
|

|
|
|
#29 |
|
Registered User
Join Date: Aug 2007
Location: Corona, California
Posts: 7,998
|
Re: 59 Apache - Lifelong obsession
The new stance looks good.
Kim |
|
|

|
|
|
#30 |
|
Registered User
Join Date: Apr 2007
Location: Calgary, Alberta
Posts: 441
|
Re: 59 Apache - Lifelong obsession
I got a set of finned corvette valve covers for Christmas, and I wanted a 60ish Corvette Air cleaner to match. I looked at reproduction air cleaners but they where crazy expensive so I decided to try making my own. I walked through the wrecking yard until I found an air cleaner that I liked the shape of. This particular one is out of a 87 Dodge Dakota. Then I cut the snorkel off and bent and welded in a piece of metal to fill the hole. I marked out and cut windows in what used to be the back of the air cleaner. I also welded a piece of metal onto the lid so I could stick a 327 Valve Cover sticker onto it. When I was finished, the windows looked like a little too open so I expoxied a metal screen in behind them.
The Edelbrock Performer intake will have the hole drilled out and will be fitted with an oil fill tube when the motor gets rebuilt, and since this is an early 327 with the pcv in the back of the block, I won’t need to put any holes in the valve covers. 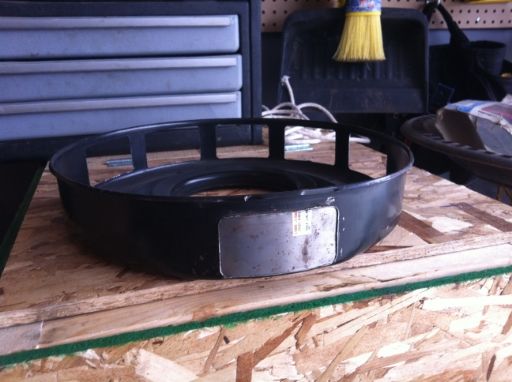 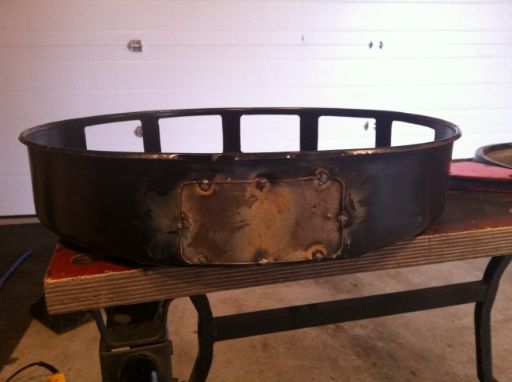 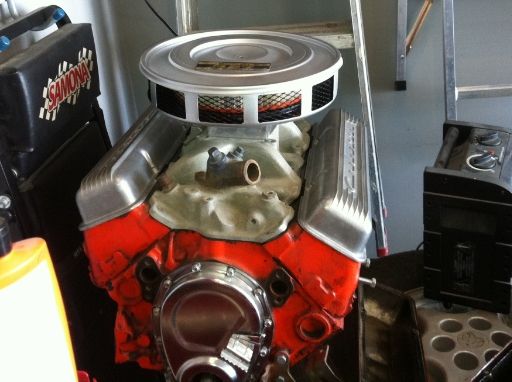
__________________
My Build Thread: 59 Apache - Lifelong obsession http://67-72chevytrucks.com/vboard/showthread.php?t=622133"]59 Apache - Lifelong obsession |
|
|

|
|
|
#31 |
|
Registered User
Join Date: Apr 2007
Location: Calgary, Alberta
Posts: 441
|
Re: 59 Apache - Lifelong obsession
When I first got my truck the original seat was basically a bare frame so I replaced it with a seat from a 66 Dodge Fury III. The seat fit well in the cab and was comfortable but it needed to be recovered and it always bugged me that it didn't tip forward like the original. I was browsing Kijiji looking for a late 80's Chevy truck seat when I stumbled onto this:
It is a stock seat that has been recovered out of a 1959 GMC Grain Truck. I couldn't believe my luck, a stock seat that was recovered in the color I want that will bolt right in 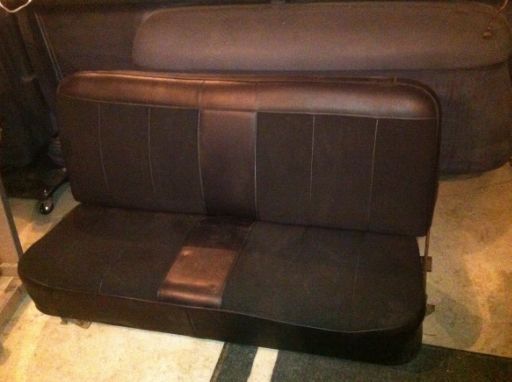
__________________
My Build Thread: 59 Apache - Lifelong obsession http://67-72chevytrucks.com/vboard/showthread.php?t=622133"]59 Apache - Lifelong obsession |
|
|

|
|
|
#32 |
|
Registered User
Join Date: Aug 2007
Location: Corona, California
Posts: 7,998
|
Re: 59 Apache - Lifelong obsession
Nice find.
Kim |
|
|

|
|
|
#33 |
|
Registered User
Join Date: Apr 2007
Location: Calgary, Alberta
Posts: 441
|
Re: 59 Apache - Lifelong obsession
I'm slowly making progress, new outer hinge pocket has been welded in. Cut out drivers side floor pan, was ready to replace it then found that I could poke a screwdriver through the driver's side cab brace. I've got it all cut out and ready to put the new one in. In between I bought some parts.
First I found a set of perfect shortbox bed sides and shortbox steps. They are rust free, straight and in bare metal. I didn't mind the longbox when it sat at stock height but once I dropped it I just didn't like the look. After doing the camaro clip on the front, shortening the frame to shortbox length doesn't seem like it will be too bad. 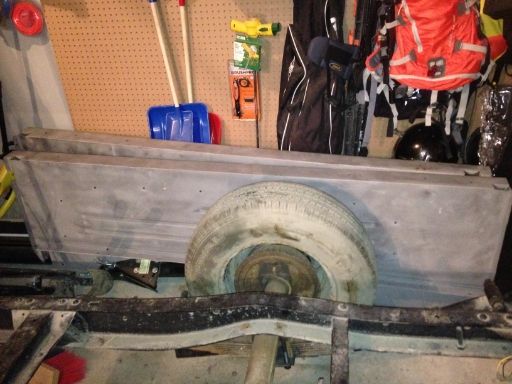 Next, I found a set of wheels. I originally planned on running a set of black Cragar G/T 's or the new Rocket Racing Fuel Wheels but these where too good to pass up. I got 5 rims plus tires . They are 71 z28 5 spoke Rally wheels. They give me a very similar look to the Cragars and fit my limited budget. I can always switch out the rims later. I plan to sell the tires and run the pinner whitewalls that are currently mounted on my old 6 bolt rims. 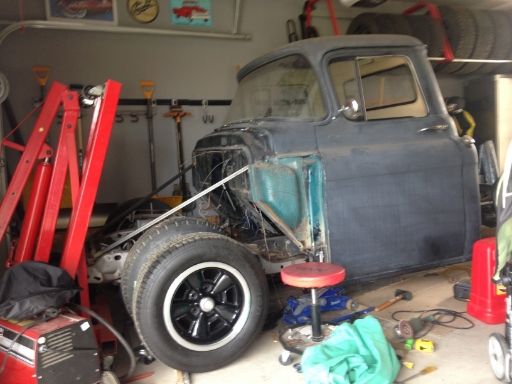 Here's a quick photoshop I did of what I want the finished truck to look like: 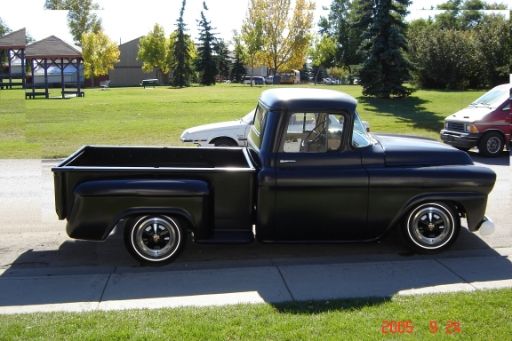
__________________
My Build Thread: 59 Apache - Lifelong obsession http://67-72chevytrucks.com/vboard/showthread.php?t=622133"]59 Apache - Lifelong obsession |
|
|

|
|
|
#34 |
|
Registered User
Join Date: Aug 2007
Location: Corona, California
Posts: 7,998
|
Re: 59 Apache - Lifelong obsession
Looks real nice.
Kim |
|
|

|
|
|
#35 |
|
Registered User
Join Date: Apr 2007
Location: Calgary, Alberta
Posts: 441
|
Re: 59 Apache - Lifelong obsession
I pushed it outside yesterday to sweep out the garage before winter comes.
It has been about a year since I pulled the truck out of hibernation and started working on it again. I'm not as far along as I had hoped but I keep working on it every chance I get. 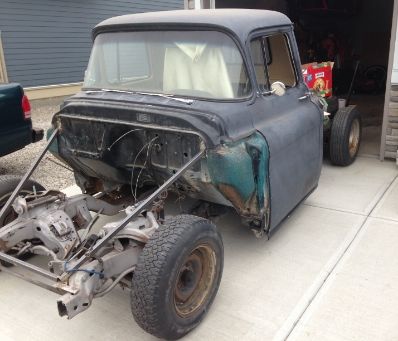
__________________
My Build Thread: 59 Apache - Lifelong obsession http://67-72chevytrucks.com/vboard/showthread.php?t=622133"]59 Apache - Lifelong obsession |
|
|

|
|
|
#36 |
|
Registered User
Join Date: Jan 2015
Location: Santa Monica
Posts: 264
|
Re: 59 Apache - Lifelong obsession
Great build thread!
Any updates?
__________________
Déjà vu. It's that feeling you get when you hit your thumb with the hammer a second time '59 Chevy 3100 Stepside |
|
|

|
|
|
#37 |
|
Registered User
Join Date: Apr 2007
Location: Calgary, Alberta
Posts: 441
|
Thanks for asking.
My two daughters keep my wife and I busy ( 1 and 3 years old ) so the only time I get out to the garage is after they go to bed. I get out to the garage once or twice a week but I'm lucky to put in two hours a night so progress has been pretty slow. I finished the drivers side cab mount, floor pan and hinge pocket. I spun it around so I can work on the passenger side. Passenger side hinge pocket is done and the rusted out cab mount has been cut out. I cut out a patch for the front of the step where the cab brace mounts as it was rusted from the backside and have it half welded in. I have a goal of finishing the passenger side floor pan by the end of February. It's a Friday night, looking forward to getting out to the garage and burning the midnight oil.
__________________
My Build Thread: 59 Apache - Lifelong obsession http://67-72chevytrucks.com/vboard/showthread.php?t=622133"]59 Apache - Lifelong obsession |
|
|

|
|
|
#38 | |
|
Registered User
Join Date: Jan 2015
Location: Santa Monica
Posts: 264
|
Re: 59 Apache - Lifelong obsession
Quote:
Don't forget tomorrow is Valentines Day... take care of your ladies 
__________________
Déjà vu. It's that feeling you get when you hit your thumb with the hammer a second time '59 Chevy 3100 Stepside |
|
|
|

|
|
|
#39 |
|
Registered User
Join Date: Apr 2007
Location: Calgary, Alberta
Posts: 441
|
Thanks for the reminder, lol. I better go out and buy the wife a card.
__________________
My Build Thread: 59 Apache - Lifelong obsession http://67-72chevytrucks.com/vboard/showthread.php?t=622133"]59 Apache - Lifelong obsession |
|
|

|
|
|
#40 |
|
Registered User
Join Date: Apr 2007
Location: Calgary, Alberta
Posts: 441
|
Re: 59 Apache - Lifelong obsession
I needed a break from all the rust repair so I decided to tackle a small project.
I wanted more of the gauges in my stock cluster to work. The first time I built the truck I ran a 3 gauge panel under the dash and only the temp gauge worked. I had seen a few threads where guys had used the stock face with updated internals, so I decided to take this a step further and find a set of gauges that had a face and needle sweep that complemented my stock cluster but gave me more detail than the stock 3 dots. I found this Autogage by Autometer 3 gauge set that looked like it would work. 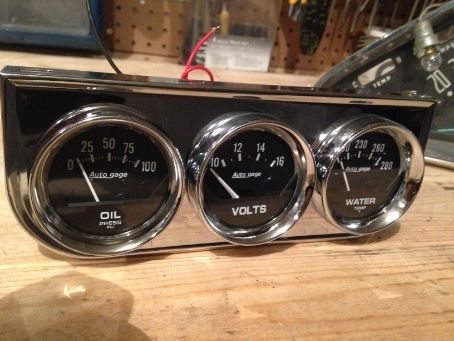 I gutted the volt and mechanical oil pressure gauges down to just the internals and the faces with my Dremel, and fit it to my original cluster. Amp meter is now a volt meter and the old oil pressure gauge was replaced with the Autogage one. 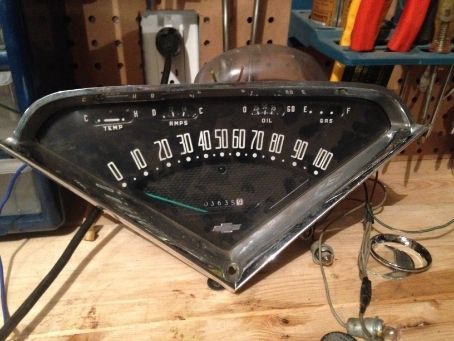
__________________
My Build Thread: 59 Apache - Lifelong obsession http://67-72chevytrucks.com/vboard/showthread.php?t=622133"]59 Apache - Lifelong obsession |
|
|

|
|
|
#41 |
|
Registered User
Join Date: Aug 2007
Location: Corona, California
Posts: 7,998
|
Re: 59 Apache - Lifelong obsession
Looks good.
Kim |
|
|

|
|
|
#42 |
|
Registered User
Join Date: Dec 2009
Location: Melbourne Australia
Posts: 549
|
Re: 59 Apache - Lifelong obsession
I like the use of the vintage 327, keep up the good work!
__________________
RIP John (Lambis), my beloved Father & best Friend. My Build 56 GMC http://67-72chevytrucks.com/vboard/s...d.php?t=486721 |
|
|

|
|
|
#43 |
|
A320 Pilot/USAF Retired
Join Date: Mar 2009
Location: Charleston, SC
Posts: 2,629
|
Re: 59 Apache - Lifelong obsession
Nice project!
__________________
JJ My 1957 build: http://67-72chevytrucks.com/vboard/s...d.php?t=334552 http://www.trifive.com/forums/showthread.php?t=22037 Instagram - Chuckdriver57 |
|
|

|
|
|
#44 |
|
Registered User
Join Date: Apr 2007
Location: Calgary, Alberta
Posts: 441
|
Re: 59 Apache - Lifelong obsession
Thanks for the encouragement! I've been frustrated by my slow progress.
__________________
My Build Thread: 59 Apache - Lifelong obsession http://67-72chevytrucks.com/vboard/showthread.php?t=622133"]59 Apache - Lifelong obsession |
|
|

|
|
|
#45 |
|
Registered User
Join Date: Nov 2010
Location: SoCal
Posts: 914
|
Re: 59 Apache - Lifelong obsession
Don't feel bad you aren't the Loan Ranger we are all behind schedule
  Nice project by the way, looking forward to seeing more pics. Nice project by the way, looking forward to seeing more pics.
__________________
I'm not tail-gating, I'm drafting.  http://67-72chevytrucks.com/vboard/s...d.php?t=432758 |
|
|

|
|
|
#46 |
|
Registered User
Join Date: Apr 2007
Location: Calgary, Alberta
Posts: 441
|
Re: 59 Apache - Lifelong obsession
Thanks BC Toy Chest. I've been following your build thread, I like all the pics you post. Your truck is looking good.
__________________
My Build Thread: 59 Apache - Lifelong obsession http://67-72chevytrucks.com/vboard/showthread.php?t=622133"]59 Apache - Lifelong obsession |
|
|

|
|
|
#47 |
|
Registered User
Join Date: Apr 2007
Location: Calgary, Alberta
Posts: 441
|
Re: 59 Apache - Lifelong obsession
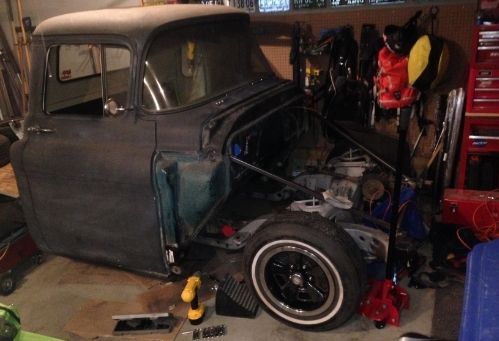
I threw a rim on to see how the 5 spokes look with the narrow whites. I'm really happy, looks exactly like I had pictured in my mind.
__________________
My Build Thread: 59 Apache - Lifelong obsession http://67-72chevytrucks.com/vboard/showthread.php?t=622133"]59 Apache - Lifelong obsession |
|
|

|
|
|
#48 |
|
Registered User
Join Date: Aug 2007
Location: Corona, California
Posts: 7,998
|
Re: 59 Apache - Lifelong obsession
Looks good on there.
Kim |
|
|

|
|
|
#49 |
|
Registered User
Join Date: Apr 2007
Location: Calgary, Alberta
Posts: 441
|
Re: 59 Apache - Lifelong obsession
Finally have some progress to show..
Before I pull the cab off the frame I wanted to make sure it has a solid foundation. When I built the truck the first time when I was 17, just cut out some sheet metal that I found in Dad's scrap metal pile by hand with tin snips. I bent it over a wooden post, my knee, whatever I could find to get it the shape I needed. I then proceeded to screw the patches down with sheet metal screws. At the time, the finished product looked pretty good. 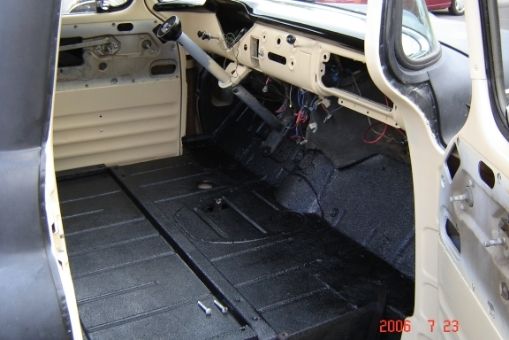 Too good in fact, because I forgot how horrible things were under my crudely constructed patches. Drivers, side: 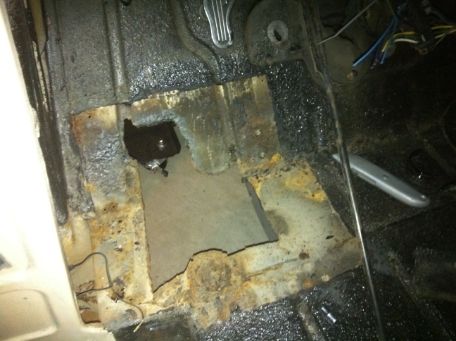 Passenger side: 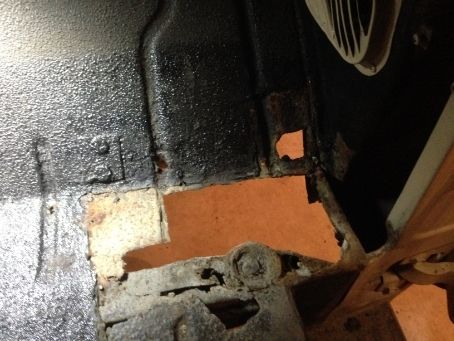 I attacked the driver's side first. Replacing the floor pan snowballed into the floor pan, lip that the floor pan butts up against, cab brace, front of the step where the cab brace is welded to, inner and outer hinge pocket. Then I moved on to the passenger side. I thought the driver's side would be the worst of it since the driver's door hinge was wore out and the passenger side wasn't at all. I deduced that this old farm truck probably didn't have a passenger most of the time and since the door hinges were not worn out there wouldn't be a passenger's wet boots rusting out the floor board on the passenger side all the time like the driver's side. As has happened a few times in this project I was completely wrong!! The passenger side was way worse than the driver's side. I now remember that I had to fix a leaky heater core, when I first put it on the road and that was likely the culprit. Passenger side needed everything the driver's side needed plus I ended up fabbing a patch for the kick panel. It rusted from the inside due to a plugged cowl drain.. I ended up using alot more of the patch panel as the metal was paper thin. My criteria was stabbing at the metal with my awl, if it went through I started cutting until I found good metal. Only 38,698 tack welds later, here is the completed floor pans. My process was to overlap the old metal with the new patch, then cut through both pieces of metal with a thin cut off wheel. I used sheet metal screws in the cut between the two pieces of metal as low buck clecos to hold everything flush. Then I butt welded it all in with my 110 flux core wire feed welder. Gas Mig would be better but I figured since most of this will be hidden on the firewall side under the inner fenders it will be good enough. A copper backer was used to prevent burning through. While I was at it, I plan on moving the battery under the floor. I copied the 47-54 chevy battery door idea that a few others have used. 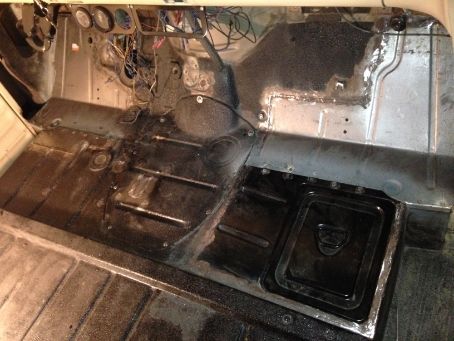
__________________
My Build Thread: 59 Apache - Lifelong obsession http://67-72chevytrucks.com/vboard/showthread.php?t=622133"]59 Apache - Lifelong obsession |
|
|

|
|
|
#50 |
|
Registered User
Join Date: Aug 2007
Location: Corona, California
Posts: 7,998
|
Re: 59 Apache - Lifelong obsession
nice repair on the floor.
Kim |
|
|

|
 |
| Bookmarks |
| Thread Tools | |
| Display Modes | |
|
|