
 |
Register or Log In To remove these advertisements. |
|
|
|
|||||||
 |
|
|
Thread Tools | Display Modes |
|
|
#26 |
|
Registered User
 Join Date: May 2012
Location: Okmulgee, OK
Posts: 205
|
Re: His 1969 Stepside build
I teach HVAC and contract quite a bit on the side. That's how I support my obsessions and go fast toys.
Mike is a beast. I'm pretty jealous of that shortwide. |
|
|

|
|
|
#27 |
|
Registered User
 Join Date: May 2012
Location: Okmulgee, OK
Posts: 205
|
Re: His 1969 Stepside build
|
|
|

|
|
|
#28 |
|
Still Learning
Join Date: Jul 2009
Location: Central Oklahoma
Posts: 10,108
|
Re: His 1969 Stepside build
What a huge score! I love the buckets and tach. Heck, I love all the parts. Congrats. Not sure how I missed these parts.....
|
|
|

|
|
|
#29 |
|
Registered User
 Join Date: May 2012
Location: Okmulgee, OK
Posts: 205
|
Re: His 1969 Stepside build
Mike, they were in a guy's attic! Somebody had stolen the AC at one of his rent houses and I replaced it and went to his house to get a check and we got to talking about his C30 flat bed. I showed him pics of mine. Then he dropped this bomb on me and he said he had brand new restored black houndstooth buckets and restored tach cluster up in the attic. By the time it was over, I knocked a few hundred dollars off his bill and have to go fix a small ductwork issue at another rent house (3 hours labor). Win Win. Major score for the good guys. =) It's really motivated me to get this frame rolling again so I can get closer to seeing these beautiful seats in my cab. Exactly what I needed.
Also decided to sell my other baby, my GSXR, to carry this project through fall and winter. |
|
|

|
|
|
#30 |
|
Registered User
 Join Date: May 2012
Location: Okmulgee, OK
Posts: 205
|
Re: His 1969 Stepside build
|
|
|

|
|
|
#31 |
|
Registered User
Join Date: Aug 2012
Location: Topeka Kansas
Posts: 2,655
|
Re: His 1969 Stepside build
Most guys are using the CPP sheet metal engine stands with Poly mounts, here is the link.
http://www.ebay.com/itm/1963-66-68-6...item417bd53146 You will also need LS adapter plates and there are some decisions to be made because there are some issues involved with leaving the A/C compressor in the stock location. If you leave the A/C compressor in the stock location you will have to make custom adapter plates, trim your frame and have custom hard lines made for the compressor. The best option is to buy a A/C compressor relocation kit and move it to the top passenger side of the engine because it makes it easy and easy is good because it requires no custom made parts, Holley sells an inexpensive kit, and don't balk at the price because you will spend that much anyway with all the custom work if you have to pay someone to do it. Last edited by Xeen; 09-21-2014 at 03:10 PM. |
|
|

|
|
|
#32 |
|
Registered User
 Join Date: May 2012
Location: Okmulgee, OK
Posts: 205
|
Re: His 1969 Stepside build
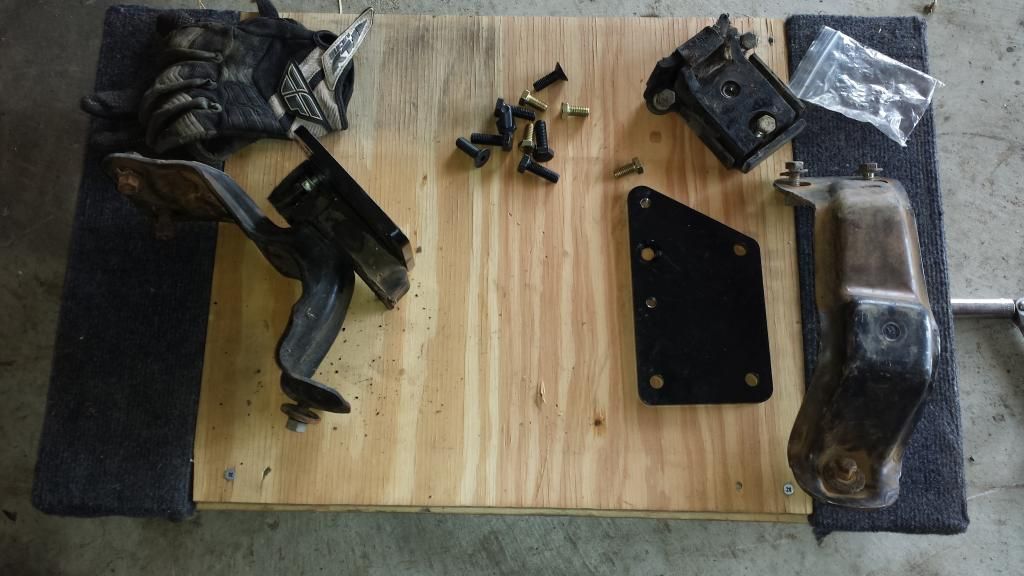
I've seen the holley kit to relocate the ac comp. It seems everybody has a different outcome with the ac comp and trans tunnel and even exhaust manifolds. I want to sit this motor and trans in frame and set my cab on and look at it with my eyes on my truck. What's wrong with using the original motor mounts and adapters? Like this
|
|
|

|
|
|
#33 | |
|
Still Learning
Join Date: Jul 2009
Location: Central Oklahoma
Posts: 10,108
|
Re: His 1969 Stepside build
Quote:
There are tons of guys on here that have used the stock mounts. I think it's safe to say they work out fine. For me, the only reason I with the later version "clam shell" design I had a bad experience with the stock design on my BB 396 truck. It was a long time ago, I hammered the throttle and the driver side mount broke then I trashed my header etc. when the engine torqued. The rubber was the only thing holding it together. I like the clamshell because the even the rubber breaks, the bolt keeps it from separating. Like I said, just my personal experience. I'm sure you'll be fine with the stock mounts. The rubber on mine was probably the oem stuff from 1970. Good idea about mocking it up with the cab before finalizing your setup. |
|
|
|

|
|
|
#34 | |
|
Registered User
Join Date: Aug 2012
Location: Topeka Kansas
Posts: 2,655
|
Re: His 1969 Stepside build
Quote:
There are however times when it's a good idea to spend a little bit of money to get a favorable outcome. The problem is two fold and caused entirely by trying to keep the A/C compressor in the stock location, if you simply relocate the compressor the engineering problems go away. When you keep the A/C compressor in it's stock configuration you are forced to move the entire engine forward via the adapter plate and this causes several issues. The first being that the exhaust ports are moved forward from their stock location in relation to the engine stands and because of that you can no longer run GM stock style manifolds of any kind or 99% of all headers because they simply wont clear the stock engine stands anymore because it is a cathedral style and it is too tall at the top. The second being that you are moving the entire engine too far forward and you run into clearance issues with the core support and subsequently you don't have enough room for your fan assembly. You can fix the exhaust clearance issues by using the CPP sheetmetal engine stands but you will still run into the problem that your engine will be too close to the core support and the only way to fix that is by moving the CPP sheetmetal engine stand back to the I6 location in the frame instead of being in the v8 location and you will have to drill holes in the suspension crossmember for the lower bolt hole. I have already been through all of this and it is possible to do but it is a major pain in the butt and can all be avoided by simply relocating the A/C compressor. You can do what you want, I am just trying to save you a major headache. Last edited by Xeen; 09-22-2014 at 04:33 PM. |
|
|
|

|
|
|
#35 |
|
Registered User
 Join Date: May 2012
Location: Okmulgee, OK
Posts: 205
|
Re: His 1969 Stepside build
I have no problem relocating the compressor to the top with the Holley kit. In fact, my plan is to pull the compressor for now and do a vintage air under dash unit after I get the truck together. This is a budget build to a certain point. I'm rushed a little bit to get it built because I want Nelson's widow wife to see the truck "finished" before she passes. Nelson is the one who willed the truck to me in his last days. And his wife isn't doing very good. I don't have an unlimited budget and have to do a little bit at a time. There are several things I plan on doing after the truck is together like:
*The AC set up *I'm keeping the 3.08 open rear for now *Rear disk brakes *the bed wood This truck will never be sold or anything. I want to get it together for her to see and I can upgrade things like that after it's street worthy and while I'm enjoying it. I've built 2 bikes and a solid front axle 96 GMC 4x4 that way and it works for me. Brian- If I move the compressor to the top then I can use my original set up like pictured or clam shell type mounts? And just go with TBSS manifolds and they'll clear the stands? I bumped an old thread, but will ask here, too. How about the POL stands? I just worry because they don't mention how far they move the motor forward. It just says "slightly" http://www.performanceonline.com/196...RACKETS-16820/ Thanks to everybody for the info! |
|
|

|
|
|
#36 | |
|
Registered User
Join Date: Aug 2012
Location: Topeka Kansas
Posts: 2,655
|
Re: His 1969 Stepside build
Quote:
The GM clam shell style mount will raise the engine up an inch and cause issues with the trans tunnel if you decide to install air ride later. As far as the POL engine stands I honestly can't tell you because I have never used them but I have used the CPP sheetmetal engine stands and they are awesome they clear the GM, TBSS and CAMARO manifolds and almost all headers, so I would go with a "known good set up" if I were you. I see that you already have an 1.25" forward LS adapter plate set, what brand is it and where did you buy it from? Last edited by Xeen; 09-23-2014 at 02:27 PM. |
|
|
|

|
|
|
#37 |
|
Registered User
 Join Date: May 2012
Location: Okmulgee, OK
Posts: 205
|
Re: His 1969 Stepside build
Ok. I'm going to look at the CPP sheet metal stands. I only learned about them hours ago. I was researching their tubular mounts and stumbled on to a post that mentioned the new sheet metal design.
Yes I have 1" forward adapter plates. They're 3/8" thick regular simple plates from E-bay. http://www.ebay.com/itm/LS1-Conversi...394207?vxp=mtr My plan now is to pull the trigger on these CPP mounts since I can run TBSS or F-body manifolds with no modifications. Did you run a 4L60E and what transmission tunnel? Are you running a truck oil pan? Thanks again for all the help! * EDIT * CPP Sheet metal stands link from Ebay. http://www.ebay.com/itm/1963-66-68-6...a8ec28&vxp=mtr |
|
|

|
|
|
#38 |
|
Registered User
Join Date: Aug 2012
Location: Topeka Kansas
Posts: 2,655
|
Re: His 1969 Stepside build
The CPP sheetmetal engine stands will allow the tranmission to clear the low hump trans tunnel with a 4L60E even when moved to the I6 frame position so no worries there.
I am using the truck pan in mine but if you ever lower the truck more than 4.5"/6" you will need to get a low profile pan. One more thing, the 1" forward LS adapter plates aren't going to work, you need the "stock location" LS adapter plates because the 1" forward LS adapter plates will throw everything out of wack, the engine will be too far forward and cause the fan assembly to have clearance issues with the core support and you will have to lengthen your driveshaft which costs more money, keep it simple no need to reinvent the wheel here. You will be able to sell the 1" forward adapter plates with no problem so don't worry about that part. Last edited by Xeen; 09-23-2014 at 03:39 PM. |
|
|

|
|
|
#39 |
|
Registered User
 Join Date: May 2012
Location: Okmulgee, OK
Posts: 205
|
Re: His 1969 Stepside build
I took Brian's advise and got the CPP sheet metal stands. They're a nice piece, it just sucks that CPP's shipping and handling times are HORRIBLE, along with their customer service... I'm fighting this issue right now---- The engine will not drop down low enough to get the bolts through the engine stand and motor mount. I shaved the bump off the back of the motor mounts (2142 motor mounts) and it helped but still no go. I asked CPP what thickness they use on their adapter plates and they couldn't tell me. I did not buy my adjustable plates from CPP, they came from cutthroat4x4.com. BUT they're 3/8" thick. I dropped them off at a buddy for him to mill them down to 5/16" thick and everything worked out. Time to bring the cab back in again.. Waiting for a new body bushing kit.
Here was my issue when the adapter plates were at 3/8" thick- 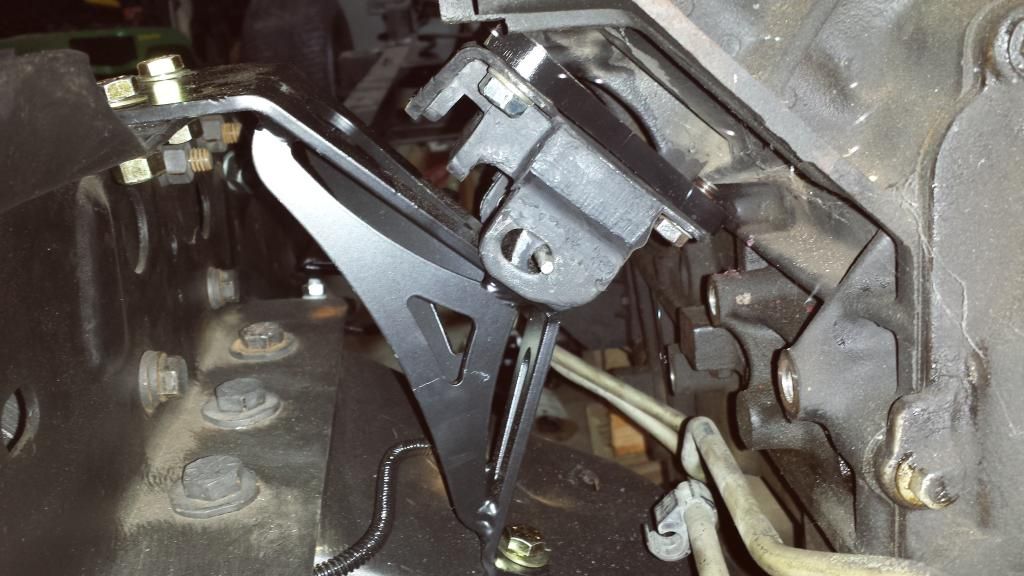 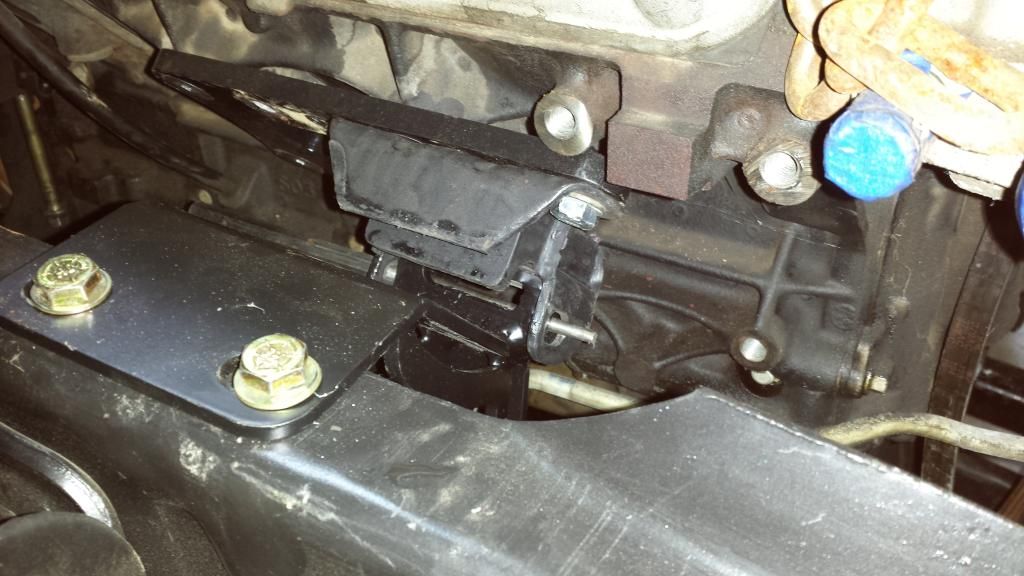 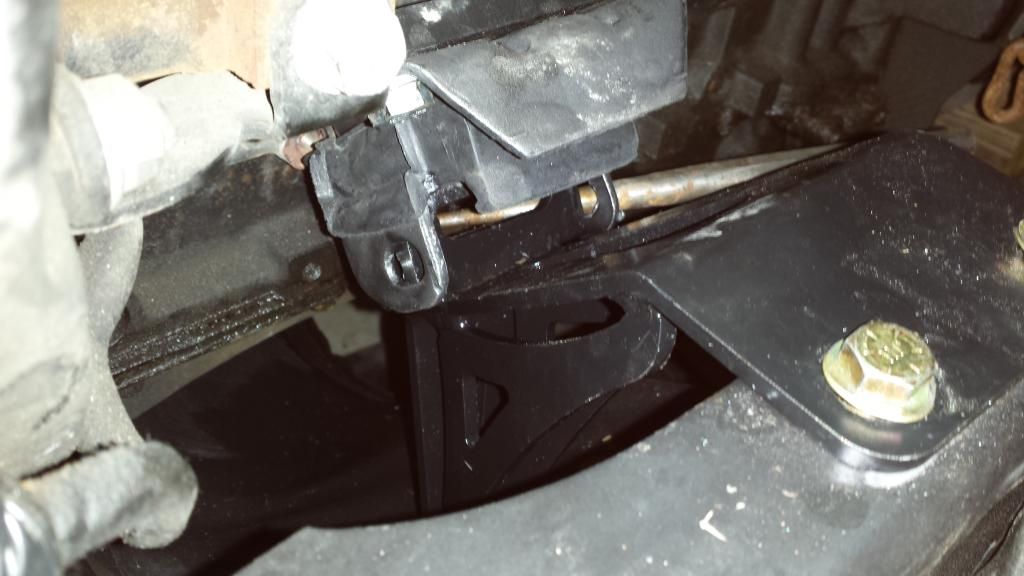 At some point I'm going to have to stop and clean my shop up 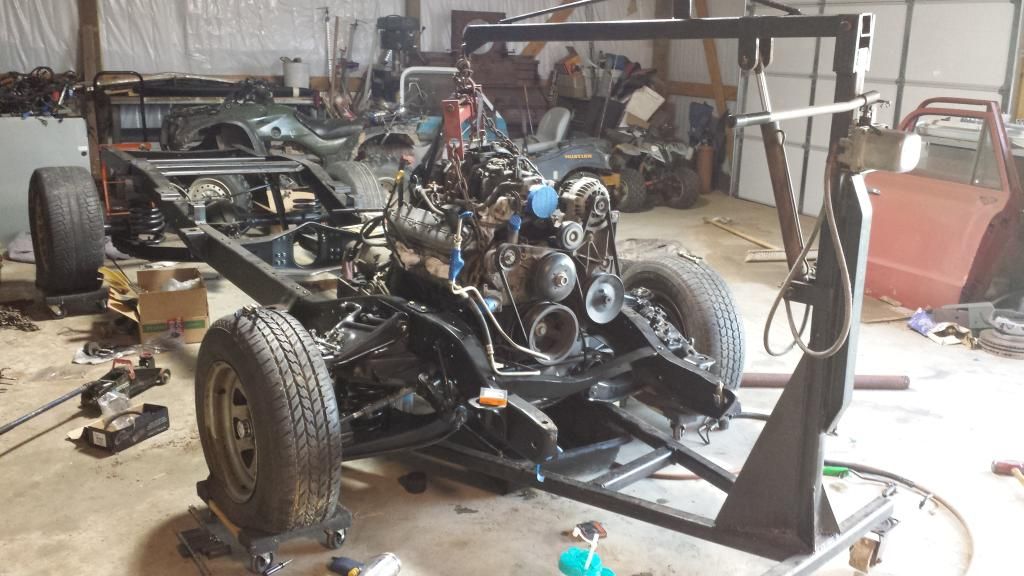 Now, I'm getting the engine laid back 4 degrees and building my trans crossmember. I plan on using a stock auto crossmember I have off a 72 and cut the one up off the 02 Chevy and just adapt the 72 to accept the 4L60E trans. I'll post up that in a couple days. Thanks everybody for the help and info. Especially Brian (xeen) and Mike (Mcbassin) Appreciate you guys. |
|
|

|
|
|
#40 | |
|
Registered User
Join Date: Aug 2012
Location: Topeka Kansas
Posts: 2,655
|
Re: His 1969 Stepside build
Quote:
Yeah those LS adapter plates were way too thick, I can't believe how thick they were it was overkill to say the least. You are lucky to have a friend with a Mill he just saved your bacon. Last edited by Xeen; 10-16-2014 at 05:31 PM. |
|
|
|

|
|
|
#41 |
|
Registered User
Join Date: Mar 2008
Location: Sapulpa, Oklahoma
Posts: 70
|
Re: His 1969 Stepside build
Its all starting to come together and looking good. Maeks me wish I would have done an LS from the start.
|
|
|

|
|
|
#42 |
|
Registered User
 Join Date: May 2012
Location: Okmulgee, OK
Posts: 205
|
Re: His 1969 Stepside build
|
|
|

|
|
|
#43 |
|
Registered User
 Join Date: May 2012
Location: Okmulgee, OK
Posts: 205
|
Re: His 1969 Stepside build
|
|
|

|
|
|
#44 |
|
Registered User
 Join Date: Dec 2013
Location: Duluth, GA
Posts: 314
|
Re: His 1969 Stepside build
nice thread. odd you need a high hump with your setup tho...
|
|
|

|
|
|
#45 |
|
Registered User
 Join Date: May 2012
Location: Okmulgee, OK
Posts: 205
|
Re: His 1969 Stepside build
Thanks. I wasn't expecting it, but I do have the motor pretty far back. The floor pan is really hitting the trans. I have looked through several build threads and it's hit and miss on the high hump. I think it all has to do with where the motor sits. I wanted it as far back as possible since there WILL BE a turbo on her the first winter after it's back together.. =)
|
|
|

|
|
|
#46 |
|
Registered User
 Join Date: Dec 2013
Location: Duluth, GA
Posts: 314
|
Re: His 1969 Stepside build
nice....i def plan on addin a snail at some point too. gotta get my mount stuff sorted out....but i have a 4l80e so we shall see if i need a high hump too lol
|
|
|

|
|
|
#47 |
|
Still Learning
Join Date: Jul 2009
Location: Central Oklahoma
Posts: 10,108
|
Re: His 1969 Stepside build
Very nice progress on your truck Joey! you have gotten a bunch done since the last time I checked in. Thanks for the sweet deal on the parts. It was good to meet you and check out your truck. It's going to be really nice!
|
|
|

|
|
|
#48 |
|
Registered User
 Join Date: May 2012
Location: Okmulgee, OK
Posts: 205
|
Re: His 1969 Stepside build
Thanks Mike! Hoping to get to work on my cab over Christmas break and get to work on my wiring harness. It may end up getting mailed to Crash. =) I use your build thread ALL THE TIME when I run in to questions. Hope the parts work well for you. Glad to meet you! Let's get together again when it warms up so I can see that beautiful short wide.
|
|
|

|
|
|
#49 |
|
Registered User
 Join Date: May 2012
Location: Okmulgee, OK
Posts: 205
|
Re: His 1969 Stepside build
Didn't get to work on my truck like I wanted... But I did get the broken exhaust manifold bolts out and bolted up the TBSS manifolds. There tons of room for them! I have also decided I'm going to have to ditch the original cab and build the black cab I have. It has some rust on each side in the floor, rockers, cab corners, around the gas tank filler, and 2 tiny pin holes on the firewall. But the red cab needed the roof cut off... plus everything the black cab needs.
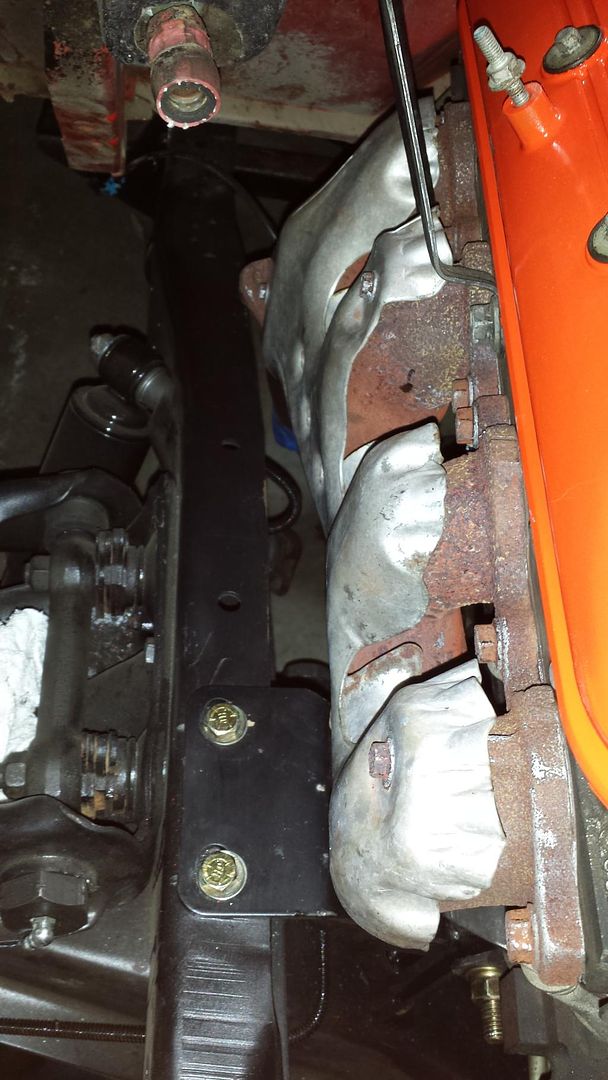 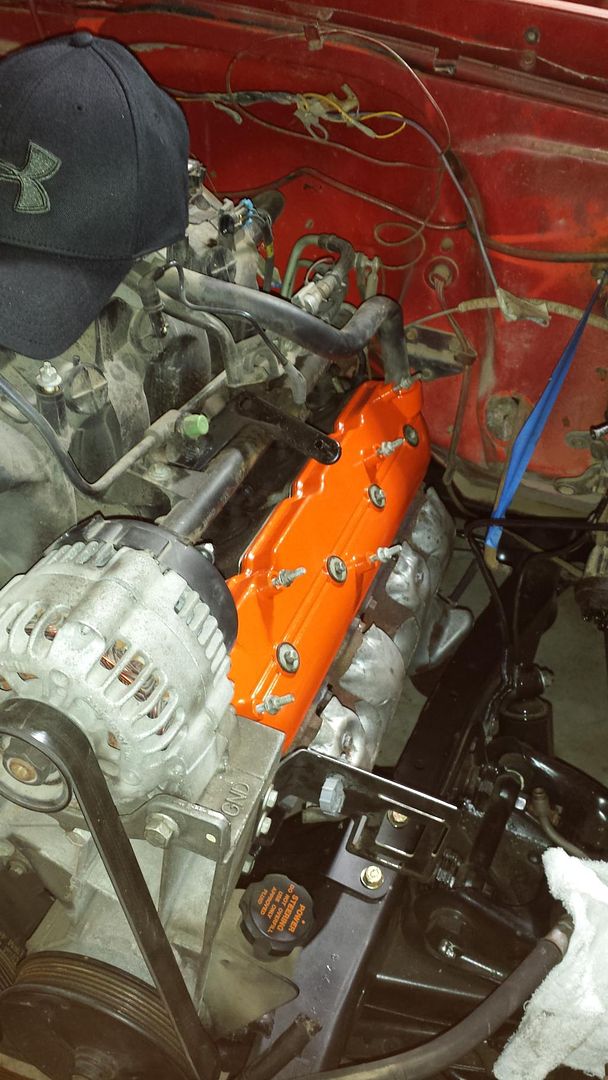 Out with the rust pile.. 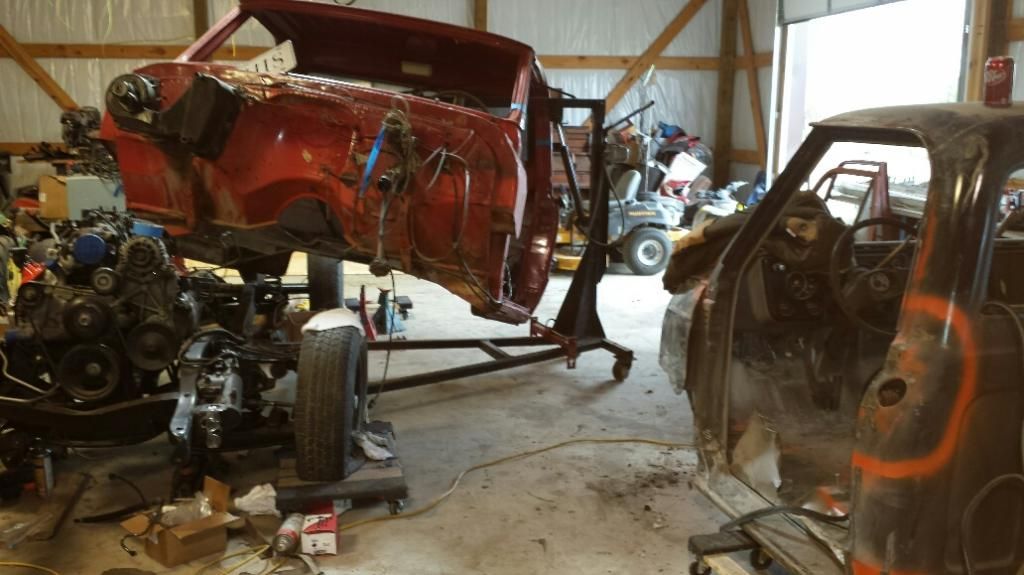
|
|
|

|
|
|
#50 |
|
Registered User
 Join Date: May 2012
Location: Okmulgee, OK
Posts: 205
|
Re: His 1969 Stepside build
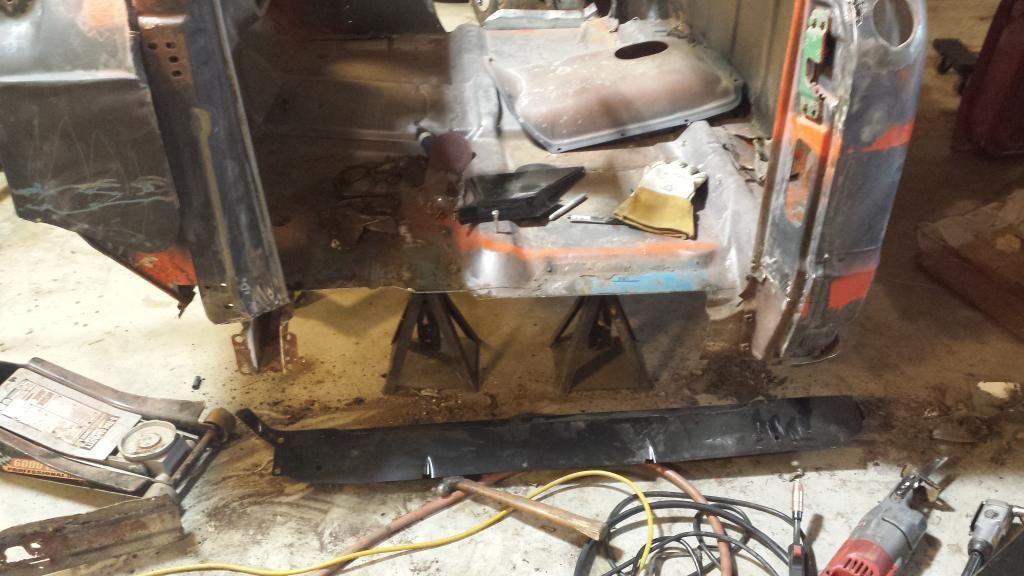
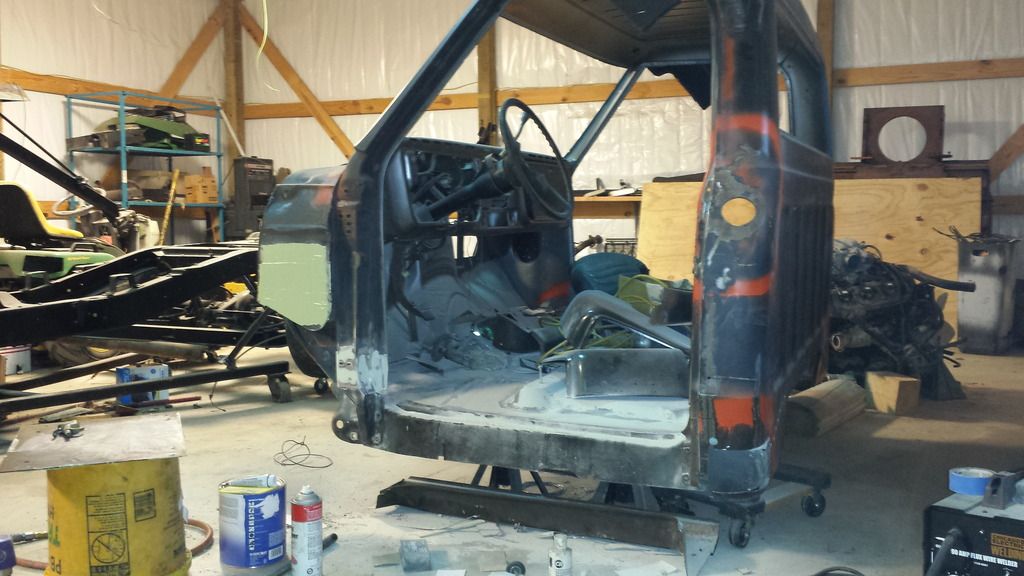
Sorry for the delay but there's been a small delay In action here. I've been tinkering with this cab but at the same time, hoping to find a clean cab somewhat local to me. I'm not 100% satisfied with the quality of these patch panels. I've had to cut, bend, relief cut, etc etc. here's what I'm working with, replacing cab corners, kick panels, Lower A pilar by lower door hinge, and doing floor extensions and a few small patches on the floor.
  Posted via Mobile Device |
|
|

|
 |
| Bookmarks |
| Thread Tools | |
| Display Modes | |
|
|