
 |
|
|
#701 |
|
Senior Member
Join Date: Apr 2004
Location: sw colorado
Posts: 2,720
|
Re: 72 k20 project
I have a few files for sure. they are all pretty specific to my truck though
|
|
|

|
|
|
#702 |
|
Senior Member
Join Date: Apr 2004
Location: sw colorado
Posts: 2,720
|
Re: 72 k20 project
It has been a few moons since i updated this. i havent done a whole lot but i just kept not taking pictures of what i had done.
so, anyhow. i finally chased down some 1/2"-13 x 4 1/2" flat allen head bolts. they only had them in stainless, which i suppose is ok, but i dont know if i will like how they pop against the bumper bracket when it gets powder coated black... unless i do it in silver. 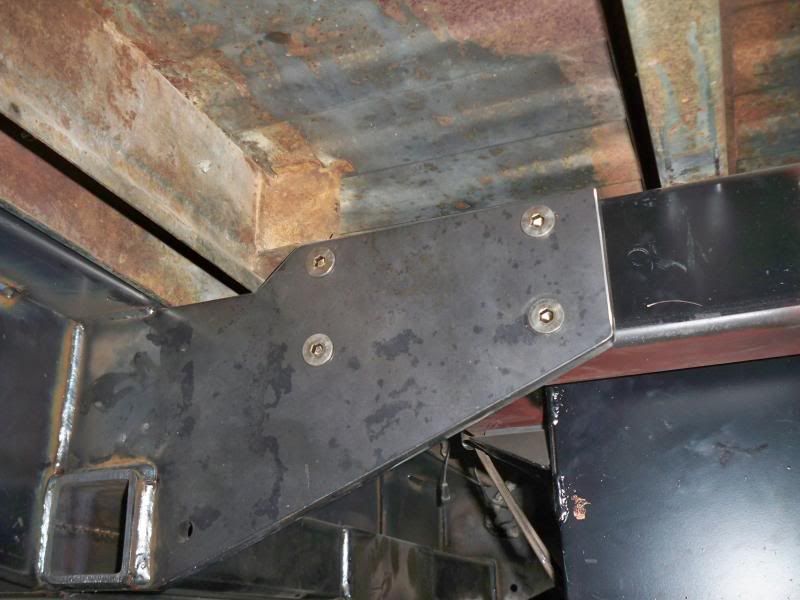 some of you may recall my first draft engine mounts. you will notice large holes in the frame and a distinct absence of aforementioned mounts on the frame. the cross member mounts are also suspiciously absent. 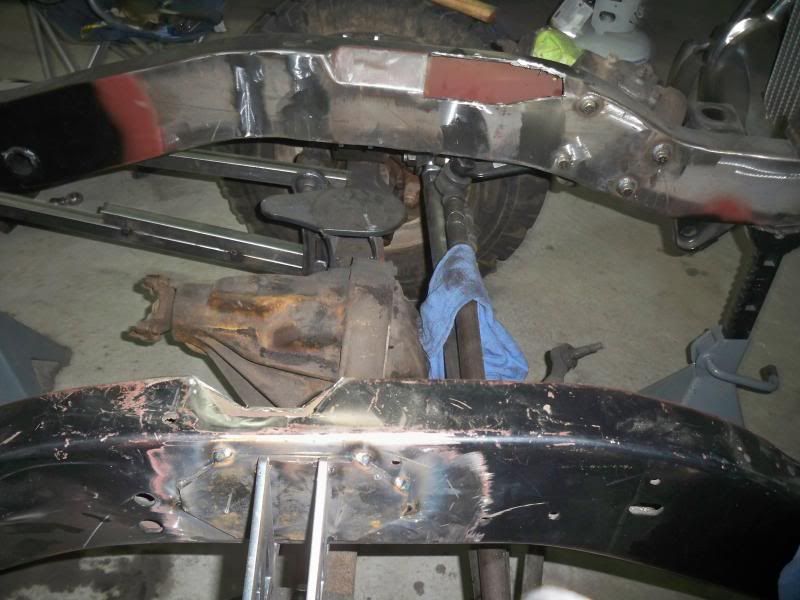 the crossmember had to go. it was directly in the way of the tie rod. i ordered this one from Offroad Design. the steering arm on the knuckle came with it, and the TRE's. you will also note the large bracket that has sprouted off of the DS framerail. that is the hard mount for the front panhard. also of note in this picture are the improved shock mount/bag gusset. i say improved because i re-cut them out of .250" material. i guess i got chicken. you cant really tell but due to some adulterous lovemaking between the panhard and the bags, they are 1/2" further to the rear as well. i am going to do some machining on the bag plates to accommodate a different bolt then i will replace them and move the lower plates back on the axle as well 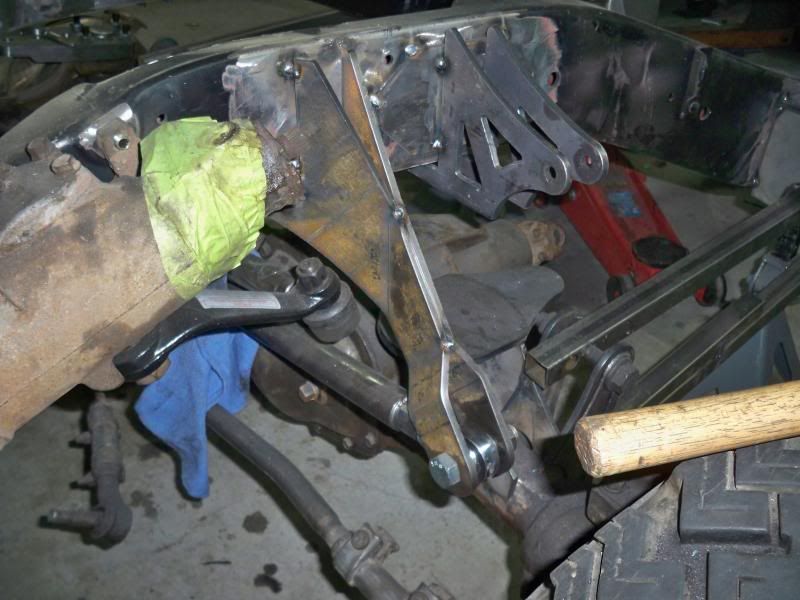 At this point you are probably thinking i am a huge jackwagon for building it all one way, then hacking it apart to do it another. you are probably right. i really should have looked closer at the crossmember and steering issue when i built it. i didnt even think about it then. but in my defense, it probably would have caused issues with the track bar anyhow, and when i built the crossmember i was planning on leaves, not bags. the engine mounts, while i was looking for an excuse to change them i was content to leave them as they were because they worked. but then something happened that allowed me to start the redesign. this shiny new awesome showed up... 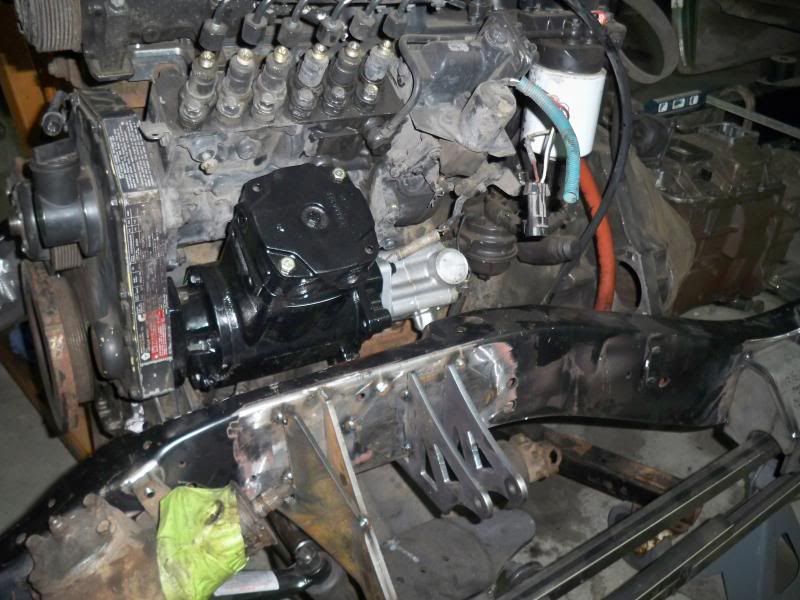 i had been wanting an engine driven air comp for quite some time. i eventually settled on an electric that was burly enough for me and that was the plan. then Ryan dangled this in front of me and i couldnt resist. 13.2 CFM at 1250 rpm. awesome. it is a haldex/bendix QE296. the silver whatchamijiggy on the back is the hydraulic pump for steering. now, since the beginning i was a little concerned that i would feel a lot of engine movement in the cab due to the abundance of poly bushings holding the engine. so one bored day i searched the interwebs until i found a direct replacement t-bushing that was molded from rubber instead. now i can easily swap between poly and rubber if i dont like the rubber, or one day it has a zestier engine that may eat the rubber. 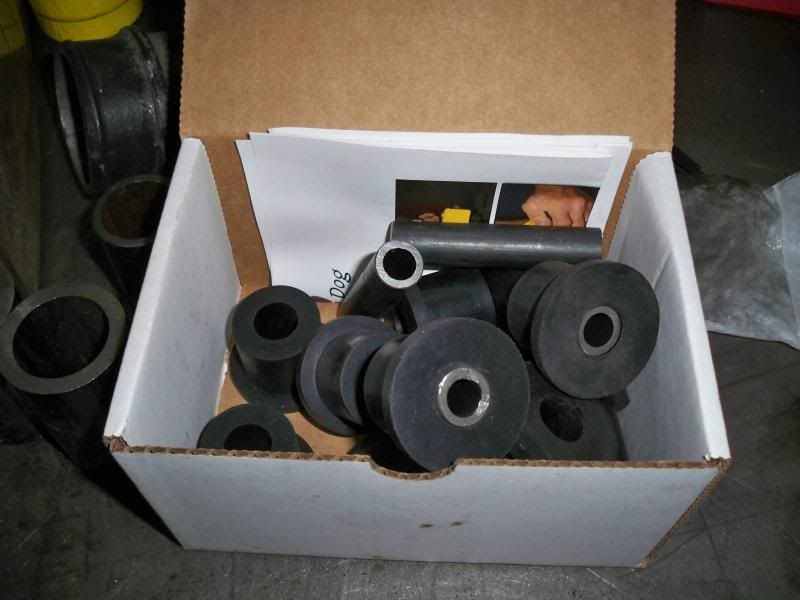
|
|
|

|
|
|
#703 |
|
Registered User
Join Date: Jun 2010
Location: Pittsburg, KS
Posts: 953
|
Re: 72 k20 project
Just seeing the pictures of the air compressed didn't make it look that big. But on the motor I can see why you have to change all that. The new mounts should be interesting. Looking forward to seeing how you do them.
__________________
1980 K10 - 6.2L Diesel/SM465/NP205 Build Thread 1984 K30 CC Dually - "The Tank" 12V Cummins/Nv4500/Np205/D60/D70HD 4" lift & 37's Build Thread 1960 C-60 Dump Truck Make it road worthy! Thread |
|
|

|
|
|
#704 |
|
Senior Member
Join Date: Apr 2004
Location: sw colorado
Posts: 2,720
|
Re: 72 k20 project
back to the engine mounts. the hydraulic pump on the air compressor ended about half way through the top of my existing mounts. that was the nudge i need to do a redesign.
first was the trans mount. since i was already remounting the engine i decided to give myself a little extra sliver of room on the back of the engine. i moved the entire powertrain forward a half an inch. 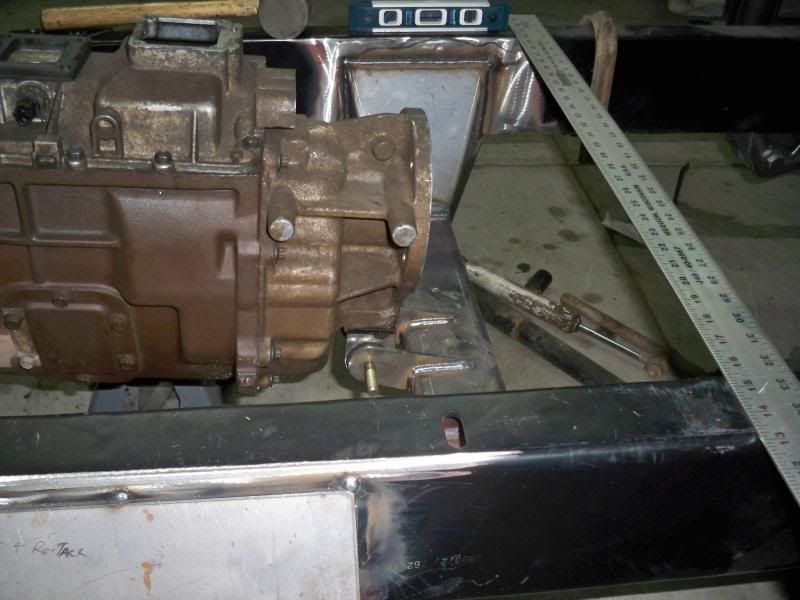 this is pretty much the same thing as it was. but it to has a rubber bushing in it now. the plan that had been cooking in my head from the first time i decided the original mounts had a flaw, was something that supported the front of the engine and the rear. similar to the medium duty rigs but a little different. this is the front engine mount i cooked up using the mounting bosses on the front and side of the block at the front. 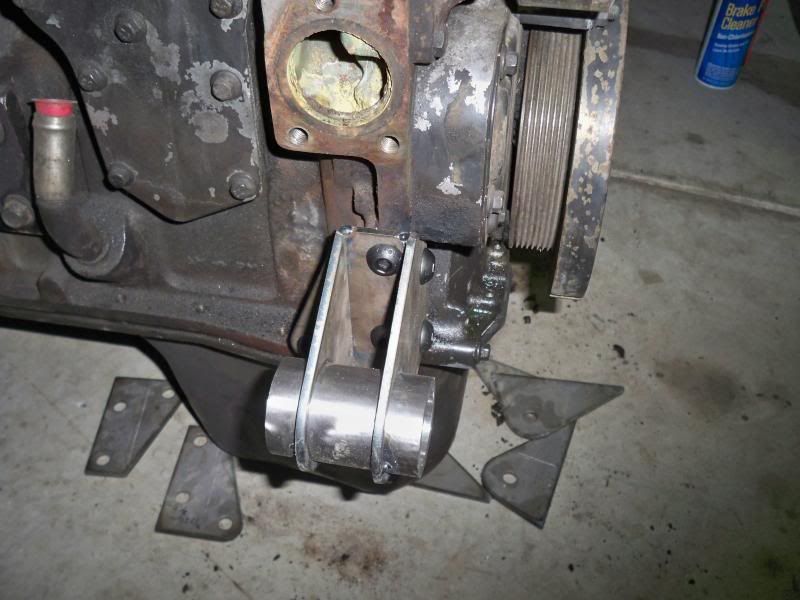 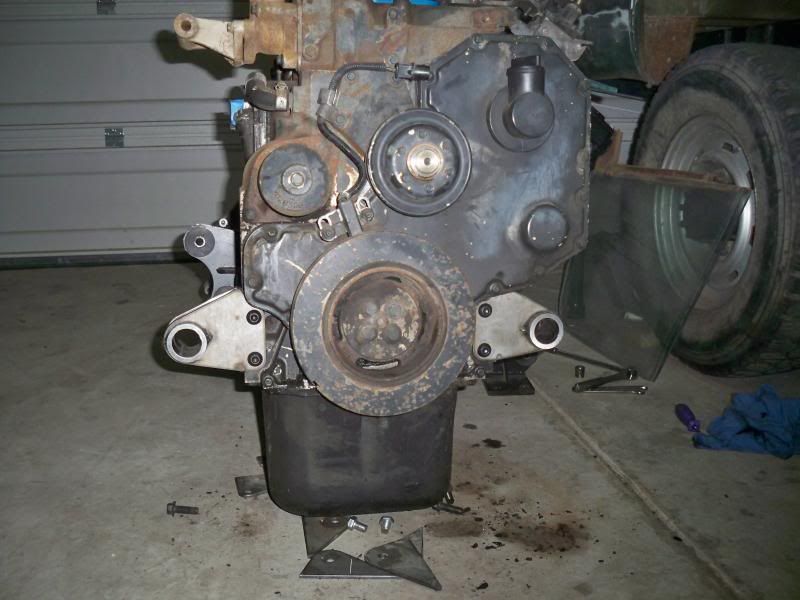 i have to finish the tabs for the frame, but this is what it looks like. it has created a small issue with the steering box bolts but i have a silly plan for that. 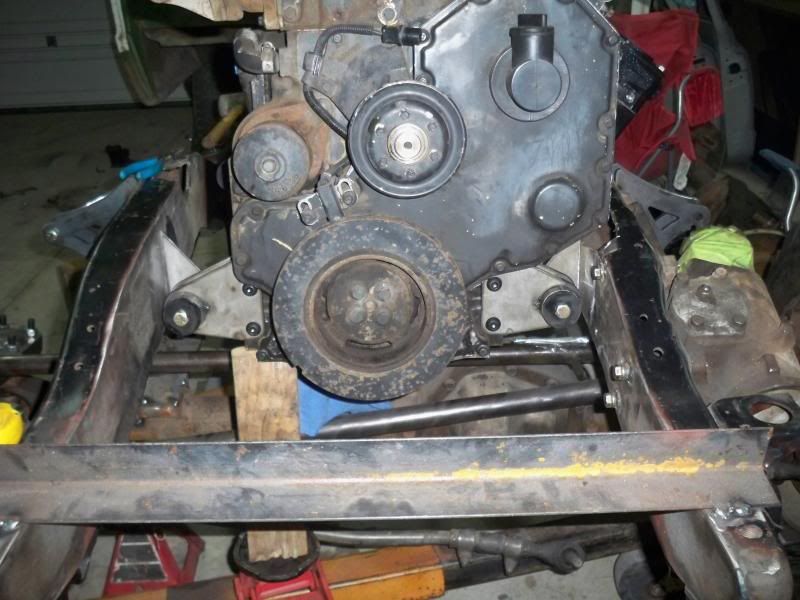 i will be fabricating some mounts that use the factory dodge location on the side of the block and go off back to the rear. the centerline of the rear set of bolts in that area is further back than the centerline of the engine weight. so anything that is behind that will mount the engine in a way that is is totally supported by its mounts. this will hopefully help take some stress from the BH and also spread the force of the engine twist in the frame across a broader area while still supporting the engine with 4 bushings as it was in the initial design. the forward motion of the powertrain required that i modify the existing notches in the frame. the air compressor just barely bumped the frame in one spot. the compressor housing on the HX55 also required a notch since the engine is so low in the chassis. so i had to cut that side of the frame more as well there are also issues with the OEM dodge oilpan. the drag link was moving well into the space that the OEM pan exists in, while the bags where dumped. i have visited that issue briefly. the flange for the new oilpan will be waterjetted out of .375" 6160 AL and then i will make some fancy AL sheetmetal pan. there will be something odd about it, but i will let that reveal itself when i am finished with the fab. Last edited by ryanroo; 12-29-2013 at 09:47 PM. |
|
|

|
|
|
#705 |
|
Registered User
Join Date: Aug 2007
Location: Show Low, AZ
Posts: 14
|
Re: 72 k20 project
Sweet progress, man.
|
|
|

|
|
|
#706 |
|
Vintage 4x4s
Join Date: Sep 2010
Location: Prior Lake, MN
Posts: 4,305
|
Re: 72 k20 project
Ryan,
I'd reconsider those stainless bolts. Most are pretty weak really- check the yield strength on those but they'd probably be equivalent to grade 2 stength at best. Also why go with the flathead style? With the hollow tube mount can you tighten them down or do they crush the tube before getting to torque? Sorry to be negative I've just fought battles with stainless, flathead, and tubes before and the ME's I work with frown on all three. The one thing you've got going for you is a four bolt mount vs. the more common 2. Everything else is top notch as always  Watching your mounts closely as I've got that 6Bt sitting here now... Watching your mounts closely as I've got that 6Bt sitting here now...
__________________
67 GMC K1500 Custom- 305V6 SM420, PTO, Ram Assist, yellow (the outcast) (project period correct upgrades) 67 GMC C2500 351V6 TH400, AC, PS, PB (can't decide what to do with. Update, decided to keep and will restore  ) )86 CHV K30 502 th400, apple red NEW 71 CHV K20 350 SM465, ochre (saved work truck) 71 CHV K20 292 SM465, white, tach, PTO, (future project) 72 CHV K20 350 350th, medium blue (project stocker) 01 CHV K2500hd crew, indigo blue ^3 dont run and the others don't see winter either '86 K30 Cummins "Fireside" thread: http://67-72chevytrucks.com/vboard/s...d.php?t=649649 '71 K20 "get driveable" thread: http://67-72chevytrucks.com/vboard/s...d.php?t=590642 '72 K20 Build Thread: http://67-72chevytrucks.com/vboard/s...=493477&page=6 |
|
|

|
|
|
#707 | |
|
Senior Member
Join Date: Apr 2004
Location: sw colorado
Posts: 2,720
|
Re: 72 k20 project
Quote:
Flat head style, for a few reasons. mainly because i prefer the look in this instance. but i like it for this application because it locates the bumper very accurately without breaking or seriously loosening all the bolts. the bumper is always mounted exactly where it belongs. it cant shift or slide. most bumpers are made with large holes in the mounting area to allow for adjustment in the fit. this bumper and frame were all designed in CAD and CNC (or DRO) cut so it is a pretty much perfect fit. with the countersunk holes it is always right where it goes. no alignment fuss, no chance to slip or pull out of adjustment. that was probably not necessary as the exactness of the whole thing would have given me the same effect with a standard faster. so, basically we are back at looks. in my eye the countersunk fastener is also a little better at spreading the load of the fastener out since it clamps over more surface area than a standard hex head bolt. no worries about negativity, i like hearing everyones opinion. i am a stubborn jackass, so getting me to change my mind is hard but i like to hear everones ideas! the mounts are hopefully going to be tacked in tomorrow. im not sure if these are terribly feasible for most since it used the mounting bosses for the dodge a/c compressor and water inlet, but for me they are great(i hope). then i can work on the rear mounts... and the lower bag mounts. and the panhard mount. jeez |
|
|
|

|
|
|
#708 |
|
Carpe manana
  Join Date: Dec 2010
Location: Eau Claire, WI
Posts: 12,450
|
Re: 72 k20 project
Looks good Ryan - Happy 2014! Pete
__________________
1972 K5 CST Highlander Blazer: http://67-72chevytrucks.com/vboard/s...d.php?t=708547 1972 K20 Cheyenne Super: http://67-72chevytrucks.com/vboard/s...d.php?t=528308  Members met: ORANGBLAZ, 2003 silverado, MikeCofield, BB72CHEVKT, Duncan&Son, Sameyrasmea72, THENEWMEXICAN, HotRod C/10, brianthelion02, Sport/Truck, ryanroo, michael bustamante, Dirt's72, Already Gone, WestButteTruck, 57taskforce, Moreyel, painterljp, AASmedic, SoCoC10, Lumaestas, carbuff382, Chevyland Members met: ORANGBLAZ, 2003 silverado, MikeCofield, BB72CHEVKT, Duncan&Son, Sameyrasmea72, THENEWMEXICAN, HotRod C/10, brianthelion02, Sport/Truck, ryanroo, michael bustamante, Dirt's72, Already Gone, WestButteTruck, 57taskforce, Moreyel, painterljp, AASmedic, SoCoC10, Lumaestas, carbuff382, Chevyland
|
|
|

|
|
|
#709 |
|
Junk Yartist
Join Date: Jul 2009
Location: Greeley, CO
Posts: 2,203
|
Re: 72 k20 project
Most fasteners that come with hitches are grade 3 or 5 at the most, and correct me if I'm wrong, that's measured in stretch yield? Not sheer, right? Now your flat head are tapered shoulder, right? So even with the mounts set up in sheer, the force can transition to stretch but only 50% with a 45° shoulder. I think you'll be alright with 8 fasteners.
When my hitch failed, the tubing let go and the fasteners stayed firm. You just like one-upping don't you! Happy new year!
__________________
-Jeremy YOU ONLY FAIL IF YOU STOP TRYING 70 Crew Cab Build Link 70 GMC Suburban 4X4 build thread 95 Yukon Daily Driver Rebuilding an NP205 |
|
|

|
|
|
#710 | |
|
Senior Member
Join Date: Apr 2004
Location: sw colorado
Posts: 2,720
|
Re: 72 k20 project
Quote:
|
|
|
|

|
|
|
#711 | |
|
Registered User
Join Date: Nov 2011
Location: 19
Posts: 607
|
Re: 72 k20 project
Quote:
A common question is whether stainless steel is stronger than a grade 5 or grade 8 bolt. Stainless commonly comes in grades 18.8 (304) or T316. Stainless steel bolts are rated for corrosion resistance. Bolt strength is rated in PSI (pounds per square inch). A stainless steel bolt has the same PSI rating as a grade 5 bolt (125,000 PSI). A grade 8 bolt has a stronger rating with a PSI of 150,000.
__________________
1999 Chevy K2500 RCLB 350 4L80e 2004 Chevy 3500 C&C Dmax Allison |
|
|
|

|
|
|
#712 |
|
Windy Corner of a Dirty Street
Join Date: Jun 2003
Location: Pueblo West, Colorado
Posts: 2,926
|
Re: 72 k20 project
The truck is coming along great Ryan! Happy New Year
__________________
Current vehicle collection: 1978 Chevrolet K10, 8.1L, NV4500, NP205 1989 Chevrolet Suburban, 8.1L, NV4500, NP241 1993 Chevrolet C1500 Sportside, TBI 7.4L, 4L60E 2001 Chevrolet K2500HD, Ext Cab, SWB, 8.1L, ZF 6 speed 2014 Chevrolet Impala LTZ 3.6L Vortec 8.1L because life is too short to tolerate underpowered vehicles
|
|
|

|
|
|
#713 |
|
Senior Member
Join Date: Apr 2004
Location: sw colorado
Posts: 2,720
|
Re: 72 k20 project
Thanks! hope you have a good new year as well!
i got a few things done today. got the holes patched up 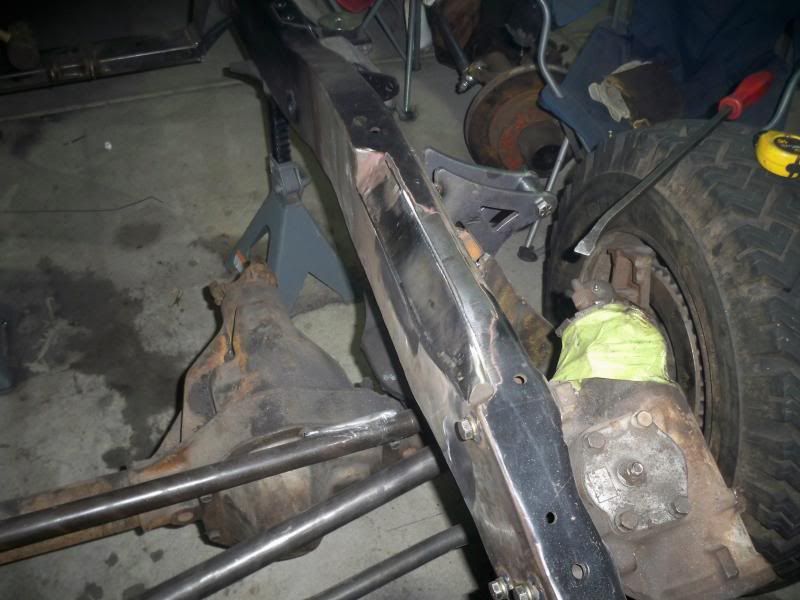 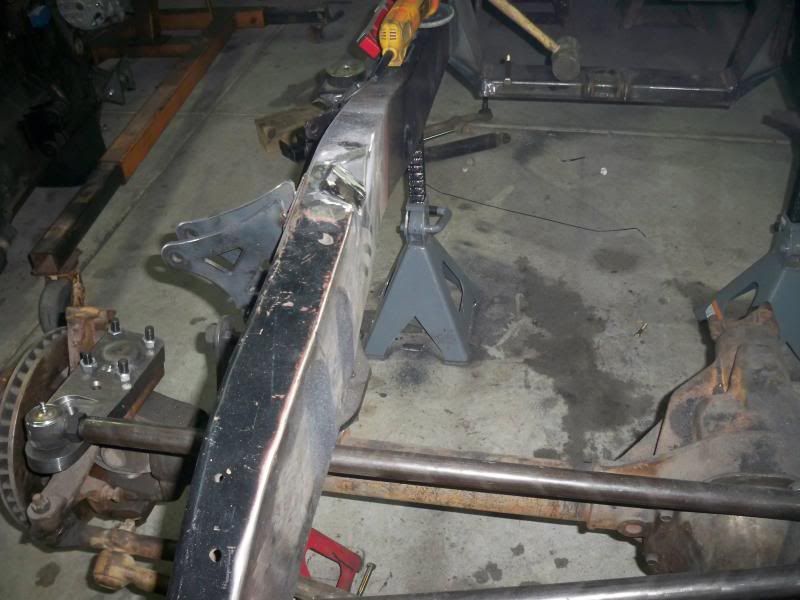 got the engine mounted again. still have to design/build the rear mounts 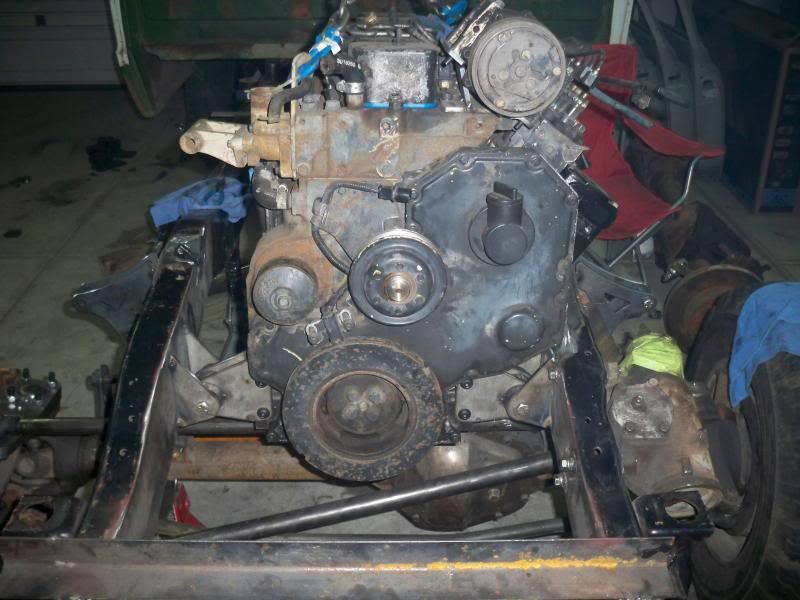 everything fit nicely. you can see in the last two how the bag moving backward helped with panhard clearance. its not that great of a pic, but you can see the room. the other is the tie rod in relation to the no.1 rod throw. i gave myself a lot more room to work with when building the pan by moving the powertrain forward. 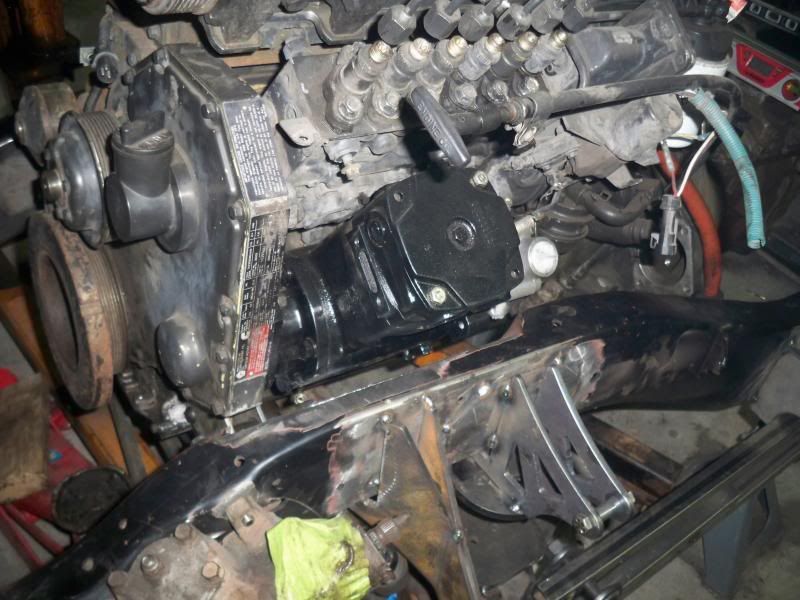 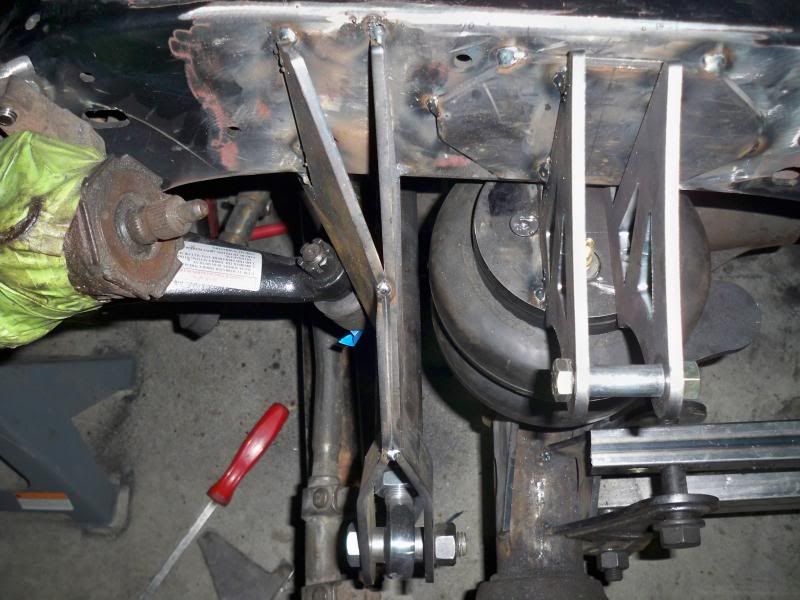 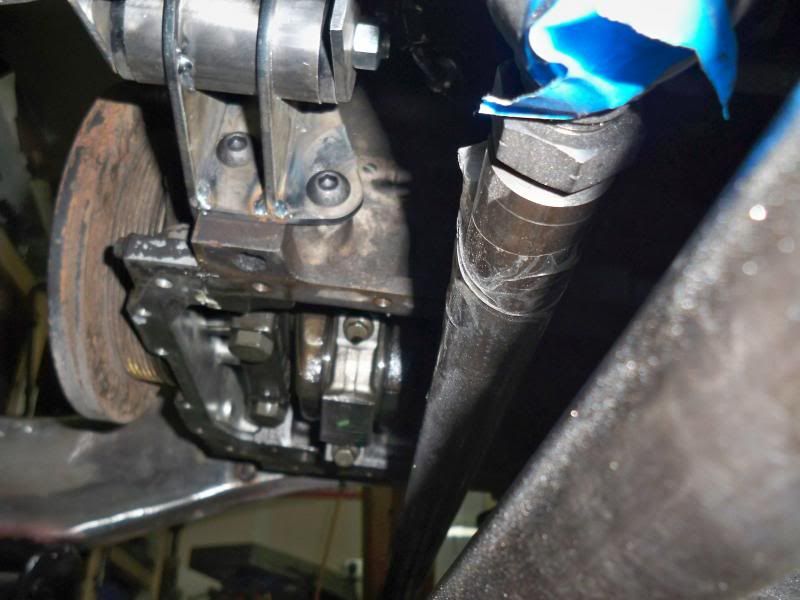
|
|
|

|
|
|
#714 |
|
Senior Member
Join Date: Apr 2004
Location: sw colorado
Posts: 2,720
|
Re: 72 k20 project
whittled out a few parts to get the front drive stuff done, or at least close.
i had this jetted out of 6061, since there was a sheet on the table. just moved the alternator up 3 inches 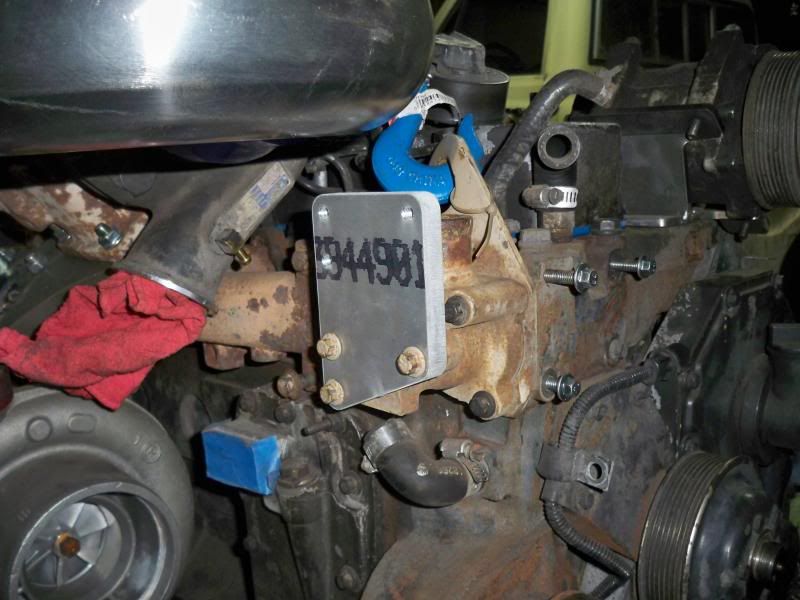 this is the industrial alternator set up. different than the dodge stuff. 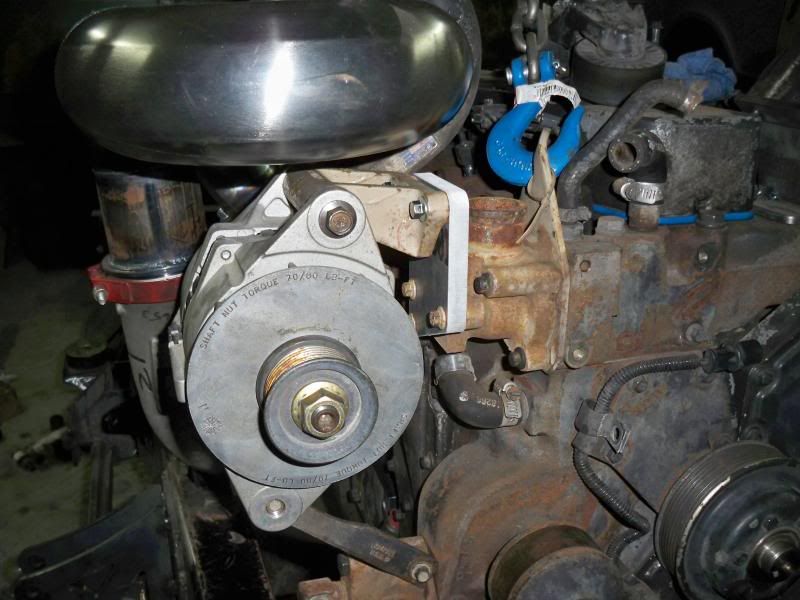 here you can see why i moved it up. i wanted unrestricted access to the inlet on the primary. i think i will remake the support bracket a little more my style at some point 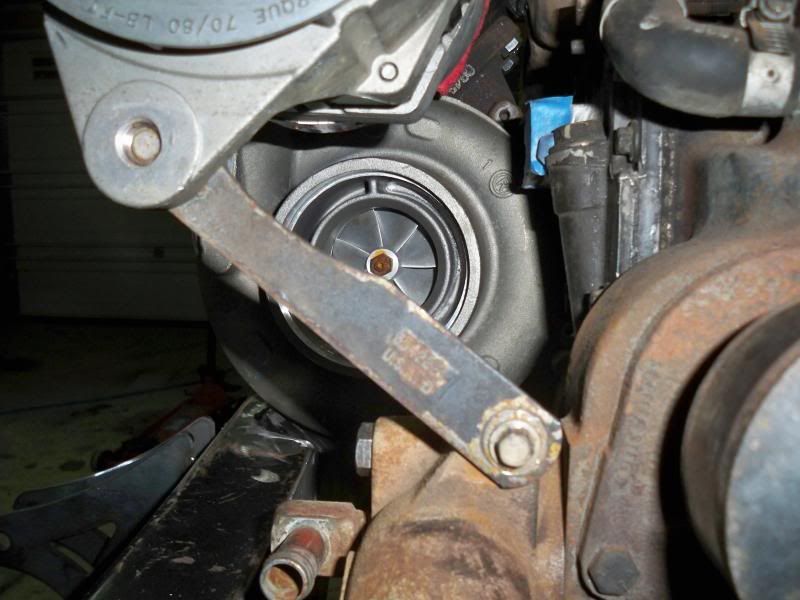 i had this drawn up but decided to carve it out the old skool method instead. i needed to tap the mount hole and figured it wouldnt be so hard to just drill all of the holes while it was in the mill. some touch up with the plasma and grinder and there it is. probably took half as long this way since i didnt need to wait on the office to send it out to the table. waiting on the flat head countersunk M8-1.25 bolts i ordered so it can be more permanent. i also wanted to check my layout since i had to measure in inches and convert to metric. silly metric 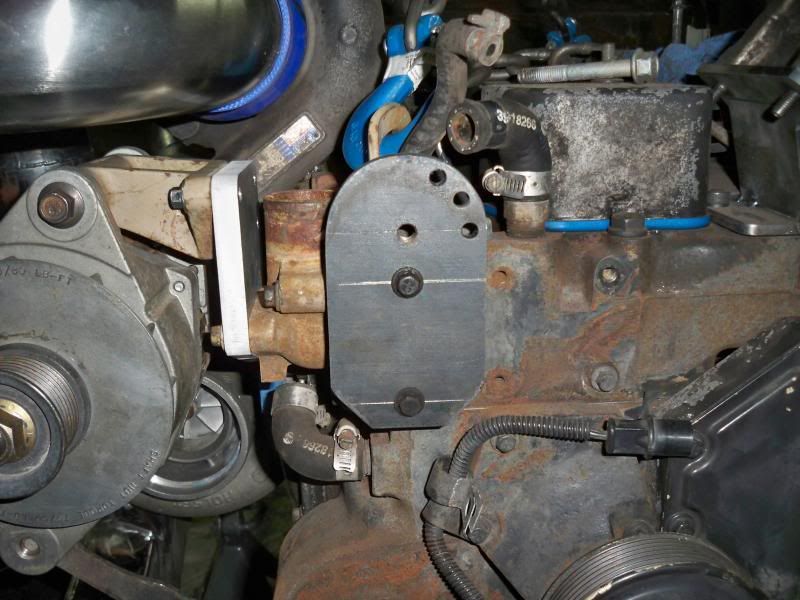 i have a new tensioner in my rock auto cart, but i want to get a more accurate measurement for the belt so i can order that at the same time. so i must wait on the bolt guy. or i can buy them from mcmaster and have them in a day or two. that would give me an excuse to buy that thread insert tool i have in my cart there.... i cheesed the old belt on there so you can get an idea on the routing. it will have good wrap on all the pulleys this way. and even though i dont need it, the factory dodge crank sensor still fits. 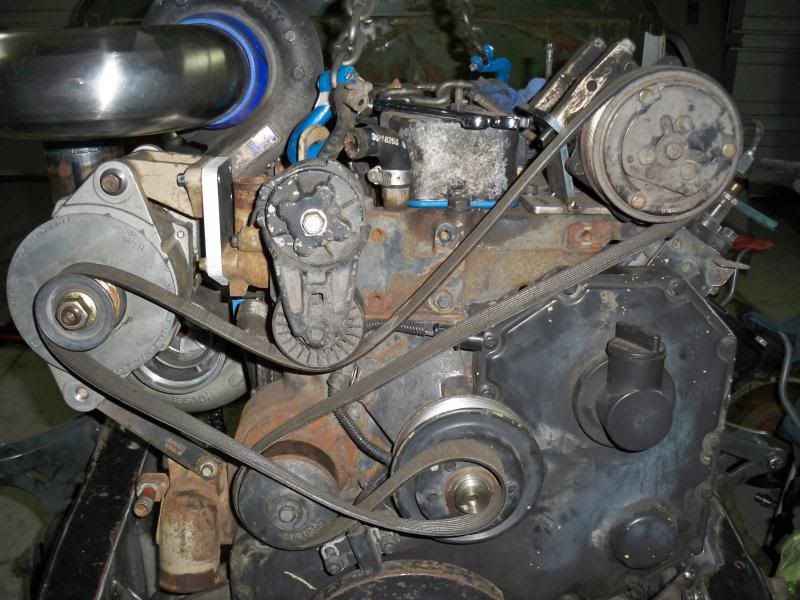
|
|
|

|
|
|
#715 |
|
Registered User
 Join Date: Feb 2009
Location: Surprise, AZ
Posts: 490
|
Re: 72 k20 project
Nice to see the engine back where it's supposed to be.
__________________
-Scott 1972 Chevy K20 Picture Gallery Build Thread 1930 Chevy AD Picture Gallery 1929 Ford Model-A Picture Gallery 1975 Triumph TR-6 Picture Gallery |
|
|

|
|
|
#716 | ||
|
Vintage 4x4s
Join Date: Sep 2010
Location: Prior Lake, MN
Posts: 4,305
|
Re: 72 k20 project
Quote:
After hearing that his holes are precision located and he has supports for them inside the tubing, I don't see there being an issue since he has four bolts per side. Even 70,000 psi x the cross sectional area of 4 bolts is still a high enough number (above what 2 grade 5's would offer) so I wouldn't worry. Stresses can get high if the holes aren't precisely located and the heads experience side loading (from misalignment) while going into the taper. And if tubing is not supported, you cant even get them to proper tightness- again, neither are the case here. Quote:
 I just got a rockauto code today for 5% off. Enter 1941004417036474 in the "how did you hear about us" line in the checkout form I just got a rockauto code today for 5% off. Enter 1941004417036474 in the "how did you hear about us" line in the checkout form
__________________
67 GMC K1500 Custom- 305V6 SM420, PTO, Ram Assist, yellow (the outcast) (project period correct upgrades) 67 GMC C2500 351V6 TH400, AC, PS, PB (can't decide what to do with. Update, decided to keep and will restore  ) )86 CHV K30 502 th400, apple red NEW 71 CHV K20 350 SM465, ochre (saved work truck) 71 CHV K20 292 SM465, white, tach, PTO, (future project) 72 CHV K20 350 350th, medium blue (project stocker) 01 CHV K2500hd crew, indigo blue ^3 dont run and the others don't see winter either '86 K30 Cummins "Fireside" thread: http://67-72chevytrucks.com/vboard/s...d.php?t=649649 '71 K20 "get driveable" thread: http://67-72chevytrucks.com/vboard/s...d.php?t=590642 '72 K20 Build Thread: http://67-72chevytrucks.com/vboard/s...=493477&page=6 |
||
|
|

|
|
|
#717 |
|
6>8 Plugless........
 Join Date: Sep 2007
Location: Prairie City, Ia
Posts: 17,142
|
Re: 72 k20 project
Nice work as usual Ryan!
__________________
Ryan 1972 Chevy Longhorn K30 Cheyenne Super, 359 Inline 6 cylinder, Auto Trans, Tilt, Diesel Tach/Vach, Buckets, Rare Rear 4-link and air ride option Build Thread 1972 GMC Sierra Grande Longhorn 4x4 1972 Chevy Cheyenne Super K20 Long Step side tilt, tach, tow hooks, AC, 350 4 speed 1972 C10 Suburban Custom Deluxe 1969 Chevy milk truck 1971 Camaro RS 5.3 BTR STG3 Cam Super T10 1940 Ford 354 Hemi 46RH Ford 9" on air ride huge project Tired of spark plugs? Check this out. |
|
|

|
|
|
#718 | |
|
Senior Member
Join Date: Apr 2004
Location: sw colorado
Posts: 2,720
|
Re: 72 k20 project
yes sir. and out of my way in the garage! Quote:
the boxing plates did make it easy, but i need to adjust a few places on the files so they fit better if i was ever to make another set. thanks Mister i dumped the suspension all the way tonight for the first time since all the changes. i was worried about having a good place to put a cross member as it is in desperate need of one. looks like i will have more space than i had feared. not a lot of space mind you, but enough. i need to decide how i am going to do the front crossmember now as well. i have enough room to do one under the engine at the very front without getting into my suspension and steering, but since i will be able to do one under the pan behind the axle, i might skip the forward engine crossmember and do a k-member type deal at the very front of the frame sort of under the core support. |
|
|
|

|
|
|
#719 |
|
6>8 Plugless........
 Join Date: Sep 2007
Location: Prairie City, Ia
Posts: 17,142
|
Re: 72 k20 project
I think a K member would help and match the ones behind the cab.

__________________
Ryan 1972 Chevy Longhorn K30 Cheyenne Super, 359 Inline 6 cylinder, Auto Trans, Tilt, Diesel Tach/Vach, Buckets, Rare Rear 4-link and air ride option Build Thread 1972 GMC Sierra Grande Longhorn 4x4 1972 Chevy Cheyenne Super K20 Long Step side tilt, tach, tow hooks, AC, 350 4 speed 1972 C10 Suburban Custom Deluxe 1969 Chevy milk truck 1971 Camaro RS 5.3 BTR STG3 Cam Super T10 1940 Ford 354 Hemi 46RH Ford 9" on air ride huge project Tired of spark plugs? Check this out. |
|
|

|
|
|
#720 |
|
Senior Member
Join Date: Apr 2004
Location: sw colorado
Posts: 2,720
|
Re: 72 k20 project
I agree. if this thing ever diamonds when i get done, i quit!
Last edited by Dieselwrencher; 01-09-2014 at 09:40 PM. |
|
|

|
|
|
#721 |
|
6>8 Plugless........
 Join Date: Sep 2007
Location: Prairie City, Ia
Posts: 17,142
|
Re: 72 k20 project
It'll probably just brake in half from being too strong!

__________________
Ryan 1972 Chevy Longhorn K30 Cheyenne Super, 359 Inline 6 cylinder, Auto Trans, Tilt, Diesel Tach/Vach, Buckets, Rare Rear 4-link and air ride option Build Thread 1972 GMC Sierra Grande Longhorn 4x4 1972 Chevy Cheyenne Super K20 Long Step side tilt, tach, tow hooks, AC, 350 4 speed 1972 C10 Suburban Custom Deluxe 1969 Chevy milk truck 1971 Camaro RS 5.3 BTR STG3 Cam Super T10 1940 Ford 354 Hemi 46RH Ford 9" on air ride huge project Tired of spark plugs? Check this out. |
|
|

|
|
|
#722 |
|
Senior Member
Join Date: Apr 2004
Location: sw colorado
Posts: 2,720
|
Re: 72 k20 project
I got the axle end of the panhard mount cut, finally. tacked it up today. i may or may not untack and adjust it tomorrow. it is good here but could go up and back a little. if i do that, the already to tight clearance on the diff cover gets worse and the differences in geometry angle is like .1-.2 of a degree. not enough to ever feel.
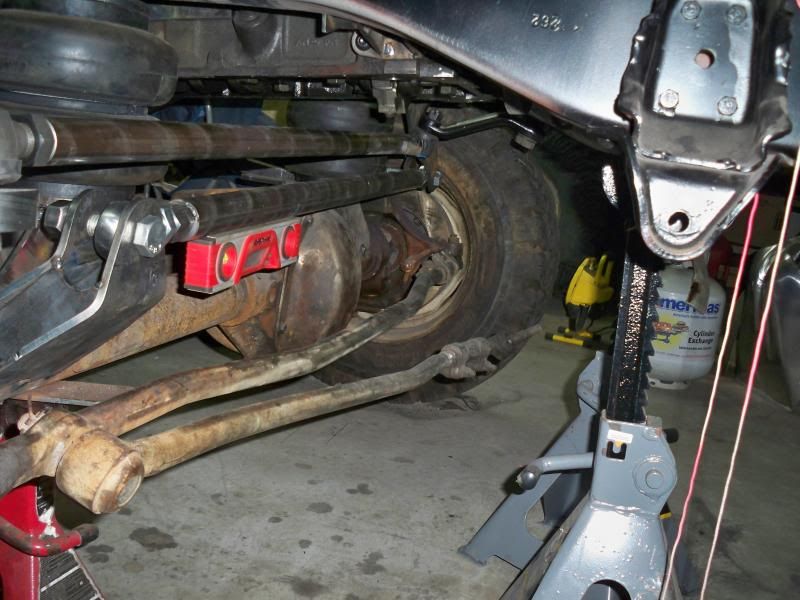 better shot of the mount 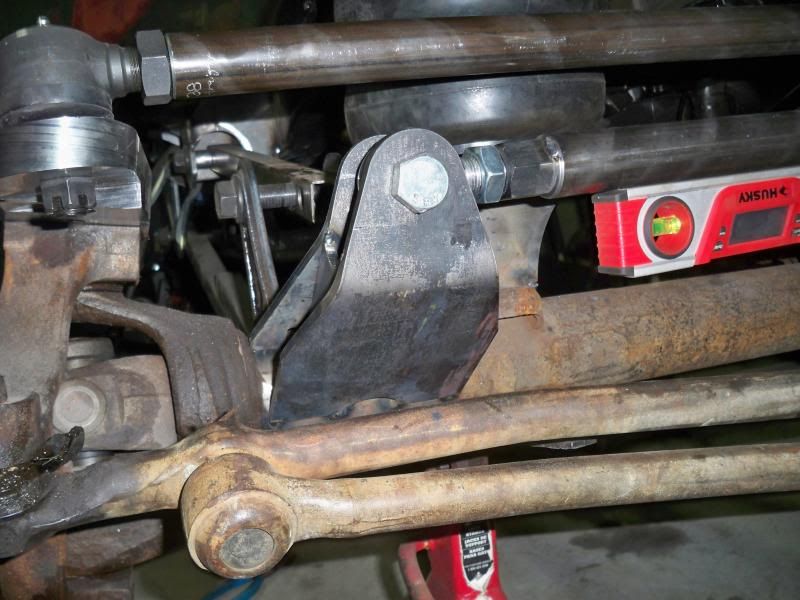 little side shot at approximately ride height. 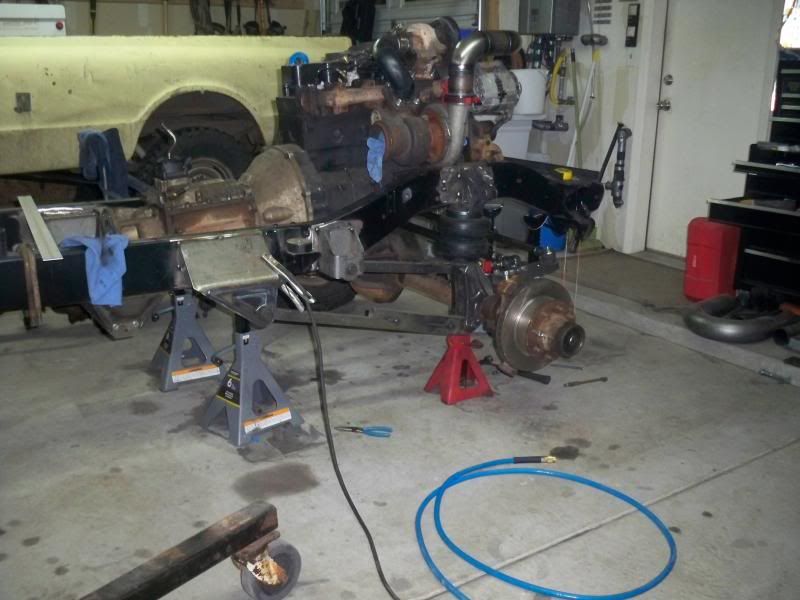
|
|
|

|
|
|
#723 |
|
6>8 Plugless........
 Join Date: Sep 2007
Location: Prairie City, Ia
Posts: 17,142
|
Re: 72 k20 project
Nice work! Definitely close quarters there. It looks like a pulling truck with square tube links.
 Very nice. Very nice.
__________________
Ryan 1972 Chevy Longhorn K30 Cheyenne Super, 359 Inline 6 cylinder, Auto Trans, Tilt, Diesel Tach/Vach, Buckets, Rare Rear 4-link and air ride option Build Thread 1972 GMC Sierra Grande Longhorn 4x4 1972 Chevy Cheyenne Super K20 Long Step side tilt, tach, tow hooks, AC, 350 4 speed 1972 C10 Suburban Custom Deluxe 1969 Chevy milk truck 1971 Camaro RS 5.3 BTR STG3 Cam Super T10 1940 Ford 354 Hemi 46RH Ford 9" on air ride huge project Tired of spark plugs? Check this out. |
|
|

|
|
|
#724 | |
|
Senior Member
Join Date: Apr 2004
Location: sw colorado
Posts: 2,720
|
Re: 72 k20 project
Quote:
 i might also rebuild the front panhard. its at the very edge of being cut to short for my comfort right now, and a slight dog leg in it would add a bit of comfort to the diff cover clearance. i really dont want a bend in the linkage, but i doubt it would ever be an issue. more than anything it would help me feel a little better about how it lines up with everything. i could also do that out of 7075, but not if i choose to bend it. i need to order the stuff for the tire rod as well. then i can think about sending out the box and pump to be doped for an assist ram. it would be really nice to call the front suspension and steering basically done. |
|
|
|

|
|
|
#725 |
|
Senior Member
Join Date: Apr 2004
Location: sw colorado
Posts: 2,720
|
Re: 72 k20 project
Another modicum of progress.
the front bag plates are composite material. they have an internal snubber, but i am guessing since the plates are plastic, the manufacturer states that the bag bumpstop cannot be the functional suspension bumpstop. i knew this from the get go and built a landing pad into my lower bag plate. but i have some stuff i want to build and having the actual finished bump height set will make sure all my stuff clears my other stuff. so i ordered nearly the most basic bumpstop i could find. its an energy poly get up. the bag plate and the frame are pretty far apart from one another at bump height, so it needs spaced down. also, it needs to be meaty enough to not fall apart. this is probably clear to everyone, but this is because all of the weight supported at either corner could potentially be banging this stuff together if the bag goes, or some other catastrophe caused the suspension to go away anyway, here is the idea and some parts. the tube started out as a piece of 2" .250" wall DOM. i turned the OD slightly to match the little aluminum puck. i either biffed the speeds and feeds on the tube, or i may have grabbed a roughing insert. they all look really similar and i didn't feel like taking a new one out of the box($30+) for something that just needed to be to size. it will end up painted, so no worries. these inserts really like to eat, so if it was a roughing insert it makes it finish worse when taking little cuts like i did. i only shaved about .040" off the diameter. the Al is just a removable insert that the poly unit threads into. i doubt this was a necessary step, but it looks pretty slick. my thinking was, if the poly somehow loosens up and the suspension bottoms, it may possibly wipe the threads on the mount instead of the stud on the snubber. if the threaded portion was not removable, i'm stuck making a repair with a grinder and welder. never a fun time. so i spun the Al pucks and then drilled the center to .3125 and tapped it for the 3/8"-16 threaded stud. i took the DOM to the mill and located and drilled a clearance hole(.328125") and counter bored it for a landing pad for a 5/16"-18 allen head cap screw. the AL puck was loaded up next and a F drill bit and 5/16-18 tap gave the screw something to thread into. in retrospect i should have done some math and figured out how deep to counterbore the hole for the screw, so it would have bottomed on the tube at the same time it kissed the stud for the snubber. that would have eliminated the need for any concern about it backing out. 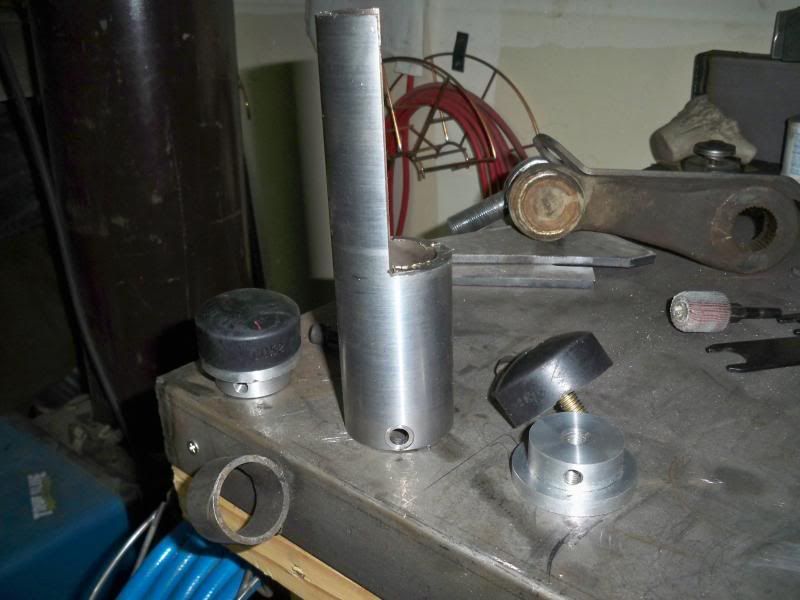 a good storyteller would have dumped the air out of the bag and showed you a better representation of the result. unfortunately you guys are stuck with me. the DOM needs to be fitted to the curve of the framerail and all positions verified before i can really show it to you in action. i'll trim and cap the opening at the top when i get there 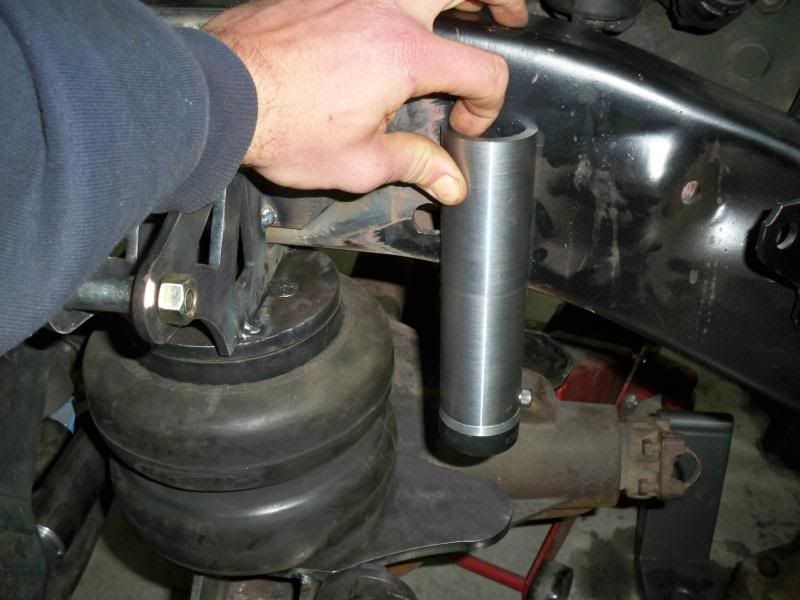 i also picked up a few M8-1.25 flat head cap screws and got the countersink machined into the bracket for the tensioner. for those following along, when we were talking about the bolts holding my rear bumper on, i stated that all std countersink fasteners are 82*. all metric countersinks are at 90*. not relevant to the thread, but fun info, at least to a nerd like me. anyhow, that allowed me to rigid mount it all. then i tested a belt and noticed that the clocking wouldnt work. it just traveled along the belt through its throw without actually taking up any space. i sort of suspected as much when i designed it so instead of doing some quick sketching on the computer to see, i just added a little adjustment into the bracket when i milled the holes. take two provided an adequate tension adjustment. my belt measurement led me to an obscure part number for a John Deere of some sort, but my local Napa was able to order a green gates Hd belt for an absurd amount of money. that will be here on saturday so i can install it and look for the first time on the finished location of all my non OEM location belt drive accessories and belt. I'm confident in all of it, but i want to see. i will have to remove the factory oil fill tube. i know the belt goes right through it. i prefer the valve cover fill style anyhow, so i will order a weld in bung and cap, or the cummins VC that has the oil fill already cast in. there is an outfit that makes really fancy machined parts for circle track cars. they have a bunch of slick looking fill caps and bungs. i think that is what i will do if any of them fit for me. 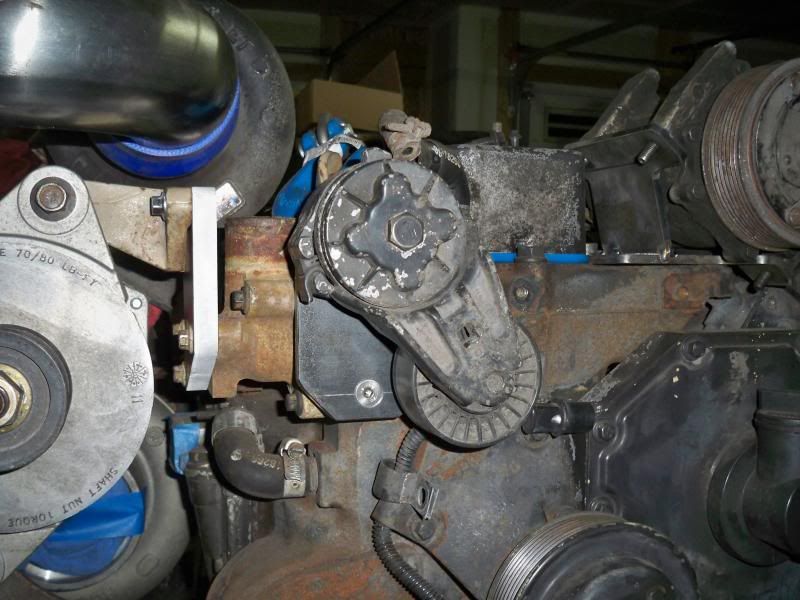
Last edited by ryanroo; 01-16-2014 at 10:54 PM. |
|
|

|
 |
| Bookmarks |
| Thread Tools | |
| Display Modes | |
|
|