
|
Register or Log In To remove these advertisements. |
|
|
|
|||||||
 |
|
|
Thread Tools | Display Modes |
 11-28-2006, 08:07 AM
|
#51 |
|
Registered User
Join Date: Nov 2006
Location: Charlotte, NC
Posts: 9
|
Re: 383 build up (progress pics)
I dunno, but if they are, then I want one!

|

|

|
|
11-28-2006, 08:26 AM
|
#52 |
|
Black 72 Chevy
Join Date: May 2002
Location: Los Angeles, California
Posts: 662
|
Re: 383 build up (progress pics)
Don't know, I don't have one to compare with.
A.P. |
|
|
|
|
11-28-2006, 05:01 PM
|
#53 |
|
Registered User
Join Date: Aug 2006
Location: Langley, BC Canada
Posts: 114
|
Re: 383 build up (progress pics)
ttt

|
|
|
|
|
11-28-2006, 05:42 PM
|
#54 | |
|
Senior Member
Join Date: Jul 2002
Location: Lindsay, TX
Posts: 1,245
|
Re: 383 build up (progress pics)
Quote:
 Much rather have black or grey than chrome. BTW the carb isnt bolted on is why its crooked. Looks good 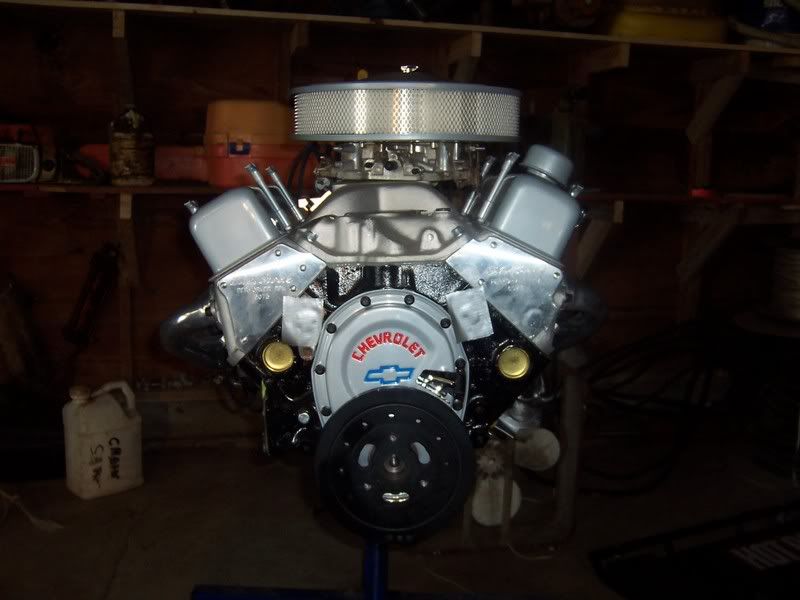
__________________
68 Chevy 383/350 w/shift kit, 380hp/425ft-lbs, 4.5/5 drop, 17" TT2s 64 Cadillac Sedan DeVille Last edited by pat; 11-28-2006 at 05:43 PM. |
|
|
|
|
|
11-29-2006, 06:31 PM
|
#55 | |
|
Registered User
Join Date: Nov 2006
Location: Vancouver, BC
Posts: 41
|
Re: 383 build up (progress pics)
Quote:
I found a great dirt bike guy in Langley from word of mouth (Super Dave at Supersport), and I'm hoping I can add your machine shop to the referred list. Thanks. |
|
|
|
|
|
11-29-2006, 06:51 PM
|
#56 | |
|
Senior Member
 Join Date: Jul 2006
Location: Leander, Texas
Posts: 850
|
Re: 383 build up (progress pics)
Quote:
Man, that motor will easily be close to 450HP+ with that setup. |
|
|
|
|
|
11-29-2006, 11:05 PM
|
#57 |
|
Registered User
Join Date: Aug 2006
Location: Langley, BC Canada
Posts: 114
|
Re: 383 build up (progress pics)
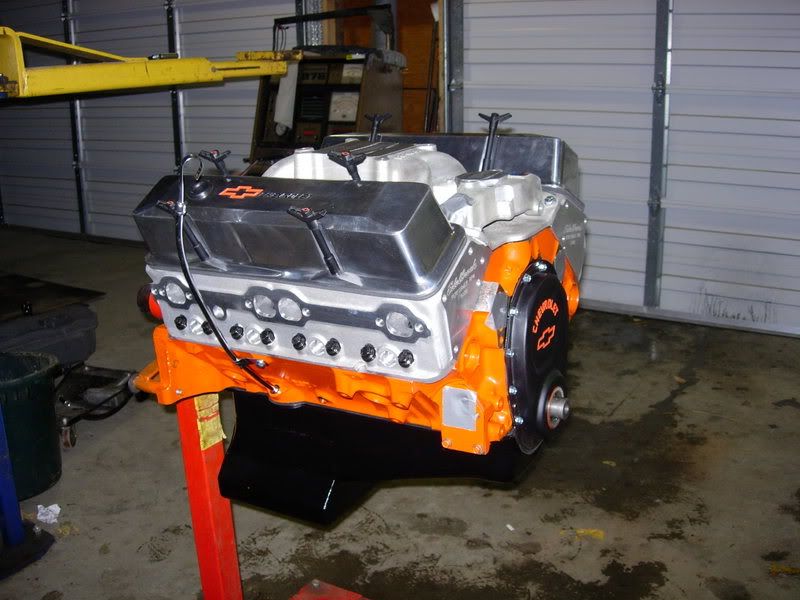
Just in the process of trying to find what headers im going to get for the new engine. Thinking of getting a pair of flowtecks, anybody have these or have another brand I should think about buying ?
Link: http://www.holley.com/31500FLT.asp |
|
|
|
|
11-29-2006, 11:14 PM
|
#58 |
|
Account Suspended
Join Date: Oct 2004
Posts: 1,276
|
Re: 383 build up (progress pics)
What I got and have and gonna use= Hedman Elite long tube.........3/8 flange heavy wall tube. Send em to flame coat or whatever they are ( I got the video sonmewhaere or other ) and they coat for 250 and that should do it for about the perfect header or close??? I still think about the coating or not, but anyway they are they heaviest duty I found.
|
|
|
|
|
11-30-2006, 10:31 PM
|
#59 |
|
Registered User
Join Date: Aug 2006
Location: Langley, BC Canada
Posts: 114
|
Re: 383 build up (progress pics)
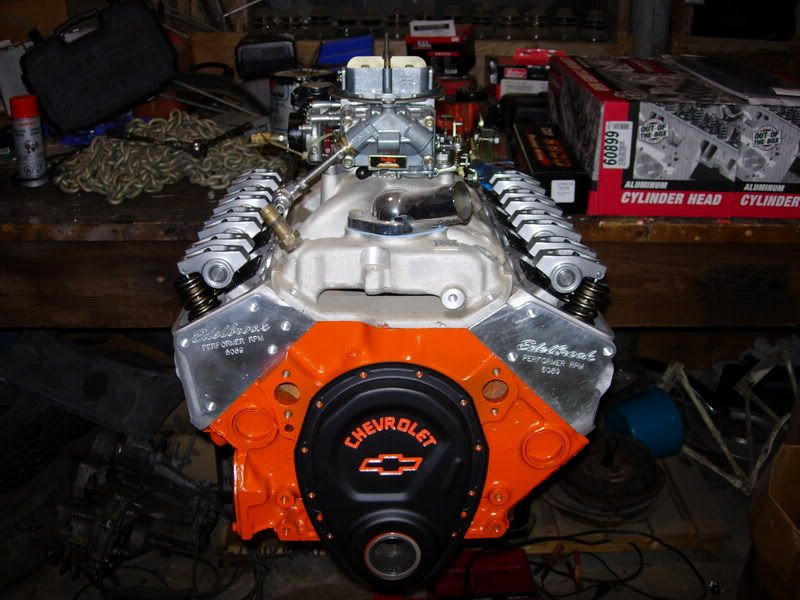
Just got the engine back from being built up
 Ill get some pics later tonight 
|
|
|
|
|
12-01-2006, 01:27 AM
|
#60 |
|
Registered User
Join Date: Aug 2006
Location: Langley, BC Canada
Posts: 114
|
Re: 383 build up (progress pics)
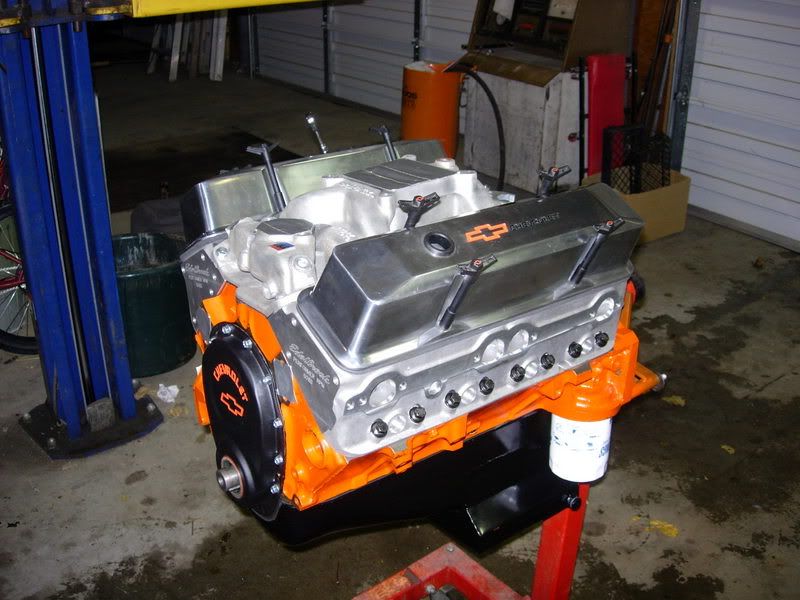
Got some pics
Last edited by mtb_will_03; 12-01-2006 at 11:36 PM. |
|
|
|
|
12-05-2006, 02:31 AM
|
#61 |
|
Registered User
Join Date: Aug 2006
Location: Langley, BC Canada
Posts: 114
|
Re: 383 build up (progress pics)
well just finished droping the engine into its new home
only one thing went rong, when i was putting one of the heater core hoses on it broke the heater core  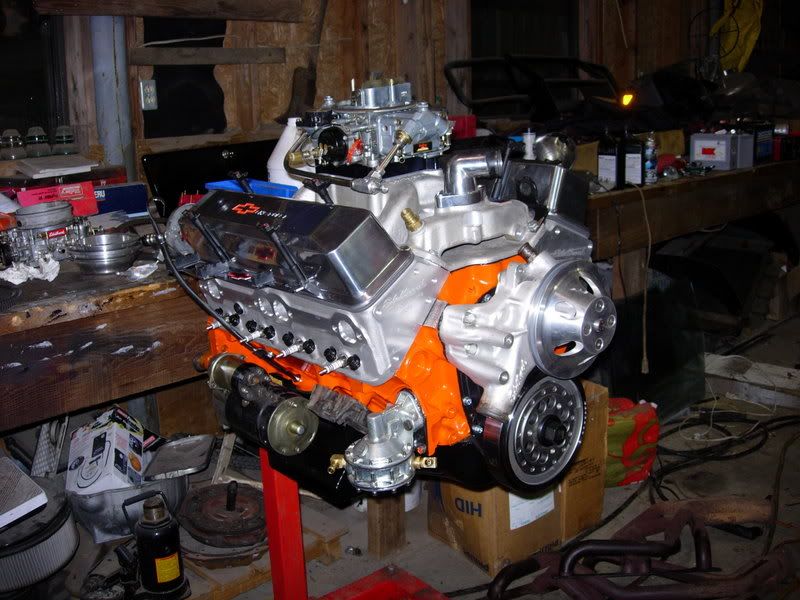 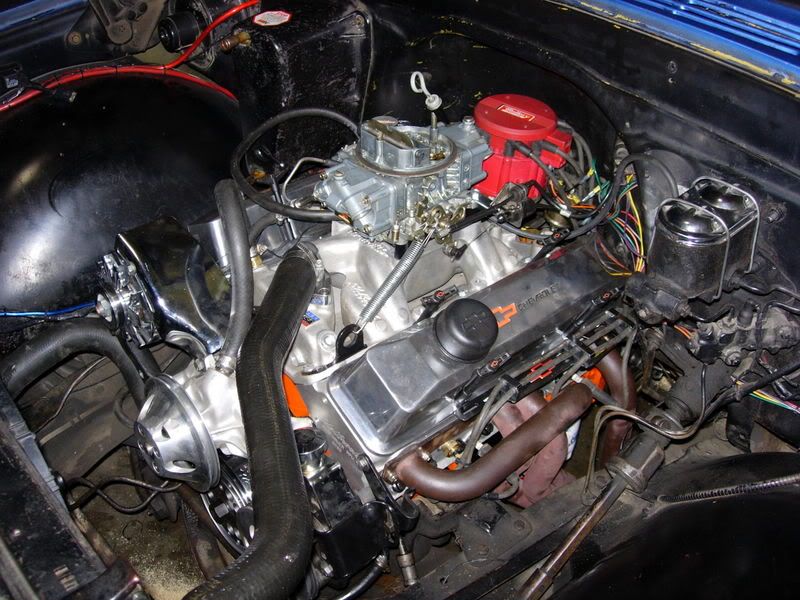
|
|
|
|
|
12-05-2006, 11:09 AM
|
#62 | |
|
Registered User
Join Date: Jun 2003
Location: Simi Valley
Posts: 145
|
Re: 383 build up (progress pics)
Quote:
Thats about as much stock as I can. I just looked up on their tech sheet, 340 hp and 435 lbs of torque.
__________________
www.cardomain.com/id/pooz911 |
|
|
|
|
|
12-05-2006, 03:18 PM
|
#63 | |
|
Senior Member
Join Date: Jul 2006
Location: Leander, Texas
Posts: 850
|
Re: 383 build up (progress pics)
Quote:
|
|
|
|
|
|
12-05-2006, 03:32 PM
|
#64 | |
|
Senior Member
Join Date: Jul 2006
Location: Leander, Texas
Posts: 850
|
Re: 383 build up (progress pics)
Quote:
Once you're in the 450-500HP range you are starting to think about 1/2" fuel lines and 3" exhaust. On paper my motor is "supposed" to make around 430HP and I'm probably fairly close to that #. If you want to hear a VERY humbling experience.... About 2 years ago I felt my truck was running pretty strong. After years of hard work and $1000's of dollars I thought it was time to put it on a dyno. I even invited a buddy of mine to watch. So off to the dyno shop we went. Filled out the paper work saying that if they blew up my motor it wasn't their fault.....Paid the $65 and watched them strap it down. They fired it up and put it in drive and rev'd it up to what I told them they could. Which was 6000RPM's. The guy did it, turned it off and said o.k., step over here to the computer. He had this big smile on his face and asked if I wanted to guess what my truck had just put down. I said sure, about 300HP to the wheels? He laughed and said, everybody always think they're going to make more power. 206HP!!!!!! He allowed me to give it more timing and I made a whopping 211HP after that. Even though a truck and an automatic transmission will eat up about 1/3 or the power I still thought I'd be putting down more than that. So, whatever you "think" you're putting down take off 50-100HP  Now, that experience made me go out and blow a ton of money on mods to make it faster!!!! |
|
|
|
|
|
12-05-2006, 03:49 PM
|
#65 |
|
Parts and more parts
Join Date: Nov 2003
Location: Lebo, Kansas (middle of nowhere
Posts: 6,821
|
Re: 383 build up (progress pics)
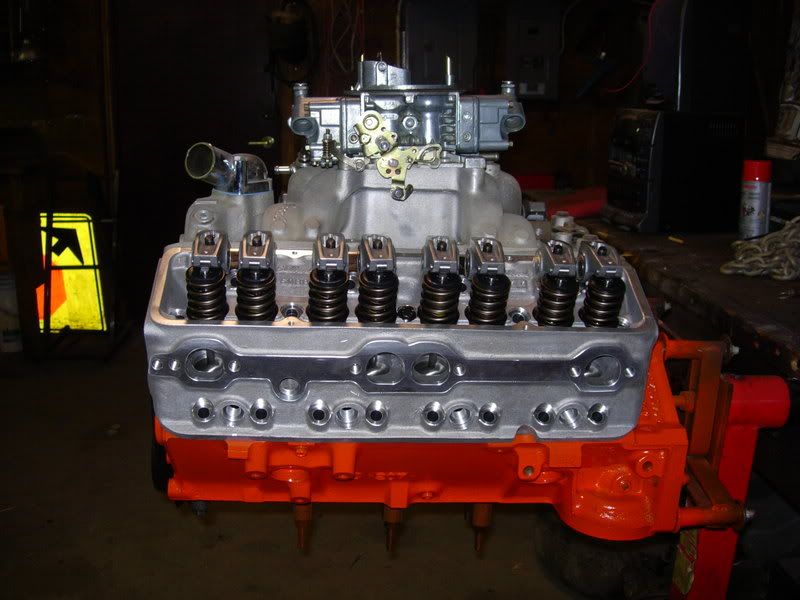
Having built a copuple of 383 strokers in the past few years, I have found this forum discussion quite entertaining. Everything from realistic numbers for Horsepower to exotic. I presently have a stroker built and installed in my 84 GMC SWB. It has an older 4-bolt main block, which provided for more metal to deal with when it comes to making the space for the 400 crank. These blocks were known as heavy blocks. The one in the bright shiney pictures is not one of those, but it can be made to work as a stroker motor. The defining feature to let you know that difference is the flat pad that the serial numbers are stamped onto in front of the passenger head. The heavy blocks have a pad that runs all the way up to the lifter valley gasket area.
The pistons, heads and the cam are the defining factor for the true horsepower here. The aluminm heads that is installed will do well to carry the heat away from the cyllinders which will allow for the compression ratio to be pushed up and not get detonation. The average ratio and what you would find as a "Streetable" motor would be around 9.5 to 1 ratio, but 10.5 to 1 is good, but it will need a higher dollar grade of fuel. I am running 9.5 to 1 on mine and I get great performance out of it. The Edelbrock intakes are a good street choice, as long as you use the dual plane design. The Performer is a 0 to 5000 RPM unit and the Performer RPM is a 1500 to 6500 rated unit, the Performer RPM Air Gap is the 1500 to 6500 unit also. I chose the Performer RPM, due to the fact that I don't drive anywhere below 1500 RPM and I wnated the warming from the oil in the engine to help on cold days, where as the air gap will have a chilling effect on it in the cold weather. The cam that I chose cam from Comp Cams and is a roller cam and roller rocker setup, at this time I would have to dig for the data on it and I am at work, but it is quite a lopey cam and I had to change my torgque converter to a 2400 stall to keep the truck from surging through the stop lights (so there are no 2 foot lights). The torque converter sets me up to hit the RPMs and the power curve at the right moment and the truck pulls hard from there on up. On this last build, I used "H" beam rods, a forged crank, and the better grade of pistons, due to shattering the last 383 by breaking a rod. So they can be destroyed, I did mine at 130 MPH+. HP is not cheap...... I have not put the motor on a dyno, but my calculations put it around 425 HP, with the setup that I used, I am limiting myself with my carb due to (once again streetability). I am running a 650 CFM Edelbrock AVS. I did use a 750 CFM for awhile, but the slobbering on the city streets made it useless to me. With a 4000# truck the 750 doesn't flow air fst enough to keep a good mix in the city driving and it is just a bad selection in daily driving. The smaller carb takes away the top end on the motor, then at 130 MPH---Maybe not. Corkscrew, tell us what you got and we will see if your 500+ HP is good. ""Been there and suffered a bad day"" |
|
|
|
|
12-09-2006, 06:14 PM
|
#66 |
|
Registered User
Join Date: Aug 2006
Location: Langley, BC Canada
Posts: 114
|
Re: 383 build up (progress pics)
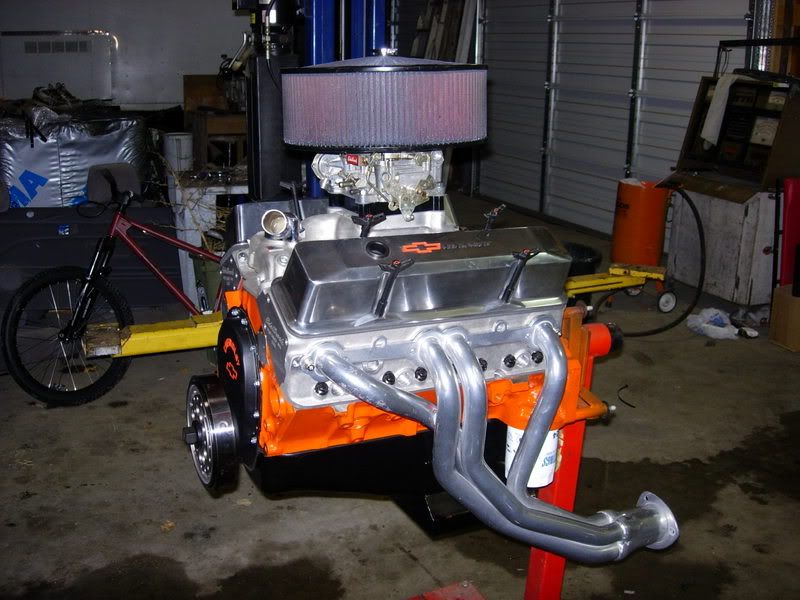
Engines all done and ready to hit the streets.
Thanks for the help guys  http://www.youtube.com/watch?v=R7UpP3rj_us http://www.youtube.com/watch?v=XyptZmlXK1U http://www.youtube.com/watch?v=8Oq9qOiM3rs 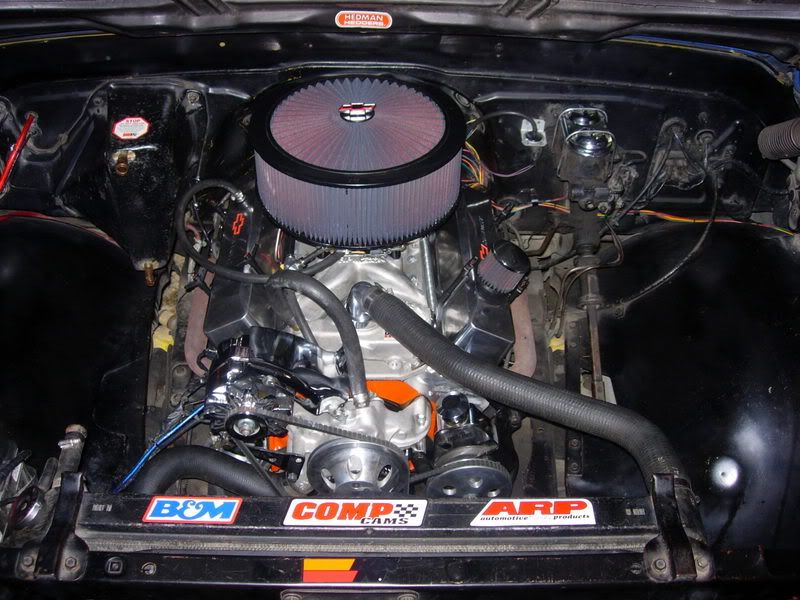
|
|
|
|
|
12-09-2006, 06:36 PM
|
#67 |
|
Registered User
Join Date: Aug 2006
Location: Langley, BC Canada
Posts: 114
|
Re: 383 build up (progress pics)
One last questions, how would you guys recommend being the best way to break in the engine.
|
|
|
|
|
12-09-2006, 08:42 PM
|
#68 |
|
Registered User
Join Date: Feb 2005
Location: B.C.
Posts: 457
|
Re: 383 build up (progress pics)
Sweet engine you have there. I want one...maybe two! Once you become familiar with it, PM me with your opinion of those heads. I recommend that you avoid idling and constant RPM especially during the first 500 to 1000 miles or so. I would take it out on a quiet highway and vary the RPM slowly at first and gradually increase and decrease the throttle amount. Keep in mind that de-acceleration is just as important as acceleration in terms of oil flow.
Rick. |
|
|
|
|
12-10-2006, 12:52 AM
|
#69 |
|
Parts and more parts
Join Date: Nov 2003
Location: Lebo, Kansas (middle of nowhere
Posts: 6,821
|
Re: 383 build up (progress pics)
I agree with Senor' Villa; The motor will need to be varied throughout the periiod of the first few miles. It is also important to get the rings seated by having short periods of agressive acceleration to get the heat and pressure built up in the cylinders. Have you allowed for the cam break-in period, per the installation instructions?
|
|
|
|
|
12-10-2006, 01:23 AM
|
#70 |
|
In Memoriam...
Join Date: Nov 2006
Location: Wallburg, NC
Posts: 1,216
|
Re: 383 build up (progress pics)
 I found a good start-up/break-in procedure on Sallee-Chevrolet's site. It seems very thorough. I have not figured out how to link yet, so I copied the text below.  This is not a recommendation...please use at your own discretion/risk. This is not a recommendation...please use at your own discretion/risk.BTW, nice motor!  1) Safety first! If the car is on the ground, be sure the emergency brake is set, the wheels are chocked, and the transmission cannot fall into gear. Next verify that all hoses are tight and that both the radiator and radiator over flow jar/tank are full and have been filled with the proper anti-freeze and water mix. [/LEFT]
2) Before starting your engine for the first time, add one pint of engine oil supplement ( EOS¹) to the crankcase oil and then check the oil level. Once this has been done, prime the oil system with an oil pump primer tool. Make sure number 1 cylinder is on TDC compression stroke, and install the distributor. 3) Adjust the distributor timing roughly by hand for a quick start up and smoothest idle possible. 4) When the engine first starts, verify that the engine rpm is at a safe level and that the timing is set near or at 30° before top dead center (BTDC). Run the engine speed between 1,500 and 2,500 RPM’s, varying the engine speed up and down with-in this range, to prevent overheating of the exhaust valves and the exhaust system. This should be done with no-load on the engine and for the first 30 minutes of operation. 5) After the first 30 minutes of the engine running, set the ignition timing according to the timing specifications. Now would be a good time to check thoroughly for leaks. 6) Adjust the carburetor settings, if necessary. 7) Drive the vehicle with varying speeds and loads on the engine for the first 30 miles. Be sure not to use a lot of throttle or high RPM. 8) Run five or six medium-throttle accelerations to about 3,800 RPM (55 to 60 MPH), then letting off in gear and coasting back down to 20 MPH. 9) Run a couple hard-throttle accelerations up to about 3,800 RPM (55 to 60 MPH), then letting off in gear and coasting back down to 20 MPH. 10) Change the oil and filter with recommended oil (10w30SG in most cases) and filter. 11) Drive the next 500 miles normally, without high RPM’s (below 3,800 RPM), hard use, or extended periods of high loading. 12) Change oil and filter again. 13) Your engine is now ready for many happy cruising miles!
__________________
'68 C10 SWB 307ci 2BBL FarmTruk Pics Here "You know, doing what is right is easy. The problem is knowing what is right." |
|
|
|
|
12-10-2006, 01:37 PM
|
#71 |
|
Account Suspended
Join Date: Oct 2004
Posts: 1,276
|
Re: 383 build up (progress pics)
I was told by my engine builder, with the stroker 383, that total timing is critical and to make sure you are running no more than 32* for that. Hook up timing light run up to about 1500 and watch the mark with your light and open throttle wide open and observe total timing on your wheel tape or marked balancer wheel.
Please correct me if wrong on this, that is how I understand it. If greater, you can stop the vac advance curve with a button stop. |
|
|
|
|
12-10-2006, 09:52 PM
|
#72 |
|
Account Suspended
Join Date: Oct 2004
Posts: 1,276
|
Re: 383 build up (progress pics)
tttny pros care to verify my info on total timing??? This seems like a post for engine and drivetrain but anyway here we are and I like it that way. Just pool all of the posts on our trucks together and it seems like you gather more input hic!....... where did i put that beer????.........
I believe I gave the right info fo thiss tutall timing bot nott cumplettly sure of it.........hic!.crucial to keep a stroked motor timed just so so you don't put undo forsces back on the rods and crankz hic!........... Hey hun??? run down the street for nuther 6 packs!!! i cant find beeer!! Any hoo i love yer 383!!! Can't wait to fire mine up!!!!!
|
|
|
|
|
12-11-2006, 12:29 AM
|
#73 |
|
Parts and more parts
Join Date: Nov 2003
Location: Lebo, Kansas (middle of nowhere
Posts: 6,821
|
Re: 383 build up (progress pics)
Really---keep the rods from being forced back onto the crank. Well the rods are connected to the crank and the timing is crucial on ALL motors, but I have been running my 383 and the previous 383 that I had with a 36 degree total for quite some time. The thing to look at here, is the starting capability and to keep the motor from having detonation. The detonation is the cause of the premature failures in a motor by beating the hell out of the bearings and burning up components in the cylinders. This really tears up a motor. This comes from many things, such as low grade octane in fuel, improper compression ratio for the driving mode, timing too slow or too fast. So your machinist is right to a degree, but you can find a point of adjustment and set the timing. A lot of this will be in accordance with how the GUY set up your cam (at what degree did he time it), what compression ratio did he use and what heads you install. An aluminum set will keep detonation away better than a set of iron heads, due to the heat reduction.
Last edited by piecesparts; 12-11-2006 at 12:31 AM. |
|
|
|
|
12-12-2006, 03:00 PM
|
#74 |
|
Account Suspended
Join Date: Oct 2004
Posts: 1,276
|
Re: 383 build up (progress pics)
Piece part you should qoute as I said: What is up???? I was just posting good info , not looking for a made up insult.....Re-read.

|
|
|
|
|
12-12-2006, 03:03 PM
|
#75 |
|
Account Suspended
Join Date: Oct 2004
Posts: 1,276
|
Re: 383 build up (progress pics)
Hey piece part you seem to have knocked my post so you could turn around and say the same thing I did. "undo forces onto rods and crank". WHY???
|
|
|
|
|
| Bookmarks |
| Thread Tools | |
| Display Modes | |
|
|


 Linear Mode

