
 |
Register or Log In To remove these advertisements. |
|
|
|
|||||||
 |
|
|
Thread Tools | Display Modes |
|
|
#51 |
|
Registered User
Join Date: Apr 2008
Location: Gales Creek, Oregon
Posts: 619
|
Re: What I've been working on....
Any progress? It looks great so far!
__________________
There are two kinds of people, those who finish what they start and so on. 70 GMC Longhorn (A.K.A Money Bucket) 57 Chev 3100 05 Chevy LLY Dmax. 67 Chevy Camaro Dad's Budget Build 55 My Longhorn Build |
|
|

|
|
|
#52 |
|
Registered User
Join Date: Dec 2007
Location: Jacksonville, AL
Posts: 479
|
Re: What I've been working on....
The truck looks great! I like the additions youve made, Can't wait to see , more!
__________________
---Ben Jammin's 1955 Chevy/GMC Project --- ---The shop's live video feed--- <<< See what I'm up to! |
|
|

|
|
|
#53 |
|
Registered User
Join Date: Mar 2007
Location: Ben Wheeler,Texas
Posts: 992
|
Re: What I've been working on....
Keep plugging away...Looks great from here.
__________________
05 2500HD 6.0 excab 69 LWB-Gone but not forgotten! 68 Dodge Charger 383/727 69 Dodge Charger-440/4spd |
|
|

|
|
|
#54 |
|
Registered User
 Join Date: Mar 2005
Location: apple valley, ca
Posts: 2,670
|
Re: What I've been working on....
I have been so busy helping out my buddies with their projects that my own stuff has been neglected. They all keep hitting me up for favors, and we all keep saying that it's my turn to have everybody gang up on my project. Hopefully, very soon the '55 will get the attention it truly deserves. The only problem with it sitting so long is that I keep changing my mind on the direction I want it to go in. First, it was going to be a budget rat rod driver, but I just can't bring myself to build anything rough. I started to do subtle body mods (grille, bumper) and it started to become more of a street rod. So then it started to go in a street machine mode, with a stout 496 big block.
All of your comments are truly appreciated, I really mean it. I work a ton of hours, and commute 125 miles a day. I always get into a funk in the winter, because it's dark when I leave for work, and it's dark when I get home. It's starting to stay lighter longer, and my enthusiasm is starting to pick up. I've also been working on my '73 Cheyenne Super short-bed quite a bit lately, and it'll soon be back on the road. I'll get back on the '55 very soon, and I'll post pictures of everything. There's always one thing that I can count on whenever I go on this website. There have been times when I was so disgusted with my projects that I was ready to just sell off everything, but I go on this site and see that everybody goes through the frustrations of wondering if you're ever going to finish your project. Everybody here is so cool, and we all give each other motivation and tell each other to keep digging and it'll all come together eventually. |
|
|

|
|
|
#55 | |
|
Certified Car Nut
Join Date: Jan 2005
Location: Inglewood, California
Posts: 3,118
|
Re: What I've been working on....
Quote:
|
|
|
|

|
|
|
#56 | |
|
Registered User
Join Date: Jun 2006
Location: Idaho
Posts: 8,800
|
Re: What I've been working on....
Quote:
I also suffered from the "abuse" of my willingness to help others until I got really sick for about 9 months in the early 1990's. Turned out to be blood poisioning from a dental problem but I was down hard and had to give up all my non-profit work, helping friends on their house remodels and being the go to guy for my relatives. I found that the world did not end, except for a few everyone still liked me and life went on. I learned that I could spend the time on what I wanted to do and no was a reasonable answer. I may be over-analyzing your comments but something to think of. Cool thing is it sounds like when you decide what you want to do you can have a hot-rod "barn raising" and accomplish a lot in a short period of time. Maybe you can figure out the parts that will work with any of the concepts and get those done??
__________________
1959 Chevy Short Fleetside w/ 74 4WD drive train (current project) OrrieG Build Thread 1964 Chevelle Malibu w/ 355-350TH (daily driver) Helpful AD and TF Manual Site Old Car Manual Project Last edited by OrrieG; 02-22-2009 at 02:13 PM. |
|
|
|

|
|
|
#57 |
|
Certified Car Nut
Join Date: Jan 2005
Location: Inglewood, California
Posts: 3,118
|
Re: What I've been working on....
Okay its time to post some new pics or at least get to work on her again. You know I follow this build.lol
|
|
|

|
|
|
#58 |
|
Registered User
 Join Date: Mar 2005
Location: apple valley, ca
Posts: 2,670
|
Re: What I've been working on....
Out of the darkness, a familiar face appears................Yep, I'M BACK!
I've been lurking almost everyday, but I haven't posted much because work and life has really made it tough to have the time to devote to anything else. Let's see.....Since the beginning of the year, the wife got really, really, sick and after 3 months the doctors are still baffled, the house flooded and did major damage, the septic tank was giving us problem$, the son got head lice from one of the helmets at the local go-kart track, the dog got really sick, and we were down a few guys at work, so I am working 12 hour days (with a 125 mile commute) almost everyday. I could write a really bad country song with the way my 2010 is going. I believe that I'm just getting all my bad luck for the entire year out of the way early. Let's see....since I've posted on this thread I've actually done a lot of little jobs on the truck: The big block has been yanked and a small block is back in. I don't want to build a one-dimensional truck that goes really fast in a straight line only. I'm building this truck to drive the wheels off of it. The manual steering box is gone, and a power box is going in. The manual brakes are going to be replaced with a Hydroboost unit. And, yesterday was a first for me. I am actually taking the truck to a buddies shop to get some suspension work done. This goes completely against my ideology of "do it myself", but what I want done is going to take a pro to do it right. I'm going to be right there with him, but I need his expertise. I like my stuff ground-hugging low, and even with all the engineering I have done, there's no way that I can make it ride nice and have it as low as I like it with leaf springs and coils. So, it got loaded up and it's now over at Exile Fabrication in Apple Valley getting a full air ride suspension. 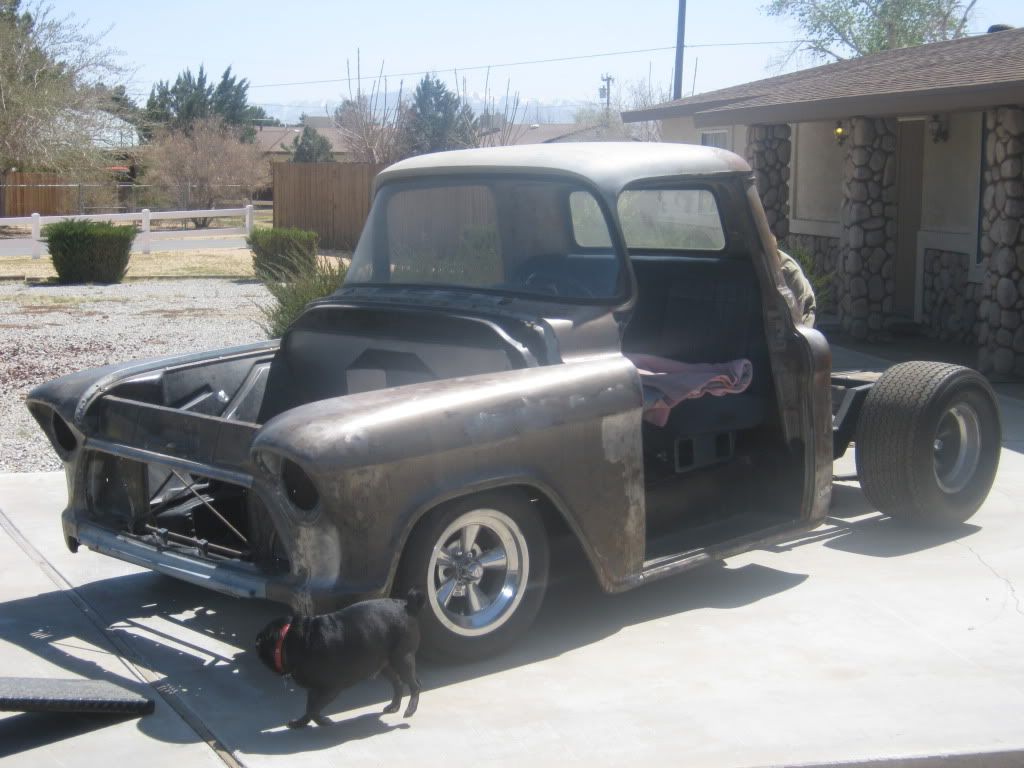 The plan is to remove the leafs in the rear and build a 3-link set-up with Slam Specialties RE-8 bags. Single 10 gallon air tank, 2 ViaAir 480 pumps, 8 valves. I want a slow-moving, quiet system. All the lines will be hard-lined. The front will get Slam Specialties RE-7 bags. It's not important for me to have the truck lay on the frame rails at full deflation. I just want to be able to raise the truck when I have to go over speedbumps, enter a driveway, or go down an uneven road. I've never had an airbagged vehicle, so this is new territory for me. While the truck is at Exile, we are going to engineer a way to make the Hydroboost work. With a Camaro subframe and with the master cylinder attached to the driver side frame rail, there isn't any room to route the exhaust. I'm running a 3" exhaust and there is NO room to route the pipes and still have the required air-space between it and the master cylinder. The plan is to move the pedal pivot tighter to the frame rail, scoot the Hydroboost and master cylinder aft, and run a pushrod and pivot assembly. I'll post pictures of the progress. Mike at Exile is quite the craftsman, and he meets my standard of quality. Kabwe, OrrieG, Coronas56,Tri5Nerd, and everybody who has posted the nice comments: THANK YOU for your words. They keep me motivated. Even while I was away, I still checked in on you guys often. I did a lot of planning for my project, and I fell asleep in my favorite recliner every night with a catalog in my lap. This site is awesome, and I look forward to a day when we can all meet up and road-trip our rides somewhere and show them off like proud parents. |
|
|

|
|
|
#59 |
|
Certified Car Nut
Join Date: Jan 2005
Location: Inglewood, California
Posts: 3,118
|
Re: What I've been working on....
Sorry about the bad luck you've been having lately man, but its got to turn around. Your truck has been one of my favorite projects to watch and I'm glad to see you are trying to get back to her.
|
|
|

|
|
|
#60 |
|
Registered User
Join Date: Mar 2010
Location: Whitehorse Yukon
Posts: 321
|
Re: What I've been working on....
looks awsome! Ive been beating away on my truck hard for the last few weeks after it sitting idle for well over a year. I found out two weeks ago Im about to be a dad, so Im getting metally prepared for the lack of hotrod time thats comming up. Ive got a beautiful understanding girl, who believes I need my car time so hopefully this doesnt have to come to a dead stop. I love the front end and was sort of thinking of some of the same mods, but where I live its hard to find any old parts laying around. keep up the good work!
|
|
|

|
|
|
#61 |
|
A320 Pilot/USAF Retired
Join Date: Mar 2009
Location: Charleston, SC
Posts: 2,629
|
Re: What I've been working on....
Glad to see you're back on this one! Can't wait to see what you do to it!!
__________________
JJ My 1957 build: http://67-72chevytrucks.com/vboard/s...d.php?t=334552 http://www.trifive.com/forums/showthread.php?t=22037 Instagram - Chuckdriver57 |
|
|

|
|
|
#62 |
|
Tripple Five Fanatic
Join Date: Sep 2006
Location: USA
Posts: 658
|
Re: What I've been working on....
Good to see you back and getting work done to the truck, bad luck can't stay with you and your family forever! Just remember to always look on the brite side of life....
Post pics as you get work done to it, I want to see how the Hydroboost is done. Everyone on this site has their own unique way of building their trucks and I've learned how to do a mod or fix something on my truck from just looking and reading this forum, now I feel good that I can contribute something too. Keep plugging away and keep your head up! Tri5
__________________
1955 Chevy Stepside/LS1 drive train http://67-72chevytrucks.com/vboard/s...d.php?t=371513 |
|
|

|
|
|
#63 |
|
Registered User
Join Date: Mar 2010
Location: Whitehorse Yukon
Posts: 321
|
Re: What I've been working on....
I love the front end of your truck! I was thinking of doing pretty much the same thing with the 57 grill bar and the headlight bezels. I have been paying attention on e-bay but havent seen any great pieces. was at the steel shop yesterday and found some 16 gauge metal with tons of holes punched in it and figure I will be using that for the center of the grill. I have a wing strut off a supercub airplane and keep eyeing it up for a middle bar! I think that the angled gate would look wicked on your truck. nice build.
|
|
|

|
|
|
#64 |
|
Registered User
Join Date: Jan 2009
Location: Omaha, Arkansas
Posts: 929
|
Re: What I've been working on....
I've got several 57 grills that I've took apart to get the best pieces off of to have rechromed. and have a couple complete grills. what parts are you looking for?
__________________
'57 Chevy Pickup '56 GMC LCF Cummins '38 Chrysler Royal '57 2wd change http://67-72chevytrucks.com/vboard/s...light=speedway |
|
|

|
|
|
#65 |
|
Registered User
 Join Date: Mar 2005
Location: apple valley, ca
Posts: 2,670
|
Re: What I've been working on....
Yukon-
Check outblackdiesel's post above. So far, I have only used just the '57 grill bar. I'm not sure if the '57 mesh backing would be big enough to fill the truck's grille opening. If you get one, I'll give you all the details on how I mounted mine. It's not 100% finished yet, but you have to do a little trimming to make it fit the opening. Today was the first day that I spent the time to look over your entire thread. To be honest, I saw your thread when you made the first postings that had the pictures of the truck, and I thought that there was NO way anybody could save it. You impress me with your abilities! I love seeing builds that rely on ingenuity and skill, not loads of cash. I find more joy in taking somebody else's "junk" parts (that I got for free) and making them work, rather than just ordering stuff from a catalog and running up the credit card. Been there, done that. |
|
|

|
|
|
#66 |
|
Registered User
Join Date: Nov 2008
Location: So. Cal.
Posts: 452
|
Re: What I've been working on....
Yes, he's back at it! I was one of the guys who was "stealing" his time of working on his own truck! He helped me finish up the 'Camino I was building and has helped me many times on my '49 truck. I told him as soon as I wrap mine up in the next couple months, I'm coming over to get the body work done and get it ready to paint and help him finish the truck. It's been a lump in his garage for FAR too long and he deserves to be cruising it! I'd love to see it driving next to me on the way to Bakersfield for the reunion in October!
__________________
It's all about the stance, baby! http://67-72chevytrucks.com/vboard/s...d.php?t=320546 |
|
|

|
|
|
#67 |
|
Registered User
Join Date: Mar 2007
Location: Ben Wheeler,Texas
Posts: 992
|
Re: What I've been working on....
You have one hell of a truck there so far. Keep pluggin' away!
__________________
05 2500HD 6.0 excab 69 LWB-Gone but not forgotten! 68 Dodge Charger 383/727 69 Dodge Charger-440/4spd Last edited by OLDIRON69; 04-16-2010 at 10:21 AM. |
|
|

|
|
|
#68 |
|
Registered User
Join Date: Feb 2005
Location: B.C.
Posts: 457
|
Re: What I've been working on....
Oldiron69 is right. I think all of us are anxious to go for a spin in your ride when you've got it done. Any fresh pictures since the suspension mods?

__________________
58 Apache short fleetside ona 64 chassis: 
|
|
|

|
|
|
#69 | |
|
Registered User
 Join Date: Mar 2005
Location: apple valley, ca
Posts: 2,670
|
Re: What I've been working on....
Funny you should ask! I was over at the suspension guy's shop last night checking on the progress and I didn't have my camera. He had a Dually he was finishing up, so he hadn't spent much time on my truck until yesterday. The lower 3-Link bars are built, and he's sent off the link brackets to the shop to be laser-cut. We bounced some ideas off of each other, and because I have a narrowed rear end with a large tire (15.50 wide), packaging all of the components is going to be a challenge, and he's got some ideas that are going to look trick and work awesome. Plus, he's going to tig weld everything, and his welding is so tight and consistent that it looks like a robot did it. I am really excited.
I am going to go over tomorrow and work on it, and I'll take pictures and post them up. I think you'll like them. I am a stickler for aesthetics and build quality, and so far, it's exceeding even my expectations. Quote:
We've got some trucks in the works that we're teaming up on as a business venture, and we'll post up pictures as they come together. You'll like 'em! Last edited by chevyrestoguy; 04-16-2010 at 07:39 PM. |
|
|
|

|
|
|
#70 |
|
Registered User
 Join Date: Mar 2005
Location: apple valley, ca
Posts: 2,670
|
Re: What I've been working on....
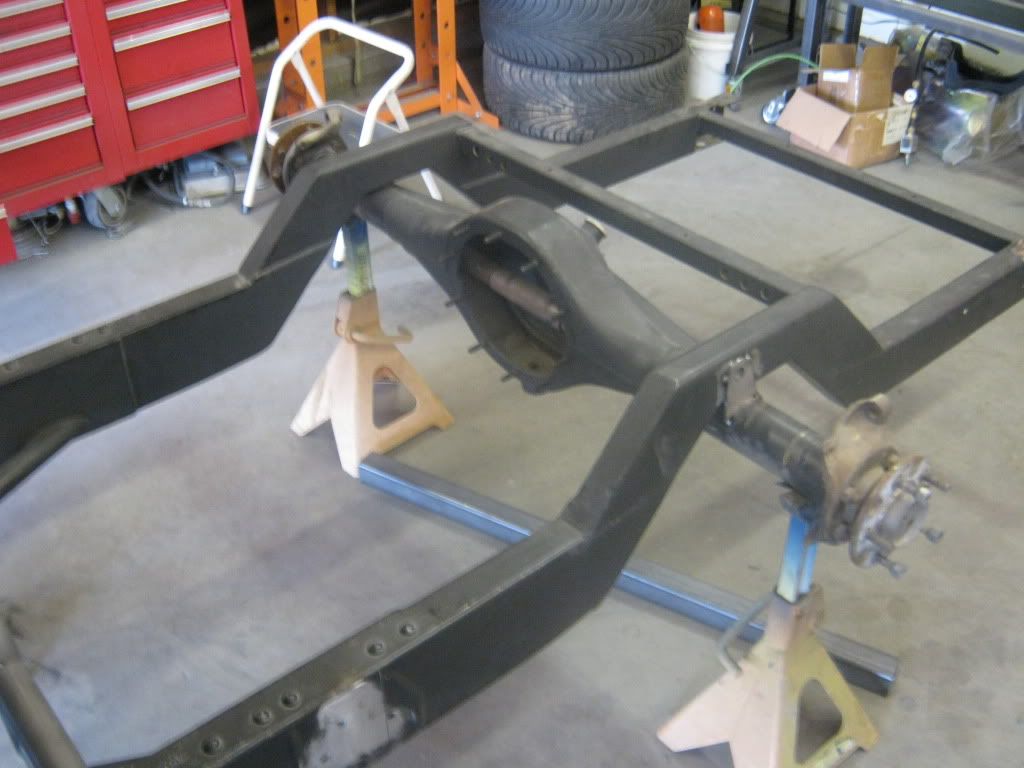
I got the forward and aft leaf spring brackets cut off and removed the fuel tank. Also, the original leaf spring perches have been cut off. Mike temporarily tacked the housing to the frame to simulate the highest point that the housing can travel in the upward direction. He had to do this to determine the max length of the lower bars. The housing will never go this high when it's completed because the rockers will hit the ground before the rear end ever gets to this point. Plus, I plan to have a small snubber just in case. Don't know why I'm wanting to do that, but I don't feel comfortable with a metal housing and a metal frame rail possibly making contact without a least some small kind of a buffer between them.
Last edited by chevyrestoguy; 04-17-2010 at 11:56 PM. |
|
|

|
|
|
#71 |
|
Registered User
 Join Date: Mar 2005
Location: apple valley, ca
Posts: 2,670
|
Re: What I've been working on....
I took some pictures of the beast at the shop today. Mike is still hot and heavy on the dually because the owner added a bunch of extra stuff at the last minute. Here's a few shots of what he has done so far:
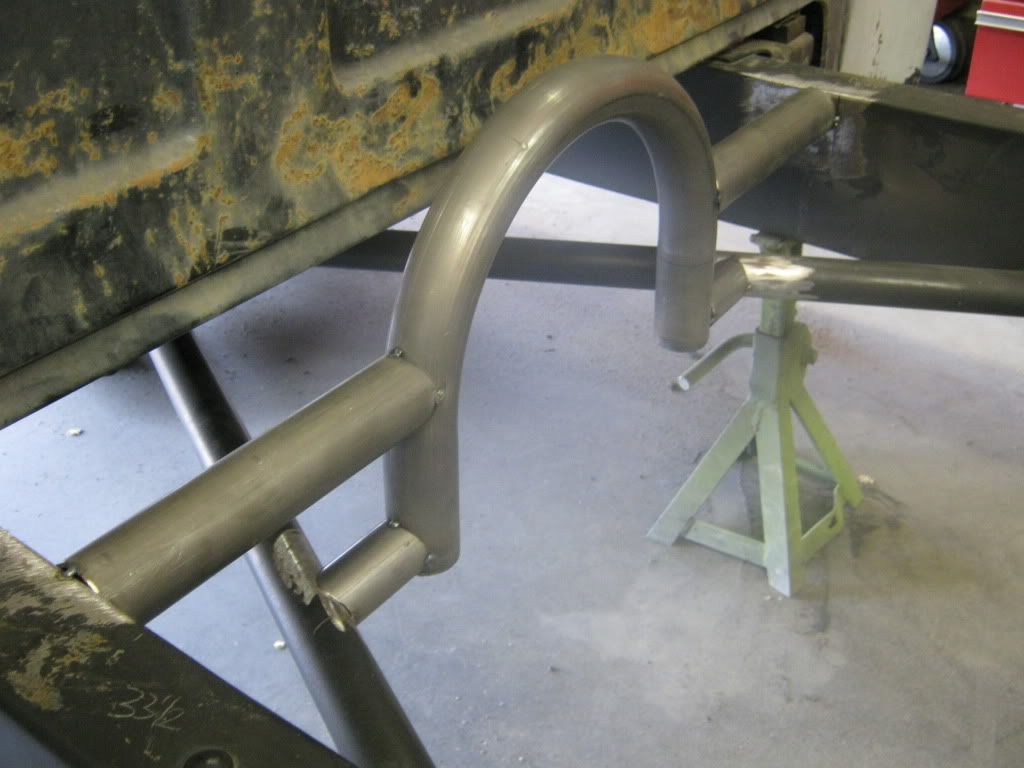 This is the beginning stages (just tacked welded in) of the support that will eventually have the forward attach points of the lower link bars and the upper bar. It is a 3-link set-up, so the upper bar will resemble a wishbone (2 attach points forward, 1 single attach point at the top side of the axle housing). He was able to attach the support to my X-member, so that'll tie everything together nicely. The frame is fully boxed with an x-member and all this extra tubing will ensure that my frame will NOT flex and should ride down the road nicely. 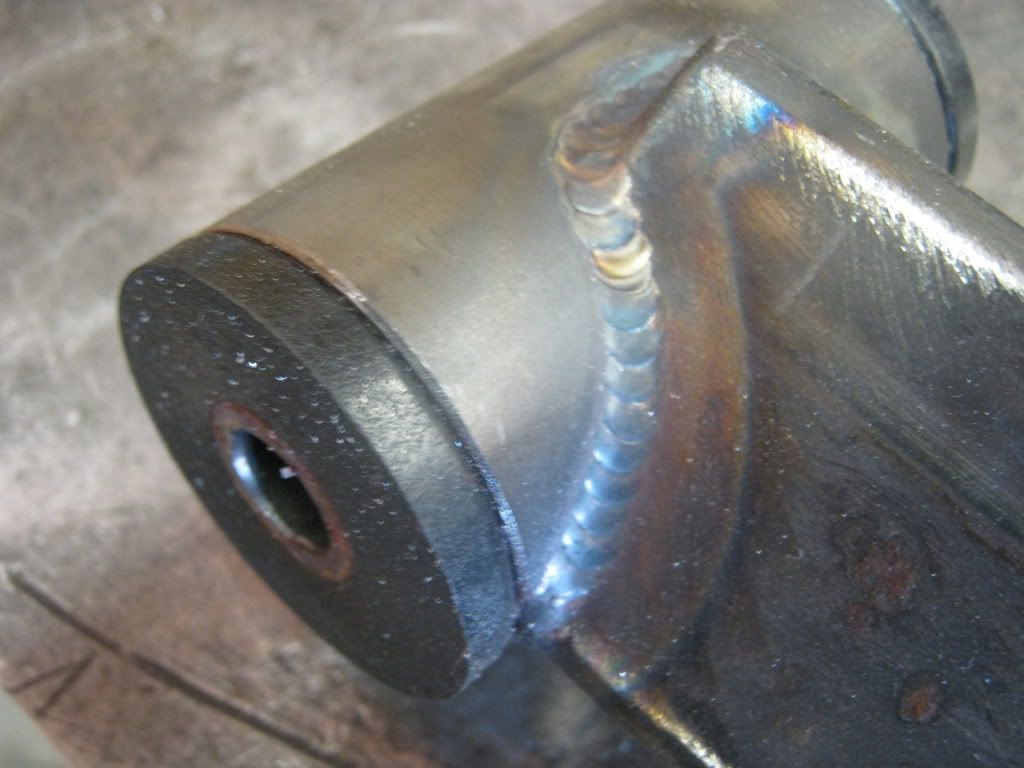 This is a shot of the one of the lower link bar ends. We decided to do a slightly different look and turn the 2"X2" lower tube on it's side and create a "diamond link". I thought I had a picture of the entire link but those are on my phone. Check out the welds. Nice, huh? He plans to get hot and heavy on it by Wednesday, and I'll post more shots as he makes progress. Last edited by chevyrestoguy; 04-17-2010 at 11:43 PM. |
|
|

|
|
|
#72 |
|
Registered User
 Join Date: Mar 2005
Location: apple valley, ca
Posts: 2,670
|
Re: What I've been working on....
I haven't posted pictures in a while because the bags were on backorder from AVS. I was hoping to get the new SS series bags for the front and rear, but when the order showed up, the fronts were the SS bags and the rears were the RE bags. No problem, either version is a great product, so once the parts finally arrived, some work got accomplished. Here's few pictures I took today.
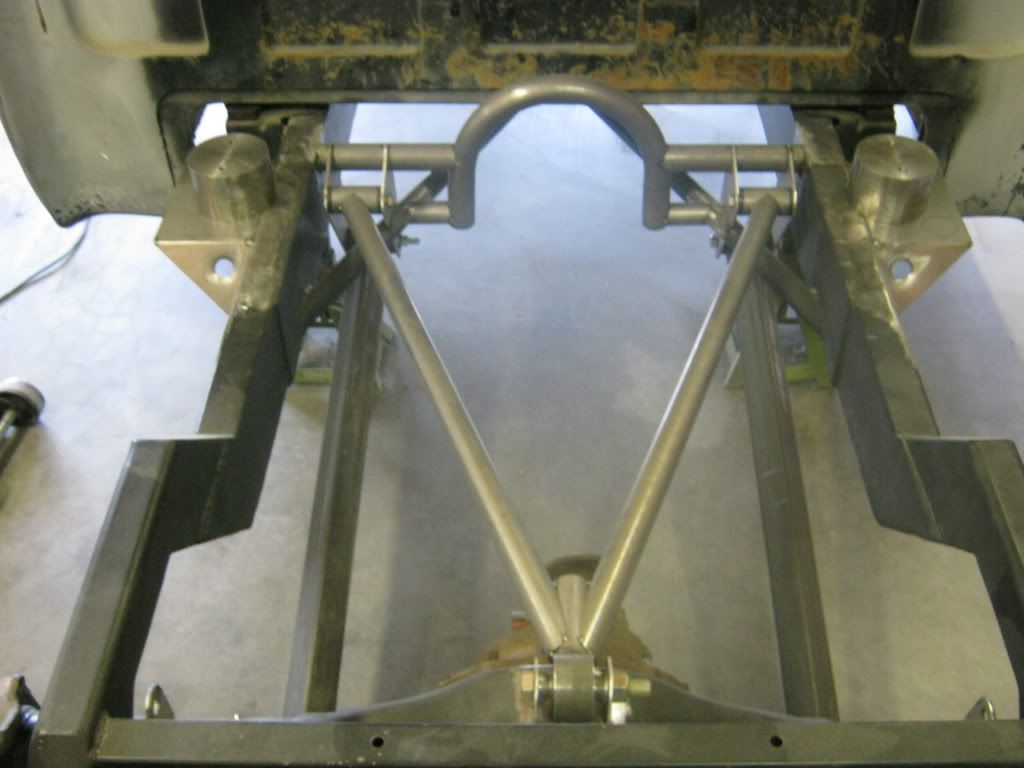 As you can see, everything so far is just tacked in place. The lower links and upper links are in and the system cycles really well. 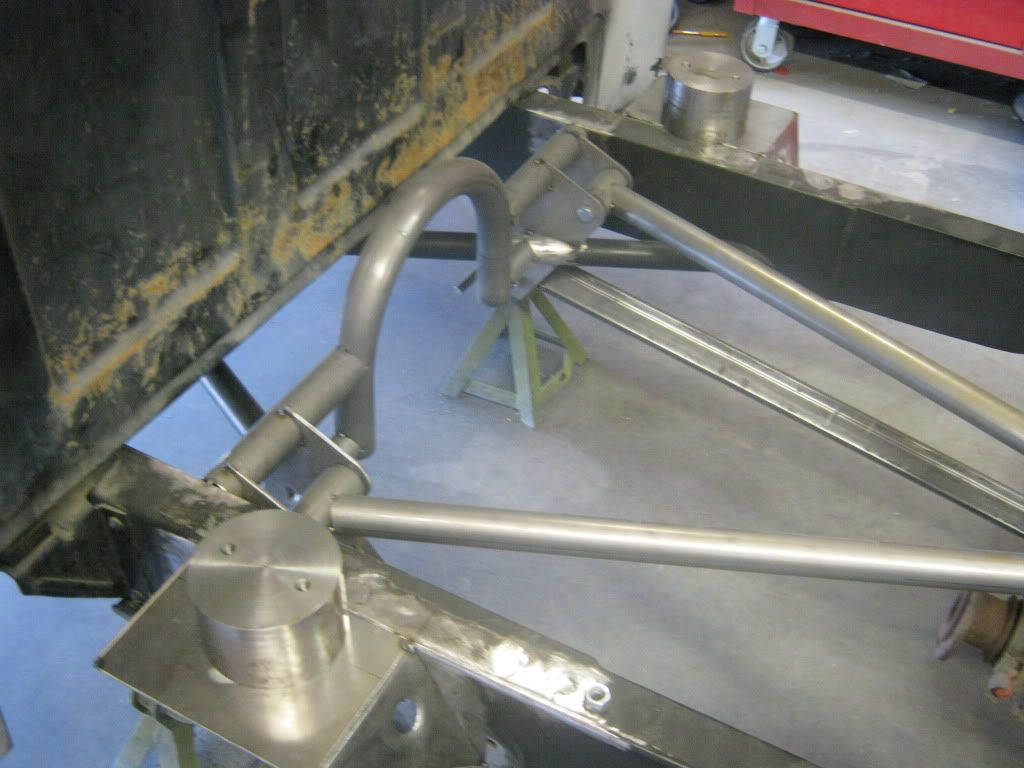 The forward brackets were a real challenge because of the existing x-member intersecting the attach points. Quite a bit of templates had to be made, but after some cutting and grinding, the brackets fit really well. They will be boxed and the flat areas will be dimple-died for a cool look. The bag mounts are tacked in, and the round piece of billet you see on top is a mock-up which simulates a deflated bag. That way, all of the measuring for any of the attach links is not based off of a floppy bag, but a solid piece. 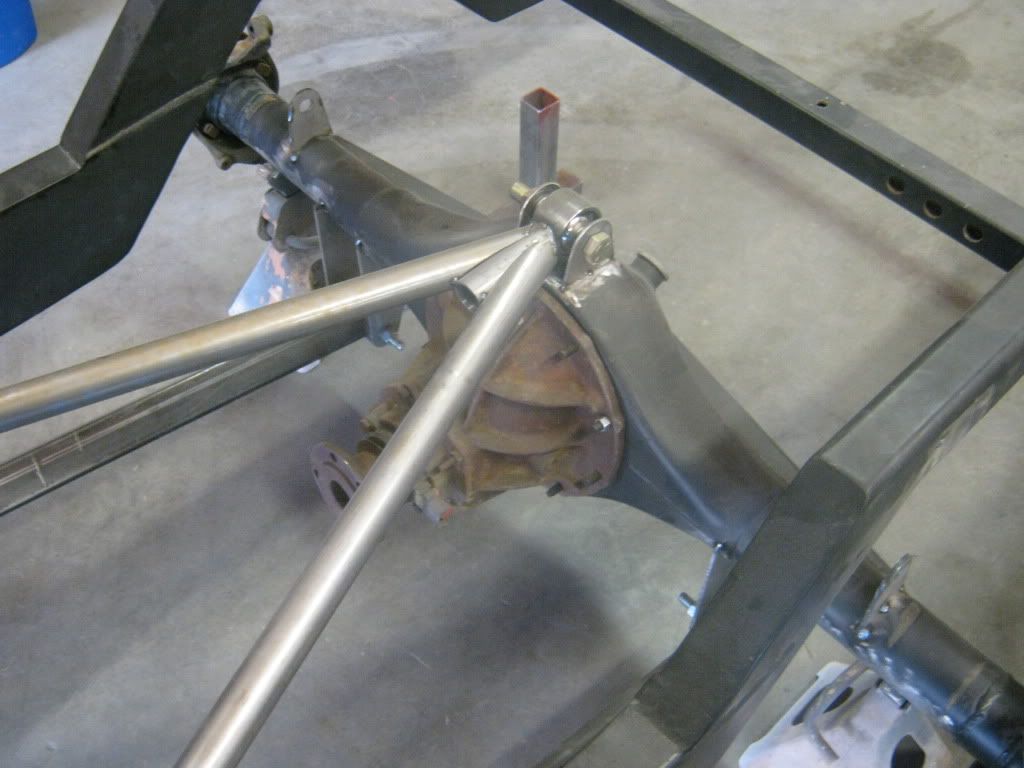 The upper bar is still missing some gusseting, and the attach bracket will be boxed and plated for strength. All of the attach points you see in the pictures will be done that way. We decided to use a Uni-Ball instead of a heim at the attach point on the housing because it'll work great for articulation. There's still a ton of work to do, but these pictures will give you an idea of what the system will look like. Once the bag mounts are finished and the bell-cranks get built, along with all of the dimple-died plates, it'll look sick. Last edited by chevyrestoguy; 05-16-2010 at 02:02 AM. |
|
|

|
|
|
#73 |
|
Certified Car Nut
Join Date: Jan 2005
Location: Inglewood, California
Posts: 3,118
|
Re: What I've been working on....
Looking great man.
|
|
|

|
|
|
#74 |
|
Under Construction
Join Date: Oct 2007
Location: Midlothian,TX (DFW)
Posts: 4,555
|
Re: What I've been working on....
nice progress.
__________________
Heath subscribe to the board here: http://67-72chevytrucks.com/vboard/payments.php http://67-72chevytrucks.com/vboard/s...d.php?t=157669 FAQ how to's 1956 Chevy Apache 1967 C10 SWB FleetSide (under construction) 1969 K10 SWB FleetSide (Future Build) 1972 C10 SWB Stepside (Future Build) 56 chevy truck : http://www.cardomain.com/ride/2955823/1 67 truck build: http://www.67-72chevytrucks.com/vboard/showthread.php?t=281357/1 69 k10: http://67-72chevytrucks.com/vboard/s...d.php?t=389470 |
|
|

|
|
|
#75 |
|
Registered User
 Join Date: Mar 2005
Location: apple valley, ca
Posts: 2,670
|
Re: Chevyrestoguy's '55 build
The project is still going! Mike at Exile Fabrications had to finish a few projects ahead of mine before he could get going, so we're back on it. The guys at the shop that do the laser cutting messed up on some bracket patterns, so that slowed us up a bit. I made a few changes since the beginning, namely, more detail on the fabrication. I like the look of exposed, high quality TIG welds, and I like the look of lightening holes and feed-thrus. I want the design to meld with the functionality of the part. I don't like exposed things that look like an afterthought. Everything must flow, but still maintain it's functionality.
In an earlier post, I mentioned that the rear suspension is going to have bell-crank arms because of the limited space due to the truck being a step-side and also the fact that it has a narrowed rear end. I want the bags to be as far outboard as possible for stability. Here are some pictures of the progress: 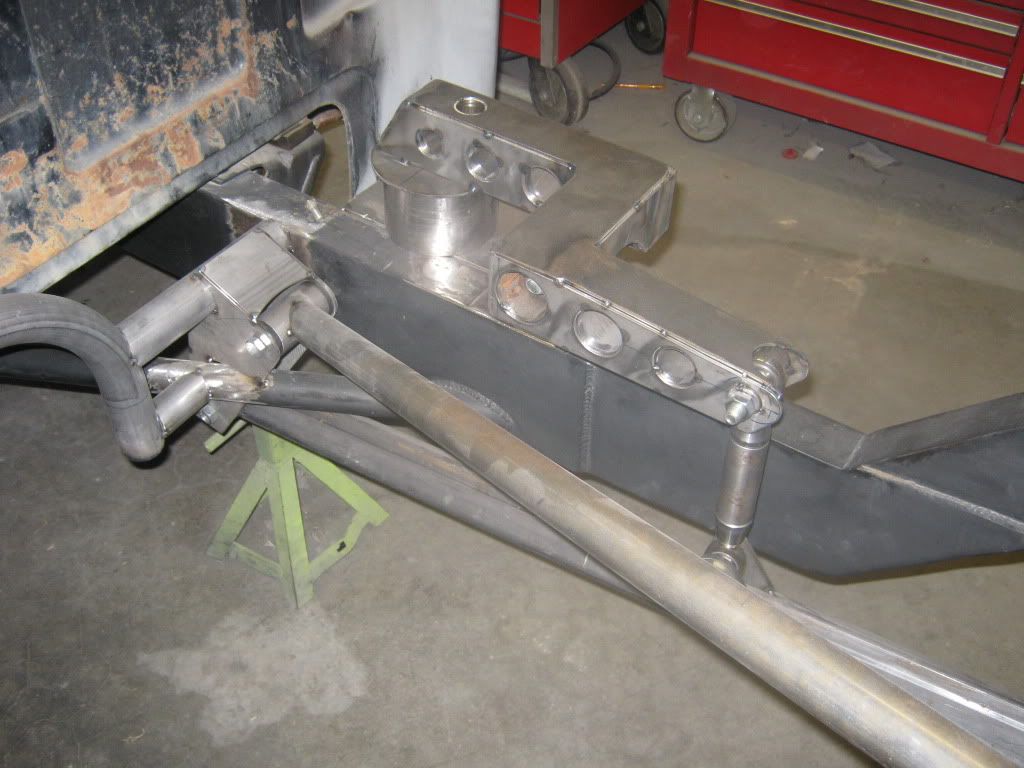 You can see the shape of the bell-crank in this shot. Currently, everything is tacked together until we get to a point where we're satisfied with the way it functions, then it will be final-welded. The link from the bell-crank to the lower trailing arm is chrome moly with welded-in rod end threaded bungs and the rod ends are the type they use on trophy trucks. They operate smoothly with no slop. The bolt for the pivot point is inside one of the lightening holes. There are still some gussets that will be added to the pivot point upright. The bushings at the pivot are the same as the ones from a trophy truck as well. The 6" round billet piece where the front of the bell-crank arm bolts to is an air-bag simulator, which simulates the air-bag at max deflation. Mike does not like using the bags during the fabrication stages because they can get damaged and they flex, which can be a problem if you're trying to get accurate measurements. 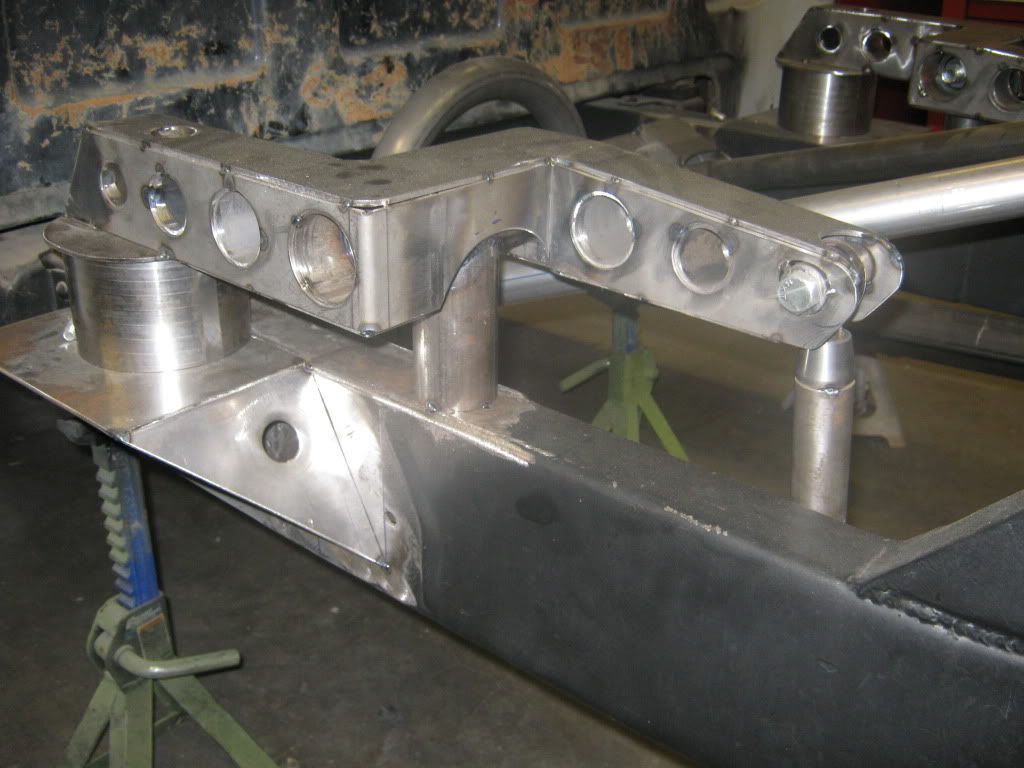 Close up shot of the arm. There will be gussets from the top of the framerail to the side of the pivot upright. Also, the relief cut-away will be opened up just a little more for additional clearance. We're still in the initial fabrication stage, so these things are normal and expected. 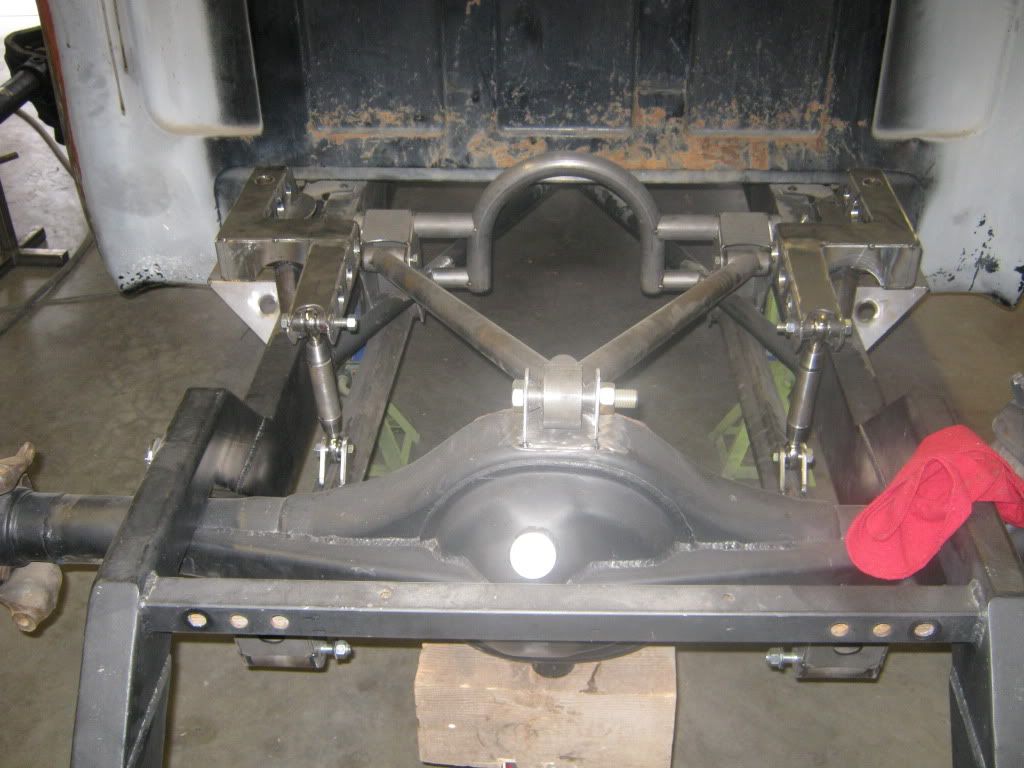 View from above. There's still alot of bridgework to do, shock mounts to make, figure out a swaybar set-up, and build the fuel tank, air tank mounts, compressor mounts, and battery box. The old shock crossmember will be cut out soon. It was staying in until the last because it was keeping the framerails parallel. I'm going to run out of room fast. We've got some ideas on packaging that will be very, very trick. Can't say right now, but the old saying about 10lbs of stuff in a 5 lb bag will be the idea. 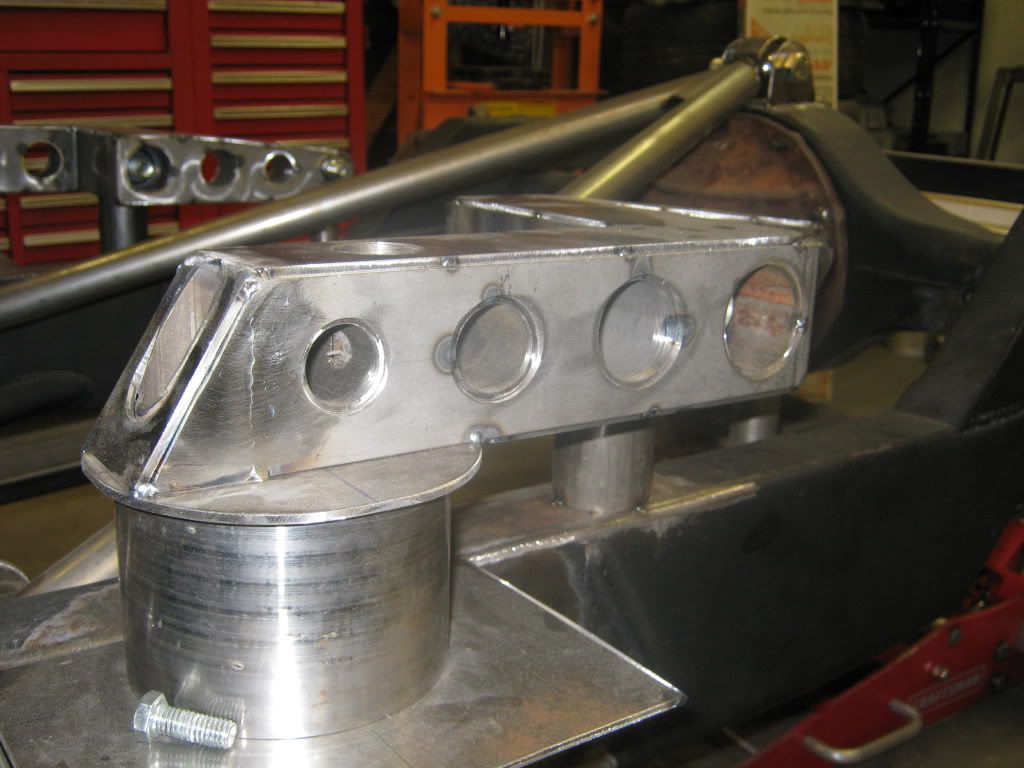 Another shot of the air-bag simulator I was talking about. Bag bolt access will be gained through the tubes that you can see on the top of the arm. The bell-crank arm pivot bolt will be accessed through the tube (4th one from the left) on the right. I'll keep posting when I get more pictures!!! Last edited by chevyrestoguy; 07-18-2010 at 01:23 PM. |
|
|

|
 |
| Bookmarks |
| Thread Tools | |
| Display Modes | |
|
|