
 |
|
|
#776 |
|
Registered User
Join Date: Sep 2012
Location: Midway, NC
Posts: 3,275
|
Re: Markeb01 Build Thread
Hadn't checked on you in awhile and you've done some great stuff!
__________________
http://67-72chevytrucks.com/vboard/s...d.php?t=581873 The low buck build threads. Check'em out! http://67-72chevytrucks.com/vboard/s...d.php?t=666022 My build thread Crossmembers CC |
|
|

|
|
|
#777 |
|
Registered User
Join Date: Aug 2012
Location: Smithfield rhode island
Posts: 722
|
Re: Markeb01 Build Thread
I just remembered a couple more uses for that stuff too. I have also used it for years for prep work before paint and now with the water borne paint we use, if you make a mistake you can spray it with this stuff and wipe the paint off and start over,it saved me a few times!
I believe you can buy it at any local parts store or auto body supplier.  Posted via Mobile Device
__________________
My frame Layin 63 short bed project  http://67-72chevytrucks.com/vboard/s...d.php?t=551353 |
|
|

|
|
|
#778 | |
|
Registered User
Join Date: Sep 2011
Location: Tacoma, WA
Posts: 2,425
|
Re: Markeb01 Build Thread
Quote:
I personally think people that write malicious code should have their hand amputated, and the two stumps sewn together as punishment.
__________________
Michael McMurphy My 66 Stepside My 64 Tow Truck My 66 Tempest Table Of Contents Added to Page1 |
|
|
|

|
|
|
#779 | |
|
Registered User
Join Date: Feb 2013
Location: Genoa, IL
Posts: 387
|
Re: Markeb01 Build Thread
Quote:
Checked on Amazon and found this glass cleaner. Not the generic kind but sounds promising.
__________________
Jeff Simplify Life! My build thread: http://67-72chevytrucks.com/vboard/s...d.php?t=566533 |
|
|
|

|
|
|
#780 | |
|
Rollin' Old Skool
Join Date: Jun 2007
Location: Hattiesburg, MS
Posts: 5,371
|
Re: Markeb01 Build Thread
Quote:
__________________
_____________________________________________ Phillip My Build threads: 1966 Chevy C-10 "Black Betty" shortbed, fleetside, BBW, 327 V8/ Powerglide (under construction) http://67-72chevytrucks.com/vboard/s...ighlight=betty 1997 Chevy Tahoe, 2dr/2wd, mild custom (Daily driver) http://67-72chevytrucks.com/vboard/s...d.php?t=601142 Pics: '66 C-10 https://flic.kr/s/aHsjHWD4h9 '97 Tahoe https://flic.kr/s/aHsjGZ7wKP '93 C-1500 https://flic.kr/s/aHskxdpdnQ '88 S-10 Blazer https://flic.kr/s/aHsjYGx4Md Previous Rides: 1993 Chevy S-10 ext. cab, 4.3L, 4/5 drop (Sold) 1993 Chevy C-1500 short/step Retro-Rod (Sold) 1988 S-10 Blazer 2dr/2wd mild custom (Sold) |
|
|
|

|
|
|
#781 |
|
Senior Enthusiast
Join Date: Feb 2007
Location: Spokane Valley, WA
Posts: 8,356
|
Re: Markeb01 Build Thread
Installed the 2nd chrome rear window bead a couple of days ago, and finally got the truck washed this morning. Here’s a front shot of the truck, and 3 pics of the back. The rear window trim is a rather small thing, but I do like the extra detail to go along with the windshield trim and the rest of the shiny parts. It was a very harsh time of day to be taking car pictures. I’ll try and capture some better images near sundown:
 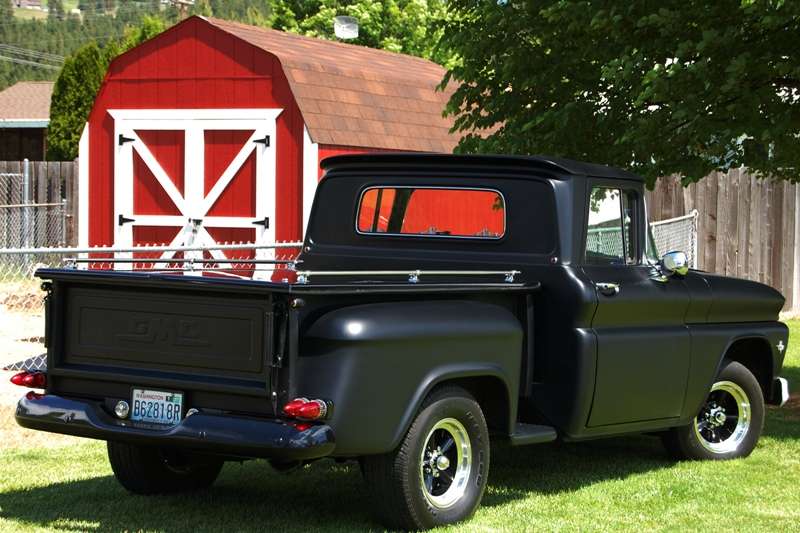 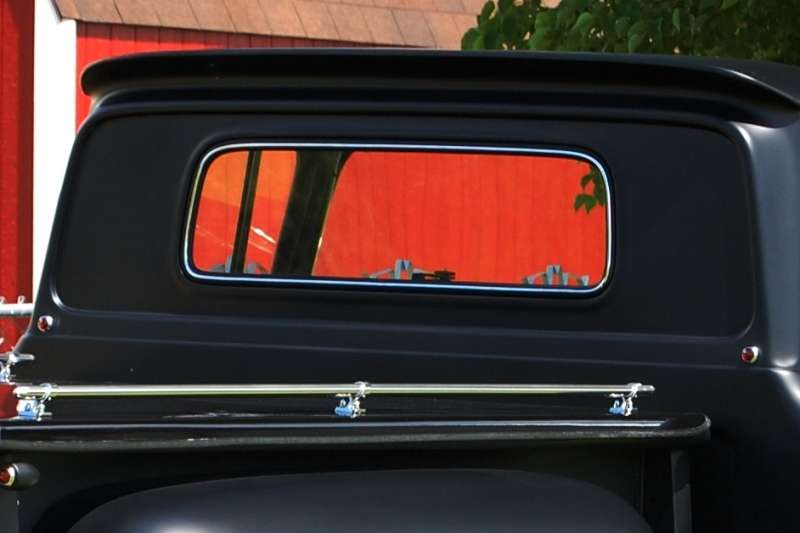 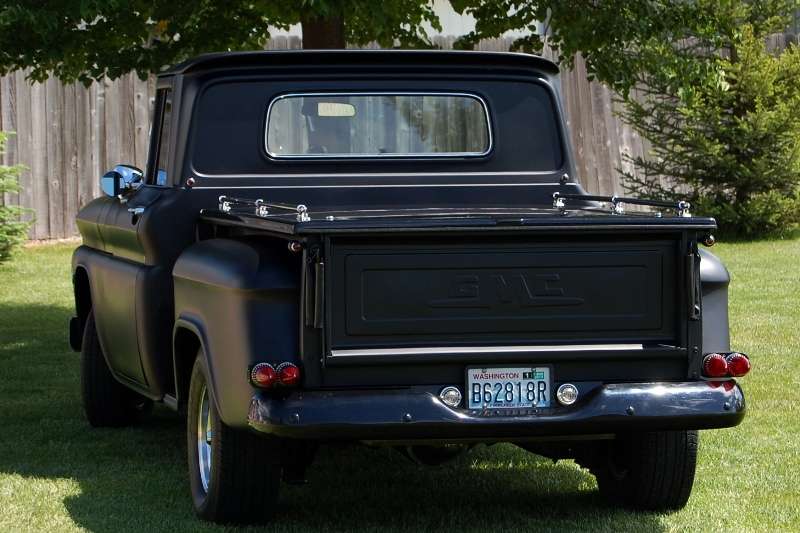 The white stripe at the bottom of the tailgate is just a sun relection. I also reset the electric fan to come on about 175 degrees. I messed up the setting during the cam break in and it was running all the time the ignition was on. And that's my wife's new shed in the background. It doesn't show real well, but I made a ramp to drive the mower up into the shed and shot the surface with the last two cans of Raptor I had left over from the firewall project. That stuff makes a fantastic non-slip covering where a slip and fall is a risk.
__________________
My Build Thread: http://67-72chevytrucks.com/vboard/s...d.php?t=444502 Last edited by markeb01; 06-05-2013 at 06:25 PM. |
|
|

|
|
|
#782 |
|
Registered User
Join Date: Apr 2012
Location: Searcy, AR
Posts: 4,203
|
Re: Markeb01 Build Thread
Very Nice Pics, even with the harsh sunlight! Love the Garden Shed in the background... Always enjoy seeing pics of your ride, I really enjoy spotting all the little details that set it apart from the rest. That rear chrome bead looks great!!!

__________________
DON Proverbs 27:17  US Air Force Retarded errr Retired My '65 Stepper Build:http://67-72chevytrucks.com/vboard/s...d.php?t=533920 My '60 Rusty Patina Build:http://67-72chevytrucks.com/vboard/s...66#post7402266 My '72 http://67-72chevytrucks.com/vboard/s...59#post7204359 SOLD |
|
|

|
|
|
#783 |
|
Registered User
 Join Date: May 2009
Location: Rathdrum, Idaho
Posts: 1,135
|
Re: Markeb01 Build Thread
The bead looks perfect Mark great job, it accents your truck nicely. That truck just gets better as time passes and as always, I love your truck..Vernski

|
|
|

|
|
|
#784 | |
|
Rollin' Old Skool
Join Date: Jun 2007
Location: Hattiesburg, MS
Posts: 5,371
|
Re: Markeb01 Build Thread
Quote:
__________________
_____________________________________________ Phillip My Build threads: 1966 Chevy C-10 "Black Betty" shortbed, fleetside, BBW, 327 V8/ Powerglide (under construction) http://67-72chevytrucks.com/vboard/s...ighlight=betty 1997 Chevy Tahoe, 2dr/2wd, mild custom (Daily driver) http://67-72chevytrucks.com/vboard/s...d.php?t=601142 Pics: '66 C-10 https://flic.kr/s/aHsjHWD4h9 '97 Tahoe https://flic.kr/s/aHsjGZ7wKP '93 C-1500 https://flic.kr/s/aHskxdpdnQ '88 S-10 Blazer https://flic.kr/s/aHsjYGx4Md Previous Rides: 1993 Chevy S-10 ext. cab, 4.3L, 4/5 drop (Sold) 1993 Chevy C-1500 short/step Retro-Rod (Sold) 1988 S-10 Blazer 2dr/2wd mild custom (Sold) |
|
|
|

|
|
|
#785 |
|
Registered User
Join Date: Sep 2011
Location: Tacoma, WA
Posts: 2,425
|
Re: Markeb01 Build Thread
That back glass trim really sets it off nice!
You did an Automatic to Manual transmission on this rig didnt you? I am asking because it has dawned on me that I have not set up a back-up lights switch yet, and I am going to want that. It is one of the smaller details that, to date, I have not paid a lot of attention looking at in other folks builds. Wanted to see what intel you had on the matter. Thanks!
__________________
Michael McMurphy My 66 Stepside My 64 Tow Truck My 66 Tempest Table Of Contents Added to Page1 |
|
|

|
|
|
#786 |
|
Senior Enthusiast
Join Date: Feb 2007
Location: Spokane Valley, WA
Posts: 8,356
|
Re: Markeb01 Build Thread
Howdy Mike, yep when I first built the truck back in 1992 I pulled the 305/granny box and swapped in a 350/350. In 2005 I couldn’t stand it anymore and swapped in a new Richmond (BW) Super T10 4 speed. At first I tried living with an illuminated toggle switch on the dash for the back up lights, but I kept forgetting to turn them off. So I just picked up a back up switch for a Hurst shifter and bolted it on and rerouted the wires.
I never had back up lights installed when the auto trans was in place. I had the Unity lights for a number of years, but it took a long time to figure out where to mount them! I’m trying to wrap up my stuff so I can get back to checking out everyone else’s builds.
__________________
My Build Thread: http://67-72chevytrucks.com/vboard/s...d.php?t=444502 |
|
|

|
|
|
#787 |
|
Registered User
Join Date: Feb 2011
Location: muskogee, ok
Posts: 1,091
|
Re: Markeb01 Build Thread
as alway super clean man!!! i like the window trim.. btw i just noticed the little red lights on the back of the cab.. are those turn signals?
__________________
 bagged 66 longbed build http://67-72chevytrucks.com/vboard/s...d.php?t=449548 my favorite colors.. black, rust, and shiny!!!! instagram: @coulter918 |
|
|

|
|
|
#788 |
|
Registered User
Join Date: Jun 2012
Location: Selkirk Ontario Canada
Posts: 1,141
|
Re: Markeb01 Build Thread
are those 2 small brake lights in the back of the cab?
__________________
My 63 GMC Panel Slow Build http://67-72chevytrucks.com/vboard/s...=1#post5457281 63 
|
|
|

|
|
|
#789 |
|
Senior Enthusiast
Join Date: Feb 2007
Location: Spokane Valley, WA
Posts: 8,356
|
Re: Markeb01 Build Thread
Yes they are my rendition of a 3rd (& 4th) brake light. The lamps are Ron Francis Brite Lights:
 https://www.ronfrancis.com/prodinfo.asp?number=BL%2D69R They do not illuminate on the tail light circuit, they only activate on the turn and brake signal circuits. They also operate with the 4 way flashers. The lamp assemblies are the same and whatís inside the little torpedo shapes lights at the top of the rear stake pockets.  http://www.ronfrancis.com/prodinfo.asp?number=MC%2D61 Those have yellow lenses and are connected to a police car headlight wig wag flasher. They blink back and forth using the same high intensity bulbs as the red ones. We used to live on a very dangerous road in North Idaho, and the only way we could turn onto our road without getting clobbered was to turn on both the 4 way flashers and the wig wags which lit up the back of the truck like an ambulance, giving us a chance to get out of the way. With everything running at night it is very startling and can be seen for miles. I once had to pull a friend out of a ditch on a pitch black night. I turned everything on including the back up lights, and it slowed 60 mph traffic enough to creep around us and nobody got run over.
__________________
My Build Thread: http://67-72chevytrucks.com/vboard/s...d.php?t=444502 |
|
|

|
|
|
#790 |
|
Registered User
Join Date: Feb 2011
Location: muskogee, ok
Posts: 1,091
|
Re: Markeb01 Build Thread
nice man thanx for the link ive been looking for some cool little light like that i could make some turn signals out of for my harley
__________________
 bagged 66 longbed build http://67-72chevytrucks.com/vboard/s...d.php?t=449548 my favorite colors.. black, rust, and shiny!!!! instagram: @coulter918 |
|
|

|
|
|
#791 | |
|
Registered User
 Join Date: May 2009
Location: Rathdrum, Idaho
Posts: 1,135
|
Re: Markeb01 Build Thread
Quote:

|
|
|
|

|
|
|
#792 |
|
Senior Enthusiast
Join Date: Feb 2007
Location: Spokane Valley, WA
Posts: 8,356
|
Re: Markeb01 Build Thread
Yes they are also available in red.
 https://www.ronfrancis.com/prodinfo.asp?number=MC%2D62 They also offer this mini bullet that might be more suited for a scooter:  https://www.ronfrancis.com/prodinfo.asp?number=SC%2D62 And they also offer this more rounded style. I prefer the bullets myself:  https://www.ronfrancis.com/prodinfo.asp?number=BC%2D62 None of these lights are inexpensive, but they are beautifully finished. Mine started out with a beautiful show chrome finish. It pained me to sand all that down to paint them black! Iím not sure what advantage they find in making their search feature so lame and difficult to navigate, but their products are high quality.
__________________
My Build Thread: http://67-72chevytrucks.com/vboard/s...d.php?t=444502 |
|
|

|
|
|
#793 |
|
Registered User
 Join Date: May 2009
Location: Rathdrum, Idaho
Posts: 1,135
|
Re: Markeb01 Build Thread
Hey thanks Mark those mini ones are what I'm lookin for, this is what the stock lights look like they are large and bulky..Vernski

|
|
|

|
|
|
#794 | |
|
Registered User
Join Date: Sep 2011
Location: Tacoma, WA
Posts: 2,425
|
Re: Markeb01 Build Thread
Quote:
Dont know why it never occured to me to check to see if anyone made a switch for the Hurst shifters. Will Google that now !! I just wish I had thought of this sooner, like before I installed my carpet. I appreciate it 
__________________
Michael McMurphy My 66 Stepside My 64 Tow Truck My 66 Tempest Table Of Contents Added to Page1 Last edited by McMurphy; 06-07-2013 at 05:17 PM. |
|
|
|

|
|
|
#795 | ||
|
Senior Enthusiast
Join Date: Feb 2007
Location: Spokane Valley, WA
Posts: 8,356
|
Re: Markeb01 Build Thread
Quote:
Quote:
This morning we took another run over to the Stateline Walmart to check out yet another configuration of the video camera mount. The permanent bracket configuration didnít work. It picked up chassis vibrations and transmitted them directly to the camera causing it to rattle, ruining the audio. I tried more insulation and that didnít work either. The only option was to return to the factory camera mount stuck to the back window. Since the back glass is mounted in a rubber gasket, Iím thinking maybe that helps eliminate chatter at the camera. In any event, Iíve abandoned any further testing on camera mounts and will have to find happiness with it hanging from the back window. This time a USMC foil sticker covers the mount, and they last at least 10 years without deterioration. We pulled into the parking lot and found a 64-66 4x4 short bed sitting there. I normally carry my big camera with me, but left it at home. So for the first time ever, I snapped a few shots with my cell phone. I think they came out pretty decent considering it was bright daylight and I couldnít see what I was doing on the phone. The blazing sunlight just bleached out the view screen: 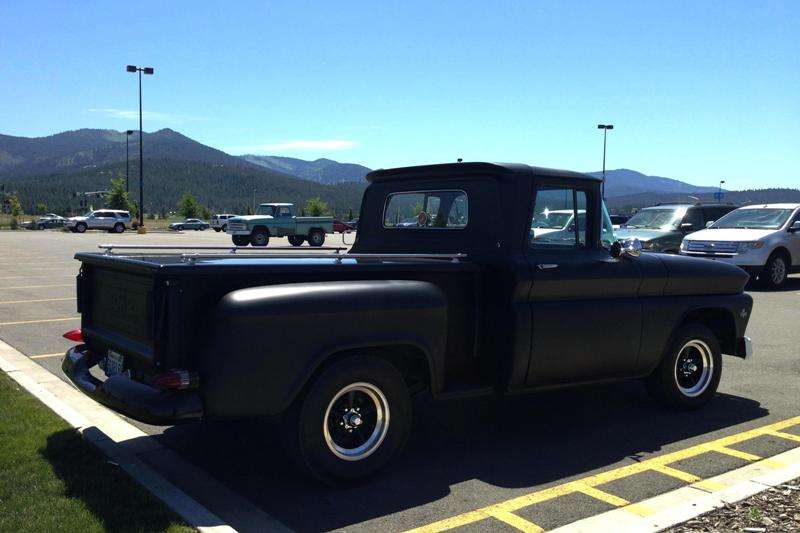 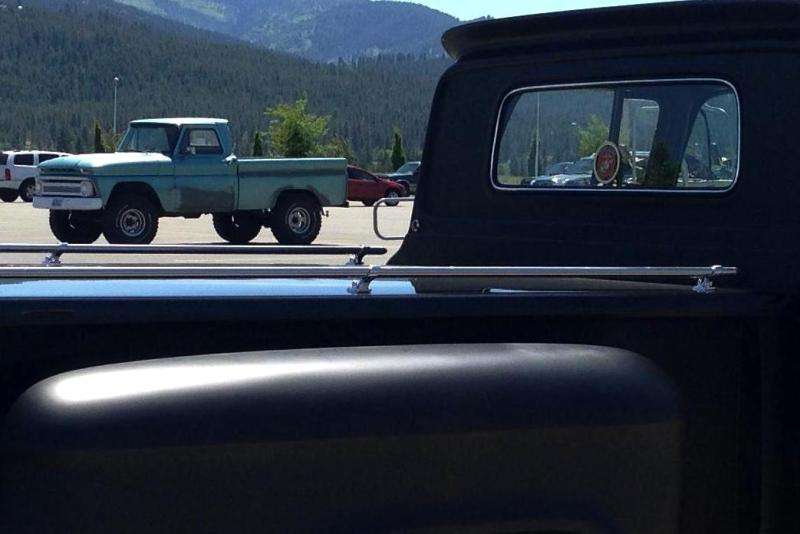 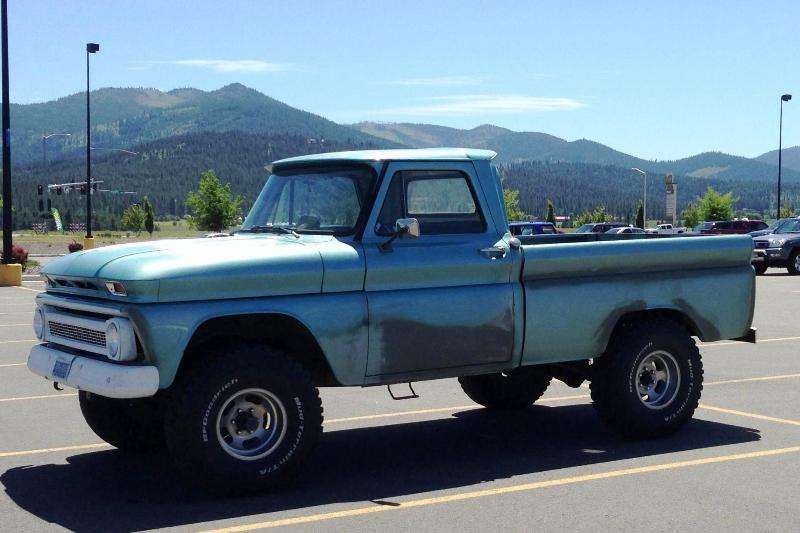
__________________
My Build Thread: http://67-72chevytrucks.com/vboard/s...d.php?t=444502 |
||
|
|

|
|
|
#796 |
|
Registered User
Join Date: Jun 2012
Location: Selkirk Ontario Canada
Posts: 1,141
|
Re: Markeb01 Build Thread
Quote:
__________________
My 63 GMC Panel Slow Build http://67-72chevytrucks.com/vboard/s...=1#post5457281 63 
|
|
|

|
|
|
#797 |
|
Senior Enthusiast
Join Date: Feb 2007
Location: Spokane Valley, WA
Posts: 8,356
|
Re: Markeb01 Build Thread
I was going to ask him, but he was leaving the driveway just as we were coming out of the store.
__________________
My Build Thread: http://67-72chevytrucks.com/vboard/s...d.php?t=444502 |
|
|

|
|
|
#798 |
|
Senior Enthusiast
Join Date: Feb 2007
Location: Spokane Valley, WA
Posts: 8,356
|
Re: Markeb01 Build Thread
With my wife retiring soon sheíll be driving the truck more than she has in recent years, and the outside mirrors arenít working for her. So they have been relocated closer to the vent window(s).
The new location has already been drilled and adjusted. The old holes on both doors are gone and the bodywork nearly completed. Just a touch of spray primer to fill in a couple of pits and the doors will be ready for paint (hopefully tomorrow). When the stock mirrors were removed, I spotted in the repairs with Blitz Black in a rattle can. The paint didnít blend/match all that well, so this time Iíll be reshooting the area with the same liquid paint I originally shot the truck with. Iím going to repaint from the body break below the glass, to the body line below the door handles. This time Iíll do it with the Sata Jet and do a few test shots to see how close I can match the rest of the door/truck.
__________________
My Build Thread: http://67-72chevytrucks.com/vboard/s...d.php?t=444502 |
|
|

|
|
|
#799 | |
|
Registered User
 Join Date: May 2009
Location: Rathdrum, Idaho
Posts: 1,135
|
Re: Markeb01 Build Thread
Quote:

|
|
|
|

|
|
|
#800 | |
|
Senior Enthusiast
Join Date: Feb 2007
Location: Spokane Valley, WA
Posts: 8,356
|
Re: Markeb01 Build Thread
Quote:

__________________
My Build Thread: http://67-72chevytrucks.com/vboard/s...d.php?t=444502 |
|
|
|

|
 |
| Bookmarks |
| Thread Tools | |
| Display Modes | |
|
|