 |
|
|
#826 |
|
Senior Member
 Join Date: Sep 2017
Location: Bryan, Texas
Posts: 2,377
|
Re: Wife's 48
Thanks Steve.
__________________
8man-aka Robert 1948 on a S10 Frame, small block with a carb 1954 Cab, 53 Front and Bed, 50 Doors, S10 Frame, Power TBD Build thread: "]http://67-72chevytrucks.com/vboard/showthread.php?t=746899&highlight=wife%27s+48[/URL] [/URL]http://67-72chevytrucks.com/vboard/showthread.php?t=840204 |
|
|

|
|
|
#827 |
|
Senior Member
 Join Date: Sep 2017
Location: Bryan, Texas
Posts: 2,377
|
Re: Wife's 48
Ok, I spent yesterday putting the running boards on and off, 4 times each, trying to adjust the mounting hole to make up for about a 1/8" problem. The dust cover that goes between the running board and the bed side was just too close to the cab. I finally had to hit a freshly painted dust cover on a point with a hammer to make it fit like I wanted, but now I have a dust cover that I need to get touched up before I install it. Needless to say, I was not a happy camper. I think the cab moved just a little on the cab mounts when put back on and tightened down, and that caused the problem.
Today I adjusted the front end and the hood and got the hood gaps about right. So I couldn't resist something fun. You can see the hood to cowl gap pretty well in this picture.  IMG_0956 by Robert Moorman, on Flickr IMG_0956 by Robert Moorman, on FlickrAnd here is a different angle of the hood latched down and in place.  IMG_0955 by Robert Moorman, on Flickr IMG_0955 by Robert Moorman, on FlickrYes, I couldn't resist putting on the bling! That's because now comes WIRING! That is going to be time consuming and challenging, so I wanted to do something fun to make it look like I really accomplished something before I go radio silent while the wiring takes place magically by elves. Dear Sant, PLEASE!!!
__________________
8man-aka Robert 1948 on a S10 Frame, small block with a carb 1954 Cab, 53 Front and Bed, 50 Doors, S10 Frame, Power TBD Build thread: "]http://67-72chevytrucks.com/vboard/showthread.php?t=746899&highlight=wife%27s+48[/URL] [/URL]http://67-72chevytrucks.com/vboard/showthread.php?t=840204 |
|
|

|
|
|
#828 |
|
Registered User
Join Date: Sep 2019
Location: Maynooth, Ontario, Canada
Posts: 174
|
Re: Wife's 48
That hood gap looks better then the factory ever did.....
__________________
http://67-72chevytrucks.com/vboard/s...82#post8619382 |
|
|

|
|
|
#829 |
|
Senior Member
 Join Date: Mar 2011
Location: West Plains, Missouri
Posts: 7,559
|
Re: Wife's 48
Robert, gaps look great, front shot is super...Jim
__________________
my build thread: http://67-72chevytrucks.com/vboard/s...d.php?t=459839 Jimbo's long bed step build:http://67-72chevytrucks.com/vboard/s...t=464626<br /> |
|
|

|
|
|
#830 |
|
Registered User
Join Date: Aug 2012
Location: Northeast KS
Posts: 1,788
|
Re: Wife's 48
Lookin' good!
__________________
1999 GMC Suburban K2500 SLT, 454/4L80E 1991 Z/28, 6.0L/T56 1949 GMC 250, S10 Frame, 6.0L/4L80E Instagram @aceshighspeedshop |
|
|

|
|
|
#831 |
|
Registered User
Join Date: Nov 2010
Location: calgary alberta
Posts: 8,322
|
Re: Wife's 48
Looks really good. Nice to see a painted truck again. Patina is not my thing.
|
|
|

|
|
|
#832 |
|
Registered User
Join Date: May 2009
Location: Grey County Ontario
Posts: 207
|
Re: Wife's 48
Those gaps are way nicer than original on trucks of this age, and that paint is gorgeous!
|
|
|

|
|
|
#833 |
|
Senior Member
 Join Date: Sep 2017
Location: Bryan, Texas
Posts: 2,377
|
Re: Wife's 48
All, thank you very much for the nice comments.
I spent a lot of time working on the gaps before paint, and I think I got pretty lucky when they went back as well as they did after paint. Thanks for the nice comments on the paint. When I took the dust cover back to the painter to get it touched up, he just shook his head and said, "be more careful!"
__________________
8man-aka Robert 1948 on a S10 Frame, small block with a carb 1954 Cab, 53 Front and Bed, 50 Doors, S10 Frame, Power TBD Build thread: "]http://67-72chevytrucks.com/vboard/showthread.php?t=746899&highlight=wife%27s+48[/URL] [/URL]http://67-72chevytrucks.com/vboard/showthread.php?t=840204 |
|
|

|
|
|
#834 |
|
Registered User
Join Date: Sep 2018
Location: Ontario
Posts: 851
|
Re: Wife's 48
very nice,
enjoy the process, looks great
__________________
https://67-72chevytrucks.com/vboard/...=797726&page=3http://https://67-72chevytrucks.com/...=797726&page=3 51 Chev 5 window on S10 with SBC 1958 Pontiac Wagon build https://67-72chevytrucks.com/vboard/...d.php?t=849781 |
|
|

|
|
|
#835 |
|
Senior Member
 Join Date: Sep 2017
Location: Bryan, Texas
Posts: 2,377
|
Re: Wife's 48
Thank you.
__________________
8man-aka Robert 1948 on a S10 Frame, small block with a carb 1954 Cab, 53 Front and Bed, 50 Doors, S10 Frame, Power TBD Build thread: "]http://67-72chevytrucks.com/vboard/showthread.php?t=746899&highlight=wife%27s+48[/URL] [/URL]http://67-72chevytrucks.com/vboard/showthread.php?t=840204 |
|
|

|
|
|
#836 |
|
Senior Member
 Join Date: May 2007
Location: Doodah Kansas
Posts: 7,774
|
Re: Wife's 48
gorgeous! your wife picked a great color.

__________________
the mass of men live lives of quiet desperation if there is a problem, I can have it. new project WAYNE http://67-72chevytrucks.com/vboard/s...d.php?t=844393 |
|
|

|
|
|
#837 |
|
Senior Member
 Join Date: Sep 2017
Location: Bryan, Texas
Posts: 2,377
|
Re: Wife's 48
Thanks Joe, and yes, she did.
__________________
8man-aka Robert 1948 on a S10 Frame, small block with a carb 1954 Cab, 53 Front and Bed, 50 Doors, S10 Frame, Power TBD Build thread: "]http://67-72chevytrucks.com/vboard/showthread.php?t=746899&highlight=wife%27s+48[/URL] [/URL]http://67-72chevytrucks.com/vboard/showthread.php?t=840204 |
|
|

|
|
|
#838 |
|
Senior Member
 Join Date: Feb 2020
Location: Boulder, CO
Posts: 239
|
Re: Wife's 48
Looks great!
__________________
My '53 build thread: https://67-72chevytrucks.com/vboard/...d.php?t=820467 |
|
|

|
|
|
#839 |
|
Senior Member
 Join Date: Sep 2017
Location: Bryan, Texas
Posts: 2,377
|
Re: Wife's 48
Thanks Fox.
And in more truck news, I looked at the radiator set up yesterday and didn't like the way it looks. Thank you, Jim and Mark, I took your cover for the radiator and modified it (meaning I used the hand tools I had at my disposal) and am building a cover. Pictures soon!
__________________
8man-aka Robert 1948 on a S10 Frame, small block with a carb 1954 Cab, 53 Front and Bed, 50 Doors, S10 Frame, Power TBD Build thread: "]http://67-72chevytrucks.com/vboard/showthread.php?t=746899&highlight=wife%27s+48[/URL] [/URL]http://67-72chevytrucks.com/vboard/showthread.php?t=840204 |
|
|

|
|
|
#840 | |
|
Senior Member
 Join Date: Mar 2011
Location: West Plains, Missouri
Posts: 7,559
|
Re: Wife's 48
Quote:
  , there as so many ways to make a cover, attaching them is the hard part, I'm sure yours will look great...Jim , there as so many ways to make a cover, attaching them is the hard part, I'm sure yours will look great...Jim
__________________
my build thread: http://67-72chevytrucks.com/vboard/s...d.php?t=459839 Jimbo's long bed step build:http://67-72chevytrucks.com/vboard/s...t=464626<br /> |
|
|
|

|
|
|
#841 |
|
Senior Member
 Join Date: Sep 2017
Location: Bryan, Texas
Posts: 2,377
|
Re: Wife's 48
Jim and Mark, here we go.
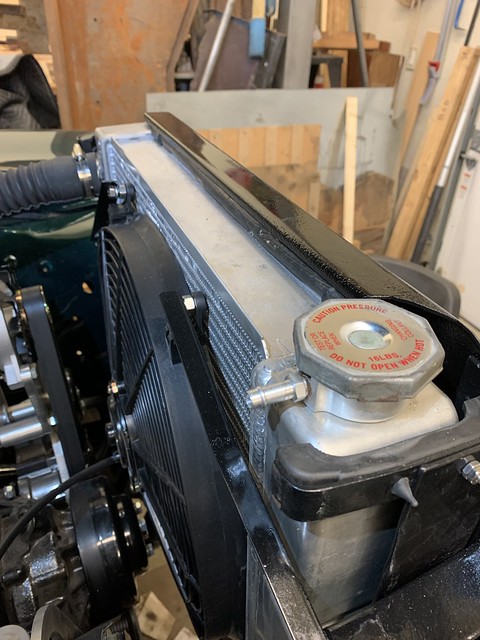
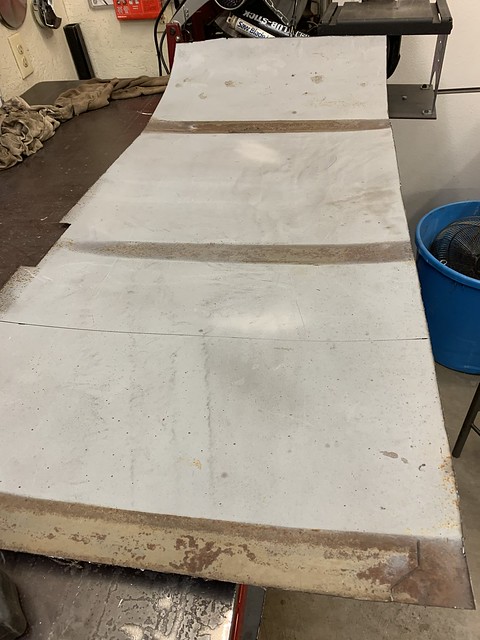
This is the unsightly radiator stuff I had to deal with.  IMG_0959 by Robert Moorman, on Flickr IMG_0959 by Robert Moorman, on FlickrI started with some steel I had on hand that I robbed from that really rusted out cab.  IMG_0957 by Robert Moorman, on Flickr IMG_0957 by Robert Moorman, on Flickr It came from the back section of that cab, so it had some "curve" to it. I cut a 1' x 2' section and used a little "body" hammer to flatten it pretty good.  IMG_0958 by Robert Moorman, on Flickr IMG_0958 by Robert Moorman, on FlickrI beat it over the edge of my work bench, cut a couple of ends and welded them on to give it some strength, drilled a 2.5" hole for the cap, cut out for the radiator hose and drilled a hole for the overflow line, and then used a 3" piece of pipe as a form and beat the area around the radiator cap down so I don't cut my fingers getting the cap off. This is what I was left with.  IMG_0961 by Robert Moorman, on Flickr IMG_0961 by Robert Moorman, on Flickrand the back side,  IMG_0960 by Robert Moorman, on Flickr IMG_0960 by Robert Moorman, on FlickrI was thinking that this was a good use of about 6 hours before paint, so I asked Laura to come out and take a look. "Why did you do that? I thought seeing the radiator was what these trucks are supposed to look like." After some discussion, I am still going to get it painted and put it on. If nothing else, it'll make me feel better.
__________________
8man-aka Robert 1948 on a S10 Frame, small block with a carb 1954 Cab, 53 Front and Bed, 50 Doors, S10 Frame, Power TBD Build thread: "]http://67-72chevytrucks.com/vboard/showthread.php?t=746899&highlight=wife%27s+48[/URL] [/URL]http://67-72chevytrucks.com/vboard/showthread.php?t=840204 |
|
|

|
|
|
#842 |
|
Senior Member
 Join Date: Mar 2011
Location: West Plains, Missouri
Posts: 7,559
|
Re: Wife's 48
Looks good...Jim
__________________
my build thread: http://67-72chevytrucks.com/vboard/s...d.php?t=459839 Jimbo's long bed step build:http://67-72chevytrucks.com/vboard/s...t=464626<br /> |
|
|

|
|
|
#843 |
|
Senior Member
 Join Date: Sep 2017
Location: Bryan, Texas
Posts: 2,377
|
Re: Wife's 48
Thanks Jim. It felt pretty good for my first attempt at building something like that.
__________________
8man-aka Robert 1948 on a S10 Frame, small block with a carb 1954 Cab, 53 Front and Bed, 50 Doors, S10 Frame, Power TBD Build thread: "]http://67-72chevytrucks.com/vboard/showthread.php?t=746899&highlight=wife%27s+48[/URL] [/URL]http://67-72chevytrucks.com/vboard/showthread.php?t=840204 |
|
|

|
|
|
#844 |
|
Registered User
Join Date: Aug 2012
Location: Northeast KS
Posts: 1,788
|
Re: Wife's 48
Nice Job Robert!
__________________
1999 GMC Suburban K2500 SLT, 454/4L80E 1991 Z/28, 6.0L/T56 1949 GMC 250, S10 Frame, 6.0L/4L80E Instagram @aceshighspeedshop |
|
|

|
|
|
#845 |
|
Senior Member
 Join Date: Sep 2017
Location: Bryan, Texas
Posts: 2,377
|
Re: Wife's 48
Thank you.
__________________
8man-aka Robert 1948 on a S10 Frame, small block with a carb 1954 Cab, 53 Front and Bed, 50 Doors, S10 Frame, Power TBD Build thread: "]http://67-72chevytrucks.com/vboard/showthread.php?t=746899&highlight=wife%27s+48[/URL] [/URL]http://67-72chevytrucks.com/vboard/showthread.php?t=840204 |
|
|

|
|
|
#846 |
|
Senior Member
 Join Date: Sep 2017
Location: Bryan, Texas
Posts: 2,377
|
Re: Wife's 48
Yes, it was the Christmas season, but I was still working on the truck.
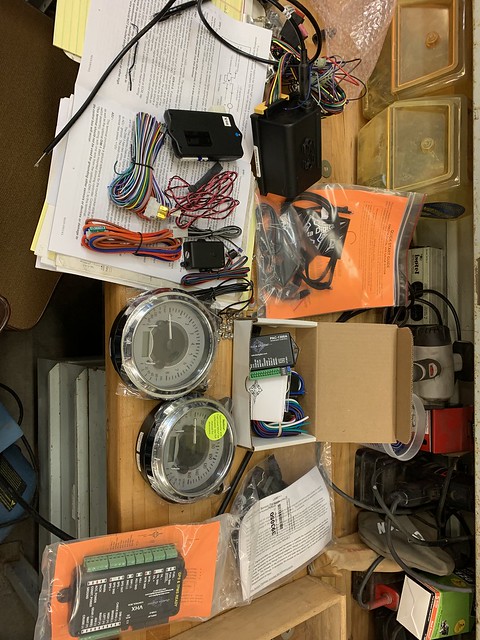
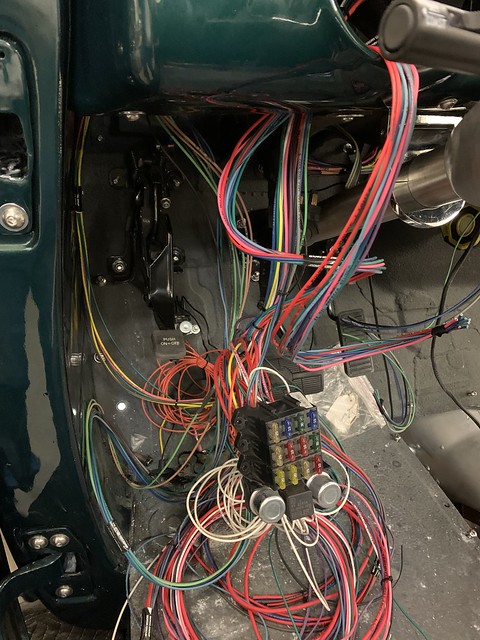
It really is time to do electrical, so I got really aggressive on this one. I intend to put all of this into this build.  IMG_0964 by Robert Moorman, on Flickr IMG_0964 by Robert Moorman, on FlickrSome of you will recognize the Dakota Digital gauges, but maybe not the cruise stuff or the headlight electronics (just like her car) with automatic on/off and courtesy light delay. Then there is the keyless entry system with push button start. I have been reading installation manuals about 3 hours a day for the last week and I think I'm ready to start connecting wires to these things. I did start the Kwik Wire harness install.  IMG_0965 by Robert Moorman, on Flickr IMG_0965 by Robert Moorman, on FlickrI have been thinning the wires out that the DD gauges don't need and preparing where all this wire will run.  IMG_0968 by Robert Moorman, on Flickr IMG_0968 by Robert Moorman, on FlickrI'm going to try and run all of the wires down the firewall so I can put a plastic loom cover over them. When they get to the bottom of the fender, I'll start in 3 directions from there, to the front, to the rear and across under the floorboard to the transmission and everything else on the rider's side. I did have some fun and put the tailgate on with the back lights, everything except the bed roll lights.  IMG_0967 by Robert Moorman, on Flickr IMG_0967 by Robert Moorman, on FlickrSome of you will notice that my driver's side back up light will be slightly covered by the license plate. Lesson learned. I spent all afternoon looking at different problems, like... 1. I was looking at the headlight buckets and thinking about installing them, but I don't know the trick to getting those little clips on the fender without scraping all the paint off. I'm just before going out and buying some 10x24 button head bolts and just bolting them in place. 2. This is my second wiring job and I'm thinking I'll get the fuse box mounted and pull the wires to wherever they are going and then cut there, after I've routed them so that I can put a loom over them to protect and hide them, and then attaching the connector at that point. Last time I left WAY too much wire under the dash. 3. On the last wire job I soldered everything! I'm thinking I'll use some weather pack connectors on everything outside the cab and use some cheaper connectors inside the cab. I was thinking connectors just in case I had to remove something later. 4. If anyone has used a cruise control kit from DD, I'd be interested in learning where you put that big, heavy box. I looked on the firewall under the hood but think it would be less obnoxious inside the cab, up on the firewall to the right of the brake pedal assembly and over the throttle pedal assembly. I think it will fit, but was looking for some thoughts. I hope to have some more pictures of "stuff" connected, but I know it'll take some time, but I'll get there.
__________________
8man-aka Robert 1948 on a S10 Frame, small block with a carb 1954 Cab, 53 Front and Bed, 50 Doors, S10 Frame, Power TBD Build thread: "]http://67-72chevytrucks.com/vboard/showthread.php?t=746899&highlight=wife%27s+48[/URL] [/URL]http://67-72chevytrucks.com/vboard/showthread.php?t=840204 |
|
|

|
|
|
#847 |
|
Registered User
Join Date: Aug 2012
Location: Northeast KS
Posts: 1,788
|
Re: Wife's 48
Robert, this part can be tedious!
I would recommend using the nylon loom instead. I used plastic and will eventually go back and do everything again with the nylon that I've been using on everything since. Most of the wiring stuff I buy, I get from CE Auto Electric Supply. The owner Tony is a great guy and I've received hand written thank yous on my invoice from him. You've got the right idea to pull it where you need it to go, find the best place to lay it down, and then do the loom last. Using weather packs is a great idea as well. With the great work you've done to this point, I have no doubt you'll nail this part of the project too! P.S. when running wires under the dash keep the groups together with zipties every 6-8", it will keep it clean and aid in routing.
__________________
1999 GMC Suburban K2500 SLT, 454/4L80E 1991 Z/28, 6.0L/T56 1949 GMC 250, S10 Frame, 6.0L/4L80E Instagram @aceshighspeedshop |
|
|

|
|
|
#848 |
|
Senior Member
 Join Date: Sep 2017
Location: Bryan, Texas
Posts: 2,377
|
Re: Wife's 48
Thanks Drifter. I will look into the nylon as I don't really like the plastic and will contact CE Electric as well.
__________________
8man-aka Robert 1948 on a S10 Frame, small block with a carb 1954 Cab, 53 Front and Bed, 50 Doors, S10 Frame, Power TBD Build thread: "]http://67-72chevytrucks.com/vboard/showthread.php?t=746899&highlight=wife%27s+48[/URL] [/URL]http://67-72chevytrucks.com/vboard/showthread.php?t=840204 |
|
|

|
|
|
#849 |
|
Senior Member
 Join Date: Sep 2017
Location: Bryan, Texas
Posts: 2,377
|
Re: Wife's 48
Ok, first off, let me reiterate this, I am learning as I go. So, several months ago, I installed the AC compressor on a Kwik bracket system. It looked right, but this week I started installing the Vintage Air system. As I looked at the hoses, and where they run, I realized the compressor was UPSIDE down! The outlet and inlet were on the bottom. With the radiator full of fluid, I didn't want to pull it, so I went to work, and 3 hours later we have this.
 IMG_0970 by Robert Moorman, on Flickr IMG_0970 by Robert Moorman, on FlickrOh, did I mention that because it is a SBC, there are SAE bolts with the bracket, but metric to the compressor. Yeah, I figured that out as I was trying to get it apart. In the good news department, I did make some progress over the last few days. First, the VA is installed under the dash. Not as much fun mounting this by oneself as you might imagine.  IMG_0971 by Robert Moorman, on Flickr IMG_0971 by Robert Moorman, on FlickrNo, it is not wired in yet. I took a break from wiring to put in the other stuff I need to wire up so I can see how much room I'm going to have to work with. See the radio in the previous post. Also, I picked a spot for the cruise control, and mounted it under the dash.  IMG_0972 by Robert Moorman, on Flickr IMG_0972 by Robert Moorman, on FlickrI had to place it where it can control the throttle and then wire it all up. I used the throttle cable hole in the firewall for that. I shortened the pedal assembly and will drill another hole for the throttle cable. When the guys fired it up, they had connected the throttle cable for me. It was at a severe angle and bound up, holding the throttle open at times. I thought that might not work like I wanted so I'll reinstall it so that it works smoother. I have been running wires, but I haven't taken any pictures of that yet. However, when I get the other three (3) cpu units wired up and mounted, I will take pictures of that!
__________________
8man-aka Robert 1948 on a S10 Frame, small block with a carb 1954 Cab, 53 Front and Bed, 50 Doors, S10 Frame, Power TBD Build thread: "]http://67-72chevytrucks.com/vboard/showthread.php?t=746899&highlight=wife%27s+48[/URL] [/URL]http://67-72chevytrucks.com/vboard/showthread.php?t=840204 |
|
|

|
|
|
#850 |
|
Registered User
Join Date: Aug 2012
Location: Northeast KS
Posts: 1,788
|
Re: Wife's 48
Any progress is good progress, keep going!
__________________
1999 GMC Suburban K2500 SLT, 454/4L80E 1991 Z/28, 6.0L/T56 1949 GMC 250, S10 Frame, 6.0L/4L80E Instagram @aceshighspeedshop |
|
|

|
 |
| Bookmarks |
| Thread Tools | |
| Display Modes | |
|
|