
|
 09-12-2013, 10:17 PM
|
#951 |
|
GEARHEAD
Join Date: Aug 2003
Location: MN
Posts: 6,126
|
Re: The Story Of A Cummins Suburban (Lots Of Pics)
Been through this part of your trip many times. You probably left Yellowstone via the east entrance (hwy 14), which is the most direct route to Cody. But if you ever go through this way again, like to the Tetons some future day, you need to take the NE entrance road (Hwy 212, then hwy 296, to hwy 120 into Cody). Spectacular scenery. Not much traffic on that road either because it is more out of the way and it gets a bit twisty and difficult for RV's and semi trucks.
My inlaws live on the west side of the Tetons (St Anthony, ID) and we usually take the Teton Pass Highway from Jackson to Driggs, ID which is more direct for us and a nice drive. I haven't taken Hwy 26 west out of Jackson to Idaho Falls in many years, but I remember it also being a nice drive, especially along the reservoirs. It's worth exploring more if you get the chance to go back there.
__________________
If no one knows what you're doing, they can't tell you you're doing it wrong HG's Dream Car Build - Shelby Cobra Kit Build your own adjustable track bar 71  Long Fleet C/10 Long Fleet C/10 72  Jimmy 4x4 (Junkyard Jimmy) Jimmy 4x4 (Junkyard Jimmy)HG's Plow Truck '78  K35 Dually K35 DuallyBigass Farm Truck HG's thread of miscellaneous stuff |

|

|
|
09-26-2013, 01:20 AM
|
#952 | |||
|
I had a V-8
Join Date: May 2003
Location: Phoenix AZ
Posts: 1,116
|
Re: The Story Of A Cummins Suburban (Lots Of Pics)
Quote:
Quote:
Quote:
__________________
1972 K20 Suburban, 5.9L Cummins, Banks Power Pack, NV4500HD, NP205, H.A.D., D60/14FF ARB Link To Build: HERE. |
|||
|
|
|
|
09-26-2013, 01:21 AM
|
#953 |
|
I had a V-8
Join Date: May 2003
Location: Phoenix AZ
Posts: 1,116
|
Re: The Story Of A Cummins Suburban (Lots Of Pics)
Ok, it looks like I am off of photobuckets black list now. It's funny, I receive messages that I have exceeded my available bandwidth for the month quite regularly, but this is the first time I recall getting my pictures turned off. Oh well. We're back at it now.
So we got to South Dakota in the last update. We got a room in Rapid City and planned out our next day. We headed downtown to get something to eat and did some wandering around after dinner. While we were wandering we came upon an alley that was covered in graffiti. Nothing surprising about that other than the quantity and more importantly, the quality. There was some very impressive art work in this alley. 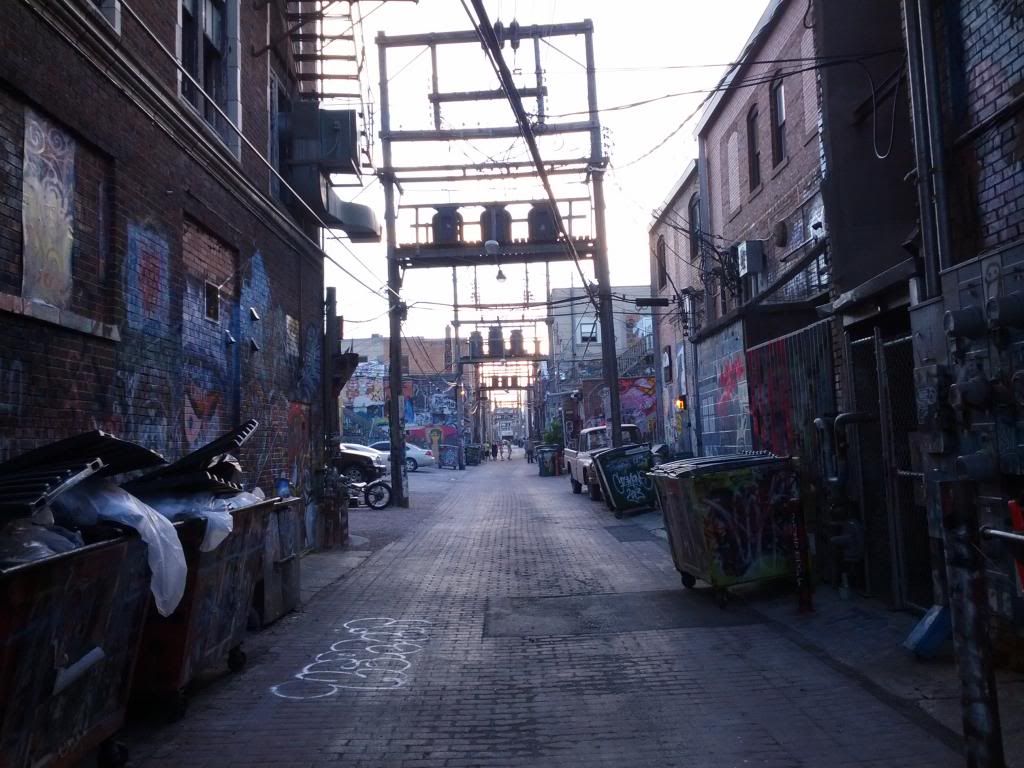 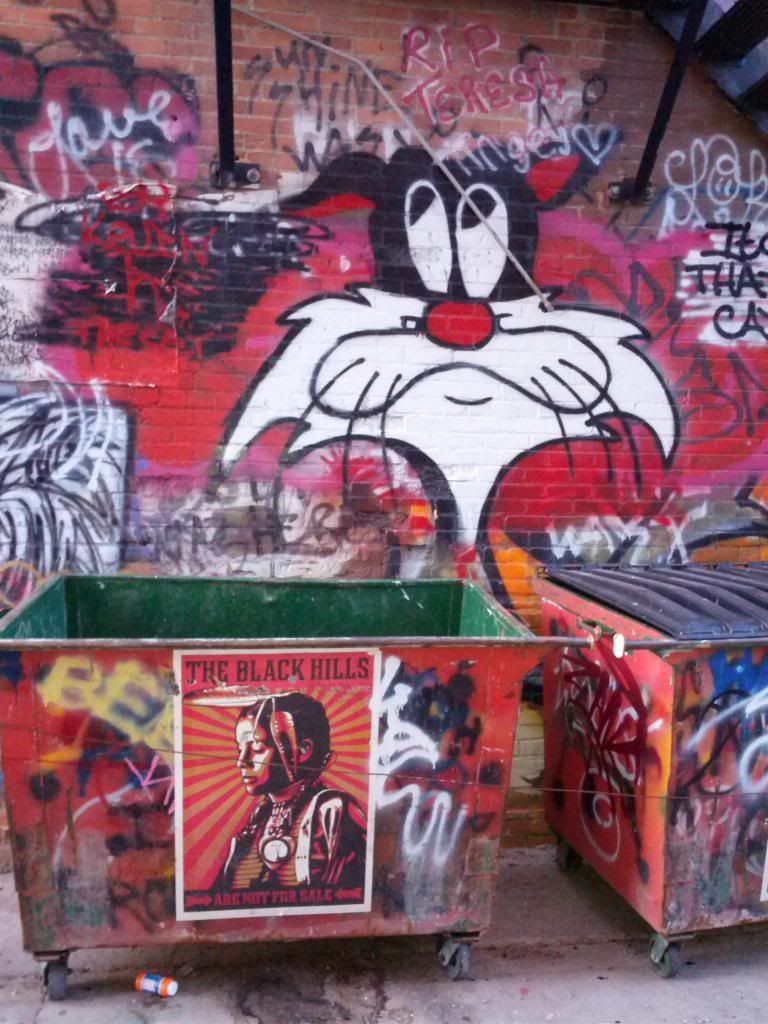 Clean old Binder in the alley: 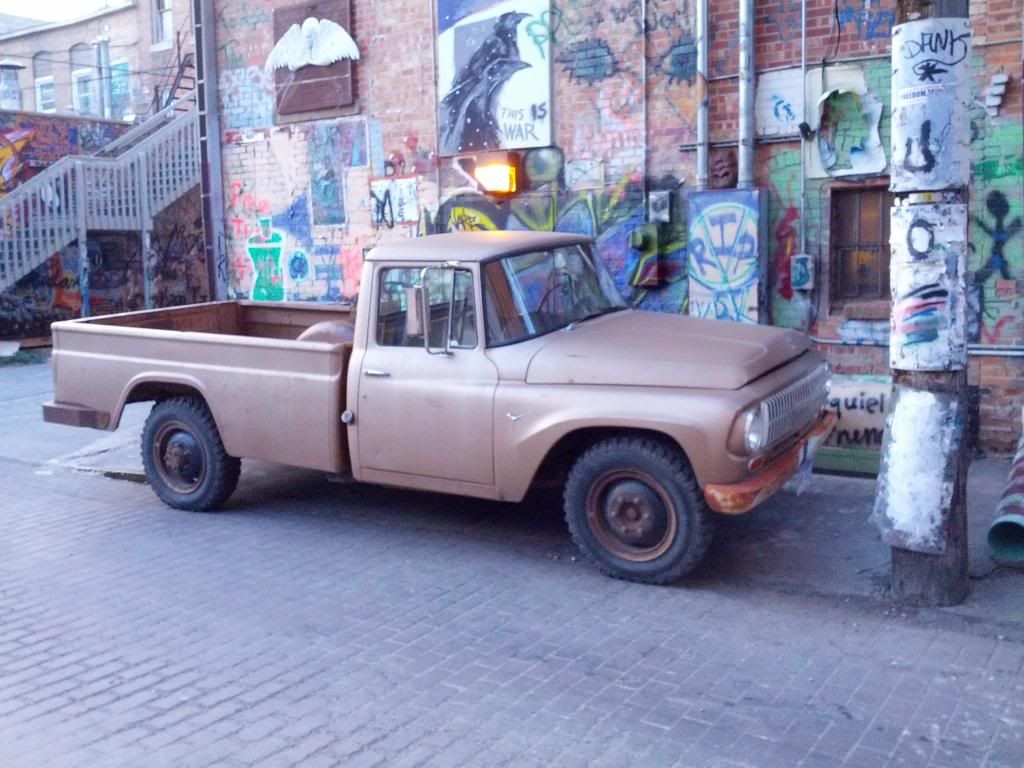  So we went back to the room, got some sleep and headed out the next morning after finding some coffee (not for me) and our first stop was: 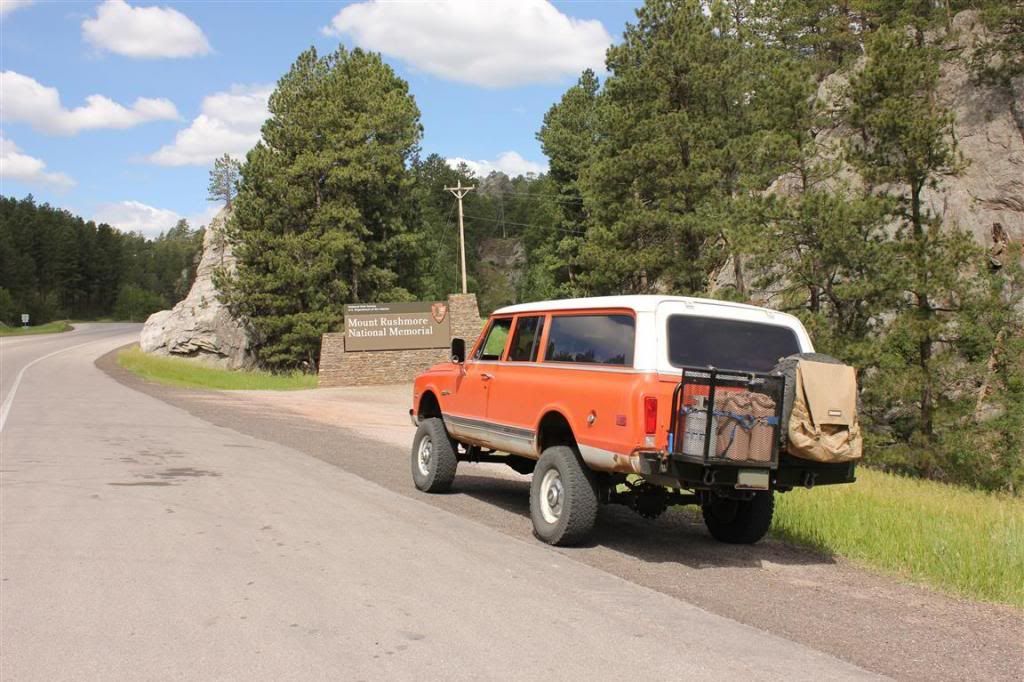 It was a beautiful, clear sunny day: 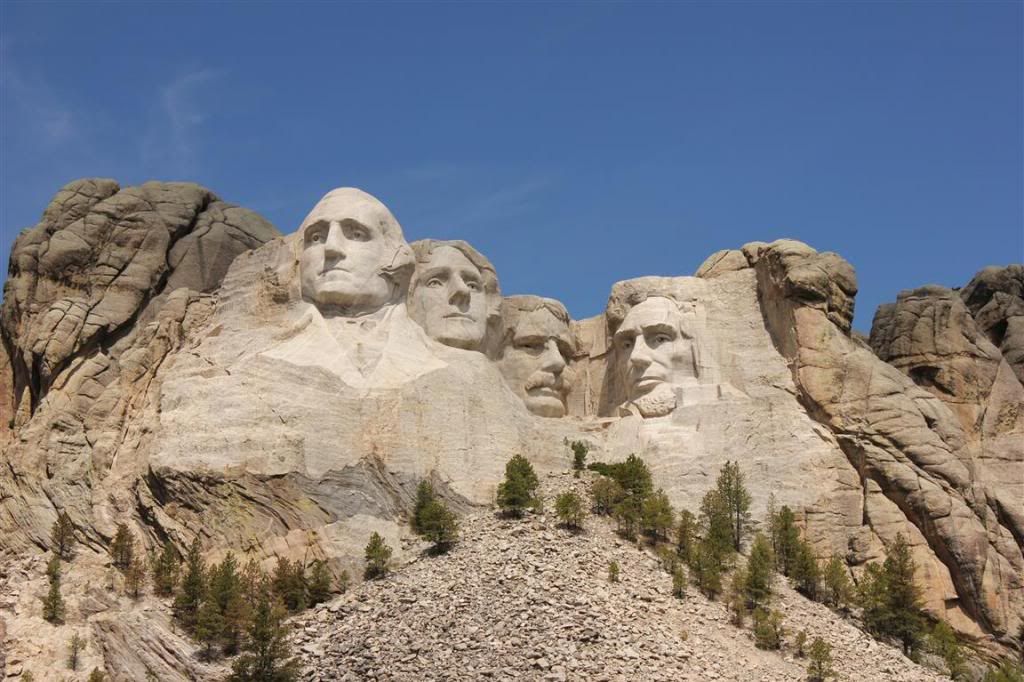 I was here about thirty years ago and much has been added on since then. This is the sculptor's studio (not a new addition) with a model of what the mountain was intended to look like upon completion: 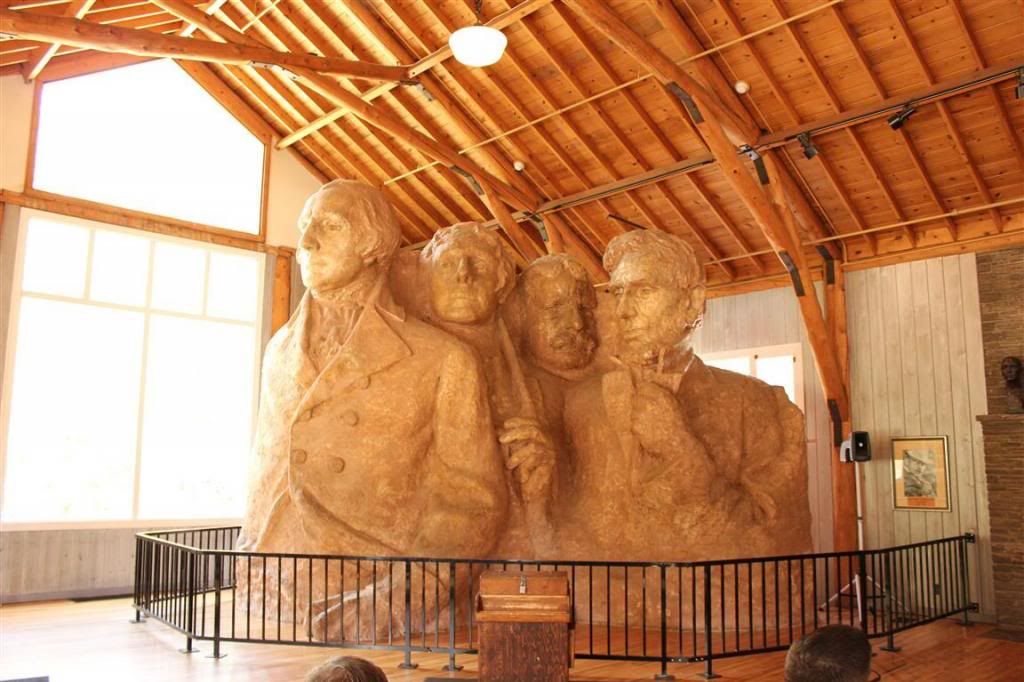 The government got involved funding the project then World War 2 occurred and when the war was over, there wasn't much interest given to completing the rest of the sculpture, so we are left with what we have today. After we left Rushmore, we headed down to Crazy Horse to see what progress has been made in the past thirty years.  Fairly impressive. This project is completely privately funded. No government involved--not that the government hasn't tried to get involved, but their assistance has been refused. They still have a ways to go though:  Really not too much to see as far as the mountain goes, but there is some fantastic Native American history exhibits in the museum there. On our way back to Rapid City, we stopped at the Sitting Bull Crystal Cavern. This was highly recommended by the guy at the hotel desk. A rather odd individual, but he has great taste in caves. We were going to hit the Rushmore Cave, but he said this one is better. Having been to Rushmore Cave, I can attest that this one is very worth the visit. Rushmore Cave has stalactites and stalagmites, but this one has dog tooth crystal--and lots of it. It is actually world-renowned for the size of the dog tooth crystal it has. Normal dog tooth crystal is small--maybe half inch to maybe an inch. This stuff could be measured with a yard stick. Massive!! 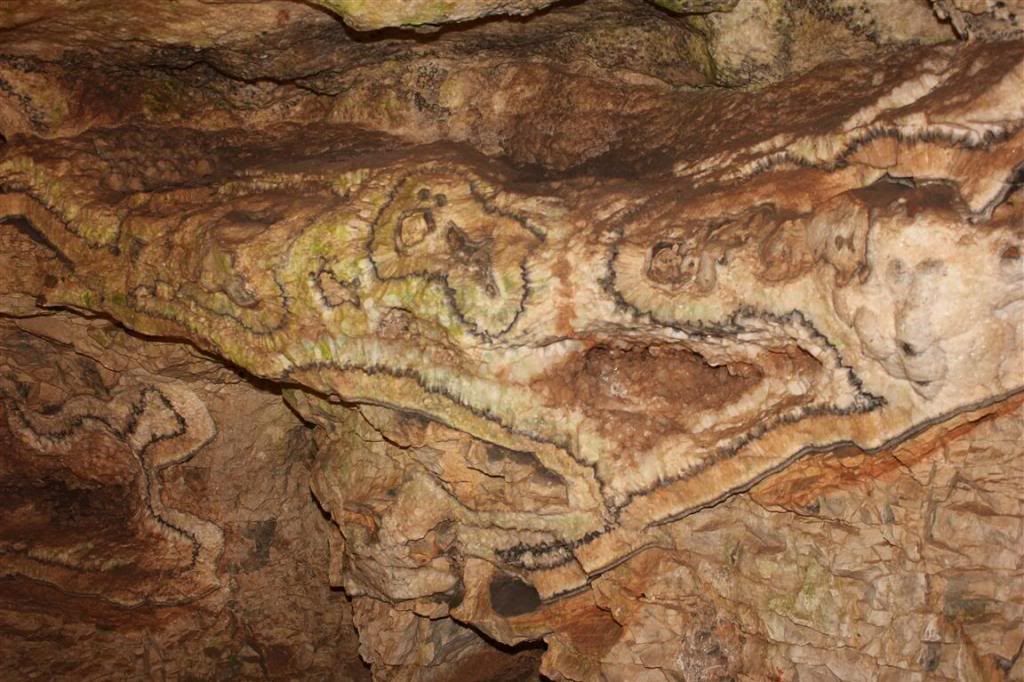 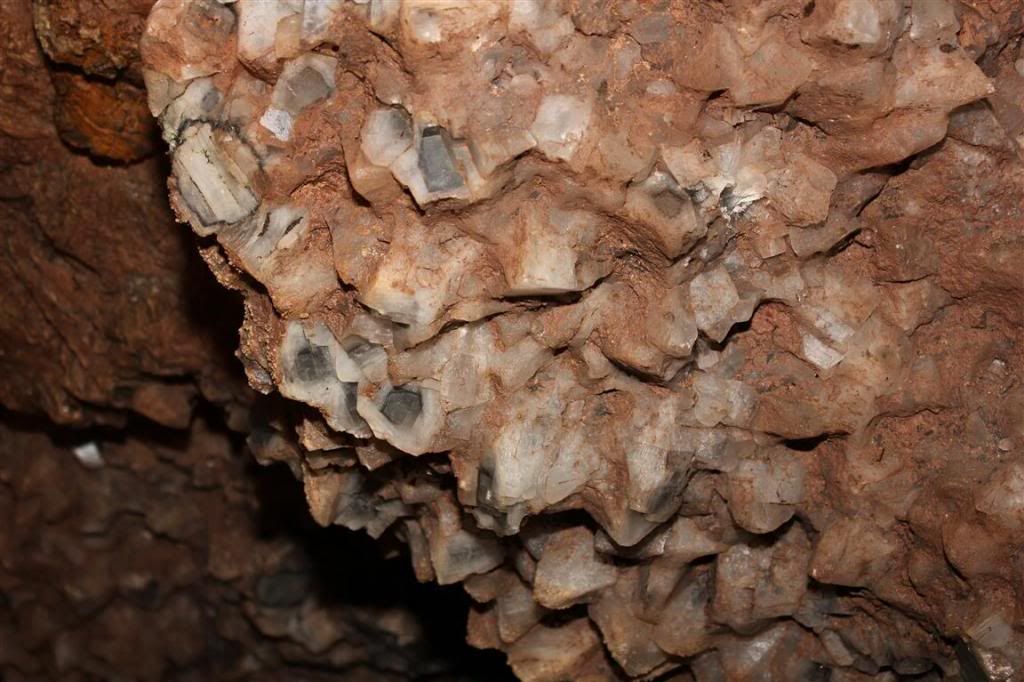 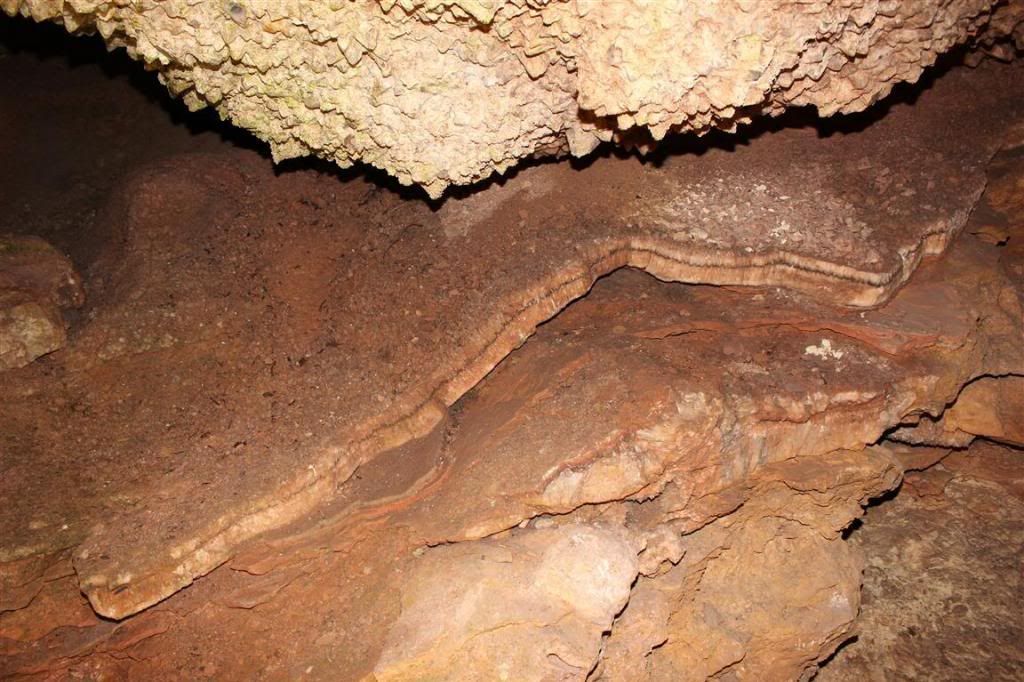 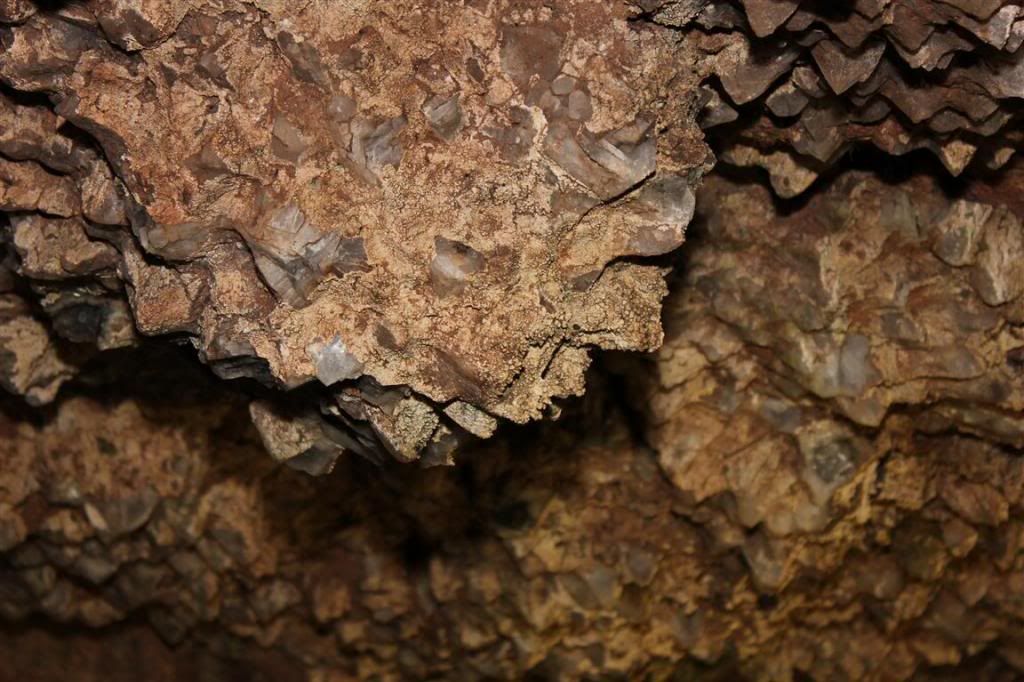 This stuff looks wet, but is actually dry:  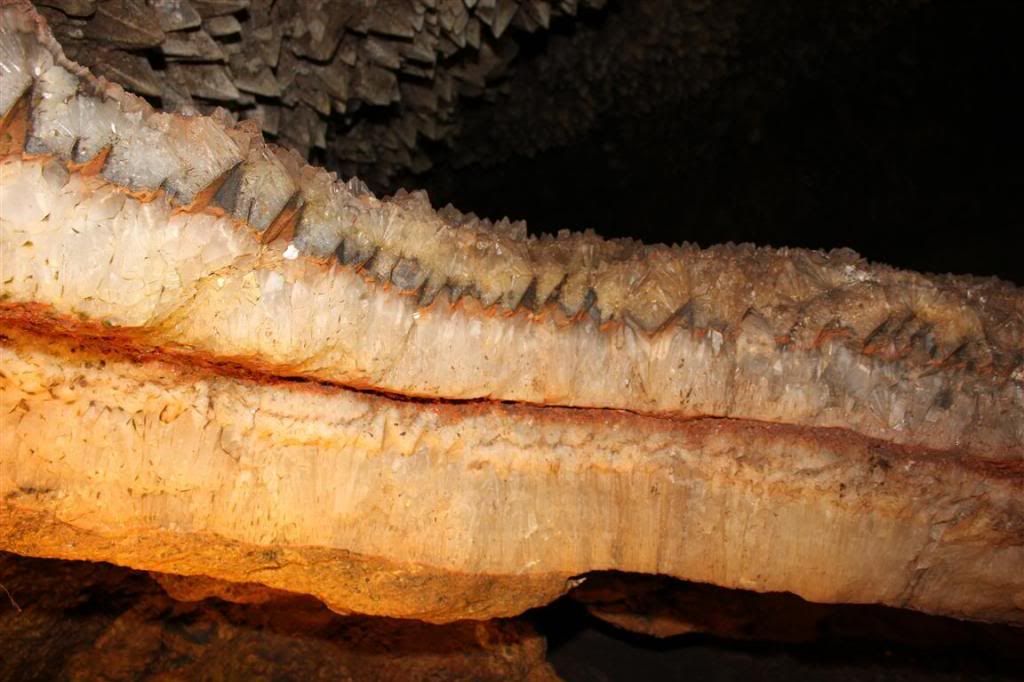 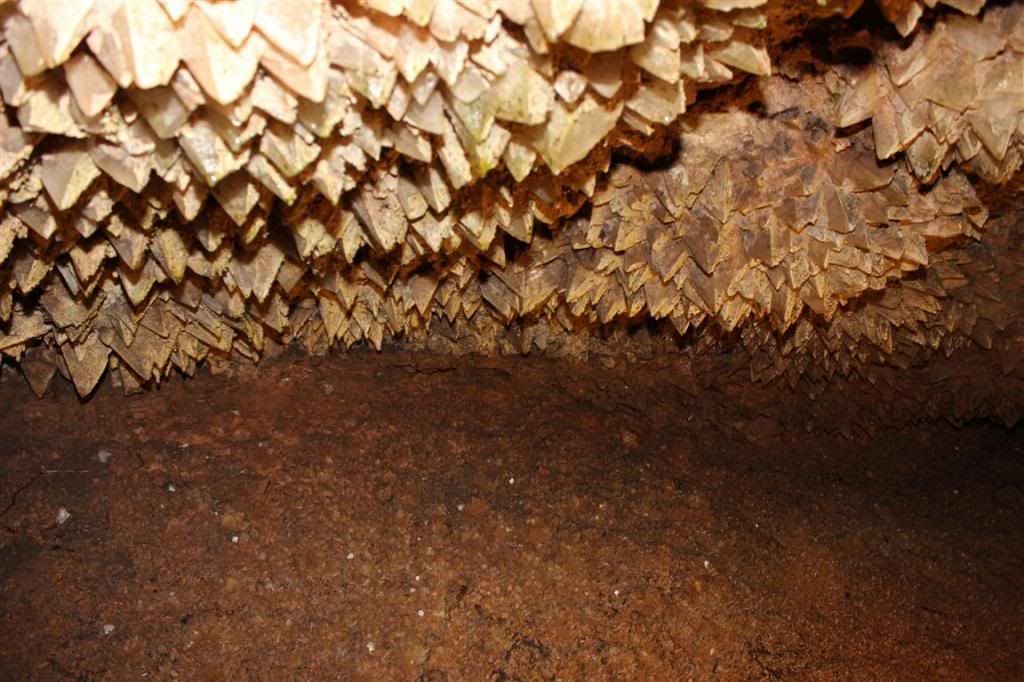 A local resident: 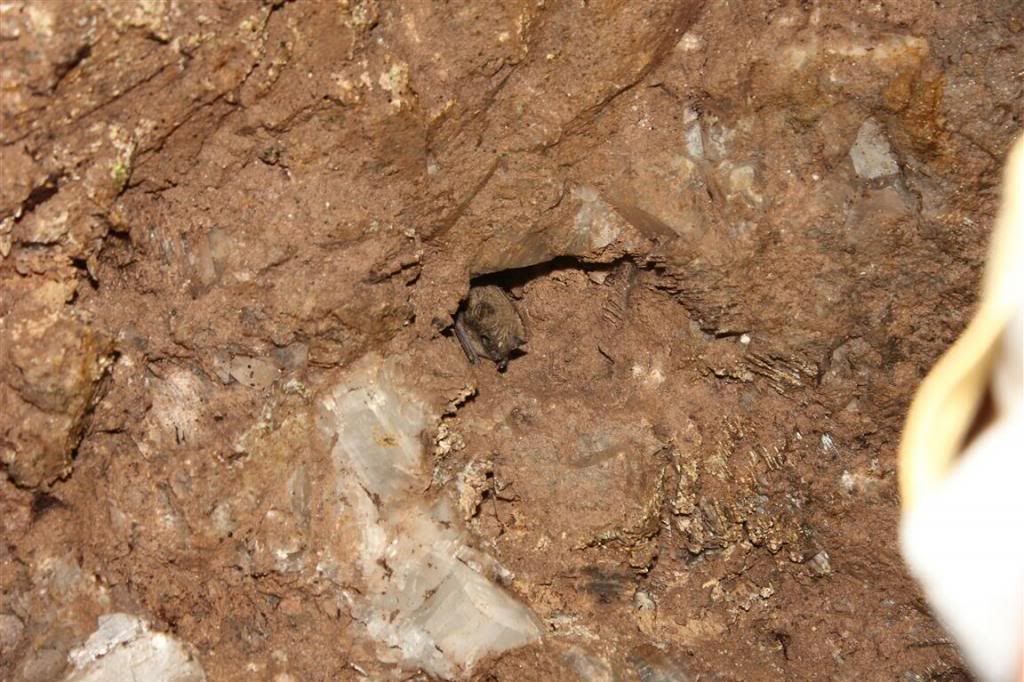 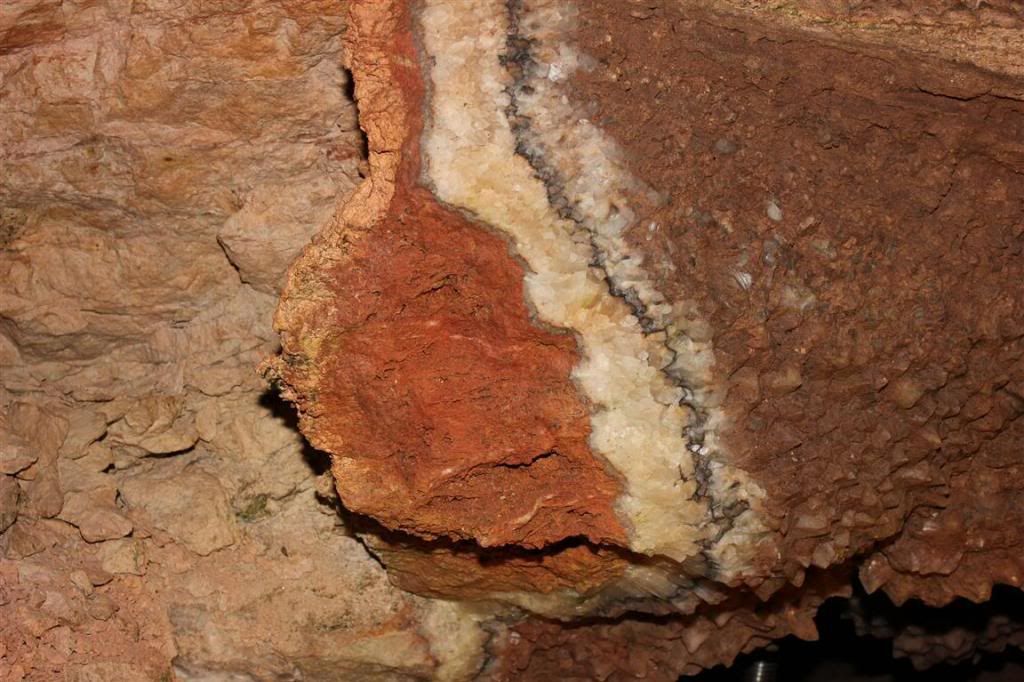
__________________
1972 K20 Suburban, 5.9L Cummins, Banks Power Pack, NV4500HD, NP205, H.A.D., D60/14FF ARB Link To Build: HERE. |
|
|
|
|
09-26-2013, 01:22 AM
|
#954 |
|
I had a V-8
Join Date: May 2003
Location: Phoenix AZ
Posts: 1,116
|
Re: The Story Of A Cummins Suburban (Lots Of Pics)
After we left the cave, my passengers wanted to go through a drive-thru zoo. Uh, ok. So we hit the Bear Country USA drive-thru Zoo. They wanted to see some bears since we didn't see any in Yellowstone. While we were waiting in line to pay a bunch of money to drive through the zoo, a couple employees noticed that orange Suburban waiting in line didn't sound right, so they came over and struck up a conversation. Turns out one of them is putting a Cummins in a Bronco (I think). We ended up getting passed by a couple vehicles while we were chatting with the guys but we finally made it into the zoo.
It's a new Dodge truck:  Pooh, eating poo: 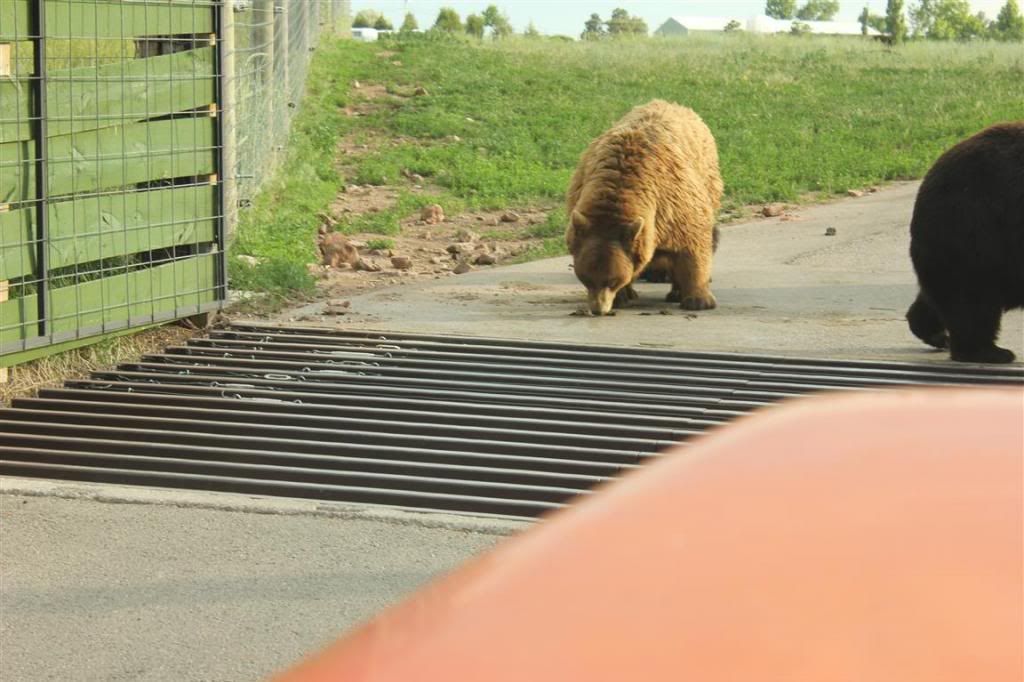 Mmmm, wet beavers:  While we were at the zoo I saw the only other old vehicle doing what we were doing while we were on our trip: 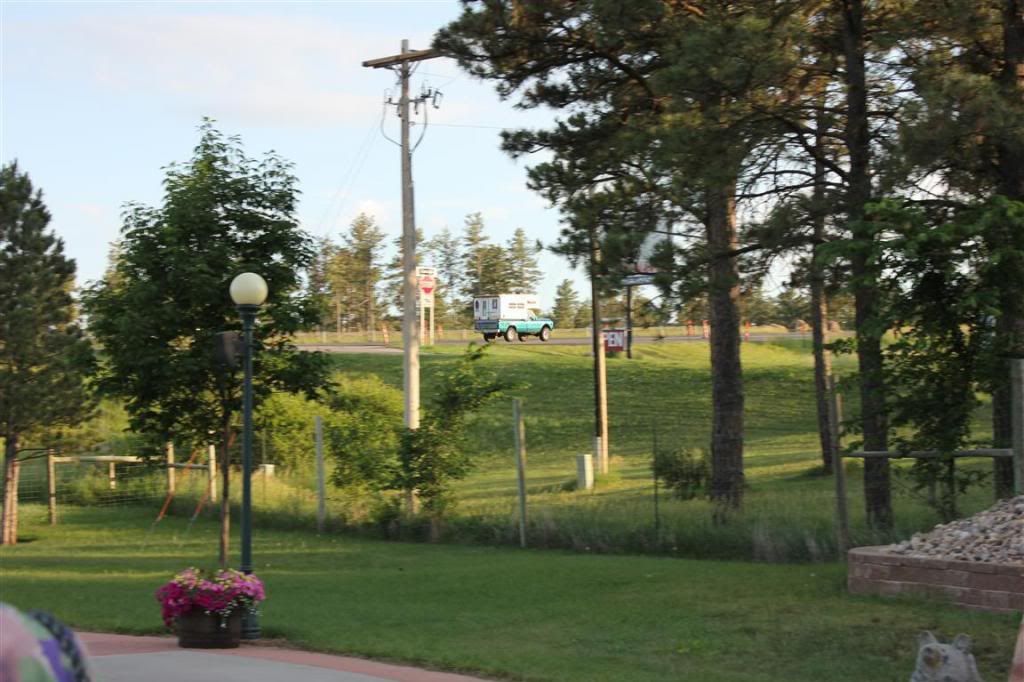 After bear cubs are born, the staff removes them from the general population of bears so they don't get eaten by the male bears. This tree was filled with cubs and they were a hoot to watch. The one at the top started at the bottom and climbed over and around every other bear in the tree. It got all the way to the top and couldn't get comfortable, so it climbed back down (without knocking any other bears out of the tree--or really disturbing the others for that matter) and started wandering around the ground. Very impressive to watch. Thought it was going to fall out more than a couple times: 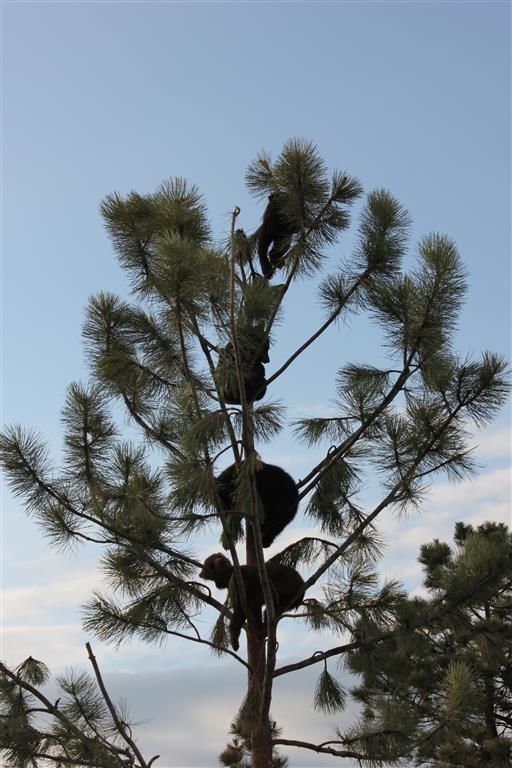 So we got out of the zoo and headed back into Rapid City, got some dinner and headed back to the room to decide on our plans for tomorrow.
__________________
1972 K20 Suburban, 5.9L Cummins, Banks Power Pack, NV4500HD, NP205, H.A.D., D60/14FF ARB Link To Build: HERE. |
|
|
|
|
09-26-2013, 07:38 AM
|
#955 |
|
GEARHEAD
Join Date: Aug 2003
Location: MN
Posts: 6,126
|
Re: The Story Of A Cummins Suburban (Lots Of Pics)
Love the bear tree. I haven't done the cave visits yet. Something to look forward to our next time through.
__________________
If no one knows what you're doing, they can't tell you you're doing it wrong HG's Dream Car Build - Shelby Cobra Kit Build your own adjustable track bar 71 Long Fleet C/10 72 Jimmy 4x4 (Junkyard Jimmy)HG's Plow Truck '78 K35 DuallyBigass Farm Truck HG's thread of miscellaneous stuff |
|
|
|
|
09-26-2013, 12:26 PM
|
#956 |
|
Registered User
Join Date: Jun 2006
Location: Indiana
Posts: 4,859
|
Re: The Story Of A Cummins Suburban (Lots Of Pics)
Hmmm so no partrige in the bear tree I presume?

__________________
'70 GMC C1500 LWB Power disc brakes. WooHoo! Posi 6 Lug Dana 60 |
|
|
|
|
09-26-2013, 04:05 PM
|
#957 |
|
6>8 Plugless........
 Join Date: Sep 2007
Location: Prairie City, Ia
Posts: 17,142
|
Re: The Story Of A Cummins Suburban (Lots Of Pics)
More great scenery, thanks for taking the time to take these pics and post them here! I've never been west of the west side of Ne in a vehicle, so I really enjoy all these shots you provide. The wife and I are waiting until our kids are a little older to go check out Crazy Horse and Rushmore.
__________________
Ryan 1972 Chevy Longhorn K30 Cheyenne Super, 359 Inline 6 cylinder, Auto Trans, Tilt, Diesel Tach/Vach, Buckets, Rare Rear 4-link and air ride option Build Thread 1972 GMC Sierra Grande Longhorn 4x4 1972 Chevy Cheyenne Super K20 Long Step side tilt, tach, tow hooks, AC, 350 4 speed 1972 C10 Suburban Custom Deluxe 1969 Chevy milk truck 1971 Camaro RS 5.3 BTR STG3 Cam Super T10 1940 Ford 354 Hemi 46RH Ford 9" on air ride huge project Tired of spark plugs? Check this out. |
|
|
|
|
09-26-2013, 09:31 PM
|
#958 |
|
Senior Member
Join Date: Apr 2004
Location: sw colorado
Posts: 2,720
|
Re: The Story Of A Cummins Suburban (Lots Of Pics)
that peice of graffiti that says the black hills are not for sale is amazing. looks so real.
|
|
|
|
|
09-26-2013, 11:23 PM
|
#959 | ||||
|
I had a V-8
Join Date: May 2003
Location: Phoenix AZ
Posts: 1,116
|
Re: The Story Of A Cummins Suburban (Lots Of Pics)
Quote:
Quote:
Quote:
Quote:
__________________
1972 K20 Suburban, 5.9L Cummins, Banks Power Pack, NV4500HD, NP205, H.A.D., D60/14FF ARB Link To Build: HERE. |
||||
|
|
|
|
09-27-2013, 12:07 PM
|
#960 |
|
Registered User
Join Date: Jun 2006
Location: Indiana
Posts: 4,859
|
Re: The Story Of A Cummins Suburban (Lots Of Pics)
Glad to help!
We went to Rushmore and Yellowstone in '91 i believe. Yellowstone was still recovering from massive fires ans it was still amazing! It's funny how quickly I got tired of seeing Buffalo. The landscape was just awsome both the burned and the unburned. Rushmore is just astounding! The magnitude is hard to realize in pictures, but the trees below in the chip pile are FULL size trees, not saplings! And yet they look so tiny compared to the massive sculpture! Crazy Horse was just a schnoz back then.
__________________
'70 GMC C1500 LWB Power disc brakes. WooHoo! Posi 6 Lug Dana 60 |
|
|
|
|
09-27-2013, 01:31 PM
|
#961 |
|
Too many projects
Join Date: Mar 2004
Location: Fargo, ND land of the flat hills
Posts: 1,147
|
Re: The Story Of A Cummins Suburban (Lots Of Pics)
For anyone else that visits Rushmore, the top of the SW parking garage is a great opportunity to get a picture with the mountain in the background.
Oh, and the ice cream is awesome so make sure to get some, maybe even let the kids have a lick or two.
__________________
Andrew 84 GMC C1500 SWB 6.2 Diesel/700R4/3.42 "Grandpa's odd duck" |
|
|
|
|
09-29-2013, 02:59 PM
|
#962 |
|
Registered User
Join Date: Apr 2013
Location: Western Montana
Posts: 50
|
Re: The Story Of A Cummins Suburban (Lots Of Pics)
Great article and even better pictures! It looks like your enjoying your ride which should be everyone's goal with these wonderful Trucks !
It has been a great Sunday morning visual read. Thanks from Idaho 
|
|
|
|
|
10-11-2013, 01:57 AM
|
#963 | |
|
I had a V-8
Join Date: May 2003
Location: Phoenix AZ
Posts: 1,116
|
Re: The Story Of A Cummins Suburban (Lots Of Pics)
Quote:
I'm glad you enjoyed the read and thanks for posting up!!
__________________
1972 K20 Suburban, 5.9L Cummins, Banks Power Pack, NV4500HD, NP205, H.A.D., D60/14FF ARB Link To Build: HERE. |
|
|
|
|
|
10-11-2013, 02:00 AM
|
#964 |
|
I had a V-8
Join Date: May 2003
Location: Phoenix AZ
Posts: 1,116
|
Re: The Story Of A Cummins Suburban (Lots Of Pics)
It's been a little hectic around here lately. I took on some work on my buddy's 1970 Suburban, but haven't been able to work on it as MY fleet has become jealous of it and started having issues that absorb any shop time I have available. Hopefully I can get my fleet back in service and start on the things that I have to do to it. Luckily, my buddy and his oldest son have been coming over and working on it. They have managed to get most of the heavy-line work done on it, so as soon as I get my fleet off of my back I will hopefully be able to make some good progress on it.
So, anyways, I'm still on vacation at this point. We are still in Rapid City SD. We got up on day two of Rapid City and decided to head over to Ellsworth AFB to check out their air and space museum. To get there we have to head further east. On the way we came across some Wall Drug signs. Anybody who has been in the vicinity of southwest SD has seen the signs. 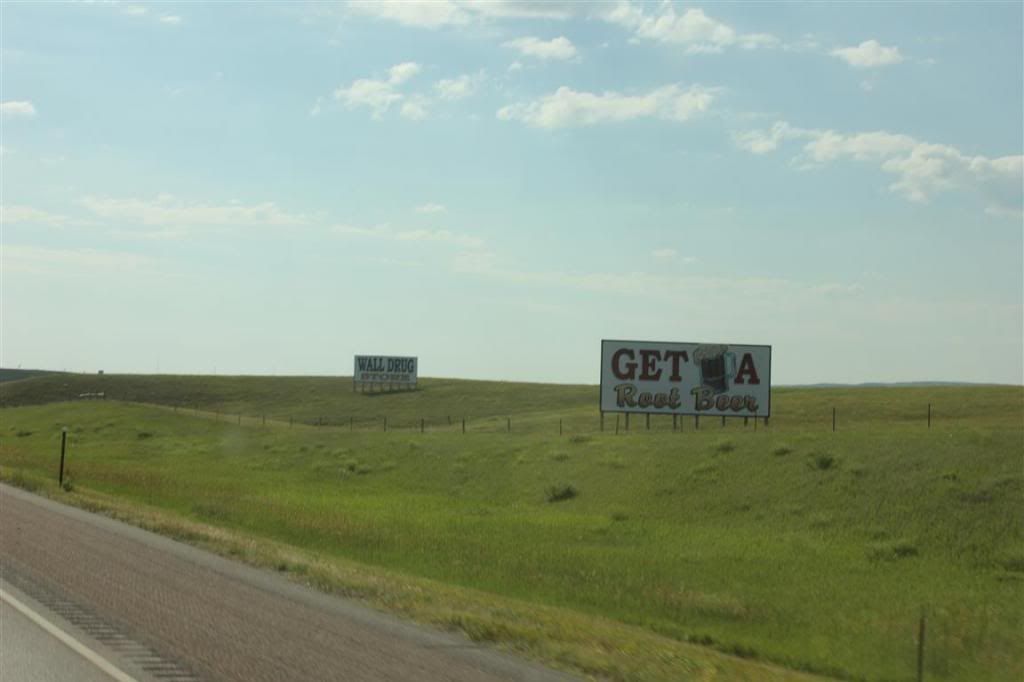 We didn't go to Wall, but I have been there before and didn't feel it was worth the time/trip to get there. Our loss. Upon arrival at the air and space museum at Ellsworth AFB, you are immediately greeted by a B-1. Neat looking aircraft: 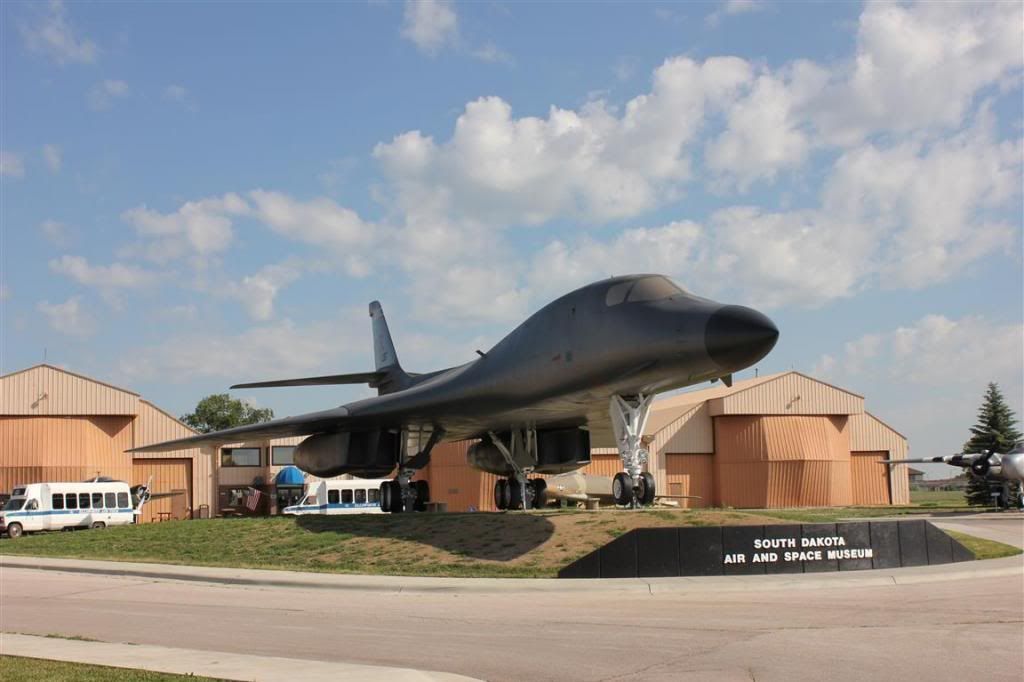 This is the only heavy bomber they fly our of Ellsworth anymore. The 52's left in the 80's, so they are left with the Bone. Nice B29 out front as well. They flew 29's out of Ellsworth years ago: 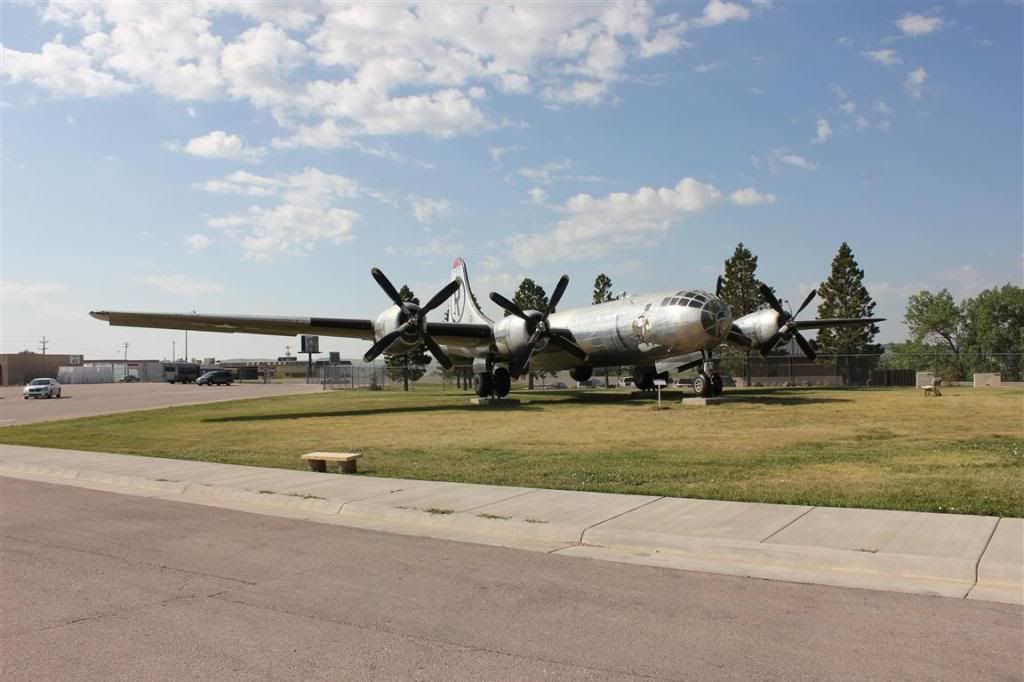 Speaking of 52's, they had an old tall tale B52 out front as well: 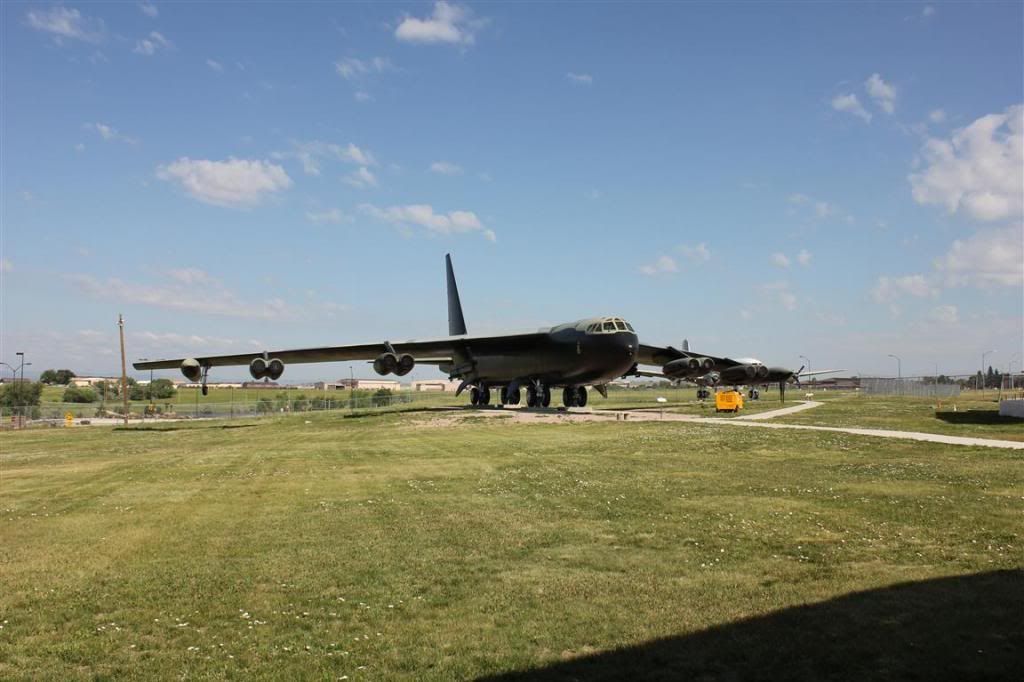 So right about now I see an old janke-ass hooptie airport shuttle bus with "Ellsworth AFB Tours" on the side of it. Hmm, if they have a bus, they probably have tours of the base. I know, it's a crazy assumption, but worth checking out. Turns out they do in fact, have bus tours of the base. Sweet. I wanna see me some Bones on the ramp. I go in to take the tour and find out the next tour leaves in ten minutes and is full. D'oh. Next one leaves in an hour and ten minutes. Sign this guy up!! (and his wife and boy too...) Sweet. I paid the lady a bunch of money and we wander around the indoor museum for an hour. It is a very nice place. Lots of great displays, pictures and mock-ups. There is even a cockpit/flight training device from one of the century series fighters there that you can get in and play with all the switches, knobs and levers. Pretty cool. The hour and ten minutes passed very quickly. Soon it was time to go. Oh boy, this is going to be sweet!! So we line up and get on the janke-ass hooptie airport shuttle bus. We had to give driver license numbers at the gate to gain access to the base. Everybody on the hooptie pass security and we are on our way!! The tour went something like this: Over here we have the base housing, and over here we have the fitness center. That building over there is the credit union and this is the fitness center. This building on the right is the teen center and the building behind it is the commissary. Uh, really?? I paid how much money for THIS?? Ugh. Come on, get the bus out on the ramp already. No dice. The ONLY saving grace of the whole tour was the Minuteman II missile silo on base. Now if you're thinking all the Minuteman II missile silos were destroyed with the START treaty you are right, they did. This particular silo on base was a training facility and thus was not required to be destroyed. It also had stairs to access the silo instead of having to go through the "B" plug like the silo operators had to back in the day. So we go down in the silo and check out the mock missile and support equipment. Not too much to see really, but we are starting to get some redemption for the money spent to take the tour. Missile in its hole: 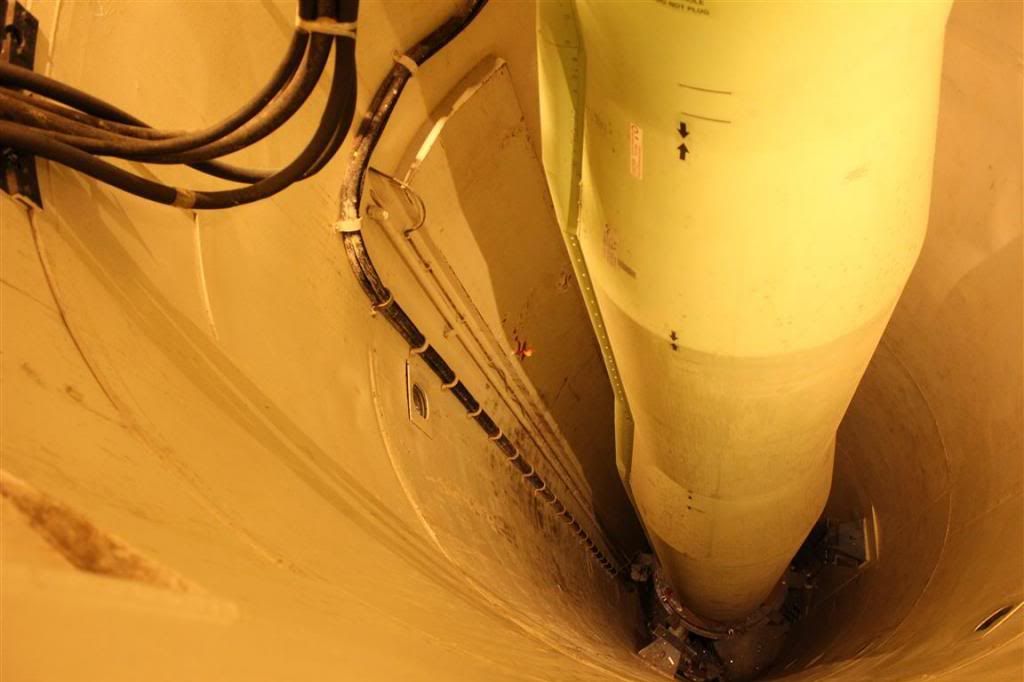 There is actually a ton of neat history about these missiles and equipment used to support them. It is also very impressive when you think about the engineers who created them. No computers, just huge brains and slide-rules. Good luck pulling that off today. So it's cool. I enjoyed it, but in my opinion, the coolest part of the missile silo area were the support vehicles on display up top (what can I say, I have a thing for trucks??) This was one of the armored trucks (two were used per shipment) that lead and followed the van trailer that transported the warhead to the silo site: 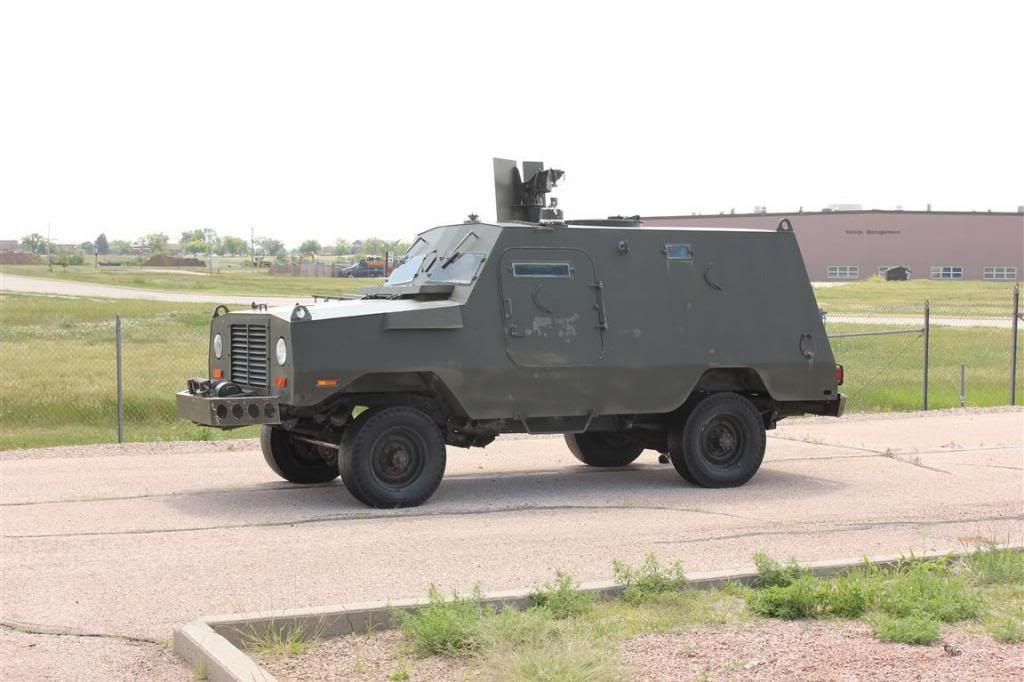 It looks like it was built on a M715/M725 running gear, but I didn't look too closely at it. The reason I didn't was I was more interested in this: 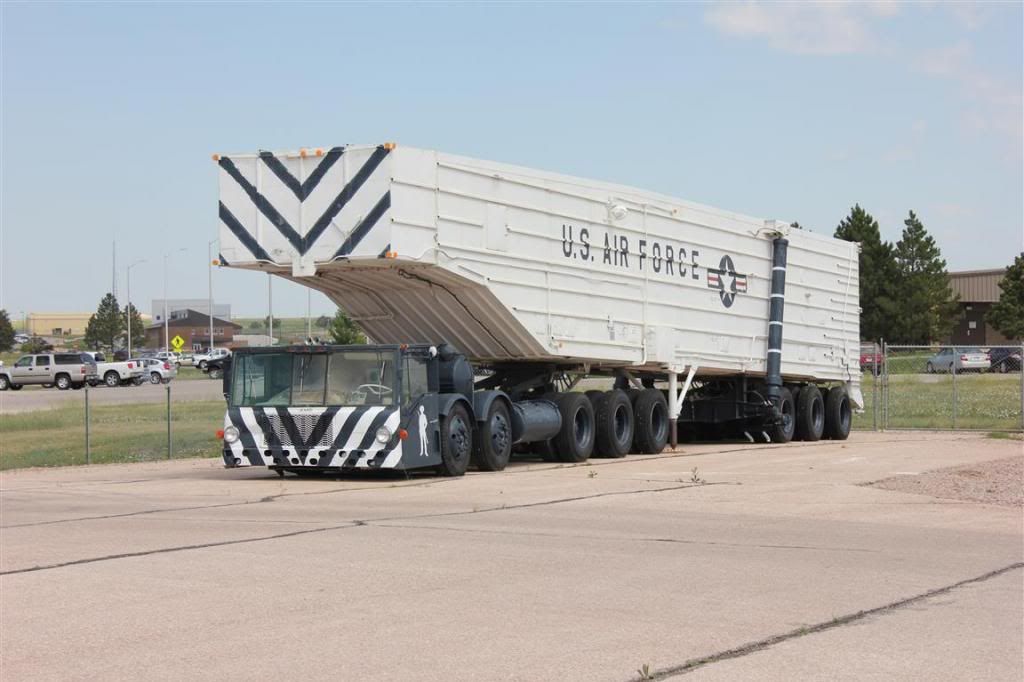 This was a purpose-built missile transport vehicle. It was built by GMC to haul the missile (minus the warhead) from the manufacturing facility to the silo site. Very unique. I made sure I was the first person out of the silo so I could check it out a little before we had to re-board the clapped-out shuttle bus. Front shot: 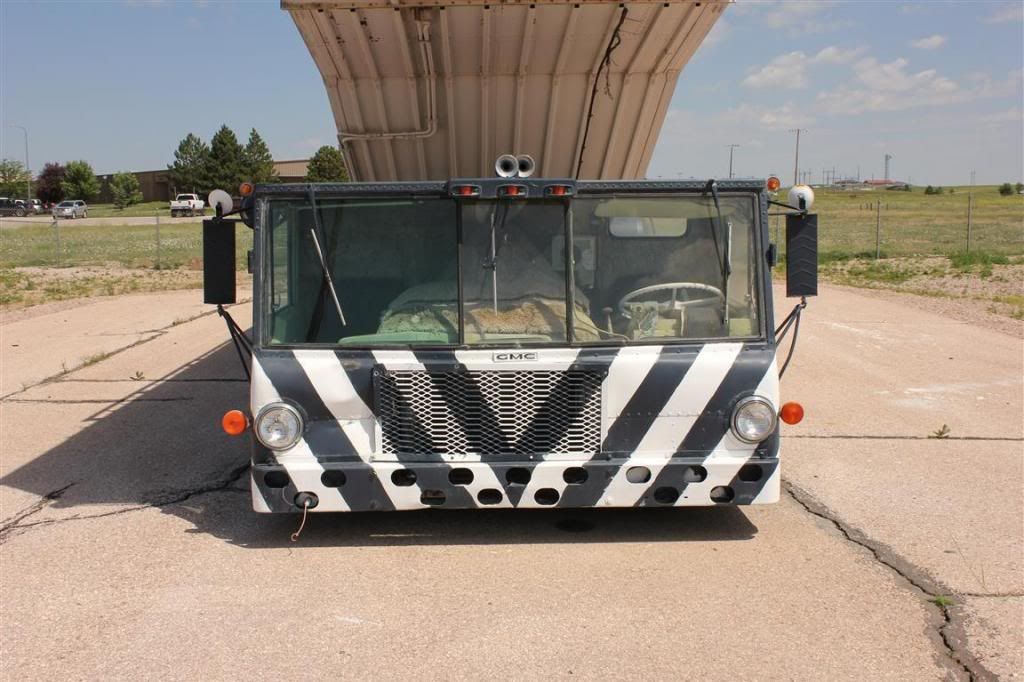 Interior shot: 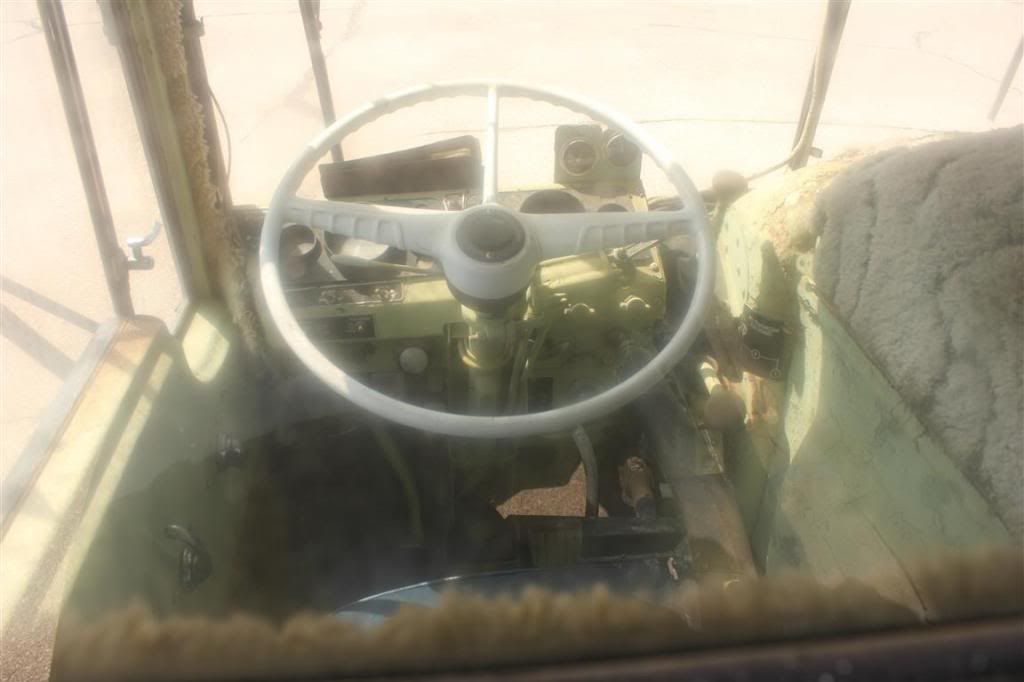 Seeing all of that high-style carpeting over the engine cover got me to thinking it must have an old Detroit Diesel in it. Maybe an 8V71 or even a 12V71?? This is a large truck and those missiles ain't exactly light. I wandered around the other side and found a cover over the rear of the engine that I could monkey with and get open to allow it's power secret to be told. I was very surprised to see two distributors looking back at me!! Yep, the GMC 702" V12 gas engine. Sure didn't expect THAT!! I know they were extensively used back then, but so were the 71's. Interesting. So I kept wandering around (time on site is finite, but I'm not sure how finite, so I have to get as many pics as possible as quickly as possible). It is a twin screw with a tag axle on the rear with two steer axles. One interesting thing I noticed were tubes in front of the lead trailer axle: 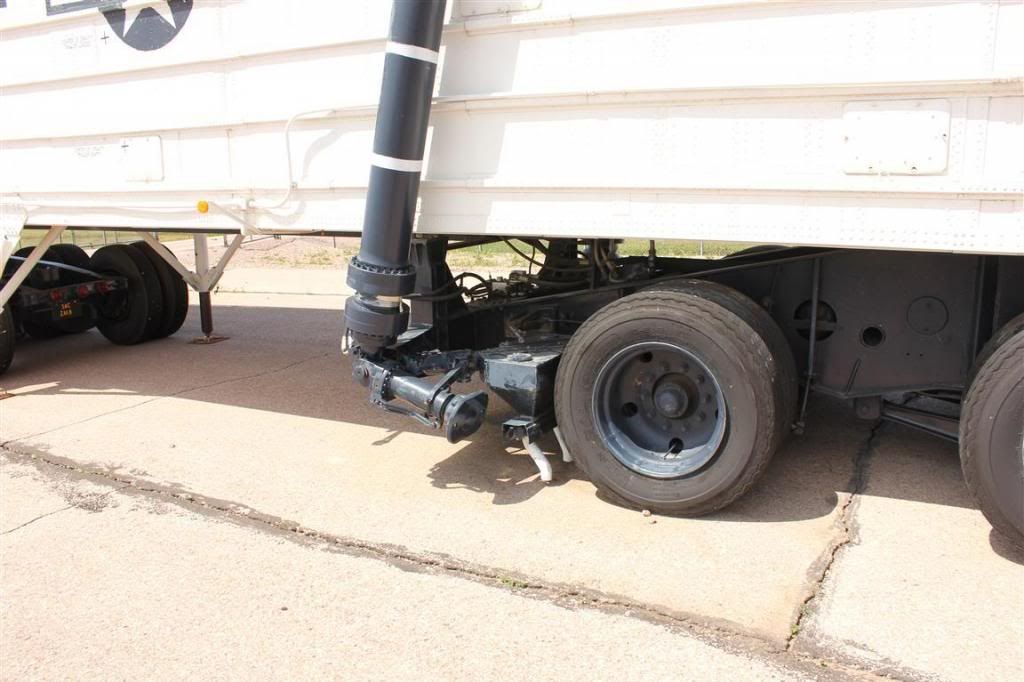 I opened one of the cans above the tube and found trace amounts of sand in the reservoirs. Sanding the tires for traction on slippery surfaces. I found it interesting that this was the only position that got the sanders. No sanders on the power axles or steer axles--only on the trailer. Another curious cat had followed me over to the transporter and he swung open one of the rear trailer doors. We were immediately hit with the smell of fiberglass resin. Amazing the thing still stunk of fiberglass after all these years.  So at this point we are getting yelled at by the tour guide and other passengers (namely our wives), so we reluctantly head back to the 6.9L diesel powered chariot. Cool. We get to see some ramp action now. Yeah, not really. This building on the left is the motor pool. The buildings on the right are the hangars (the back side of them). If you look real close between the buildings you might be able to see the tail of a B-1. Hell, I saw a B-1 sitting at the entrance of the museum and I MIGHT be able to see the top of the tail on one here?? I can understand not being allowed out on the flightline or even the ramp for that matter, but how about pulling up to a fence down the road a bit so we can see the lineup?? Meh, I digress. I guess we saw what we could see, but I was a little disappointed for the money spent. The missile transport truck was very cool to check out, even if we weren't supposed to be over there. The museum itself is great. If you ever find yourself in the area it is well worth the time to check out (use your own judgment on the base tour). It is free to get into the regular museum and there is a TON of stuff to see there. I've been to pay-museums that were not as nice as this one. Very cool place. So with that, we finish our time in Rapid City SD. Where should we go now??
__________________
1972 K20 Suburban, 5.9L Cummins, Banks Power Pack, NV4500HD, NP205, H.A.D., D60/14FF ARB Link To Build: HERE. |
|
|
|
|
10-11-2013, 09:39 AM
|
#965 | ||
|
GEARHEAD
Join Date: Aug 2003
Location: MN
Posts: 6,126
|
Re: The Story Of A Cummins Suburban (Lots Of Pics)
Quote:
Quote:
Nice pics as always, but you're missing one. Where's the pic of the GMC V-12? And after thinking about your comments on the sanding tube, here's my best guess of why just the trailer end. It was probably only used sporadically to keep from jack knifing. It would be hard to put that set up on the truck with the trailer swinging over that part of it in turns. If they did run into slick roads they would probably use chains on the drive axles. Also, most of the weight would likely be on the drive axles giving it more traction. I doubt that the missile was as heavy as you might think. Every ounce that can be removed from them is removed. They are typically aluminum and basically most of the rocket is empty tanks. The fuel is loaded once it is installed in the silo and probably weighs more than the rocket itself. But I was just nuclear reactor trained and not nuclear warhead trained, so I could (probably) be wrong. And no mention of
__________________
If no one knows what you're doing, they can't tell you you're doing it wrong HG's Dream Car Build - Shelby Cobra Kit Build your own adjustable track bar 71 Long Fleet C/10 72 Jimmy 4x4 (Junkyard Jimmy)HG's Plow Truck '78 K35 DuallyBigass Farm Truck HG's thread of miscellaneous stuff |
||
|
|
|
|
10-11-2013, 02:17 PM
|
#966 |
|
Registered User
Join Date: May 2008
Location: Alta Loma, Ca.
Posts: 930
|
Re: The Story Of A Cummins Suburban (Lots Of Pics)
Mt. Rushmore is being added to all the time. I've been there a few times and there is always something new. The artist rendition of the completed project was something I do not recall seeing when I was there last.
Most of that part of the country is very scenic, I have trouble in the plains when the mountains fade into the distance. The only exception is when I run through Kansas in the summer and the corn is truly as high as an elephants eye as far as you can see. The only thing that comes close east of the Mississippi is south of the Ohio river along the Smokeys and Appalachians. |
|
|
|
|
10-11-2013, 04:59 PM
|
#967 |
|
6>8 Plugless........
Join Date: Sep 2007
Location: Prairie City, Ia
Posts: 17,142
|
Re: The Story Of A Cummins Suburban (Lots Of Pics)
That GMC is too cool and I'm with Mike on his thoughts of the sand tube. Hey, just be glad you didn't try to go on this vaca October 1st or after. You'd be really upset as most of your spots would be closed.
__________________
Ryan 1972 Chevy Longhorn K30 Cheyenne Super, 359 Inline 6 cylinder, Auto Trans, Tilt, Diesel Tach/Vach, Buckets, Rare Rear 4-link and air ride option Build Thread 1972 GMC Sierra Grande Longhorn 4x4 1972 Chevy Cheyenne Super K20 Long Step side tilt, tach, tow hooks, AC, 350 4 speed 1972 C10 Suburban Custom Deluxe 1969 Chevy milk truck 1971 Camaro RS 5.3 BTR STG3 Cam Super T10 1940 Ford 354 Hemi 46RH Ford 9" on air ride huge project Tired of spark plugs? Check this out. |
|
|
|
|
10-14-2013, 02:43 AM
|
#968 | |||||||
|
I had a V-8
Join Date: May 2003
Location: Phoenix AZ
Posts: 1,116
|
Re: The Story Of A Cummins Suburban (Lots Of Pics)
Quote:
Quote:
Quote:
Quote:
Quote:
Quote:
Quote:
This is the view they are trying to block: 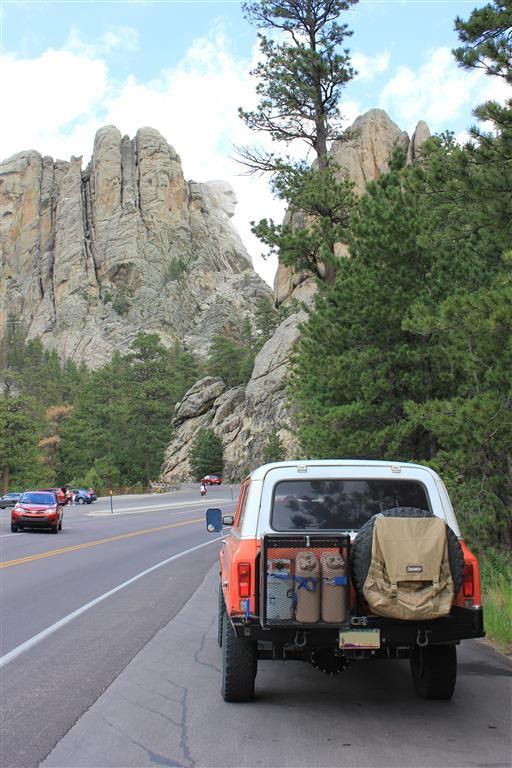
__________________
1972 K20 Suburban, 5.9L Cummins, Banks Power Pack, NV4500HD, NP205, H.A.D., D60/14FF ARB Link To Build: HERE. |
|||||||
|
|
|
|
10-14-2013, 02:44 AM
|
#969 |
|
I had a V-8
Join Date: May 2003
Location: Phoenix AZ
Posts: 1,116
|
Re: The Story Of A Cummins Suburban (Lots Of Pics)
Ok, lets see if we can move this train a little further down the line here.
So we got out of the South Dakota Air and Space Museum at Ellsworth AFB and decided it was time to head south. We set a southwestern course and hit the road. This course led us back into: 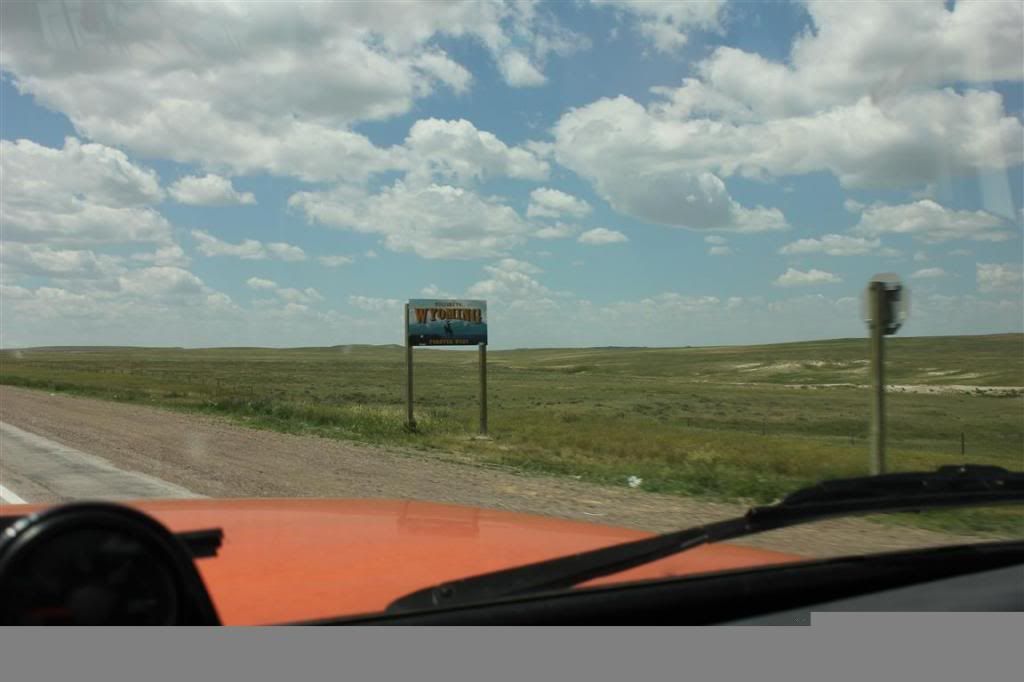 We soon encountered a town that must be named after my favorite diesel tech support person: 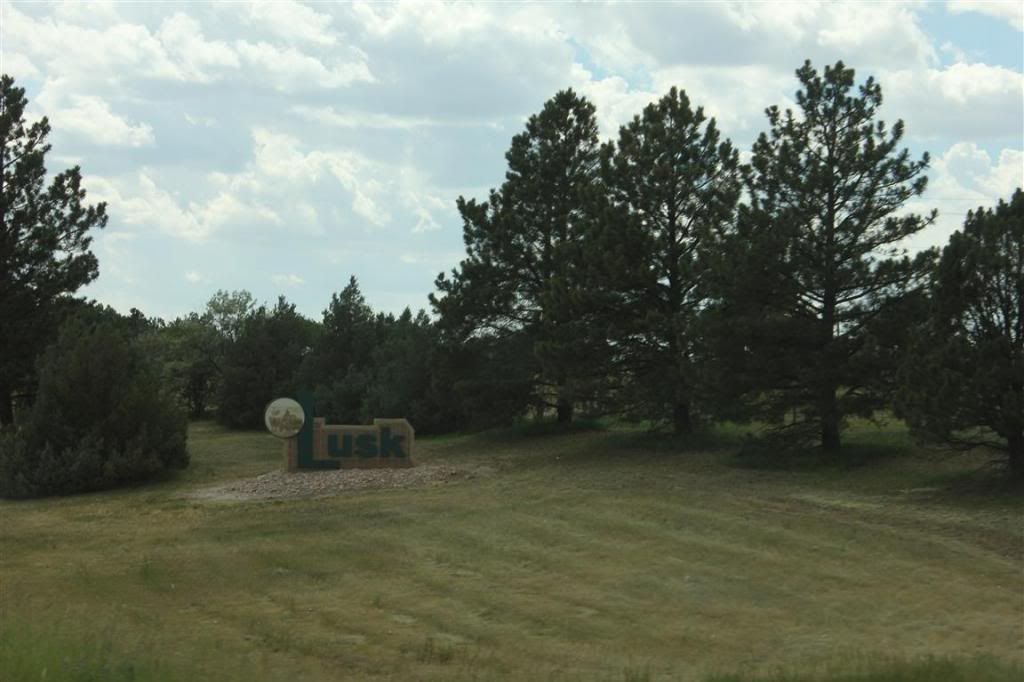 Sometime after we passed through there we stopped in another little town to get some road road snacks. When we were getting back into the truck a guy came over and asked where we were from and going, etc. I told him and he said I was so lucky to be doing the trip in the Suburban and he pointed to a Honda or Hyundai small SUV type vehicle that he and his family were motoring in. I really wanted to say something to the effect that it wasn't luck, but actually a bunch of hard work, long days (and nights) and piles of money building an older vehicle to be reliable enough to take on a journey like the one we were on, but instead I just agreed with him figuring he was already suffering enough having to travel in whatever it was he was running. Soon after that, we found ourselves in: 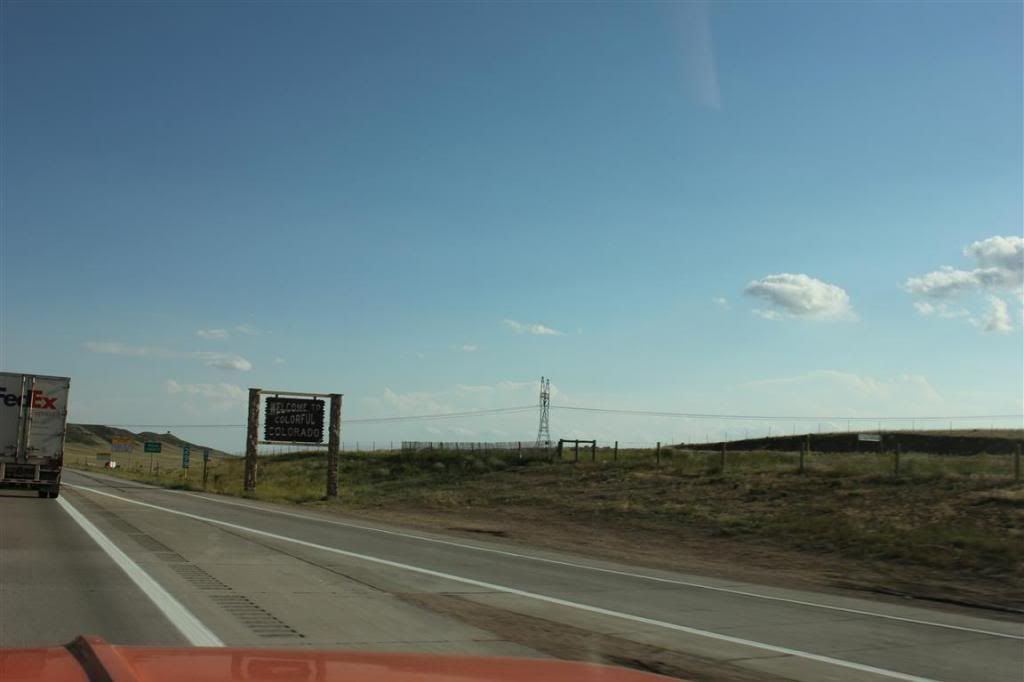 We got into Fort Collins and decided to shut it down for the night. We got a room and headed into town for some grub. We came back to the room and started winding down, but it was difficult. The a/c unit was making a horrendous amount of noise. I can fall asleep with noise like that (years of practice sleeping in noisy places), but I know for a fact my wife will not sleep well, if at all. What to do?? Call the front desk?? Hmm, don't like the odds of that ending well. Get another room?? Might fare better, but still not great odds. Hmm, I think I'll take a look and see what is actually going on. I find an access panel and using a chair as a ladder, figure out what is happening to make the noise. Generally just a worn out unit. I poke around and figure out what it is going to take to silence the monster. I find a chunk of wood up in the ceiling somewhere and jam that in between two parts and that gets rid of 90% of the noise. Much better, but still not good enough. I start poking and prodding other parts and find the other offender. What can I use?? A washcloth would work well, but then I have to get back up here tomorrow and retrieve it so I don't get charged $25.00 for a lost towel. That's no good. The I find a complimentary bar of soap. That could work. We bring our own soap, so we won't need it. So I stuff the bar of soap up there and the machine is quiet save for the actual sound of the moving air and the white noise of the blower motor running. An a/c unit that is quiet enough for my wife to sleep in the room--WIN!! 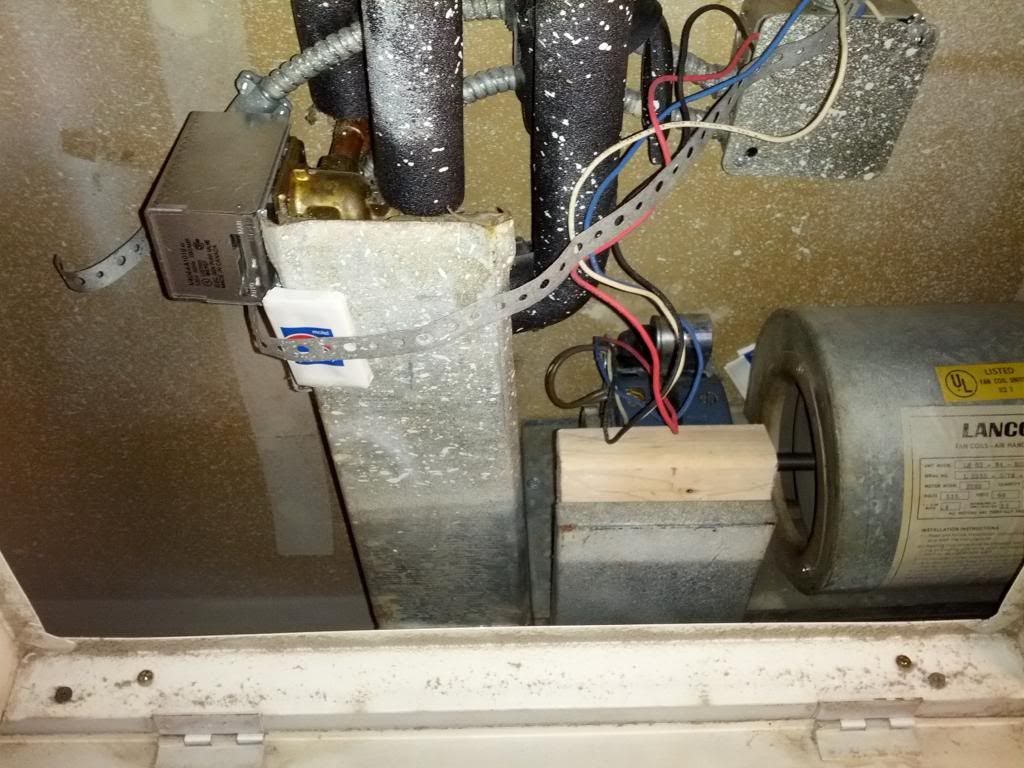 The next morning we get up and head over to the Waffle House next door to get some vittles before we head into the great unknown. We eat and I head to the can before we leave. I find myself looking at an engineering masterpiece that was created by an artist who must have gone to the same engineering school that I did: 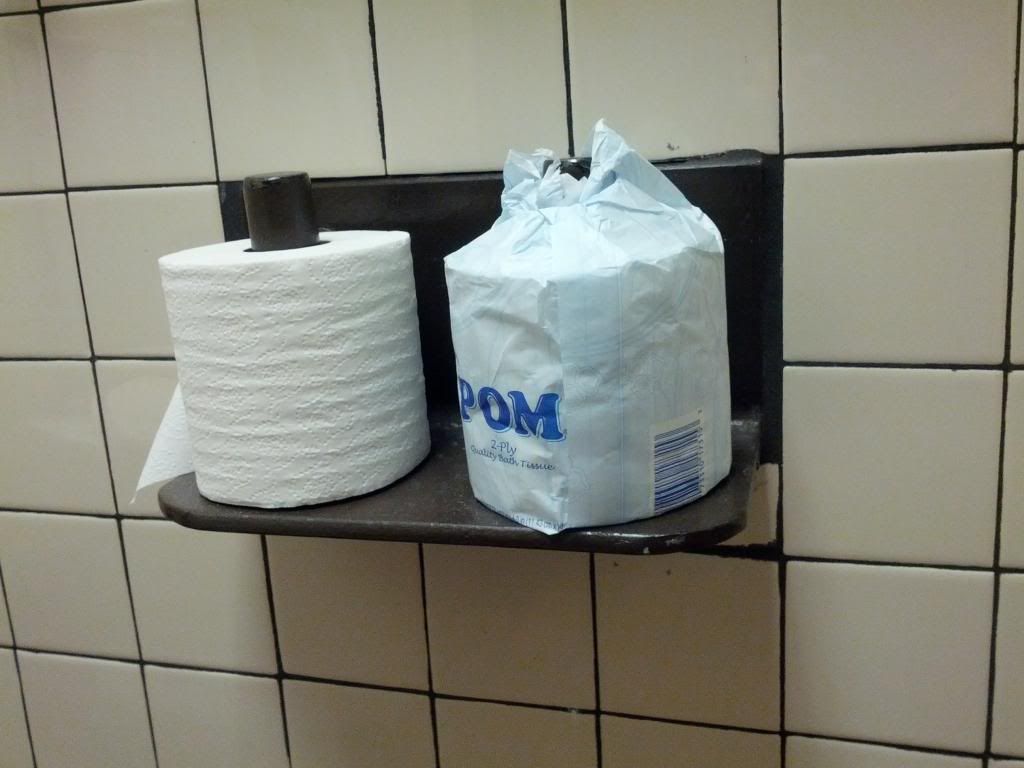 Half inch thick, 6x6 angle iron supporting not one, but TWO rolls of toilet paper. Light-weight and high speed FTW!! So we left the Waffle House and headed west. We soon came upon our first destination for the day: 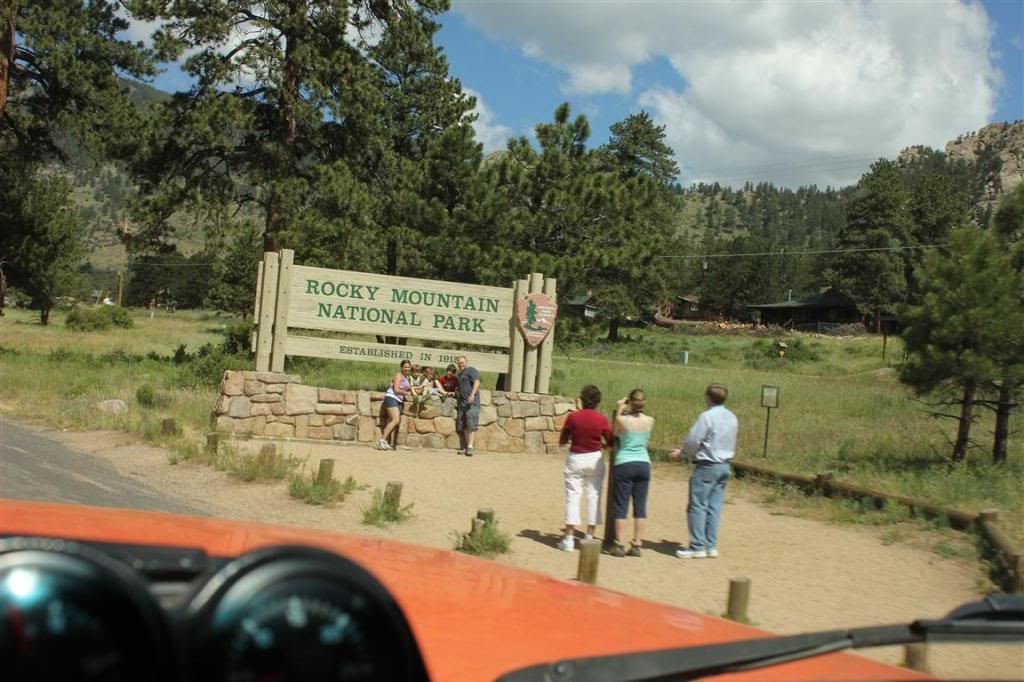 We did stop here and there along the way, but MY main reason for going is the high-altitude area of the park. Now, don't get me wrong, there are TONS of scenic views to be had in the park, but where we live and the areas where we travel tend to mentally take away some of the grandeur of the park due to familiarity, whereas someone from, say, the mid-west, would be awestruck by the views and panoramas available at any of the stops in the park. Views like those are rather commonplace for us. I want to see the tundra region. Gratuitous truck shot above the tree line: 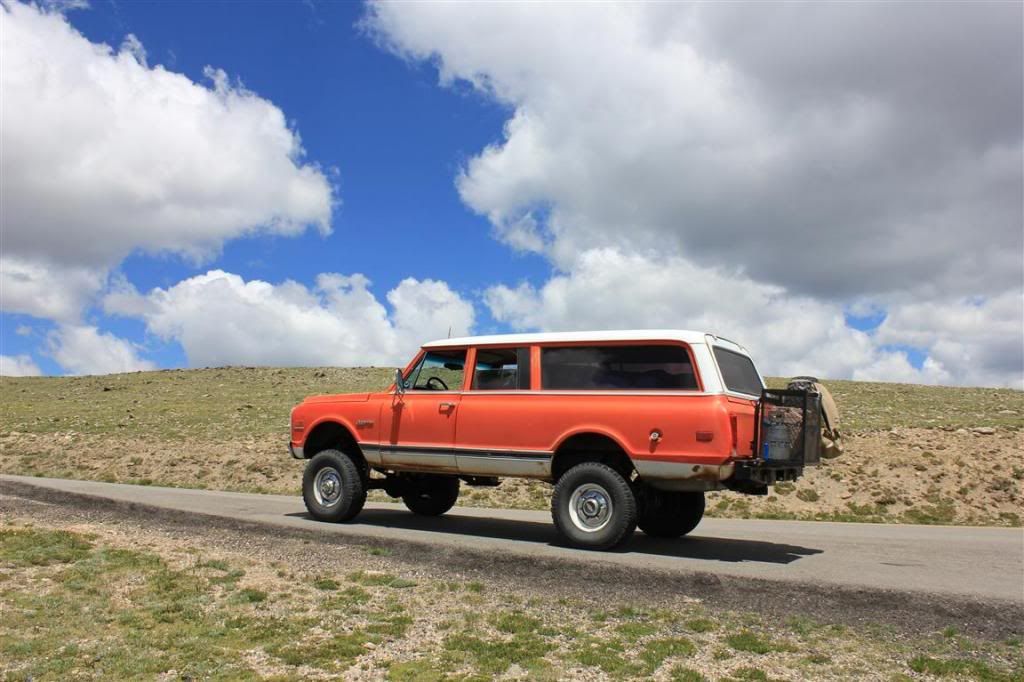 Beautiful high-altitude views: 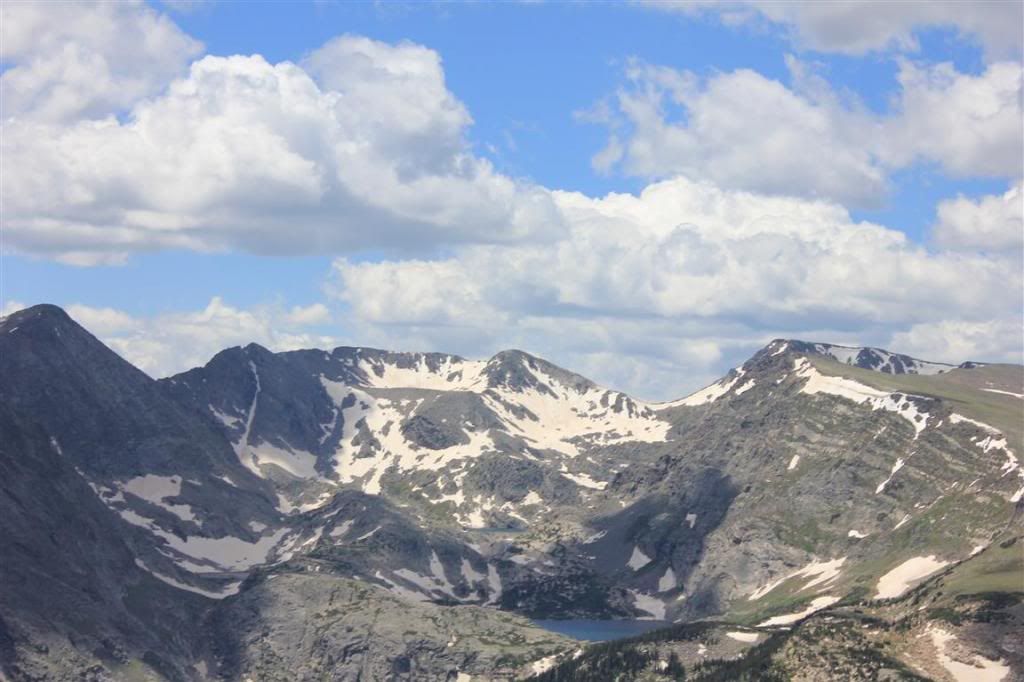 Tundra: 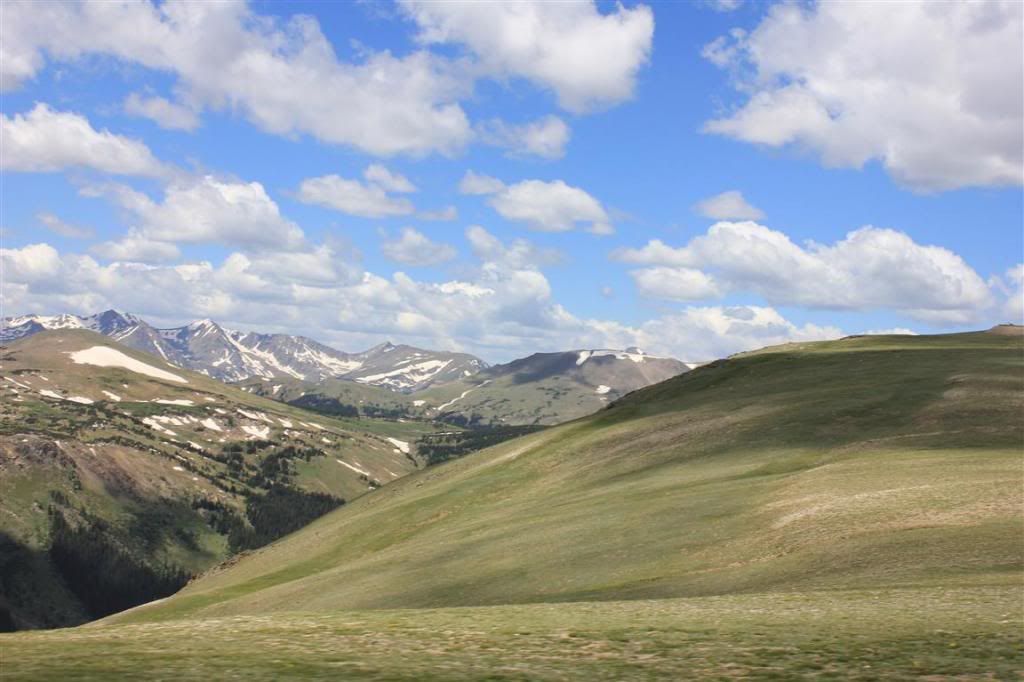 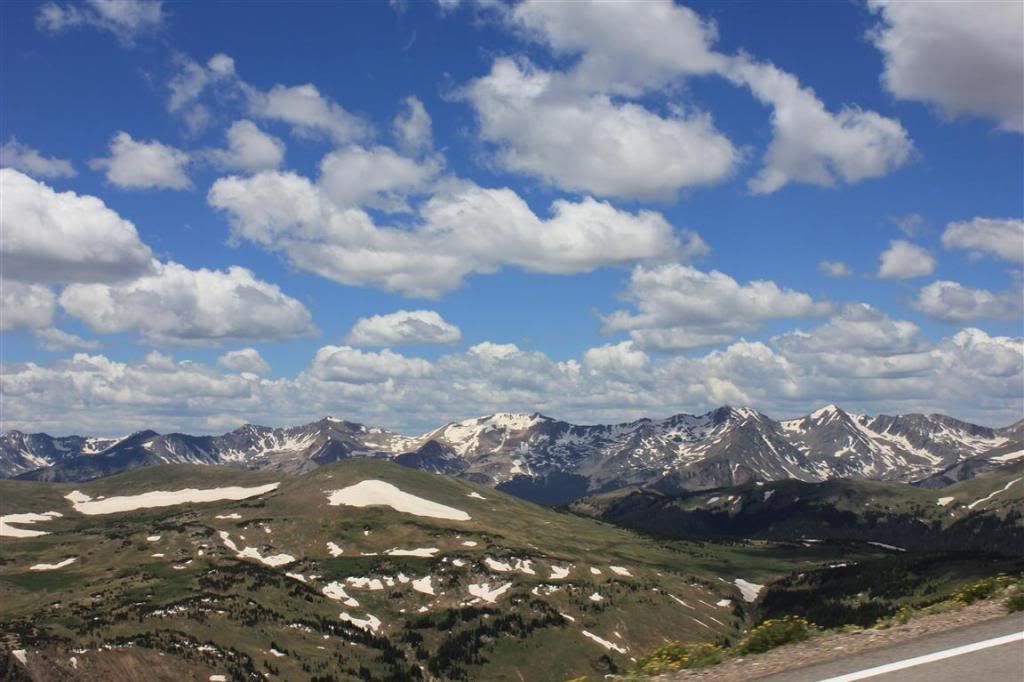  So we were up at the Alpine Visitor center in the park deciding what we wanted to do next. Continue on and go out a different way than we came in or go back out and take a different route when we get into Estes Park?? We decided to head back out the way we came in. When we got to Estes Park we headed south east toward Boulder instead of west like we came in. My wife has a friend that recently moved to Aurora. She calls her and she is home. She gives us some directions and we set a course for her house. There was a small brush fire next to the highway ahead of us, so we spent well over an hour in stop and go traffic to get past the extinguished fire (took us a long time to get there). This put us to my wife's friend's house later than we should have been there. She was still there, but we only got to stay for about an hour because once here husband got home, they had to go somewhere with the kids. Oh well, at least we got to see them. So what to do now?? Well, I guess a little backstory is appropriate now. Many of you that know my boy, know about his food allergies, but for those that don't, he has many. A whole bunch. I carry a paper in my pocket with about 24 different foods written on it that he is allergic to. Some are common, like dairy, egg, pork, beef, wheat, fish, shellfish, soy, but then there are some odd ones like black pepper, pineapple, raspberries, potatoes(!!) and corn (among others--those named only total 13 of the 24). So before we left on vacation, my boy had his annual allergy test. Man you want to talk about a nerve wracking wait for results. Ugh. You never know what will be added to the list. When soy showed up I bet we had to get rid of $500.00 worth of food because of that ONE allergy. Not fun. This test proved to be MUCH better though. Several things came off of the list. The item pertinent to the story though is wheat. Wheat in and of itself is an easy one because it is so common. The problem is that many of the wheat free products also have OTHER ingredients in them that he is allergic to. That's not so related to the story right now though. Anyway, my buddy Bill (the guy in the wheel chair with the white Ramcharger from our trip last year) asked if we were going to roll through Pueblo. I asked if he was making his world famous fried chicken?? (I ate so much chicken when I was younger that I really don't care to eat it ever again, but I would eat this fried chicken for breakfast, lunch and dinner it is so good). He said of course fried chicken would be on the menu if we came to town. He also said we could stay with him if we wanted to. Hmm, hang out with Bill and eat his fried chicken?? How do we get there?? He gave us directions from the highway and we left Aurora with empty stomachs. I had discussed the ingredients in his fried chicken with him and found that my boy could now have his fried chicken. Bill had made his fried chicken at Overland Expo, but at that time my boy was still allergic to wheat so he could only listen to EVERYBODY raving about how great it is. Well, now he can have it. We have plenty of time to discuss that as we are leaving Denver in rush hour: 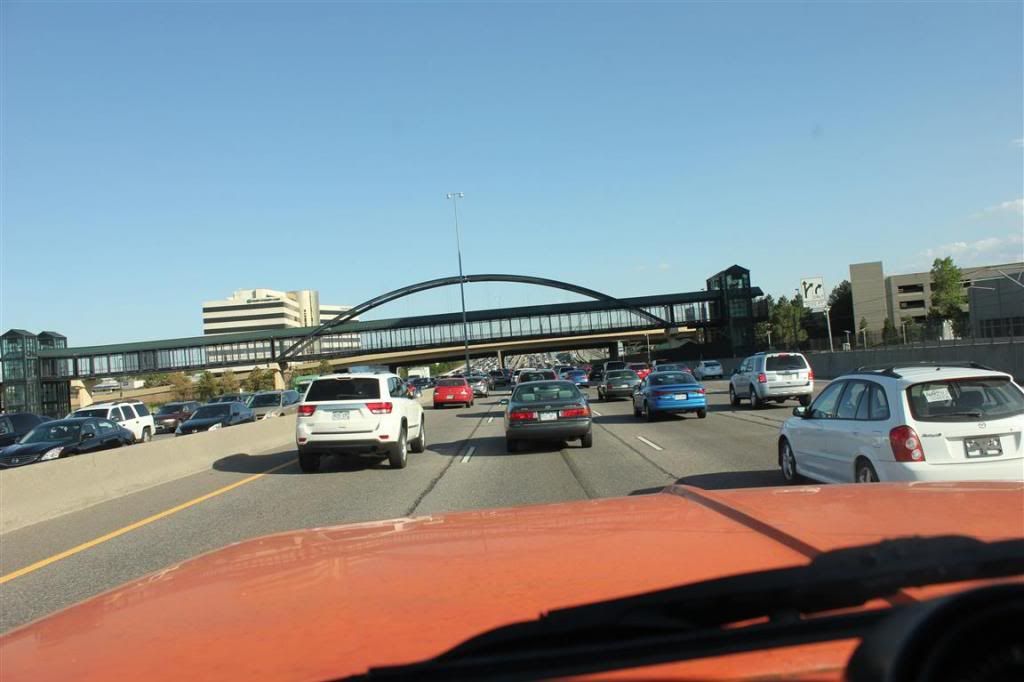 I had passed through Denver during rush hour thirty years ago and it was miserable. Evidently things haven't changed much. We have bad traffic here, but ours isn't even playing the same sport as this place. So we make it to Pueblo a little bit late and walk into Bill's house to a table set for us and fried chicken just coming off the stove. It doesn't get much better than that. My boy absolutely loved the chicken. He eats a LOT of chicken already, but this was a new twist for him. It was great. I was so glad he was able to have it too. We mimicked ravenous bears at dinner and afterwards we sat around all fat and happy discussing possible plans for tomorrow.
__________________
1972 K20 Suburban, 5.9L Cummins, Banks Power Pack, NV4500HD, NP205, H.A.D., D60/14FF ARB Link To Build: HERE. |
|
|
|
|
10-14-2013, 12:26 PM
|
#970 |
|
Junk Yartist
Join Date: Jul 2009
Location: Greeley, CO
Posts: 2,203
|
Re: The Story Of A Cummins Suburban (Lots Of Pics)
I had to stop reading because you are posting pictures of Colorado and southern Wyoming, and after living in Laramie and Wyoming I am really wondering what am I doing in this desert.
__________________
-Jeremy YOU ONLY FAIL IF YOU STOP TRYING 70 Crew Cab Build Link 70 GMC Suburban 4X4 build thread 95 Yukon Daily Driver Rebuilding an NP205 |
|
|
|
|
10-14-2013, 08:11 PM
|
#971 | |
|
Senior Member
Join Date: Apr 2004
Location: sw colorado
Posts: 2,720
|
Re: The Story Of A Cummins Suburban (Lots Of Pics)
Quote:
that traffic looks decent. try the 405 north on a friday afternoon in LA... makes me laugh. better yet, try south durango on a friday afternoon. i had to wait like 2 minutes for the light by home depot because of construction. BS. we'll see ya tomorrow. |
|
|
|
|
|
10-15-2013, 01:08 AM
|
#972 | |||
|
I had a V-8
Join Date: May 2003
Location: Phoenix AZ
Posts: 1,116
|
Re: The Story Of A Cummins Suburban (Lots Of Pics)
Quote:
Quote:
Quote:
__________________
1972 K20 Suburban, 5.9L Cummins, Banks Power Pack, NV4500HD, NP205, H.A.D., D60/14FF ARB Link To Build: HERE. |
|||
|
|
|
|
10-15-2013, 01:26 AM
|
#973 |
|
Junk Yartist
Join Date: Jul 2009
Location: Greeley, CO
Posts: 2,203
|
Re: The Story Of A Cummins Suburban (Lots Of Pics)
Laramie and Colorado Springs... like Ryan said, im a tech-er we donut spel. Lack of oksigen or somthin. Do i forsee a stop in pueblo to harras Larry? Or not this trip
__________________
-Jeremy YOU ONLY FAIL IF YOU STOP TRYING 70 Crew Cab Build Link 70 GMC Suburban 4X4 build thread 95 Yukon Daily Driver Rebuilding an NP205 |
|
|
|
|
10-15-2013, 01:39 AM
|
#974 | |
|
I had a V-8
Join Date: May 2003
Location: Phoenix AZ
Posts: 1,116
|
Re: The Story Of A Cummins Suburban (Lots Of Pics)
Quote:
Well, being that we are hanging out with Bill, we will probably have to stop over to Larry's compound and check out his fleet of stinky gas engines .
__________________
1972 K20 Suburban, 5.9L Cummins, Banks Power Pack, NV4500HD, NP205, H.A.D., D60/14FF ARB Link To Build: HERE. |
|
|
|
|
|
10-15-2013, 09:04 PM
|
#975 | |
|
Senior Member
Join Date: Apr 2004
Location: sw colorado
Posts: 2,720
|
Re: The Story Of A Cummins Suburban (Lots Of Pics)
Quote:
|
|
|
|
|
 |
| Bookmarks |
| Thread Tools | |
| Display Modes | |
|
|


 Linear Mode

