
 |
Register or Log In To remove these advertisements. |
|
|
|
|||||||
 |
|
|
Thread Tools | Display Modes |
|
|
#76 |
|
Registered User
Join Date: Apr 2010
Location: Phoenix, AZ
Posts: 341
|
Re: My '72 Blazer project.
Looks good! Did you go with the tinted windows? Looks like it to me but just wondering what to expect. Thanks for the really good pics. I was wondering what the tailgate looks like though. Is it a band like on the windshield? Also how does the band on the windshield mount? I assumed screws somewhere along the line but didn't see any. Are the inside or underneath some of the rivets?
Posted via Mobile Device |
|
|

|
|
|
#77 |
|
Registered User
Join Date: May 2011
Location: Hershey, Nebraska
Posts: 319
|
Re: My '72 Blazer project.
The back is Velcro, the only thing that has rivets is the header bar and the rails you bolt down, and yes that is the tinted window option. The bar on the windshield has snaps already installed with 7 or so empty holes where you ad self tapping snaps. Except those are crap and took forever to get them installed, I noticed that with it mounted the way they say to do (windshield bar ) that there were some "humps" you could say where there wasn't any self tapping snaps there, so I added some self tapping screws there to make it flush the whole length
Posted via Mobile Device
__________________
Blazer Build Thread: http://67-72chevytrucks.com/vboard/s...d.php?t=483399 |
|
|

|
|
|
#78 |
|
Registered User
Join Date: May 2011
Location: Hershey, Nebraska
Posts: 319
|
Re: My '72 Blazer project.
Ok...need some help guys. I'm having some problems with the fuel gauge. I filled the tank up full yesterday and it showed EMPTY. But before I went to fill it (put in 13 gallons) it showed 1/4 full. IDK how these work if its wired backwards which causes it to be backwards, or it could be another problem. Or a faulty gauge? Thanks guys...let me know what you think.
__________________
Blazer Build Thread: http://67-72chevytrucks.com/vboard/s...d.php?t=483399 |
|
|

|
|
|
#79 |
|
Registered User
Join Date: Nov 2001
Location: Austin, TX
Posts: 308
|
Re: My '72 Blazer project.
A correctly working fuel sender will read 0 ohms when empty and 90 ohms when full.
A broken sender wire (infinite ohms) will peg the gauge way past the FULL mark. My suggestion would be to pull the sender wire off wherever it's most convenient and take a reading with your DVM. If the reading you get makes sense based on the numbers listed above, it's probably a bad gauge. -G
__________________
1972 K5 - 502BBC/4L80E/Magnum205/Mog-9s/5.26s/38" BFG KM2s Find me on INSTAGRAM @MIGHTASWELLK5 '72 K5 - Greg's "Might As Well™" Build |
|
|

|
|
|
#80 | |
|
Registered User
Join Date: May 2011
Location: Hershey, Nebraska
Posts: 319
|
Re: My '72 Blazer project.
Quote:
I need some help. I feel mental for not being able to fold up the sides and back all that well for the safari top. Any advice, cause yours looks good, mine just looks like someone didn't know what they were doing   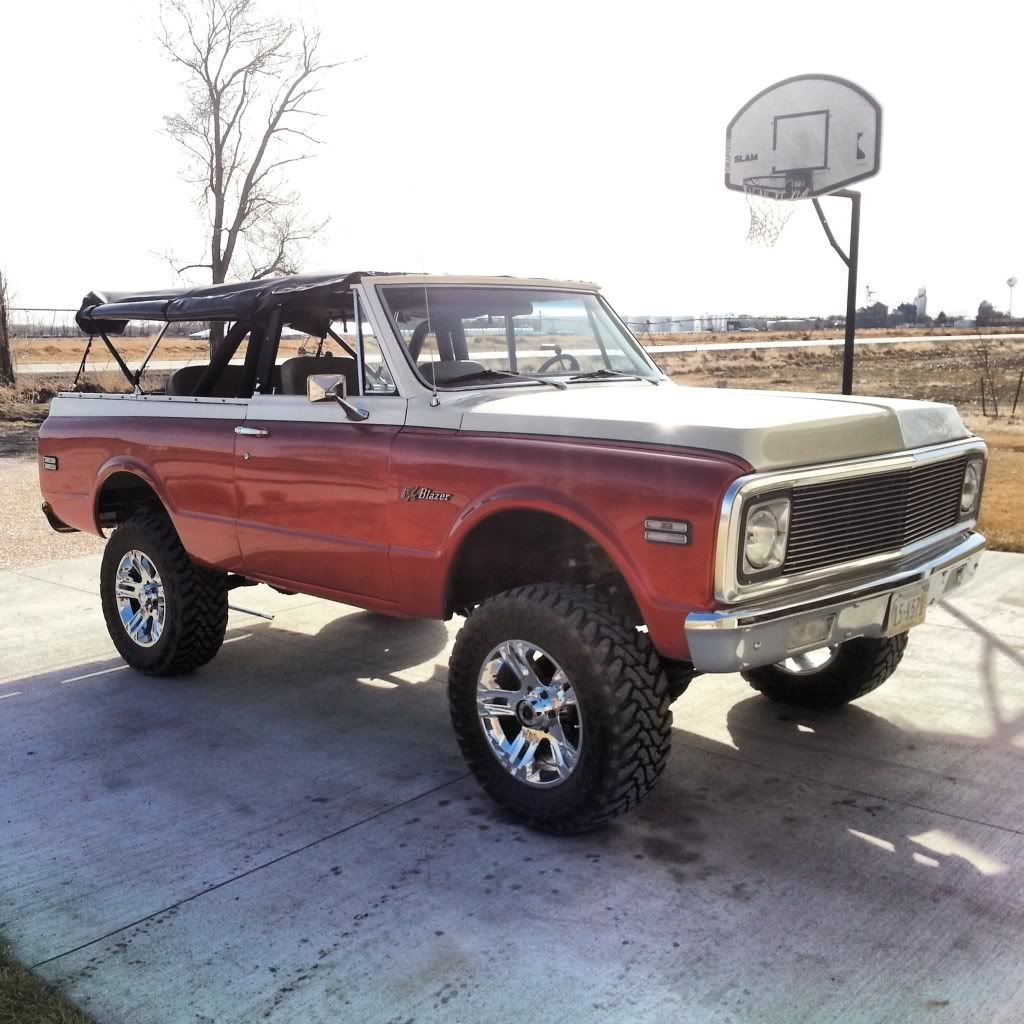
__________________
Blazer Build Thread: http://67-72chevytrucks.com/vboard/s...d.php?t=483399 |
|
|
|

|
|
|
#81 |
|
Registered User
Join Date: Jul 2012
Location: Novato, CA
Posts: 35
|
Re: My '72 Blazer project.
Here is what works on mine.
For the sides, I fold in the back flap first after unzipping, like so: 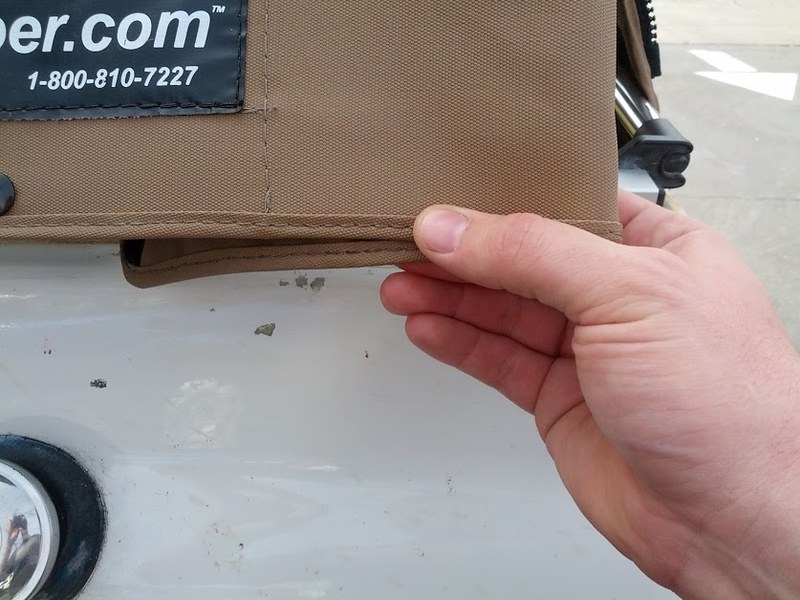 Then I roll up that back corner, and then the front part by the window. Then inside I always make sure my back strap is as tight at is can be, and I may even overdo it, you can see the plastic hoop where it is attaching is kind of being bent up:  And then I also make sure the top straps on the inside are always as tight as they can be (mine go to just about the limit):  This seems to keep the top fabric pulled taught against the snaps on the windshield frame and the whole thing the smooth look. I also just generally roll up the back rather than un-attaching it, and leave the bar in snapped in to the back holders. Let me know if that does or doesn't help any and we can figure out what's up. |
|
|

|
|
|
#82 |
|
Registered User
Join Date: May 2011
Location: Hershey, Nebraska
Posts: 319
|
Re: My '72 Blazer project.
I tried your way and man it looks a lot better. Thanks!
Posted via Mobile Device
__________________
Blazer Build Thread: http://67-72chevytrucks.com/vboard/s...d.php?t=483399 |
|
|

|
|
|
#83 |
|
Registered User
Join Date: Jul 2012
Location: Novato, CA
Posts: 35
|
Re: My '72 Blazer project.
Awesome! Glad it did. Hopefully the weather is nice enough for you to enjoy it like that!
|
|
|

|
|
|
#84 |
|
Registered User
Join Date: Jul 2012
Location: Novato, CA
Posts: 35
|
Re: My '72 Blazer project.
I was looking at your pics again and saw that in the following pic you don't have the fabric piece moved down to protect the window:
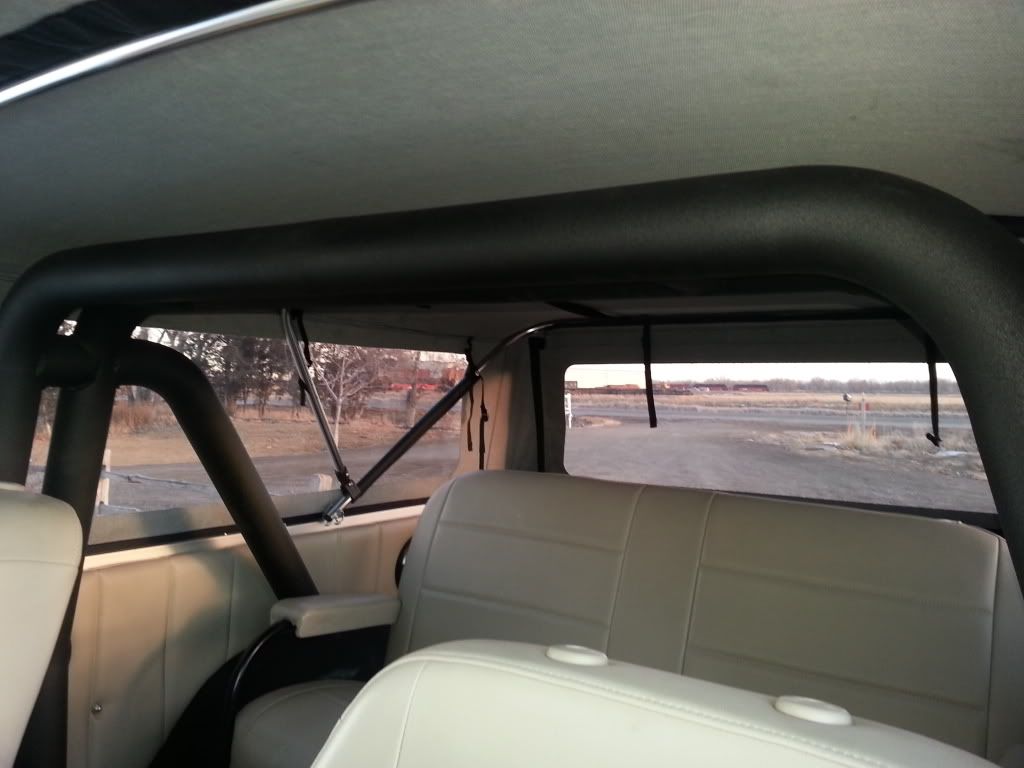 I didn't have them down for a little while but someone asked if the fabric sleeves were there to protect the plastic, and that seemed to make sense. I also checked pics from their site and it looks like they slid them down on each side. You may have already done it, but I figured it couldn't hurt to mention it. http://www.softopper.com/chevy-blaze...px#prettyPhoto |
|
|

|
|
|
#85 |
|
Registered User
Join Date: May 2011
Location: Hershey, Nebraska
Posts: 319
|
Re: My '72 Blazer project.
ahhhhhhh...I see what your talking about! I never noticed that, but that makes perfect sense now. Thanks you. any more advice, like How about folding it all the way down? I tried the other day but cant get it to fold up clean to fit into that cover they send into.
__________________
Blazer Build Thread: http://67-72chevytrucks.com/vboard/s...d.php?t=483399 |
|
|

|
|
|
#86 |
|
Registered User
Join Date: Jul 2012
Location: Novato, CA
Posts: 35
|
Re: My '72 Blazer project.
Sorry for the delay, had to wait until the rain stopped.
Here is how I do it to make it fully convertable: Loosen the straps on the inside (will only make it easier when you go to put it back up) Remove the Velcro pieces holding it to the bars and unbutton from the header. Lay it flat, fully extended with the back bars resting on the back. Fold in the sides and the back window, trying not to get any plastic window part exposed if possible (I leave the back window attached by Velcro only, so i unzip it and remove it from the bottom bar). 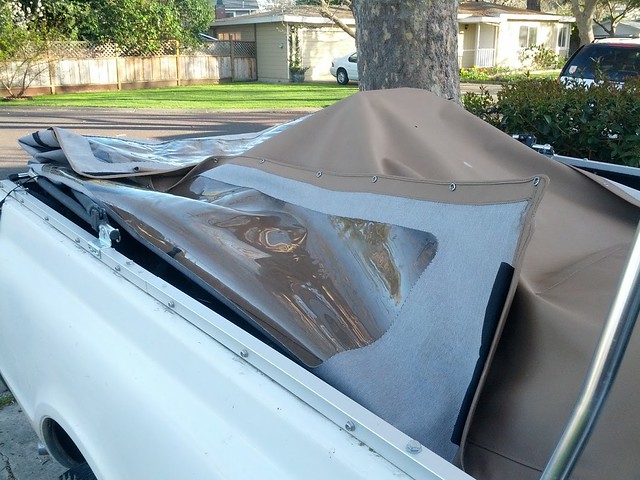 Then I fold it back in half and then in quarters: 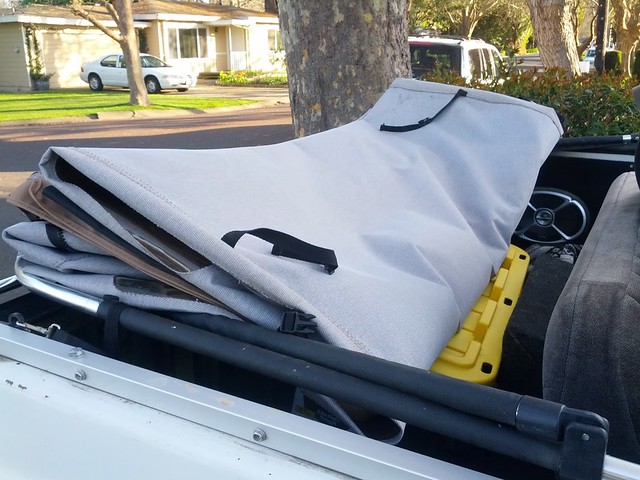 At that time it's fairly easy to slide the cover over the back side. Then I fold it one more time into the cover: 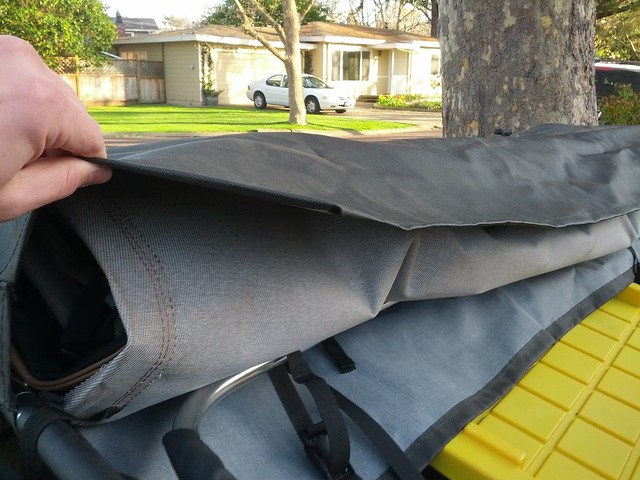 Then I snap the sides and then the center strap trying my best to keep the top of the cover over the whole top and tucked into the bottom so the wind won't catch it at all:  The whole process is easier with two people, but it just limits the back and forth from side to side really. Last edited by ekajkrats; 03-21-2013 at 09:52 PM. Reason: added notation to folding in side windows |
|
|

|
|
|
#87 |
|
Registered User
Join Date: May 2011
Location: Hershey, Nebraska
Posts: 319
|
Re: My '72 Blazer project.
Thank you!! You my man are really helpful with this top!
Posted via Mobile Device
__________________
Blazer Build Thread: http://67-72chevytrucks.com/vboard/s...d.php?t=483399 |
|
|

|
|
|
#88 |
|
Registered User
Join Date: Aug 2007
Location: peoria az
Posts: 252
|
Re: My '72 Blazer project.
Does your top have a gap betweem the vent window and windshield frame if so can you take some pics i have mine on and it sucked when it rainrd and hopefuly one day i can fix the problem lol thanks.
Posted via Mobile Device
__________________
1972 gmc jimmy project comin soon ( jus a sin )  1959 chevy apache shortbed fleetside (brsgrm)  1966 Chevy c30 duallie 2wd (big chief) 
|
|
|

|
|
|
#89 |
|
Registered User
Join Date: May 2011
Location: Hershey, Nebraska
Posts: 319
|
Re: My '72 Blazer project.
__________________
Blazer Build Thread: http://67-72chevytrucks.com/vboard/s...d.php?t=483399 |
|
|

|
|
|
#90 |
|
Registered User
Join Date: Jul 2012
Location: Redmond, WA
Posts: 126
|
Re: My '72 Blazer project.
Do you need the drip rail installed? (#3 from this page http://www.lmctruck.com/icatalog/cb/full.aspx?Page=13)
|
|
|

|
|
|
#91 |
|
Registered User
Join Date: May 2011
Location: Hershey, Nebraska
Posts: 319
|
Re: My '72 Blazer project.
UPDATE: fixing the transmission cause its leaking. New powerstearing box is going on, and still no front driveshaft. Have to build a custom crossmember so the front driveshaft will be able to run to the front. Just small things now.
__________________
Blazer Build Thread: http://67-72chevytrucks.com/vboard/s...d.php?t=483399 |
|
|

|
|
|
#92 |
|
Registered User
Join Date: May 2011
Location: Hershey, Nebraska
Posts: 319
|
Re: My '72 Blazer project.
Got a wire gremlin that needs fixed now. Going down the road with the headlights on hitting bumps in the road will cause the turn signals to flash on and off. Thinking maybe a short someplace? both of them do it, but not at the same time. Going to trace wires im thinking, if anyone has any ideas, id love to hear them!
__________________
Blazer Build Thread: http://67-72chevytrucks.com/vboard/s...d.php?t=483399 |
|
|

|
|
|
#93 |
|
Registered User
Join Date: Jan 2009
Location: belmont, ca
Posts: 76
|
Re: My '72 Blazer project.
Hello,
With the top all the way down does the little support bars above the front seats have to stay in place like in this picture? 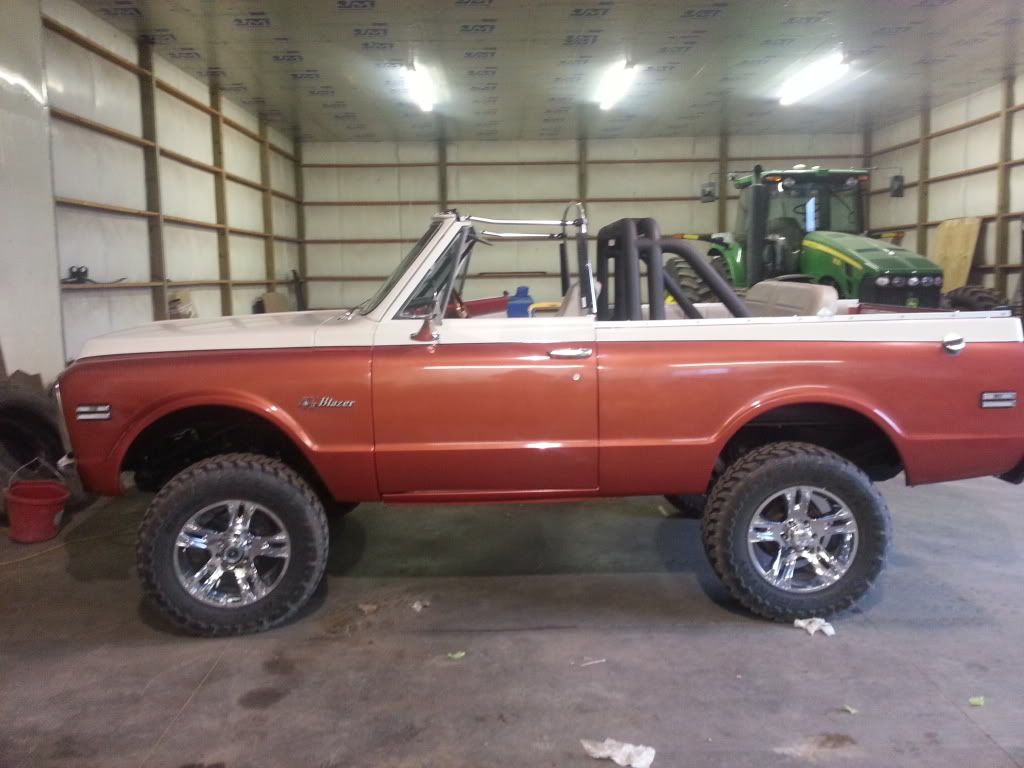
__________________
<< sean >> |
|
|

|
|
|
#94 |
|
Registered User
Join Date: Jul 2012
Location: Redmond, WA
Posts: 126
|
Re: My '72 Blazer project.
The front attaches to the top of the windshield with wing nuts so can easily be removed and the whole thing folds back. In my situation, I frequently have kids in the back, so it's in the way of the back seat passengers. To remove it completely just takes a standard screwdriver to remove the two pins attaching the bottom of the bracket, then I just store it in the back, under the top.
|
|
|

|
|
|
#95 |
|
Registered User
Join Date: May 2011
Location: Hershey, Nebraska
Posts: 319
|
Re: My '72 Blazer project.
Beat me to it haha. You don't even need a screw driver to carry around. I got lazy usually during the summer at the lake and used a quarter or some other coin from my pocket or cup holder and used it to take those two screws out. Then like stated before you can undo the wing nuts up at the top and that bar comes out. Only I slide mine between the side panel and the back seat.
__________________
Blazer Build Thread: http://67-72chevytrucks.com/vboard/s...d.php?t=483399 |
|
|

|
|
|
#96 |
|
Registered User
 Join Date: Dec 2012
Location: Pownal VT
Posts: 73
|
Re: My '72 Blazer project.
nice !!
|
|
|

|
|
|
#97 |
|
Registered User
Join Date: Nov 2009
Location: Cranbrook, BC
Posts: 253
|
Re: My '72 Blazer project.
Great looking Blazers guys.
Think I need to order one of those tops this spring. |
|
|

|
|
|
#98 |
|
Registered User
Join Date: May 2011
Location: Hershey, Nebraska
Posts: 319
|
Re: My '72 Blazer project.
Got the custom cross member built and will soon have 4wd again! Took it out of the back shop and spent a couple hours washing, vacuuming, detailed, and waxed before it starts driving to the lake every day.
 
__________________
Blazer Build Thread: http://67-72chevytrucks.com/vboard/s...d.php?t=483399 |
|
|

|
|
|
#99 |
|
Registered User
Join Date: Nov 2009
Location: Cranbrook, BC
Posts: 253
|
Re: My '72 Blazer project.
Man, that's a great looking Blazer. You guys inspired me. Just received my Softop this week. Have to get the brakes finished first, but it will be on soon enough.
|
|
|

|
|
|
#100 |
|
Registered User
Join Date: May 2011
Location: Hershey, Nebraska
Posts: 319
|
Re: My '72 Blazer project.
UPDATE:got the driveshaft built and installed.
 
__________________
Blazer Build Thread: http://67-72chevytrucks.com/vboard/s...d.php?t=483399 |
|
|

|
 |
| Bookmarks |
| Thread Tools | |
| Display Modes | |
|
|