
 |
|
|
#176 |
|
6>8 Plugless........
 Join Date: Sep 2007
Location: Prairie City, Ia
Posts: 17,142
|
Re: Over 25 Years Later, Finally My 71 C-10 Truck Build
Good luck spraying the primer. It's always a PITA getting ready to spray because you're so nervous to try and not ruin/spill your material.

__________________
Ryan 1972 Chevy Longhorn K30 Cheyenne Super, 359 Inline 6 cylinder, Auto Trans, Tilt, Diesel Tach/Vach, Buckets, Rare Rear 4-link and air ride option Build Thread 1972 GMC Sierra Grande Longhorn 4x4 1972 Chevy Cheyenne Super K20 Long Step side tilt, tach, tow hooks, AC, 350 4 speed 1972 C10 Suburban Custom Deluxe 1969 Chevy milk truck 1971 Camaro RS 5.3 BTR STG3 Cam Super T10 1940 Ford 354 Hemi 46RH Ford 9" on air ride huge project Tired of spark plugs? Check this out. Last edited by Dieselwrencher; 02-15-2010 at 05:21 PM. |
|
|

|
|
|
#177 | |
|
GEARHEAD
Join Date: Aug 2003
Location: MN
Posts: 6,126
|
Re: Over 25 Years Later, Finally My 71 C-10 Truck Build
Quote:
Anyway, good or bad, here are the pics. Criticism I can take. Try to be helpful if you can. I just want to know what I did wrong, what I did right, what I need to do next. 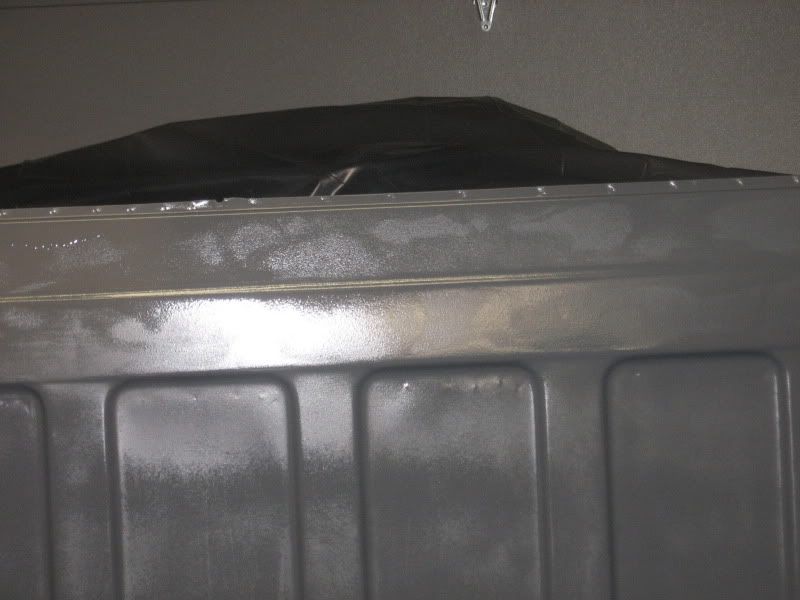 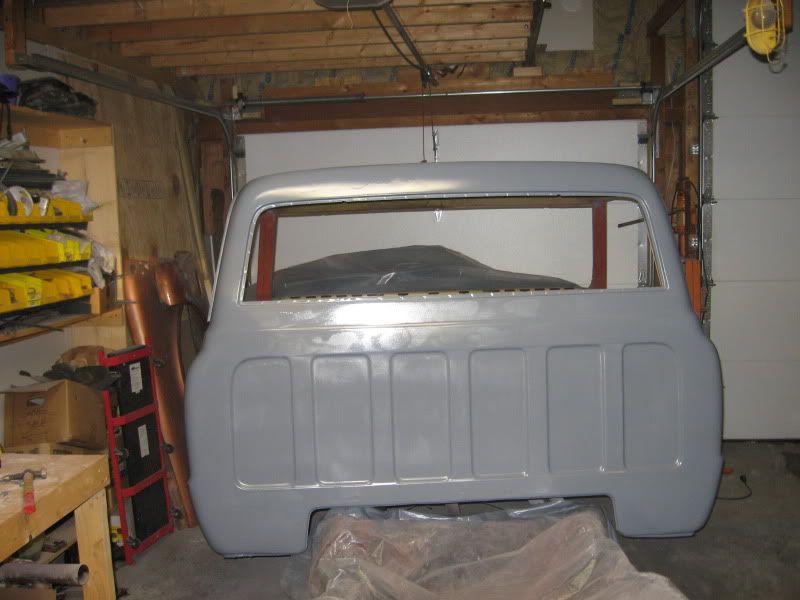 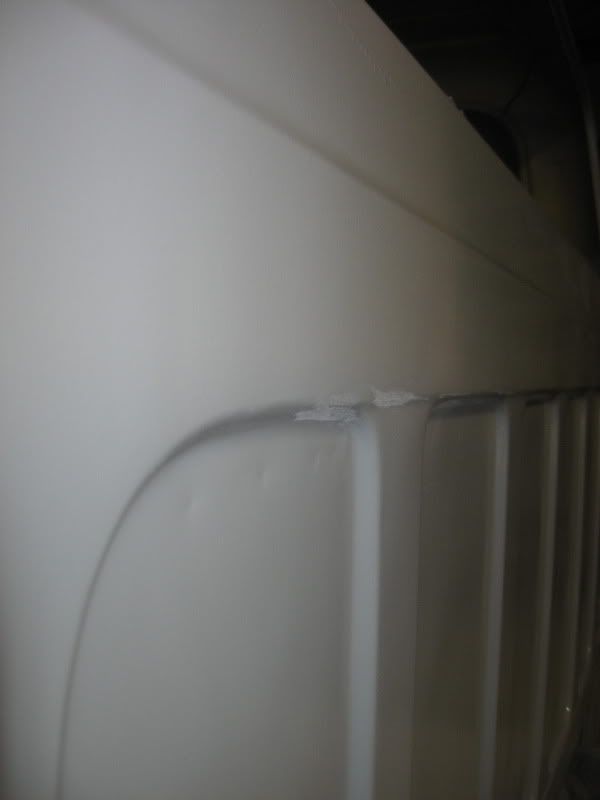 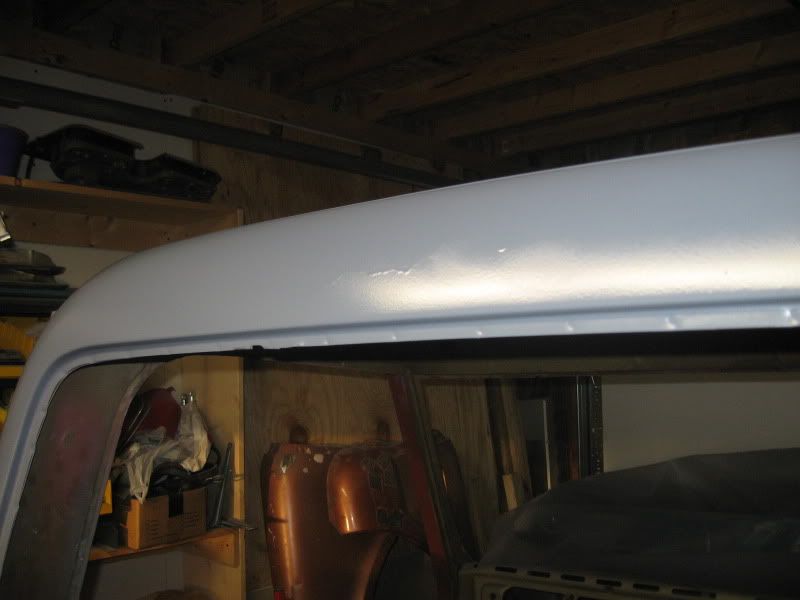 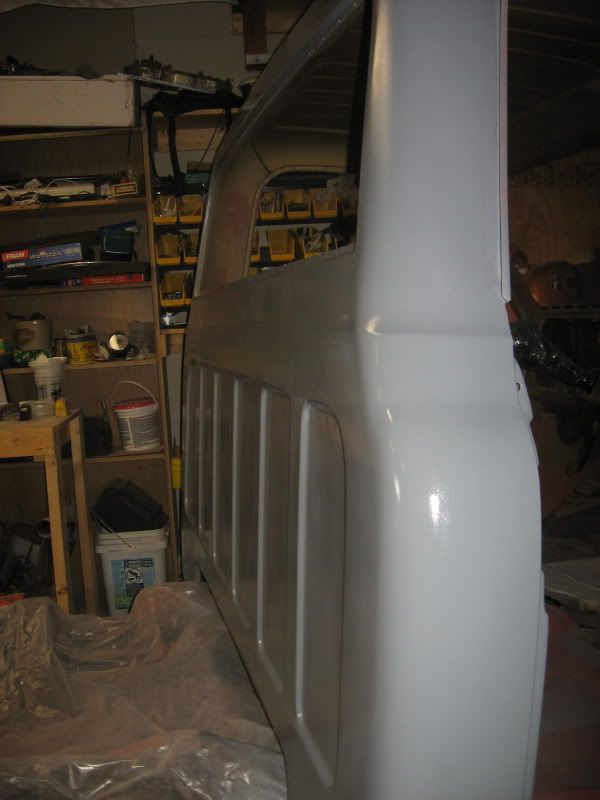 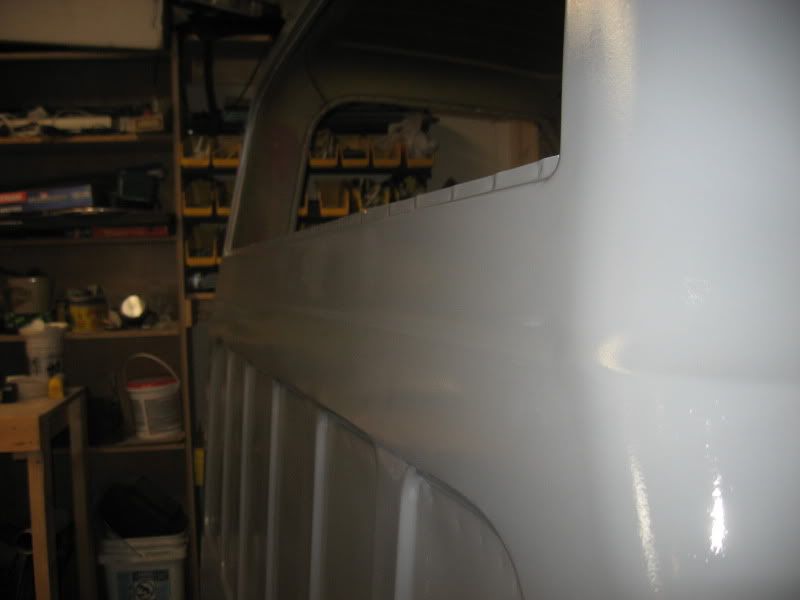 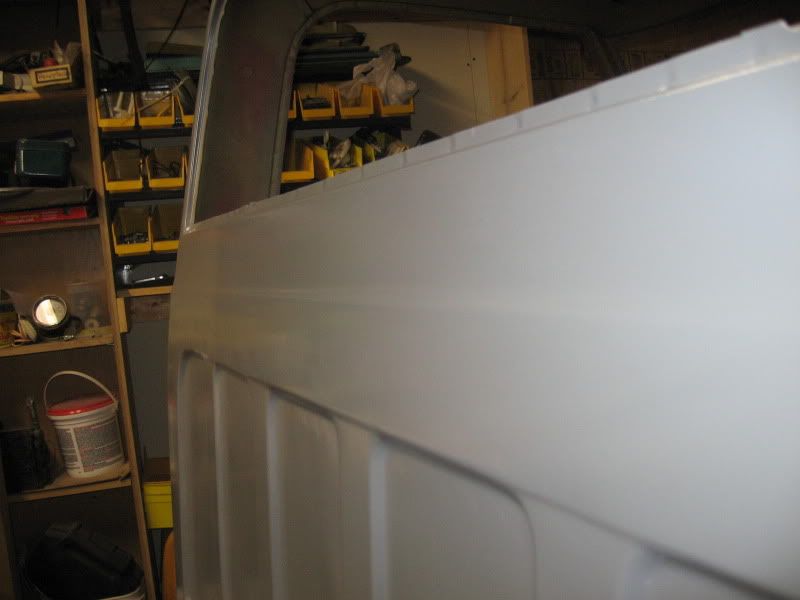 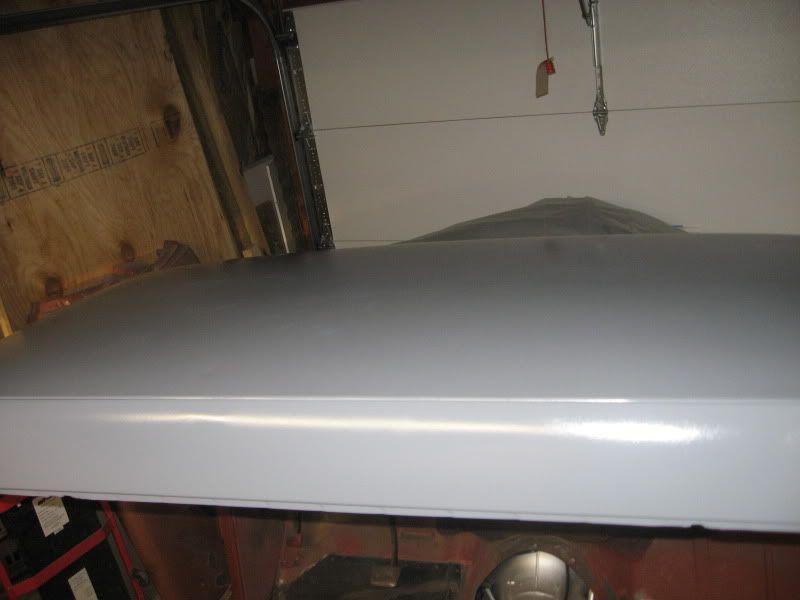
__________________
If no one knows what you're doing, they can't tell you you're doing it wrong HG's Dream Car Build - Shelby Cobra Kit Build your own adjustable track bar 71  Long Fleet C/10 Long Fleet C/10 72  Jimmy 4x4 (Junkyard Jimmy) Jimmy 4x4 (Junkyard Jimmy)HG's Plow Truck '78  K35 Dually K35 DuallyBigass Farm Truck HG's thread of miscellaneous stuff |
|
|
|

|
|
|
#178 |
|
Registered User
Join Date: Jun 2007
Location: Saskatoon, Saskatchewan,:
Posts: 2,901
|
Re: Over 25 Years Later, Finally My 71 C-10 Truck Build
Hello, well i just got back from Edmonton and checked in with you, Looks good, but i got a couple questions first. well, my first question is, how big is the tip of your spraygun? It looks a little dry, heavier coats and open up your fluid volume some. How many coats did you put on? How thivk were your coats? either way, it has COLOR! Now let it dry, sand it down and reprime it. Good job!!!
__________________
James 1968 GMC "HAVOC" 1986 GMC "Frank" J.J.R.H. Design & Consulting My 68`Rebuild "HAVOC": http://67-72chevytrucks.com/vboard/s...d.php?t=316300 A 58' chev build thread: http://www.67-72chevytrucks.com/vboa...d.php?t=311238 1969 Camaro Pro Touring http://67-72chevytrucks.com/vboard/s...61#post3513361 Swiss Cheese: http://67-72chevytrucks.com/vboard/s...d.php?t=384390 Adjustable Trailing Arm How-To: http://67-72chevytrucks.com/vboard/s...d.php?t=321100 1968 Ford Farm Truck: http://67-72chevytrucks.com/vboard/s...=1#post6555587 |
|
|

|
|
|
#179 |
|
GEARHEAD
Join Date: Aug 2003
Location: MN
Posts: 6,126
|
Re: Over 25 Years Later, Finally My 71 C-10 Truck Build
So it looks ok then for a single coat?
I have a 1.8 tip I think. I wasn't sure how much reducer to use so ended up doing a 8:4:1 mix with the reducer and hardener. It seemed real thin. I should probably use less reducer next time. I was changing my distance a bit and need to stay more consistent with that. To do the top and back of the cab I had 1 cup of primer, plus the reducer and hardener. I don't know how to tell how thick it is.
__________________
If no one knows what you're doing, they can't tell you you're doing it wrong HG's Dream Car Build - Shelby Cobra Kit Build your own adjustable track bar 71  Long Fleet C/10 Long Fleet C/10 72  Jimmy 4x4 (Junkyard Jimmy) Jimmy 4x4 (Junkyard Jimmy)HG's Plow Truck '78  K35 Dually K35 DuallyBigass Farm Truck HG's thread of miscellaneous stuff |
|
|

|
|
|
#180 |
|
Still Learning
Join Date: Jul 2009
Location: Central Oklahoma
Posts: 10,108
|
Re: Over 25 Years Later, Finally My 71 C-10 Truck Build
Looks real good to me. You should be able to tell how your body work turned out now for sure. You might want to let it dry a little then start sanding. Don't sweat the runs, thats the only way to learn how to use the gun. Keep it up!
|
|
|

|
|
|
#181 |
|
GEARHEAD
Join Date: Aug 2003
Location: MN
Posts: 6,126
|
Re: Over 25 Years Later, Finally My 71 C-10 Truck Build
Thanks. No worries on the runs from me. No sanding yet either. I have a couple things I want to smooth out, and then I'm going to finish the prep of the inside of the cab. I already scuffed with a scotch pad on most of it, but it needs some sanding done in a few areas. Then I'll mix up another batch of primer for the inside and another coat on the back.
__________________
If no one knows what you're doing, they can't tell you you're doing it wrong HG's Dream Car Build - Shelby Cobra Kit Build your own adjustable track bar 71  Long Fleet C/10 Long Fleet C/10 72  Jimmy 4x4 (Junkyard Jimmy) Jimmy 4x4 (Junkyard Jimmy)HG's Plow Truck '78  K35 Dually K35 DuallyBigass Farm Truck HG's thread of miscellaneous stuff |
|
|

|
|
|
#182 |
|
GEARHEAD
Join Date: Aug 2003
Location: MN
Posts: 6,126
|
Re: Over 25 Years Later, Finally My 71 C-10 Truck Build
Met a guy yesterday that was a master body tech. He answered some questions I had, gave me a couple tips and said to call him if I had any more questions. I'm getting my confidence built back up now with encouragement here and elsewhere.
Went out to the garage today and scuffed/sanded the inside of the cab. Sanded a couple spots on the back that I missed before. I have a short work day tomorrow and plan on trying out more primer. I want to shoot the inside and put a second coat on the back and top. That epoxy primer sands like crap BTW. It clogs up the paper almost immediately. Anyone have any tips for that?
__________________
If no one knows what you're doing, they can't tell you you're doing it wrong HG's Dream Car Build - Shelby Cobra Kit Build your own adjustable track bar 71  Long Fleet C/10 Long Fleet C/10 72  Jimmy 4x4 (Junkyard Jimmy) Jimmy 4x4 (Junkyard Jimmy)HG's Plow Truck '78  K35 Dually K35 DuallyBigass Farm Truck HG's thread of miscellaneous stuff Last edited by hgs_notes; 02-18-2010 at 02:08 AM. |
|
|

|
|
|
#183 |
|
GEARHEAD
Join Date: Aug 2003
Location: MN
Posts: 6,126
|
Re: Over 25 Years Later, Finally My 71 C-10 Truck Build
As planned, more spraying today. I changed the mix up a little to 8:2:1 paint/reducer/hardener and not sure I like it. It was easy enough to control, the pattern seemed ok, no runs, but the texture wasn't good. Looks like orange peel. If I increased the paint it got worse, so I dialed it back down and the droplets were smaller. Added more air and it got better, I think the thinner mix flowed much better. Maybe I'll try 8:3:1 next time and see if I like it better.
Using an HVLP gun is hard for overhead work. Doing the inside cab roof kinda sucked. Might be easier with a smaller cup size. Pretty much got the inside done except the floor. Recoated the back and top. Other than the orange peel texture, I think it turned out good. No sign of the filler spots either. It looks much better. 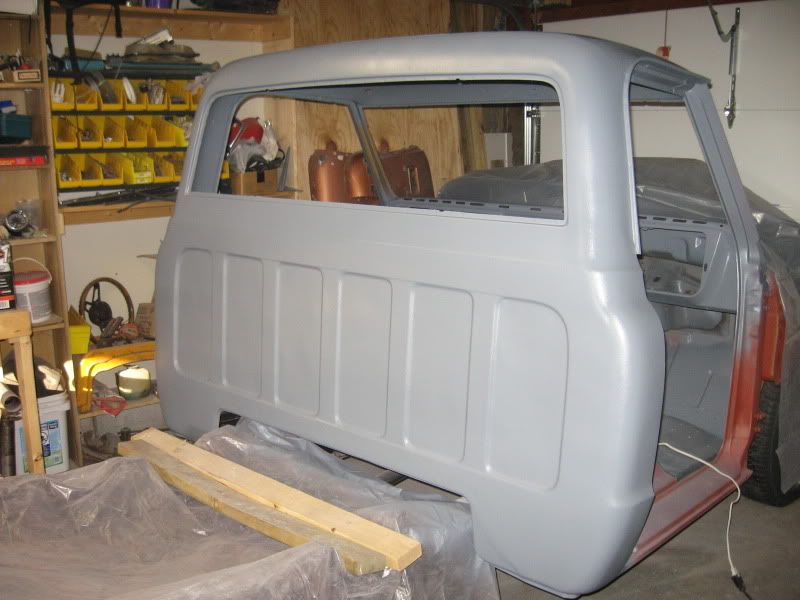 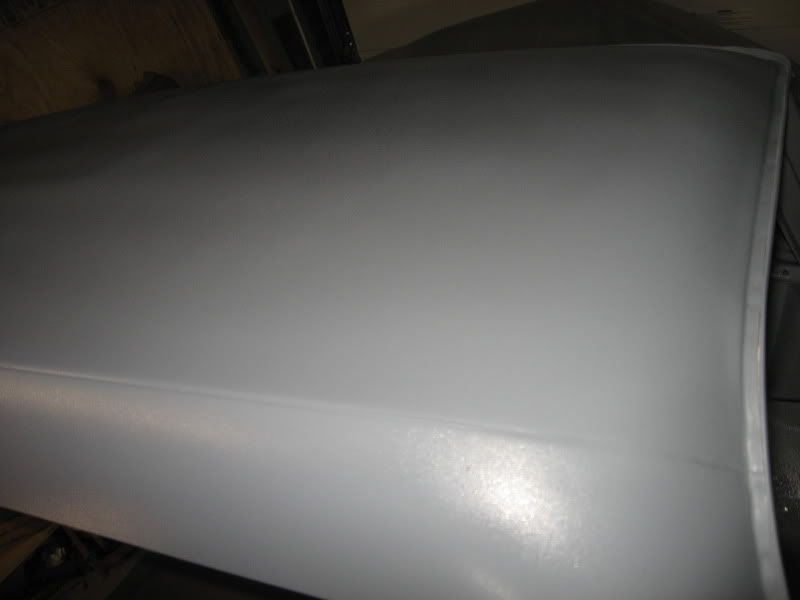 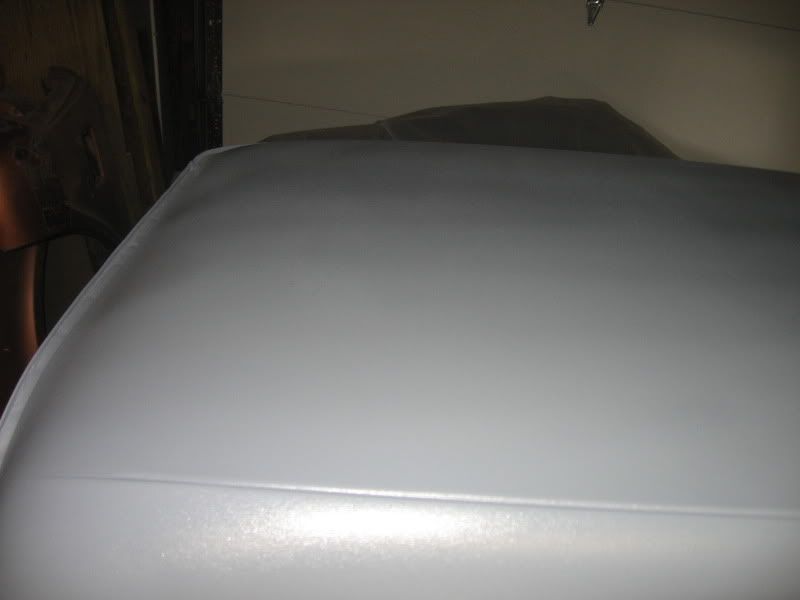 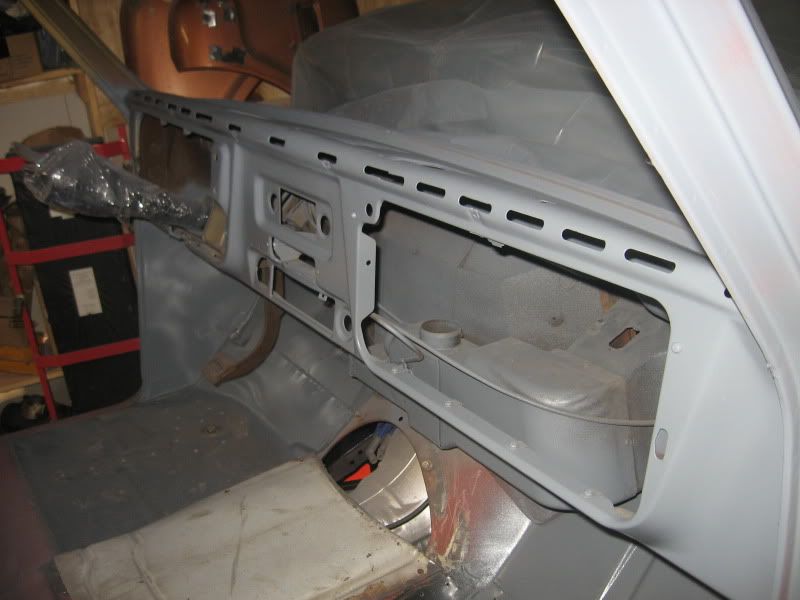 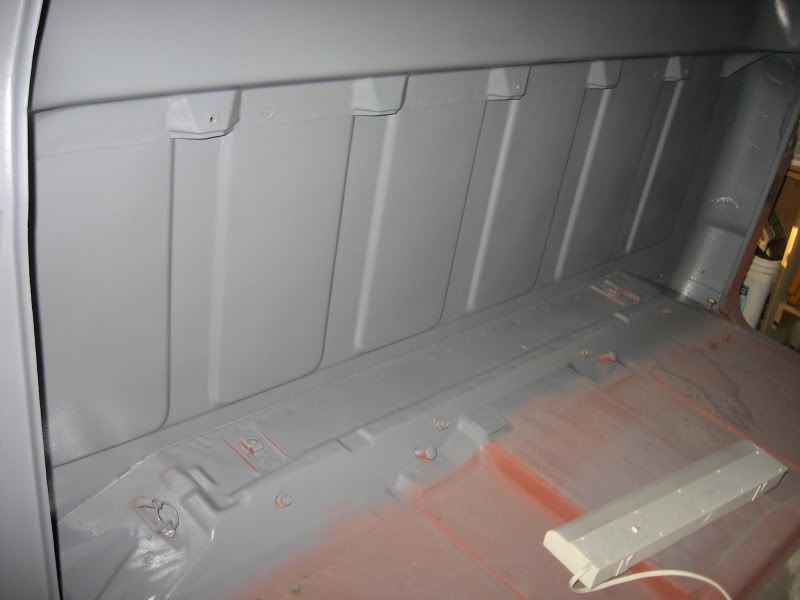 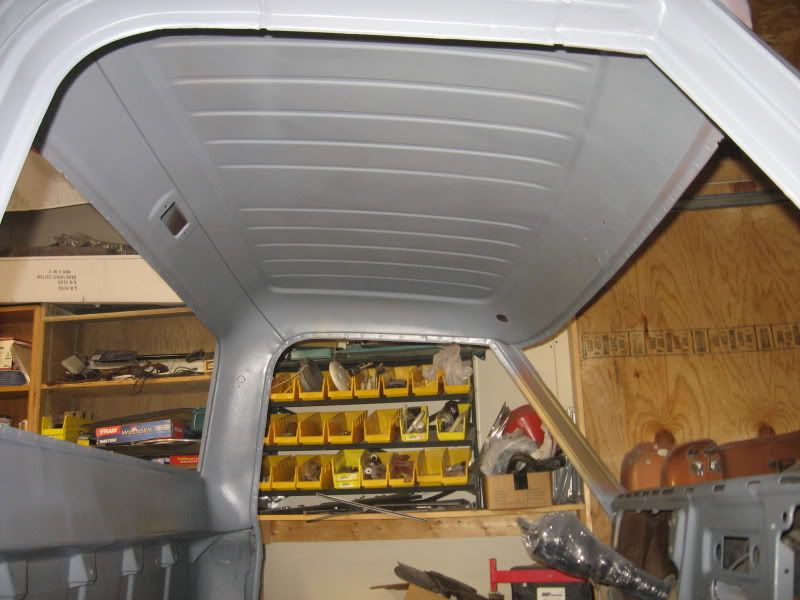 Might be able to see the texture more in this one. 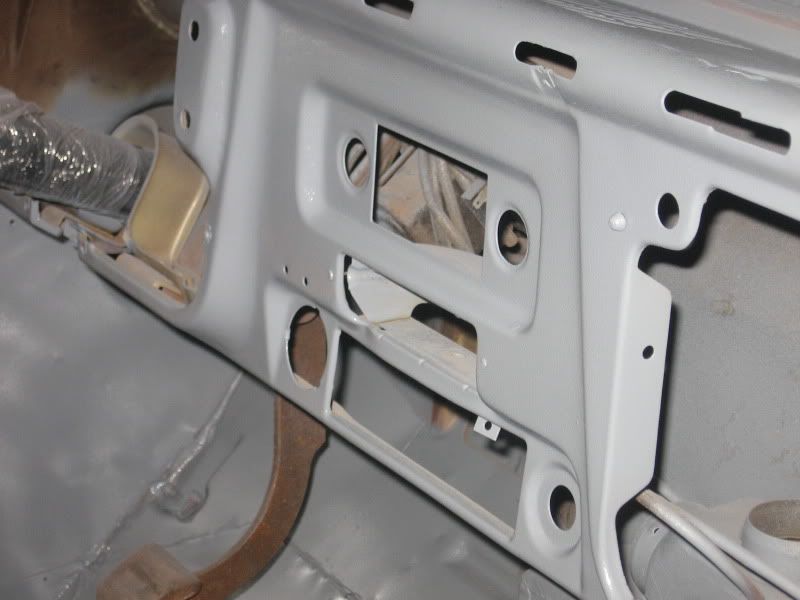 It might look smoother after it dries and shrinks too. I'm not really worried because there is more primer and blocking to do, just stating what I'm seeing.
__________________
If no one knows what you're doing, they can't tell you you're doing it wrong HG's Dream Car Build - Shelby Cobra Kit Build your own adjustable track bar 71  Long Fleet C/10 Long Fleet C/10 72  Jimmy 4x4 (Junkyard Jimmy) Jimmy 4x4 (Junkyard Jimmy)HG's Plow Truck '78  K35 Dually K35 DuallyBigass Farm Truck HG's thread of miscellaneous stuff |
|
|

|
|
|
#184 |
|
GEARHEAD
Join Date: Aug 2003
Location: MN
Posts: 6,126
|
Re: Over 25 Years Later, Finally My 71 C-10 Truck Build
Hmmm, you can actually see the texture more in the pics of the roof. Overall, I'm happy with it.
Time to get it turned around and work on the firewall I guess. I hate to set dates on myself, but I might be able to finish the cab yet this month.
__________________
If no one knows what you're doing, they can't tell you you're doing it wrong HG's Dream Car Build - Shelby Cobra Kit Build your own adjustable track bar 71  Long Fleet C/10 Long Fleet C/10 72  Jimmy 4x4 (Junkyard Jimmy) Jimmy 4x4 (Junkyard Jimmy)HG's Plow Truck '78  K35 Dually K35 DuallyBigass Farm Truck HG's thread of miscellaneous stuff |
|
|

|
|
|
#185 |
|
6>8 Plugless........
 Join Date: Sep 2007
Location: Prairie City, Ia
Posts: 17,142
|
Re: Over 25 Years Later, Finally My 71 C-10 Truck Build
It is looking really nice. You might be discouraged due to the texture appearance. But atleast you are learning and figuring out your gun. Atleast it is primer and not paint. No big deal on the primer since you know it will need sanded again to get to your end result. Keep up the great work!
__________________
Ryan 1972 Chevy Longhorn K30 Cheyenne Super, 359 Inline 6 cylinder, Auto Trans, Tilt, Diesel Tach/Vach, Buckets, Rare Rear 4-link and air ride option Build Thread 1972 GMC Sierra Grande Longhorn 4x4 1972 Chevy Cheyenne Super K20 Long Step side tilt, tach, tow hooks, AC, 350 4 speed 1972 C10 Suburban Custom Deluxe 1969 Chevy milk truck 1971 Camaro RS 5.3 BTR STG3 Cam Super T10 1940 Ford 354 Hemi 46RH Ford 9" on air ride huge project Tired of spark plugs? Check this out. |
|
|

|
|
|
#186 |
|
GEARHEAD
Join Date: Aug 2003
Location: MN
Posts: 6,126
|
Re: Over 25 Years Later, Finally My 71 C-10 Truck Build
Got some more garage time today. I found out I can turn the truck around inside the garage using my floor jack. Better light and more room to work this way. Cleaned up a dent on the firewall. Didn't spend too much time on it because I'm not doing anything special under the hood. I had a couple dings on the top side of the rockers, so I got those cleaned up a bit. I mixed up too much filler so pulled out one of the fenders and started getting it straightened out. It will definitely need more work, but I got started and made use of the filler rather than tossing it out. I also tried putting seam sealer in the rain gutter, but I'm not sure I did it right. I might have to clean it out and try again.
Before, with the half inch of filler:  After with maybe 1/8" filler: 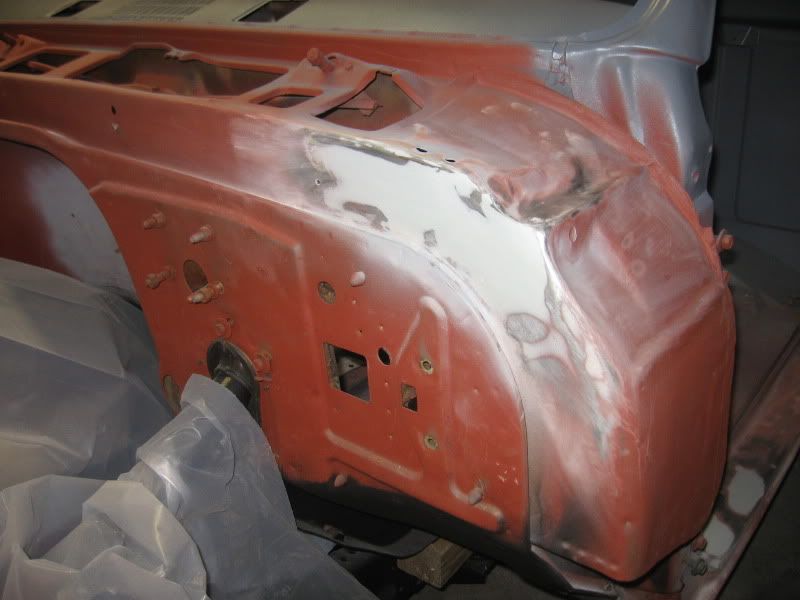 Rockers: 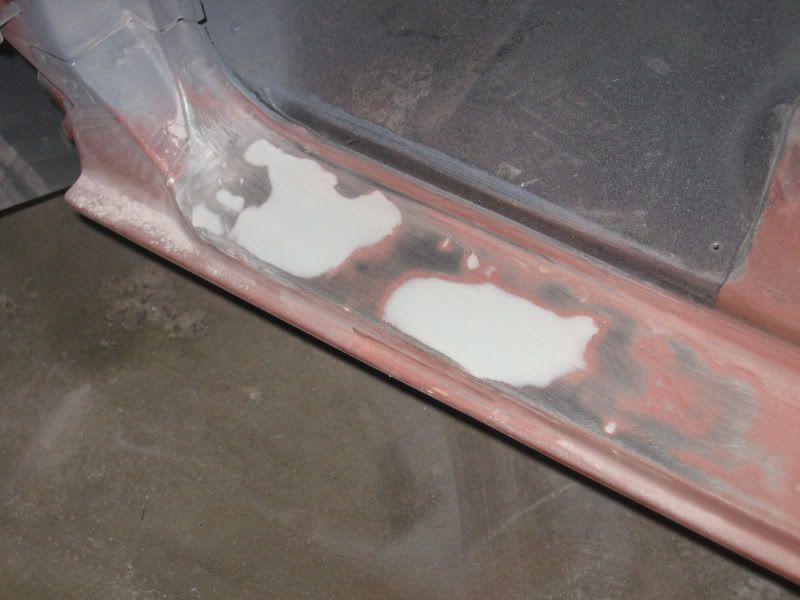 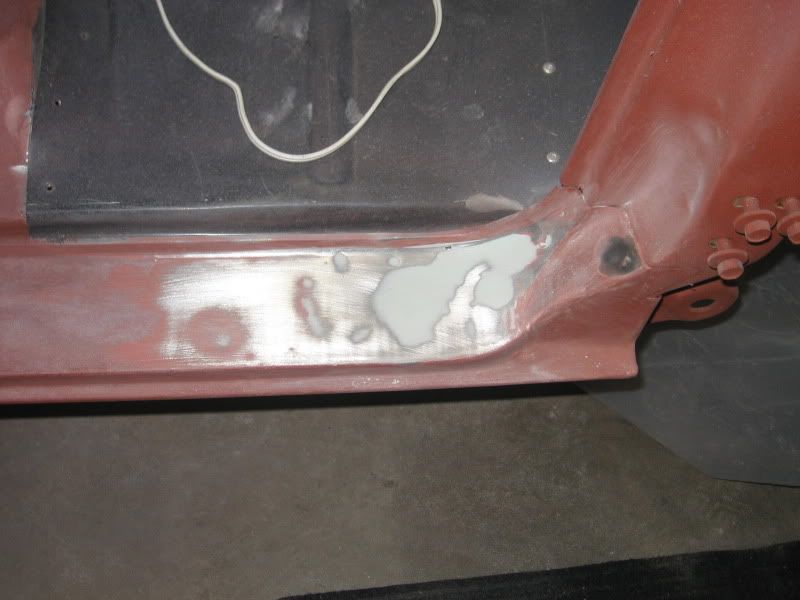 fender 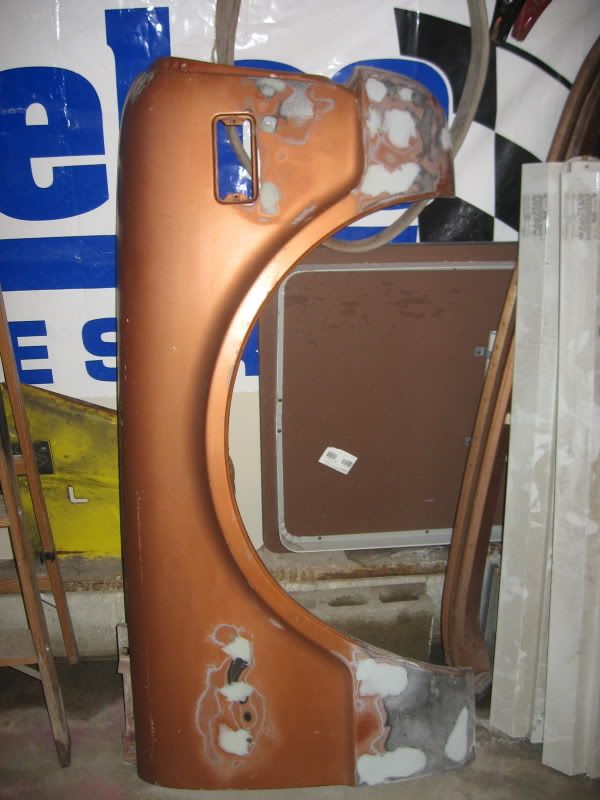 seam sealer 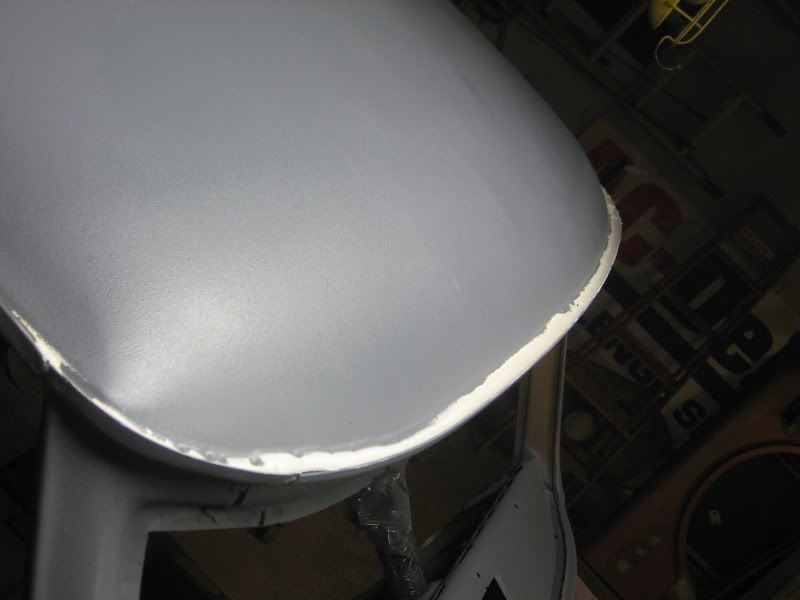
__________________
If no one knows what you're doing, they can't tell you you're doing it wrong HG's Dream Car Build - Shelby Cobra Kit Build your own adjustable track bar 71  Long Fleet C/10 Long Fleet C/10 72  Jimmy 4x4 (Junkyard Jimmy) Jimmy 4x4 (Junkyard Jimmy)HG's Plow Truck '78  K35 Dually K35 DuallyBigass Farm Truck HG's thread of miscellaneous stuff |
|
|

|
|
|
#187 |
|
GEARHEAD
Join Date: Aug 2003
Location: MN
Posts: 6,126
|
Re: Over 25 Years Later, Finally My 71 C-10 Truck Build
I spent almost the entire day in the garage and barely touched the truck. The mess was just getting too hard to work around and something needed to be done about it. I added another light, which is really helping with the body work. I cleaned up the work benches, got a pile of stuff off my parts washer, rearranged things and made it cleaner than it's been in years.
I even ran my little MIG welder on some exhaust pipe I had around. It's set up with flux core right now and the spatter is really bad. I'd never consider it for body work. I have a gas set up, but no bottle. I really don't have much welding work that needs to be done on this vehicle, but if I do the blazers I might get the bottle and try it out again. Work should be fairly light tomorrow, giving me some time to get back on the truck. There are a few small holes in the firewall I want to clean up. I need to get the gas peddle from the original cab and get it in. I might work more on the fenders since they are sitting there waiting, but might bring a door over from the storage garage and get started on that. Probably no more spraying until next weekend. The pic of todays progress...You should have seen it before... 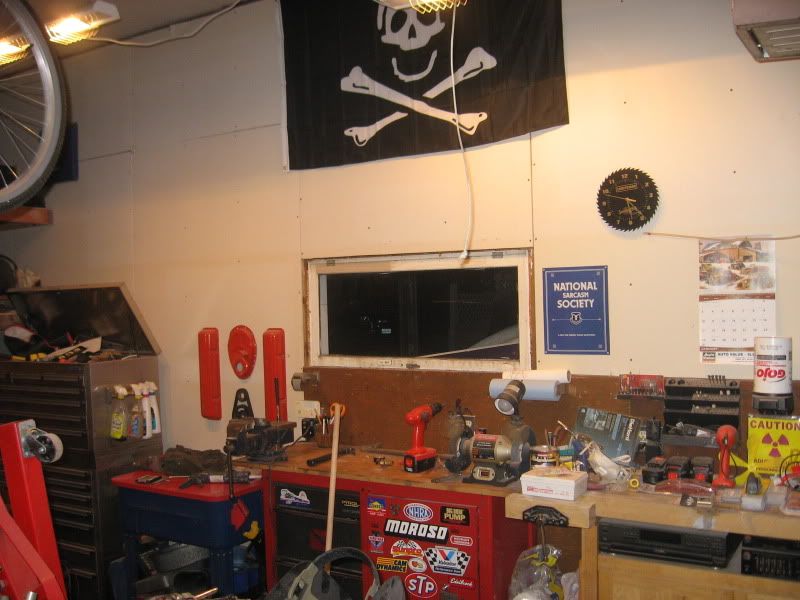
__________________
If no one knows what you're doing, they can't tell you you're doing it wrong HG's Dream Car Build - Shelby Cobra Kit Build your own adjustable track bar 71  Long Fleet C/10 Long Fleet C/10 72  Jimmy 4x4 (Junkyard Jimmy) Jimmy 4x4 (Junkyard Jimmy)HG's Plow Truck '78  K35 Dually K35 DuallyBigass Farm Truck HG's thread of miscellaneous stuff |
|
|

|
|
|
#188 |
|
Registered User
Join Date: Jun 2007
Location: Saskatoon, Saskatchewan,:
Posts: 2,901
|
Re: Over 25 Years Later, Finally My 71 C-10 Truck Build
Ok, well I sure wish i could see your pics at work today, but otherwise , congrats on getting more done and learning the gun, once you get use to it, it will be fine. As for the garage, everyone needs to clean up, i know it bothers me too some days.
__________________
James 1968 GMC "HAVOC" 1986 GMC "Frank" J.J.R.H. Design & Consulting My 68`Rebuild "HAVOC": http://67-72chevytrucks.com/vboard/s...d.php?t=316300 A 58' chev build thread: http://www.67-72chevytrucks.com/vboa...d.php?t=311238 1969 Camaro Pro Touring http://67-72chevytrucks.com/vboard/s...61#post3513361 Swiss Cheese: http://67-72chevytrucks.com/vboard/s...d.php?t=384390 Adjustable Trailing Arm How-To: http://67-72chevytrucks.com/vboard/s...d.php?t=321100 1968 Ford Farm Truck: http://67-72chevytrucks.com/vboard/s...=1#post6555587 |
|
|

|
|
|
#189 |
|
Registered User
Join Date: Jun 2007
Location: Saskatoon, Saskatchewan,:
Posts: 2,901
|
Re: Over 25 Years Later, Finally My 71 C-10 Truck Build
Ok, now that i am at home and can look at the pics, One helpful hint for the day, The seam sealer, use masking tape to make the line that you want to go around the cab with. On the inside edge and on the outside drip rail so none gets on it. Place your seamsealer and use some rubber gloves, or your finger. Next depending on the type of seam sealer, either wet your fingers with water or thinner, reducer and run your fingers along the seam sealer, just like when you do a bath tub surround. TRhis will give you a nice flowing look and then take the masking tape off right away, DO NOT let it sit there and let the sealer harder, will never look right or lay down right. Nite.
Good luck, and it is definetly coming along. James
__________________
James 1968 GMC "HAVOC" 1986 GMC "Frank" J.J.R.H. Design & Consulting My 68`Rebuild "HAVOC": http://67-72chevytrucks.com/vboard/s...d.php?t=316300 A 58' chev build thread: http://www.67-72chevytrucks.com/vboa...d.php?t=311238 1969 Camaro Pro Touring http://67-72chevytrucks.com/vboard/s...61#post3513361 Swiss Cheese: http://67-72chevytrucks.com/vboard/s...d.php?t=384390 Adjustable Trailing Arm How-To: http://67-72chevytrucks.com/vboard/s...d.php?t=321100 1968 Ford Farm Truck: http://67-72chevytrucks.com/vboard/s...=1#post6555587 |
|
|

|
|
|
#190 | |
|
GEARHEAD
Join Date: Aug 2003
Location: MN
Posts: 6,126
|
Re: Over 25 Years Later, Finally My 71 C-10 Truck Build
Quote:
__________________
If no one knows what you're doing, they can't tell you you're doing it wrong HG's Dream Car Build - Shelby Cobra Kit Build your own adjustable track bar 71  Long Fleet C/10 Long Fleet C/10 72  Jimmy 4x4 (Junkyard Jimmy) Jimmy 4x4 (Junkyard Jimmy)HG's Plow Truck '78  K35 Dually K35 DuallyBigass Farm Truck HG's thread of miscellaneous stuff |
|
|
|

|
|
|
#191 | |
|
PITbut
Join Date: Sep 2007
Location: monroe washington
Posts: 3,052
|
Re: Over 25 Years Later, Finally My 71 C-10 Truck Build
Quote:
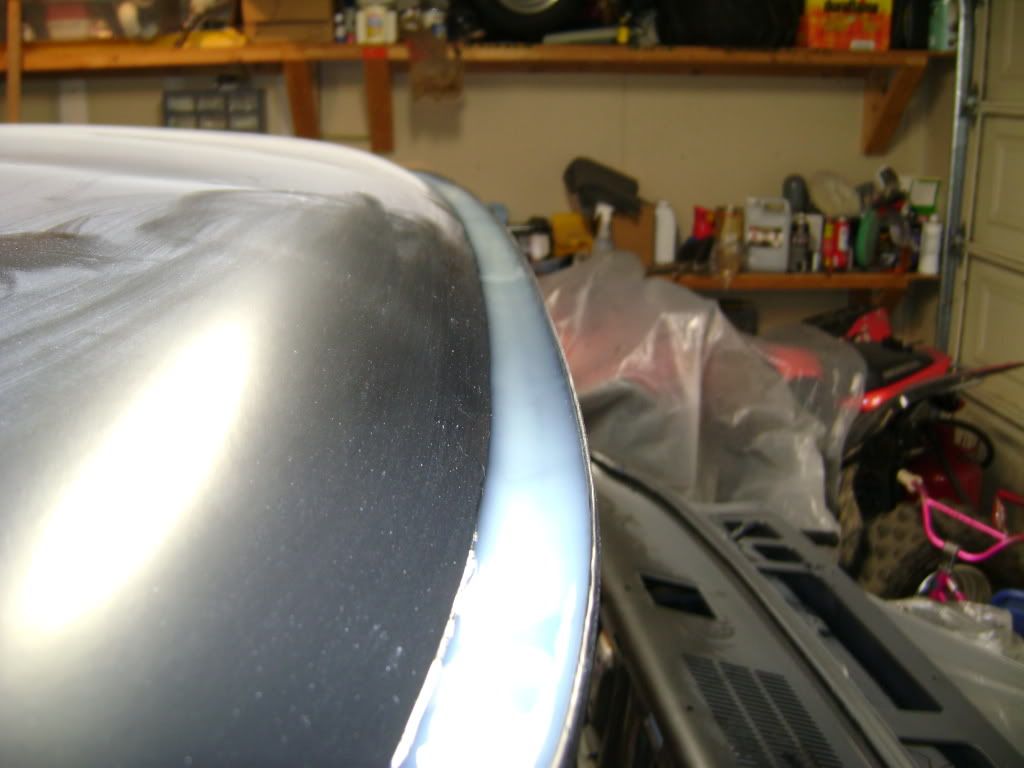 Sits flat like glass. ONLY issue is where it goes down the back. You have to dam it, then when it dries you add caulk to the back...
__________________
New project. 1971 Twin Turbo blazer http://67-72chevytrucks.com/vboard/s...d.php?t=676047 My new YOUTUBE channel.. Videos of my truck and a current walk around. Lyrikz74 Youtube channel DONE! SOLD!  My 1971 stepside build thread My Build Thread UPDATED 6/11. DONE and sold. Last edited by lyrikz; 02-23-2010 at 12:42 AM. |
|
|
|

|
|
|
#192 |
|
Registered User
Join Date: Jun 2007
Location: Saskatoon, Saskatchewan,:
Posts: 2,901
|
Re: Over 25 Years Later, Finally My 71 C-10 Truck Build
I Have used this stuff lots also, way better than the actuall caulking
__________________
James 1968 GMC "HAVOC" 1986 GMC "Frank" J.J.R.H. Design & Consulting My 68`Rebuild "HAVOC": http://67-72chevytrucks.com/vboard/s...d.php?t=316300 A 58' chev build thread: http://www.67-72chevytrucks.com/vboa...d.php?t=311238 1969 Camaro Pro Touring http://67-72chevytrucks.com/vboard/s...61#post3513361 Swiss Cheese: http://67-72chevytrucks.com/vboard/s...d.php?t=384390 Adjustable Trailing Arm How-To: http://67-72chevytrucks.com/vboard/s...d.php?t=321100 1968 Ford Farm Truck: http://67-72chevytrucks.com/vboard/s...=1#post6555587 |
|
|

|
|
|
#193 |
|
GEARHEAD
Join Date: Aug 2003
Location: MN
Posts: 6,126
|
Re: Over 25 Years Later, Finally My 71 C-10 Truck Build
They place where I got mine had a tube of self leveling, but just the one, and I wasn't sure if that would be enough so I got the other stuff. But after using this, I think I should have went with the self leveling. I think mine turned out ok on the vertical sections though.
__________________
If no one knows what you're doing, they can't tell you you're doing it wrong HG's Dream Car Build - Shelby Cobra Kit Build your own adjustable track bar 71  Long Fleet C/10 Long Fleet C/10 72  Jimmy 4x4 (Junkyard Jimmy) Jimmy 4x4 (Junkyard Jimmy)HG's Plow Truck '78  K35 Dually K35 DuallyBigass Farm Truck HG's thread of miscellaneous stuff |
|
|

|
|
|
#194 |
|
GEARHEAD
Join Date: Aug 2003
Location: MN
Posts: 6,126
|
Re: Over 25 Years Later, Finally My 71 C-10 Truck Build
Got a couple hours to spend in the garage, so I did a little grinding, a little cutting, a little sanding...
Started working on the driver side door. I had thought it was in pretty good shape. And on the outside it really wasn't bad. The bottom had very small rust spots, but the lower corners were not so good. I probably could have let it go, just cleaned it up real good, seal it up with some kind of rust preventer, but decided I should try and do better than that. I took off the handles, mirror, inside trim, etc. cut off the bottom outside and have to decide how I want to repair the inner part of the door. I have time to think on it, and I'll take a closer look at the other door before I do anything. It started like this: 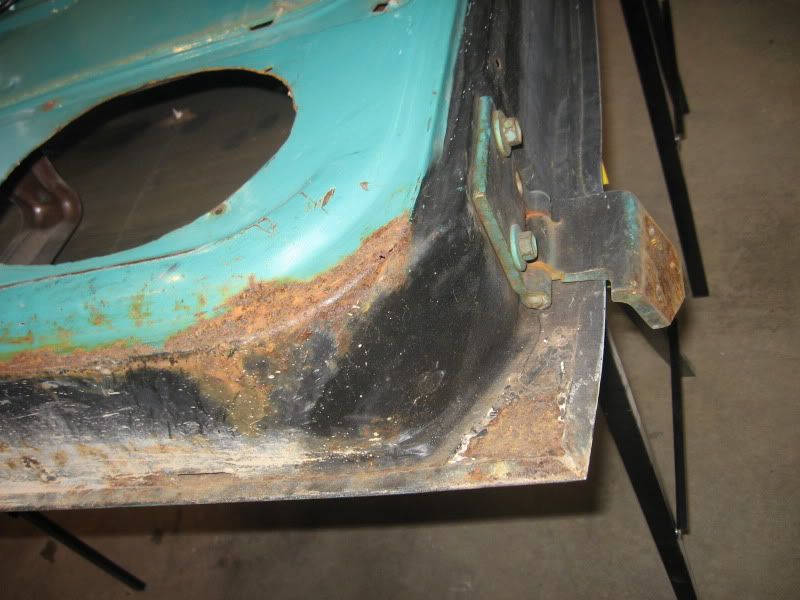 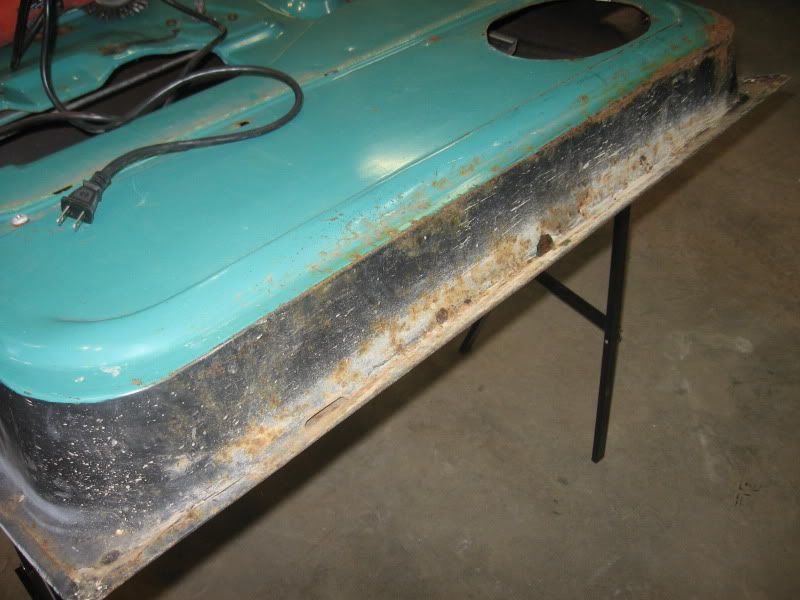 Then I cleaned it up with a wire wheel on the makita: 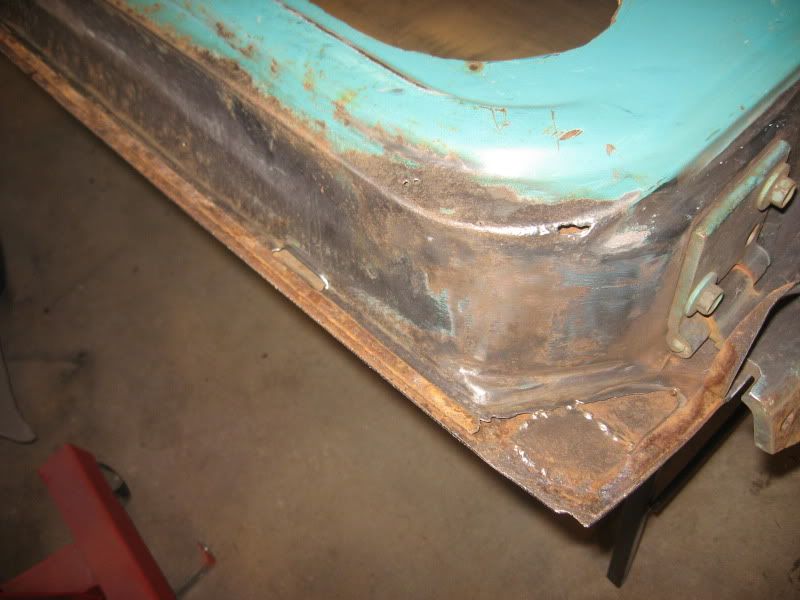 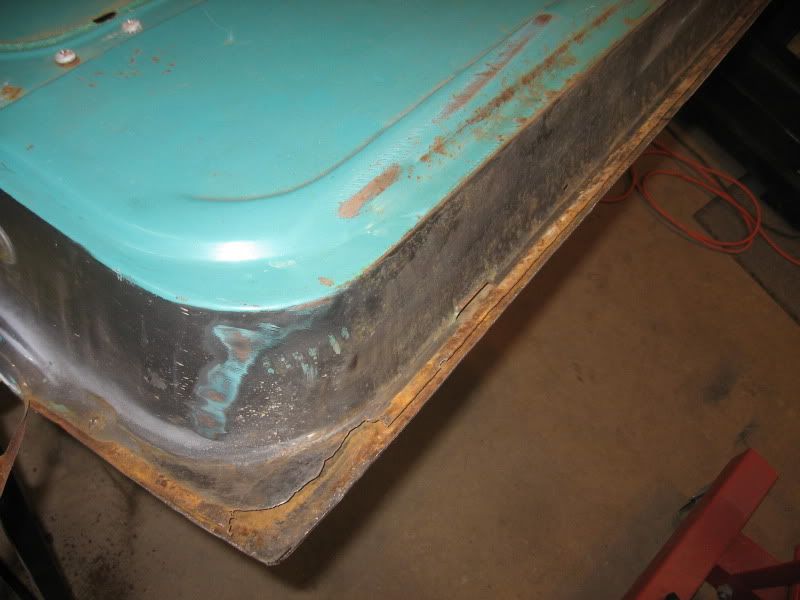 Then cut off the lower outside part: 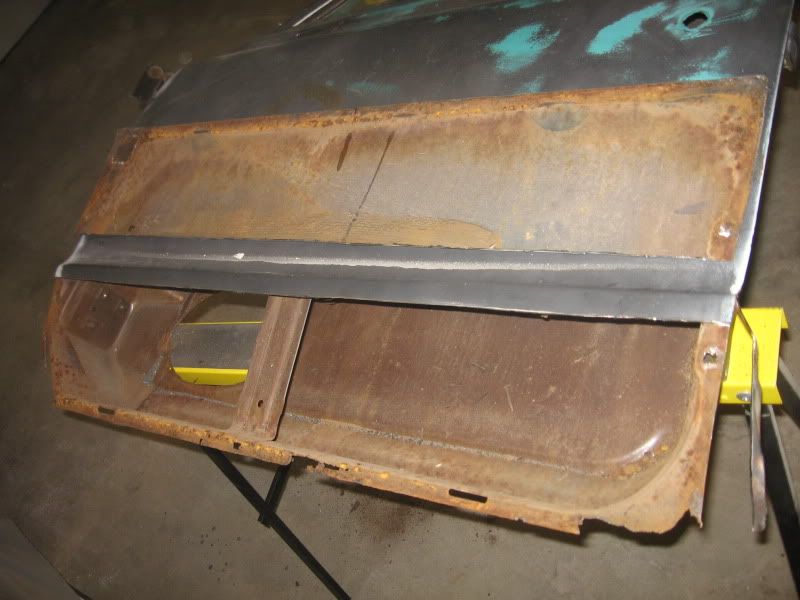 Then sanded the rest of the outside to see if anything else was hidden, it was ok. Just a few spots from where the old farm truck mirror was mounted and a small dent. Oh yeah, the lower door hinge is kinda worn too. 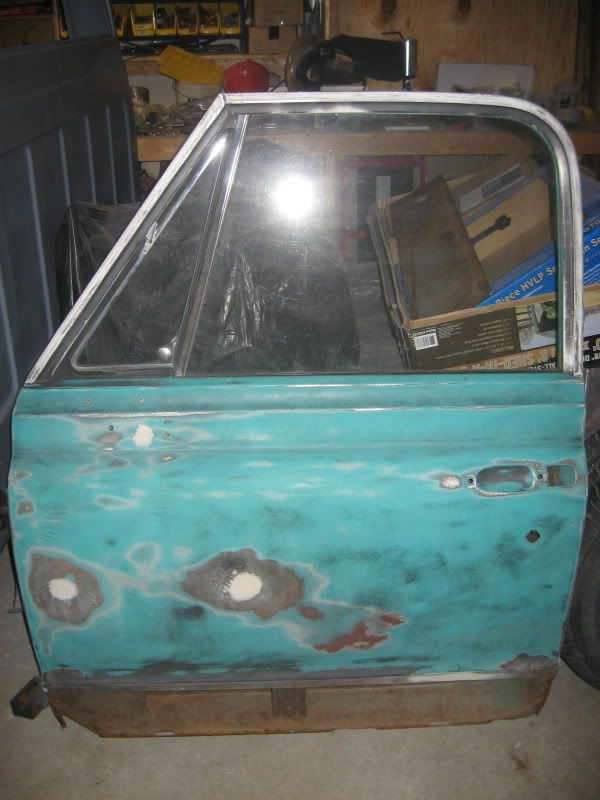 I did more sanding on the fender I started on also. Basically scuffing off the second coat of paint and found a couple small repair areas. This will be an easy panel to prep for paint I think. 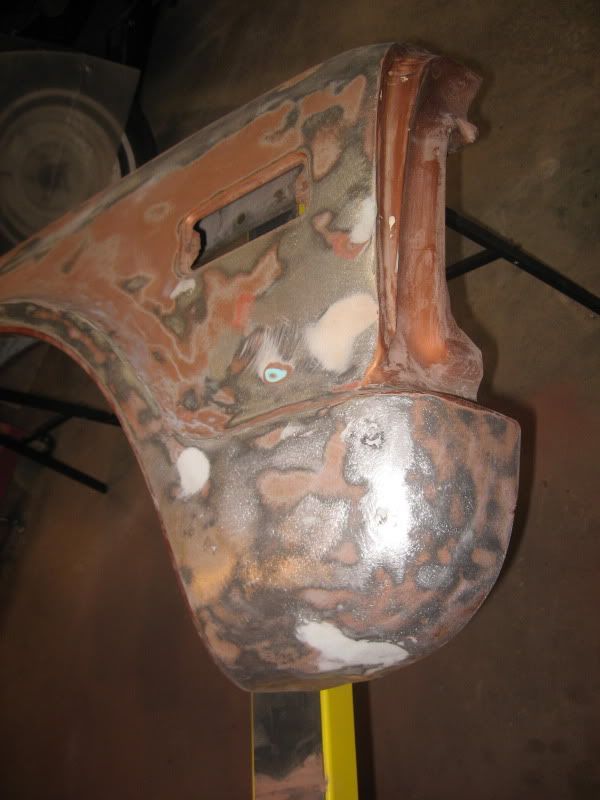  The cab isn't done yet, but I didn't really have time to mess with that tonight. I'm going to World of Wheels in St Paul tomorrow with the family.
__________________
If no one knows what you're doing, they can't tell you you're doing it wrong HG's Dream Car Build - Shelby Cobra Kit Build your own adjustable track bar 71  Long Fleet C/10 Long Fleet C/10 72  Jimmy 4x4 (Junkyard Jimmy) Jimmy 4x4 (Junkyard Jimmy)HG's Plow Truck '78  K35 Dually K35 DuallyBigass Farm Truck HG's thread of miscellaneous stuff Last edited by hgs_notes; 02-27-2010 at 12:47 AM. |
|
|

|
|
|
#195 |
|
Registered User
Join Date: Jun 2007
Location: Saskatoon, Saskatchewan,:
Posts: 2,901
|
Re: Over 25 Years Later, Finally My 71 C-10 Truck Build
Looking really good there, you know you could just put the truxck together now let is rust a but and call that perfect PATINA, J/K. Anyways keep up the good work and get those patches in there and welded up, should not be too bad at all.
__________________
James 1968 GMC "HAVOC" 1986 GMC "Frank" J.J.R.H. Design & Consulting My 68`Rebuild "HAVOC": http://67-72chevytrucks.com/vboard/s...d.php?t=316300 A 58' chev build thread: http://www.67-72chevytrucks.com/vboa...d.php?t=311238 1969 Camaro Pro Touring http://67-72chevytrucks.com/vboard/s...61#post3513361 Swiss Cheese: http://67-72chevytrucks.com/vboard/s...d.php?t=384390 Adjustable Trailing Arm How-To: http://67-72chevytrucks.com/vboard/s...d.php?t=321100 1968 Ford Farm Truck: http://67-72chevytrucks.com/vboard/s...=1#post6555587 |
|
|

|
|
|
#196 |
|
GEARHEAD
Join Date: Aug 2003
Location: MN
Posts: 6,126
|
Re: Over 25 Years Later, Finally My 71 C-10 Truck Build
I've had that "rough, well seasoned" look for many, many years. Time to make it shiny.
__________________
If no one knows what you're doing, they can't tell you you're doing it wrong HG's Dream Car Build - Shelby Cobra Kit Build your own adjustable track bar 71  Long Fleet C/10 Long Fleet C/10 72  Jimmy 4x4 (Junkyard Jimmy) Jimmy 4x4 (Junkyard Jimmy)HG's Plow Truck '78  K35 Dually K35 DuallyBigass Farm Truck HG's thread of miscellaneous stuff |
|
|

|
|
|
#197 |
|
Registered User
Join Date: Nov 2009
Location: Bend, Oregon
Posts: 169
|
Re: Over 25 Years Later, Finally My 71 C-10 Truck Build
I read in your posts that you are sanding the epoxy primer. That does suck sanding that. If you need to sand it you can wet sand it with some grease and wax remover and some wet or dry sand paper. If your going to just prime over it you could just scotchbrite it. or recoat and apply a primer over it. Keep up the good work. Scott
|
|
|

|
|
|
#198 | |
|
GEARHEAD
Join Date: Aug 2003
Location: MN
Posts: 6,126
|
Re: Over 25 Years Later, Finally My 71 C-10 Truck Build
Quote:
I didn't really plan on any welding repairs from here on out. I thought I would stick with the body adhesive where it was needed. I know it can be done, but I might find a gas bottle for my welder and give another try. The door repairs have thrown me a curve. The flux core just has too much spatter and heat to mess with on a long straight seam like the door.
__________________
If no one knows what you're doing, they can't tell you you're doing it wrong HG's Dream Car Build - Shelby Cobra Kit Build your own adjustable track bar 71  Long Fleet C/10 Long Fleet C/10 72  Jimmy 4x4 (Junkyard Jimmy) Jimmy 4x4 (Junkyard Jimmy)HG's Plow Truck '78  K35 Dually K35 DuallyBigass Farm Truck HG's thread of miscellaneous stuff Last edited by hgs_notes; 02-28-2010 at 10:40 AM. |
|
|
|

|
|
|
#199 |
|
Registered User
Join Date: Dec 2003
Location: Thomasville, NC
Posts: 1,877
|
Re: Over 25 Years Later, Finally My 71 C-10 Truck Build
Hey from N.C. looking at your progress, there alot of work you have done ,and it's looking good, keep up the hard work and pictures coming

|
|
|

|
|
|
#200 | |
|
GEARHEAD
Join Date: Aug 2003
Location: MN
Posts: 6,126
|
Re: Over 25 Years Later, Finally My 71 C-10 Truck Build
Quote:
Here is todays progress update. Got a couple more hours of filling and sanding. The firewall is ready for primer. I filled a few small screw holes, another dent by the heater fan and another layer over the driver side dent. I forgot to sand and look over the rockers to make sure they are dent free. Then a little more sanding inside the cab and finish the gutter sealant and I'll be ready to finish primering the cab. I also did more work to the fender. A little more sanding, some glazing putty and more sanding, and it will be ready for primer also. I'll probably do the other front fender next so I can primer all of that. I'll check out the other door later this week I think, and order patches as needed. 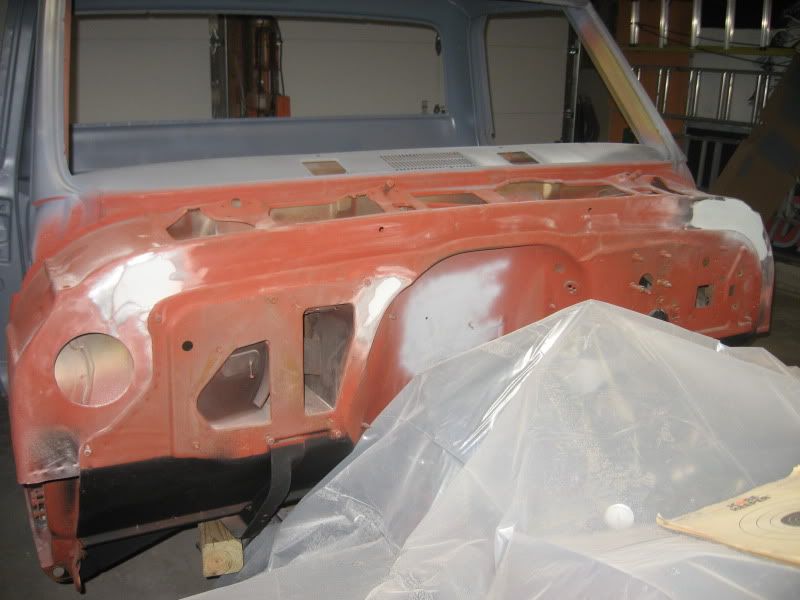 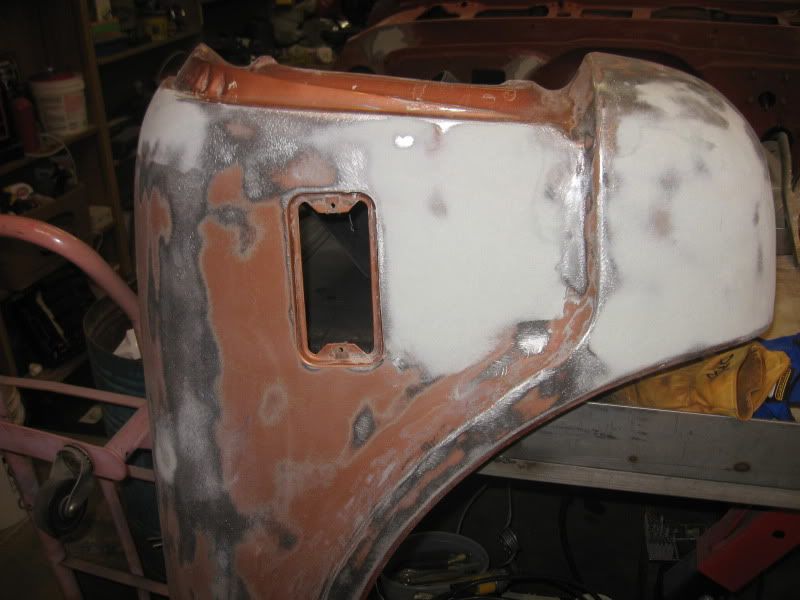 
__________________
If no one knows what you're doing, they can't tell you you're doing it wrong HG's Dream Car Build - Shelby Cobra Kit Build your own adjustable track bar 71  Long Fleet C/10 Long Fleet C/10 72  Jimmy 4x4 (Junkyard Jimmy) Jimmy 4x4 (Junkyard Jimmy)HG's Plow Truck '78  K35 Dually K35 DuallyBigass Farm Truck HG's thread of miscellaneous stuff |
|
|
|

|
 |
| Bookmarks |
| Thread Tools | |
| Display Modes | |
|
|