
 |
|
|
#201 |
|
Certified Car Nut
Join Date: Jan 2005
Location: Inglewood, California
Posts: 3,118
|
Re: Kabwe's aka Bam's build
lol. Yuck. Don't remind me. The admin emailed me and told me he removed those pics and I was like thank god. That was plain nasty. Yuck R.A.D is nutz.lol
|
|
|

|
|
|
#202 |
|
Registered User
Join Date: Oct 2009
Location: Monson,MA
Posts: 503
|
Re: Kabwe's aka Bam's build
i was sooo afraid to come back to this build thread. I didn't know if i could handle seeing that again...
whooof! I will sleep tonight. back to the truck at hand sir!!!
__________________
current project; 1950 GMC "Junk Yard Dawg" http://67-72chevytrucks.com/vboard/s...d.php?t=635960 ___________________________________________ SOLD to "ONEBADFIVEFIVE" http://67-72chevytrucks.com/vboard/s...d.php?t=436406 |
|
|

|
|
|
#203 | |
|
Registered User
Join Date: Nov 2010
Location: SoCal
Posts: 914
|
Re: Kabwe's aka Bam's build
Quote:
 Thanks for posting that bobinbc Thanks for posting that bobinbc  Attachment 704128
__________________
I'm not tail-gating, I'm drafting.  http://67-72chevytrucks.com/vboard/s...d.php?t=432758 |
|
|
|

|
|
|
#204 |
|
Account Suspended
Join Date: Aug 2010
Location: richmond ill
Posts: 376
|
|
|
|

|
|
|
#205 |
|
Certified Car Nut
Join Date: Jan 2005
Location: Inglewood, California
Posts: 3,118
|
Re: Kabwe's aka Bam's build
Oh I said I could not be easily offended, but I was not offended by those pics I was disgusted.lol
Last edited by Kabwe; 02-28-2011 at 12:09 AM. |
|
|

|
|
|
#206 |
|
Account Suspended
Join Date: Aug 2010
Location: richmond ill
Posts: 376
|
Re: Kabwe's aka Bam's build
|
|
|

|
|
|
#207 |
|
56 - autocross
Join Date: Apr 2010
Location: Camarillo, Ca
Posts: 1,121
|
Re: Kabwe's aka Bam's build
Hey Bam:
I finally can come back to your build (pictures). Can u tell us more about the steering column and size that u used and if u have any pictures of inside and the engine compartment? Did you already hook it up to the rack? I know that u had some of this info on your old build. |
|
|

|
|
|
#208 | |
|
Certified Car Nut
Join Date: Jan 2005
Location: Inglewood, California
Posts: 3,118
|
Re: Kabwe's aka Bam's build
Quote:
The brother show will be here before we know it, do you plan on going this year? I used a flaming rivers 28 inch tilt steering column. Interior 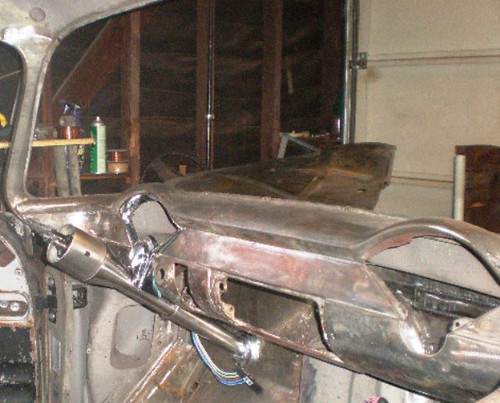 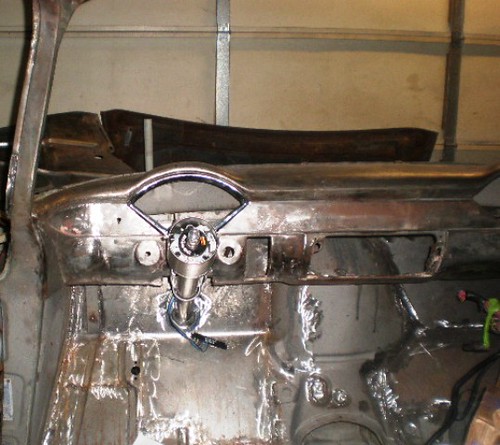 Engine compartment  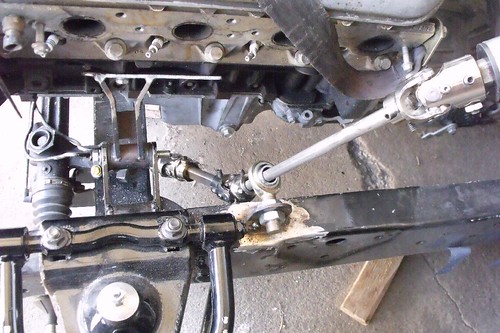 I hope that helps. Last edited by Kabwe; 03-01-2011 at 12:18 PM. |
|
|
|

|
|
|
#209 |
|
56 - autocross
Join Date: Apr 2010
Location: Camarillo, Ca
Posts: 1,121
|
Re: Kabwe's aka Bam's build
Thanks. That's exactly what I wanted to see. Beautiful work. You are Great! What an icon you are on this site. You are always looking to help people.
|
|
|

|
|
|
#210 |
|
56 - autocross
Join Date: Apr 2010
Location: Camarillo, Ca
Posts: 1,121
|
Re: Kabwe's aka Bam's build
I was curious to penetrate the firewall instead of the kickboard stock hole. To me it makes for a more "car" feel. What was you reasoning and what did you learn about this position? Did it make for a more tricky connection to the power rack? Any difficulty? Thanks
|
|
|

|
|
|
#211 | ||
|
Certified Car Nut
Join Date: Jan 2005
Location: Inglewood, California
Posts: 3,118
|
Re: Kabwe's aka Bam's build
Quote:
Quote:
Yes the steering linkage was a little more involved by coming through the firewall. Once again pick your poison.lol Last edited by Kabwe; 03-01-2011 at 04:30 PM. |
||
|
|

|
|
|
#212 |
|
Certified Car Nut
Join Date: Jan 2005
Location: Inglewood, California
Posts: 3,118
|
Re: Kabwe's aka Bam's build
Not much to report its just that after buying a flaming river column and installing the column in my truck I thought it was too long. I just did not like how far it was sticking out the firewall. I thought I could live with it but I couldn't take it anymore, so I decided to cut it up. It was much easier than I thought.
First I marked where I wanted the column to stop while it was in the truck. The tape line is where it will be cut. 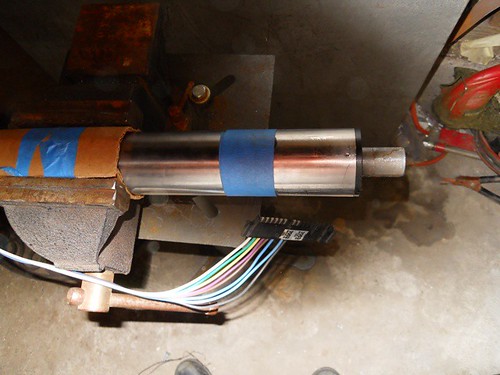 I looked down the DD end when I took it out the truck and notice that the DD goes all the way down the column oh now this is easy. The bottom bushing seems to be held in by two dimples so I drilled them out. I can get the bushing out later. 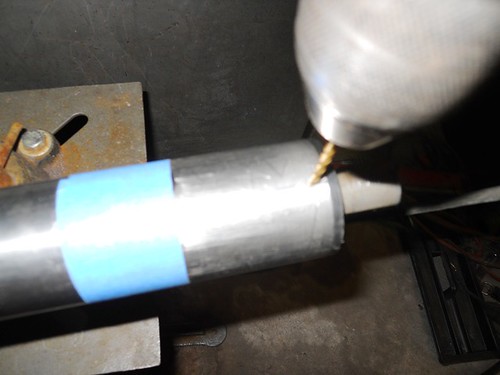 I used a cut off wheel to shorten the tube. When I mark the spot with the tape I used a square to mark the cut line all around the radius of the tube and then taped it so that my cut was square. 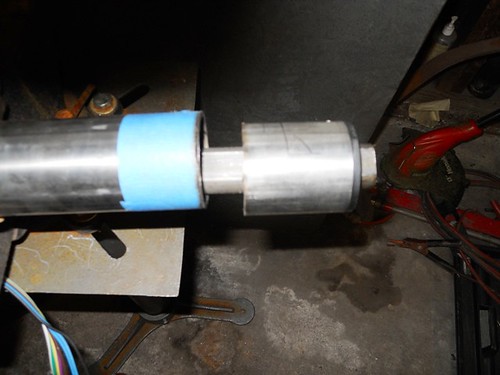 I removed the bushing using a vise and two hammers. 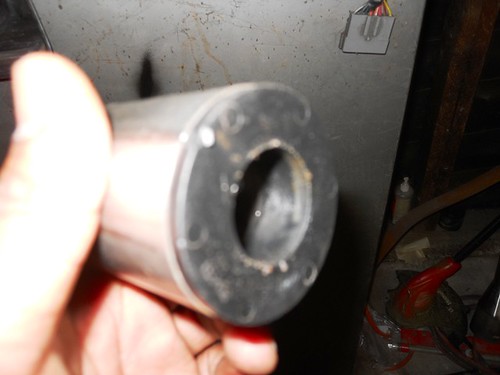 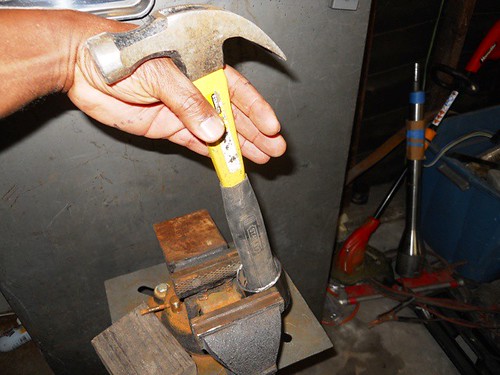 I then used a hand file to smooth the edges of the cut and install the bushing and cut the DD at the correct length and I’m done. This is easy and I thought someone may need to do the same thing so I posted it. 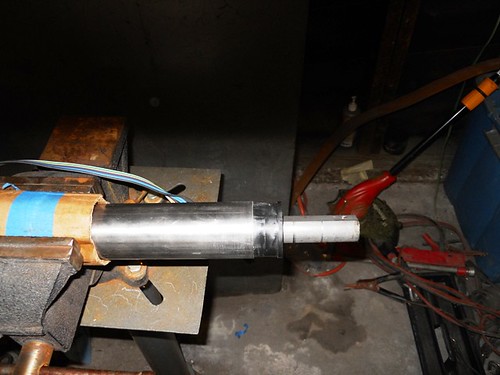 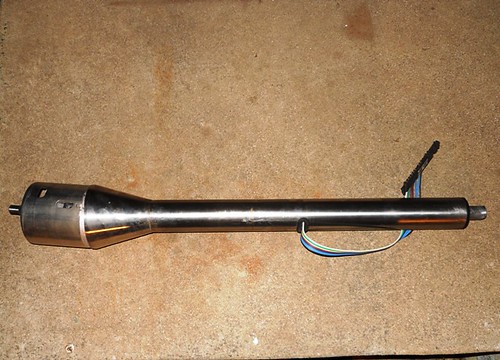 I think I like it better now. 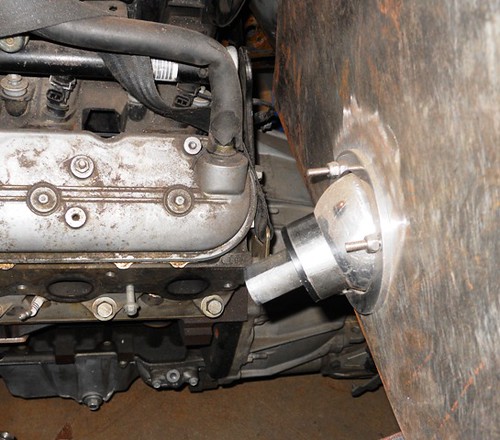 I was completely shocked at how easy this was it took all of 30 min and most of that was measuring. Last edited by Kabwe; 03-11-2011 at 02:01 AM. |
|
|

|
|
|
#213 |
|
Account Suspended
Join Date: Mar 2007
Location: san bernardino ca. everywhere
Posts: 3,938
|
Re: Kabwe's aka Bam's build
looks pretty good to me, keep up the nice work
|
|
|

|
|
|
#214 |
|
Registered User
Join Date: Jan 2007
Location: York, Pa.
Posts: 1,386
|
Re: Kabwe's aka Bam's build
Kabwe. That is the same way I just shortened the column in the truck I'm building. Excepted the Southern Rods column had 2 tubes in it besides the DD and I had to turn up a special bushing. I don't know what do if they would stop selling those .045 cut off wheels for a 4.5' angle grinder! I use them to cut alot. Look great.
Shannon |
|
|

|
|
|
#215 |
|
Senior Member
 Join Date: Nov 2008
Location: Fannystelle, Manitoba, Canada
Posts: 853
|
Re: Kabwe's aka Bam's build
Great work Kabwe.
__________________
Jean-Marc Lacasse 57 GMC 55 GMC 55 Belair 99 S10 http://67-72chevytrucks.com/vboard/s...d.php?t=316140 http://67-72chevytrucks.com/vboard/s...d.php?t=806011 |
|
|

|
|
|
#216 |
|
Registered User
 Join Date: Mar 2005
Location: apple valley, ca
Posts: 2,670
|
Re: Kabwe's aka Bam's build
That looks excellent. I am also of the thought that the column cannot extend too far into the engine compartment. I cut mine off using the same method you used, and it turned out great.
Not too many people give much thought about the placement (and style) of the steering column. To me, the column, and especially the steering wheel, are one of the most important parts of the build because every time you climb behind the wheel, it's your connection to the truck. Have you ever driven a vehicle where the column was mounted all funky and the steering wheel was crappy? It's a terrible driving experience, no matter how nice the rest of the truck is.
__________________
Check out my latest endeavor: https://roundsixpod.com My build threads: '55 Chevy: http://67-72chevytrucks.com/vboard/s...d.php?t=247512 '64 C-20: http://67-72chevytrucks.com/vboard/s...d.php?t=446527 |
|
|

|
|
|
#217 | |
|
Certified Car Nut
Join Date: Jan 2005
Location: Inglewood, California
Posts: 3,118
|
Re: Kabwe's aka Bam's build
Quote:
Last edited by Kabwe; 03-11-2011 at 01:07 PM. |
|
|
|

|
|
|
#218 |
|
56 - autocross
Join Date: Apr 2010
Location: Camarillo, Ca
Posts: 1,121
|
Re: Kabwe's aka Bam's build
Nice work on the column.
What radiator do think you are going to use? Any dimensions or ideas? |
|
|

|
|
|
#219 |
|
Registered User
Join Date: Aug 2007
Location: Corona, California
Posts: 7,998
|
Re: Kabwe's aka Bam's build
Looks great Kabwe.
Kim |
|
|

|
|
|
#220 |
|
Registered User
 Join Date: Jul 2010
Location: memphis
Posts: 2,537
|
Re: Kabwe's aka Bam's build
That looks a whole lot better..
|
|
|

|
|
|
#221 | ||
|
Certified Car Nut
Join Date: Jan 2005
Location: Inglewood, California
Posts: 3,118
|
Re: Kabwe's aka Bam's build
Quote:
Quote:
Thank you man, the more I looked at the more disappointed I got. It looked like a elephant truck or a penis to me. At least now its circumcised.lol Last edited by Kabwe; 03-11-2011 at 07:05 PM. |
||
|
|

|
|
|
#222 |
|
Registered User
Join Date: Nov 2010
Location: SoCal
Posts: 914
|
Re: Kabwe's aka Bam's build
Ok I see what you were talking about, it does look a lot better. I know you rather have it come out of the toe board of the firewall but it looks clean and neat. It doesn't look like an after thought it looks factory so thats good 'nough.
__________________
I'm not tail-gating, I'm drafting.  http://67-72chevytrucks.com/vboard/s...d.php?t=432758 |
|
|

|
|
|
#223 |
|
Registered User
Join Date: Jan 2009
Location: kissimmee Florida
Posts: 494
|
Re: Kabwe's aka Bam's build
As allways your doing a great job. Just a few thing to think about while your working inside. There are some bumps on the floor behind the seat, these are in the way if you want your carpet to lay down flat. They are also in the way if you plan to build any type of covers for behind the seats. You may want to look into removing them. Also if building a cover for behind the seats weld in any mounts and and supports before you do any painting in the cab. Looks like you'll be done in notime. LOL!!!
|
|
|

|
|
|
#224 |
|
Registered User
Join Date: Aug 2010
Location: somerville nj
Posts: 194
|
Re: Kabwe's aka Bam's build
Kabwe
You should entertain doing a cable show on saturdays "This Old Truck" that way everyone can watch you work and pick up ideas for their rides. |
|
|

|
|
|
#225 |
|
Certified Car Nut
Join Date: Jan 2005
Location: Inglewood, California
Posts: 3,118
|
Re: Kabwe's aka Bam's build
No one would watched because it would take 5 seasons to finish the truck.lol
Last edited by Kabwe; 03-17-2011 at 08:35 PM. |
|
|

|
 |
| Bookmarks |
| Thread Tools | |
| Display Modes | |
|
|