
|
Register or Log In To remove these advertisements. |
|
|
|
|||||||
 |
|
|
Thread Tools | Display Modes |
 01-03-2009, 09:54 PM
|
#1 |
|
Junior Member
Join Date: Dec 2006
Location: Newburgh, IN
Posts: 1,247
|
Welding 101 on ol Curt
Well, I thought I would try a small repair using the welder. I had a rusted thru/pitted area at the top of the rear wheel cutout on the bedside panel. I thought I would try to cut it out and butt weld another piece in.
I took the first picture and found the batteries were then dead in the camera. That should have been my first clue, but I pushed on! I had the batteries re-charged by the time I finished and was quite proud of my first try. I saw one spot that I thought I could make look a bit better if I put a small tack there to fill it in and grind it back down.......that metal is VERY thin after all that grinding!!! What a dumb a**  I guess I'll have another little spot to cut out and patch. 
|

|

|
|
01-03-2009, 10:08 PM
|
#2 |
|
1961 crewcab
Join Date: Dec 2007
Location: missoula, mt
Posts: 6,164
|
Re: Welding 101 on ol Curt
try this trick:get a small piece of copper. the weld will not stick to the copper.
clamp it behind your hole, and then slowly fill the hole up with weld. |
|
|
|
|
01-03-2009, 10:13 PM
|
#3 |
|
Registered User
Join Date: Jul 2006
Location: Central PA
Posts: 12,201
|
Re: Welding 101 on ol Curt
copper,brass, wood etc... behind the hole... low heat and quick welds...
__________________
The Garage: 1968 K-10 SWB - "Project Money Pit" 1996 Z-71 - "huntin rig" 1969 C-10 LWB (SOLD) "Project flip that truck or else" 1993 Passport, F@rd 1-ton (SOLD)"Project Cousin Eddie" My Garage Build "The 1,000 footer" |
|
|
|
|
01-03-2009, 10:30 PM
|
#4 | |
|
Junior Member
Join Date: Dec 2006
Location: Newburgh, IN
Posts: 1,247
|
Re: Welding 101 on ol Curt
Quote:
 Those sound like good ideas! Thanks guys!! |
|
|
|
|
|
01-03-2009, 10:33 PM
|
#5 |
|
Registered User
Join Date: Jul 2006
Location: Central PA
Posts: 12,201
|
Re: Welding 101 on ol Curt
build it up from the inside of the hole, don't just pile it up like a big bird turd! I do that often enough!
I did a little welding today too... 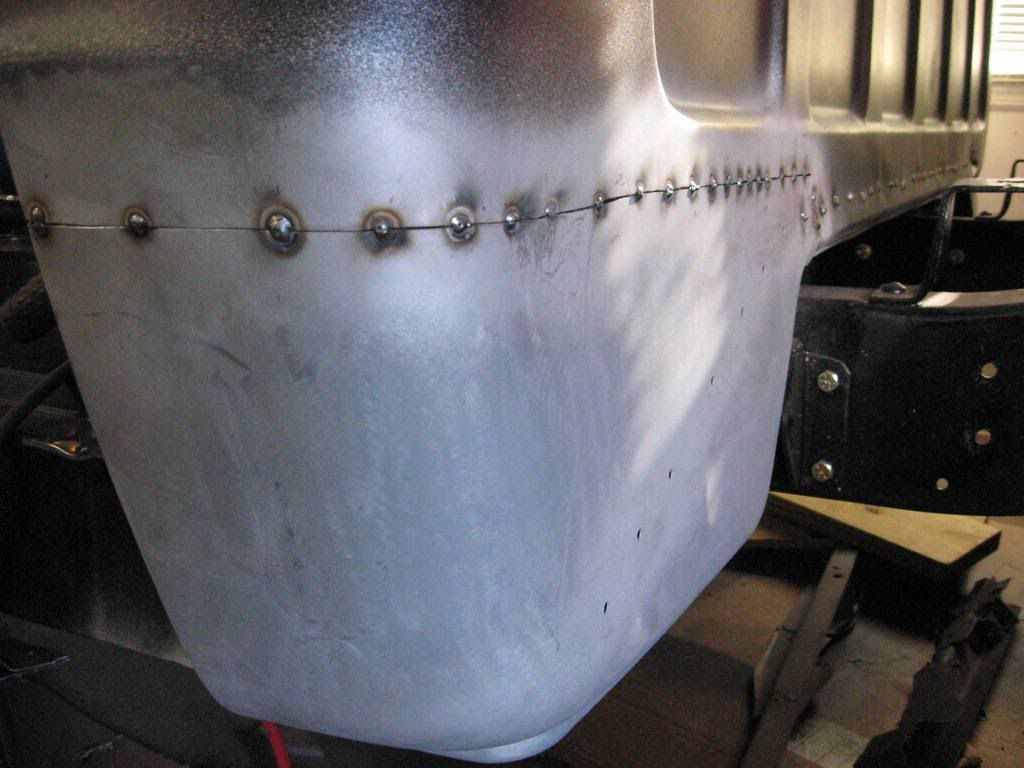 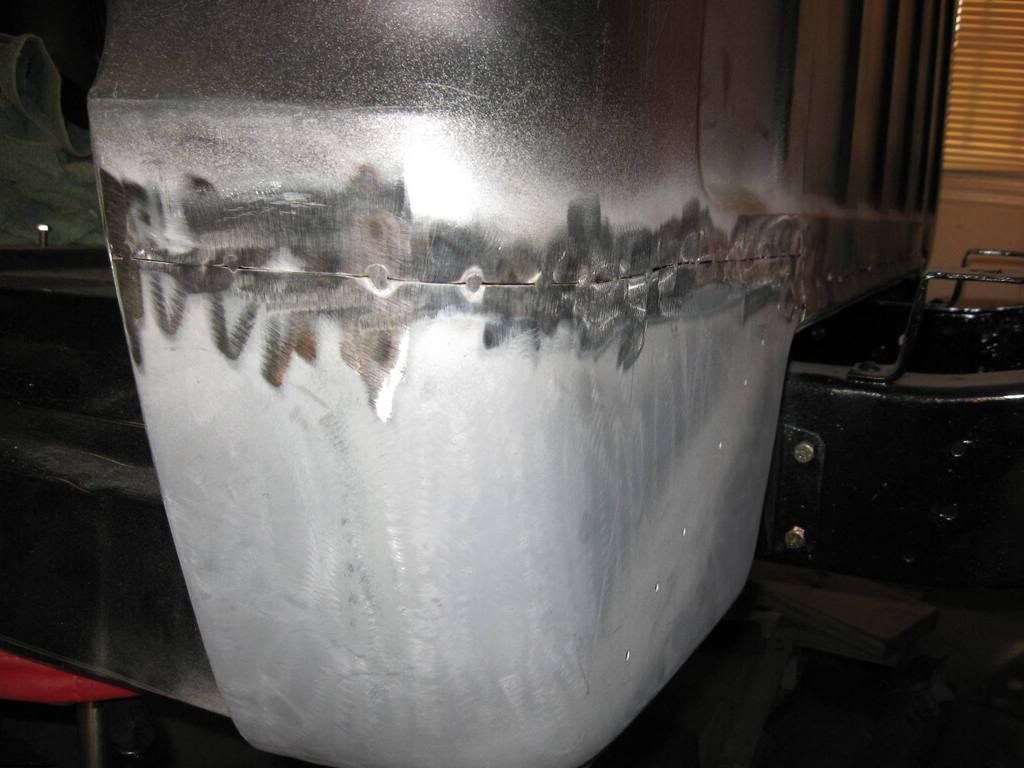
__________________
The Garage: 1968 K-10 SWB - "Project Money Pit" 1996 Z-71 - "huntin rig" 1969 C-10 LWB (SOLD) "Project flip that truck or else" 1993 Passport, F@rd 1-ton (SOLD)"Project Cousin Eddie" My Garage Build "The 1,000 footer" |
|
|
|
|
01-03-2009, 10:34 PM
|
#6 |
|
One day...
Join Date: Apr 2008
Location: Tuttle, Ok
Posts: 9,240
|
Re: Welding 101 on ol Curt
And if you do small tacks around the hole you are trying to fill it will work better to. (low heat)
|
|
|
|
|
01-03-2009, 10:38 PM
|
#7 | |
|
One day...
Join Date: Apr 2008
Location: Tuttle, Ok
Posts: 9,240
|
Re: Welding 101 on ol Curt
Quote:
Cool! Are you not going to tack anymore on it? Just curious. |
|
|
|
|
|
01-03-2009, 10:46 PM
|
#8 |
|
Junior Member
Join Date: Dec 2006
Location: Newburgh, IN
Posts: 1,247
|
Re: Welding 101 on ol Curt
This may sound like a really stupid question, but bare in mind I have never welded before this week. Do you guys have the wire actually touching the metal before you trigger the gun, or just close?

|
|
|
|
|
01-03-2009, 11:00 PM
|
#9 |
|
Hey Y'all!!
Join Date: Dec 2007
Location: Bay Minette, Alabama
Posts: 1,755
|
Re: Welding 101 on ol Curt
Looks good for a first attempt at a repair. Just think, a week ago you were still just thinking about being able to do this. It won't be long and you'll be giving welding advice. Congrats!!
On the gun placement, I usually just get it close but I am not sure what the "proper" way is. |
|
|
|
|
01-03-2009, 11:09 PM
|
#10 |
|
Registered User
Join Date: Mar 2007
Location: East Texas
Posts: 429
|
Re: Welding 101 on ol Curt
You want your stick out(amount of wire between the nozzle and the arc)to be 1/2 ",or there about.Clip the wire flush w/nozzle and position your tip 1/2 " from your work ,then angle tip of gun back slightly and press the trigger for a half second only. This works well,assuming wire speed/heat/gas are adjusted propperly. Take your time,make sure any patch material is nice n flush before you tac it.
Last edited by Inverter; 01-03-2009 at 11:17 PM. |
|
|
|
|
01-03-2009, 11:23 PM
|
#11 | |
|
Junior Member
Join Date: Dec 2006
Location: Newburgh, IN
Posts: 1,247
|
Re: Welding 101 on ol Curt
Quote:
|
|
|
|
|
|
01-03-2009, 11:35 PM
|
#12 | |
|
Registered User
Join Date: Mar 2007
Location: East Texas
Posts: 429
|
Re: Welding 101 on ol Curt
Quote:
Last edited by Inverter; 01-03-2009 at 11:35 PM. |
|
|
|
|
|
01-03-2009, 11:47 PM
|
#13 | |
|
Junior Member
Join Date: Dec 2006
Location: Newburgh, IN
Posts: 1,247
|
Re: Welding 101 on ol Curt
Quote:
|
|
|
|
|
|
01-03-2009, 11:58 PM
|
#14 |
|
Junior Member
Join Date: Dec 2006
Location: Newburgh, IN
Posts: 1,247
|
Re: Welding 101 on ol Curt
I have about his much sticking out of the gun when I start...probably 1/4-3/8". It sounds as though I should start with the wire cut off even with the tip but get the tip of the wire within 1/2" of the work.
Hope that makes sense! |
|
|
|
|
01-04-2009, 12:04 AM
|
#15 | |
|
Registered User
Join Date: Mar 2007
Location: East Texas
Posts: 429
|
Re: Welding 101 on ol Curt
Quote:
|
|
|
|
|
|
01-04-2009, 12:09 AM
|
#16 | |
|
Registered User
Join Date: Mar 2007
Location: East Texas
Posts: 429
|
Re: Welding 101 on ol Curt
Quote:
That is what I was saying in my previous post.Clip the wire flush and position the tip over your work. That stick out looks like about 5/8" or more,maybe just the photo. 1/4-3/8 is plenty close. |
|
|
|
|
|
01-04-2009, 12:28 AM
|
#17 |
|
Registered User
Join Date: Jul 2006
Location: Central PA
Posts: 12,201
|
Re: Welding 101 on ol Curt
you could have the wire speed too slow if there is still popping... Is your ground good? metal clean?
When the poer is low I find it harder to get that "sizzle" as well.. and yes, I still have to finish welding my corners, just tacked them in till I know that the door is aligned...
__________________
The Garage: 1968 K-10 SWB - "Project Money Pit" 1996 Z-71 - "huntin rig" 1969 C-10 LWB (SOLD) "Project flip that truck or else" 1993 Passport, F@rd 1-ton (SOLD)"Project Cousin Eddie" My Garage Build "The 1,000 footer" |
|
|
|
|
01-04-2009, 11:42 PM
|
#18 |
|
Registered User
Join Date: Dec 2008
Location: San Diego, CA
Posts: 10
|
Re: Welding 101 on ol Curt
also check the polarity of the welder. The polarity is changed from gas mig welding and innershield flux core wire welding. if they arent connected the correct way it will pop and sputter.
|
|
|
|
|
01-04-2009, 11:48 PM
|
#19 |
|
Registered User
Join Date: Mar 2007
Location: East Texas
Posts: 429
|
Re: Welding 101 on ol Curt
Bam!! forgot about that.I remember going through a half bottle of gas before I figured that one out. Good point.
|
|
|
|
|
01-04-2009, 11:51 PM
|
#20 | |
|
Registered User
Join Date: Dec 2007
Location: Palmer, Alaska
Posts: 13,821
|
Re: Welding 101 on ol Curt
Quote:

__________________
 CHEVY ONLY CHEVY ONLY
|
|
|
|
|
|
01-04-2009, 11:52 PM
|
#21 |
|
Registered User
Join Date: Jul 2006
Location: Central PA
Posts: 12,201
|
Re: Welding 101 on ol Curt
and don't run a cheap extension cord either..
just a thought
__________________
The Garage: 1968 K-10 SWB - "Project Money Pit" 1996 Z-71 - "huntin rig" 1969 C-10 LWB (SOLD) "Project flip that truck or else" 1993 Passport, F@rd 1-ton (SOLD)"Project Cousin Eddie" My Garage Build "The 1,000 footer" |
|
|
|
|
01-05-2009, 01:16 AM
|
#22 |
|
Junior Member
Join Date: Dec 2006
Location: Newburgh, IN
Posts: 1,247
|
Re: Welding 101 on ol Curt
Polarity is correct!
|
|
|
|
|
01-05-2009, 02:03 AM
|
#23 |
|
Registered User
Join Date: Jul 2008
Location: Watson LA
Posts: 105
|
Re: Welding 101 on ol Curt
when your grinding, try to stay on your weld till you have it knocked pretty much all the way down and that will keep from thinning out the surrounding material and keep that from happening.
|
|
|
|
|
01-05-2009, 01:04 PM
|
#24 | |
|
Junior Member
Join Date: Dec 2006
Location: Newburgh, IN
Posts: 1,247
|
Re: Welding 101 on ol Curt
Quote:

|
|
|
|
|
|
01-05-2009, 01:15 PM
|
#25 |
|
Registered User
Join Date: Jul 2006
Location: Central PA
Posts: 12,201
|
Re: Welding 101 on ol Curt
ouch...
I like to use the 60 grit flapper discs for grinding... doesn't take too much away on accident... remember that the more angle that you put on your grinder the more metal is eaten away... keep it flat and moving over the entire area so you don't build up a lot of heat...
__________________
The Garage: 1968 K-10 SWB - "Project Money Pit" 1996 Z-71 - "huntin rig" 1969 C-10 LWB (SOLD) "Project flip that truck or else" 1993 Passport, F@rd 1-ton (SOLD)"Project Cousin Eddie" My Garage Build "The 1,000 footer" |
|
|
|
|
| Bookmarks |
| Thread Tools | |
| Display Modes | |
|
|


 Linear Mode

