
 |
Register or Log In To remove these advertisements. |
|
|
|
|||||||
|
|
Thread Tools | Display Modes |
|
|
#1 |
|
Registered User
Join Date: Jan 2007
Location: vernon b.c.
Posts: 3,022
|
home made shop tools etc?
Is there a thread on here on home made shop tools,benchs etc on here,if not should start one
|
|
|
|
|
#2 |
|
Hand Crafted C-10
 Join Date: Aug 2006
Location: Burien, WA
Posts: 5,180
|
Re: home made shop tools etc?
The only tool I can think of right off hand is too simple. Hopefully it will qualify.
 I have a big chunk of Styrofoam I lodge over the hood release on my truck so I can climb in safely without tearing my jeans (and bum  )…I’m kind of short and often have to sit right in the )…I’m kind of short and often have to sit right in the engine compartment to get anything done. I'm sure there's a zillion other things so I guess I'll be back here often to post... ...and learn new inventions...  . |
|
|
|
|
#3 |
|
Hollister Road Co.
Join Date: Apr 2005
Location: Houston
Posts: 6,131
|
Re: home made shop tools etc?
I made a proportioning valve lock tool out of an set screw because I couldn't find them anymore. I have an old 9" South Bend that comes in hand for things like this.

|
|
|
|
|
#4 |
|
Senior Member
 Join Date: Sep 2005
Location: Lewisville, Nc
Posts: 10,237
|
Re: home made shop tools etc?
My make shift door spring tool

__________________
David fuller Ase Certified Mechanic Click here to help support our board!! 1971 Chevy c-10 under going a 4.8l LSx swap Build Thread http://67-72chevytrucks.com/vboard/s...d.php?t=421305 2007 Honda Accord my daily 145kmiles 2002 Honda Accord 4 door With 330k(sisters car) 2005 toyota Avalon 228k( brothers car) 2002 Sububran 5.3 245k 2000 Tahoe 5.3l 378 General manager for Marco's Carwash & lube |
|
|
|
|
#5 |
|
Registered User
Join Date: Jan 2007
Location: vernon b.c.
Posts: 3,022
|
Re: home made shop tools etc?
here are a couple I found that looked interesting
 
|
|
|
|
|
#6 |
|
Registered User
Join Date: May 2009
Location: Motor City
Posts: 9,226
|
Re: home made shop tools etc?
I've got quite a few that my dad made, from before they were commercially available. I'll post 'em up as I can get pictures.
In the meantime, here's my homemade fixture for supporting my pickup bed for transport and paint -  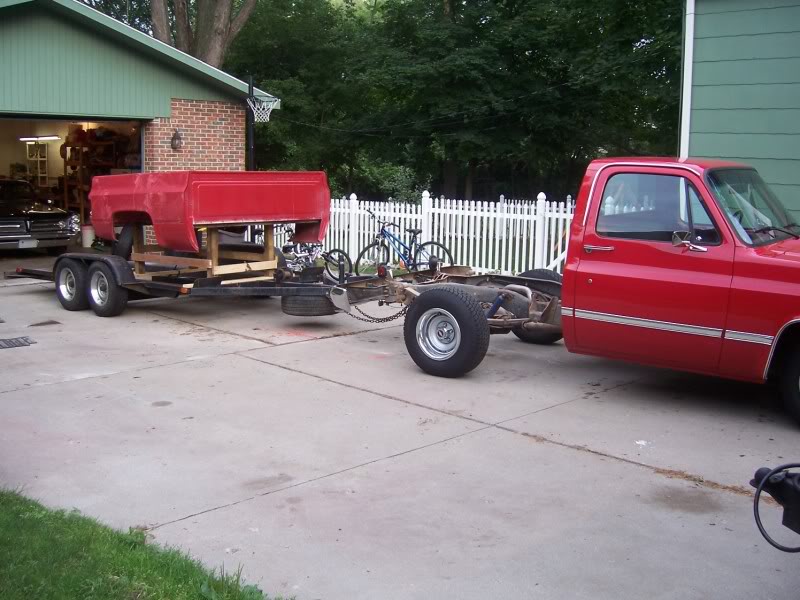  K
__________________
Chevrolet Flint Assembly 1979-1986 GM Full Size Truck Engineering 1986 - 2019 Intro from an Old Assembly Guy: http://67-72chevytrucks.com/vboard/s...d.php?t=342926 My Pontiac story: http://forums.maxperformanceinc.com/...d.php?t=560524 Chevelle intro: http://www.superchevy.com/features/s...hevy-chevelle/ |
|
|
|
|
#7 |
|
Registered User
Join Date: May 2009
Location: Motor City
Posts: 9,226
|
Re: home made shop tools etc?
As an aside, the "trailer" should count as a homemade shop tool, too -
Dad and I built the trailer on the floor of the garage in 1967. K
__________________
Chevrolet Flint Assembly 1979-1986 GM Full Size Truck Engineering 1986 - 2019 Intro from an Old Assembly Guy: http://67-72chevytrucks.com/vboard/s...d.php?t=342926 My Pontiac story: http://forums.maxperformanceinc.com/...d.php?t=560524 Chevelle intro: http://www.superchevy.com/features/s...hevy-chevelle/ |
|
|
|
|
#8 |
|
I am a Referee of life.
Join Date: Jun 2000
Location: Greensboro N.C.
Posts: 13,992
|
Re: home made shop tools etc?
I don't have a pic or time to clear the way to get one but my workbench was built from Kitchen cabinets.I used 4 3 w/doors and 1 with drawers.The doors are 2 ft wide and the drawers are 18".The top is made from 4 2X8's on a 1X4 frame(8ft long).I wanted closed storage beneath because my shop tends to be cluttered enough without open storage and the closed doors help keep stuff cleaner.I also used a couple of wall cabinets above it to store other stuff.The back wall is pegboard and the top is spanned by a 1X12(top cabnets are 12") with a 4ft flourescent light.I added 2 8ft flourescents where the original incadescent lights were.I have some open shelving and a folding table for additional space.Plugged a retractable shop light in at the plug for the door opener and mounted it to the support for the GDO.
__________________
The 47-present Chevrolet and GMC Truck Message Board Network,it's owners,moderators,members,and associates of any type should not be held responsible for my opinion. You can't fix stupid,not even with duct tape. "My appearance is due to the fact that "GOD" does punish you for having too much fun!" Barrett-Jackson has perfected alchemy,they make rust into gold! "You can lead a horse to water but you can't saddle a duck" "Cleverly disguised as a 'Responsible Adult' "Sometimes your Knight in shining armor is just a retard in tinfoil" |
|
|
|
|
#9 |
|
Registered User
Join Date: May 2009
Location: Motor City
Posts: 9,226
|
Re: home made shop tools etc?
As promised, some pictures of homemade tools from my Dad's collection;
I mentioned he was a diemaker at Chevrolet for 26 of his 35 years with GM, so he had access to any kind of machinery or help imaginable. As a result he/they made a lot of tools that were either not available in the marketplace, or just because they could make them for free rather than having to purchase them. I hit the "mother lode" yesterday - Here are a few I found while I was unpacking: Homemade tubing bender, for bending 1/2" fuel lines -  This is a good one. It doesn't look like much, but it is made from a turned down cap screw. The small end fits into a connecting rod (piston end) and you swing the rod past the weight on the crank. This is either to (a) ensure you have adequate clearance or (b) use as a fixture to grind the crank weight until clearance is acheived. I've done this at least a couple times.  Homemade tool for pushing the rear axle pinion yoke off the pinion gear shaft (for those stubborn applications) - ]  Fixture that emulates the bolt pattern of the exhaust side of a Chevy Big Block cylinder head, for use in fabricating header tubes - IMG]  Pretty simplistic but still counts: a Drift pin for aligning bolts; I use this one for lining up suspension bolt holes for rear upper and lower control arm attachments -  Homemade tool that keeps the flywheel from turning while torquing attaching bolts/torque convertor bolts/harmonic balancer bolts or installation. The beveled edge is placed in the ring gear teeth and it rotates until stopped by the bellhousing alignment pin or some other feature on the block/trans:  Valve spring compressor for use when the cylinder head is installed on the engine. The cylinder is filled with compressed air and the locks can be removed to repair a seal, or replace/shim the valve spring -  To be honest, I'm not sure what these are for. They were in the tool kit with all the rear end set-up tools. One of them looks like it might be for holding the pinion yoke to keep it from turning:  Homemade bearing/seal installer (fits front wheel "dust cups" too, I believe) -  Homemade slide hammer, for removing the rear axle ring gear/carrier after the caps are removed (for Pontiacs, which are a press fit) -  This is the tool for checking pinion depth when setting up a rear axle. The round portions are held in the carrier saddle and then a depth gage is placed on the flat. The flat is machined to match the rear axle shaft centerline and the depth is measured from there to the rear face of the pinion gear (for Pontiac) - ]  These are used to keep the pinion yoke from rotating, while torquing or removing the pinion nut and/or crushing the crush sleeve. The fork portion is bolted into the yoke, and then a piece of pipe is inserted over the end -  Not sure what this is, either, but it was in with the rear axle tools and too cool to pass up -  Homemade drift pin/punch, for whatever -  I know there's more up at Mom's house, like a homemade camshaft degree wheel that's about 2 feet in diameter (made before they were commercially available). I'll shoot some pics the next time I'm up there. K
__________________
Chevrolet Flint Assembly 1979-1986 GM Full Size Truck Engineering 1986 - 2019 Intro from an Old Assembly Guy: http://67-72chevytrucks.com/vboard/s...d.php?t=342926 My Pontiac story: http://forums.maxperformanceinc.com/...d.php?t=560524 Chevelle intro: http://www.superchevy.com/features/s...hevy-chevelle/ |
|
|
|
|
#10 |
|
Hand Crafted C-10
 Join Date: Aug 2006
Location: Burien, WA
Posts: 5,180
|
Re: home made shop tools etc?
Keep them coming!!
When I worked for Boeing, I had a whole drawer devoted to my own fixtures for things I needed to do ... if there was not the right tool made or it was too much trouble to ask for the right tool to use just one time (in their opinion). ...so I made my own. Your Dad did the same. and now more people can benefit. The wealth of information your dad gave you so you could even identify these tools is astounding! Please continue...I'm lovin' this thread! |
|
|
|
|
#11 |
|
Registered User
Join Date: May 2011
Location: Anderson SC
Posts: 3,901
|
Re: home made shop tools etc?
I needed a tubing roller a few years ago when buildig a Targa top for a 1978 Camaro. I didn't want to pay what Eastwood or similar companies were wanting for a roller so I built this one. It's adjustable for different size tubing and has a bottle jack for tension on one of the outside rollers. I wanted the outside to push up instead of the inside wheel pushing down like most rollers are; this way the tubing curls up instead of down towards the ground. If you're making long, broad curves, the tubing will hit the ground if the roller curves the metal downward, mine doesn't have that problem.
   Here's my homemade air drier. Used a dorm fridge, a 5 gallon bucket, and 20 feet of copper tubing coiled inside the bucket. It has a water trap on the outlet side and quick release fittings so it can be unhooked and moved easily.    
__________________
Project Goldilocks '66 C10 Short Fleet BBW Build '65 C10 Highly Detailed Stock Restoration Thread '78 Camaro Targa Roof Build '55 International Metal/Body/Paint Work '66 F100 Full Rotisserie Restoration '40 Packard 120 Convertible Coupe Restoration How To Restore and Detail an Original Gauge Cluster How To Detail Sand Body Panels, Edges, Corners, Etc |
|
|
|
|
#12 | |
|
Registered User
Join Date: May 2009
Location: Motor City
Posts: 9,226
|
Re: home made shop tools etc?
Quote:
Here's a few more: The aforementioned homemade cam degree wheel:  This is a homemade stand, used to hold a burette (like you might see in science class) while cc'ing cylinder heads:  And, these are PVC pipe construction but are slipped over axle shafts during storage, to keep them from getting coated with dirt and fuzz: 
__________________
Chevrolet Flint Assembly 1979-1986 GM Full Size Truck Engineering 1986 - 2019 Intro from an Old Assembly Guy: http://67-72chevytrucks.com/vboard/s...d.php?t=342926 My Pontiac story: http://forums.maxperformanceinc.com/...d.php?t=560524 Chevelle intro: http://www.superchevy.com/features/s...hevy-chevelle/ |
|
|
|
|
|
#13 |
|
Registered User
Join Date: May 2009
Location: Motor City
Posts: 9,226
|
Re: home made shop tools etc?
Found a couple more.
This is a spacer, used as a fixture for widening a steel wheel.   The length of the spacer corresponds to the final wheel width. We used to widen wheels by preserving the front half (thereby keeping the dimensional integrity between the wheel spider and the front face of the rim) and by cutting the back portion off the wheel. A new back portion, from a different wheel and with an additional 2", would then be fixtured to the front face/spider, using this spacer as a checking fixture. A small plate was affixed in four locations, allowing for minute adjustments of the donor portion. Once the radial and lateral runout are within spec then the two halves can be welded together.  Here is a finished sample, a 10" Corvette rally with the front spacing preserved and the 2" added to the rear.  
__________________
Chevrolet Flint Assembly 1979-1986 GM Full Size Truck Engineering 1986 - 2019 Intro from an Old Assembly Guy: http://67-72chevytrucks.com/vboard/s...d.php?t=342926 My Pontiac story: http://forums.maxperformanceinc.com/...d.php?t=560524 Chevelle intro: http://www.superchevy.com/features/s...hevy-chevelle/ |
|
|
|
|
#14 |
|
Registered User
Join Date: Sep 2010
Location: British Columbia
Posts: 484
|
Re: home made shop tools etc?
This Bandsaw isn't mine but I used it when cutting my bed wood. I started with 2" thick pieces and cut them in half. With this monster you strap the wood to the guides and push the spinning blade through the wood rather than pushing the wood through the blade. Tons of fun, super loud.
  
__________________
Trevor "You already said spite" |
|
|
|
|
#15 |
|
Registered User
 Join Date: Jul 2011
Location: Las Vegas, NV
Posts: 329
|
Re: home made shop tools etc?
[CENTER]mines a cheap and easy.. but it really helped with my carpet and sound mat install...
 
__________________
I drive a lowered Chevy, a lifted Ford and I have a 62 VW bug stripped down in the garage.
Which "Piss on" sticker do I buy? |
|
|
|
|
#16 |
|
here, just not logged in
Join Date: Nov 2007
Location: Tx
Posts: 1,011
|
Re: home made shop tools etc?
I've been needing a third hand working on some stuff. So i made a stand for my
 I made some stakes to go through the lug holes so if i need it a little more solid i can stake it to the ground. Still not 100% if i'm going to use them or fill the base with ready-mix concrete. 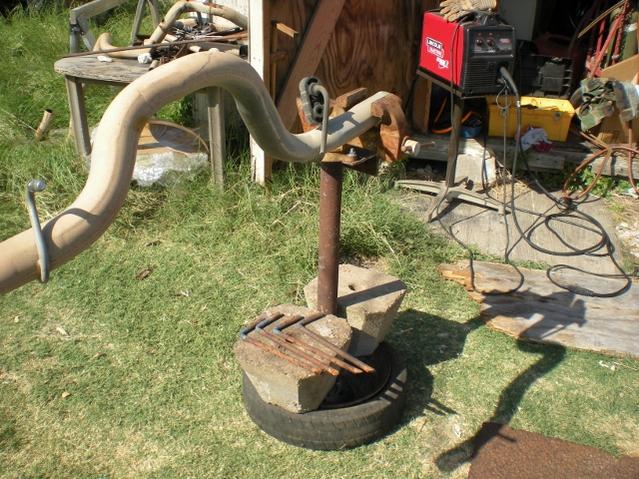
|
|
|
|
|
#17 |
|
Registered User
Join Date: Apr 2012
Location: Two Hills, Alberta
Posts: 207
|
Re: home made shop tools etc?
I made a frame for helping remove/re-install the box of a pickup truck:
   It's pretty simple, although a bit large, but it works like a charm. I ran remove or re-install a box in 5 minutes by myself. I had to do something after I damaged my box a bit when I tried removing it myself with the skidsteer and some chains.  This is another simple tool for helping cut holes in steel with a torch. Just a few large flat washers welded together. 3 different sizes welded together works out nicely. You always have it clamped to the steel so that the hole you want to use is raised up off the steel surface a bit.  Then you put the torch in and simply use it as a circle cutting guide.  It works, although finding the exact hole size you need may take a bit of trial and error, depending on your torch and how well you operate. Naturally, you won't cut a 2" diameter hole if the washer's ID is only 2". You would need slightly larger washers than the hole size you intend to cut. Of course I can't take credit for the washer jig, I found out about it because of a welder at work. He told me he learned about it years ago from another welder. |
|
|
|
|
#18 |
|
Registered User
Join Date: Jul 2011
Location: strausstown pa
Posts: 3,394
|
Re: home made shop tools etc?
well mine is allmost like dragginmetal's only its a lil' more portable just a old broken vise that was welded and put back too use on a old engine stand. portable and very handy(kudo's too the kid for puttin this together)pay no mind too the p.w it was only in the pic.
__________________
81 camaro 355 4/spd 342 posi my first love  . .67 swb step 454/4spd ott 373 posi 4/7 drop. 2000 s10 zr2 little blue truck that never gets stuck. '74 heald super bronc vt8. tecumseh powered moon rover. |
|
|
|
|
#19 | |
|
here, just not logged in
Join Date: Nov 2007
Location: Tx
Posts: 1,011
|
Re: home made shop tools etc?
Quote:

|
|
|
|
|
|
#20 |
|
Registered User
Join Date: Mar 2012
Location: Lacombe, Alberta
Posts: 288
|
Re: home made shop tools etc?
I made a sandblaster out of a pressure tank and plumbing fittings.
I still need some flex line and a nozzle. 
|
|
|
|
|
#21 |
|
Registered User
Join Date: Mar 2012
Location: Lacombe, Alberta
Posts: 288
|
Re: home made shop tools etc?
I got the idea from a video i saw on youtube. He used a propane tank instead, which i didnt feel was safe, as they are hard to drain, and propane is very explosive. The build went as follows:
First, i went to the local hardware store and purchased the following: 2 ball valves, 1 gate valve 2 90 degree fittings 2 "T" fittings 1 'nipple'- short piece of pipe threaded on both sides. this one had a hex part between the two threads. 1 bushing 3/8" to 1/4" We already had a large amount of 3/8" pipe at home from plumbing in air lines for the new compressor. I used around 3' Then, i drilled 2 holes in the top and bottom of the tank. They were 7/8" in diameter, which is approximately the same i.d. as 3/8" pipe, which doesnt make much sense to me either. Then i put together the top and bottom sections, which go as follows: Top: stubby piece of pipe-> 90-> nipple-> ball valve-> short piece of pipe-> 't' fitting-> bushing-> air line fitting The 'T" fitting also went to a short piece of pipe attached to the second ball valve. Bottom: stubby piece of pipe-> gate valve-. 'nipple'-> 'T' fitting-> short piece of pipe-> 90 The 90 on the bottom and the second ball valve on the top were then connected by the correct length piece of pipe to place the stubby pieces of pipe against the holes i drilled. I then welded it on and checked for leaks. Make sure you get everything good and tight before welding, because it cannot be taken apart without a grinder after it has been welded. mine already had a threaded hole in it for filling it, which i put a plug in, i plan on using this for filling it with sand. I still need to make a stand, and buy a section of flex line and a nozzle, but after that, i should have a very cheap sandblaster. I also cut a chunk out of the base for easier access to the gate valve.  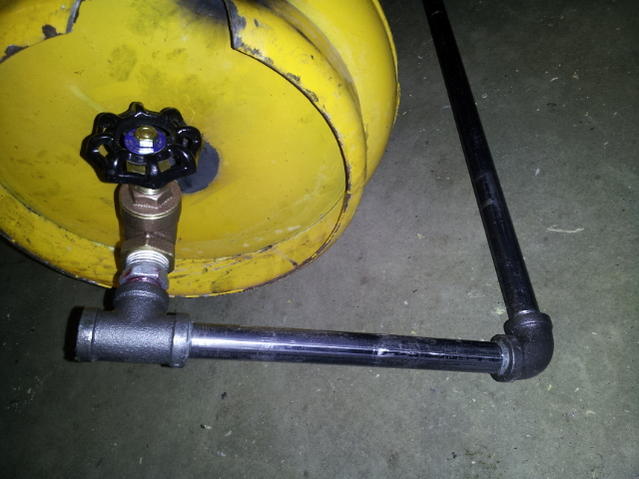 
|
|
|
|
|
#22 |
|
Registered User
Join Date: Mar 2012
Location: Lacombe, Alberta
Posts: 288
|
Re: home made shop tools etc?
All done! I purchased a deadmans valve from princess auto, along with a 15foot air line for my blast line, and two 3/8" x 1/4" bushings to connect the air line to the 'T' fitting on the bottom of the tank and to the nozzle. I welded three pieces of rod onto the base for a stand for now. The sway bar is after about 30 seconds to 1 minute of blasting.
   
|
|
|
|
|
#23 |
|
Registered User
 Join Date: Aug 2005
Location: Hillsboro Oregon
Posts: 6,449
|
Re: home made shop tools etc?
I know many on here already know this but I tell everyone using a blaster; Don't use silica/play sand. Here's why.
|
|
|
|
|
#24 |
|
Registered User
Join Date: May 2011
Location: Anderson SC
Posts: 3,901
|
Re: home made shop tools etc?
Very important info on blasting with sand! If you're going to do it, make sure you wear a GOOD particulate filter, and do it outdoors! As said, the dust gets everywhere and it'll make a mess of your shop very quickly, not to mention that you'll have the hazardous dust everywhere.
I do blast with sand occasionally (did a couple wheels yesterday) bud I do it outdoors and wear a full paint suit with a respirator. I change the respirator cartridges out for 3M P100 filters which are very effective at filtering.
__________________
Project Goldilocks '66 C10 Short Fleet BBW Build '65 C10 Highly Detailed Stock Restoration Thread '78 Camaro Targa Roof Build '55 International Metal/Body/Paint Work '66 F100 Full Rotisserie Restoration '40 Packard 120 Convertible Coupe Restoration How To Restore and Detail an Original Gauge Cluster How To Detail Sand Body Panels, Edges, Corners, Etc |
|
|
|
|
#25 |
|
Registered User
Join Date: May 2011
Location: Anderson SC
Posts: 3,901
|
Re: home made shop tools etc?
I built a stand for our new bead roller last week with 4x4 and 2x2 tubing, both 1/8" wall. I angle cut the end of the legs so they're not as easy to trip over.
 Still need to get some plate to weld over the angle cuts and have it powdercoated. Still need to get some plate to weld over the angle cuts and have it powdercoated. 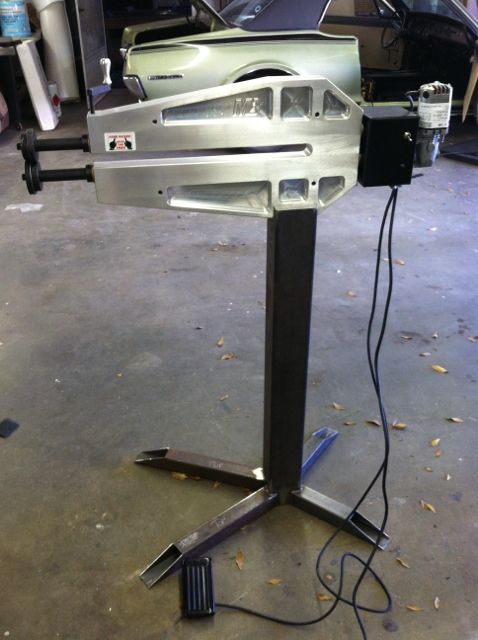 I also built my work/paint mixing table and stand for the shrinker/stretcher using 4" and 2" tubing. I don't have a finished pic of the table, but it has a 1/2" plate steel top with a 16g stainless cover that wraps down the edges about 2-3" and adjustable legs welded to the bottom. Both of these have been powdercoated semigloss black. 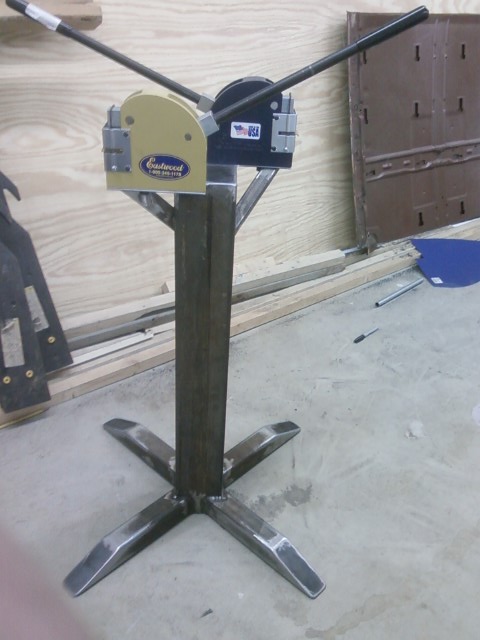  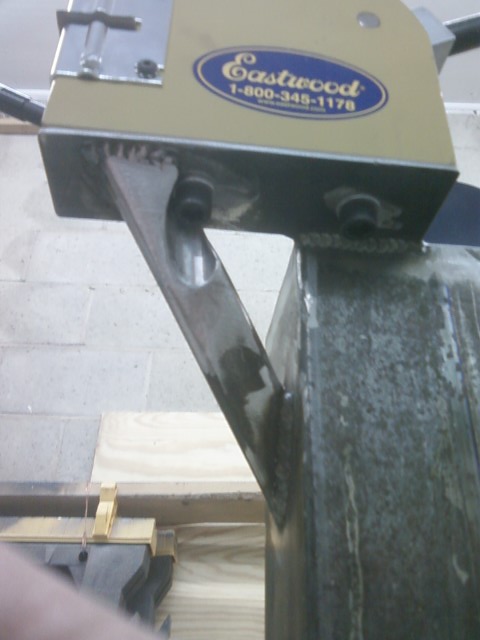  
__________________
Project Goldilocks '66 C10 Short Fleet BBW Build '65 C10 Highly Detailed Stock Restoration Thread '78 Camaro Targa Roof Build '55 International Metal/Body/Paint Work '66 F100 Full Rotisserie Restoration '40 Packard 120 Convertible Coupe Restoration How To Restore and Detail an Original Gauge Cluster How To Detail Sand Body Panels, Edges, Corners, Etc |
|
|
| Bookmarks |
| Thread Tools | |
| Display Modes | |
|
|