
 |
Register or Log In To remove these advertisements. |
|
|
|
|||||||
 |
|
|
Thread Tools | Display Modes |
|
|
#1 |
|
The oddest Todd around
Join Date: May 2004
Location: Miami, Florida
Posts: 1,418
|
67-72 Window Regulator Replacement
(yes, I know the pictures are big. The better to see the details)
Hello, I'm toddtheodd. You might remember me from other FAQs like External to Internal Voltage Regulated Altenator Conversion. Today we are doing the 67-72 Window Regulator Replacement FAQ. Now, if you window was stuck up like mine, you'll need to find something to get the window down. I found a pair of vise grips worked wonders. Why do you need the window down? Because you have to remove the vent window assembly to get the window out to get the regulator out. So getting the window down is step number one. Now in picture 1, we have A, B, C, and D. A are the bottom two bolts that hold in the vent window. This is step number two. Remove these 2 bolts. B is the hole in the door that you will being doing most of your work through. C is the vise grips that got the d@mn window down. D are the four bolts that hold the regulator to the door. Remove these 4 bolts next to last.  Picture 2 shows the other 3 small screws that hold in the vent window assembly (A). Remove these. 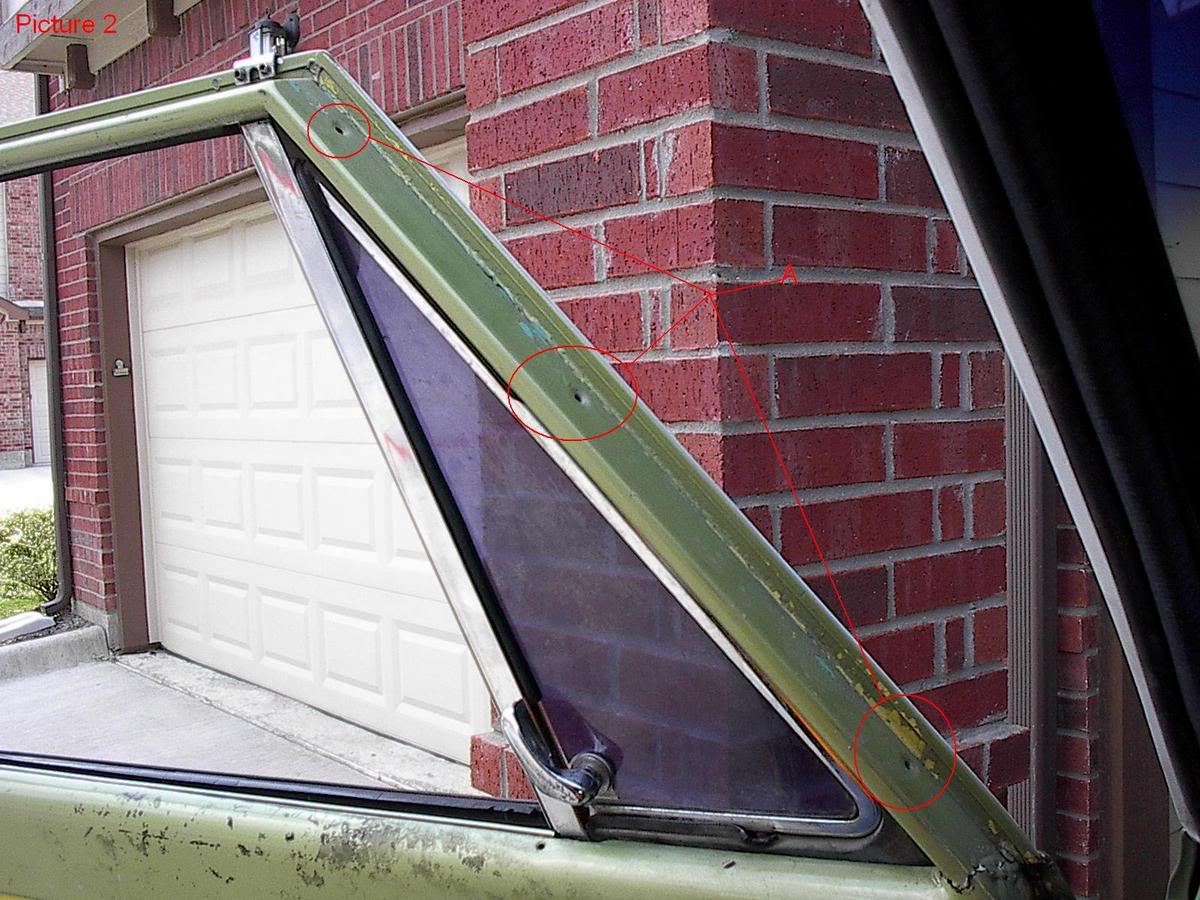 After you get the two bottom bolts out and the top three screws out, you can pull the vent window assembly back like this. I also pulled the weather stipping out of the top to keep from doing too much damage to it. In Picture 3 you will see A and B. You have to pull the vent window back far enough to get A clear of the door, and you have to have the vent window tilted back far enough to get B clear of the top of the window. 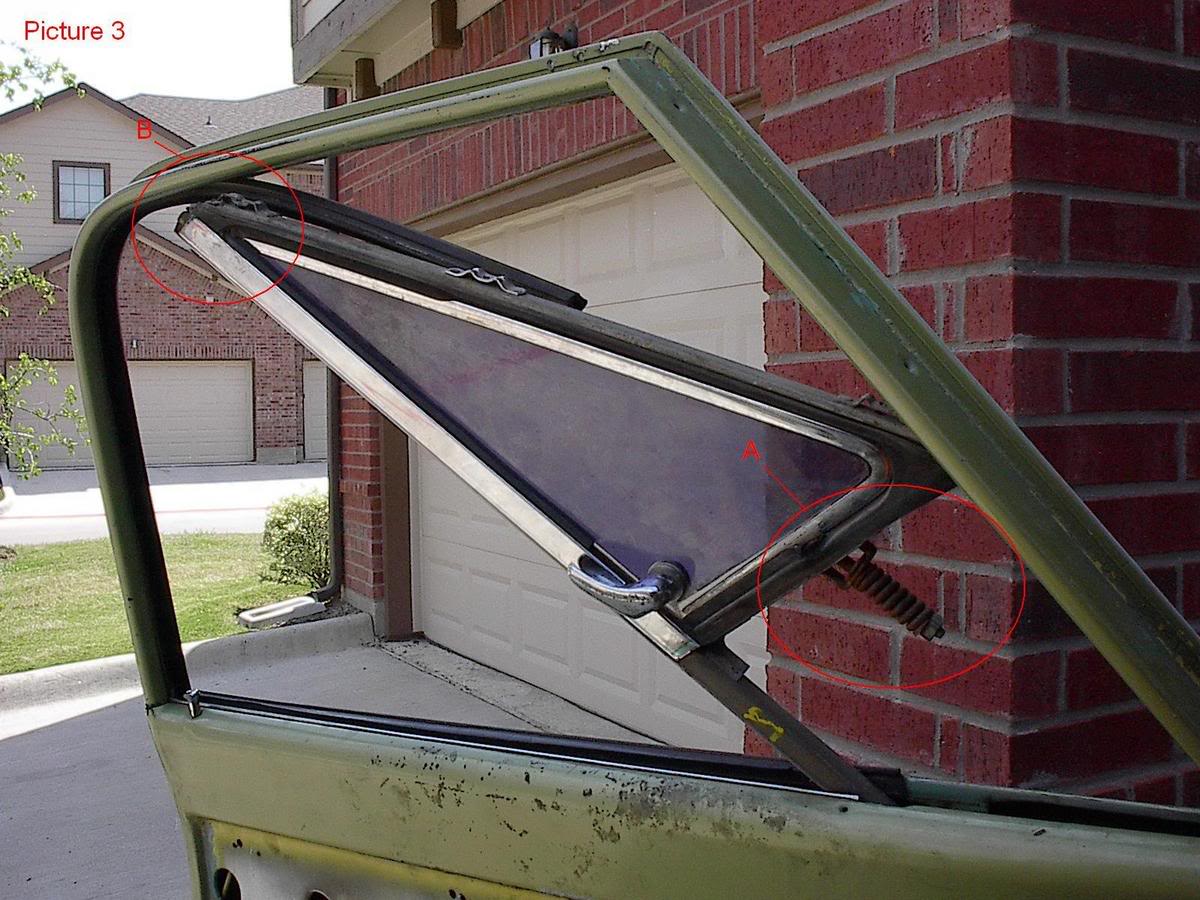 Once you get those clear, turn the vent window assemly sideways like this, and just pull it straight up out of the door. You will have to hold your tongue just right for this.  Now for the rest of this, it's easier to explain with the window and window regulator out of the door. 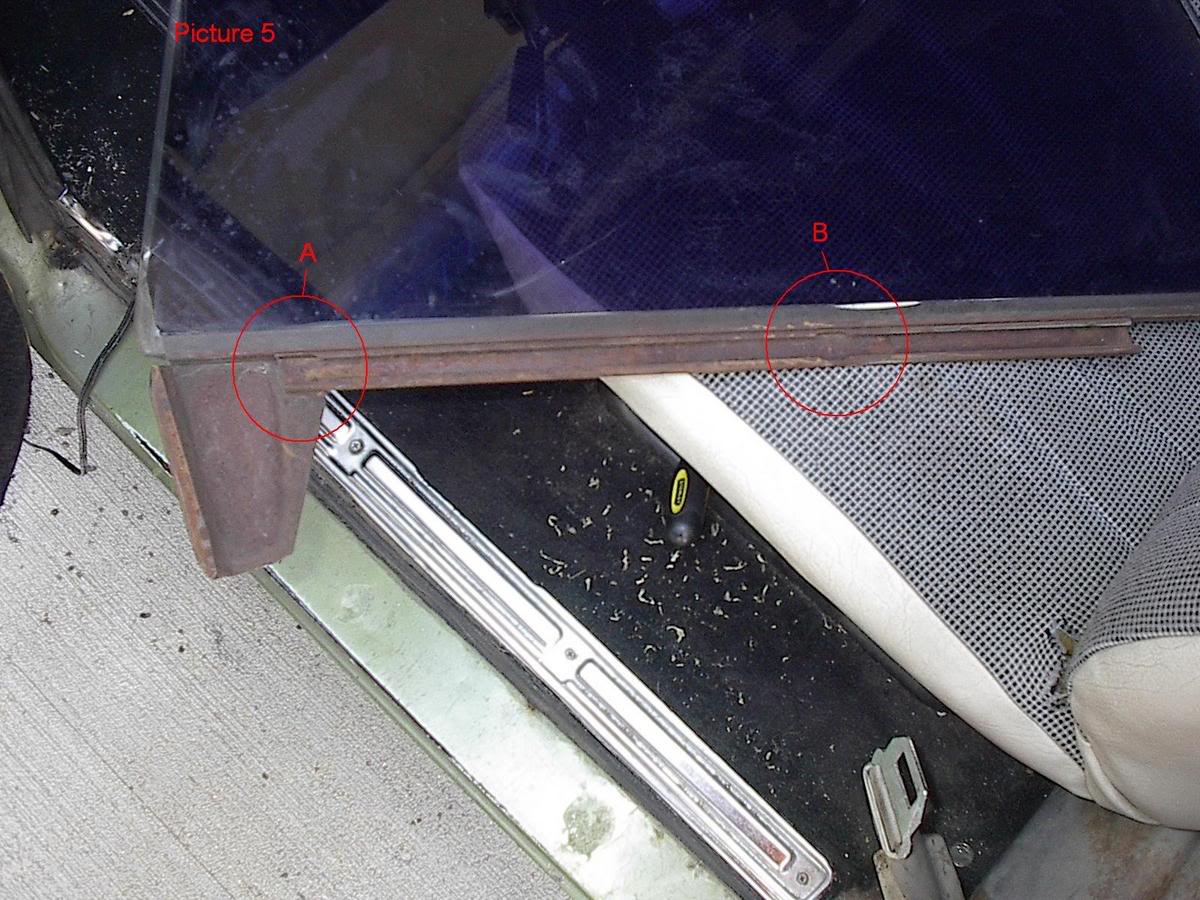 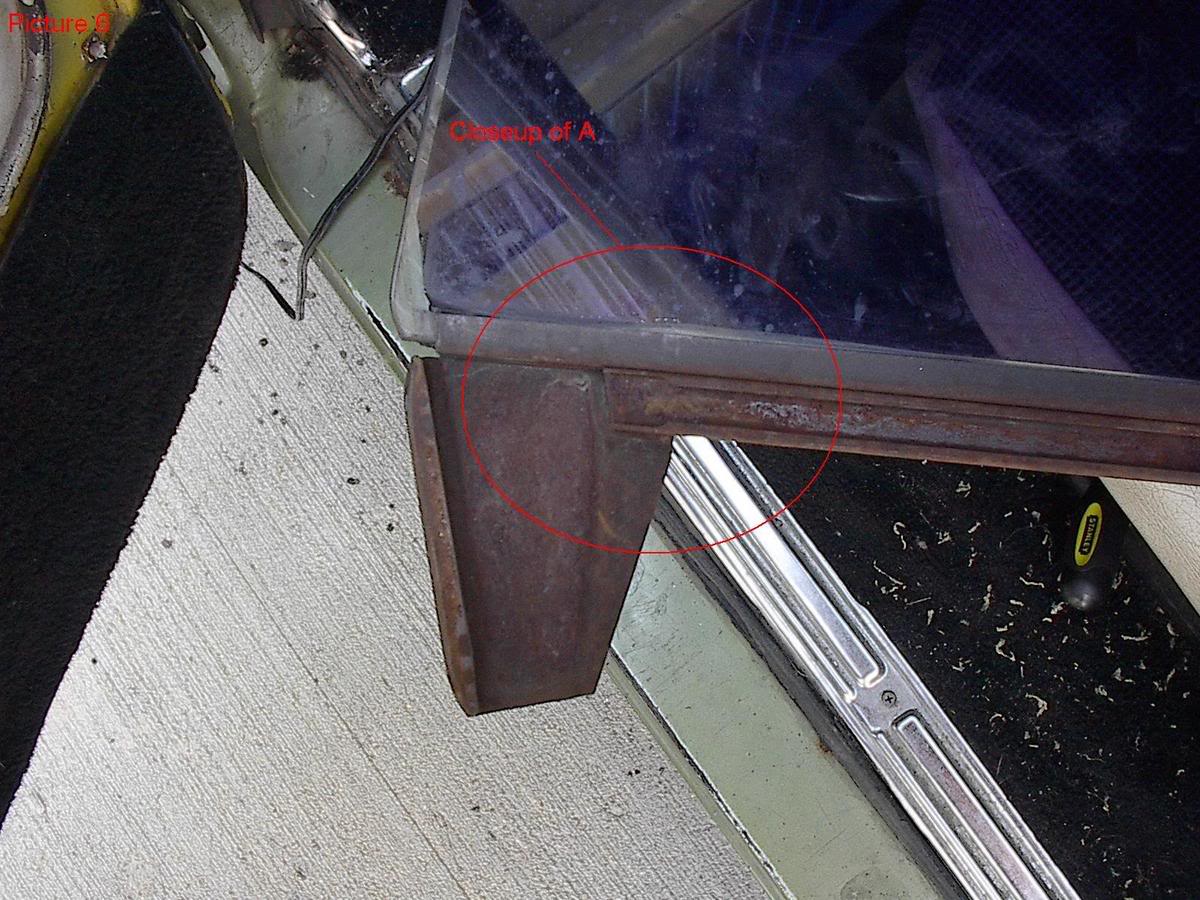 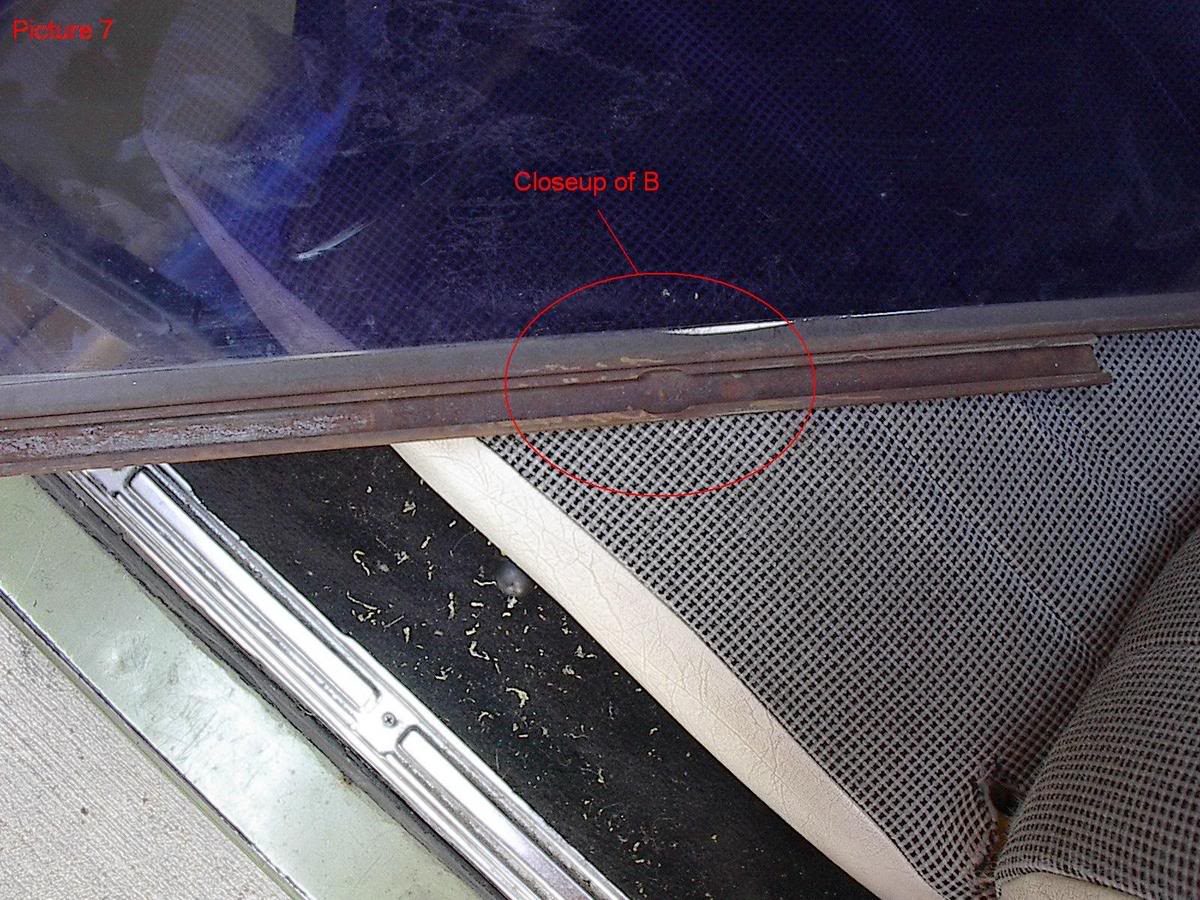  Ok, pictures 6 and 7 are just closeups of picture 5. The A and B in picture 8 correspond with the A and B in pictures 5, 6, and 7. The D's in picture 8 correspond with the D's in picture 1. This is where you start working in Picture 1 B. Once you have the vent window assembly out you can slide the window forward. Lift the window up until the arm of A in picture 8 is level. This will allowPicture 8 A to come out of Picture 5 A. Once that one is out, lower the window back down. You can then slide the window into position to get Picture 8 B disconnected from Picture 5 B. Once A and B in picture 8 are seperated from A and B in picture 5, you can lift the window right out of the top of the door. Now you remove Picture 1 D. Once those are out, you can slip Picture 8 C out of the slide mounted on the inside of the door. Installation is the reverse of removal. ***Edited by mod***Here's a tip from incoma on reinstalling the vent. "A trick to getting the vent window to install without a lot of pushing, scratching of paint, and general trouble is to loosen the rear window guide. This guide has 3 bolts - one on the back of the door, and two towards the bottom of the door just inside where the door panel mounts. Without loosening this bracket, you'll have to bend the vent window frame to get the vent window installed." Have fun! 
__________________
"The greatest pleasure is to vanquish your enemies and chase them before you, to rob them of their wealth and see those dear to them bathed in tears, to ride their horses and clasp to your bosom their wives and daughters." Ghengis Khan IIOY??? Last edited by augie; 04-12-2011 at 12:18 AM. |
|
|
|
|
#2 |
|
Its Magically Delicious
Join Date: Jan 2003
Location: oregon
Posts: 2,398
|
great info .... you motivated me to get out early and get started on this ....im stuck though ... i can't acheive what is in pic 3 .... i can't get the regulator up and back enough ... im putting lots of stress on the window and i dont want to bust it .....i removed the fuzzies in the vent window track to hopefully gain some more clearance .....can i loosin the regulator bolts alittle to get more wiggle from the window ????
please help ASAP
__________________
71 C10 LWB 350sbc -TH350 12 bolt 3.42 Posi Of all my favorite things to do, The utmost is to have a brew. My love grows for my foamy friend, with each thirst-quenching elbow bend. Beer so frosty, smooth, and cold it's paradise pure liquid gold. Yes beer means many things to me that's all for now cus I gotta pee. |
|
|
|
|
#3 |
|
Its Magically Delicious
Join Date: Jan 2003
Location: oregon
Posts: 2,398
|
window, regulator and vent are back in ... seems alot tighter to operate than i imagined ... going to grease it more... there was a 1 rivet and 3 screws holding the reg in , so i have to drill that out and replace with a screw ( my junkyard days are paying off ... i had 4 of those screws i pulled from trucks in boneyards ... ... vacuumed out glass from bottom of door (all thieves ..rot in h^ll)
now to put all the small stuff back on .. thanks again for the great info guys
__________________
71 C10 LWB 350sbc -TH350 12 bolt 3.42 Posi Of all my favorite things to do, The utmost is to have a brew. My love grows for my foamy friend, with each thirst-quenching elbow bend. Beer so frosty, smooth, and cold it's paradise pure liquid gold. Yes beer means many things to me that's all for now cus I gotta pee. |
|
|
|
|
#4 |
|
The oddest Todd around
Join Date: May 2004
Location: Miami, Florida
Posts: 1,418
|
I just noticed this.
Yes, it takes a lot of force to get that vent window assembly back enough to get it out. The first time I did it I thought I was breaking it too. Todd
__________________
"The greatest pleasure is to vanquish your enemies and chase them before you, to rob them of their wealth and see those dear to them bathed in tears, to ride their horses and clasp to your bosom their wives and daughters." Ghengis Khan IIOY??? |
|
|
 |
| Bookmarks |
|
|