
|
|
|
 11-16-2016, 10:51 PM
|
#1 |
|
Registered User
Join Date: Mar 2006
Location: Gilbert, AZ
Posts: 179
|
Re: The Story Of A Cummins Suburban (Lots Of Pics)
Awesome! You do some incredible work. I think it's great that you've documented the diesel so well and that you're using it to the extent you do. I sold my blazer a few years back, and I really want to build a gas 4x4 suburban for camping, fishing, hunting, etc. So cool, thanks for sharing!
|

|

|
|
11-18-2016, 02:12 AM
|
#2 | |
|
I had a V-8
Join Date: May 2003
Location: Phoenix AZ
Posts: 1,116
|
Re: The Story Of A Cummins Suburban (Lots Of Pics)
Quote:
__________________
1972 K20 Suburban, 5.9L Cummins, Banks Power Pack, NV4500HD, NP205, H.A.D., D60/14FF ARB Link To Build: HERE. |
|
|
|
|
|
12-06-2016, 02:52 AM
|
#3 |
|
I had a V-8
Join Date: May 2003
Location: Phoenix AZ
Posts: 1,116
|
Re: The Story Of A Cummins Suburban (Lots Of Pics)
So, on to some truck stuff for a change. I am way behind on post about the service/modifications that support the travels that seem to take the spotlight around here. Things are not always rainbows and unicorns with this thing and a significant amount of maintenance/service/modifications occur behind the scenes to try to keep our adventures hand tool-free. I have no issues changing a part that is kind enough to fail in my driveway or around town here. A part that fails away from home, but still allows me to get home is the next best kind. All vehicles have parts that fail (even brand new vehicles) and doing what we do, a keen eye, ear, etc is required to keep the back country travel uneventful in the mechanical department.
One part that has become a recurring issue are my electric fans on the intercooler. These are mainly used at low speed on the trails to keep the large belt driven fan off as much as possible and also to increase airflow across the condenser when the a/c is on. A little back story on the fans I use; they are Hayden 12" curved blade pushers that I have been using for decades as pushers on every other vehicle in my fleet (all of which see more hours of service in summer than this truck does). All of those vehicles still have the original ones I installed in them. The Suburban on the other hand has barfed one in an electrical smokeshow on the trail out of Fossil Creek a few years back. I changed both out with new ones so as to not have an issue with either again. While doing that I made new aluminum mounts welded to the intercooler and engineered them in such a way I could drop a fan out the bottom and not have to disassemble the whole grille structure. That worked great until I installed that gigantic winch behind the bumper (which places it under the intercooler, thus blocking my great plan to drop a fan out the bottom). Enter ANOTHER dead Hayden fan into the picture. Can't drop it out the bottom. Have to disassemble grille structure. I don't want to. It needs to be done. Still don't want to. I'm sick of changing Hayden fans. I decided I needed to change them both again--to a different brand this time. I've been installing Spals for a while now in other vehicles, so I opted for a pair of those to replace these. The pictures of the Spals looked like the same housing, but when they arrived they were different. All of those nice brackets I made to support the Hayden fans had to be cut off and remade. Swell. Not only that, the Spals use a mounting setup that is the same style, but quite different at the same time. It took me a bit to come up with a mounting setup that would give the support these things need. New brackets: 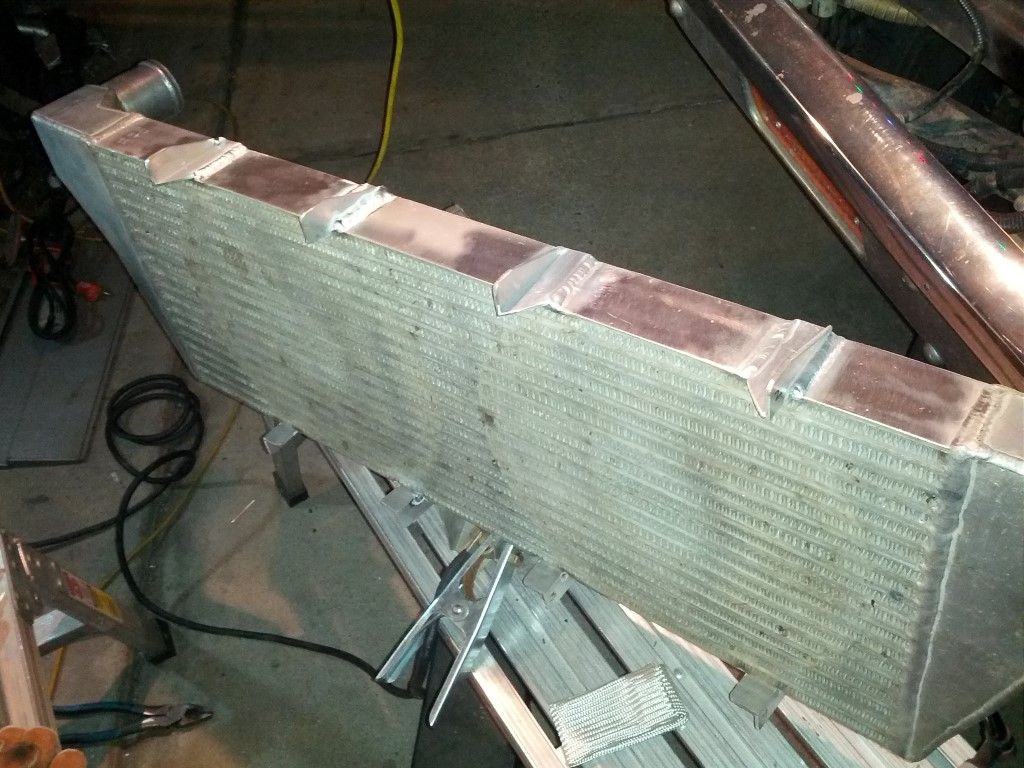 Spals mounted: 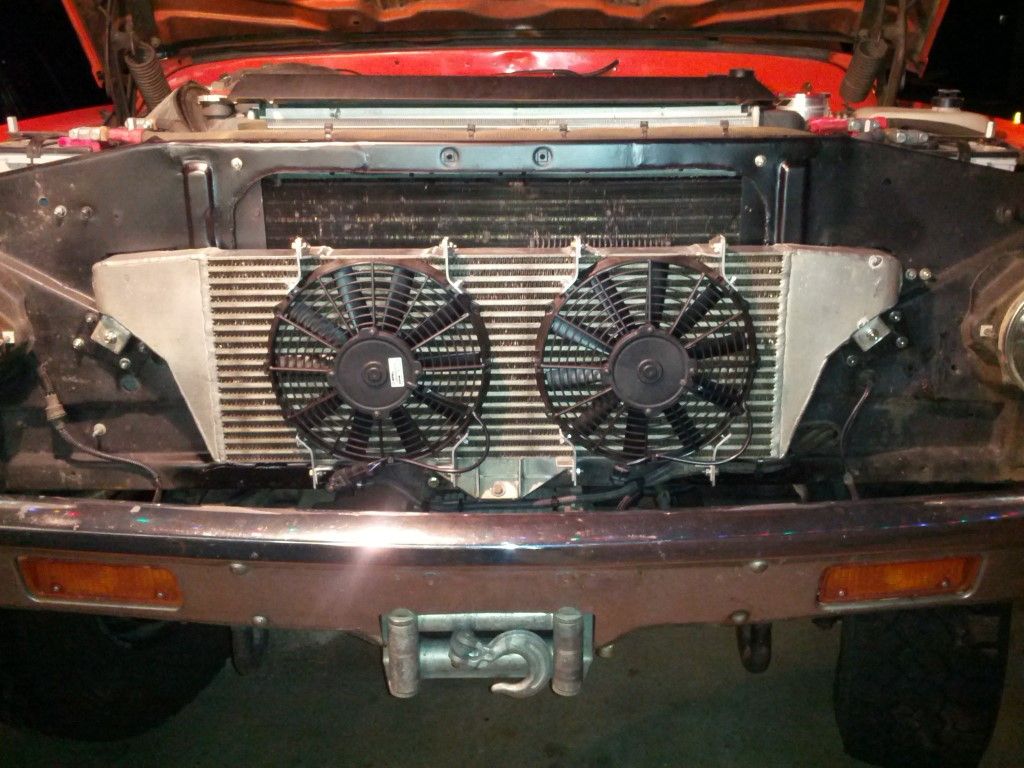 These things move a bunch more air and also make a fair bit more noise as well. Nothing obnoxious, but noticeable. Hopefully their service life will be measured in decades and not weeks... One nice thing about living and traveling in the desert is the bugs are small and fairly dry. Once we get out of the desert, the bugs get larger and much juicier. Many times while traveling through an area that bugs are greasing my windshield to the point visibility is becoming an issue, I start wondering about the immediate health of my cool-pack. If my windshield looks like this, you can bet the intercooler and condenser are looking the same or worse. I ALWAYS thoroughly wash the heat exchangers when I have a component out, but out on the road, that really isn't an option. I decided to add a stainless wire cloth behind the grille. Simple enough, but not quite so. Luckily a buddy of mine introduced me to the evils of the screen once upon a time when he added some to his racecar and instantly had cooling issues. Come to find out there are three dimensions to the wire cloth. Diameter of wire, size of hole, number of holes per inch. All of these contribute to calculate the open area. So, great, where to start... I took some vernier calipers to work and measured the dimensions of the cloth on a Mack, a Sterling, a Freightliner and an International. Interestingly, they all used cloth with the exact same dimensions. So I set out to get some cloth with those dimensions. I couldn't find any. I could come close, but not the same. I did find an online calculator that you can put each dimension into and find out what open percentage of area you have and it is absolutely amazing how a small change in one dimension can cut open area DRASTICALLY. It took an evening with the calculator and some online sources to find something close to what the tractors use. I went with a little more open area and still lost 1/3 of the area to wire. Yep, cut airflow across the cool pack by 1/3. Wow. It is noticeable in how often the fan clutch engages in the heat, but the amount of junk it keeps out is well worth it. The cooling system is big enough to deal with the airflow loss and not have a detrimental on engine temperature. 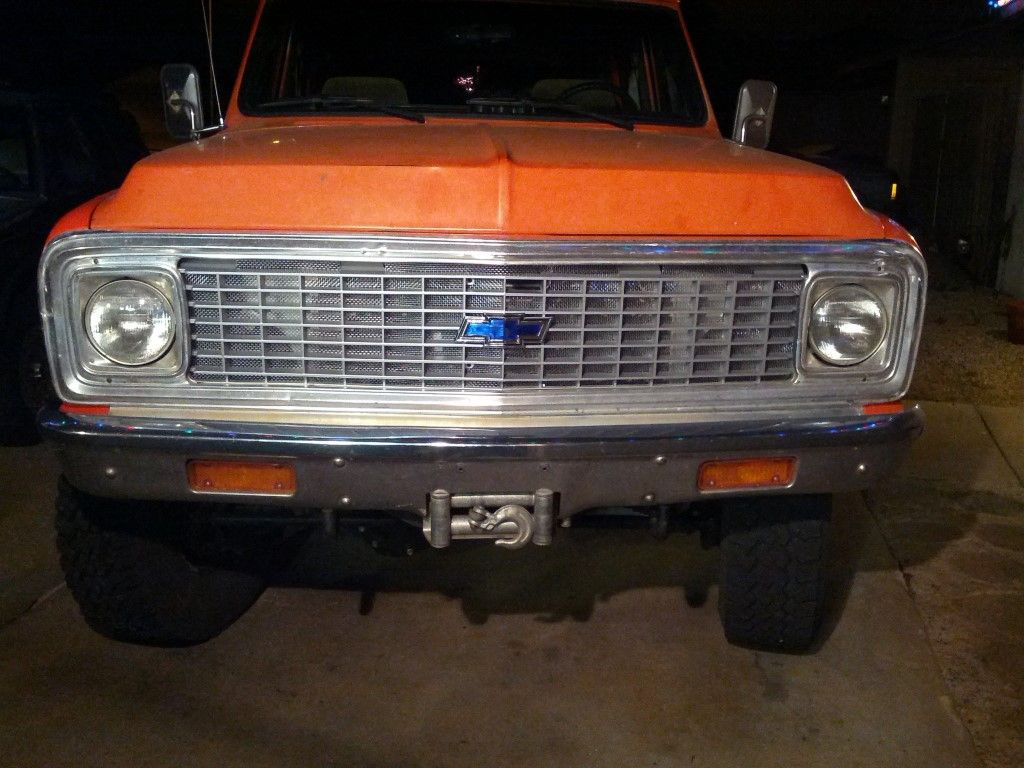 I also added the bowtie to the grille. It is an authorized GM reproduction and it already looks like crap. Water got into the blue area and the sun faded it out. Good job china. I wanted to try some more noise abatement up front. It's actually fairly quiet inside, but some quiet is good, more is better. One thing I had done nothing to was the hood. The hood acts like a big sound radiator and all that sound goes right through the windshield because normal glass has absolutely no sound dampening properties whatsoever. After much research both online and people in the know, the most popular method I found was Line-X. So off came the hood and to Line-X we went. After: 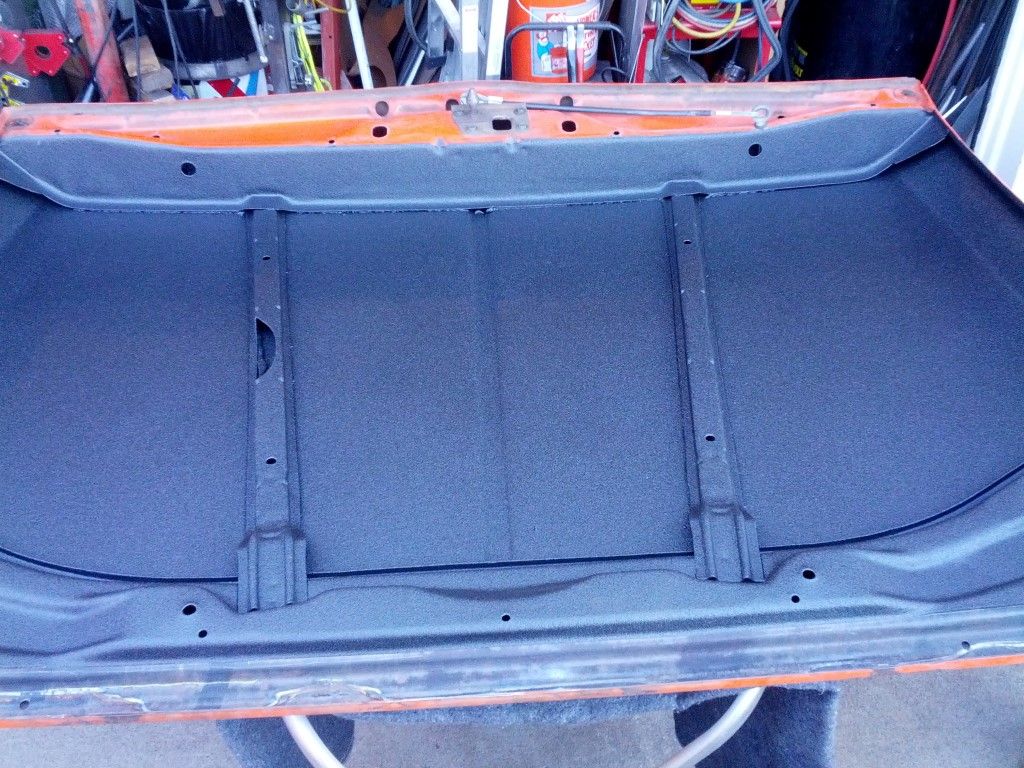 It turned out pretty good. Does it work?? Yes and no. It definitely kills lower frequencies. Heavy engine sounds etc. Unfortunately, this "unmasks" the higher pitch sounds. Now it sounds like someone cranked the volume on the higher frequency turbo whine. Not terrible, but much more noticeable. It really isn't that bad because the high pitch sounds are more of an annoyance than the lower pitch which are great contributors to driver fatigue. We don't want that. All in all, I feel it was worth the time and money and definitely helped a situation that didn't seem that bad to begin with. Win-win.
__________________
1972 K20 Suburban, 5.9L Cummins, Banks Power Pack, NV4500HD, NP205, H.A.D., D60/14FF ARB Link To Build: HERE. |
|
|
|
|
12-07-2016, 05:20 PM
|
#4 |
|
6>8 Plugless........
 Join Date: Sep 2007
Location: Prairie City, Ia
Posts: 17,140
|
Re: The Story Of A Cummins Suburban (Lots Of Pics)
Nice maintenance and upgrading. Do you have a link to the screen that you went with to save us the same research?

__________________
Ryan 1972 Chevy Longhorn K30 Cheyenne Super, 359 Inline 6 cylinder, Auto Trans, Tilt, Diesel Tach/Vach, Buckets, Rare Rear 4-link and air ride option Build Thread 1972 GMC Sierra Grande Longhorn 4x4 1972 Chevy Cheyenne Super K20 Long Step side tilt, tach, tow hooks, AC, 350 4 speed 1972 C10 Suburban Custom Deluxe 1969 Chevy milk truck 1971 Camaro RS 5.3 BTR STG3 Cam Super T10 1940 Ford 354 Hemi 46RH Ford 9" on air ride huge project Tired of spark plugs? Check this out. |
|
|
|
|
12-08-2016, 02:30 AM
|
#5 | |||
|
I had a V-8
Join Date: May 2003
Location: Phoenix AZ
Posts: 1,116
|
Re: The Story Of A Cummins Suburban (Lots Of Pics)
Quote:
Quote:
Quote:
__________________
1972 K20 Suburban, 5.9L Cummins, Banks Power Pack, NV4500HD, NP205, H.A.D., D60/14FF ARB Link To Build: HERE. |
|||
|
|
|
|
12-16-2016, 02:15 AM
|
#6 | |
|
I had a V-8
Join Date: May 2003
Location: Phoenix AZ
Posts: 1,116
|
Re: The Story Of A Cummins Suburban (Lots Of Pics)
Quote:
Wire diameter is .027" Hole size is .140" Holes per inch: 6 I forget exactly how this compares tot he stuff off the tractors, but I believe the wire diameter is slightly smaller and the holes are a fuzz bigger than the big truck stuff.
__________________
1972 K20 Suburban, 5.9L Cummins, Banks Power Pack, NV4500HD, NP205, H.A.D., D60/14FF ARB Link To Build: HERE. |
|
|
|
|
|
12-16-2016, 02:21 AM
|
#7 |
|
I had a V-8
Join Date: May 2003
Location: Phoenix AZ
Posts: 1,116
|
Re: The Story Of A Cummins Suburban (Lots Of Pics)
So one of the few recurring issues I have had over the years is warping the front brake rotors. It has happened a few times since I built it. It makes no sense as I know how to descend a grade without riding, or oftentimes even using the brakes. I have no issue going down a hill in a lower gear even if it is a bit slower than I would like to be running. If it keeps me off the brakes, I'm good with it. The rear brakes are fully functional and the auto adjusters work as well as being manually adjusted a couple times a year. So that, and the fact that I only use high quality components in the system really puzzles me. The rotors have not floated on any boat to arrive in this country. They are complete hub/rotor assemblies from GM and are from Budd, a longtime OE supplier. The caliper were also brand new units from GM, not some rebuilt rusted out cores. Brand new, zero mile units. The caliper brackets were some very nice pieces I found locally and installed after the first warping issue. The mounting hardware is new and cleaned/lubed any time the caliper is removed for any reason. The original caliper brackets that came on the 60 had a bit of wear in the area where the end nub of the pad rides. The replacement pieces had much less wear in that area and none where the caliper itself rides. I use Bendix Fleet/Metlock pads exclusively. They are a great compound that has a great coefficient of friction but also has great pad life and does not kill rotors. Win, win, win. I ditched the corroded rotor dust shields because they were pretty much junk and also all the cool kids do it. So with all of the money and brand new parts I've thrown at these brakes, I was getting very frustrated having to repeatedly deal with warped rotors. So what is the problem?? All of this good stuff should work in harmony making the pressing of the brake pedal nothing less than an experience full of unicorns and rainbows.
So I guess I have lost track of exactly when I decided to try again (about 1.5 years ago), but I eventually started acquiring MORE new parts. One possibility I could not discount was the area of the caliper bracket where the nub of the pad rides. Every bracket I have ever seen has some wear in this area, but they don't warp rotors like mine does. So I throw out the dragnet looking for caliper brackets and eventually I come up with two new ones (not at the same time mind you). 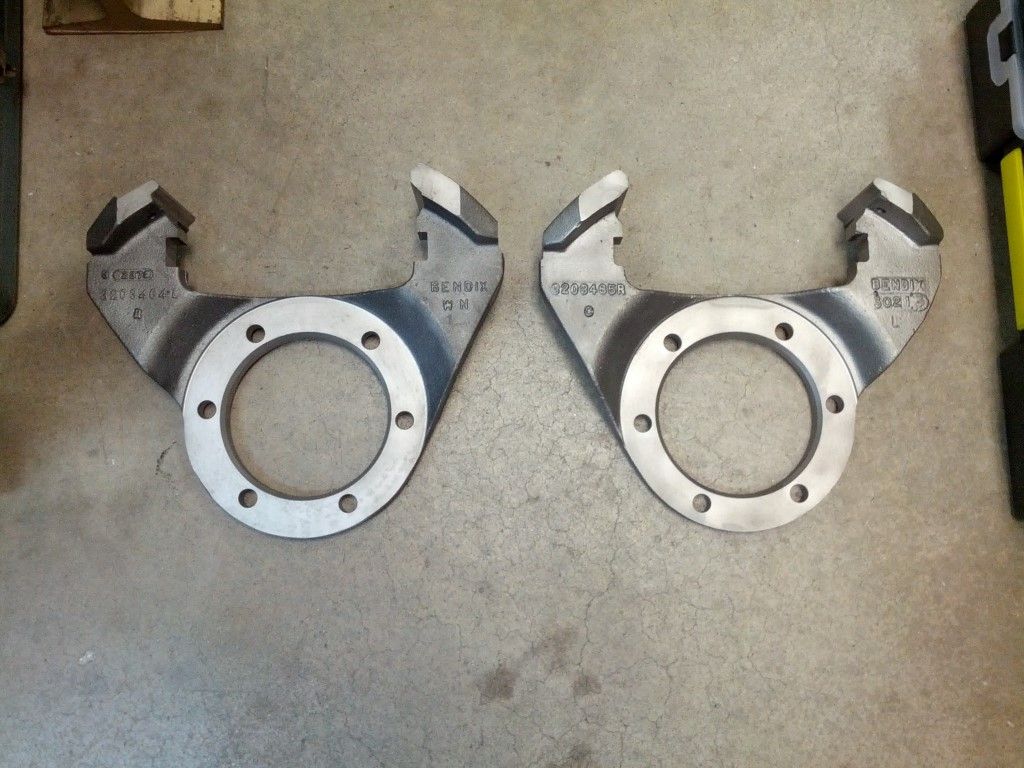 Yep, those are NOS caliper brackets. Not an easy thing to find, but I am really trying to eliminate any known possibilities here. Another thing I decide to try is installing the rotor dust shields. I've heard the main reason the cool kids remove them to prevent rocks from getting caught between the dust shield and the rotor. While a viable possibility, I have never had it happen on any other vehicle I've driven on dirt, so that reason is out for me at this point, but looking at my situation from a different angle the shields can help a different situation--quenching/thermal shock from water. When running in the desert, the brakes run warm/hot and a small stream crossing or puddle will throw cold/cool water onto a hot rotor. Obviously the dust shields are not water tight, but they will keep small amounts of water from directly contacting the hot rotor. Will it solve the problem?? Who knows, but I'm going to try it. The only problem now is I have to find dust shields. I'm not exactly sure where these came from, but I think they came from my buddy Russ that does all of my precision machining. I could be wrong, but if I am, I'll still give him credit. I cleaned them up and ended up with dust shields that look like this:  Nice pieces. Now what?? Well, about the only thing left are the rotors themselves. Ugh, I paid a ton of money for these GM/Budd hub/rotor units that are made in the US, and I really don't want to condemn them, but they have been cut a few times, a couple of those were real deep cuts to get them straight. Are they permanently warped?? Do they have memory?? I don't know. One thing I have done for decades on vehicles that I use in a performance fashion is to machine cooling slots in the rotor faces. I never got into drilling cooling holes in the faces due to potential cracking issues and the fact that the slots have always been enough. Now I have an issue. Do I machine these possibly compromised rotors with cooling slots?? Do I buy new rotors and machine slots into them?? Can I even find domestic rotors anymore?? Well, I started researching rotors that are pre-machined with slots in them already. There are several companies out there that offer them. It seems that none of them use domestic iron for this vehicle application. I finally settle on Street Plus Performance units. They are slotted and drilled rotors. The holes in the face of the rotors are radius chamfered so stress risers are greatly reduced. They also warranty their rotors against cracking. I guess that is as good as I'm going to get, so I throw down another pile of cash for the new rotors: 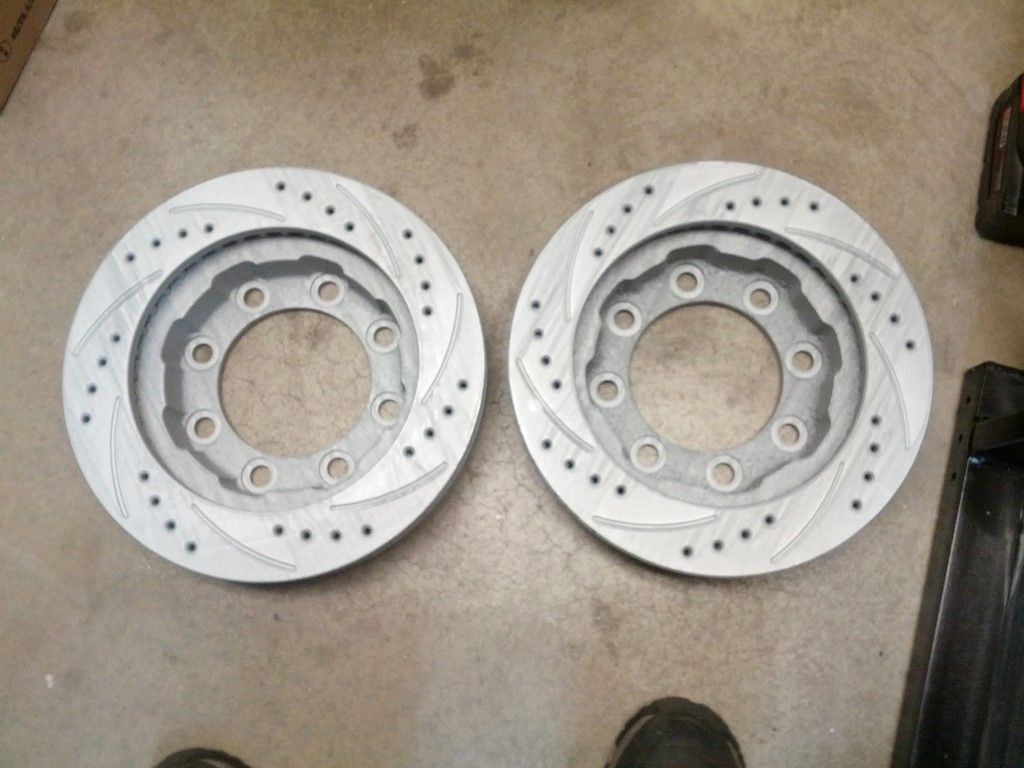 So we're ready to go now, right?? Well, not quite.... I can not bring myself to install all of these new , high dollar parts with the old brake pads. I grab another set of Bendix Fleet/Metlock pads and start inspecting them for issues. One thing I did not like was the way the end nub, that locates the pad in my brand new caliper brackets, is shaped. I decided to square up the end of the pad and then polish the end of the nub so no additional drag would occur in that area. The picture is not so great, but the pad on the left is the one that got squared up and polished: 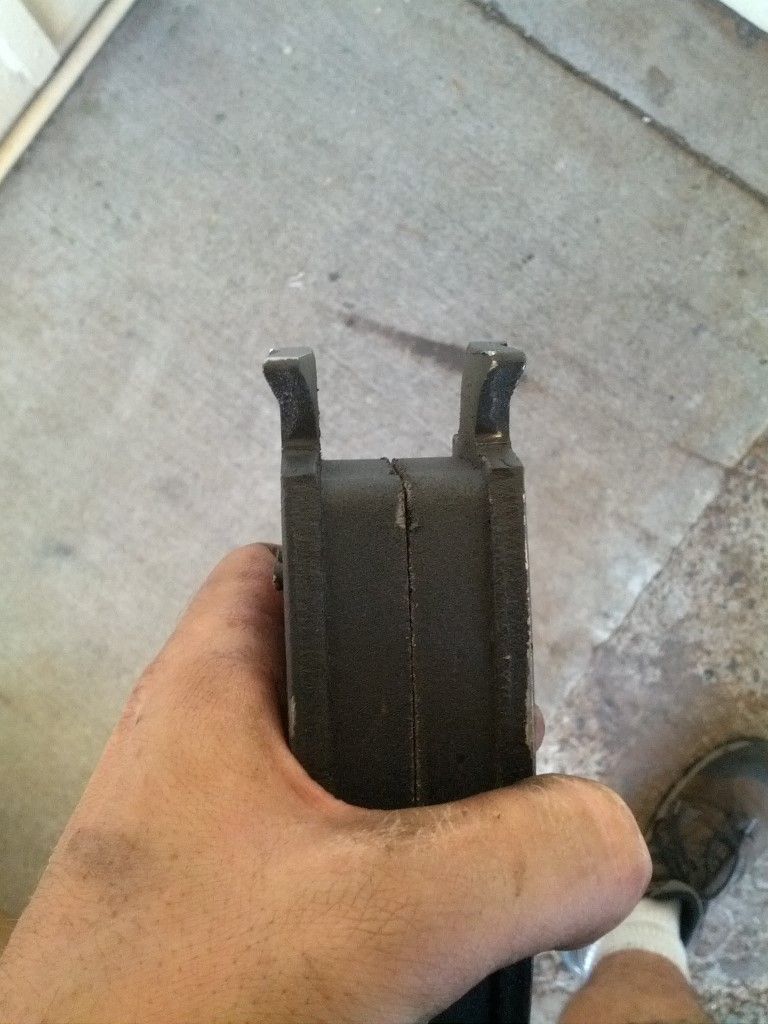 A different angle that shows the end a little better: 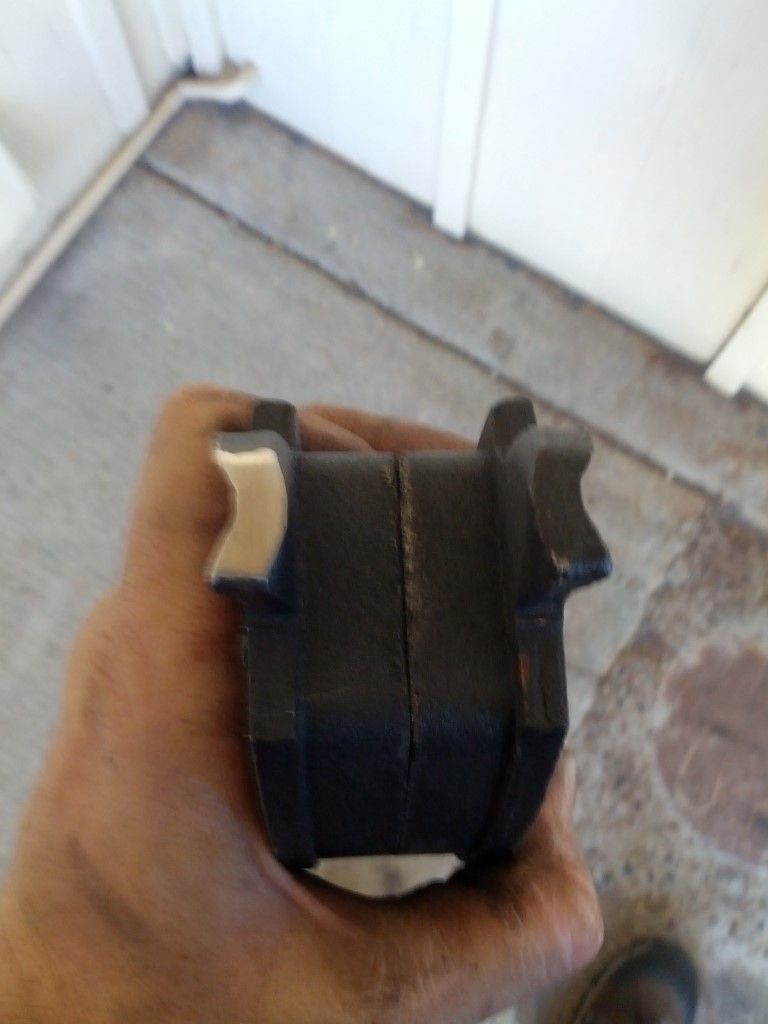 So I added it all together and threw it at the vehicle and this is what I came up with: 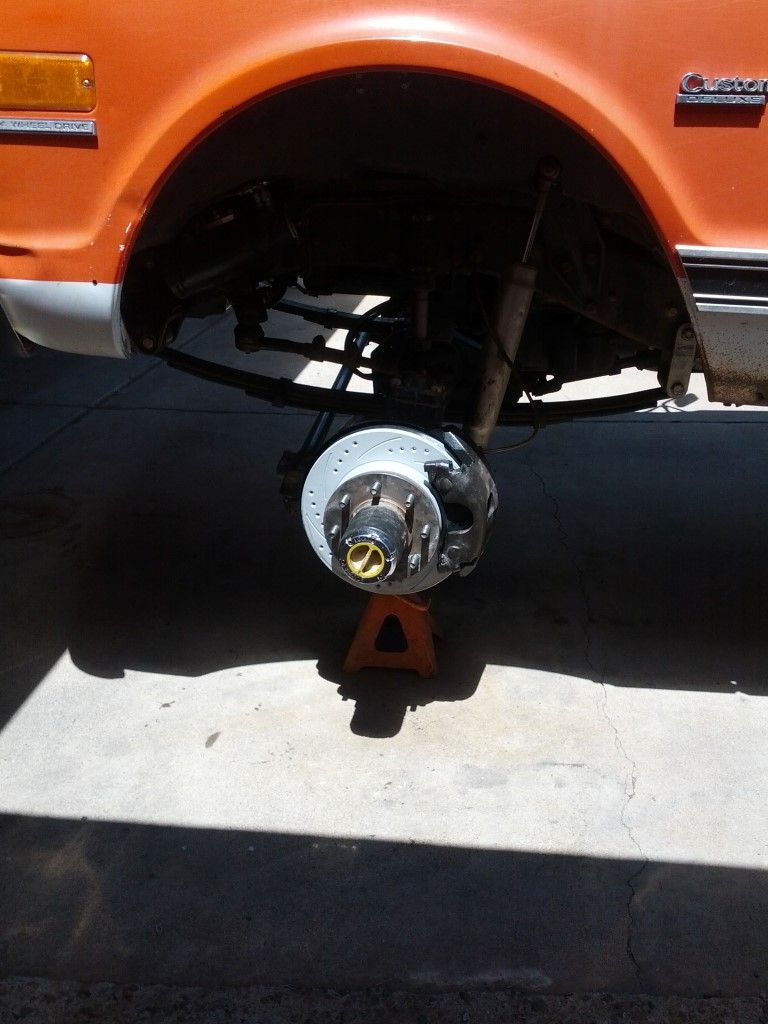 Looks like every other time, except the rotor is drilled and slotted now. So, does it work?? I'd say the jury is still out, but so far, so good. The parts have been in there for about a year and a half now and have no indication of being warped at all. When I hubbed the rotors I measured the runout and it was a bit more than I wanted (I don't recall what the reading was, just that it was more than I wanted), but it has not been an issue at all. The braking performance seems about the same as it was before, but without the warpage it is so nice to drive. It has been on several trips since installation as well as two of our long summer trips with no problems so far. So hopefully, the problem is finally solved, but if not, I have at least had a couple years of no warpage. At this point I call it a win.
__________________
1972 K20 Suburban, 5.9L Cummins, Banks Power Pack, NV4500HD, NP205, H.A.D., D60/14FF ARB Link To Build: HERE. |
|
|
|
|
12-16-2016, 02:55 PM
|
#8 |
|
Registered User
Join Date: Dec 2011
Location: Earth, NJ
Posts: 479
|
Re: The Story Of A Cummins Suburban (Lots Of Pics)
Where did you get the rotors and the pads? I am working towards my 4x4 conversion and have not found much except stock replacement stuff. I like EBC, but they don't seem to make a rotor for a K30 and only two pad choices and I would like something with low dust.
|
|
|
|
|
12-16-2016, 07:21 PM
|
#9 |
|
Registered User
Join Date: Oct 2014
Location: Kitchener, Ontario, Canada
Posts: 3,254
|
Re: The Story Of A Cummins Suburban (Lots Of Pics)
Ya sounds very frustrating. At least it has been good for a while now. I would put my money on the dust/splash shield.
__________________
http://67-72chevytrucks.com/vboard/s...d.php?t=648459 https://67-72chevytrucks.com/vboard/...d.php?t=769441 1951 MG TD 1967 Jeep CJ5 1.9L TDI 33X13.5X15 Mud Grapplers. 1952 GMC 9700 p/u 7.3L diesel on air, dually |
|
|
|
|
12-17-2016, 12:59 AM
|
#10 |
|
Chevy Enthusiast
Join Date: Jul 2009
Location: Canyon Lake Texas
Posts: 2,024
|
Re: The Story Of A Cummins Suburban (Lots Of Pics)
Looks good! I was sure someone made drilled and slotted d60 rotors but hadn't ever looked into it. Glad to know they're of decent quality.
Yeah I wonder about the dust shields as well. Is there any chance they act like a fan shroud making cooling of the rotor more efficient?
__________________
Tony 1985 GMC K2500 restoration Project: Rust, White & Blue 1989 Chevy R3500 CC Cummins & 4X4 swap some day... 1989 Burb (D60, 14BFF, 12V, NV4500, NP205, 37" tires in progress) |
|
|
|
|
12-17-2016, 03:08 AM
|
#11 | |||
|
I had a V-8
Join Date: May 2003
Location: Phoenix AZ
Posts: 1,116
|
Re: The Story Of A Cummins Suburban (Lots Of Pics)
Quote:
Quote:
Quote:
__________________
1972 K20 Suburban, 5.9L Cummins, Banks Power Pack, NV4500HD, NP205, H.A.D., D60/14FF ARB Link To Build: HERE. |
|||
|
|
|
|
12-18-2016, 10:45 PM
|
#12 | |
|
Registered User
Join Date: Jan 2016
Location: Mesa, AZ
Posts: 60
|
Re: The Story Of A Cummins Suburban (Lots Of Pics)
Quote:
If I have a warping issue I may see about installing some kind of Wilwood rotor/hat assembly in place of the OE crap. So far though I haven't had any issues, but then again I've only had these on there for a month or so.
__________________
1991 V1500 Blazer (Silverado), 5.9L 12V P-pumped Cummins (5x .012 sac injectors, #6 fuel plate, WH1C with external 38mm wastegate running 30psi), NV4500 with 1-⅜" input shaft, SBC Con-O clutch, NP205, HAD, 4.10 D61/14BFF spinning 37" Nitto Exo's  "I got a shotgun, a rifle, and a four wheel drive and a country boy can survive." |
|
|
|
|
|
12-19-2016, 04:00 PM
|
#13 | |
|
Registered User
Join Date: Dec 2011
Location: Earth, NJ
Posts: 479
|
Re: The Story Of A Cummins Suburban (Lots Of Pics)
Quote:
Looks like Wilwood sells two front hats for the 8 on 6.5...
|
|
|
|
|
|
12-19-2016, 10:35 PM
|
#14 | |
|
Registered User
Join Date: Jan 2016
Location: Mesa, AZ
Posts: 60
|
Re: The Story Of A Cummins Suburban (Lots Of Pics)
Quote:
__________________
1991 V1500 Blazer (Silverado), 5.9L 12V P-pumped Cummins (5x .012 sac injectors, #6 fuel plate, WH1C with external 38mm wastegate running 30psi), NV4500 with 1-⅜" input shaft, SBC Con-O clutch, NP205, HAD, 4.10 D61/14BFF spinning 37" Nitto Exo's "I got a shotgun, a rifle, and a four wheel drive and a country boy can survive." |
|
|
|
|
|
01-02-2017, 11:14 PM
|
#15 |
|
Registered User
Join Date: Jun 2012
Location: Selkirk Ontario Canada
Posts: 1,141
|
Re: The Story Of A Cummins Suburban (Lots Of Pics)
That's awesome..
__________________
My 63 GMC Panel Slow Build http://67-72chevytrucks.com/vboard/s...=1#post5457281 63 
|
|
|
|
|
01-03-2017, 08:56 PM
|
#16 |
|
Registered User
Join Date: Oct 2014
Location: Kitchener, Ontario, Canada
Posts: 3,254
|
Re: The Story Of A Cummins Suburban (Lots Of Pics)
That looks fantastic!!!! Where did you get and what brand are the clamps used to hold your roof rack on? Also do you have a close up of the pivots for the arms of your awning? Thanks
__________________
http://67-72chevytrucks.com/vboard/s...d.php?t=648459 https://67-72chevytrucks.com/vboard/...d.php?t=769441 1951 MG TD 1967 Jeep CJ5 1.9L TDI 33X13.5X15 Mud Grapplers. 1952 GMC 9700 p/u 7.3L diesel on air, dually |
|
|
|
|
01-04-2017, 02:21 AM
|
#17 | |
|
Registered User
Join Date: Apr 2012
Location: Grants Pass, OR
Posts: 543
|
Re: The Story Of A Cummins Suburban (Lots Of Pics)
Quote:
http://search.nrs.com/search?w=quick%20n%20easy to save some searching if anyone is interested.
__________________
1960 c30 Apache Panel w/ '95 cummins bt6 turbo diesel (work in progress) NOTE: due to photobucket trying to extort money my photos are temporarily unavailable. currently looking for alternative to fix issue. http://67-72chevytrucks.com/vboard/s...d.php?t=523009 |
|
|
|
|
|
01-03-2017, 09:48 PM
|
#18 |
|
6>8 Plugless........
Join Date: Sep 2007
Location: Prairie City, Ia
Posts: 17,140
|
Re: The Story Of A Cummins Suburban (Lots Of Pics)
Very nice awning! I bet you have a lot of time in finding all the stuff to make it happen. That is good you found a friend of a friend to do the actual sewing building of the canvas. We just got quotes for some custom camper awnings and holly cow those people are nuts.
__________________
Ryan 1972 Chevy Longhorn K30 Cheyenne Super, 359 Inline 6 cylinder, Auto Trans, Tilt, Diesel Tach/Vach, Buckets, Rare Rear 4-link and air ride option Build Thread 1972 GMC Sierra Grande Longhorn 4x4 1972 Chevy Cheyenne Super K20 Long Step side tilt, tach, tow hooks, AC, 350 4 speed 1972 C10 Suburban Custom Deluxe 1969 Chevy milk truck 1971 Camaro RS 5.3 BTR STG3 Cam Super T10 1940 Ford 354 Hemi 46RH Ford 9" on air ride huge project Tired of spark plugs? Check this out. |
|
|
|
|
01-04-2017, 01:55 AM
|
#19 | ||||
|
I had a V-8
Join Date: May 2003
Location: Phoenix AZ
Posts: 1,116
|
Re: The Story Of A Cummins Suburban (Lots Of Pics)
Quote:
Quote:
Quote:
Quote:
__________________
1972 K20 Suburban, 5.9L Cummins, Banks Power Pack, NV4500HD, NP205, H.A.D., D60/14FF ARB Link To Build: HERE. |
||||
|
|
|
|
01-06-2017, 12:37 AM
|
#20 |
|
Chevy Enthusiast
Join Date: Jul 2009
Location: Canyon Lake Texas
Posts: 2,024
|
Re: The Story Of A Cummins Suburban (Lots Of Pics)
Awesome awning! I kinda wish the 73-91 trucks had a drip rail like these.
__________________
Tony 1985 GMC K2500 restoration Project: Rust, White & Blue 1989 Chevy R3500 CC Cummins & 4X4 swap some day... 1989 Burb (D60, 14BFF, 12V, NV4500, NP205, 37" tires in progress) |
|
|
|
|
01-10-2017, 11:24 PM
|
#21 |
|
Registered User
Join Date: Mar 2015
Location: Utah
Posts: 750
|
Re: The Story Of A Cummins Suburban (Lots Of Pics)
very cool rig subscribed for the updates!!
__________________
72 GMC highlander nicknamed by my then 6-year-old brother "stripes" http://67-72chevytrucks.com/vboard/s....php?p=7378180 Check out my Youtube channel @Chad's Fab |
|
|
|
|
02-12-2017, 05:48 PM
|
#22 |
|
Registered User
Join Date: Feb 2017
Location: Utah
Posts: 1
|
Re: The Story Of A Cummins Suburban (Lots Of Pics)
Stumbled across this thread looking for information/motivation for my Chevy Cummins conversion, great build! I enjoyed the pictures you took of your adventures. I had planned on taking a vacation to Flathead Lake when I finished my truck, but now I'm thinking I'll have to extend that to parts of Glacier National Park. Looking forward to more updates!
|
|
|
|
|
02-16-2017, 02:44 PM
|
#23 |
|
Senior Member
Join Date: Apr 2004
Location: sw colorado
Posts: 2,720
|
Re: The Story Of A Cummins Suburban (Lots Of Pics)
Thats super cool! a little shade and a little rain protection can make a huge difference in the mood of the whole trip! i like the white roof rack too. blends in nice.
|
|
|
|
|
02-17-2017, 02:22 AM
|
#24 | ||
|
I had a V-8
Join Date: May 2003
Location: Phoenix AZ
Posts: 1,116
|
Re: The Story Of A Cummins Suburban (Lots Of Pics)
Quote:
Quote:
__________________
1972 K20 Suburban, 5.9L Cummins, Banks Power Pack, NV4500HD, NP205, H.A.D., D60/14FF ARB Link To Build: HERE. |
||
|
|
|
|
02-27-2017, 02:59 AM
|
#25 |
|
I had a V-8
Join Date: May 2003
Location: Phoenix AZ
Posts: 1,116
|
Re: The Story Of A Cummins Suburban (Lots Of Pics)
So here are some more truck stuff photos before we get back to traveling photos. Up until this point I had still been using the sleep platform that I threw together for our first camp trip years ago. It worked. It was already built. It took up more space than it needed to. It had been modified many times and was better than when I built it, but over the years I had learned a lot about what I liked and didn't like about it. I had rebuilt it many times in my head and every time it worked out great. Yeah, well, it's cheaper than building materials.... Anyway, I thought I had figured out the best plan that balanced stout with functionality, weight, and ease of installation/removal.
I started out by making a new driver side rear side panel. I had done the right side as well as the left front piece, but somehow was still using the vinyl covered cardboard left rear piece. That one made a nice template on some sheet steel that I zipped out with the plasma and it got covering from the same piece that supplied material for the other panels. 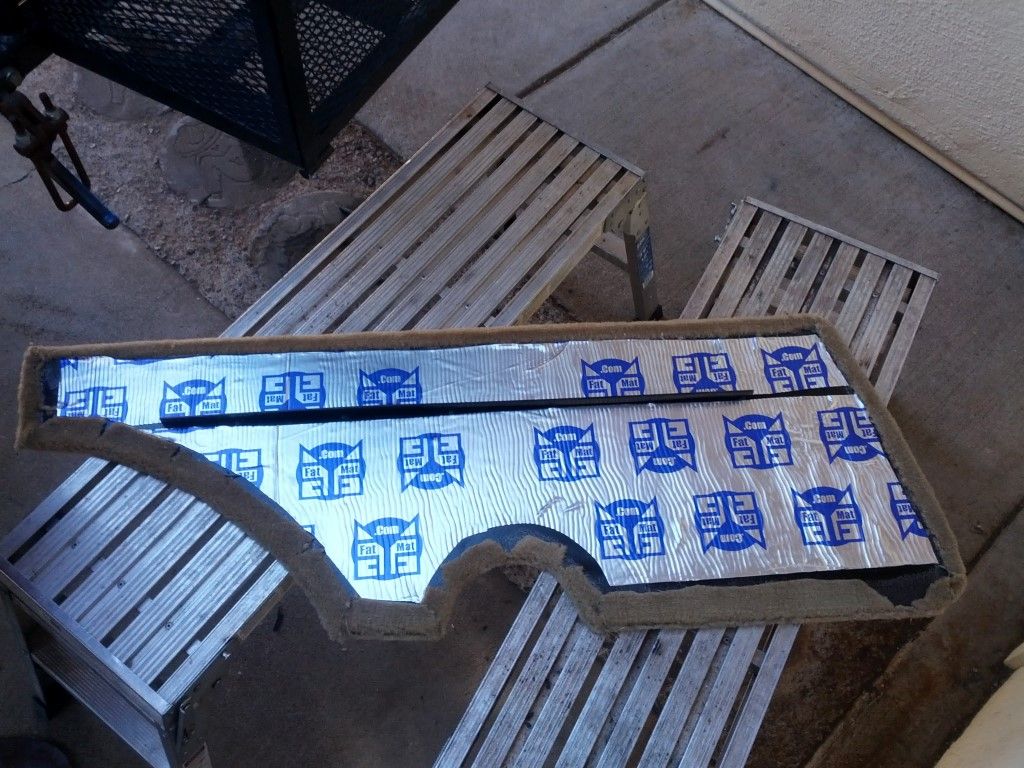 Next came the platform and first on that list was the framework. The original used 2x4's. While durable, plenty stout and easy to assemble, they take up way too much space. Each side had two 2x4's screwed together. One horizontal on the bottom, one horizontal on the top, and one vertical here and there for support of the two horizontals. Now, if you add the thickness of the 2x4's together you get 3". Now each side has one of these structures, so 3" x 2 = 6" total. That is 6" of total width lost to wood. Overkill?? Yes, but it did work. Anyway, that is very valuable basement real estate, so for the redo I opted for some 1" square tube framework with some 1x2" tubing in the center. With only two 1" vertical pieces of tubing I effectively gained 4" of total width under the platform. 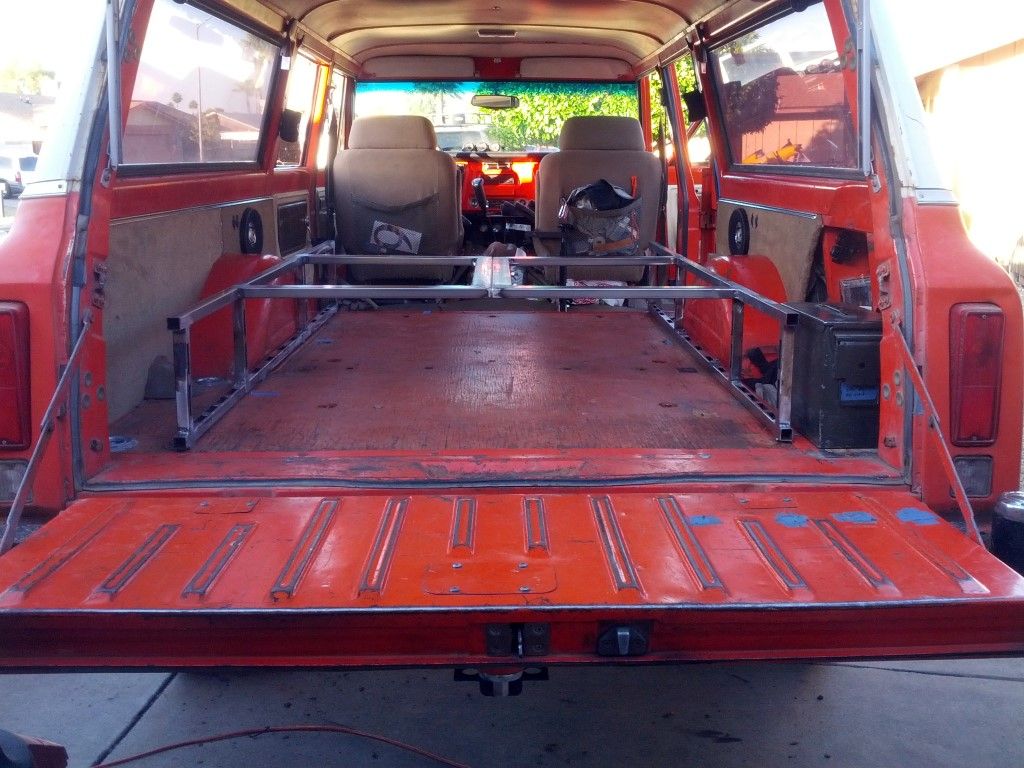 The 1x2" tubing allows the base to be disassembled for installation/removal. At this point it really isn't needed, but as soon as I add anything off of the sides, it won't go into or out of the rear door opening. The two pieces of tubing that run parallel in the middle are bolted together. Take the bolts out and the center falls in and can be removed. Also, if you look closely at the 1" square tubing used everywhere else, you sill see that it is riddled with E-track holes. Yep, good ol' free E-track holes. One thing that I wanted in the new setup was some form of tie down ability as well as some sort of bulkhead provisions. The E-track solved both issues. I can tie stuff down under the platform as well as use D-rings and straps to make bulkheads where needed. Why so much attention to load securement UNDER the platform?? When traveling down less than smooth roads/trails, things under the platform move at will and often end up being inaccessible. Some things always need to be accessible, other things are rarely if ever used and can be stored deeper in the middle. Without some method of securing the items, they all become jumbled up and their whereabouts are unknown. Some E-track debris: 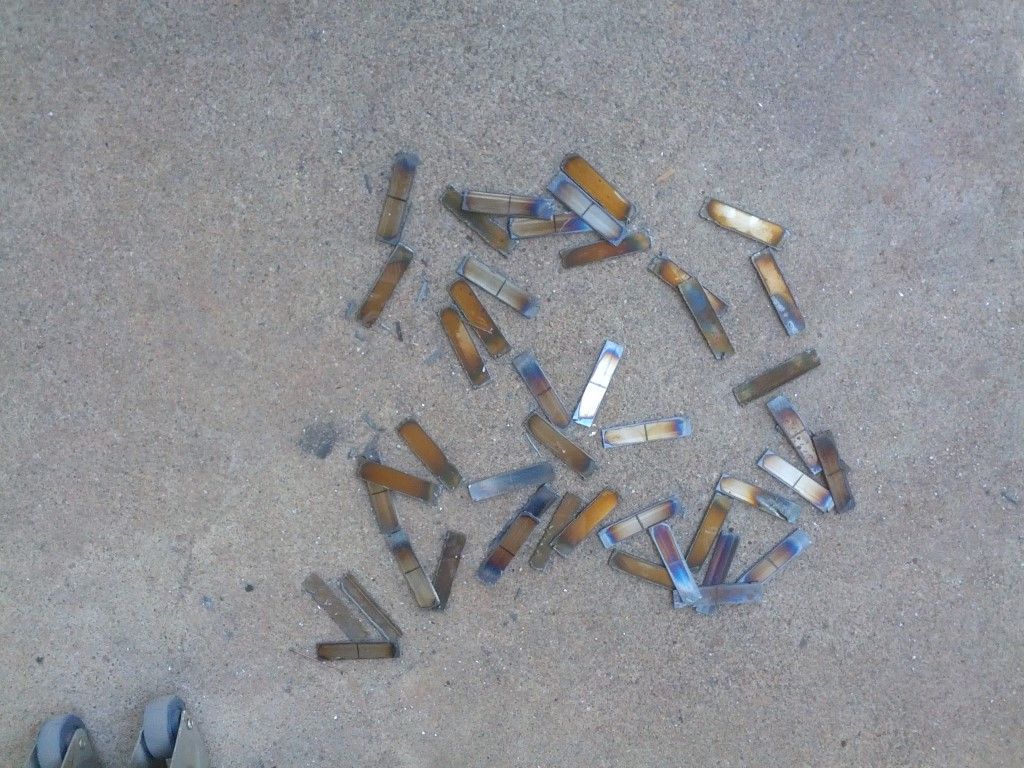 So after determining what the tallest item is that needs to ride under the platform I dropped the height to a fuzz (scientific measurement) over that. That is a very critical as the lower the deck gets, the better the headroom up top is. I took a couple specific measurements of me and my wife to determine how much room was needed and I was able to make enough to allow her to sit upright on the deck. I am close, but not quite enough. When camping, her comfort is more important. I went with slightly thinner plywood on the deck this time as every fraction counts. I also gained 1/2" in basement depth by getting rid of the 2x4's and using the steel tubing. What I was able to do is make the platform deck the same height as the wheel wells. I cut the deck above the wheel wells so the wheel wells actually stick through the deck. Those are the symmetrical notches on opposing sides of the deck: 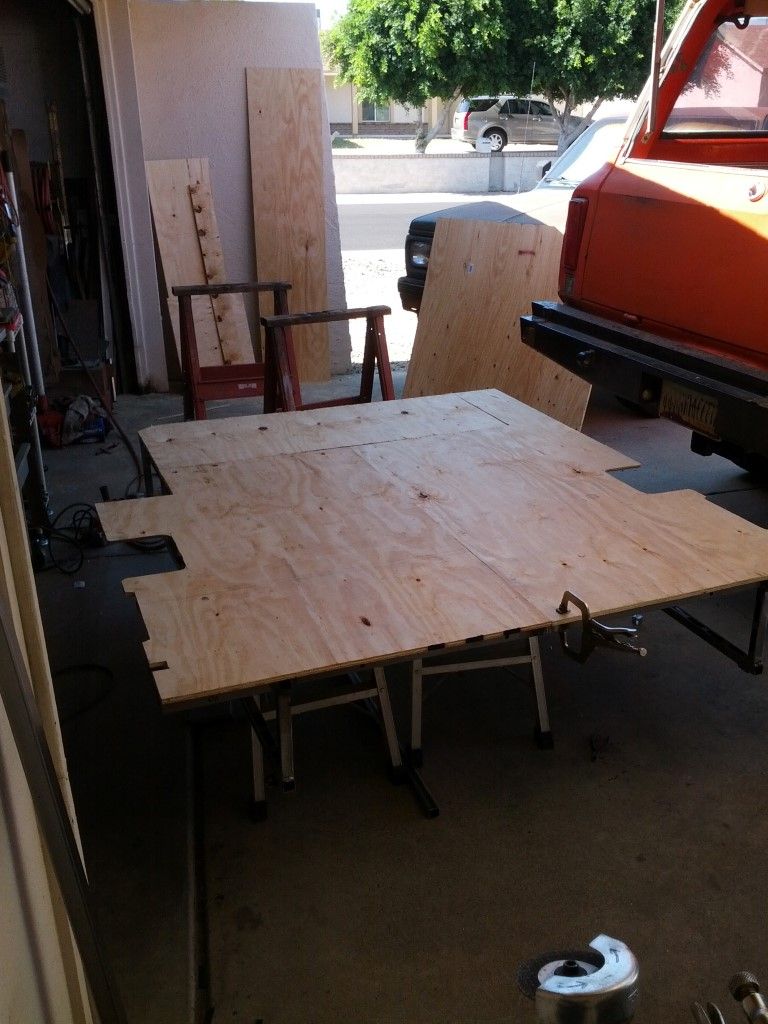 Here it is outfitted with more tie downs and some hinged panels for access to the basement from the top. 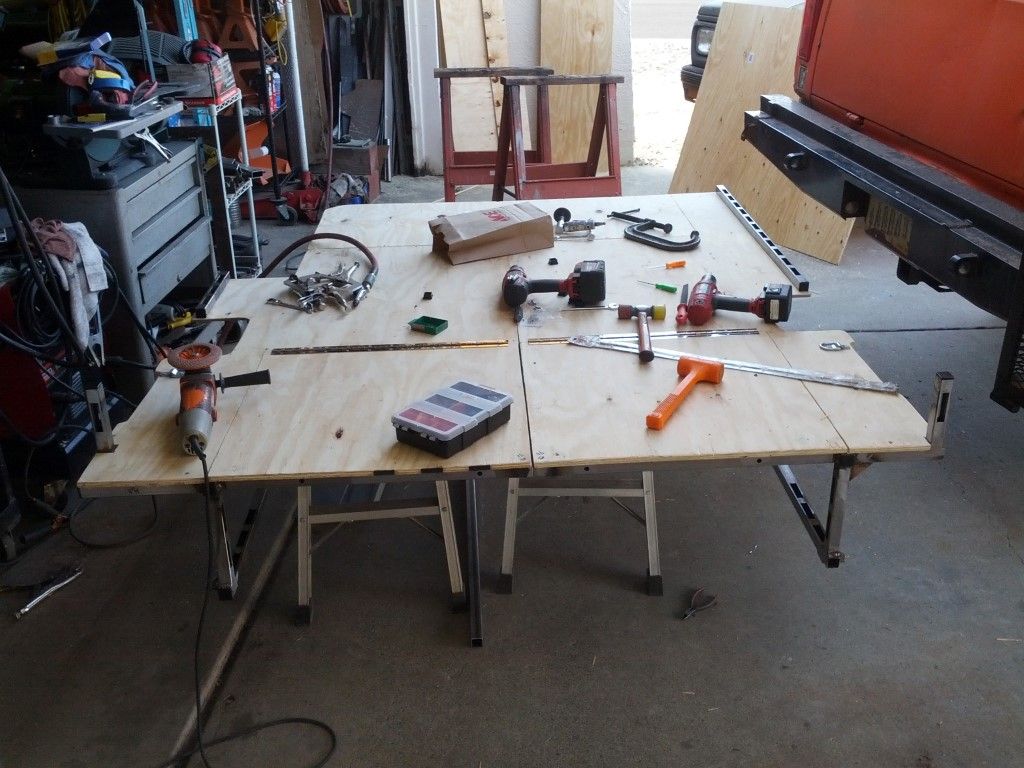 The two pieces of square tubing standing vertically at the front corners are for E-track D-rings and straps to create a bulkhead to hopefully prevent everything on the deck from sliding off the front when descending long, rough trails. I also added tie down points on both sides (some are not visible from the top). All of this works together to hold everything in place and keeps it on top of the deck instead of mixing it all up and barfing it off the front when going down a trail on the brakes. I prepped everything and got it ready to go. I sent the boy in to finish up a couple things, but I think he found a squirrel on the headliner or something: 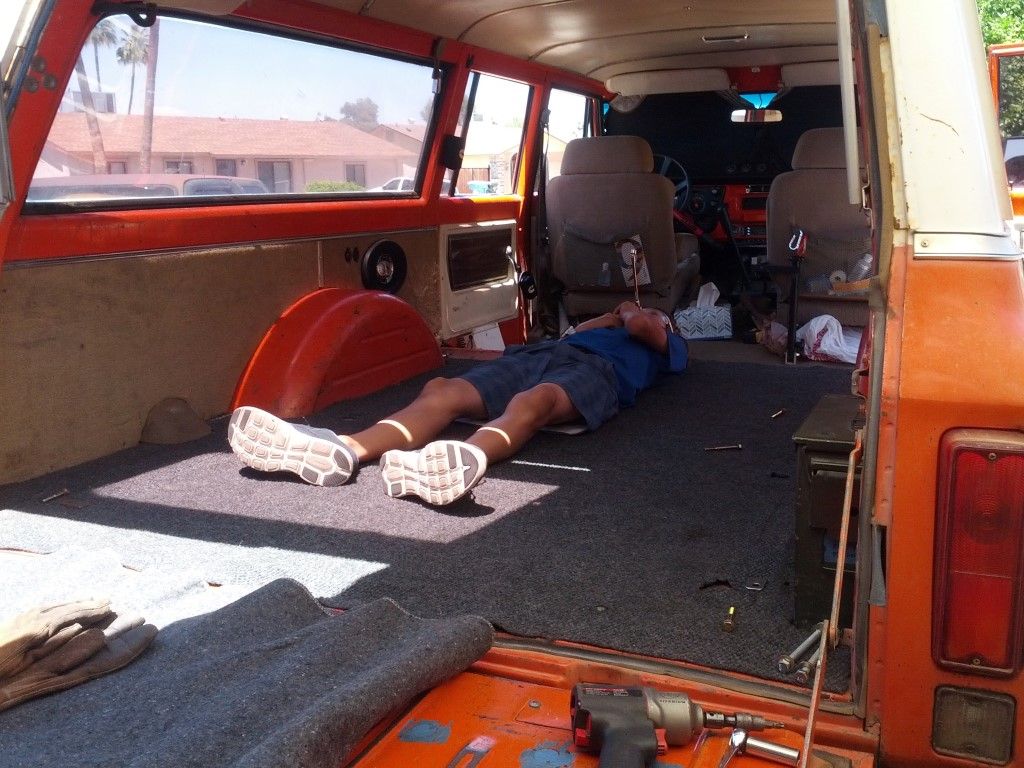 So there it is. A whole lot of engineering/scheming on a seemingly simple item. So was it worth it?? It all turned out great and with several trips on the setup I can say that all of the planning and time spent getting it all right was very worth it. I use the center of the basement for the things rarely used and I use the ends for items that are needed more often/everytime. Everything stays put up on top very nicely now. Not shown in the pics is the carpet that rides on top of the platform for both noise abatement and aiding in equipment retention. Add everything up and it is a very nice unit now. I'm glad I finally took the time to redo it.
__________________
1972 K20 Suburban, 5.9L Cummins, Banks Power Pack, NV4500HD, NP205, H.A.D., D60/14FF ARB Link To Build: HERE. |
|
|
|
 |
| Bookmarks |
|
|


 Hybrid Mode
