
|
Register or Log In To remove these advertisements. |
|
|
|
|||||||
 |
|
|
Thread Tools | Display Modes |
|
|
 10-15-2011, 12:10 AM
|
#1 | |
|
Rollin' Old Skool
Join Date: Jun 2007
Location: Hattiesburg, MS
Posts: 5,371
|
Re: Project Goldilocks, '66 C10 SWB BBW Build
Quote:
those notches look great smoothed up & painted...hope the engine works out for ya
__________________
_____________________________________________ Phillip My Build threads: 1966 Chevy C-10 "Black Betty" shortbed, fleetside, BBW, 327 V8/ Powerglide (under construction) http://67-72chevytrucks.com/vboard/s...ighlight=betty 1997 Chevy Tahoe, 2dr/2wd, mild custom (Daily driver) http://67-72chevytrucks.com/vboard/s...d.php?t=601142 Pics: '66 C-10 https://flic.kr/s/aHsjHWD4h9 '97 Tahoe https://flic.kr/s/aHsjGZ7wKP '93 C-1500 https://flic.kr/s/aHskxdpdnQ '88 S-10 Blazer https://flic.kr/s/aHsjYGx4Md Previous Rides: 1993 Chevy S-10 ext. cab, 4.3L, 4/5 drop (Sold) 1993 Chevy C-1500 short/step Retro-Rod (Sold) 1988 S-10 Blazer 2dr/2wd mild custom (Sold) |
|

|

|
|
10-15-2011, 09:12 AM
|
#2 |
|
Registered User
Join Date: Jun 2010
Location: Vancouver Island BC
Posts: 652
|
Re: Project Goldilocks, '66 C10 SWB BBW Build
Great project, love the 6 plan. That Opala completely rocks, hope you get your six to that level, I'll definitely watch with interest.
|
|
|
|
|
10-15-2011, 09:25 PM
|
#3 | ||
|
Registered User
Join Date: May 2011
Location: Anderson SC
Posts: 3,876
|
Re: Project Goldilocks, '66 C10 SWB BBW Build
Quote:
Quote:
Got a little bit done this afternoon, worked in the yard most of the day. Flipped the frame up on its side so I could drill the bottom holes for the C notches and bag mounts. Man I hate drilling holes in steel this thick! 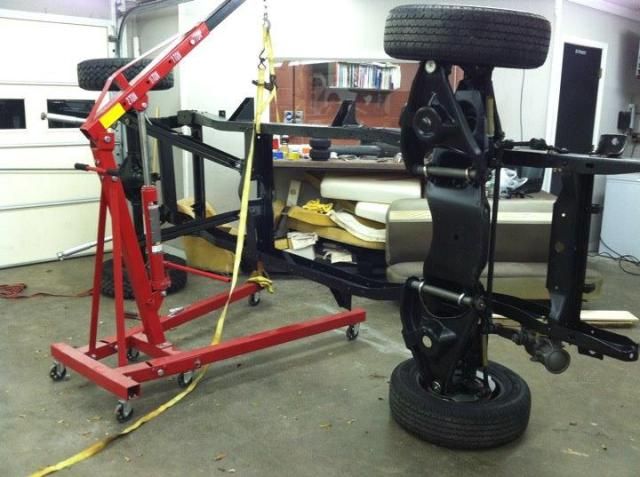 Here's a mini tech tip. Put some wide tape over the part that you will be mounting (bags in my case), and mark where the holes are. Then transfer the tape and use the markings as a template to drill your holes. You can center punch the part while the tape is on there too, and I was able to peel the tape off and use it again for the other side. 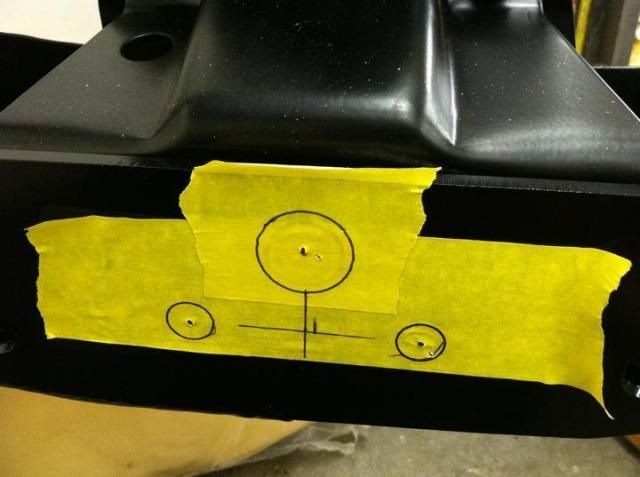 Center punched:  And here's what the notches looked like once the paint dried, its a fairly close match to the frame. 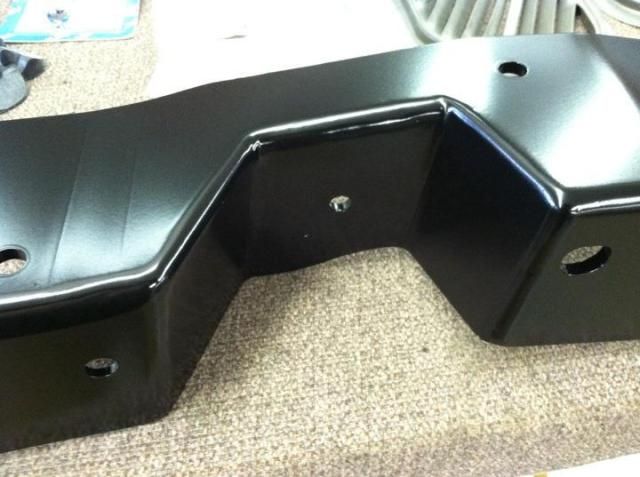
__________________
Project Goldilocks '66 C10 Short Fleet BBW Build '65 C10 Highly Detailed Stock Restoration Thread '78 Camaro Targa Roof Build '55 International Metal/Body/Paint Work '66 F100 Full Rotisserie Restoration '40 Packard 120 Convertible Coupe Restoration How To Restore and Detail an Original Gauge Cluster How To Detail Sand Body Panels, Edges, Corners, Etc Last edited by theastronaut; 12-07-2012 at 02:34 PM. Reason: Fix dead pic links |
||
|
|
|
|
10-16-2011, 11:01 AM
|
#4 |
|
Registered User
 Join Date: Mar 2005
Location: apple valley, ca
Posts: 2,670
|
Re: Project Goldilocks, '66 C10 SWB BBW Build
Very, very nice work! I really like your attention to detail. All of that extra work will really pay off in the finished product.
Your tape template trick works well, as I have used it before. Another trick that works is to use a scrap piece of sheetmetal and double-back tape it or loop some duct tape to keep it in position. I work in aerospace, and when we transfer holes, we use a drill bushing that has an O.D. that fits in the hole in the part (in your case, a 1/4" or .250"). The I.D. of the bushing has a small hole, usually around a .080". When you pop the holes, it's dead center in the middle, and then you remove the part and the bushing, and then step-drill to the final size. You can find drill bushings on-line in places like ebay. A lot of times, guys fight drilling holes in steel because they try to drill the final hole size at the start. Always step drill, and work slowly. It'll save your drill bits from wearing out, and it'll keep you from breaking your fingers when the drill catches at the end. Been there, done that, but usually with a drill press. Those things can be evil
__________________
Check out my latest endeavor: https://roundsixpod.com My build threads: '55 Chevy: http://67-72chevytrucks.com/vboard/s...d.php?t=247512 '64 C-20: http://67-72chevytrucks.com/vboard/s...d.php?t=446527 |
|
|
|
|
10-16-2011, 12:22 PM
|
#5 |
|
Registered User
Join Date: Jun 2010
Location: Vancouver Island BC
Posts: 652
|
Re: Project Goldilocks, '66 C10 SWB BBW Build
Great tips guys. Thanks for instructing us.
|
|
|
|
|
10-16-2011, 05:28 PM
|
#6 | |
|
Registered User
Join Date: May 2011
Location: Anderson SC
Posts: 3,876
|
Re: Project Goldilocks, '66 C10 SWB BBW Build
Quote:
I'd never heard of drill bushings before, I'll have to look those up. Good to know! I did start out with a 3/16th hole before working up to a 3/8" bit for the air bag mounts, then 1/2" for the air line fitting, then using the air grinder and a carbide burr to open the hole up the rest of the way. I should have used a hole saw for the air line fitting; I'll know better when I do the other side though. I went slowly and used alot of pressure on the bit and kept it cool by spraying it with glass cleaner every few seconds. The bits aren't discolored or dull yet so I guess my method is working ok. I use the looped tape trick all the time to keep masking paper/plastic in place, remembered that one from hanging up pictures of trucks I'd drawn in kindergarten 
__________________
Project Goldilocks '66 C10 Short Fleet BBW Build '65 C10 Highly Detailed Stock Restoration Thread '78 Camaro Targa Roof Build '55 International Metal/Body/Paint Work '66 F100 Full Rotisserie Restoration '40 Packard 120 Convertible Coupe Restoration How To Restore and Detail an Original Gauge Cluster How To Detail Sand Body Panels, Edges, Corners, Etc |
|
|
|
|
|
10-16-2011, 07:09 PM
|
#7 |
|
Registered User
Join Date: Sep 2009
Location: menifee california
Posts: 788
|
Re: Project Goldilocks, '66 C10 SWB BBW Build
clifford sells manifolds for mounting webbers to chey sixes. if you are serious about building a six you need to get Leo Santucci's book. those guy's in Brazil are getting 800 to 1100 horespower out of turboed 250 chevy sixes.
|
|
|
|
|
10-17-2011, 05:32 PM
|
#8 | |
|
Rollin' Old Skool
Join Date: Jun 2007
Location: Hattiesburg, MS
Posts: 5,371
|
Re: Project Goldilocks, '66 C10 SWB BBW Build
Quote:
__________________
_____________________________________________ Phillip My Build threads: 1966 Chevy C-10 "Black Betty" shortbed, fleetside, BBW, 327 V8/ Powerglide (under construction) http://67-72chevytrucks.com/vboard/s...ighlight=betty 1997 Chevy Tahoe, 2dr/2wd, mild custom (Daily driver) http://67-72chevytrucks.com/vboard/s...d.php?t=601142 Pics: '66 C-10 https://flic.kr/s/aHsjHWD4h9 '97 Tahoe https://flic.kr/s/aHsjGZ7wKP '93 C-1500 https://flic.kr/s/aHskxdpdnQ '88 S-10 Blazer https://flic.kr/s/aHsjYGx4Md Previous Rides: 1993 Chevy S-10 ext. cab, 4.3L, 4/5 drop (Sold) 1993 Chevy C-1500 short/step Retro-Rod (Sold) 1988 S-10 Blazer 2dr/2wd mild custom (Sold) |
|
|
|
|
|
10-18-2011, 01:11 PM
|
#9 | |||
|
Registered User
Join Date: May 2011
Location: Anderson SC
Posts: 3,876
|
Re: Project Goldilocks, '66 C10 SWB BBW Build
Quote:
Quote:
Thanks dude! I'm waiting for updates on your build thread! I checked it out awhile back and love the style you're going for- that engine looks great! Good to know on the shock mounts, I'll look into those. I'm thinking about building my own, not sure yet but its good to see what others are running to get ideas Quote:
Got a little done last night. Went and picked up the bed wear strips from Trucks USA in Greenwood, SC (they look and fit great btw) and took the four short boards and two outer long boards home with me to mark the fenderwell openings and perimeter bolt holes. Only took a couple pics though. I should be able to get the bed wood painted this week, will have to wait til the support rails and wear strips are back from powdercoat before I can get the floor back in. Gunna scrub down the inside of the bed with steel wool and CLR while I've got the floor out to get rid of the rust stains on the tubs and flanges. I'll probably go over the paint inside the bed with some sort of cleaner wax to spiffy it up a lil bit too. 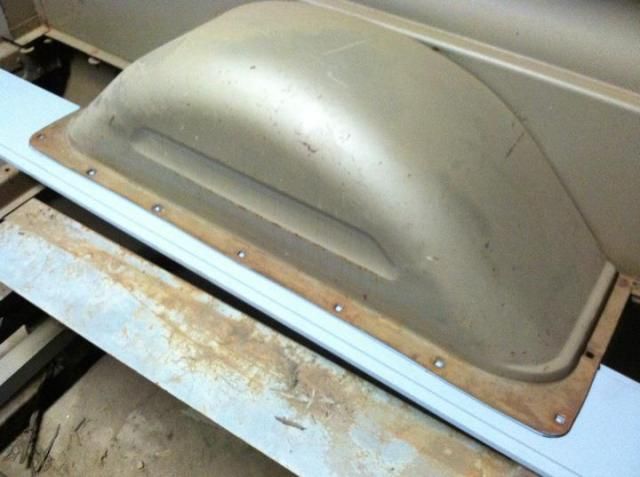 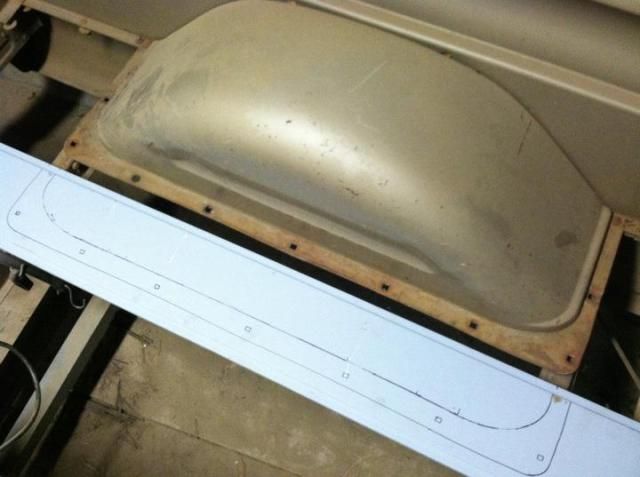
__________________
Project Goldilocks '66 C10 Short Fleet BBW Build '65 C10 Highly Detailed Stock Restoration Thread '78 Camaro Targa Roof Build '55 International Metal/Body/Paint Work '66 F100 Full Rotisserie Restoration '40 Packard 120 Convertible Coupe Restoration How To Restore and Detail an Original Gauge Cluster How To Detail Sand Body Panels, Edges, Corners, Etc Last edited by theastronaut; 12-07-2012 at 02:35 PM. Reason: Fix dead pic links |
|||
|
|
|
|
10-21-2011, 10:09 AM
|
#10 |
|
Registered User
Join Date: May 2011
Location: Anderson SC
Posts: 3,876
|
Re: Project Goldilocks, '66 C10 SWB BBW Build
Progress may be slowed up a little on my '66. Dad found a '50 Chevy in a barn about two miles from the house and bought it yesterday so I'll be helping him get it back on the road. I'll start a build thread on it once we get that far with it. Plans include a dropped axle, bias ply tires, and leave the body like it is and run it. It's got a '59 engine that was running when he parked it (brakes went out) and hopefully won't take much to get it going again.

__________________
Project Goldilocks '66 C10 Short Fleet BBW Build '65 C10 Highly Detailed Stock Restoration Thread '78 Camaro Targa Roof Build '55 International Metal/Body/Paint Work '66 F100 Full Rotisserie Restoration '40 Packard 120 Convertible Coupe Restoration How To Restore and Detail an Original Gauge Cluster How To Detail Sand Body Panels, Edges, Corners, Etc Last edited by theastronaut; 12-07-2012 at 02:36 PM. Reason: Fix dead pic links |
|
|
|
|
| Bookmarks |
|
|


 Hybrid Mode
