
|
Register or Log In To remove these advertisements. |
|
|
|
|||||||
 |
|
|
Thread Tools | Display Modes |
|
|
 01-10-2015, 03:03 AM
|
#1 | |
|
Registered User
Join Date: Dec 2012
Location: Rochester, KENT
Posts: 10,509
|
Quote:
The pics of both cars together looks good, but this may be a favourite. 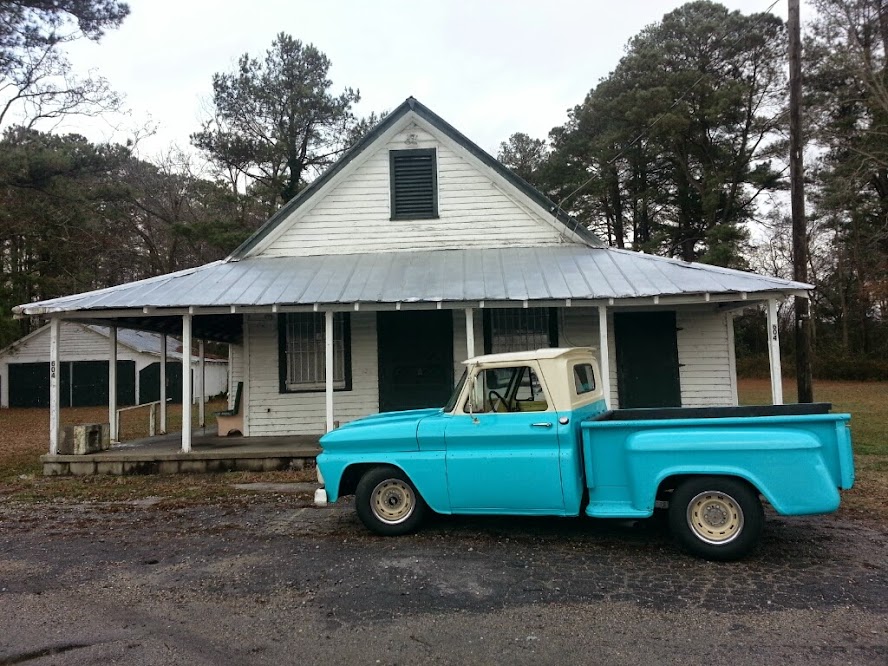
__________________
MY BUILD LINK: http://67-72chevytrucks.com/vboard/s...585901]Redneck Express - 1966 C10 Short Fleetside MY USA ROADTRIPS http://forum.retro-rides.org/thread/...2018-humdinger IF YOU CAN'T FIX IT WITH A HAMMER, YOU'VE GOT AN ELECTRICAL PROBLEM MATE. |
|

|

|
|
12-22-2015, 11:54 PM
|
#2 |
|
Registered User
Join Date: Aug 2015
Location: Kelowna, B.C, Canada
Posts: 1,747
|
Re: 64 "Large Marge" LWB-SWB / Build thread.
Good job on the painting. Looks pretty good for rattle can. Love the valiant! My dad just sold his 69 dart. It had a 340 with a stage 2 cam, loved to rev and went like hell in a 2800 pound car.
__________________
Nik...................____ 62 lwb c10 step-side 261 5 spd .........________//__{\_____ ,,,,,,,/__(O)___//___/__(O)_/ my build thread. Sending unit solution |
|
|
|
|
02-02-2015, 10:27 AM
|
#3 |
|
Registered User
Join Date: Oct 2014
Location: VIRGINIA BEACH
Posts: 140
|
Drivin' the crap out of it!
Figured it was about time for an update.
 Overall I have just been driving the crap outta the poor thing. I drive it daily to work at just shy of 40 miles a day. Been doing that for couple months now with no major issues fortunately. Recently I got a lead on a 71 rear end with 3.07 gears and went out to pick it up. I have realized I let the desire to get the correct gears (as a whole differential) get the best of me. The rear I picked up, while having the correct gears, needs a LOT of work to be road worthy. It had sat for years with no Yoke on it and the snout pointed upward and the differential collecting water. There was enough gear oil coating things to not let the rust destroy it, but needless to say everything need to be gone through to be reliable. For the cost and effort there, I can have another set of gears installed in the rear thats currently in the truck..... Soooo.... As for the latest work on the truck, it would be a full exhaust system! Just like the rest of this build, the exhaust is no exception to a tight budget. Purchased parts in the list below and there is of course some story to why the cost went a little nutty at the end! LOL Parts: $89.00 Block Hugger Headers from EBAY $68.00 PAIR of knock-off Flowmaster mufflers $200.00 to run the 2-1/2" pipe from collectors-mufflers-just under the steps. $140.00 (in trade for some fabrication work) NASCAR "Boom Tube" Tips $60.00 MSD ignition wire set (also in trade fro fabrication work) So the story goes like this. When I built the previous exhaust system it was from the bit and pcs that were on the truck when I got it. I scabbed it together and it didnt sound bad at first, but then it quickly showed its age and began to deteriorate. The hangers that I welded to the pipe ripped the side out of the pipe and both sides had broken at one point and were hanging temporarily from the manifolds only. I fixed them both right away but not before the drivers side "donut" took quite a hit and was damaged bad enough to completely fall apart. Now I had a huge leak right after the manifold and it sounded like pure A$$. Needless to say it prompted me to buy headers as I wasn't about to try to break free the studs that were in the manifolds since 1964! Block hugger headers were the obvious choice based on fitment and my concern over the long and mid length headers hitting the clutch linkage. I spent time in a friends heated garage tearing the old stuff off the block, installing the headers and running the 5 min. trip to the exhaust shop with OPEN HEADERS! That was fun for that 5 minutes, but thats all I could have taken of normal driving like that! Hahahah So the "Boom Tube" I seen this installed on my friends 1934 Ford 5 window and it souded so damn good! As I planned this exhaust system they came to mind but I quickly dismissed them based on the budget. However when I got to his house, he happened to have 2 pairs sitting on the bench in the garage! He said "I see you eyeballin' my exhaust!" Next thing ya know a deal was struck on some stuff I was there to look at doing for him anyhow. He also happened to have the plug wire set that I needed in a pinch once I put the headers on and they required 90* boots at all 4 corners. (Again traded fro the fabrication work he wanted outta me) Gotta love having a skill to barter with!!!! So here are a few pics and a YOUTUBE link to the finished sound.    Had to make a few reducers. The Boom Tubes are 3.5" inlet and I have 2.5" pipe. I wasnt about to pay SUMMIT RACING $22.00 a pc for reducers 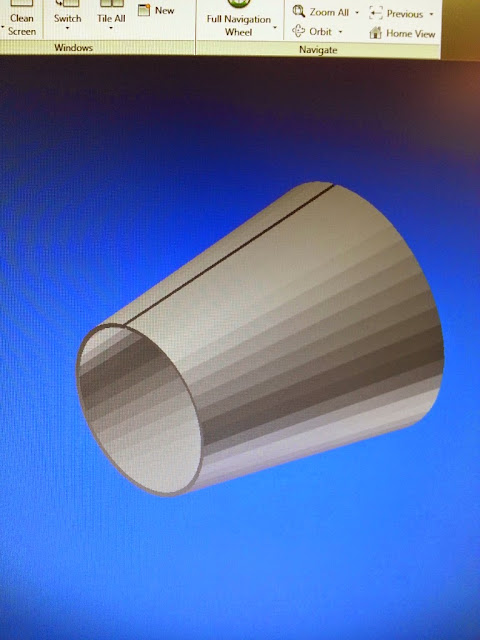    Here is the Tip with my reducer.  YouTube link: https://www.youtube.com/watch?v=k2jtKflRXD0
__________________
64 LWB to SWB Step build. Daily driven! http://67-72chevytrucks.com/vboard/s...d.php?t=647168 |
|
|
|
|
02-02-2015, 11:08 AM
|
#4 |
|
Registered User
Join Date: Oct 2014
Location: VIRGINIA BEACH
Posts: 140
|
Re: 64 "Large Marge" LWB-SWB / Build thread.
__________________
64 LWB to SWB Step build. Daily driven! http://67-72chevytrucks.com/vboard/s...d.php?t=647168 |
|
|
|
|
02-04-2015, 12:02 PM
|
#5 |
|
Registered User
Join Date: Oct 2014
Location: VIRGINIA BEACH
Posts: 140
|
Choosing rear gears
So while I recently picked up a second rear diff. I am not happy with my purchase and the hunt continues.
So I have been scouring Craigs List for donors. I am finding plenty of rear diffs, but of course what they come from is an issue. Width, bolt pattern, and gear ratio are my biggest concerns. I dont mind the fabrication aspect of trailing arm perches, shock mounts, and panhard bar mounts. After digging for a calculator online, and scrounging up all the needed variables, here are my findings. This first pics are of calculations based on the normal cruising speed of 65 MPH The second set of pics is based on MY typical cruising speed at 70 MPH Im thinking Ill likely go for somewhere between 3.23 and 3.50 THESE ARE ALL FIGURED AT 65 MPH        THESE ARE ALL FIGURED AT 70 MPH     
__________________
64 LWB to SWB Step build. Daily driven! http://67-72chevytrucks.com/vboard/s...d.php?t=647168 |
|
|
|
|
02-22-2015, 08:36 PM
|
#6 |
|
Registered User
Join Date: Oct 2014
Location: VIRGINIA BEACH
Posts: 140
|
Re: 64 "Large Marge" LWB-SWB / Build thread.
So today......
Today was the first day I have had a chance to do anything at all worth a crap outside. Its been unusually cold here. So I wanted to give my truck a bit of attention primarily because I have been steady driving it and thats it. Nothing other than the exhaust has been done. So I started with hooking up the tach thats been on the column since soon after I got it running. The reasons were both general concerns for what the engine was up to, and more interestingly what my final RPMs were. I have a stock 84 350, a T5 trans wit a .73 overdrive gear and "thought" my rear gears were incredibly tall! Turns out I am right in the sweet spot with RPMs. 2100 @ 65mph 2300 @ 75mph I was extremely happy to find this out as I was just about to pull the trigger on new gears. so needless to say, Ill not be changing a thing for now. Beyond that I checked my timing a few weeks ago and was happy with where it sat. (I set it "by ear" and with no timing light) So after determining it was actually spot on with a timing light. I decided it was time to get the carb dialed in as I knew it was running rich since I rebuilt the carb. Hooked up the vacuum gauge and stared tweaking the mixture screws to get the highest vacuum possible, then ran em back in just a hair. Its running great and the exhaust smells much better now! Aside from that I managed to score a set of 2006 Honda civic coupe door seals for $40.00 off CL. I was / am happy as hell with the end product. I'll be sure to add important photos of that tomorrow. Anyhow a very productive day today on the truck. Not to mention the amount of $ that the tach saved me today from not needing new gears! I should have known better to check my RPMs before even contemplating another set of gears in the first place! 
__________________
64 LWB to SWB Step build. Daily driven! http://67-72chevytrucks.com/vboard/s...d.php?t=647168 |
|
|
|
|
02-23-2015, 09:06 AM
|
#7 |
|
Registered User
Join Date: Oct 2014
Location: VIRGINIA BEACH
Posts: 140
|
2006 Honda Civic (2 door coupe) door seal install.
Ok first and foremost pay no mind to my crusty old Daily driver! LOL I made it reliable and now I am working on all the crusty stuff!
 So here we go. This first picture was something I was interested in very much, and that is the actual fit that everyone says is so damn awesome. Proof is in the picture! They fit better than Chevy would have made em'! This is the last of the "stretch" in pushing on the seal. It is not actually stretched in this picture, it seated properly and very nicely, with no tension trying to make it pop back off. 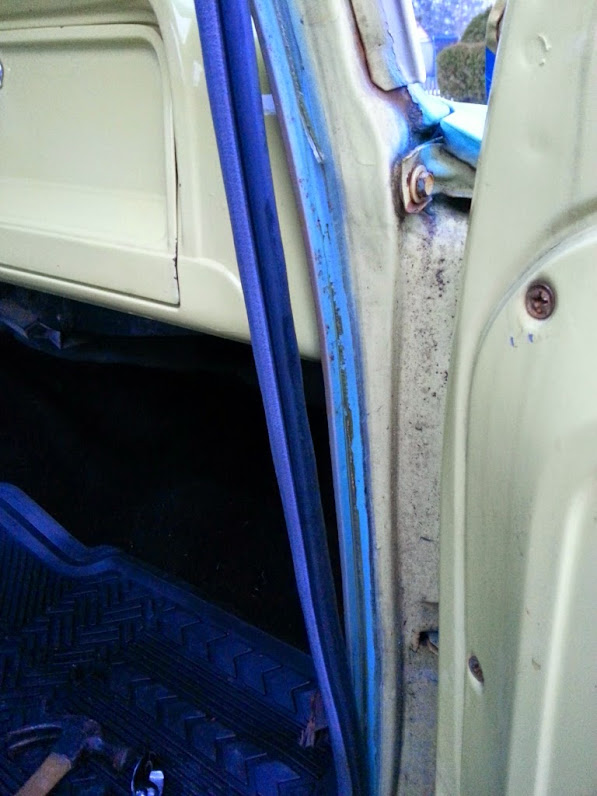 Here is a little something I did (may not have been necessary), but I gently pinched the seal (the whole thing) before installing it. I feel it helped a bit just to get a better bite and Ill not have to worry about it coming off.  Here is the seal being pressed on to the door jamb. Nothing all that interesting really, but good to see since we are all here wondering how they fit.  Here is the seal installed. This is the drivers side looking at the A-pillar. The compression of the seal is like this all the way around the door and I am extremely happy with it. *NOTE* There must be a few colors of these seals. (Hence the "graphite" in the description of the part number supplied earlier in the thread) This may be valuable information since the part number supplied seems to be getting depleted. Maybe look for another color? (beige or grey?)  Just a few pictures of the corners to show there is no stretching or trying to pop off. 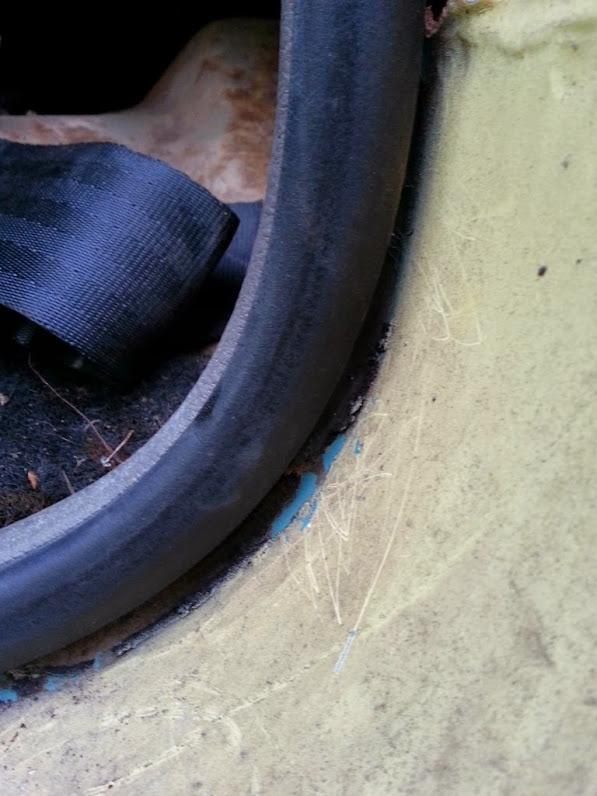  Now for the one and only thing I wasnt a fan of. BUT...... I feel it is completely negated by all the "PROs" for this swap. The seal has a secondary "flap" that is likely used to cover the edge of the Hondas plastic interior panels. It is roughly 3/16" and in my case the seal is light grey. There does seem to be a fix for this if it seems to bother you all that much. You could potentially trim it off cleanly (and carefully). At that point you would be left with the black colored edge that is actually the "gripping" part of the seal. That portion does look presentable as well. (Picture taken with the camera at the windshield lookin in at the A-pillar) 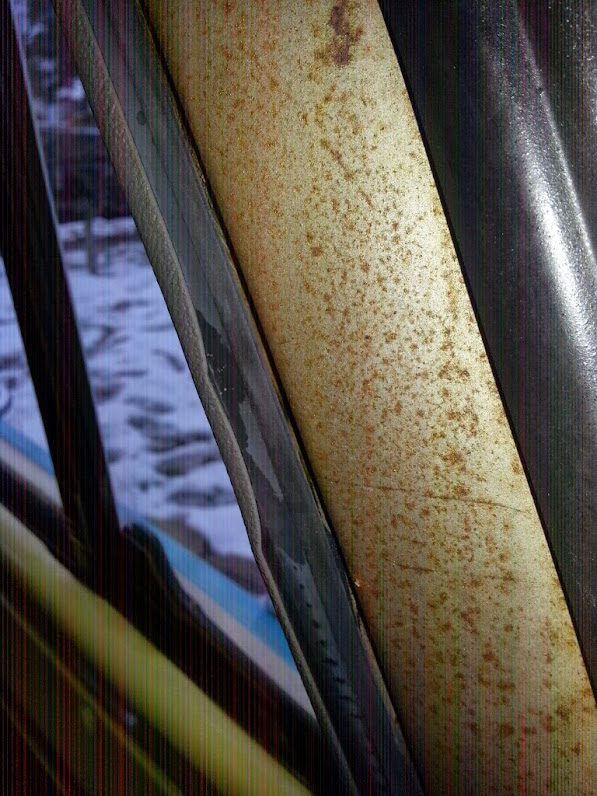 And finally the over all look from inside the cab! As you can see, the portion mentioned above really is a NON-ISSUE as it doesnt draw any attention at all. I pointed it out to my wife and she (as usual) said I was ridiculous and that nobody would ever even notice it. Hahahaha I hate the YELLOW by the way! It will be gone ASAP! Hahahah 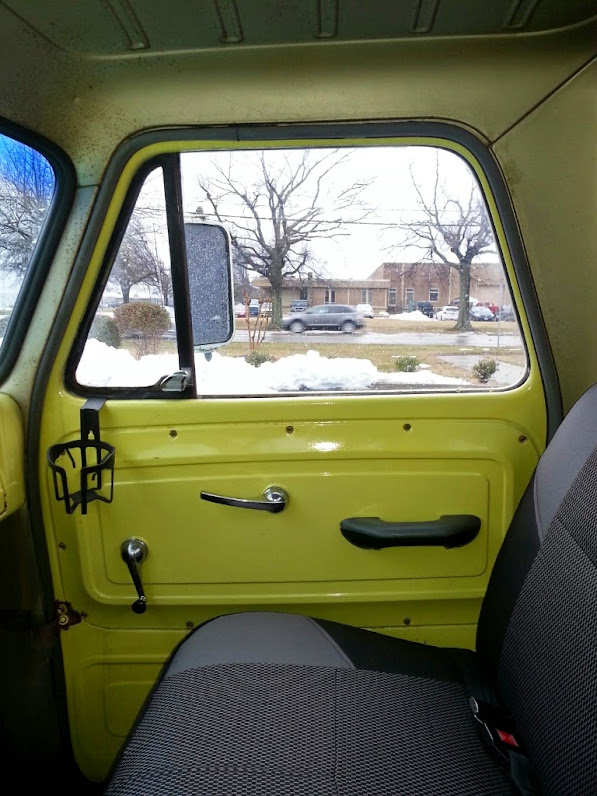 So I hope this answers a few questions! I give this mod and research put into it a 12 on a scale of 1-10!
__________________
64 LWB to SWB Step build. Daily driven! http://67-72chevytrucks.com/vboard/s...d.php?t=647168 |
|
|
|
|
02-27-2015, 04:59 PM
|
#8 |
|
Registered User
Join Date: Oct 2014
Location: VIRGINIA BEACH
Posts: 140
|
Scored a bunch of little "bits" today!
So I have a guy that is only minutes from where I work, that has a host of parts (haven't even seen his "warehouse") for these trucks. I had him in mind for a radio that I seen last time I was there.
I called him up to see if he still had it, and ended up down there to grab it. Was able to strike a deal with him and left with the radio, and a nearly full set of the custom knobs, including a cigarette lighter that I was about to buy online. All for the cost of a bumper that I bought from him a while back! He needs it back and I no longer needed it! I plan to hand the radio over to a friend that does radio conversions. He will use the tuner and volume controls, and gut the rest to add Bluetooth, and a USB port out the side for a charging port for my phone. Some screws for the door panels, and a vac gauge was scored as well.  
__________________
64 LWB to SWB Step build. Daily driven! http://67-72chevytrucks.com/vboard/s...d.php?t=647168 |
|
|
|
|
04-13-2015, 07:42 AM
|
#9 |
|
Registered User
Join Date: Oct 2014
Location: VIRGINIA BEACH
Posts: 140
|
Re: 64 "Large Marge" LWB-SWB / Build thread.
The weather has broken finally!
I finally had a chance to get out and get some work done to my own stuff. (I do a lot of metal fab work on the side) So last weekend I decided enough was enough and gave attention to Large Marge. Small list of things I managed to get accomplished -Installed Jeep Cherokee door stops (more on this in a bit) -Removed the old piece of seatbelt strap that acted as the passenger door stop the PO installed (now I have holes to weld up) -Stripped and painted the front bumper. -lubed the heater cable to move freely, and fixed the knob that was twisting loosely. -Connected the cigarette lighter -Adjusted the hood latch so it wont let loose and rely on the 2nd safety latch. -Removed all the over spray from the PO paint job. While all this stuff is little its nice to get them done. I'm fortunate that the truck runs solid as can be and I only have little stuff like this to be concerned with now. I have a running list like many do and just because I have been keeping that going, Ill throw the latest list updates on here. To do: Replace rear wheel cylinders Seal fuel tank sending unit Install rear bumper Paint tailgate Replace core support Fix front running lights New wing windows Valve cover gaskets Hook up gauges Install radio Install speakers Sand and paint inside of cab New seat upholstery Flip passenger seatbelt Door sill plates Replace sheetmetal patches Rockers Fenders Cab corners Replace steps Patch rear fenders
__________________
64 LWB to SWB Step build. Daily driven! http://67-72chevytrucks.com/vboard/s...d.php?t=647168 |
|
|
|
|
04-24-2015, 08:06 AM
|
#10 |
|
Registered User
Join Date: Oct 2014
Location: VIRGINIA BEACH
Posts: 140
|
Been slacking on build pics!
So with the good weather comes progress!
Some of this has been done for a little bit, but I realized I hadnt posted pics so... First the engine bay. Ill post pics of when I first picked up the truck, then how I was driving it for a bit, then when I finally got a chance to clean it up a bit. So here it is the day I picked it up. It had been sitting roughly a year under a host of trees, and had no attention given to it at all really.  Here it is after I had installed headers and had been driving it for a bit. The mess with the wiring was driving me nuts.  Here is how it sits now. Much better, certainly not show worthy, but hell its a daily driver. Not to mention I am definitely not through with this. I plan to replace heater hoses, etc. and clean it up further when I replace the radiator core support. 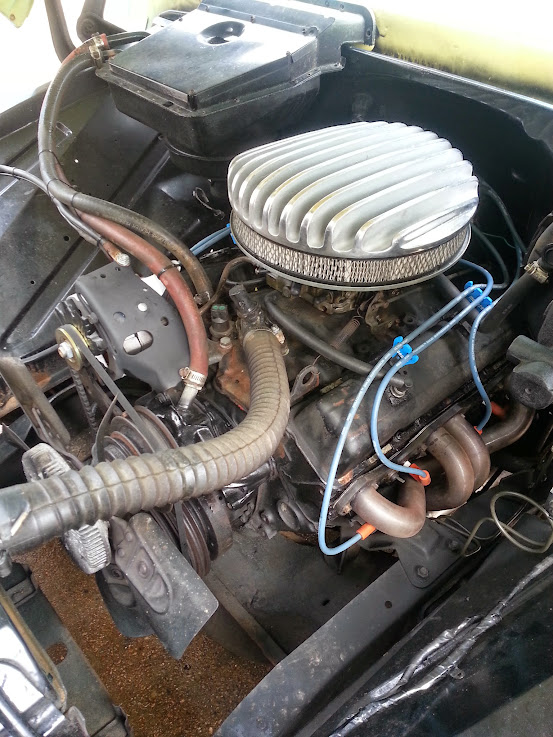
__________________
64 LWB to SWB Step build. Daily driven! http://67-72chevytrucks.com/vboard/s...d.php?t=647168 |
|
|
|
|
04-24-2015, 08:26 AM
|
#11 |
|
Registered User
Join Date: Oct 2014
Location: VIRGINIA BEACH
Posts: 140
|
Dash and covering the last of that damn Yellow paint!
So, as you may have read previously, I HATE THE YELLOW that was on the truck when I got it. I have gotten rid of most of it (all except for the doors now).
So, the dash..... Some people may not approve and even I was hesitant with what I did, but I think I pulled it off pretty well. What I am speaking of is the heater control panel and the "stamped" detail on the opposing side. Ill start by saying how and why I decided to go this route. First, I didnt want to have a gauge panel hanging down from under the dash. I just dont care for the look of that. Next I wanted to keep the factory look of the dash. That lead me to the obvious open spots on the dash. Below the heater knob, and the opposite side of the radio hole were prime candidates for the gauges, however it wasn't without its cons. I was really reluctant to cut the dash itself. (I kick myself constantly for cutting holes in my door panels on my valiant for speakers!) So, I actually put this project on the back burner and sat on the idea. THEN...... while scoring a few other parts I happened across another heater control panel. At that point I thought "well if I cut a hole in the dash to accept that panel, then I could always get another one with no giant gauge holes and pop it in and it would look pretty much factory still. So the pictures tell the rest of the story. Here you can see I cut a hole to accept a second heater control panel. (Yes I was very reluctant as I cut it out still! HAHAHAHA  Here it is with the gauges in place and prior to paint.  Bits and pcs stripped and ready for a little straightening and paint. 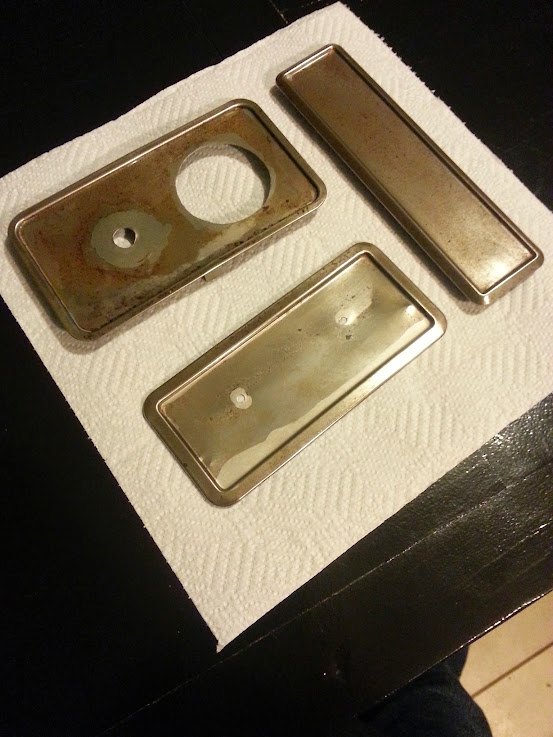 Painted bits (the radio delete plate will not be needed son! ) Dash painted and that ugly damn yellow gone!!!  All put together! I am pretty happy with the end result. The steering wheel is next along with paint the rest of the cab in the cream color.  Here is the side by side comparison. 
__________________
64 LWB to SWB Step build. Daily driven! http://67-72chevytrucks.com/vboard/s...d.php?t=647168 |
|
|
|
|
04-24-2015, 08:30 AM
|
#12 |
|
Registered User
Join Date: Oct 2014
Location: VIRGINIA BEACH
Posts: 140
|
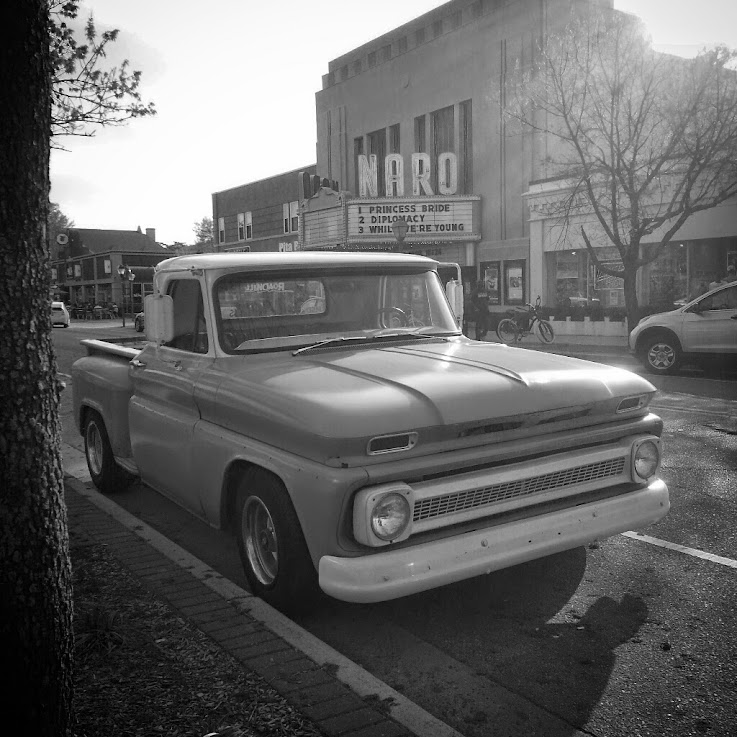
Re: 64 "Large Marge" LWB-SWB / Build thread.
Just a picture I took while in Norfolks "artsy" area called Ghent. The Naro theater in the background.
__________________
64 LWB to SWB Step build. Daily driven! http://67-72chevytrucks.com/vboard/s...d.php?t=647168 |
|
|
|
|
04-24-2015, 08:37 AM
|
#13 |
|
Registered User
Join Date: Sep 2011
Location: Ark City, Kansas
Posts: 3,317
|
Re: 64 "Large Marge" LWB-SWB / Build thread.
Look'n Good!!!
|

|
|
|
04-24-2015, 08:40 AM
|
#14 |
|
Registered User
Join Date: Nov 2011
Location: fayetteville nc
Posts: 10,338
|
Re: 64 "Large Marge" LWB-SWB / Build thread.
I used to live by Lynnhaven mall. Haven't seen that part of Norfolk in a long time. Thanks for sharing the pic!!!
Great looking truck.
__________________
1963 Short bed step side SBW 427 big block and borg warner T-16 HD 3 speed manual http://67-72chevytrucks.com/vboard/s...d.php?t=519869 1963 Short bed fleetside BBW 348 1st gen big block w/Powerglide http://67-72chevytrucks.com/vboard/s...d.php?t=619024 1964 Short bed trailer |
|
|
|
|
04-24-2015, 09:32 AM
|
#15 |
|
Registered User
Join Date: Oct 2014
Location: VIRGINIA BEACH
Posts: 140
|
Re: 64 "Large Marge" LWB-SWB / Build thread.
Thanks guys!
Yeah there are a lot of good restaurants in Ghent, so we tend to head there a few times a month. LOL I live nearly at the ocean front in VB myself.
__________________
64 LWB to SWB Step build. Daily driven! http://67-72chevytrucks.com/vboard/s...d.php?t=647168 |
|
|
|
|
04-24-2015, 10:06 AM
|
#16 | |
|
Registered User
Join Date: Nov 2011
Location: fayetteville nc
Posts: 10,338
|
Re: 64 "Large Marge" LWB-SWB / Build thread.
Quote:
And nice job on the sail panels.
__________________
1963 Short bed step side SBW 427 big block and borg warner T-16 HD 3 speed manual http://67-72chevytrucks.com/vboard/s...d.php?t=519869 1963 Short bed fleetside BBW 348 1st gen big block w/Powerglide http://67-72chevytrucks.com/vboard/s...d.php?t=619024 1964 Short bed trailer |
|
|
|
|
|
04-24-2015, 11:42 AM
|
#17 |
|
Registered User
Join Date: Dec 2012
Location: Rochester, KENT
Posts: 10,509
|
Re: 64 "Large Marge" LWB-SWB / Build thread.
Still love this build.
I want these, and love the side exit look. https://www.youtube.com/watch?v=k2jtKflRXD0 Your pipes sound how I want mine too.
__________________
MY BUILD LINK: http://67-72chevytrucks.com/vboard/s...585901]Redneck Express - 1966 C10 Short Fleetside MY USA ROADTRIPS http://forum.retro-rides.org/thread/...2018-humdinger IF YOU CAN'T FIX IT WITH A HAMMER, YOU'VE GOT AN ELECTRICAL PROBLEM MATE. |
|
|
|
|
04-24-2015, 09:44 AM
|
#18 |
|
Registered User
Join Date: Oct 2014
Location: VIRGINIA BEACH
Posts: 140
|
Re: 64 "Large Marge" LWB-SWB / Build thread.
Realized I didnt post my "Custom Wings" that I made.
So as some of you know, the trim option for the "Custom" included the "wings" that are just aft of the doors on the cab. I looked a bit on ebay and in a few aftermarket catalogs and didnt like the price at all. Well I have had some ribbed stainless steel in my stash for a while and have had it in mind to make my own from that. 30 mins worth of work, and some double sided 3M tape.... Here is my version. Note: what looks like dents or bends is an illusion from using scotchbrite for a brushed effect. Nice and straight! 
__________________
64 LWB to SWB Step build. Daily driven! http://67-72chevytrucks.com/vboard/s...d.php?t=647168 Last edited by 4mulaSvaliant; 04-24-2015 at 10:13 AM. |
|
|
|
|
04-24-2015, 11:50 AM
|
#19 |
|
Registered User
Join Date: Oct 2014
Location: VIRGINIA BEACH
Posts: 140
|
Re: 64 "Large Marge" LWB-SWB / Build thread.
Thanks Grizz!
I too am a little envious of something you have going....... The fact that you are in a country building something VERY VERY few people will ever have a chance to get their paws on! That is the first thing that comes to mind for you guys in other countries.
__________________
64 LWB to SWB Step build. Daily driven! http://67-72chevytrucks.com/vboard/s...d.php?t=647168 |
|
|
|
|
04-25-2015, 05:33 AM
|
#20 |
|
Registered User
Join Date: Nov 2013
Location: Stanley Co' Durham UK
Posts: 535
|
Re: 64 "Large Marge" LWB-SWB / Build thread.
Great thread, love this truck. I have been agonising over where to put my auxiilary gauges, I like this idea, cos it can easily be "reversed" with new panels. looks great too!
|
|
|
|
|
04-25-2015, 08:42 AM
|
#21 |
|
Registered User
Join Date: Sep 2012
Location: Leander, TX
Posts: 969
|
Re: 64 "Large Marge" LWB-SWB / Build thread.
Dash came out great. Like what you did with the gauges. I too would have to get rid of that yellow. Belongs on Corvettes and that it.
__________________
64' Build Thread http://67-72chevytrucks.com/vboard/s...d.php?t=586955 |
|
|
|
|
05-11-2015, 08:50 AM
|
#22 |
|
Registered User
Join Date: Oct 2014
Location: VIRGINIA BEACH
Posts: 140
|
Whoo Hoo! Got my seat back on Friday!
So I after asking on a FB page for the local Cars and Coffee event, I went to check out "Felix Auto Upholstery" here in VB.
Met up with him, he answered all my questions to my liking and we struck a deal I was happy with which included a little bartering of my fabrication skills and a rear differential I had kicking around in the bed of my truck for two months! LOL Here is what I got in return! EXACTLY THE SEAT I HAD ENVISIONED!  https://lh3.googleusercontent.com/-y...7-no/upload_-1  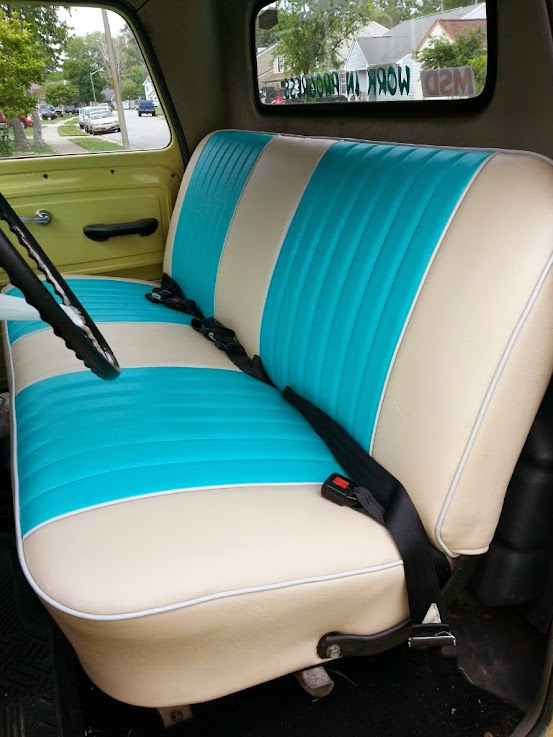 Chances are incredibly high that Ill use him again for the Valiant when the time comes! Certainly a stand up guy as well. Very humble and does fantastic work! http://felixautointeriors.com/
__________________
64 LWB to SWB Step build. Daily driven! http://67-72chevytrucks.com/vboard/s...d.php?t=647168 |
|
|
|
|
05-11-2015, 11:31 AM
|
#23 |
|
I'm just glad to be here!
Join Date: Jan 2008
Location: Longview, TX
Posts: 4,788
|
Re: 64 "Large Marge" LWB-SWB / Build thread.
Seat looks great!
__________________
Karl  1965 Chevy Stepside(Grandpa's Old Blue) and (July 2015 Shop Build!)(2020, the Saga Continues) http://67-72chevytrucks.com/vboard/s...d.php?t=372424 The LST Challenge: http://67-72chevytrucks.com/vboard/s...=1#post7812257 Korbin's 1st Square: "Sunburn" http://67-72chevytrucks.com/vboard/s...d.php?t=418618 1985 GMC Sierra: "White Trash", Korbin's 2nd now... http://67-72chevytrucks.com/vboard/s...d.php?t=632305 Henry - 1984 Chevrolet, Owen's 1st Square |
|
|
|
|
05-11-2015, 02:29 PM
|
#24 |
|
Registered User
Join Date: Nov 2013
Location: Stanley Co' Durham UK
Posts: 535
|
Re: 64 "Large Marge" LWB-SWB / Build thread.
The seat turned out real nice, I may "borrow" that design when I get that far!
|
|
|
|
|
05-11-2015, 02:43 PM
|
#25 |
|
Registered User
Join Date: Oct 2014
Location: VIRGINIA BEACH
Posts: 140
|
Re: 64 "Large Marge" LWB-SWB / Build thread.
Thanks guys!
Yeah its a pretty classic design. Nothing real crazy. I tend to lean to the subtle side.
__________________
64 LWB to SWB Step build. Daily driven! http://67-72chevytrucks.com/vboard/s...d.php?t=647168 |
|
|
|
|
| Bookmarks |
|
|


 Hybrid Mode
