
 |
Register or Log In To remove these advertisements. |
|
|
|
|||||||
|
|
Thread Tools | Display Modes |
|
|
#1 |
|
Watch out for your cornhole !
 Join Date: Jun 2003
Location: Azle, Texas
Posts: 14,162
|
Back to the Basics: Rebuilding a steering coupler rag joint
In an effort to contribute something good around here, I thought I'd do a pictorial of a little job I did this morning. Now, I know this is elementary to a lot of you, but I'm sure there's some folks who haven't ever done this before.
The back story is that the steering on my daily driver stepside was very sloppy with something like 1/4-1/2 turn of play in the steering wheel. All of the hard parts in the steering are sound and tight. The culprit is the rubber "rag joint" in the steering shaft. My truck had a bad power steering leak for many years prior to me getting it. This leak caused the rubber disc to be continuously soaked in fluid which caused it to fail. I had fixed the leak, but the damage was done to the rubber disc. There are three ways you can fix this issue. 1) replace the entire steering coupler for about 50 dollars 2) replace the coupler with an upgrade. I understand there is a Jeep part that works well. I wasn't interested in searching the junkyards and I believe in GM engineering of the original setup. 3) rebuild the existing coupler I chose method three since I'm kind of bucks down right now. The parts to do the job were 9 dollars out the door from Autozone. My time commitment was about 30 minutes total. I find my own part numbers online to avoid frustration at the parts counter 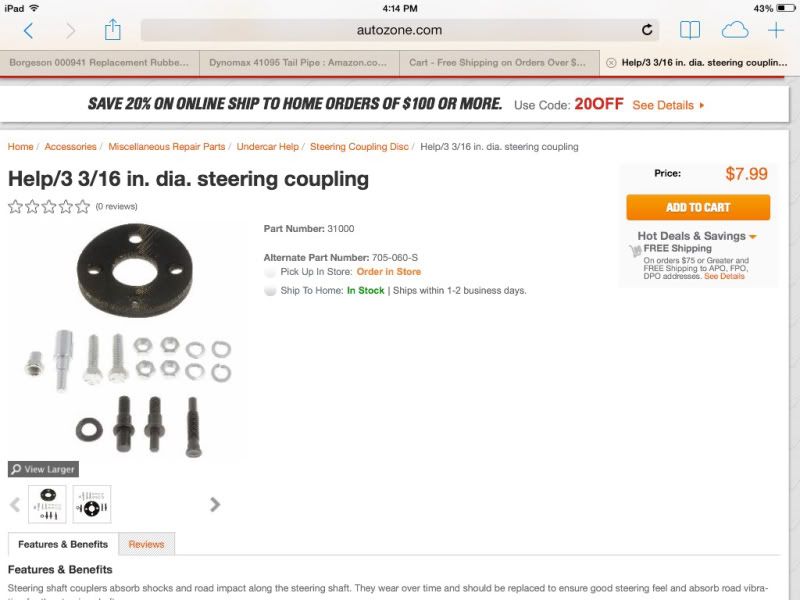 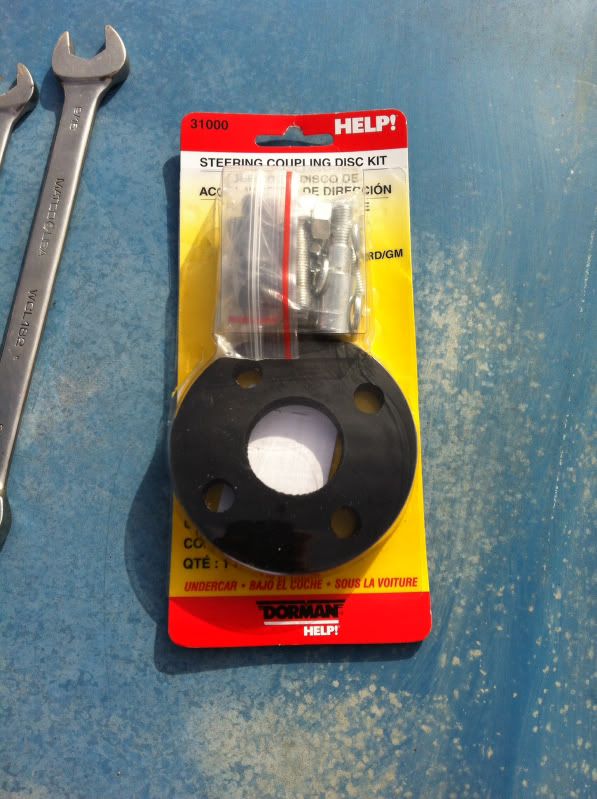 The part number is there on top of the package 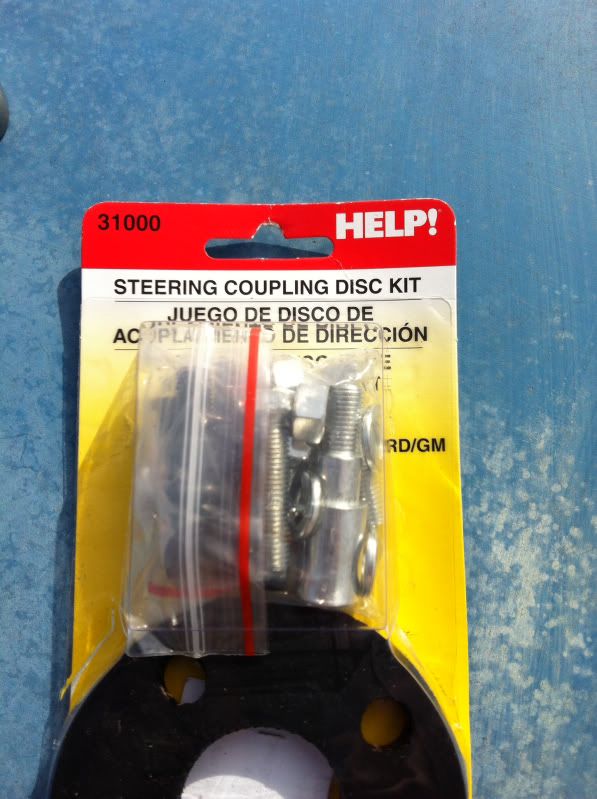 Tools needed. A medium pry bar to pry the steering shaft off the coupler. 1/2 and 9/16 wrenches for the bolts and nuts, and a 7/16 12 point socket (a 12 point box end wrench would work but not quite as well if you don't have the socket) with ratchet and extension. Not shown, but you will need an angle grinder or aggressive sander also. 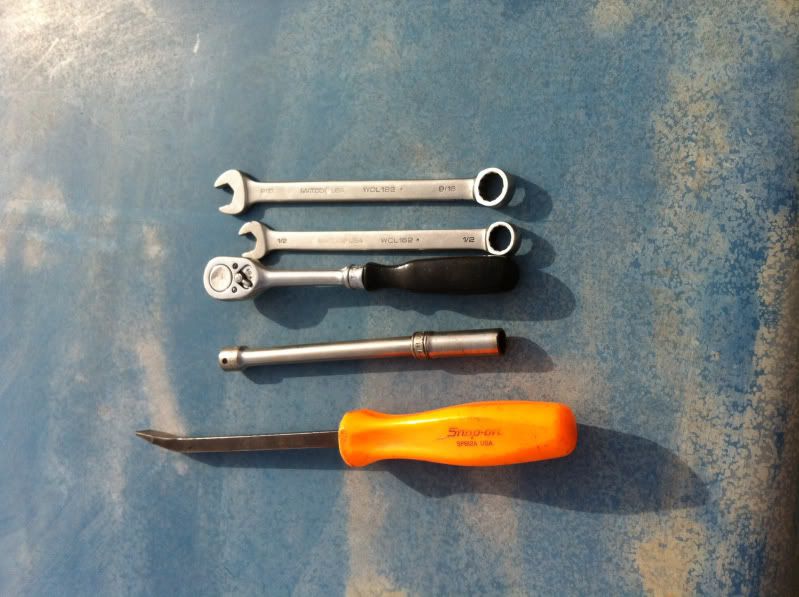 Here is the old coupler still in place. Notice I had shoved a couple of short lengths of fuel hose onto the stubs to remove some slack until I could fix it right. This is very ghetto, but also completely safe. GM engineered this in such a way as if the rubber disc completely failed, the two studs would hit the edges of the slots and allow full steering control. When the rubber disc fails, the slop allows this to happen. The fuel hose just alleviated that until proper repairs could be made. 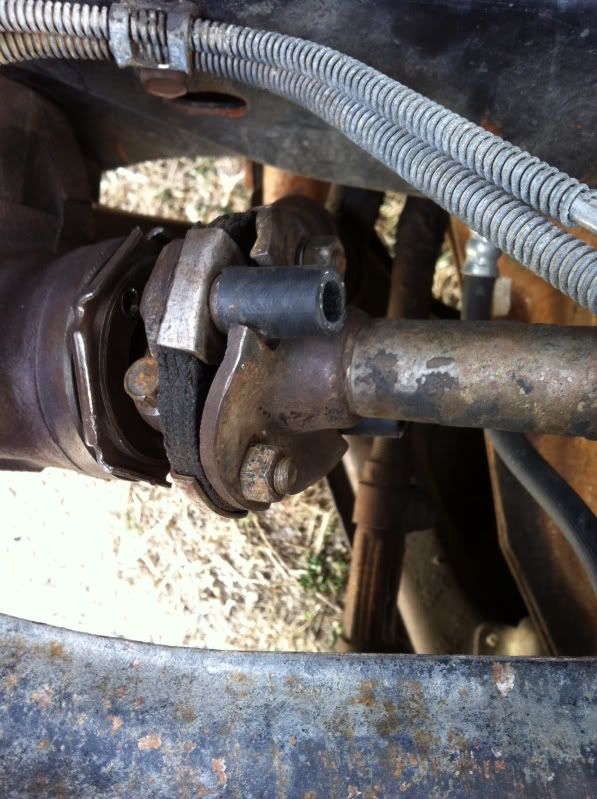 Fuel hose removed. You can now see the studs and how they fit into slots. In the event of a total failure, that's all the play that would be allowed into the steering before the metal met metal. Hence the moderate but not deadly play in my steering. 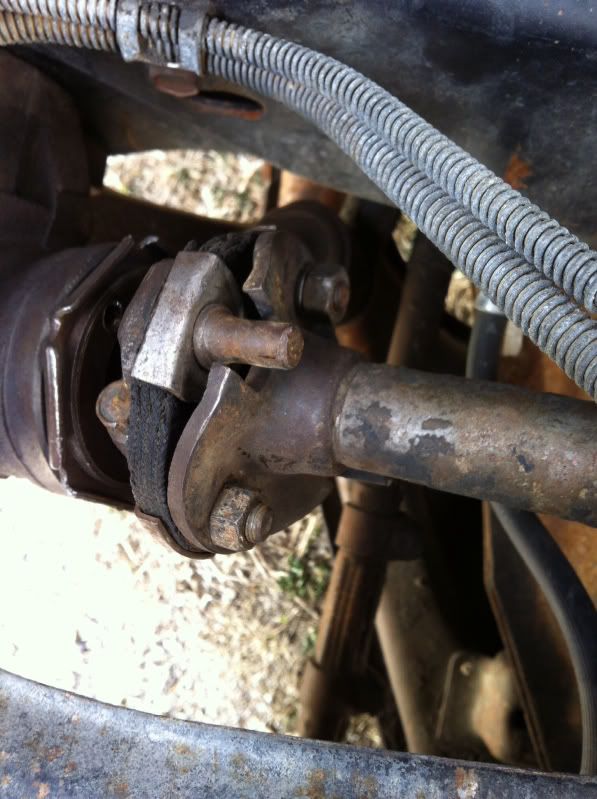 Coupler removed. You can begin to see the failure near the bolts. 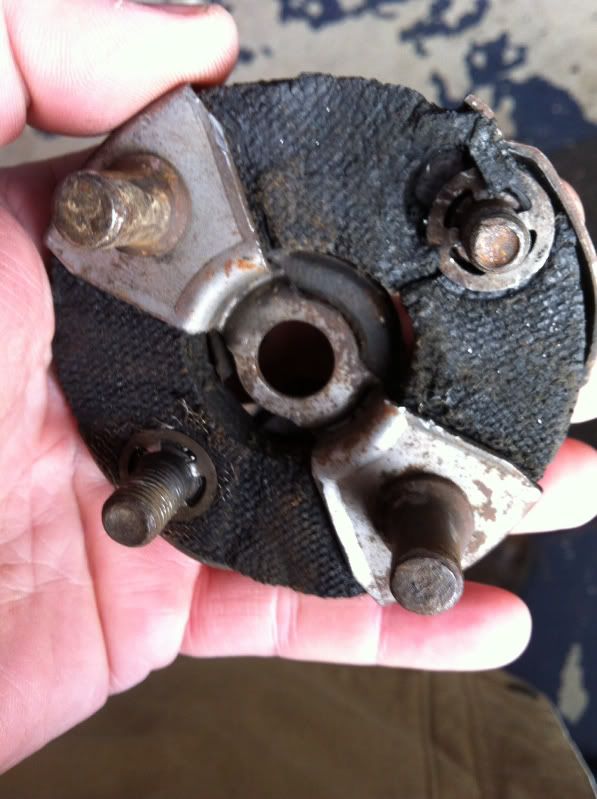 Take before pictures of top and bottom so you can reference to get it all reassembled properly afterward. Note there is a big bolt and a little bolt. It's important to get them in the proper place when reassembled. 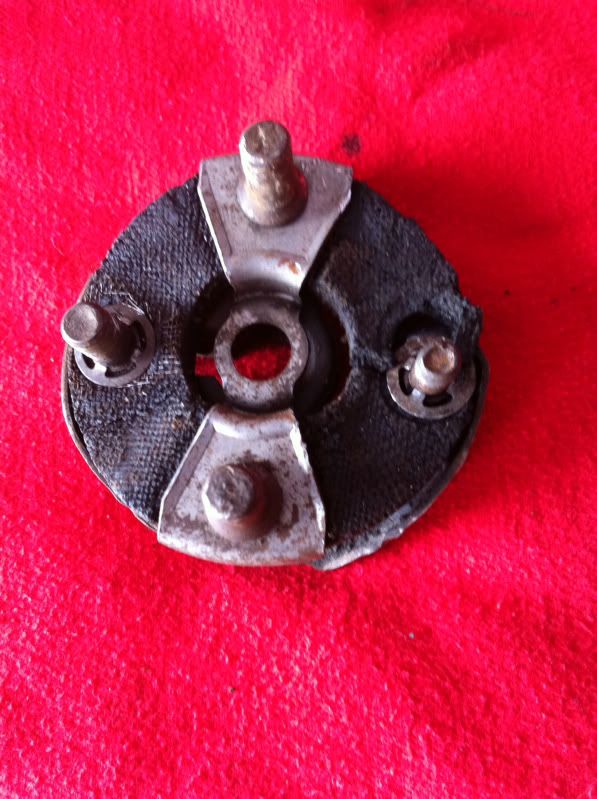 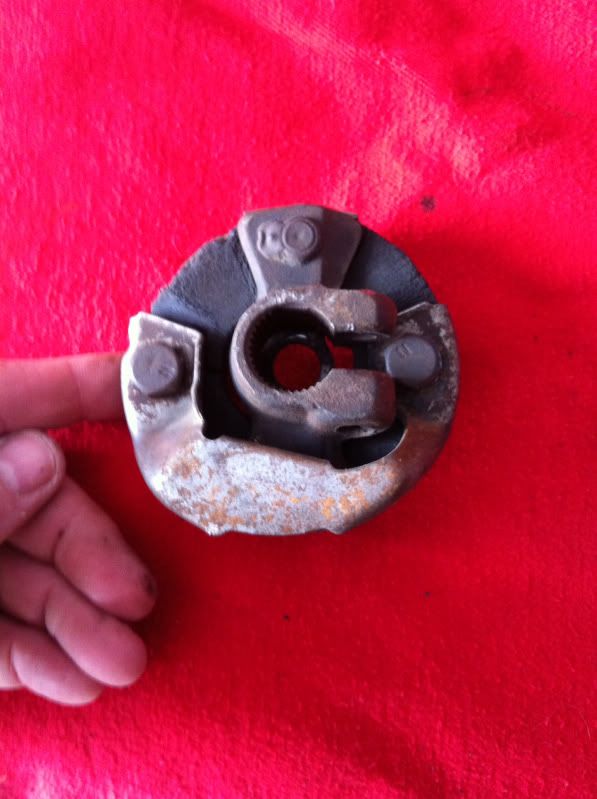 Tap the two captured bolts out. It won't take much. Use a brass hammer if you have one to protect mushrooming the ends of the bolts. At this point you can see the failure very well. 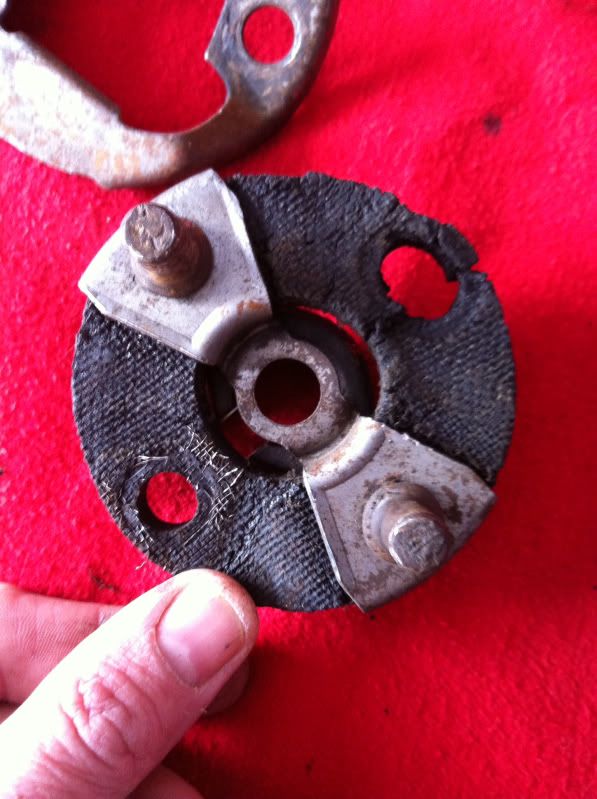 Now, on the back side, grind off the ends of the pressed in studs. They are welded or peened or riveted somehow from the factory. Grinding them smooth removes that and allows us to remove the old studs. 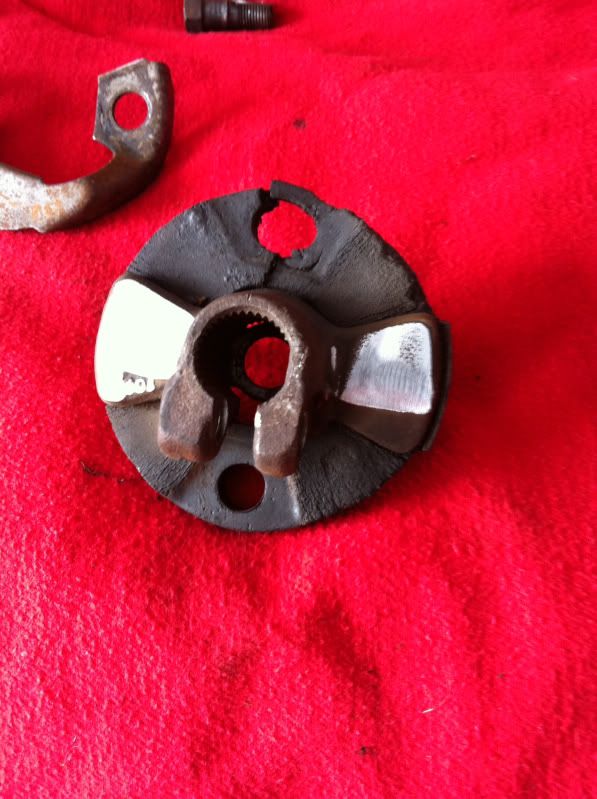 Put it into a vise and using a hammer and punch, tap the remains of the studs out. This will free the rubber disc. 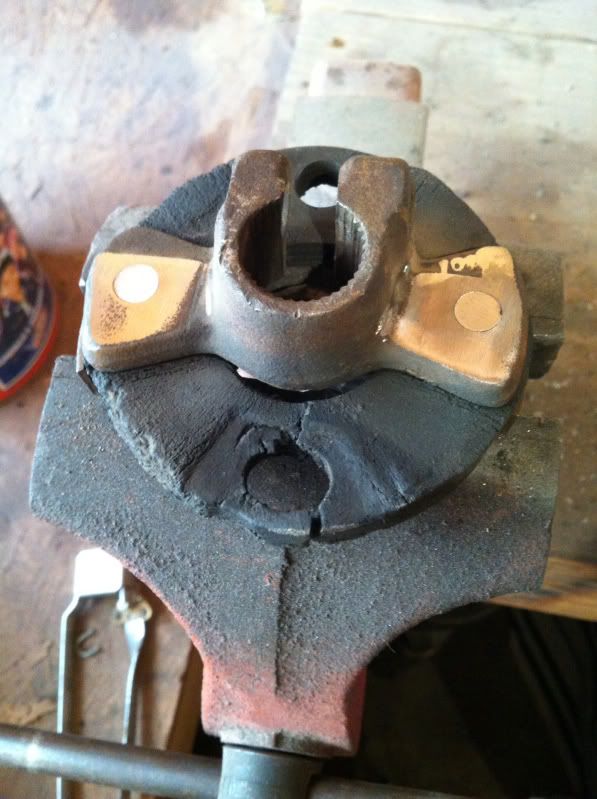 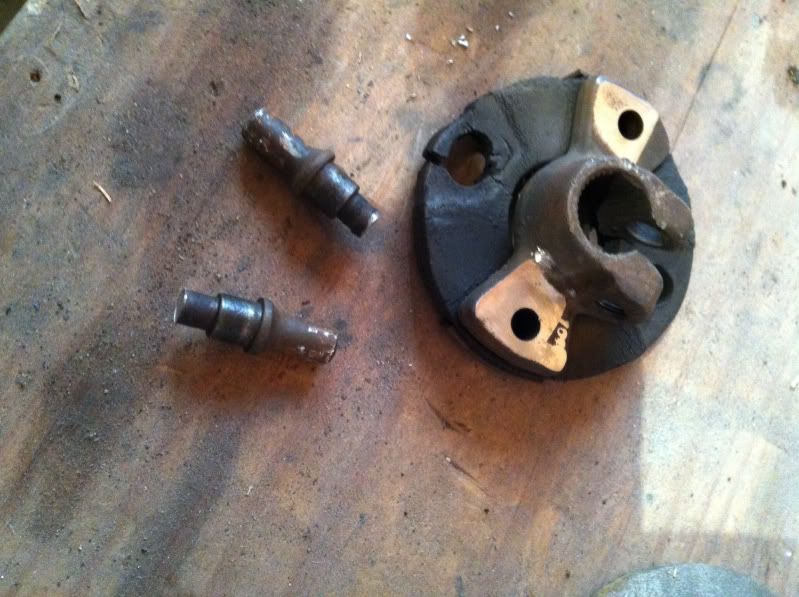 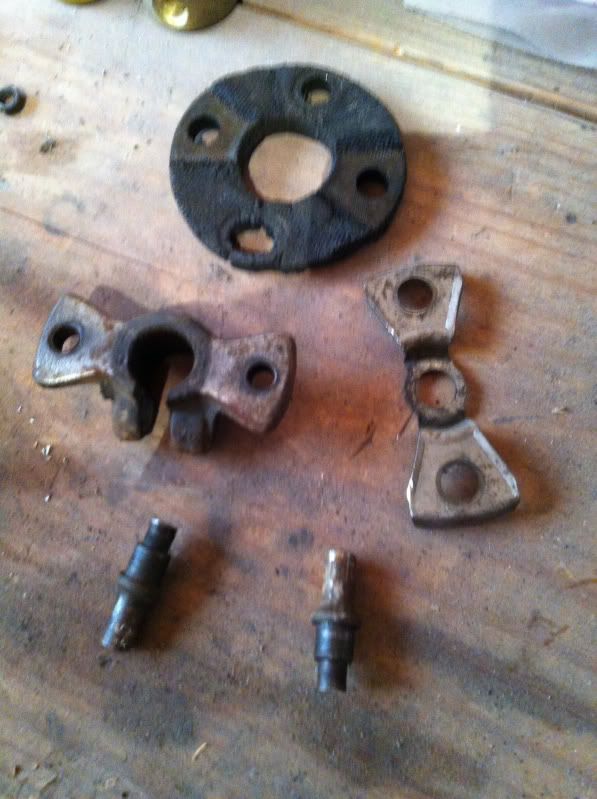 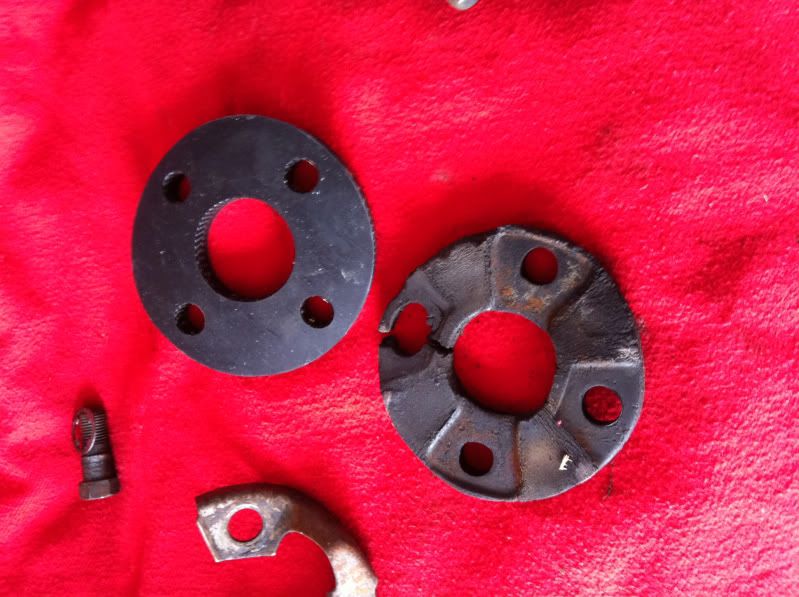 The kit comes with a knurled stud that you install into one of the holes. Just use a small hammer and seat it fully into place. 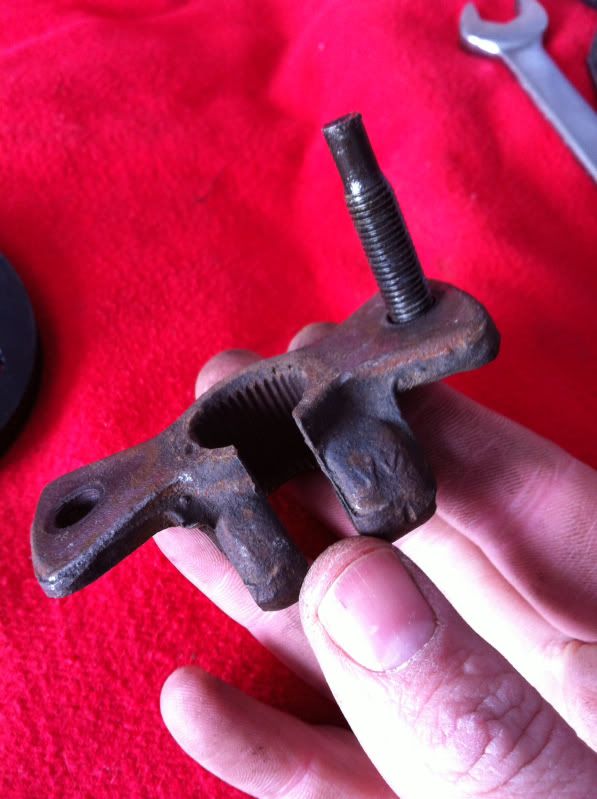 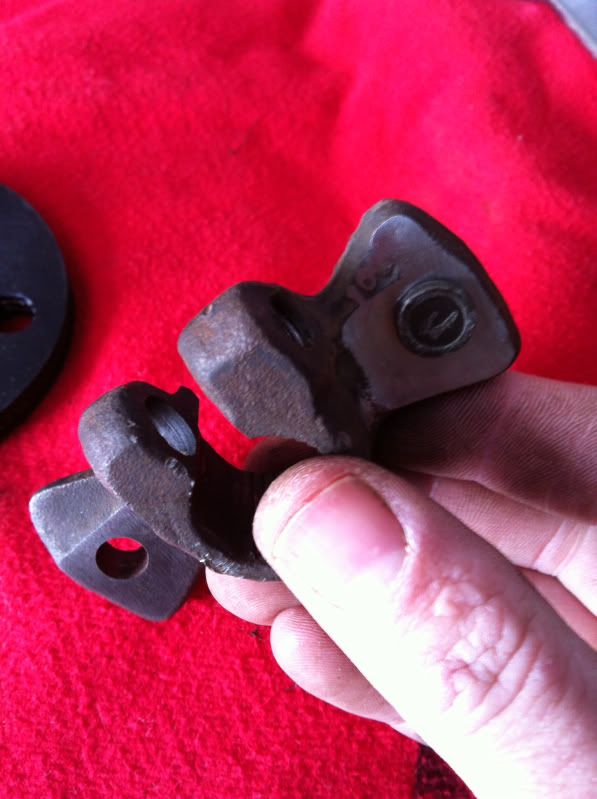 Reassemble with the included new hardware. I chose to use loctite on all of it for added security. I also reused the two original shouldered fine thread bolts rather than the new stuff included in the kit. The original GM stuff looked much better quality than the generic non shouldered bolts included in the kit. 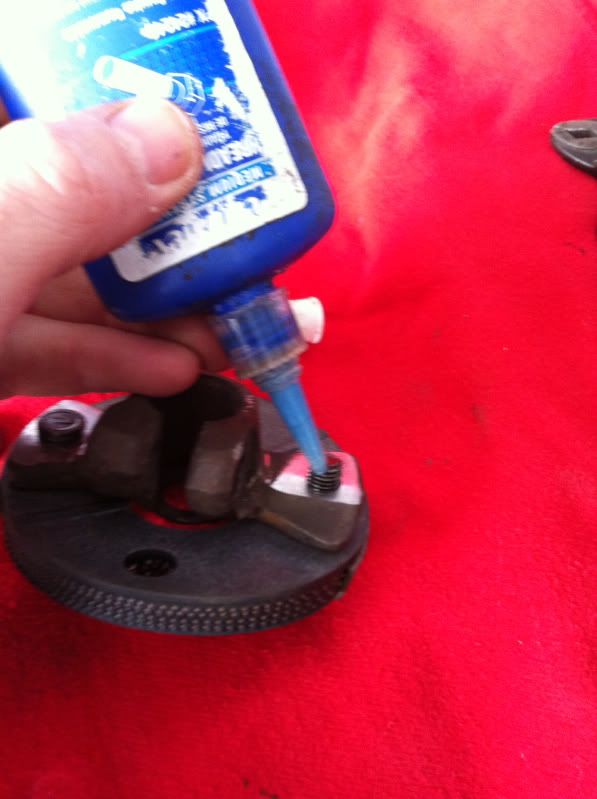 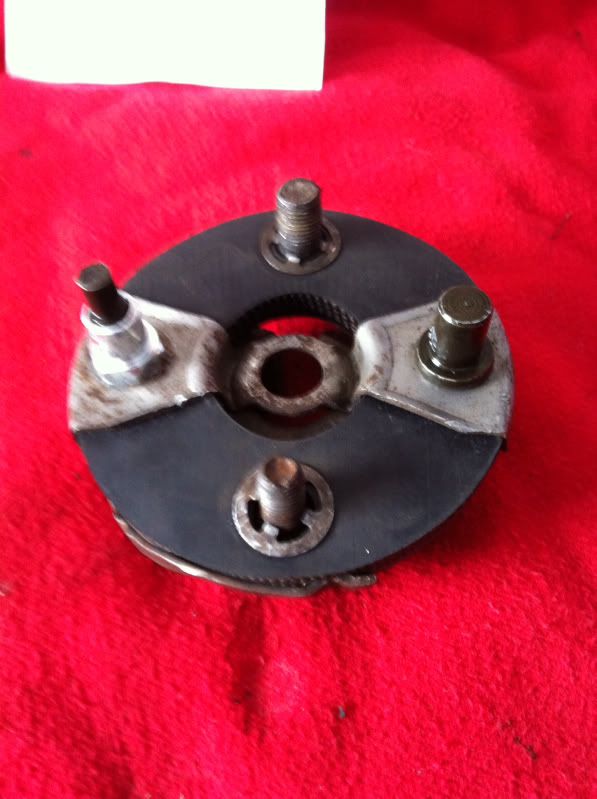 Now, reinstall it back onto the truck. 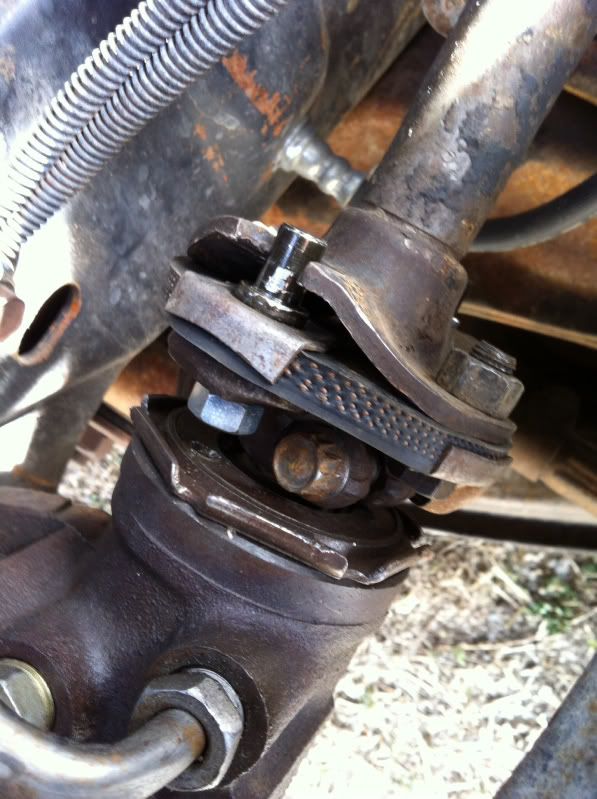 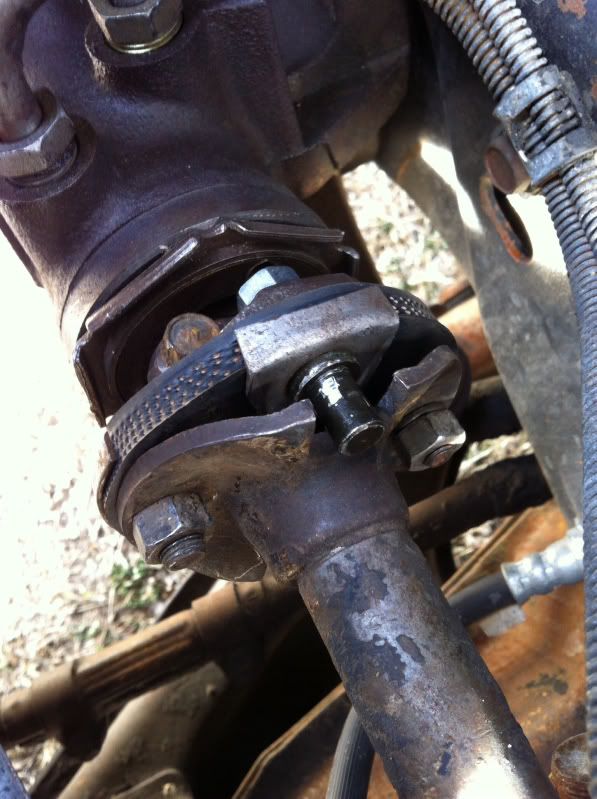 The end cost was 9 dollars and about half an hour of work. The results are very much improvement on steering feel. The slop is now gone and the truck is back to driving comfortably with one finger on the wheel like we all know a well cared for GM truck will do. Any questions, just ask and I'll do my best to clarify. This is definitely one of those jobs that's easier to understand when it's on the workbench in front of you than when you're reading about it. It's all very intuitive when you're doing it yourself. Other than grinding off the little welds on the two stubs, it's very basic hand tool work that gives a very rewarding result in the way your truck drives.
__________________
I'm on the Instagram- @Gearhead_Kevin |
|
|
|
|
#2 |
|
Registered User
Join Date: Jun 2004
Location: El Lago, TX
Posts: 1,668
|
Re: FAQ - Rebuilding a steering coupler rag joint
Nice thread. I did not realize you could rebuild these. I swapped in one that was in better condition, but even it could probably use a rebuild.
|
|
|
|
|
#3 |
|
Registered User
Join Date: Nov 2013
Location: Comox BC
Posts: 337
|
Re: Back to the Basics: Rebuilding a steering coupler rag joint
I enjoy reading your rebuilding threads. Lots of pictures and simple instructions.
Just saw the one about leaky steering boxes. You make it look easy. The one question I have, I know it is important to replace the small bolt in the right location in the rag joint so the steering wheel is not upside down. The part I am unsure of is with the rag joint with approx. 20 splines and the shaft with approx. 31 splines is there only 1 way it goes on ? Cal. |
|
|
|
|
#4 |
|
Watch out for your cornhole !
 Join Date: Jun 2003
Location: Azle, Texas
Posts: 14,162
|
Re: Back to the Basics: Rebuilding a steering coupler rag joint
That's correct. You can only install the coupler onto the box one way. Both the coupler bore and the box shaft have a flat spot on them. You line up the flat spots and it pushes right into place. If you don't have the flat spots lined up, it's not gonna go on regardless of what you do.
__________________
I'm on the Instagram- @Gearhead_Kevin |
|
|
|
|
#5 |
|
Hellasick
 Join Date: Jul 2006
Location: Death Moans, IA
Posts: 876
|
Re: Back to the Basics: Rebuilding a steering coupler rag joint
Did yours not have a ground connection? When I did mine it has a ground from a column bolt to box bolt.
__________________
I keep two MAGNUMS in my desk. One's a gun, and I keep it loaded. The other's a bottle and it keeps ME loaded. I'm Tracer Bullet. (Calvin and Hobbes) This life was a test. It was only a test. If this had been an actual life, you would have received instructions on where to go and what to do. RED meat is not bad for you...FUZZY BLUE/GREEN MEAT is bad for you!!!!!!!!!!!!! BUILT FORD TOUGH WITH CHEVY STUFF--sticker at Goodguys |
|
|
|
|
#6 |
|
Watch out for your cornhole !
 Join Date: Jun 2003
Location: Azle, Texas
Posts: 14,162
|
Re: Back to the Basics: Rebuilding a steering coupler rag joint
That's a good observation. It didn't have a ground wire. I never really thought about it. My dually does have one like you described though. The horn does not work on this truck because I haven't gotten the little pigtail wire under the horn button, so I never noticed. I'll add one when I fix the horn.
__________________
I'm on the Instagram- @Gearhead_Kevin |
|
|
|
|
#7 |
|
Registered User
Join Date: Mar 2014
Location: West Monroe, Louisiana
Posts: 79
|
Re: Back to the Basics: Rebuilding a steering coupler rag joint
Another great writeup and one more thing on my list of things to do. The writeup with a lot of pictures will make it a lot easier for me.
|
|
|
|
|
#8 |
|
Registered User
 Join Date: Mar 2014
Location: Chatsworth, ca
Posts: 20
|
Re: Back to the Basics: Rebuilding a steering coupler rag joint
Did you use a angle grinder to cut off the pin. I had mine apart following your instructions and I realized I needed a grinder/cutter and I just put it all back together. Will get a angle grinder tomorrow.
|
|
|
|
|
#9 |
|
Watch out for your cornhole !
 Join Date: Jun 2003
Location: Azle, Texas
Posts: 14,162
|
Re: Back to the Basics: Rebuilding a steering coupler rag joint
Yes.
If you look at the pictures you can see the one where I mention grinding the backside to free the studs. Then, punch the studs out of their place after that. You're definitely gonna have to have the grinder. I went back just now and added the grinder to the tool list. I seem to have overlooked that originally. Sorry about that.
__________________
I'm on the Instagram- @Gearhead_Kevin |
|
|
|
|
#10 |
|
Registered User
Join Date: Apr 2013
Location: Houston,TX.....Hometown of San Jose Cali
Posts: 361
|
Re: Back to the Basics: Rebuilding a steering coupler rag joint
i think i might be able to attempt this when its time, thanks to your tutorial.
__________________
63 big window lwb bagged and shaved |
|
|
|
|
#11 |
|
Watch out for your cornhole !
 Join Date: Jun 2003
Location: Azle, Texas
Posts: 14,162
|
Re: Back to the Basics: Rebuilding a steering coupler rag joint
Dive in. Its a straightforward project. The pictures and instructions make it seem harder than it really is.
__________________
I'm on the Instagram- @Gearhead_Kevin |
|
|
|
|
#12 |
|
Registered User
Join Date: Sep 2013
Location: redding ca
Posts: 56
|
Re: Back to the Basics: Rebuilding a steering coupler rag joint
last spring I hit a snow bank and my drivers side leaf spring popped up and slammed the steering shaft and messed up the worm gear. (had this happen once before when I broke said spring, but lifting the truck up a couple times fixed it..idkw, I had driven it 80 miles on mountain hiway then it locked up in the yard). Anyways I went to Napa and got a new steering box. Then my rag joint would not fit the new box. Napa said it was carried because its a non wearing part. (so tired of unknowledgeable part store employees) Went to all five scrap yards spread thoughout town and found three other 67-72'S, and stole their rag joints.
Only one fit the new steering box. slightly different issue but this explains why so much slop has come into my steering over the last 11 months. the rag joint I used as replacement look about as good as the one you replaced. Thank you much for turning on the light for something everyone else just closes the door on. |
|
|
|
|
#13 |
|
Registered User
Join Date: Nov 2012
Location: DFW, TX
Posts: 298
|
Re: Back to the Basics: Rebuilding a steering coupler rag joint
I noticed that this "doesnt fit" my 71 on the vehicle fitment at autozone.com
looks like it fits 80s ford cars. what year were you using this on? thanks! |
|
|
|
|
#14 |
|
Watch out for your cornhole !
 Join Date: Jun 2003
Location: Azle, Texas
Posts: 14,162
|
Re: Back to the Basics: Rebuilding a steering coupler rag joint
The subject I used here was my mid 70s half ton Chevy. Same coupler as your 71 uses (as long as your 71 is power steering). Dorman is screwed up on their application for these. Mine said Ford fitment on the package too.
__________________
I'm on the Instagram- @Gearhead_Kevin |
|
|
|
|
#15 |
|
Registered User
Join Date: Jul 2012
Location: Springtown Tx
Posts: 4
|
Re: Back to the Basics: Rebuilding a steering coupler rag joint
I have the same rebuild kit, the Doorman 31000. I purchased it to rebuild the rag joint on my 65 C10 fleetside. Will it fit my manual steering? I thought that it would work if the absorption disc was the correct size. You hit the nail on the head when you said that the applications are messed up. The first kit that I purchased (listed my application) had a disc that was way too little (31001 I think). Also, do I remove the steering box to get the rag joint off? My truck has the old original fire hose looking material in the coupler. As far as I can tell, your pictures seem to be the same joint as mine. Also, it looks as if maybe after loosening the coupler bolt, I can slip the joint down just enough to move the steering shaft a little and remove the rag joint without removing the steering box. Am I on the right track?
Thanks, Joe |
|
|
|
|
#16 |
|
Registered User
Join Date: Jul 2012
Location: Springtown Tx
Posts: 4
|
Re: Back to the Basics: Rebuilding a steering coupler rag joint
Hey, I got it figured out already, thanks for the post, it helped alot.
Joe |
|
|
|
|
#17 |
|
Registered User
Join Date: Apr 2014
Location: republic, mo
Posts: 57
|
Re: Back to the Basics: Rebuilding a steering coupler rag joint
Nice article. How many splintes on a 72 power gearbox? I've been trying to diagnose why I have so much play in my steering column so I took off the rag joint and coupler off of gearbox counted 30 spline three of them were flattened down. Shouldn't it be 36 slides? Im struggling on this build. Help would be appreciated. Thanks.
|
|
|
|
|
#18 |
|
Registered User
Join Date: Nov 2011
Location: fayetteville nc
Posts: 10,338
|
Re: Back to the Basics: Rebuilding a steering coupler rag joint
Great write up, picked up a rebuild kit last night and will install this weekend.
__________________
1963 Short bed step side SBW 427 big block and borg warner T-16 HD 3 speed manual http://67-72chevytrucks.com/vboard/s...d.php?t=519869 1963 Short bed fleetside BBW 348 1st gen big block w/Powerglide http://67-72chevytrucks.com/vboard/s...d.php?t=619024 1964 Short bed trailer |
|
|
|
|
#19 |
|
Registered User
Join Date: Apr 2009
Location: Pflugerville, TX
Posts: 594
|
Re: Back to the Basics: Rebuilding a steering coupler rag joint
Thanks for the write up, Tx! I rebuilt the suspension on my 84' C10 about a year ago and it's been getting progressively sloppier. I guess all the fresh new tight hardware put a little extra load on the rag joint and finished er' off. Tons of slop in the joint when I look under the hood and have someone turn the wheel. I'd heard some people saying Dorman's full replacement has the nub backwards so the steering wheel is off, so this seems like the best route to go. Thanks again!
|
|
|
|
|
#20 |
|
Registered User
Join Date: Oct 2014
Location: TN
Posts: 294
|
Re: Back to the Basics: Rebuilding a steering coupler rag joint

|
|
|
|
|
#21 |
|
Registered User
Join Date: May 2009
Location: Monroe, LA
Posts: 2,105
|
Re: Back to the Basics: Rebuilding a steering coupler rag joint
Great write up Kevin! You know, I'm beginning to think you've got a future in web based tutorials about rebuilding these old trucks. Folks are hungry for good, easy to follow How To articles.
We could market a video series...let me know if you need a marketing manager!LOL
__________________
Keith SOLD - 1963 C10 Short Fleet 350/700R4 4/6 drop 1967 GMC Super Custom - Short Fleet COPO concept w/427 BBC T-400 w/Doug Nash overdrive 4/6 Drop, Buddy Buckets, etc... Frame Off (In Progress) I call it "Vulgar Display of Power" 1980 Silverado Original paint 49k Original miles 4/6 drop Check out my build thread here: http://67-72chevytrucks.com/vboard/s...=1#post6209941 |
|
|
|
|
#22 |
|
Registered User
 Join Date: Apr 2001
Location: Beavercreek, Ohio 45431
Posts: 737
|
Re: Back to the Basics: Rebuilding a steering coupler rag joint
Thanks for the great post!
Well written and the pics make it even better. Now I have another project to upgrade the ole' girl!
__________________
1967 K30 461/TH400/Np205/D60/14FF/BDS MTZ 375/75/16 on 16x10 Pro Comps |
|
|
|
|
#23 |
|
Registered User
Join Date: Jun 2013
Location: Somewhere
Posts: 3,100
|
Re: Back to the Basics: Rebuilding a steering coupler rag joint
I think it was on chevelles.com someone who claimed to be a former GM engineer said never rebuilt the rag joint. He said this was because the rebuild parts depend on tightening 2 bolts/nuts that compress the rubber bit, and that this would never hold up over time. The nuts would loosen.
|
|
|
|
|
#24 |
|
Registered User
Join Date: Jun 2004
Location: Medford,Oregon
Posts: 390
|
Re: Back to the Basics: Rebuilding a steering coupler rag joint
I finally got around to rebuilding my rag joint today and i was using this thread as a guide to help me along the way. I noticed the instructions that came with the kit show the sleeve nut(Part D) going down inside the rubber disk but in your pictures it is upside down. Is there a reason why you chose to mount it that way?
__________________

|
|
|
| Bookmarks |
|
|