
|
Register or Log In To remove these advertisements. |
|
|
|
|||||||
 |
|
|
Thread Tools | Display Modes |
 10-03-2016, 03:18 PM
|
#201 |
|
Registered User
Join Date: Jun 2012
Location: Portland
Posts: 1,330
|
Re: Project "Second Chance" - Hot Rod 66' GMC
Yeah there are definitely quicker ways to do it. If I had a hole saw and a sheet of aluminum I might have gone that route. But the closest hardware store that would have the stuff is a two hour adventure for me. Took about 20 minutes to design, 15 to setup. Sure, it took 6 hours to print, but I was asleep the whole time
 . .
|

|

|
|
10-03-2016, 07:31 PM
|
#202 |
|
Registered User
Join Date: May 2013
Location: Centerville,Ma.
Posts: 1,223
|
Re: Project "Second Chance" - Hot Rod 66' GMC
On the flip side it would have taken me days to figure out how to program your machine to make them anyway. Yet I have all the metal tools from being in the auto body business for over 40 years. Your skills are replacing our older skills as years go by. Evolution.
|
|
|
|
|
10-15-2016, 08:10 PM
|
#203 |
|
Registered User
Join Date: Jun 2012
Location: Portland
Posts: 1,330
|
Re: Project "Second Chance" - Hot Rod 66' GMC
Pulley system 90% done!
More progress on this stormy day on the pulley system. So my 3rd attempt at getting an alternator that fit these brackets was a bust. I tried every clock configuration for alternator mounting that these brackets said they'd fit, but each was off. I'm guessing that 165 amp alternator is simply in a bigger case, with wider bracket spacing. So I ended up modifying the pulley by adding some metal. I'll clean it up a bit before powdercoating later on. Started by marking/cutting the bracket: 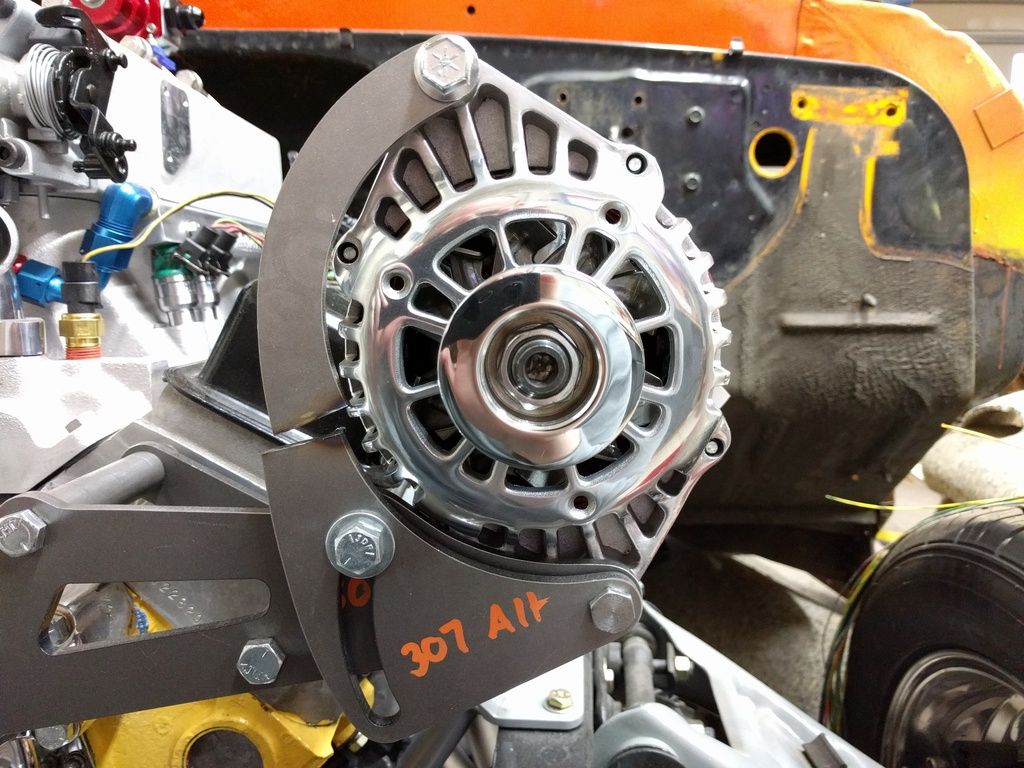 Then I used magnets to space it enough to bolt it together: 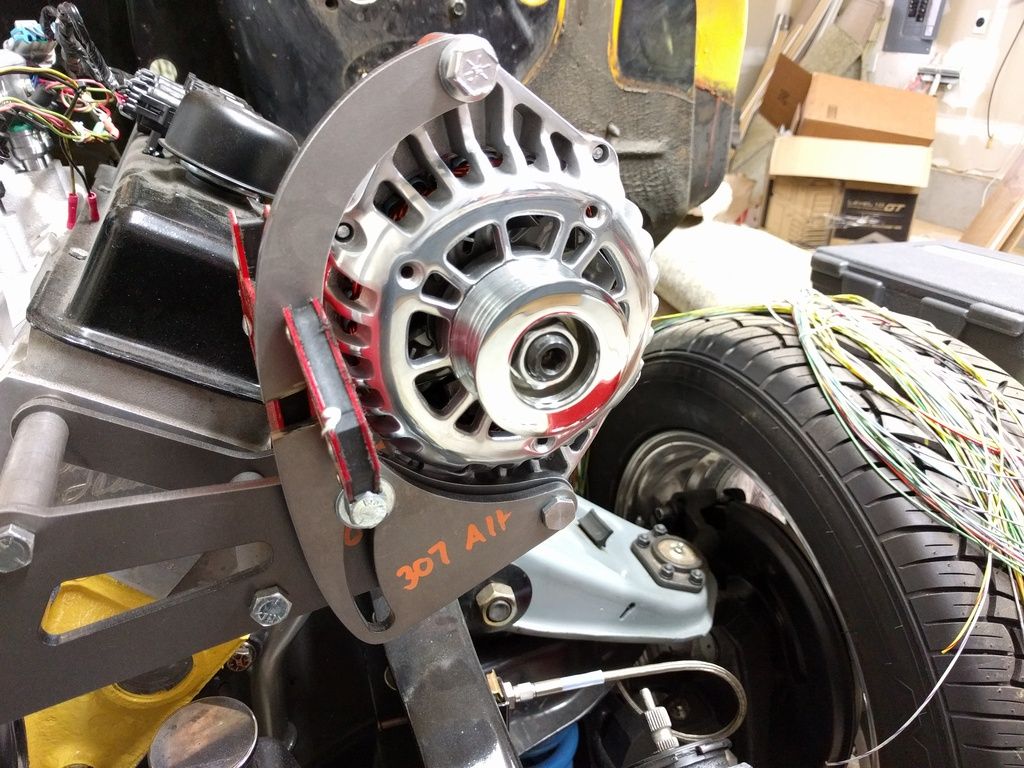 Then I measured out how much metal to add, and cut some from some 1/4" stock I had. Then I tacked it in, and removed the bracket: 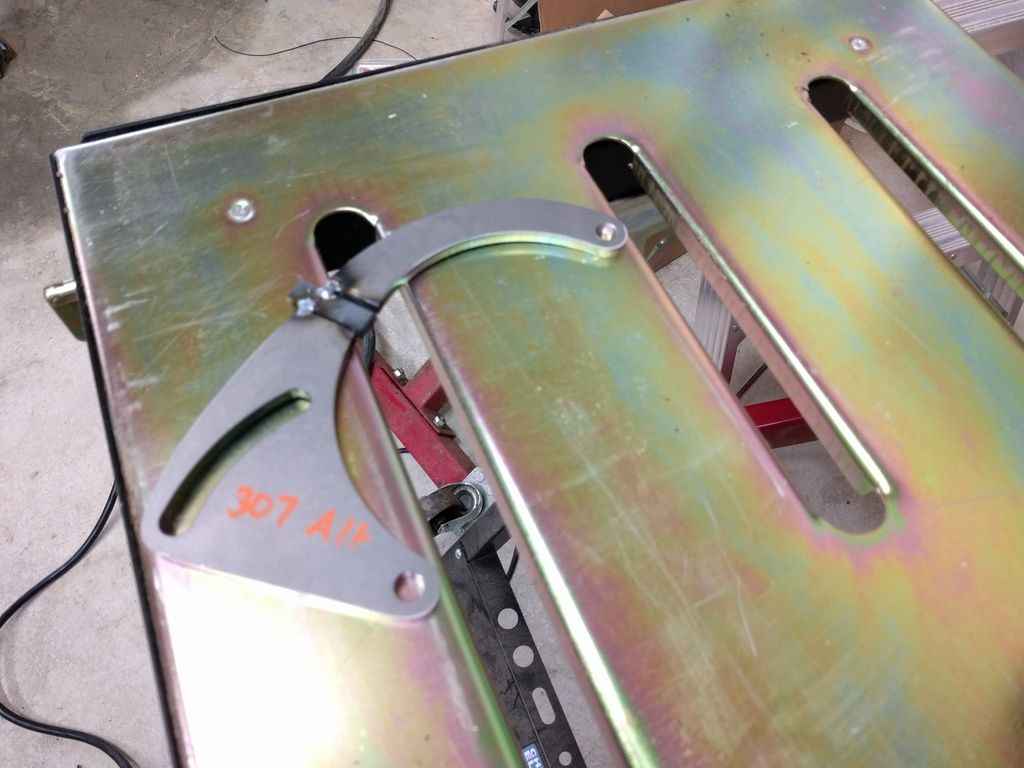 Then did a little cleanup and put it back together to check fitment:  After all that, I mounted my AC compressor and walla! I just need to do my power steering changes, space a few things, and powdercoat, and my pulleys will be done! One step at a time . . . 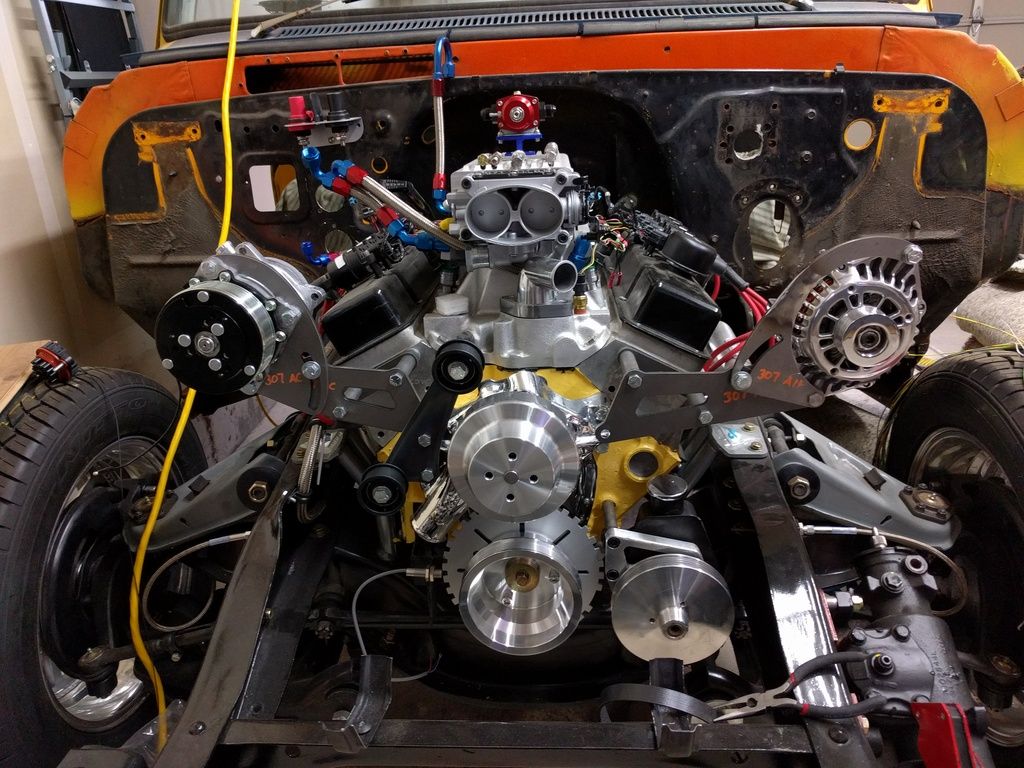
|
|
|
|
|
10-15-2016, 08:23 PM
|
#204 |
|
Registered User
Join Date: Jan 2014
Location: Portland, Oregon
Posts: 436
|
Re: Project "Second Chance" - Hot Rod 66' GMC
good job, I haven't felt like going out in garage today, weather really sucks as you know and even though it's not that bad in garage decided just to get away from it a little today. I did hook hardlines up to my Vintage air and have it ready to install.
__________________
Hey man  67 GMC Short Stepside 400 small block, turbo 350. Build thread:http://67-72chevytrucks.com/vboard/s...d.php?t=650603 |
|
|
|
|
10-16-2016, 10:31 AM
|
#205 |
|
Registered User
Join Date: Jun 2012
Location: Portland
Posts: 1,330
|
Re: Project "Second Chance" - Hot Rod 66' GMC
Storm ended up more docile than I expected it to be. I haven't hooked up my lines yet. Will probably wait until after paint, but will mock it up beforehand.
|
|
|
|
|
02-23-2017, 12:33 AM
|
#206 |
|
Registered User
Join Date: Jun 2012
Location: Portland
Posts: 1,330
|
Re: Project "Second Chance" - Hot Rod 66' GMC
Decided to keep going on the project now that I have some extra free time. Home renovations are slowing down (though not 100% done) so I'm finding more spare time to work on stuff. Moving the bed back to the truck soon to free up room, so I wanted to finish wiring the fuel tank. I already had the grounds set, so I did a small harness for the power and fuel level sender. Made it a quick disconnect so that if I have to drop the tank it's easy to do in the future.
I went overkill with the pump power supply line, as I wasn't sure what my eventual ECU would us, and would rather have the wire size step UP as it goes back, than going DOWN. I fed both wires into a 2-prong weatherpack which I'll later tie to the frame. I crimped, shrinkwrapped, and tapped each end, and then bound the two wires in a cloth/fiber shielding, taping the ends. Trying to make this as quality and OEM as possible so it's reliable. Here is the harness: 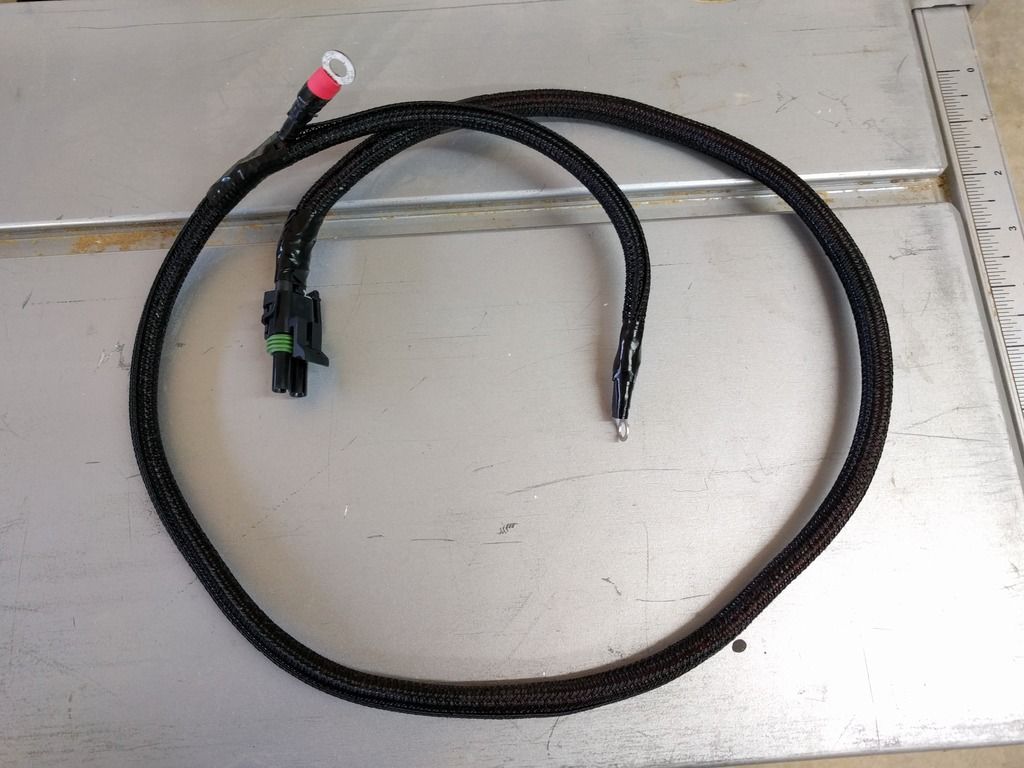 That's all for the moment, but I did put a whiteboard in the garage, and am listing out all the jobs left to do, to help organize my time. I've also been thinking about ditching the leafs in the rear, and doing something like a No-limit coil over setup. I'd likely stick with the coil springs in the front for now, until I could convert, but since I have to weld spring perches and shocks to the rear, and would need to buy leafs anyways, seems like a smart time to redirect the money and work into a better rear setup. Thoughts? http://nolimit.net/products#!/Fatbar...tegory=6157547 Cheers all! |
|
|
|
|
02-23-2017, 12:34 AM
|
#207 |
|
Registered User
Join Date: Jun 2012
Location: Portland
Posts: 1,330
|
Re: Project "Second Chance" - Hot Rod 66' GMC
I also ended up selling the Gen I sbc and transmission, as if I finish this I'll likely be going with an LS3/6l80e type of powertrain. I want this to be supportable in the future, and building a frankenmotor, while cool, would make it a lot harder to fix should stuff go wrong.
|
|
|
|
|
02-24-2017, 03:12 AM
|
#208 |
|
Registered User
Join Date: Dec 2012
Location: Rochester, KENT
Posts: 10,491
|
Re: Project "Second Chance" - Hot Rod 66' GMC
Whiteboard is a great idea.
I used to use one for my wood shed when I was doing a lot of commission work. Keeps you feeling that you are progressing and keeps you focussed.
__________________
MY BUILD LINK: http://67-72chevytrucks.com/vboard/s...585901]Redneck Express - 1966 C10 Short Fleetside MY USA ROADTRIPS http://forum.retro-rides.org/thread/...2018-humdinger IF YOU CAN'T FIX IT WITH A HAMMER, YOU'VE GOT AN ELECTRICAL PROBLEM MATE. |
|
|
|
|
02-27-2017, 11:59 PM
|
#209 |
|
Registered User
Join Date: Jun 2012
Location: Portland
Posts: 1,330
|
Re: Project "Second Chance" - Hot Rod 66' GMC
Thanks Grizz,
It's also helped me identify what other parts I need to keep moving forward! I bit the bullet today and ordered a NoLimit Fatboy 4-link for the rear. It'll be about 2x as much as getting the drop leafs I wanted, but I can make a little back by selling the shocks I won't be using. I figure it'll be easier to set it up once the way I want, rather than get leafs in there, and then have to cut and weld on the rear MORE later on. Should be a fun install. Also bought an air chisel to hopefully make quicker work of the rivets, since I'll be ditching all the brackets related to the leaf springs soon. |
|
|
|
|
03-04-2017, 06:59 PM
|
#210 |
|
Registered User
Join Date: Jun 2012
Location: Portland
Posts: 1,330
|
Re: Project "Second Chance" - Hot Rod 66' GMC
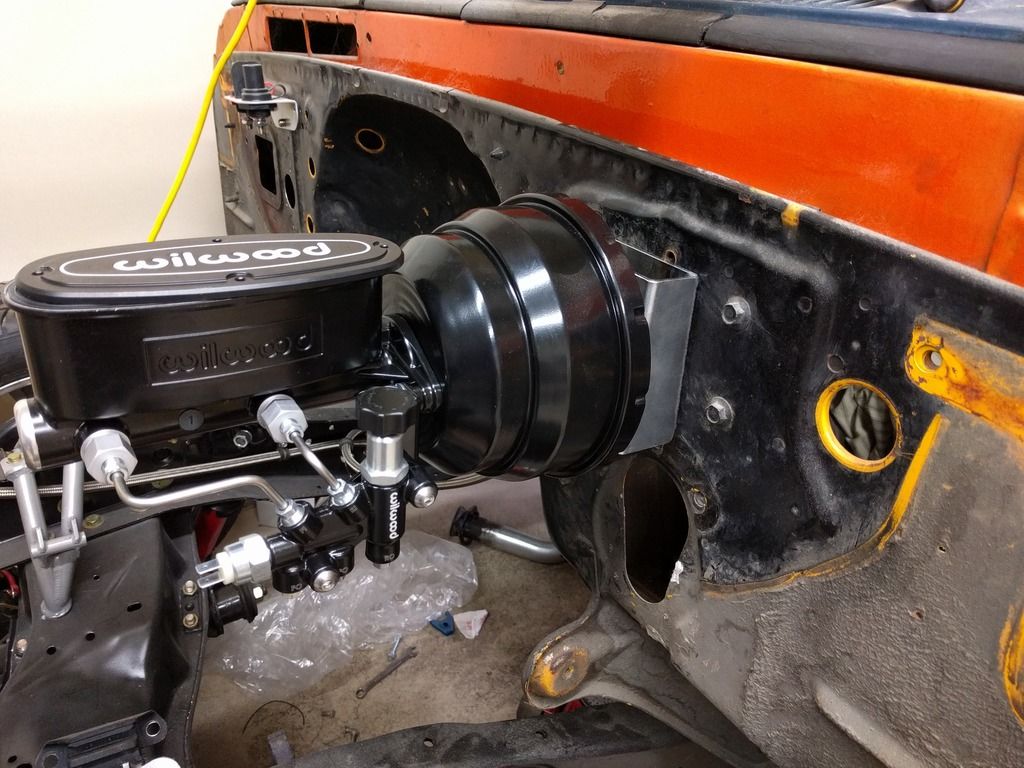
Got my captain fab booster mount bracket, and mocked up my booster, MC, and prop valve. Will start working on the brake lines to the front next.
|
|
|
|
|
03-15-2017, 12:52 AM
|
#211 |
|
Registered User
Join Date: Jun 2012
Location: Portland
Posts: 1,330
|
Re: Project "Second Chance" - Hot Rod 66' GMC
New tools arrived today. Next step will be making front brake lines!
   
|
|
|
|
|
03-16-2017, 01:43 AM
|
#212 |
|
60-66 Nut
  Join Date: Mar 2007
Location: Coeur d'Alene, Idaho
Posts: 23,246
|
Re: Project "Second Chance" - Hot Rod 66' GMC
Looks like a perfect inverted flare. How do you like that flaring tool? Is it from Eastwood?
__________________
Power Steering Box Adapter Plates For Sale HERE Power Brake Booster Adapter Brackets For Sale '63-'66 HERE and '67-'72 HERE and '60-'62 HERE and "60-'62 with clutch HERE Rear Disc Brake Brackets For Sale. Impala SS calipers HERE Camaro Calipers HERE D52 Calipers HERE 6 Lug HERE Hydroboost Mounting Plates HERE |
|
|
|
|
03-16-2017, 10:33 PM
|
#213 | |
|
Registered User
Join Date: Jun 2012
Location: Portland
Posts: 1,330
|
Re: Project "Second Chance" - Hot Rod 66' GMC
Quote:
I got it on Amazon. It's from a company called Mastercool. At least from photos it appears to be the same kit Eastwood sells, but for about $300 less. This one was $286, vs $539 from Eastwood. I was actually able to buy the flaring tool AND line straightener for less than the eastwood flaring tool. Eastwood's lever flaring tool you put in a vice looks nice and is less expensive. Upside of this one is you can use it anywhere, though the occasion might be rare that you'd need to use it outside the garage. https://smile.amazon.com/Mastercool-...e+flaring+tool I haven't used it much other than to try and get a good flare. This was my 4th attempt. I had to play with how much past the die to stick the line, and nailed it on this try. |
|
|
|
|
|
04-04-2017, 08:13 PM
|
#214 |
|
Registered User
Join Date: Jun 2012
Location: Portland
Posts: 1,330
|
Re: Project "Second Chance" - Hot Rod 66' GMC
4/4/17 Update
Over the weekend I began installing a No Limit Fatbar 4link setup. Ran into a few issues. 1. The kits and instructions were designed with a short-bed Chevy in mind. They can be made to work with a long-bed and GMC frames, but there are a few additional steps and measurements that I had to figure out. 2. The bar threads were either shrunken during welding, or gummed up with powdercoating. I found a machinist and managed to fix all but 1. The last one's threads began pulling out as we tried to remove the end link. That's why it looks cross-threaded. The end was loosely in there when I took the photo. All threads went in smooth, but became EXTREMELY tight right around the depth of the weld on the bar. I'm going to send this back, and No Limit is going to send me a new one. Unfortunately this will prevent me from completing the install until it's done. 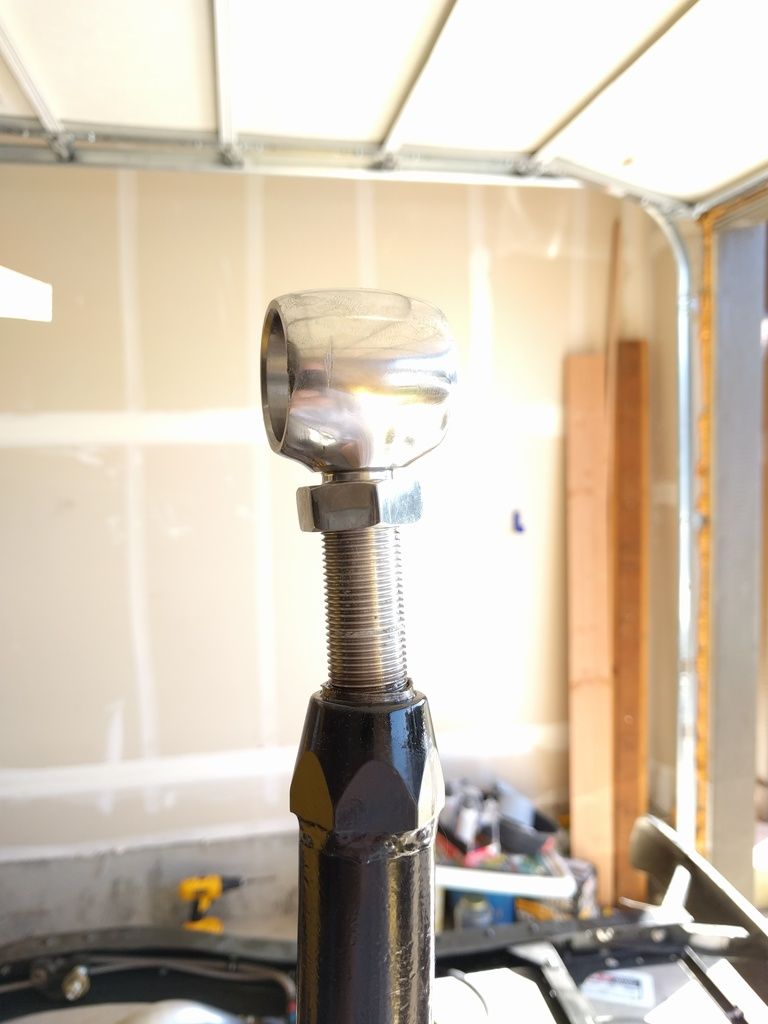 So with that out of the way, I began measuring. I knew I wanted to move the rear back about 2", so I found my original centerline and marked it. Then I measure about 2" back. I then validated that line against my bed and wheel well. It may not end up perfectly centered, but should be closer than factory. 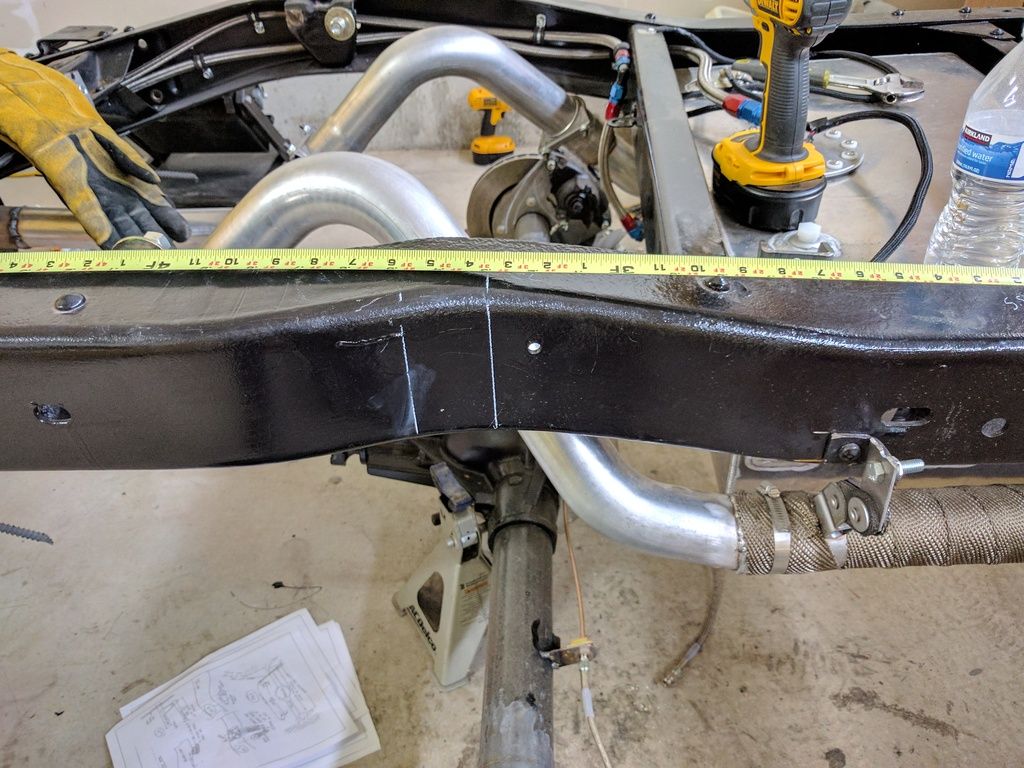 From the frame end to the new centerline is 39 3/8", making it 5.875" longer than a stock Chevy shortbed frame to centerline. So I marked a level line on both sides. Since all of the instructions provided absolute measurements from brackets to the end of the frame I figured that taking those measurements and adding the delta of 5.875" should give me the correct spacing. This gave me a measurement of 67" from the rear of the frame to the centerline of the first bolt hole on the bracket. So clamped the bracket on, parallel with the frame bottom, and centered the first hole on the 67" mark. In order to clamp it, I had to grind and cut away the other frame bump that encased the leaf spring bracket. I'll weld the back side of the frame to this bracket as well, to add strength back in. 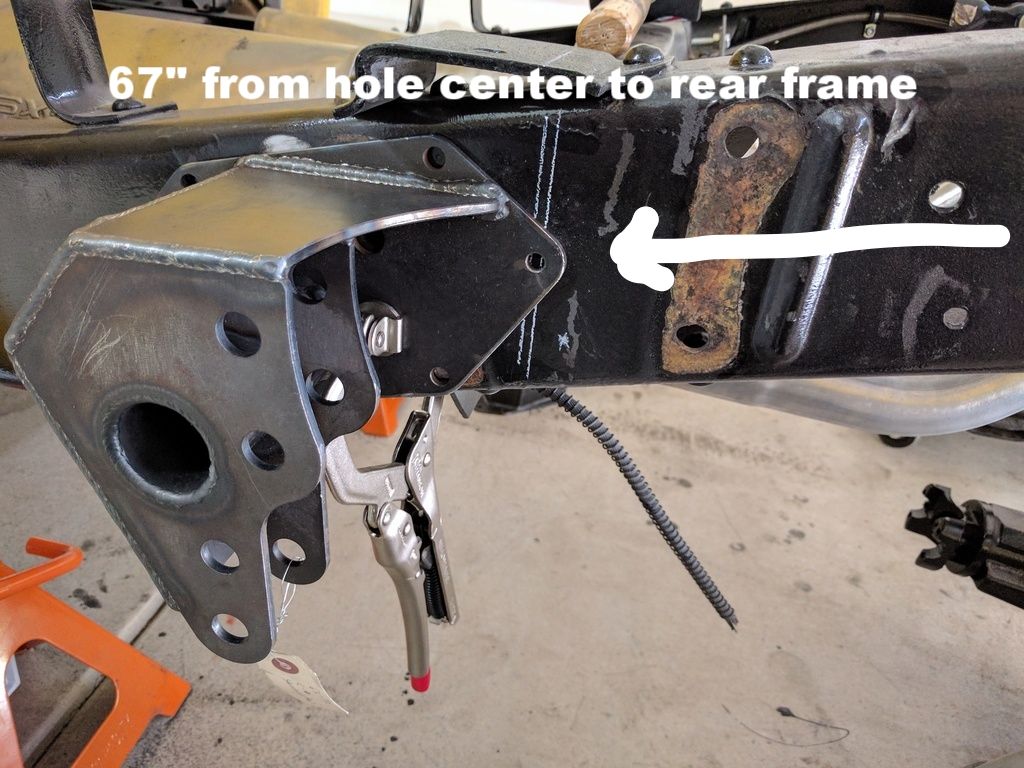 Next I bolted two of the bars to the bracket, just to get a visual. I then went and measured my passenger side for the new bracket, and doubled checked distancing on both sides, both from the rear frame, and axle centerline to ensure both were the same distance. Frame to CL, and CL to front bracket hole are now the same on both sides. 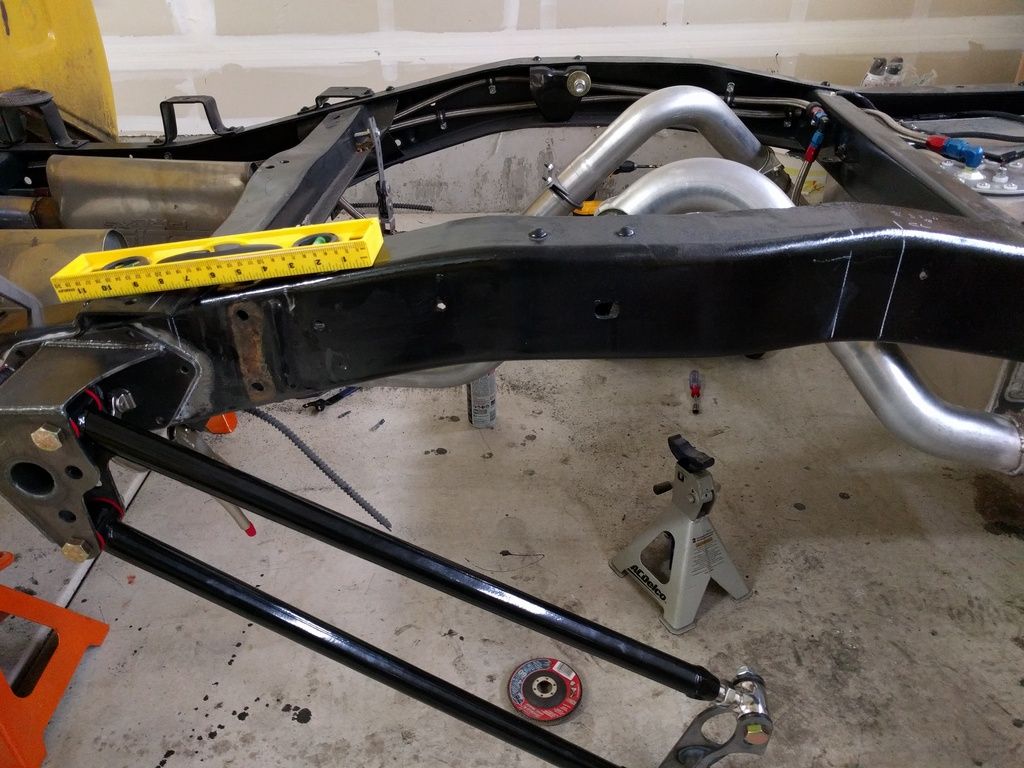 Once I get my replacement bar I can get the rear end on jack stands, suck it into the brackets with a strap, set the pinion angle, and start tacking things in. The stock suspension, loaded (minus the bed though) had a gap of 8" from the rear to the frame. I plan to set the diff at about a 4-5" gap when I tack in the brackets, which should give me a decent amount of lowering on the rear. That's about it for now! Once the new bar is here I'll continue the project. |
|
|
|
|
04-04-2017, 08:46 PM
|
#215 |
|
Moderator
  Join Date: Aug 2011
Location: China Spring, TX
Posts: 7,280
|
Re: Project "Second Chance" - Hot Rod 66' GMC
I've had a Mastercool Hydraulic Flare tool kit since 1997 and would never attempt flaring without it. The days of the old hand held manual units are long gone for me. I did buy the tube straighteners from eastwood for 3/16" and 3/8" tubing, another set of great tools http://www.eastwood.com/eastwood-han...ighteners.html
__________________
Master Chief, US Navy, Retired 1964 C10 Step-side Short Bed - In Progress 2009 2500HD Duramax LTZ 1948 GMC Panel 1956 Big Window Stepside 1953 5 Window Chevy Stepside 1932 Coupe New Seat Foam for Bench Seats? |
|
|
|
|
04-05-2017, 12:27 PM
|
#216 | |
|
Registered User
Join Date: Jun 2012
Location: Portland
Posts: 1,330
|
Re: Project "Second Chance" - Hot Rod 66' GMC
Quote:
.
|
|
|
|
|
|
04-17-2017, 09:18 PM
|
#217 |
|
Registered User
Join Date: Jun 2012
Location: Portland
Posts: 1,330
|
Re: Project "Second Chance" - Hot Rod 66' GMC
A little bit more progress on the 4-link. Got the replacement bar in, got it all measured, set, and the 4 bar brackets tacked into place.
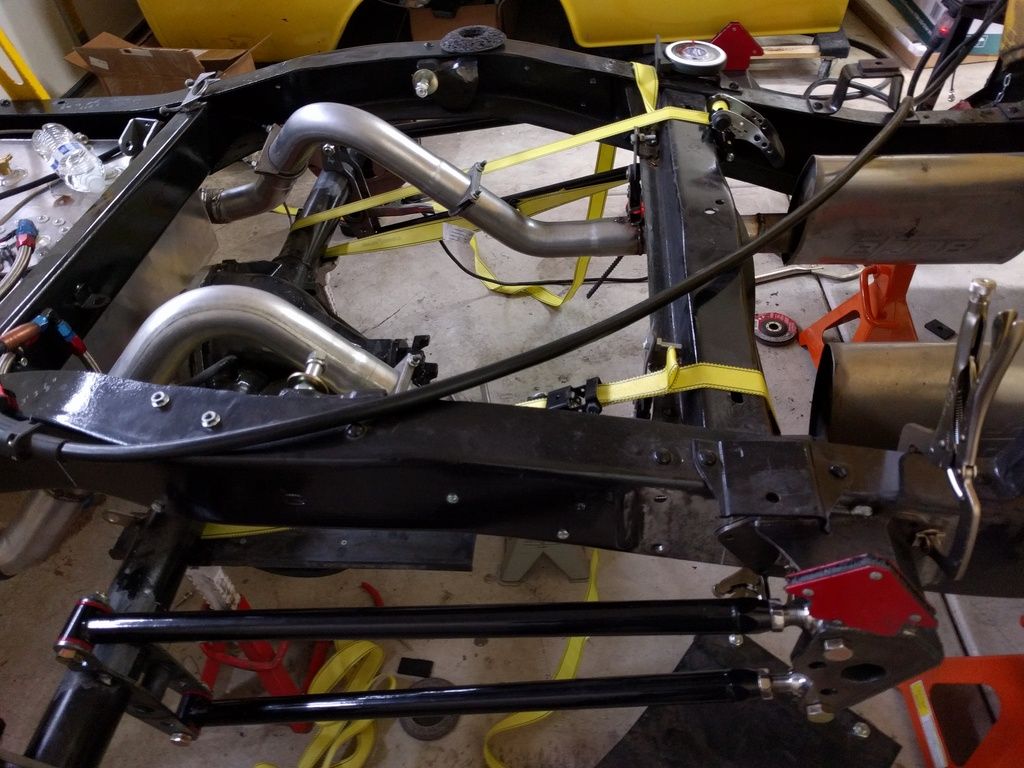 Next I'll measure and mount the coilover perches, then the panhard bar. |
|
|
|
|
04-18-2017, 07:14 PM
|
#218 |
|
Registered User
Join Date: Jun 2012
Location: Portland
Posts: 1,330
|
Re: Project "Second Chance" - Hot Rod 66' GMC
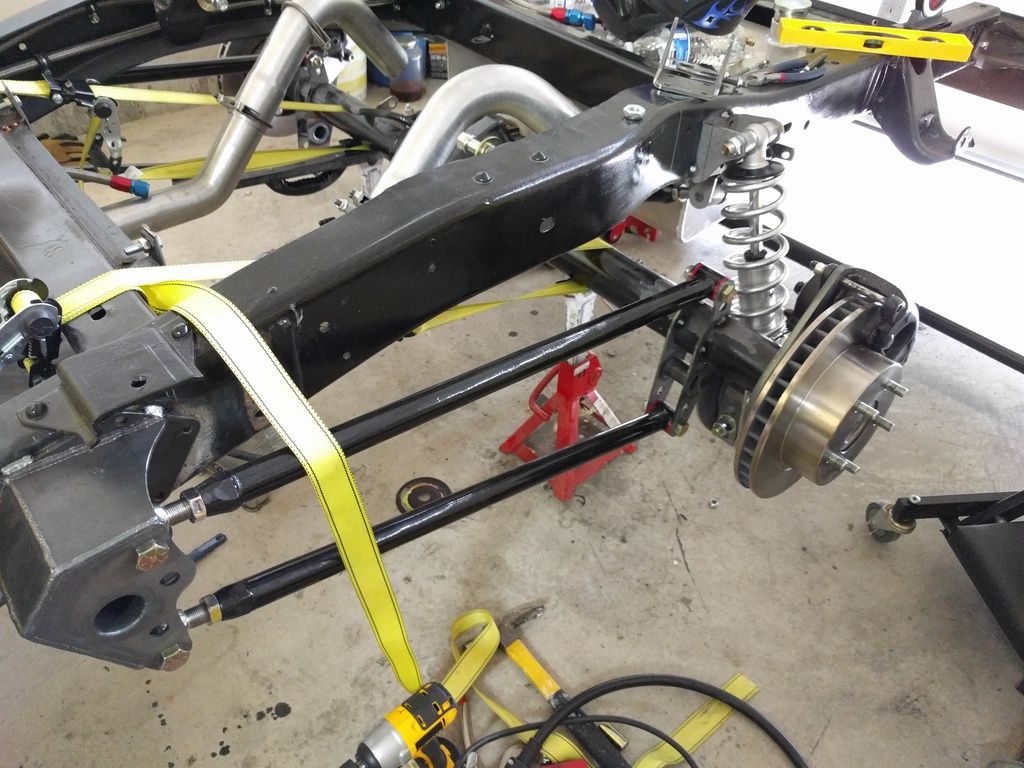
One side almost completely tacked in. Just have to get the other side tacked in, tack in the panhard mount to the diff, finish welding the axle mounts, drill bolt holes, paint, and put it all back together. Now that I think about it . . . there are still a bunch of steps left haha.
|
|
|
|
|
04-20-2017, 07:09 AM
|
#219 |
|
Registered User
Join Date: Mar 2017
Location: Las Vegas
Posts: 10
|
Re: Project "Second Chance" - Hot Rod 66' GMC
I just found this thread, and spent about an hour and a half going through it. Awesome build, and can't wait to see the truck together again. It was fun to see your welding skills get better and better with more and more practice.
I will be following this thread until it's done! EDIT: My heart sank when you talked about stuffing it in a garage for the new J-O-B and sank even further when you hurt yourself. Hope you are back to 100 percent man. |
|
|
|
|
04-20-2017, 04:59 PM
|
#220 | |
|
Registered User
Join Date: Jun 2012
Location: Portland
Posts: 1,330
|
Re: Project "Second Chance" - Hot Rod 66' GMC
Quote:
Back to about 90%, but can do everything I need aside from heavy lifting at the gym, and the occasional heavy lift on something for this project. The project sure has taken some turns, but when I started it I was fired up and planning to finish it in a year! If I knew now what I did then, I wouldn't have spent so much time on the previous powertrain. But in the next few months I should be getting an LS3/6-speed auto setup to install .Right now I'm trying to debate whether or not I want to do coilovers in the front. If all the front components weren't already new it would be a no-brainer . . . |
|
|
|
|
|
04-20-2017, 08:41 PM
|
#221 |
|
Registered User
Join Date: Jun 2014
Location: dresden , ontario
Posts: 628
|
Re: Project "Second Chance" - Hot Rod 66' GMC
Looking good Siggy
__________________
Dale ---------------- My suburban's Twisted Little Sister http://67-72chevytrucks.com/vboard/s...d.php?t=655167 |
|
|
|
|
04-21-2017, 12:41 PM
|
#222 | |
|
Registered User
Join Date: Jun 2012
Location: Portland
Posts: 1,330
|
Re: Project "Second Chance" - Hot Rod 66' GMC
Quote:
|
|
|
|
|
|
| Bookmarks |
|
|


 Linear Mode

